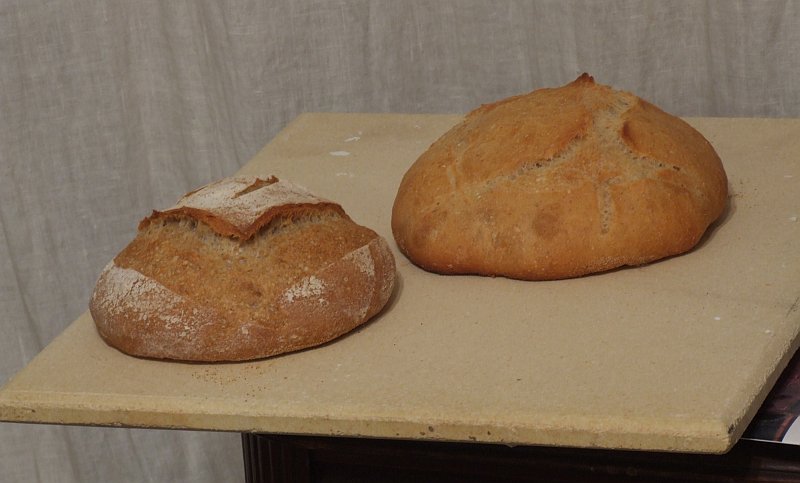
The Fresh Loaf

A Community of Amateur Bakers and Artisan Bread Enthusiasts.

Blogs

vincent's picture
vincent

PANDESAL PILIPINO BUNS


PANDESAL PILIPINO BUNS

Serves 24

Ingredients
  • 1 cup evaporated milk
  • 1 egg
  • 1/2 cup sugar + 3 tablespoon sugar
  • 3/4 teaspoon salt
  • 5 tablespoons softened butter
  • 1 tablespoon vegtable oil
  • 4 cups all purpose flour
  • 3 teaspoons yeast
  • 3 tablespoon breadcrumbs just enough to rools the bread
Directions

·  Combine the water, evaporated milk and milk and heat in the microwave for 35 seconds. Run tap water over the egg for 30 seconds to warm it.

·  2

Add all ingredients (except the bread crumbs) in the order suggested by the manufacturer.

·  3

The dough is supposed to be somewhat sticky (when I made this recipe, it was not sticky but it turned out well anyway).

·  4

Spray two baking sheets with non-stick cooking spray; preheat oven to 375 degrees.

·  5

When the dough is ready, scoop out a small amount (about the size of an ice-cream scoop) and roll in bread crumbs in an oval shape; place on baking sheet.  1 inch apart

·  6

Cover and leave to rise in a warm place until doubled.

·  7

Bake for 10 to 15 minutes, until golden brown.

happy eating


VINCENT

mmdione's picture
mmdione

- 500g all purpose flour
- 80g ground almond
- 20 cl evaporated milk 
- 6 eggs room temperature
- 250g sugar
- Powdered sugar
- 125g butter
- 1 1/2 tsp instant yeast
- 1/2 tsp of salt

Heat milk. Add the butter, sugar and salt. Stir until all is dissolved. When cooled, add yeast.

Sift in flour and add about 1/2 to the milk mixture. Mix until smooth and add the egg, beat well. Add the remaining flour mixture and stir until all is smooth. Cover with a damp towel and allow to rise, about 1-2 hours.

Put dough onto a floured surface and roll out to about 1/4 inch thickness. Cut into 2 or 3 inch squares and let stand 20 minutes before frying.

 Heat oil in deep fryer to 360 degrees. Fry four rectangles at a time for 2 to 3 minutes turning beignets as they rise to the surface. When golden brown, remove with a slotted spoon onto paper towels to blot excess oil. Dust with powdered sugar and eat immediately.


* I find the beignets more tasty when using 150g of unsweetend dessicated coconut instead of the ground almonds

madzilla's picture
madzilla

So I have been learning to bake bread.  I did NOT buy a bread machine, which I did consider for a while.  I was thinking about what would be easy, simple, less time consuming.  But when it came down to it, I just didn't like the constraints of a bread machine.  The loaf pans are so small, sometimes square, and the whole paddle thing just leaves me cold.  I had a bread machine when I lived in Germany.  I used it and hated it. It dumbed me down and I never understood the whole process of bread baking.  This made it impossible to troubleshoot or use anything other than the basic settings. 

Now, without a bread machine, I am so happy.  I feel like I have found a new hobby [that hopefully won't make me TOO fat!] and it is very exciting to create such wonderful works of edible art.  The breads that I have made so far, that have been successful, are a half-white, half-wheat loaf that is very nice, and would be great for sandwiches, cinnamon toast, and just about anything else.  The other loaf I have made that needs a bit of work is the artisan bread.  I have managed to get the right size, rise, and color...but need to work on the scoring and taste. 

Next I will try making a huge starter in the fridge and flavor it with some sourdough starter I already have.  Another really interesting thing I am doing, is using the bread mixes I am getting delivered.  Hodgson Mills makes some great mixes, but I don't use them as is.  I use them as additives to my breads for more flavor and the dough conditioning properties.  I could buy dough conditioner, but this is much more fun to experiment!

I also am working with gluten, and this addition is particularly helpful up here in the mountains.  I am at almost 8000 feet, so the high altitude is also a challenge.  But I am figuring it out as I go.

Thats it for now. Will post my recipes soon.

ejm's picture
ejm

A while back, Julie J was asking for advice on how best to crush cardamom for her Finnish cardamom buns. As soon as I saw the recipe, I knew I had to try it! And finally, this week, I got the chance.

pulla

I'm not sure if this is how the buns are supposed to look. I pretty much guessed about how much of an indentation to make for the butter. And as I was inserting butter into the thumb holes, I completely forgot about sprinkling extra sugar on top as per Julie's instructions. But I did think of using some inferior apricot jam on two of the buns. It turns out that this is a great way to use and improve apricot jam! I decided to make a 3-strand braided loaf as well. And then when I was placing the buns on the tray and worried that they were too close together, I shaped 4 of the rounds into snakes and braided them together into a smallish 4-strand round loaf.

pulla

Did I take my advice to use the coffee grinder to crush the cardamom? Ha! That would have been too easy. I used the mortar and pestle. Remind me to use our big sharp knife next time. The mortar and pestle is way too labour intensive and leaves rather large chunks of cardamom behind. Or perhaps I will follow my own Fresh Loaf advice to use our coffee spice grinder. Luckily, large chunks of cardamom taste good and are soft enough that we aren’t risking getting broken teeth... and the crumb is beautifully soft and moist. Absolutely delicious with or without extra butter! (The extra butter is really unnecessary! But oh so good!)

-Elizabeth

pulla


edit: link to JulieJ's pulla recipe fixed.

SylviaH's picture
SylviaH

We celebrated St. Patricks Day with a traditional dinner!

Mom's Irish Soda Breads.

Traditional Corned Beef Dinner

Dessert:   Buttermilk cake with Irish Tea Fondant/Glaze

One of our family....Sweet Katie Girl wearin her Green!

Happy St. Patrick's Day from our Home to Yours!  

Sylvia

koloatree's picture
koloatree

hello,

new guy here from NJ! i am new to baking and look forward to learning about bread from all the cool and knowledgable members here. my first goal to achieve is to create a tasty and nice looking baguette, sourdough, and raisin walnut. also id like to learn bagels, dinner rolls, and sandwich/hoagie rolls! i have the BBA book and just recently purchase the PR whole wheat book. look fwd to learning as much as possible! below is what i baked on sunday.


PR Whole wheat trisitional bread, very good first try


this one is the king authors whole wheat bread recipe that is printed on the back of the flour container...pretty dry and probably will not make again however very easy and quick to make.


first baguette using gold medal all purpose flour. i used the technique posted by
dmsnyder about anis bouabsa. however, my oven temps were way off. the position of the bakingstone was not in true 480-500 degrees, it was much less. mucho thanks to youtube user nothernsourdough for posting technique on how to shape bread!


this was a soudough baguette. i used the italian culture from sourdo.com and this was a same day bread. next try, i will increase the sourness...


this is another sourdough baguette. during the shaping i totally messed it up. thinking of tossing it, i decided to just reshape it. i was surprised that it had the most rounded shape and oven spring, but crumb was not as airy. i think the rise was most likely from the oven increasing the temps? it was my last bake before pizza so i cranked the oven up.


family photo


a pic of my pizza


gothicgirl's picture
gothicgirl

I had a craving for carrot cake the other day.  It was one of those cravings you try to ignore, but in the end you submit because, like it or not, you did not try all that hard to avoid it in the first place.

Carrot Coconut Cupcake

Submitting to my desire also gave me the opportunity to play around with a recipe.  I always enjoy that!  I did not just want carrot cake, I wanted carrot cupcakes, and I did not just want carrot, I wanted carrot coconut.  I do not bake with coconut often because my husband, and main test subject, dislikes the texture of it.  Did I say dislikes?  I mean loathes. 

Regardless of the likes of my husband my mind was set on carrot coconut, so on the way home from work I picked up a few things and set to work.

Carrot Coconut Cupcake 

The original recipe for the carrot cake is my father's.  It is an excellent, moist, and very dense carrot cake, but I knew with all the eggs and oil it would make a very poor cupcake.  Besides, I hate getting a cupcake with a greasy liner!  Yuck!

So, I made some modifications, such as reducing the eggs, replacing some of the oil with applesauce, and adding some buttermilk to thin the batter and to add a slightly tangy note to the cakes.   Adding the coconut helped add moisture along with the grated carrots, so in the moistness department I figured I was good.

Carrot Coconut Cupcake 

The original cake calls for 1 teaspoon of baking soda for a 9″x13″ cake which is quite dense.  I wanted fluffy cupcakes that would dome proudly inside the liners so I added an additional 1/4 teaspoon of baking powder.

My modifications resulted in tender, moist, flavorful cupcakes with a slightly chewy texture from the shredded coconut.  Even my husband, who avoids coconut like the plague, said they were pretty tasty ... coconut aside. 

Carrot Coconut Cupcake Fixins' 

Carrot Coconut Cupcake   Yield 24

1 cup sugar
2 eggs
3 tablespoons vegetable oil
1/4 cup applesauce
1/4 cup buttermilk
1 teaspoon vanilla
1 teaspoon cinnamon
1/4 teaspoon allspice
1 cup flour
1/4 teaspoon salt
1 teaspoon baking soda
1/4 teaspoon baking powder
1 cup shredded carrots
1 cup shredded coconut

Heat the oven to 350F and line your cupcake pans with paper liners.

Sugar, Eggs, Applesauce, Buttermilk, Oil, and Vanilla

In a large bowl combine the sugar, eggs, oil, applesauce, buttermilk, and vanilla.  Blend until smooth and well incorporated.

In a smaller bowl sift the dry ingredients, then pour the dry onto the wet and whisk until the dry ingredients just moisten.

Folding in the Carrots and Coconut

Add the shredded carrots and coconut and fold gently, making sure to scrape the sides and bottom of the bowl.

Fill the cupcake liners 1/3 of the way full.  Bake for 25 - 30 minutes, or until the center of the cupcake springs back when lightly pressed. 

Carrot Coconut Cupcake Fresh from the Oven 

Allow the cupcakes to cool in the pan for three minutes, then turn onto a wire rack to cool the rest of the way.

Carrot Coconut Cupcake 

I frosted my cupcakes with a simple cream cheese frosting. 

Cream Cheese Frosting   Enough to decorate 24 cupcakes

1 stick unsalted butter, softened
1 - 8 oz bar of cream cheese, softened
2 teaspoons vanilla
2 1/2 cups powdered sugar

Blend the butter and cream cheese on medium speed until well mixed, about five minutes.  Add the vanilla and blend to combine.

Add the powdered sugar and blend on low until the powdered sugar is moist, then blend on high for thirty seconds to remove any lumps.

Carrot Coconut Cupcake

Store frosted cupcakes in the refrigerator. 

Enjoy! 

Posted on www.evilshenanigans.com - 3/17/2009

mmdione's picture
mmdione

I've never made bread dough and always thought it required a special gift to make. After hours of browsing, I finally found this great website and decided to give a try. Lesson 1 gave me the basics about the ingradients. That made me jump straight to lesson 2 to officially break the ice.

This is the rising dough :

Rising dough

The result was great!

As you can see, the bread was very yummy :)

bnb's picture
bnb

Gave this recipe a try-half a batch. Started the whole process late afternoon yesterday. I did not have the 10 grain cereal, so subbed grapenut cereal. Used orange oil in place of orange zest. The dough accomodated about 2.25 cups of flour. In spite of this the dough turned out stiff.

I decided to put the dough through cold fermentation. The dough stayed refrigerated all evening. Before bedtime set the dough out to rise at room temperature. Next morning, shaped the loaf, gave it a bit of cinnamon filling and let it rise again. Once in the oven, the dough did not have any oven spring.  Once the bread was out, poured an orange creamsicle cream cheese topping over it (recipe below).

The bread was dense, as I expected, yet moist and soft right out of the oven. Good flavor. I was disappointed with orange flavor in the dough, it wasn't fresh and citrus-y. The long fermentation probably dulled the taste or maybe it just needs more orange oil/zest.  Here are some pics:


IMG_5334


IMG_5348

Orange creamsicle cream cheese topping:

2 tblsps cream cheese (softened)

1/4 cup, heaped, powdered sugar

1/4 - 1/2 tsp vanilla extract

1 drop orange oil/1/4 tsp orange zest

1/4 cup milk.

Thoroughly whisk everything till smooth. The topping does not dry and set. It stays sticky and wet.

Kuret's picture
Kuret

It is my girlfriends birthday today so I decided to make her a special breakfast! I had eyeballed the butter scones from Advanced Bread and Pastries before but seeing as how they are so rich I didn't want to make them save for a special occasion. Here in sweden a scone is more akin to Soda Bread than the sweetish style scones you get in Britain och America.

I managed to make them up the day before without my girlfriend noticing and refrigerate them overnight so that I could bake them for here first thing in the morning. I think they turned out pretty good, and my girlfriend did like them so I'm set!

Butter scones


I have also finally taken the plunge and aquired a Pullman pan for myself, maybe a 1.5kg loaf of tasty toast bread is too much for a two person family but maybe a 2.5kg loaf of Vollkornbrot might not be enoguh? hmm.. might have to share any attempts at Vollkornbrot with friends or there will be leftovers for ever! Here the pullman pan Is shown beside my regular breadpan.

and here is how a loaf of sourdough sandwich bread turned out, tasty! This is the same bread I have blogged about earlier, with a formula developed by me. Unfortunately the picture is insanely yellow, but that is due to poor lighting when I took the picture.

This is a secret too, but I have also made two mini cheesecakes for tonights dinner wich I am making for my girlfriend, hope that they are tasty..


Pages

Subscribe to RSS - blogs