The Fresh Loaf

A Community of Amateur Bakers and Artisan Bread Enthusiasts.

Doc.Dough's blog

Doc.Dough's picture
Doc.Dough

Since this is a process of discovery more than an exposition of well understood science, the update number in the title will change when enough significant changes have accumulated that you might want to re-read from the top. At some point it will stabilize but in the beginning it is somewhat volatile as I discover/uncover truth and apply a dope slap for what proves to be erroneous. 

The time has come to see if I can make an acceptable injera at home.  I found a few injera-related posts here on TFL though while I found them interesting (and one provided a compact summary of an excellent YouTube video) none seemed to improve on what I found on YouTube and in some quite excellent reference sources.

Having watched a number of videos explain how to make injera, I found some common threads which I have tried to interpret using my general understanding and knowledge of other fermented foods (mostly sourdough and idli/dosa).  I present here my evolving observations which are open for discussion and prone to elaboration, enhancement, and correction based on superior knowledge from other members of this community:

An outstanding publication on Ethiopian fermented food containing a fairly complete section on injera
Ethiop. J. Biol. Sci., 5(2): 189-2245, 2006 [section on injera begins on page 205]

Annotated injera flow chart from linked paper:

It appears that an injera starter culture contains multiple yeasts and multiple LAB, though it is not clear to what extent there is a progression of activity from one yeast and LAB to others over the course of a typical fermentation cycle.

The pouring off of the liquid layer that accumulates on the surface of injera starter and batter is essential, and discarding the liquid layer results in loss of soluble compounds (amino acids, sugars and minerals) and a large portion of the microorganisms.  It seems that one function served by the liquid layer on the surface is to keep mold and aerobic yeast off of the batter. I found that after a few days a layer of aerobic yeast forms on the surface of the ersho, and mold will eventually begin to grow on any bits of batter that remain on the side of the fermentation container. Thus washing the sides of the container before you begin the fermentation is an act of sanitation and contamination reduction while pouring off the ersho gets rid of the aerobic yeast that tends to accumulate there. As a result of experimentation I have discovered that if you run the fermentation near the optimum/elevated temperature (37°C/99°F) the aerobic yeast and mold never show up, perhaps because the cycle is so short.  They may be there but not at levels sufficient to cause a problem.

The use of self-rising flour (apparently an adaptation of the Ethiopian method and now commonly used in NA) seems to be a way to get by with a less than fully active starter, letting the baking powder in the self-rising flour serve as an alternate source of CO2 to produce "eyes" in the final fried injera. Another possibility is that the microflora in injera are incompatible with wheat flour, or wheat flour will not ferment quickly enough to generate the required CO2 and an alternative is to use baking powder.  There is no evidence that the resulting injera are of lower quality in any way.  In fact, in many parts of Ethiopa (and in NA) grains other than teff are used to make injera, including sorghum, millet, wheat, barley, and corn (maize).

I found a paper that used modern PCR methods to characterize the yeasts in injera batter and there were clear differences in the constituent yeasts between injera batters prepared at home, in hotels, and by what were characterized as microenterprises (which I presume means that they were producing commercial injera).

Pichia fermentans was the only yeast that was found in all 97 of the injera batter samples (which may indicate that it is brought to the mix by the teff flour itself); and our old friend Saccharomyces cerevisiae was also found in all of the batters prepared in hotel kitchens (though it does not speculate as to whether the source was intentional addition or cross contamination from other yeast-based products being produced in the hotel kitchen).  This may indicate that any yeast that will tolerate the low pH conditions of the injera batter is sufficient to produce the CO2 needed to make "eyes" (bubbles) in the resulting injera (or not if baking powder is needed to provide additional CO2).

A final warm fermentation followed by cooling the batter may be just a retardation step that drops the temperature of the batter and allows any additional CO2 (being produced in the batter) to be absorbed into the liquid phase, but the guidance to use the batter when the secondary fermentation peaks (I assume that means that the height of the batter in the fermentation container peaks) is consistent with frying when the CO2 in the batter is maximized.  The CO2 then comes out of solution when the batter heats up on the mitad (frying surface) and makes the "eyes" as the bubbles are called.  The size of the eyes seems to depend on the viscosity of the batter with a thicker batter producing larger eyes, and a thicker/less desirable injera.

Covering the injera for a period at the end of the cooking cycle keeps the surface from completely drying out by retaining moisture from condensed steam on the surface of the injera while allowing the dough to fully cook and solidify.

It is clearly not essential to mix injera batter by hand and any mixing method that fully hydrates the flour(s) and eliminates lumps is adequate.  I found no obvious reason not to use a whisk, blender, or simply a spoon.

In some of the YouTube videos there is a step where the batter is put into a blender and blended for perhaps 10 seconds to eliminate the "sandy texture" of the batter.  I haven't figured out what this is about. The boiling of some batter with water for a couple of minutes to make the 'absit' which seems very similar to making a tangzhong (water roux) is claimed to have the same effect of smoothing out the batter texture.  I found another video where the batter was blended after incorporation of the self rising flour to get rid of lumps.

To test the hypothesis that absit is just a tangzhong, I mixed 50g of brown teff flour with 250g of RO filtered water and heated it to 65°C/149°F while stirring, as I would do to make a tangzhong. The behavior was exactly as expected, the mixture thickened and stirring with a whisk was sufficient to see the bottom of the pan so the starch in the teff is gelatinized at about the same temperature as wheat flour. A search for gelatinization temperatures confirmed that teff gelatinizes at  145–176°F (63–80°C), a few degrees above wheat [124–140°F (51–60°C)].

I am struck by the similarity of the injera process to making dosa, where the final batter viscosity is set by the need to spread it suitably on the frying surface and depends on many factors which make it difficult if not impossible to predict exactly how much additional water will be needed. The acceptable band of viscosities is quite narrow and when it is too low the injera produces fewer eyes and large cracks form between isolated islands of cooked dough.  If the viscosity is too high the injera does not flow to the edge of the mitad, is thicker than desired, cooks more slowly, has larger eyes, and is harder to handle.

Having spent a couple of weeks verifying the described features and issues, it was time to try some variations on the general theme and see if there was any significant difference in the result.

First, I tried raising the fermentation temperature to the reported optimum of 37°C/99°F and was amazed by the increase in fermentation rate and reduction in the time required to deplete the fermentable sugars and halt the generation of CO2. At 99°F the primary fermentation was complete in less than six hours (since it is a very liquid batter with no gluten to give it structure, it may rise and collapse multiple times before the yeast run out of food).  Mixing the batter using 120°F water produced a 100°F batter so that there was no delay in getting it up to the 99°F fermentation chamber temperature and reduced the time needed to rise and fall once and develop a nice sour flavor to about 4:30 from mixing the ingredients and the secondary fermentation completed in about 90-120 minutes followed by 90 minutes in the refrigerator to slow it down, cool it off, and allow it to absorb the CO2 suspended in the batter as bubbles. This CO2 promptly comes out of solution to form the "eyes" when the batter is poured on the griddle.

If the objective is to cook the injera when the CO2 trapped in the batter is maximized, the strategy that seems to achieve that end seems to be to allow it to ferment until it reaches 80-90% of maximum height without collapsing then refrigerate the batter to dissolve as much of the trapped CO2 in the liquid phase as possible.

There is some point at which if you don't refrigerate it, the continuing production of CO2 will outstrip the capacity of the batter to hold it and the batter will collapse anyway.  If you begin cooling it too soon, the batter cools down and stops producing CO2 before it has depleted the fermentable sugars.  So it is a fine line that encourages a slightly early termination of secondary fermentation to avoid a collapse before the batter has absorbed the maximum amount of CO2. 

It is also possible that if there are fermentable sugars remaining in the batter when the temperature has stabilized at the final storage temperature, fermentation may continue (slowly) for an extended period of time keeping the batter loaded with CO2 and capable of being converted into freshly baked injera with lots of eyes. Since the source of fermentable sugars to support the secondary fermentation is the abjit, it may be (speculation here on my part) that increasing the amount of absit that is added back to the batter may influence how long the batter can be stored and still be used to make high quality injera, though unless the absit is made with excess water, increasing the absit may make the batter too viscous to pour properly.

Thus I offer my current modified improved method for making enough batter for 1.8 - 14" diameter injera cooked on a 16" griddle:
{why 1.8 injera you ask? - because that much fits into a one quart wide mouth Mason jar without overflowing}

Ingredients:
40g starter + 250g water (@110°F )+ 180g teff (@105°F) + 5g salt (added to the water)

then for absit/tangzhong
25g teff + 180 water make absit (~1:7)

Process:

  • Place the starter in a bowl and add the warm water, whisk to combine
  • Add teff flour and slowly whisk it in until the batter is smooth (a whisk with fewer rather than more wires helps keep the flour from splattering)
  • Pour into a container with sufficient head space to allow a 70% volume expansion (it will expand by at least 50% and you don't want it to overflow).
  • Place the batter in a 99°F fermentation chamber or well controlled low temperature oven (combi. or an oven with a light on that you have confidence will settle at ~99°F) and let it ferment for 6:00; remove and stir down the foam then put it back to ferment for another hour.  At 5:00 stir down again and let it sit at 99°F for another 20 min or so; it should not rise again.  This seems to be the indication that all of the fermentable sugars have been consumed.  Taste to be sure that it is appropriately sour (if not let it sit longer since yeast and LAB have different cycles).
  • Mix and cook the tangzhong by combining the 25g of teff flour with the 180g of water, mixing until they make a smooth slurry.  Cook over medium heat until the tangzhong reaches 180°F, stirring constantly; when it reaches the fully gelatinized state the scraper will leave a permanent streak on the bottom of the pan.  Remove pan from the heat and continue stirring over a bowl of cool water until the tangzhong reaches ~130°F before adding to the injera batter and whisking it in. 
  • Adjust the viscosity at this point if needed.  I have found that it seems still a little thick at this point but will thin out during secondary fermentation. Put the container back into the 99°F fermenter and allow it to undergo a second fermentation for about 90 min to 2 hrs;
  • Then transfer it to a refrigerator without mixing and leave it to cool off for 90 minutes or so. The level of the mixture will recede to near the level at the beginning of the secondary fermentation when it is fully cool and the CO2 has been fully dissolved in the batter. Stir well to re-suspend the solids (resist the tempatation to make viscosity adjustments here) and pour onto the griddle.
  • Heat the griddle to 330°F (based on IR thermometer measurement) and spray the griddle with a very small amount of non-stick spray (vegetable oil + lecithin) before pouring batter in the middle and picking up the griddle and rotating it to spread the batter to the edge. I found that 325ml at the appropriate viscosity (to test the viscosity, it should pour smoothly from a 3 oz ladle in a few seconds at a height of about 8" without breaking up into droplets) will spread all the way to the edge of a 16" griddle.
  • Turn up the thermostat to 400°F and cook uncovered until about 70% of the surface looks dry and then put the lid on for a minute (steam will be coming out of the lid by then) before removing. Wait for the bottom surface to become sufficiently cooked that there is an obvious separation at the outer radius where you can get a thin Teflon or other high temperature spatula (or lefse stick) under the injera then use a sefed to transfer it from the griddle to a cloth surface where it can cool off and lose some of the moisture. If you use a lower temperature you can turn the griddle  up to 400°F after taking the lid off to hasten the final cooking stage so that it comes off the griddle sooner and more easily. But you have to wait for it to be ready - otherwise it will stick badly to the spatula.
  • Do not try to stack until they are fully cool and no longer sticky on the surface.
  • If you find that there is not enough dissolved CO2 in the batter to make the eyes you like, add about 2t of baking powder (not baking soda) per quart of batter and stir it in. Wait a minute or two before continuing to fry injera.  I have found that at this concentration the baking powder leaves no distinctive taste.


Jan 28, 2022 - a note of some potential significance:
I was pointed to a video on YouTube where a chef makes beautiful injera without any absit, which poses the question "what makes absit important"?  Thus far I have been operating under the assumption that the absit is needed to pump up the dissolved CO2 in the batter just before cooking the injera to form the eyes.  But it seems clear that the incorporation of absit followed by a secondary fermentation is perhaps not an essential step if you can get the CO2 into the batter via another route. This opens up a range of options going forward.  I am already fermenting injera batter in eight hours which bypasses mold and aerobic yeast growth on the surface of the batter as well as reducing the planning time. Making the absit and timing the addition relative to when you want to cook them remains a process constraint that now may conceivably have a workaround. In the video you will notice that the chef has three griddles, of which two are from ADDIS.  This is the model that I finally selected after some considerable study, but I will not make this into an ad more than to say that my rationale for selecting it turned out to be valid.

July 30 2022 - see an added comment below with a 30 July 22 date for how to refresh and maintain an injera starter.

Doc.Dough's picture
Doc.Dough

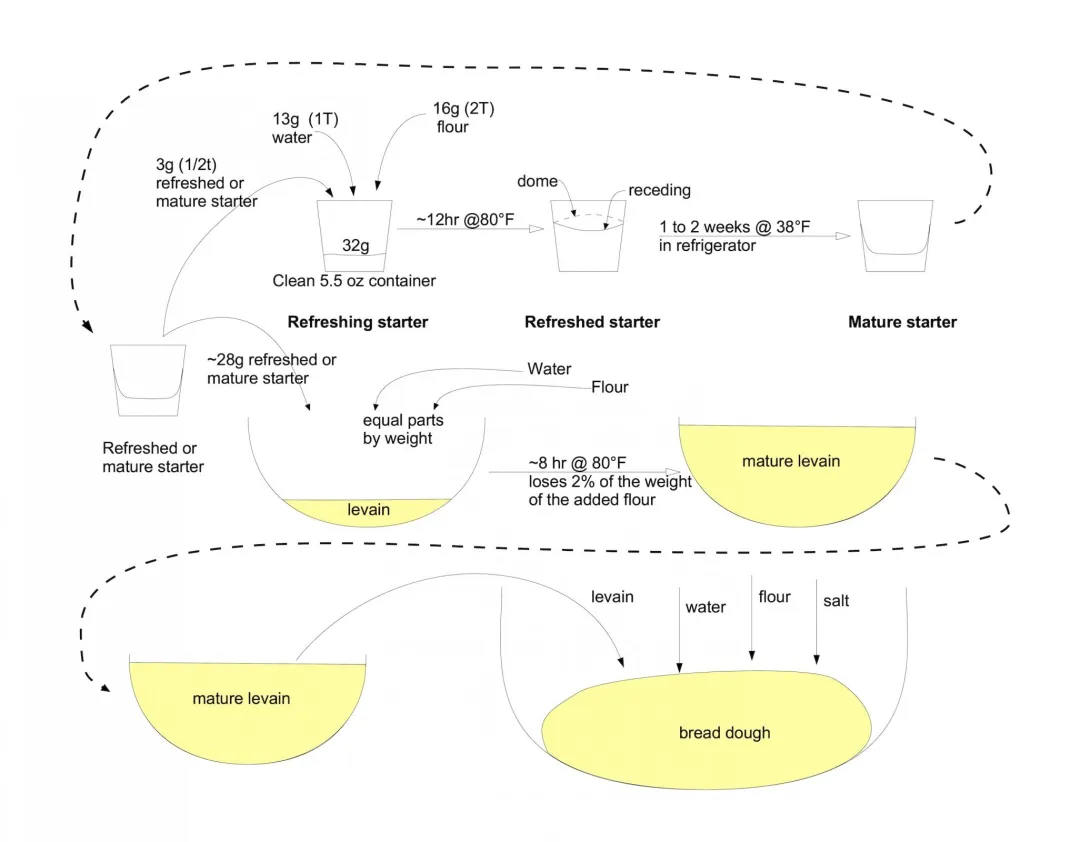
Since the facility for uploading fully formatted Word and PDF documents has not been implemented, the details of this post can be found here and I have loaded (above and below) a pictographic shorthand version which lacks any explanation of the rationale.  The artwork covers the whole bread-making process of which the illustration above covers starter maintenance, elaboration into a levain, and then using the levain to initiate a batch of bread dough.  The linked paper covers only the starter maintenance and
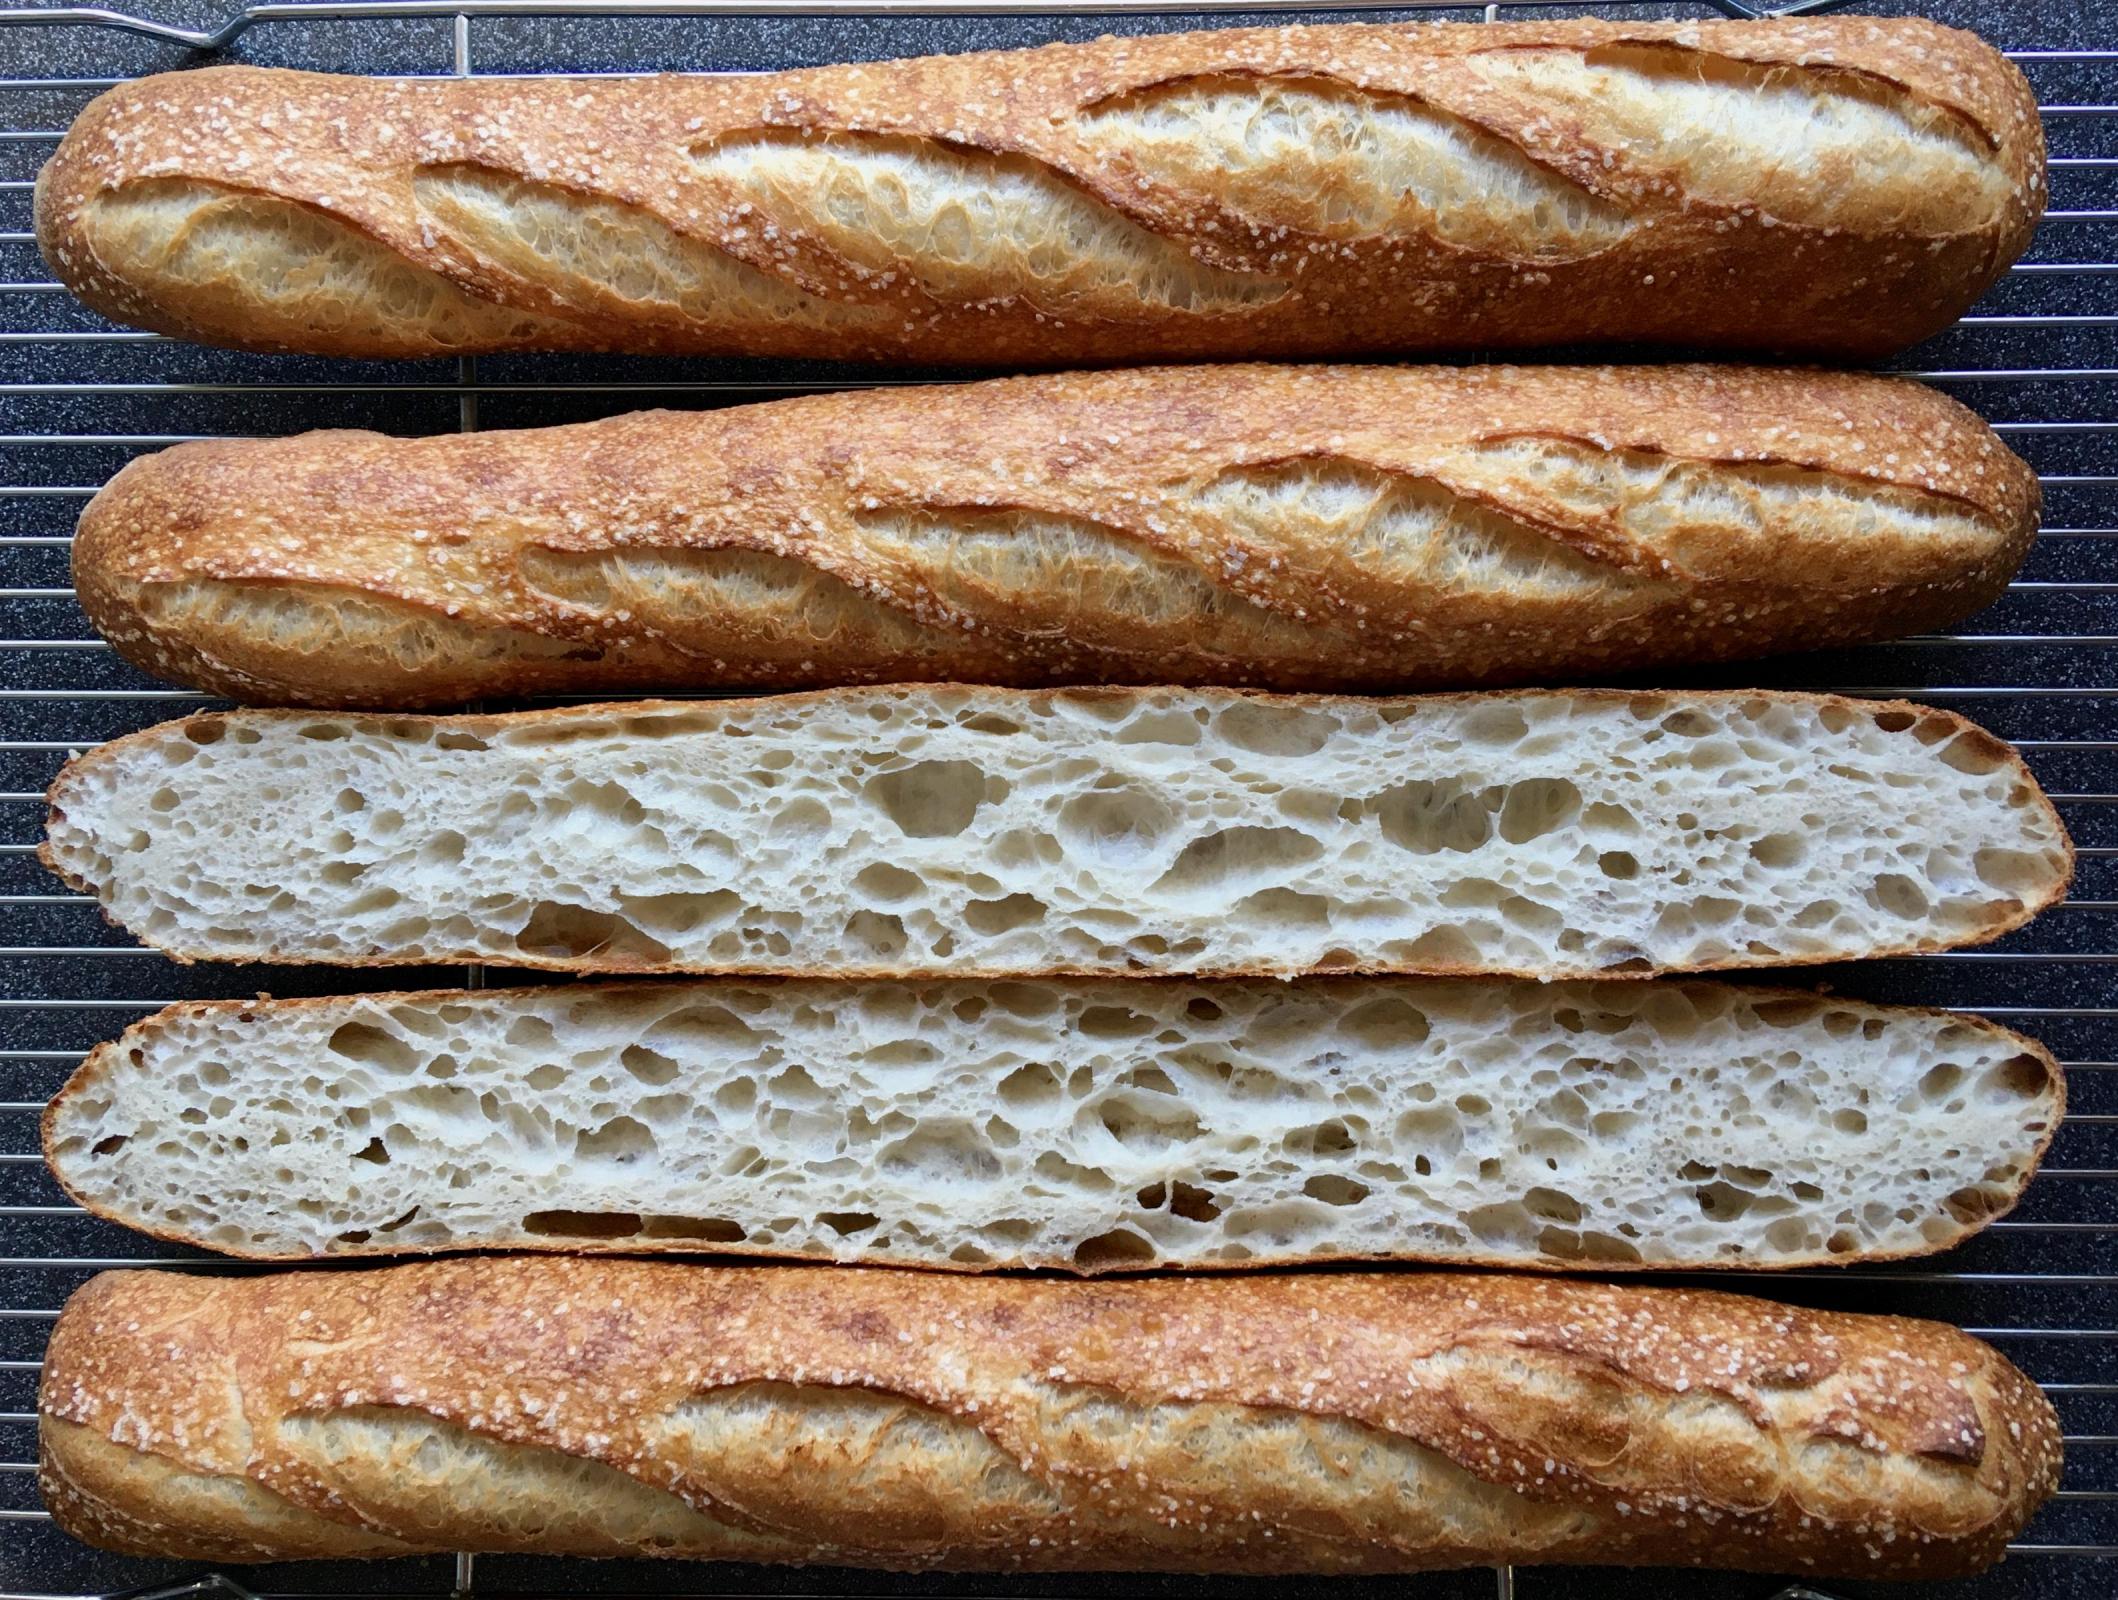
 elaboration aspects of this process. The remainder of the complete bread process is included in the illustrations below.

One point I want to make here is that you don't need to keep a lot of starter, even if you want to make a lot of bread. Using the quantities noted below, you are keeping about 30g of starter, from which you use 3g to seed a refresh cycle and either throw out the remainder or use it to make a levain, from which you will make a batch of bread.

Many sources would have you keep at least a cup of starter (or a pint, or a cup in a pint jar, or a pint in a quart jar) which is totally unnecessary.  If you are going to need 10Kg of levain, you can elaborate 20g into 10,500g in two steps (or 3g into 10500g in three steps), building 20g into 500g of refreshed starter by feeding it at 20:250:250 (a factor of 12.5) and letting it ferment for 6 to 12 hrs depending on the temperature and repeating the feeding to expand it by another factor of 10 (500:5000:5000) to yield 10.5 Kg of levain. So your little 5.5 oz polypropylene food service cup containing 28g of starter becomes 10.5 Kg of levain in 24 hrs.  By doing this and assuming that you feed it every day (which is one option though once a week is enough to maintain it if you don't need bread during that time) you throw out starter containing ~16g of flour every day. That is a total of  over 5.5Kg of flour in a year which is not trivial, but it does make for a pretty inexpensive hobby - or you might perfer to think of your starter as a pet which doesn't eat nearly as much as a dog.  If you maintain a pint of starter and feed it 50g of flour daily you will need 18Kg of flour over the course of a year in addition to the amount you use to make bread. And you have to figure out where to throw out 100g+ every day (which should never go down the drain since it will eventualy coat your drain line like hundreds of layers of paint and irretrieveably plug it up).

You can also read the blog post down below the one about idli that explains the The 2% weight loss method for judging levain maturity (which you can also use for your starter if you have a high accuracy scale).


Doc.Dough's picture
Doc.Dough

as of 30 Oct 2022 [edited to change my fermentation temperature from 40°C to 37°C)

I have been making idli on and off for about 20 years, learning in each interval more about what not to do than anything else. There are lots of how-to posts, almost all of which have some "mandatory" action or ingredient that turns out to be unnecessary when you actually run the experiment.  But the cacophony of opinions unsupported by data makes it really hard to sort out what is essential, what is optional, what is unproductive and what is provably detrimental. And while I am not done yet (as you can tell from what I offer below) I have a process that consistently produces good idli (and in the hands of a skilled practitioner very nice dosa) and in the process have assembled a lot of experimental data that illuminates what is unproductive.  The technical literature is actually quite rich with quantitative and qualitative assessments that are very useful once you get past the vocabulary hurdles and translate the results back to a baseline formulation where comparisons can be made.  Thus the following is offered for critique and pushback as you see fit.  I am here to learn more than to teach.  As has been pointed out to me on more than one occasion, what I really need is an Indian mother-in-law.

Idli

Ingredients:

Idli is a steamed dumpling made from a mixture of decorticated urad beans and short or medium grain (preferably parboiled) white rice that have been soaked, ground, and fermented.

The urad bean (Vigna mungo, black gram, urad bean, or black mapte bean), is grown in South Asia and available in your local Indian store whole with the black skin intact, decorticated whole (urad gota), and decorticated split (urad dal or sometimes white lentils).  I prefer to use urad gota that is less than two years old since the bacteria that are responsible for the fermentation decline with age (or may be killed by heat sterilization or excess heat during shipping or storage) and the gota seems to retain sufficient bacteria longer than the dal does.  The bacteria are associated with the urad and not the rice. My testing showed that I got better fermentation when I used urad gota than when I used urad dal (a preference confirmed by others as well).

Rice that is appropriate for idli needs to be a short or medium grain variety because it needs to have a high ratio of amylopectin/amylose.  A long grain rice will not produce an acceptable idli as the rice starch (high in amylose and low in amylopectin) is not sticky enough to hold everything together when it is steamed (that is also why long grain rice is not sticky).  Do not use basmati rice. A parboiled rice is the preferred rice to use.  Ask for idli rice at your local Indian store.  If you can’t get parboiled rice, use any short or medium grain rice that is suitable for sushi (it may be labeled as sushi rice).

Testing:

Because the age of the urad impacts the fermentation, it is prudent to check your supply to make sure that the bacterial population is robust enough to do the job for you. First look to see if there is a "use by" date on the package and try not to buy urad that is past that date.  To test what you have, wash 3 teaspoons of urad and place it in a small cup or dish and cover it with at least 1 cm of water.  Using a piece of paper towel  remove any bubbles that are on the surface of the water including bubbles attached to the meniscus at the edge of the cup. Cover with plastic wrap and place in a warm spot (30-40°C) for 4 hours. If your urad is fresh you will find that there are fairly large patches of very small bubbles floating on the surface of the water.  If there are no bubbles, or just a few patches of bubbles, your idli will not ferment well. If the bubbles cover less than 10% of the surface after 4 hrs @ 40°C you probably don’t have enough bacteria to complete the fermentation in a reasonable amount of time (13-15 hrs).

The photo on the left below (which you can blow up to full original resolution by right clicking on the photo and selecting "open in a new tab") is a batch of very old (over 10 yrs in the cupboard) urad dal after it had been soaked for 5 hrs at 99°F.  You can see some bubbles on the surface indicating that it is not sterile, but also that it would take a long time to ferment a batch of idli.  The photo on the right is a batch of urad gota from a package purchased about one year ago after it too had been soaked for 5 hrs at 99°F.  In this case you see a nearly continuous film of small bubbles on the surface.  This is the indication of a bacterially well-endowed and relatively fresh batch of urad gota.


Washing:

[Note: Rice will fully hydrate at room temperature in about 45 minutes and since it doesn't contribute any biological activity to the fermentation that is probably just a minimum time.  It will become less resistant to grinding if it is left to soak longer.  The urad will fully hydrate in about an hour in warm (40°C) water, and while the bacteria that drive the fermentation come from the surface of the urad, there appears to be no reason to soak for longer than the minimum time needed to just fully hydrate the beans.  But since there are lots of bacterial species involved it is hard to say what an optimum soaking time is since some of the contaminants may have a combination of initial populations and growth rates that are large enough to compete with the bacteria we care about.  Further experimentation is required to tease out the relative importance of a particular soaking time or perhaps an optimum combination of washing, soaking time and soaking temperature.  As a result, the following is a process that I know works but can be confident is not optimum.]

There are many kinds of bacteria on the surface of the urad, some of which you would rather not have making flavor components for your idli, so wash the urad a couple of times, rubbing them between your hands to remove surface contamination, then add enough water to fully submerge the urad and let them soak until fully hydrated.  Time is a function of temperature but at typical room temperature 15-25°C, 90 minutes enough, and at 40°C an hour is plenty.

Wash the rice a few times until the water runs clear to remove any surface starch that is left over from polishing then pour off the washing water and add back enough clean water to soak the rice.

Soaking:

Both the urad and the rice need to be fully hydrated before they are ground, so make sure that there is enough water in the soaking container to keep the urad and rice fully submerged for the full soaking time.

Grinding:

There is a debate about whether you should carry over the soaking liquids to the grinding process, with the advocates suggesting that there are bacteria in the soaking water that are needed for a proper fermentation.  When I ran the experiment, doing it both ways (grinding using the soaking water and grinding using fresh water) the results demonstrated that you don’t need to use the soaking water as the fermentation was at least as rapid when using fresh water for the grinding process.  This doesn’t mean you have to use fresh water, but it does mean that there is no apparent reason why you must. 

When the urad and rice are done soaking, pour off the soaking water and transfer the urad to a sieve and rinse it under running water. Put a bowl on your scale and tare the scale; transfer the soaked urad to the bowl. The scale now shows you the weight of the dry urad plus the weight of water that was absorbed during soaking.  Add water until the scale shows 4x the weight of the dry urad (for 64g of urad that would be 256g for urad + water).  Transfer the urad and water to the grinder.

Now take the soaked rice and put it in the sieve and wash it and transfer it to the bowl on the scale after it has been tared to show zero and add water until the scale shows 2.25x the weight of the dry rice (for 192g of rice this is 432g for rice + water) then set the rice and water aside until the urad has been ground and transferred to the fermentation container.

With the urad and its soaking water in a wet grinder or a (high powered) blender, grind until they make a very smooth paste, (15-20 min for a wet grinder) adding a little additional water if needed (more likely for a blender than a wet grinder) so that the ground urad flows smoothly. You want the urad to be very smooth and creamy with no sandy or gritty feel.  A blender may heat up the urad so using ice water may be necessary with powerful blenders and big batches and you don’t want the urad to get above ~110°F or you may kill off the bacteria or some of the enzymes that you want to ferment the idli.

To grind urad and rice together in one batch:

After the urad is smooth, add the rice and its soaking water and grind/blend until you reach your end point.  That is not a very precise description of when to stop, but some people like idli to be somewhat grainy while others demand that it be perfectly smooth, and some people add part of the rice and blend until it is smooth before they add the rest and then blend until it is just right to have a more porous idli. Again, don’t run the blender so long that the temperature of the mixture rises above 110°F, using ice water or ice if required to control it.  Transfer the resulting slurry to your fermentation container.

To grind dal and rice separately:

After the urad is smooth, remove it from the wet grinder or blender into your fermentation container. Then put the rice and the clean water you added to it into the wet grinder and grind until you have the texture that you want (about like fine cornmeal).  Now transfer the ground rice to join the urad in the fermentation container and whisk them together until they are fully combined.

Fermenting:

When everything is done grinding, you can add salt (I use ~2% of the weight of the dry urad + rice or 1% of the weight of the batter) either before the fermentation or wait until it is done fermenting and stir it in. There is a theory that there are some bacteria in the mix that are slowed down by the salt, and some that actually grow faster when some salt is present (that would be the Leuconostoc mesenteroides which seems to prefer somewhere around 1% salt to maximize its growth rate).  I have done it both ways and while I don’t see a huge difference between adding the salt before or after the fermentation, the consensus among the cognoscenti is that adding the salt before the fermentation is the preferred method when the temperature is high (because you will slow down the fermentation rate by adding salt) and add the salt after the fermentation when the temperature is cold when you don't want to do anything to slow down what is already a painfully long process (see the experiments with iodized and kosher salt in the comments below).

The temperature for fermentation needs to be above 30°C/86°F and up to 40°C/104°F (below 30°C/86°F the fermentation time is long but tolerable if you are patient, but 40°C/104°F provides a much more satisfying timeline as it should ferment overnight and be ready for breakfast though it is perhaps harder to find someplace that stays at a constant 40°C without some amount of external control or thermal management). I have tried fermenting as high as 45°C and found that the volume expansion was very small (~5% vs 30-40% at 40°C) so I am currently running a series of experiments to clarify what temperature seems to provide the best overall result.  At the higher temperatures the principle lactic acid producing bacteria (Enterococcus faecalis) does in fact do its job and after 15 hrs or so the batter is appropriately tart without being sour.

There are two bacteria that are sequentially in control of the process. {for the details see Ref 9} The first one is Leuconostoc mesenteroides which makes both CO2 (making the batter foamy) and lactic acid (contributes to the tart flavor but does not supply all of the required acid). The second bacteria is Enterococcus faecalis which begins rapid growth only after the pH has been lowered to around 5.25 by the Leuconostoc and produces sufficient additional lactic acid to drop the pH to below 4.5 (I have measured pH as low as 4.2 before the batter became more sour than tart).  When the Enterococcus faecalis has stopped producing lactic acid there is a third bacteria, Pediococcus cerevisiae, that can take over after about 24 hrs and contributes additional lactic acid to the batter making it unpleasantly sour and it is considered to be a spoilage bacteria thus limiting how long you should let the batter ferment.

The optimum temperature for idli fermentation probably varies over the cycle but not enough is known about the optimum growth conditions of the various constituents in a mixed culture to specify much more than a range of acceptable temperatures that produce good tasting idli. I have had success as low as 30°C and as high as 40°C and currently control to 37°C/99°F and consistently get good results so long as the urad has enough bacteria to adequately seed the fermentation (this may change when more test data is available).

The idli batter gets foamy and rises during the fermentation process.  Leuconostoc mesenteroides produces dextran which stabilize the foam; it also produces the CO2 required to puff it up. There is no yeast in idli and the Leuconostoc mesenteroides is the sole producer of the CO2 that inflates the batter, slowing down when the Enterococcus faecalis has produced enough lactic acid to effectively become the dominant component of the mixture.  So, when the volume increase seems to have stopped (it hasn’t but it seems that way), the batter should be at about pH 5.25, after which the Enterococcus faecalis continues to produce lactic acid.  You may stop the fermentation and make idli at any point after the batter is as tart as you like it.  Typically volume expansion is mostly complete by 9-18 hrs depending on temperature and the initial contribution of Leuconostoc mesenteroides from the urad to the mix.

While it is always gratifying to see a lot of volume expansion, there is a limit beyond which it is not terribly useful. You need about 20% volume increase to assure that there is sufficient CO2 in the batter to cause the idli to puff up when steamed (I have made acceptable idli with 5% volume growth), but beyond that too much CO2 will cause the idli to collapse in the middle of being steamed. So always stir down the batter before steaming until you have about 20-25% more volume than you had when you started the fermentation.  This is most important if you add the salt before the fermentation since there is then nothing that demands that you stir the batter before loading the steaming pans.  If you delay salt addition until after the fermentation is complete (or put half of the salt in before and half in after fermentation) the post-fermentation mixing in of the salt will partially deflate the foam and this will keep the idli from falling while steaming. You will learn how much batter to load into each mold so that the idli do not puff up and stick to the pan above.  You will need to rotate the pans so that successive pans in the stack are offset by enough to minimize the inclination for them to become stuck to the pans above and below (I made some plastic spacers that increase the distance between idli steamer trays and thus avoid (usually) having idli stick to the pan above) but the thickness of the spacer is limited in some circumstances by how many trays you want to load since (I found) that if the spacers are too thick, the stack no longer fits on the rack without removing one tray.

Steaming:

After you have greased and loaded the pans, and stacked them as appropriate, put the rack into your steamer and steam for 10-13 minutes. Then take the lid off and remove the rack to somewhere that the idli can cool off enough to let the starch crystalize (about 10-15 min) so that you can separate the racks without ripping big chunks of idli that are stuck to the pan above.  This will happen when you separate the pans too early. If you wait, the idli will separate cleanly and the pan will leave a dimple in the top of the idli in the pan below.

Serving:

Remove the idli from the steaming trays with a wet spoon, a small flat spatula or silicone scraper, or anything you can slide under the edge of the idli to get them out of the pans.  Transfer the idli to a plate and serve warm with coconut chutney or sambar (or whatever your specialty is).

Bibliography:

  1. Agarwal, R., Rati, E.R., Vijayendra, S.V.N., Varadaraj, M.C., Prasad, M.S., and Nand, K., 2000. Flavour profile of idli batter prepared from defined microbial starter cultures.  World Journal of Microbiology and Biotechnology 16 (7), 687-690.
  2. Desikachar, H.S.R., Radhakrishnamurty, R., Rao, G.R., Kadkol, S.B., Srinivasan, S.N. and Subrahmaniyan, V., 1960. Studies on idli fermentation.  Some accompanying changes in the batter.  J. Sci. Indust. Res. 19, 168-172.

  3. Nisha, P., Ananthanarayanan, L. and Singhal, R.S., 2005. Effect of stabilizers on stabilization of idli (traditional south Indian food) batter during storage.  Food Hydrocolloids 19, 179-186.

  4. Purushothaman, D., Dhanapal, N. and Rangaswami, G., 1977. Microbiology and biochemistry of idli fermentation.  Symposium on indigenous fermented foods, Bangkok, Thailand.

  5. Soni, S.K. and Sandhu, D.K., 1991. Role of yeast domination in Indian Idli batter fermentation.  World Journal of Microbiol. Biotechnol. 7, 505-507.

  6. Sowbhagya, C.M., Pagaria, L.K. and Bhattacharya, K.R., 1991. Effect of variety parboiling and aging of rice on the texture of idli.  Journal of Food Science and Technology 28(5), 274-279.

  7. Steinkraus, K.H., Van veen, A.G. and Thiebeau, D.B., 1967. Studies on Idli- and Indian fermented black gram rice food.  Food Technol. 21, 110-113.

  8. Role of Leuconostoc mesenteroides in Leavening the Batter of Idli, a Fermented Food of India1S. K. Mukherjee, M. N. Albury, C. S. Pederson, A. G. Van Veen, and K. H. Steinkraus; Appl Microbiol. 1965 Mar; 13(2): 227–231.

  9. Diversity and Succession of Microbiota during Fermentation of the Traditional Indian Food Idli. Madhvi H. Mandhania,a Dhiraj Paul,a Mangesh V. Suryavanshi,a Lokesh Sharma,a Somak Chowdhury,a Sonal S. Diwanay,a Sham S. Diwanay,a Yogesh S. Shouche,a and Milind S. PatoleAppl Environ Microbiol. 2019 Jul 1; 85(13).  https://www.ncbi.nlm.nih.gov/pmc/articles/PMC6581174/pdf/AEM.00368-19.pdf

After notes:

You may note that I have not included any fenugreek in the idli even though many people do.  I do not particularly care for the flavor and after a lot of experiments found nothing to support a claim that it is needed.  I thought for a long time that it was essential for either bacterial growth or as a thickener or thixotropic agent.  It turns out that the bacteria don't care and produce sufficient dextran to stabilize the batter foam.

The other practice which I now put in the category of wives' tales unsupported by experiment is that there is something about mixing the batter with your bare hands that contributes to successful fermentation.  If your hands are clean enough to put into the batter, they don't have anywhere near enough bacteria to impact the fermentation, and if your hands have enough bacteria on them to make a difference, then you don't want to put them into a batter that may encourage the propagation of contaminants.

The water you use needs to be good enough to drink and should not have so much residual chlorine that it kills off the bacteria you depend on.  I use reverse osmosis filtered water with an activated carbon pre-filter to get rid of any residual chlorine that comes from the municipal water supply but I have never had a case where I could definitively point to highly chorinated water as the cause of a failed fermentation.

There is some data suggesting that not all urad beans harbor exactly the same bacteria which may impact the fermentation process, including the effects of washing or pre-treating the ingredients, and intermediate milestones during fermentation such as when one bacteria shuts down and another one becomes dominant.

Doc.Dough's picture
Doc.Dough

A few years ago, I was experimenting with various ways to increase the acidity of sourdough bread and found that I needed a way to produce levains that were similarly mature but at various hydration levels, including some as high as 250%. The “normal” method was to watch for the volume of the levain to rise and when it began to fall back it was declared to be “mature”.  But for high hydration mixes, there was not any rising and falling because it was simply too liquid to retain enough CO2 to allow it to increase in volume (other than producing some surface foam which did not seem to be very useful).

After thinking about this for a while, I wondered if there was enough CO2 escaping from the levain to measure the weight that was lost in the process.  To find out if there was enough being produced, I did a rough calculation based on the fermentation of glucose to ethyl alcohol and

C6H12O6 → 2 C2H5OH + 2 CO2

One mol of glucose weighs 180g and is converted into 2 mols of ethyl alcohol (46g/mol) and 2 mols of CO2 (44g/mol), so in the process 88g of CO2 is produced of which some escapes and the rest either remains dissolved in the liquid phase of the dough or is retained as gas in the bubbles of the dough.  When a levain is mixed, the amylase enzymes in the flour begin to break down some of the starch in the flour (which starts with a just a little maltose and some broken starch granules and after about 6 hours has as much as 6% maltose along with some other fermentable polysaccharides). [Saunders, Ng, and Kline]  And the enzymes are recycled so the process of starch degradation continues for as long as there is broken starch for it to work on and the rest of the required conditions are met.  So, if we take 10g of flour and after getting it wet and letting the enzymes do their thing for 6 hours, it contains about 600mg of maltose, and because maltose is made up of two glucose molecules, we have 600mg of glucose equivalent.  If the formula above held true, about 48% of the weight of the 600mg glucose should show up as CO2.  This would yield something like 293mg of CO2, and that should be measurable but would require a high resolution/high accuracy scale.

So, the initial estimate of how much CO2 might be lost was high enough to make it interesting to pursue measuring actual weight loss in a high hydration levain. My expectation was that the amylase enzymes would continue to produce sugars from the starch and the process would run until something (perhaps metabolic byproducts or pH sensitivity might poison the environment) slowed it down.

The next question was what else might be going on that could look like CO2 loss.  The first guess was that evaporation of water off the levain surface might be high enough to be a problem, and to address that I ran a simple experiment, measuring the weight of a container of water (about 36g of water in a 4g polypropylene food service cup with a snap-on but not gas-tight) lid in place) over a few days to see if it lost enough weight to get in the way of seeing the loss of CO2.


As you can see, the fluctuation in the weight of the water at refrigerator temperature (38°F) averages to be a very small number, with measured weight differences of less than 20mg over multiple hours when temperature variations may have affected scale accuracy.  Once the water was allowed to return to room temperature, evaporation became measurable, losing about 4% of the weight of the water over 15 days or ~0.25% per day. So, it is clear that evaporation is a measurable quantity but when it is refrigerated and the vapor pressure is low, the loss rate is effectively zero.

Now, how much weight does a levain lose over a refresh cycle?  And how does that compare with water evaporation?  To measure the weight loss on a consistent basis, I use the weight of the added flour to normalize the weight lost to CO2, so for a refresh cycle that starts with 6g of starter, adds 12g of water and 12g of flour, the weight loss is divided by the 12g of added flour to arrive at a percentage that grows with time.  If we use the 0.25% per day weight loss due to evaporation and assume (a conservative assumption) that the evaporation of water from the mix will be the same as from a container of pure water and that it will lose 0.25% of the weight of the water over 24 hrs, the weight loss looks like this:

The different starters each exhibits its own weight loss because each one is growing and giving off CO2 at a different rate and in this case, I have plotted a line at the bottom that models the evaporative loss. Thus, the weight loss of an actively growing starter is large enough and fast enough that we don’t have to worry about mistaking water evaporation for CO2 loss.  And we can differentiate between the growth rates of different starters (which doesn’t tell us much more than perhaps something about the numerical density of living yeast cells in the seed starter (which sets the initial growth rate).

If the growing starter is refrigerated at any point during the growth cycle, growth effectively stops (it does continue to grow but very slowly and we will see how fast it continues to grow a little later).

My observation has been that from the appearance of the rise and fall of the starter as it matures, the point at which it begins to fall is generally at the point where it has lost about 2% of the weight of the added flour, so I use this as a guide to judge when a starter is ready to use, even when I can’t tell whether it has begun to fall (perhaps because it rose up and contacted the cover of the container and I thus can’t tell if it fell because of that, or because it was of such high hydration that there is no bulk volume expansion of the growing starter, just some foam floating on the surface of the liquid.  When it has lost 2% of the weight of the added flour, it is (by definition) ready to use.  It works for me.  If you want to use a different number, feel free. “Trial and success” is the name of the game.

Now let’s look at how long you can leave a starter in the refrigerator before you need to feed it. For that experiment I didn’t let the starter get going before I refrigerated it, just mixed it, capped it, and stuck it in the refrigerator. And they were mixed stiff, using a refresh ratio of 5:10:15.


As you can see, in the refrigerator at 38°F, it takes about a week to lose 2% of the weight of the added flour, so if you don’t let your starter grow before you refrigerate it, it will take a week to mature but you can use it without feeding it again.

By day 14, there is some small divergence between the three starters in this test, but the growth rate is still fairly constant (linear growth) for all of them, and I have found that I can still use it to start a levain without an intermediate feeding.

By the end of the third week, there is additional divergence between the three samples shown here, and the weight loss curve is clearly beginning to flatten out, but there is still a significant amount of CO2 being produced.  I find that after three weeks I get better performance if I do a double refresh before making a levain.  I take this as strong evidence that the native amylase enzymes remain active and continue to convert broken starch into maltose, and the yeast continues to convert the maltose into CO2 and other metabolic products until something limits the process.

Now while all of these experiments demonstrate that weight loss is an adequate method for judging the maturity of starter, it is equally good for gaging the maturity of levain, and it has the advantage that you don’t need a milligram scale to use it.  For any levain where you are adding at least 100g of flour and assuming that you have a digital scale that is accurate to 1g, you just cover the bowl of levain with plastic wrap and weigh the bowl, levain, and plastic wrap, and make note of the total weight of the combination, calculate 2% of the weight of the added flour and subtract it from the total and that becomes your target weight for the bowl of starter when the levain is mature.  And from the extended cold propagation experiment we know that you can lose as much as 4% of the weight of the added flour and it doesn’t make much difference in terms of the health or proofing capacity of the levain.

Notes:

For stiff starters, there is less water in which the CO2 can dissolve, and any dissolved CO2 will not escape, plus CO2 will be trapped in the alveoli of the expanding starter. In all cases, there is little or no CO2 released until the starter is saturated with CO2 at which point it cannot hold any more. So, when you plot weight loss, expect for there to be a lag between when you mix the starter and when it starts to lose weight. Part of that is due to not having a lot of yeast cells actively consuming sugar and making CO2 soon after being mixed, and part is due to the fact that the early CO2 is being absorbed by the liquid in the starter as well as being stored in internal alveoli (bubbles) within the starter.

While both mechanisms are operating, you need a way to get accurate measurements, and I found that if I would thump (burp) the container on a towel or my hand, it would deflate the bubbles in the starter releasing trapped CO2 and knocking it down to some common (low) level of porosity.  If/when I did not do this, the weight loss data was very noisy since the starter will deflate on its own after a period of time and you can’t control it and probably don’t even observe it (it looks like surface bubbles popping but it gives off CO2 which impacts what you weigh). It is also important to remove the lid of the container and blow out any accumulated CO2 that is trapped in the head space between the top of the starter and the top of the container.  While CO2 is a gas, it is a heavy gas, and it is measurable and it contributes to measurement noise if you don’t flush it out.  Note that larger containers trap more CO2 and the difference in buoyancy is the difference between the molecular weights (at sea level that is 44g per 22.4 liters for CO2, and 29g per 22.4 liters for air).

Fifteen grams per 22,400 ml is 15 mg per 22.4 ml, and half of a 5.5 oz polypropylene food service cup (78 ml) filled with CO2 instead of air adds about 53mg to the measured weight if you don’t replace it with air before measuring.  You can do the same calculation for large bowl filled with levain and covered with StretchTite; there is a substantial amount of trapped CO2 and you need to flush it out before you weigh the starter when determining if it is mature.


Doc.Dough's picture
Doc.Dough

In reviewing a few month's worth of baguettes, I found that a batch from 9/21/20 that had a nice open crumb and an unusually long and high energy mix.  It was made with high gluten flour, 68% hydration, long mix time (5 min @speed 0 [low speed], 18 min @4 [high speed]), and 78.6°F dough temperature at end of mix.


9/21/20 (high gluten flour, 68% hydration)
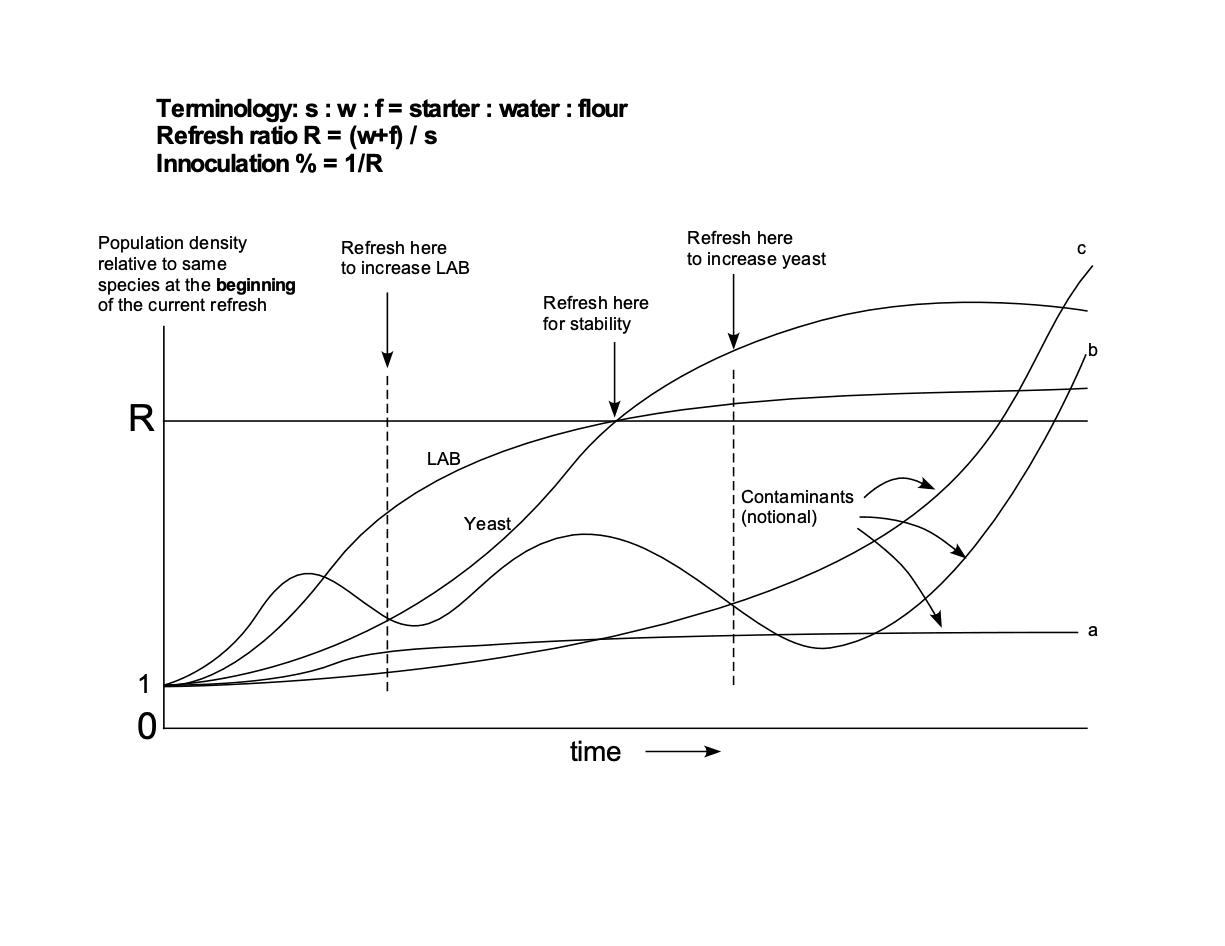
To explore the territory, a test sequence was designed to bake three batches, with two (10/18/20 and 10/19/20) using AP flour at 66% and 68% hydration respectively, and one (10/21/20) using high gluten flour at 75% hydration.


10/18/20 (AP flour, 66% hydration)


10/19/20 (AP flour, 68% hydration)


10/21/20 (high gluten flour, 75% hydration)

The low protein flour and lower (66%) hydration responded well to the long mix times and yielded a reasonably open crumb.  Slightly increasing the hydration (to 68%) did produce a slightly more open crumb, and presented some minor handling issues which were accommodated. While the high gluten flour with a bigger jump in hydration (to 75%) produced an even more open crumb (in keeping with the expectation that higher hydration should open up the crumb if everything else is equal) but at a cost in terms of ease of handling.

Mixing:

All of these were mixed in a Famag IM-5S with an initial stage (10 min) of mixing at speed 0 to combine the cold autolysed dough with the 12% pre-fermented flour in the levain, followed by 2 minute increments of mixing at speed 4 with total times at speed 4 of 10, 12 and 12 minutes respectively. Final dough temperatures were 78.8°, 79.1°, and 80.1°F.

It is important to note that every flour has an optimum level of hydration which varies depending on what you are making. Low protein flours require a lower hydration to deliver the same open crumb that you get using a high gluten flour and higher hydration. I found a technical paper (which I can't find at the moment) that approximated the optimum hydration as a linear function of the protein content, but the data points had a significant scatter pointing out that there are other factors in play and hydration is not the exclusive determinant of how open the crumb will be for a particular flour. This insight pushed me to experiment with much lower hydrations when using AP flour to make baguettes with surprizingly good results.

So the conclusion seems to be that you can get an open crumb baguette using either high gluten flour or AP flour when you use high intensity mixing for an extended period of time and enhance the open crumb even further when you add more water via bassinage after gluten development.

Doc.Dough's picture
Doc.Dough

Since the facility to accept text from Word documents is not yet implemented here, the text of this post can be found at this link.  The figure below is notional but while it does not reflect lab measurements, it should be thought of as an aid to thinking about the underlying issues.

Doc.Dough's picture
Doc.Dough

A friend asked for some help with a recipe for a Portuguese corn bread known as broa, and the formula she had been given was not working for her and was producing hockey pucks.  So, having not made any corn bread for a long time I decided to try and figure out what it should be.

It turned out to be one of those on-line formulas that was probably never tested as written and was destined to produce pretty good hockey pucks if you followed it.  But it did give some history and I found some photos that were helpful but nothing that seemed to be really authoritative.

The recipe called for about equal weights of corn flour and AP flour but called for almost all of the water to be used to hydrate the corn and almost none allocated to the wheat flour component so there was never going to be any significant gluten development and thus it was going to become a hockey puck.  And there was no fat in it so it was going to quickly become a stale hockey puck.

But after a couple of iterations I got it to work pretty well.  The first issue was what to use for flour.  That was solved by using instant masa for the corn which is quite fine and does not leave you with a sandy/granular mouth feel, though if you don't add a fair amount of water and fat it will still be a hockey puck, and I went to a strong bread flour in place of AP so that I would have the potential capacity to carry the large load of corn without getting the hockey puck effect.

The second issue was process.  How to develop the gluten before incorporating the masa?  I was not sure it would be possible because of the large fraction of corn flour that was called for.  The solution was to use enough boiling water to saturate the masa and to include all of the salt with the masa.  This made the saltiness of the final bread just fine without inhibiting the yeast very much (since the corn does not get mixed in until the yeast is well established). The bread flour then gets some sugar, the IDY, and enough very warm water to yield a 100°F dough after it begins to mix.  I let it sit for 15 min to autolyse then mixed it at high speed long enough to develop the gluten but not to the point where it would not accept the hydrated masa, incorporating 6% solid fat in the process.  The fat would further stabilize the gluten and should improve crumb texture, mouth feel, and staling qualities of the bread.

Now the corn was added and mixed until it was fully incorporated.  The dough got sticky enough to stay on the side of the mixing bowl, but was easy to scrape off with a silicone scraper.  And it had a good degree of extensibility so I thought it would tolerate a short bulk fermentation to get some gas into the dough.

A 30 min BF followed by very gentle shaping into a boule and about 40 min of final proof (about 50% volume increase) was as much as I thought it could take.  So into the combi oven it went:  500°F for 15 min at high fan speed, followed by 15 min at low fan speed while it cooled down to 350°F.  At this point the core temperature was 205°F and I pulled it out to cool. I think that if you bake it in a conventional oven it will certainly take longer but getting it to brown first is important since the corn does not help much with crust color.

After 2 hrs to cool, it was time to test.  Contrary to the first round, this loaf sliced easily and the crumb texture is much more like a conventional loaf of wheat bread than a loaf of corn bread, even though by weight of ingredients there is about 50% corn masa in the mix. The flavor of the corn is totally dominant though you may want to personalize it by adjusting the amount of sugar. Photos below of the crust and the crumb illustrate the reality of iteration two.


Ingredients:

202g  instant masa (corn flour)

12g    salt

260g  boiling water (for the masa)

-------------------------

207g  bread flour

28g    sugar

8g      instant dry yeast

168g  130°F water (for the wheat flour dough that contains the yeast)

24g    solid fat

In a bowl, mix the corn flour and salt; add boiling water and stir/fold until evenly moistened; cover and let sit about 30 minutes to fully hydrate. 

Stir together bread flour, sugar, and yeast. Add the 130°F water and mix until it forms a dough; let sit covered for 15 minutes. Mix until gluten is beginning to develop (~4-5 min), add solid fat and continue to mix until fully incorporated.  Add warm wet masa and continue to mix until the wheat flour dough and the corn flour dough are thoroughly combined (~5 min) [when it was fully combined the dough began to stick to the sides of the bowl but could be easily scraped off with a silicone spatula.  Using masa instead of corn meal and extra water make the dough soft and developing the gluten in the wheat flour dough before incorporating the masa assures that the gluten is strong enough to support a 50% corn fraction].

Turn dough out onto the counter and using a bench knife and a little flour to keep it from sticking, shape the dough into a ball about 5 inches in diameter and place in a lightly oiled bowl to bulk ferment.  Leave it covered for ~30 min, then turn it out and fold a few times to tighten up the boule and place it on a Teflon or non-stick pan that has been lightly greased or sprayed with Pam/oil.

Dust the top with rice flour and cover with a kitchen towel. 

Let rise in a warm, draft-free spot until the volume increases by about 50 percent, ~30 -40 min. 

Meanwhile, heat the oven to 500°F with a rack in the middle.  Slash just before oven entry.  There is a lot of yeast in this formulation, but there is also a lot of corn so don't expect a huge oven spring.

Bake the bread for 15 minutes at 500°F.  Reduce to 325°F and continue to bake until deep golden brown, another 15 (with convection) to 30 minutes (without).  Crumb temperature should be 202-210°F when it comes out of the oven.  It will rise another few degrees before it begins to cool just from thermal soak back.  Transfer the bread from the baking sheet to a wire rack and let cool completely, about 2 hours. 


Doc.Dough's picture
Doc.Dough

Below is a proofed demi-baguette that was marked with lines spaced 1.25" apart.  It is about to be baked without any steam as a baseline for testing the hypothesis that steam facilitates the stretching of dough. Since this loaf is not scored, we should expect it to blow out along the side.  But still, if the surface stretches in response to internal pressure generated by the expanding CO2, then we will be able to observe and measure how much stretch there is.

Raw marked no steam


Here is the resulting baked demi-baguette. The spacing between the lines is still very close to 1.25" indicating that there is little or no stretching when baked in a dry oven (this was baked in a combi oven set to hold the box humidity below 20% which effectively removes even the steam that escapes from the bread itself).

Cooked marked no steam

The photo below is another demi-baguette from the same batch that was baked with steam.  It too was marked with lines spaced 1.25" apart before it was baked.  This loaf had a defect on the top that allowed it to open slightly (actually the side-to-side dimension of the slit it almost exactly 0.25"), and the post-bake line spacing is very close to 1.375" except where the defect increases it to 1.625".  So there is some small amount of surface stretching that seems to be facilitated by steam in the oven.

Cooked with steam marked

This loaf was baked in the same combi oven but with the steam generator and humidity controls set to maintain 100% humidity in the oven for the first 7 minutes of the bake (when it was just beginning to brown).

The photo below is another demi-baguette from the same batch that was slashed and baked with steam, illustrating the surface expansion that occurs when a well proofed loaf is slashed to allow the oven spring to open the loaf where you want it to split.

So the data indicates that the difference between having no steam and maximum steam is the difference between no surface area increase, and perhaps ~20% area increase even when there is no steam in the oven. It is a measurable but not significant effect.  However, you can see the difference in color between the steamed and un-steamed loaves, with the steamed loaves having a more yellowish tone and a shiny surface (as opposed to a dull brown surface for the loaf baked without steam.

It is worth noting that this experiment has a sample size of 1 which does not imbue it with great weight in a statistical sense. But it does set expectations and will guide further experimentation.  This particular batch of dough was mixed at 70% hydration, which is a bit higher than the 67% at which I would normally make baguettes. The objective was to build a fairly stretchy dough that I thought might be more amenable to surface stretch than a lower hydration mix.  The next step up would have been 75%, but at that level it is ciabatta and I was not sure that I could put marks on the surface without deflating it.

Slashed unmarked w/ steam


Doc.Dough's picture
Doc.Dough

This post has no pictures and is not going to interest a lot of readers since I did it to help my own understanding of what is going on in the oven.  Writing it down forced me to explain more when I didn't understand why and fix apparent inconsistencies.  If it is too much technobabble, just jump out and find something interesting. For those who wade through it, I welcome comments, corrections, clarifications, and questions.  Just consider it a work in progress.  When you understand this, you should be able to write the versions that apply to wood-burning ovens and deck ovens with external steam generators.

CONVERTING DOUGH TO BREAD BY BAKING IN A HOME OVEN

The modes of heat transfer from oven to bread include:

  • Conduction (by direct contact with a hot surface)
  • Convection (both natural and forced mechanisms from hot oven air)
  • Radiation (the heat flow between the oven walls and the bread in the oven)
  • Phase change (the evaporation of water from, and condensation of steam onto the dough surface)

For pan bread, the sides and bottom of the loaf are cooked by conduction of heat through the pan while the top is cooked by a combination of radiation, convection, and possibly condensing steam. The relative contribution from each mode is dependent on the oven, the temperatures involved, and whether there is any mechanical stirring of the air to enhance the convective heat transfer.

For freeform loaves baked on a metal pan, the bottom is cooked by conduction of heat through the pan while the remainder of the loaf is baked by other mechanisms.  When the baking surface is tile or stone or firebrick (something other than a thin sheet of typically aluminum or steel), heat stored in the baking surface is transferred by conduction to the loaf which both heats the loaf and cools the baking surface. The rate of heat delivery to the loaf is determined by the mass of the cooking surface, the initial temperature of the material, the thermal conductivity of the cooking surface, and the specific heat (cp) of the cooking surface material as well as the density, thermal conductivity and cp of the dough. The rate at which the energy stored in the baking surface is replaced from the oven primary energy source depends on the geometry, surface temperatures and convective flows, and also on what else is simultaneously in the oven (e.g., other loaves of bread or other pans above or below).

There is always some amount of free convection in any oven, driven by the temperature distribution within the oven which heats or cools air causing it to expand and rise, or contract and fall as its density changes. This results in the top of an oven generally being hotter than the lower shelf positions. Convection ovens have mechanical fans that circulate air within the oven to both increase the heat transfer rate to the food and to achieve a more uniform temperature distribution within the oven (top to bottom, side to side, and front to back). Even the small fans in widely available home ovens deliver very high temperature uniformity and shorten baking times because they increase the heat transfer rate from the oven heat source to the food.  The general guidance for using a convection oven is to reduce the temperature by 25°F and bake for the amount of time that is called for if you were using a conventional oven.

For most non-convection, non-steam injected ovens, radiation from the oven walls is the principle heat transfer mechanism.  The Stefan-Boltzmann law governs radiation energy transfer between the oven surfaces and the bread.  It takes the form of:

Qdot12= s A1 F12(T1^4 – T2^4)

where s is the Stefan-Boltzmann constant, A1 is an increment of oven wall area, F12 is a shape factor that accounts for geometry and surface emissivity, T1 is oven wall temperature and T2 is the bread temperature (both in °K).  Note that the heat transfer rate Qdot is proportional to the difference between the fourth powers of the absolute temperatures.  This is not (T1 - T2)^4, but T1^4 - T2^4 which is a really big number at typical bread baking conditions [T1 might be 250°C (523°K) and T2 might be 15°C (288°K) at oven entry].   At these temperatures, a 30°C reduction in oven wall temperature produces about a 20% reduction in radiant heat transfer rate and about a 13% reduction in convective heat transfer rate.

In steam-injected ovens, condensation of water on the surface of the dough delivers a lot of heat.  The enthalpy of vaporization for water (2250 J/g), is more than five times the energy required to heat the same quantity of water from 0°C to 100°C (418 J/g) and is delivered directly to the surface of the dough when steam condenses. Steam does two things for you; it brings water directly to the dough which helps to fully gelatinize the starch forming a shiny, waterproof, gas tight membrane that prevents CO2 from escaping through the surface (thus forcing dissolved CO2 in the dough just under the skin to form blisters when it comes out of solution as the dough temperature rises to exceed the temperature at which the CO2 can remain dissolved).  The cooked surface is also physically strong and cannot stretch to accommodate expansion of the trapped CO2 (oven spring) and will thus facilitate fracture along the lines defined by your lame when you slashed the dough (or randomly at weak spots if you forgot, or slashed ineffectively).

During the first few minutes in the oven, the dough is cool enough to condense steam on the surface, and the more steam there is in the oven the more effectively and rapidly it cooks what will become the crust.  If there is inadequate steam, the dough will still cook, but the starch will not be fully gelatinized so that the crust is not as shiny or gas tight as you might desire and the coloration will be different and generally dull.

When the surface temperature of the dough gets high enough that it exceeds the local water vapor saturation temperature (oven dew point) steam no longer condenses on the crust.  At this point, while the specific heat (cp) of unsaturated steam is somewhat higher than dry air (by about 2x), the dominant heat transfer mechanism in a non-convection oven switches over from phase change (condensing steam) to radiation (from the oven surfaces). In convection ovens, the size of the fan and the capacity of the heating elements will determine whether radiation or convection will be dominant. In most home ovens, the convection fan is adequate to maintain uniform temperature throughout and does increase heat transfer by about 15% above what it would be with radiation plus free convection, but does not provide sufficient air velocity to raise convective heat transfer to a point where convection dominates radiation as the mechanism for transferring heat to the bread.  In commercial convection or combination ovens, the situation is reversed and since the heating elements and the convection fan are big and powerful, they transfer heat via convection considerably faster than radiation alone.

Gas ovens (with burners that share the bread baking volume) suffer from the absolute need to exhaust combustion gasses when the fire is on and in the process sweep out both the steam that is generated by combustion and any steam that is added to the oven (by both your steam generator and by evaporation from the bread dough itself).  The conventional solution is to preheat the oven to very high temperature, include some additional heat storage capacity in the oven (tile, brick, stone, scrap iron), then turn off the gas and plug the vents after loading the bread until there is no additional value from further steam. At this point you can unplug the vents, re-ignite the flame, and remove your steam generator from the oven.

Crust thickness is determined by the depth to which the baking bread has been depleted of moisture, and is generally a function of both oven temperature and oven cycle time. If the oven is too hot, the bread will over-brown before it develops a thick crust.  If the oven is too cool, the crust will be light in color even though it may be relatively thick.

When generating steam by boiling water inside the oven, some energy that would otherwise go toward raising the oven temperature is used to boil water.  This can be a major factor in small ovens and is important to understand.

Bread loses about 15% of its initial weight to evaporation of water during the bake cycle, thus a 750g loaf will lose ~110g of water.  It takes 2.13 BTU/gm to evaporate the water so you expend about 235 BTU in the process. That 235 BTU is about 68 watt-hours of energy, which you can allocate over the bake cycle and think of as reducing the effective power of the oven.  For a 30 min bake cycle that is like reducing the 2500W heating element by 136w to 2364W except that the effective reduction is bigger at the beginning of the cycle than at the end because there is more water to easily evaporate at oven entry. 

If you consume a pint (pound) of water in a steam generator, you will use 1000 BTU or 0.3 KWH to convert it to steam (plus 1 BTU for every °F that the initial average water temperature is below 212°F).  A 2500W oven will take about 7 minutes to recover the heat lost to the steam generator, and for a 4.5 cu ft oven, it takes about 75g of water to produce enough steam to fill the oven.  You will have to make an assumption about how tight your oven is but it would not be a bad assumption to guess that you lose one oven volume of steam per minute of active steaming. My observation is that after the first five minutes in the oven, the surface of the dough stops looking wet, and for rolls and small diameter loaves, they have completed almost all of their oven spring (note that there is an alternate view that says you should steam until the dough begins to brown – just figure out what works for you).

Seventy five grams of water takes 3.84 KW-minutes to boil, but you need 75g of steam per minute (about a pint for five minutes of steam if you leak at one oven volume per minute), so with a 2.5KW oven, if you don’t want to substantially cool off your oven in the process of making steam, you need some energy storage in the oven.  Lava rock has a cp of around 0.2 so it takes a bit more than a pound of lava rock at 400°F to generate 5 minutes of steam, but that is not unreasonable since you will heat the rock up during your normal pre-heat cycle (I am assuming it takes 1 hr @ 500°F to get the lava rock thermally charged to 400°F in a non-convection oven). And you will want to use boiling water to charge the steam generator so that you don’t use another 20% of additional energy to heat the water up to boiling.

Doc.Dough's picture
Doc.Dough

For about the last year I have been working to understand exactly what is going on when a properly proofed and slashed loaf is baked with steam. What is the role of the steam?  What is the role of the yeast?  How does hydration and proofing impact the results?  Deep slash or shallow slash? What are the differences between large and small loaves? ...

After a number of false starts, I have produced a short video showing what is going on. It is annotated but not narrated. I offer it for critique.  What is missing?  And what questions are not addressed?

You can find it at:

Slashing 3

Doc


Subscribe to RSS - Doc.Dough's blog