The Fresh Loaf

A Community of Amateur Bakers and Artisan Bread Enthusiasts.

Recent Blog Entries

FoodFascist's picture
FoodFascist

Poppy seed cake


This cake is my own creation, made with layers of lightly moist sponge (this is effectively the same sponge as in Black Prince, with minor alterations), a sweet poppy seed filling, and a basic Tiramisu cream filling. I recommend using cream cheese rather than mascarpone because cream cheese has that bit of sour flavour to it, creating a fresh contrast against the sweetness of the sponge and poppy.

Ingredients (makes a 1.1 kg cake or thereabouts)

For the sponge

  • 2 medium eggs
  • 140 g sugar
  • 120 g sour cream
  • 80 g plain flour
  • 1 heaped teaspoon bicarbonate of soda
  • 50 g poppy seed, rinsed

 For the poppy seed filling

  • 150 g poppy seed, rinsed (or 200 g if you aim for a thicker layer)
  • Approx. 120-150 ml milk
  • 3-4 tablespoons double cream
  • 2 teaspoons sugar
  • 2-3 tablespoons honey

 For the cream filling

  • 200 g cream cheese (I used Philadelphia light)
  • 250 ml double cream
  • 1 heaped tablespoon caster or icing sugar
  • (Optional) 2-3 teaspoons brandy, cream liqueur or strong sweet wine
  • (Optional) seeds of 1/3 vanilla bean, or equivalent amount of vanilla paste, or extract (I used 1/3 teaspoon vanilla paste)


Method

Sponge

Beat eggs and sugar together to a pale and smooth mass. Switch your mixer to a low speed and add the sour cream in 3-4 increments (or more). Stir the bicarbonate of soda into the flour, fold into the egg and sour cream mix. Lastly, fold in the poppy seeds. (NB I put poppy seeds in the sponge for structure rather than flavour, it’s a bit like adding more flour but without making the sponge too dense.)

Transfer the batter into a greased cake tin. Ideally, use a small diameter springform tin (because you’ll be layering the cake in the same tin afterwards). It’s important that the diameter is no more than 15 cm because we want a tall cake. Don’t worry, the batter is too runny to bake to a volcano shape. Mine usually comes out with a perfectly flat top.

I’ve only got one springform tin and it was in use, so this time I baked my cake in a 1 lb bread tin.

Bake at 180 C/350 F for approx. 30-40 min, or until a wooden stick inserted into the middle comes out clean.

Poppy seed filling

Poppy seeds sometimes come with bonus sand in it. So it’s best to give them a rinse, in case. Put the rinsed seeds in a dish and pour over some boiling water. Cover and allow to infuse for 30 min.

Drain in a sieve and transfer to a small pan. Level with the back of a spoon. Pour over enough milk to cover the poppy seeds, plus another couple of tablespoons (should make about 10-12 tablespoons altogether). Add the sugar and 2 tablespoons cream. Cover and heat to a simmering point, then lower the heat and continue to simmer until soft. This takes approx. 30 min. Stir every few minutes and add milk by the tablespoon as required. When it’s ready, stir in another tablespoon or two of cream. Allow to cool and stir in some honey, to taste. You can of course stir in the honey while the poppy filling is still hot, but honey will lose any health properties if heated.

Cream Filling

Beat the cream until soft peaks form.

It’s important not to over-beat at this stage as you want to leave some room for mixing the other ingredients into it. Add everything else, beat together until well combined (only a few seconds!).

Layering

Slice the sponge horizontally to make 3-4 equal size layers.

If not using a springform tin, lay a sheet of parchment paper into the tin so you can later lift the cake out by pulling at the ends. Use one sheet for a rectangular tin, or two sheets, placed crosswise, for a square or round tin.

Lay the first piece of sponge into the tin. Spread some poppy seed filing over it. Press down slightly.
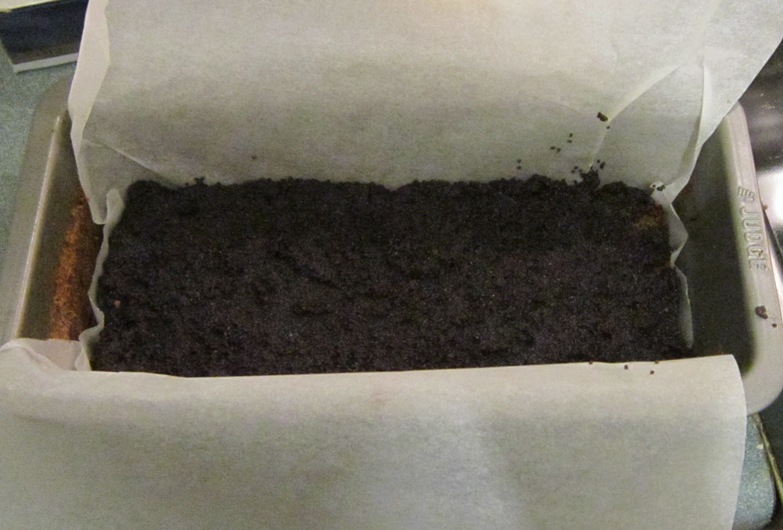
Next, spoon some of the filling over the poppy seeds, covering the whole thing. Use a teaspoon and take care not to leave large gaps, because spreading the filling over seeds is quite tricky. Level out the filling. Some seeds will inevitably end up in the cream filling at this stage, that’s fine.

Repeat layers, finishing with cream filling on the top. Reserve a couple tablespoons for later.

Refrigerate overnight.

Take out, carefully lift out of the tin onto a serving plate. Spread the remaining cream filling over the sides.

Decorate as you wish, I used some butter icing (creamed butter, icing sugar, red colouring for the red icing, cocoa powder for the brown).

If you like the idea, one other version you could try is a berry cake. Just replace the poppy seed filling with some seasonal fresh berries; or if using frozen berries, defrost thoroughly and drain excess juice – you can then use it to soak the sponge if you wish. Sprinkle some icing sugar over the berries, or make the cream filling a little sweeter. You could also replace the poppy seed in the sponge with 50g ground nuts, or leave out altogether.


FoodFascist's picture
FoodFascist

Black Prince Cake 


Known in Russia as Black Prince, this is a cake made with lightly moist chocolate sponge layered with sauce that tastes a bit like toffee, and finely chopped or ground nuts. My version also includes sour cherries which makes it similar to Black Forest cake. Black Prince in the Wood if you like J

 Ingredients

For the sponge

  • 3 medium or 2 large eggs
  • 180 g sugar
  • 180 g sour cream
  • 120 g plain flour
  • 2 level teaspoons bicarbonate of soda
  • 50-70 g dark or bitter chocolate, grated; or, 2-3 tablespoons cocoa powder; or, a mixture of both
  • 50 g ground or finely chopped almonds, hazelnuts or walnuts

 For the sauce

  • 400 g tin sweetened condensed milk, boiled (see below for instructions)
  • 150 g butter
  • 100 g ground or finely chopped nuts
  • (Optional) 2-3 teaspoons brandy, cream liqueur or strong sweet wine

 Also

  • 1-2 handfuls sour cherries, fresh or frozen, stoned

For decoration

  • Some more ground/chopped nuts, and/or nut flakes
  • A few cherries, if desired
  • Butter-cream icing, if desired


Method

Sponge

Beat eggs and sugar together until pale and smooth. Switch your mixer to a low speed and add the sour cream in 3-4 increments (or more). Stir the bicarbonate of soda into the flour, fold into the egg mix. Add chocolate/cocoa. Lastly, fold in the nuts.

(NB Most common versions of the recipe don’t include nuts at this stage, but I find that they improve the structure. Made as is, with just 120 g flour, this cake had collapsed on me a couple of times. Adding a little nuts makes sure the cake keeps its shape, yet does not make the sponge denser in the way an equivalent amount of flour would.)

Transfer the batter into a greased cake tin. A springform tin is best, because you’ll be layering the cake in it afterwards. It’s important that the tin is no larger than 18 cm diameter because we want a tall cake. Don’t worry, the batter is too runny to bake to a volcano shape! Mine usually comes out with a perfectly flat top.

Bake at 180 C/350 F for approx. 30-40 min, or until a wooden stick inserted into the middle comes out dry.

Sauce

Boil the condensed milk. This will need to be done in advance.

Peel any labels off the tin and place it in a saucepan, on its side. Do not open or pierce the tin. Pour in enough water to cover the whole tin + an inch or so. Cover, put on a hob and heat until the water begins to boil. Then turn the heat right down and cook for 1 hr 30 min. Check that the water is bubbling slightly. Don’t worry the tin will not burst AS LONG AS you make sure the water doesn’t boil away.

Allow to cool completely before opening. When ready, boiled condensed milk has a dark caramel colour and a taste very similar to toffee.

Leave butter on the counter until it is room temperature. If you wish to speed up the process, cut into small chunks or slice. Cream the butter with a spoon or mixer on low speed. Add the cooled “toffee” and nuts and beat together until well combined.

Layering

Slice the sponge horizontally to make 3 equal size layers. If not using a springform tin, lay two sheets of parchment paper, crosswise, into the tin so you can later lift the cake out by pulling at the ends.

Lay the first piece of sponge into the tin. Place half of the cherries onto the sponge, holes down, so that the juices moisten the sponge rather than make puddles in the sauce. There’s no need to defrost frozen cherries, but if you have, pour the drained juice over the sponge. Spoon the sauce in between and over the cherries. Place the next layer of sponge on the top, then cherries and sauce. Finish with sponge and a layer of sauce, but reserve a couple tablespoons for later.

Refrigerate overnight.

Take out, carefully lift out of the tin onto a serving plate. Spread the remaining sauce over the sides.

Decorate as you wish, the easiest way to do it is to dust the top and sides with ground nuts. I used some cherries, almond flakes and butter-cream icing (creamed butter, icing sugar, cocoa powder), and dusted the sides with almond powder.

(Please be lenient on my decorating ability, this was only my third ever go with the icing bag!)

I also like this cake with pieces of prune instead of cherries.


occidental's picture
occidental

Wow, it's been a bit over a year since my last post.  Time to rectify that!  I baked my first loaf in 2012 a few days ago.  I meant to bake Susan's Simple Sourdough but after going by memory and adding too much water I had to improvise a bit to keep the overall hydration in the ballpark of what it should be.  Anyhow, the loaf turned out great, with a crackly crust and a fairly open crumb.  Best to all your baking efforts in 2012.

PiPs's picture
PiPs

My stocks have been running low. Grains, flour, salt and even the bread in the freezer have all taken a beating over a busy Christmas period.

With suppliers back on board after holidays I was more than a little relieved when a new shipment of biodynamic wheat and spelt grains finally arraived.

Along with the grain, I was also in need of white flour. The idea of leaving a gentler footprint to me means that if I have to use processed white flour then it should be from a local and organic producer. So for this reason I have switched to organic plain white flour from the Kialla Pure Foods mill only 150 km away. (90 miles) Kialla’s plain flour with a protein level of 12.5% is stronger than the bakers flour I been currently using but has a slightly creamier colour and chewier mouth feel. For this weekends bake though, I wanted wholegrains and organic. I hadn’t planned on baking any rye until a friend suggested she would like to try a lighter rye sourdough. Nat and I have a strong appreciation for caraway seeds with rye so this was suggested as well.


Organic 40% Rye Sourdough with caraway

Formula

Overview

Weight

%

Total dough weight

1800g


Total flour

1071g

100%

Total water

769g

72%

Total salt

19g

1.8%

Prefermented flour

428g

40%

Desired dough temperature 26-27°C


Rye sour build – 12-14 hrs 22-24°C


Starter (not included in final dough)

21g

5%

Freshly milled rye flour

428g

100%

Water

428g

100%


Final dough


Rye sour

856g

133%

Organic plain flour

643g

100%

Water

341g

53%

Salt

19g

1.8% of total flour

Caraway seeds

19g

3%

Method

  1. Mix rye sour and leave overnight to ferment
  2. Next day disperse rye sour in remaining water and add flour.
  3. Knead for 5 mins (this is sticky and uncomfortable)
  4. Add salt and knead for a further 10 mins until dough starts to show signs of smoothness.
  5. Gently mix in caraway seeds until combined.
  6. Bulk ferment one hour
  7. Gently preshape. Bench rest 20 mins. Gently shape into batards.
  8. Final proof was one hour at room temperature (27°C).
  9. Load into oven with steam at 230°C for 10 mins then reduce temperature to 200°C and bake a further 30 mins. 

The rye sour had developed nicely and apart from the seemingly unending stickiness of kneading, the dough eventually bulk fermented into a smooth dough that shaped quite easily.

The final proof kept me only my toes as I was mowing the backyard and ducking inside every 15 minutes to check on it’s progress, as it has been quite hot and humid recently.

I am particularly fond of the crumb colour with the caraway seeds hidden amongst the rye bran. The flavour is a really nice balance of a subtle rye tang with a puff of caraway scent on some bites.


I also baked a pair of simple organic wholegrain sourdoughs - the first breads for our household this year. The levain contains a proportion of Kialla plain flour so approximately 90% of the flour is freshly milled wholegrains.

I tried a few new procedures with this bake. I milled the wheat grains in two passes. The first pass cracked the grains before passing them through the mill again at a finer setting. This didn’t produce much heat in the flour and I ended up with softer feeling flour than in the past.

The other change was the fold in the bulk ferment. I recently read a comment by proth5 on the timing of a stretch-and-fold in a two hour bulk ferment. (sorry Pat I can’t remember where you posted it) If the dough is already well developed before the bulk ferment, perhaps a stretch-and-fold could occur earlier in the bulk ferment allowing some larger gas pockets to develop in the 2nd half of the bulk ferment.


Organic Wholegrain Sourdough

Formula

Overview

Weight

%

Total dough weight

2000g


Total flour

1081g

100%

Total water

919g

85%

Total salt

21g

2%

Prefermented flour

270g

25%


Levain build – 4-5 hrs 26-27°C


Starter (60g not included in final dough)

100g

40%

Flour (I use a flour mix of 70% Organic plain flour, 18% fresh milled wheat, 9% fresh milled spelt and 3% fresh milled rye)

240g

100%

Water

120g

50%


Final dough


Levain

405g

50%

Freshly milled organic wheat flour

703g

86%

Freshly milled organic rye flour

108g

14%

Water

784g

96%

Salt

21g

2%


Method

  1. Mix levain and leave to ferment for 4-5 hours
  2. Mill flours and allow them to cool before mixing with cold water from fridge (hold back 50 grams of water) and autolyse four hours.
  3. Add levain to autolyse then knead (French fold) 5 mins. Return the dough to a bowl and add salt and remaining 50 grams of water and squeeze through bread to incorporate (dough will separate then come back together smoothly) then knead a further 10 mins.
  4. Bulk ferment two hours with one stretch-and-fold after 30 mins.
  5. Preshape. Bench rest 20 mins. Shape.
  6. Load into oven with steam at 230°C for 10 mins then reduce temperature to 200°C and bake a further 30 mins.


This has become familiar dough for me to mix. At 85% hydration doubts can creep into my thinking as the initial mix feels sticky and loose. Press on, add the salt and feel relief as the dough tightens up and releases cleanly from the bench.

The dough felt strong even after shifting the stretch-and-fold forward 30 mins so I left it untouched for the remaining time and was rewarded with light bubbly dough ready for preshaping. I am quite pleased with the proofing on both of the loaves and find I am becoming braver at judging their readiness for the oven. They sprang beautifully on a hot stone.

Some rye bran is visible scattered throughout the moist crumb which contains no hint of sour. The change in bulk ferment procedure has possibly led to a slightly more irregular crumb, but this will need to be experimented with and expanded.


Another busy day in the kitchen which was balanced by an equally busy day doing yard work.  The sun is finally shining here after a day of humid grey skys. We plan to make the most of it.

Cheers,
Phil 


PaulZ's picture
PaulZ

Hi all,

Can someone pls inform  me why it is suggested that we use cornflour or cornmeal on the peel, transfer paddle or the couche cloth instead of AP flour or regular bread flour? What's the difference?

R.Acosta's picture
R.Acosta

I gotta say, that even though I've only worked with whole wheat twice now, I haven't run into an ingredient that puts me on edge as much as this one. 

So I'm trying to make this bread again, only this time I tried to follow the exact measurements instead of my gut.  So putting in the exact amount of water it calls for I got what looked like the beginnings of crumbly whole wheat play dough, but I resisted the urge to keep adding water until it was soupy (because I'm pretty sure that's why my dough wouldn't get to the tacky stage last time).  Well I let that do its thing overnight and then mixed in the other ingredients, with the addition of bread flour being gradual.  In the end my dough was tacky, but not smooth and hardly elastic.  With a sigh I put it in the oiled bowl and hoped that that was just how whole wheat doughs operate.  Then I read and saw that basically, its not.  So in a fury I took the dough out 5 minutes later and tried to knead it into submission, but honestly, I'm pretty sure it just got much worse.

Let me just say how livid I am because I don't have enough bread flour to make anything after this and this bread is supposed to last us for the next week.  Damn you whole wheat...which I have plenty of.  Arghh!  Who knows, maybe I'll be surprised in the end, but for now I'm thinking trusting my gut isn't a terrible idea in the future.  Here's the dough:


I know it doesn't look as bad in the picture, but trust me...final photos to come later in the day...


Well after about 5 hours of a first rise (with it seeming to plateau around the 3 hour mark) I broke down and formed the loaves. I warmed the oven then turned it off and put the loaves in there for a second rise, hoping things would move along a bit faster this time around.  Well 30 minutes later, I had a beautiful rise on both of them. About an inch and a half over the rims, yay!  I decided to go ahead and bake them, because I didn't want them to overproof and then deflate...we'll see what this day long venture produces soon..


Well, here is the crumb shot from this day long honey whole wheat:

After cutting into it I feel like I could have let it rise a little longer, however I feel like I made a little improvement between this loaf and the last one (being that it wasn't as flat).  The taste was completely different.  It was very yeasty with just a hint of sweetness, which I guess was a result of that 5 hour rise.  It's quite addicting I must say.  I guess the key with whole wheat, just like any bread, is patience. Here's the loaf:

So however frustrating, I was ultimately satisfied. Thank God!

-Rachel

Mebake's picture
Mebake

This bake was triggered by Karin's tease bake here. The recipe is from Peter Reinhart's Wholegrain breads. The bread is an enriched bread that contains lots of seeds, such as sesame, flax, sunflower, and pumpkin seeds (i used crushed walnut instead).

The Bread is also 100% Wholegrain, and contains Rye flour too. I mixed all the ingredients on day two ,but the seeds, as they tend to hinder the development of the dough. When the dough was coherent and moderately developed, i added the seeds and kneaded for a while longer.

Added by edit: I accidentally re-read the recipe again today, and found that it actually is 50% wholewheat as the biga is bread flour. So, my bake isn't really the transitional one in the book. Anyway, who cares? The bread was spectacular!

Obviously, i scaled a 1kg dough for a 1.2kg pan.

This Bread was SO popular with family, it was deemed to be the Best tasting bread i've baked!

To me, it was a really nice nutty bread, that is sweet, wholesome, and healthy. This is one of those breads that is best consumed alone, with no topping whatsoever, save for some butter.

This bread is extremely recommended! Thanks for the reminder, Karin!

JoeVa's picture
JoeVa

Baking Wood Fired Oven Pizza.

Ecco un breve video delle mie pizzate. Buona visione!

Here a short video of my pizza baking in the wood fired oven. Have fun!

loydb's picture
loydb

I'm not dead, it just feels that way. I spent the holidays either travelling or cooking for New Year's, so didn't get around to the challenge until 2012. I made a fatal error, as well, relying on memory instead of looking at the schedule. Thus, we have Almond Horns instead of Almond Buns.

Let me start by saying that I think there's an error in the Almond Horn recipe in that it calls for zero flour. Without flour, as written, it makes a soupy, almondy-eggy batter. I ended up adding 1.25 cups of AP, and it was still flat and runny. If it's not an error, then the egg weights are too high or something.

These ended up tasting fabulous -- but they are more like flat almond sugar cookies than anything else.

I'll work the actual challenge -- almond buns -- into the schedule this month hopefully. :)


JoeVa's picture
JoeVa

Due, quasi tre giorni di lavorazione per un buon Panettone a Lievitazione Naturale.
Almeno un giorno per mettere in forza la "madre", 12-14 ore per il primo impasto, 6-8 ore per il secondo impasto, 12 ore di raffreddamento, almeno 24 ore di riposo. Tanti tuorli, tanto burro, tanto zucchero, vera bacca di vaniglia, scorza di arancia e limone, uvetta ...

Two, almost tree days of work to have a good Naturally Leavened Panettone.
At least a day to strengthen the "Italian mother dough", 12-14 hours for the first dough, 6-8 hours for the second dough, 12 hours of cooling, and 24 hours of rest. Many egg yolks, butter, sugar, real vanilla bean, orange and lemon peel, raisins ...

DSC04422

Quest'anno mi sono attrezzato e, grazie all'aiuto dell'impastatrice e della cella di lievitazione a temperatura controllata, tutto il processo è stato molto più facile e ripetitibile. Non ho documentato tutto ma ho scattato solo alcune foto nei momenti più tranquilli (quando non avevo le mani imburrate).

This year I was prepared and, with the help of the mixer and proof box with controlled temperature, all the process was much easier and repetitive. I have not documented every step, only just some photos I took in the quieter moments (when I had not butter in my hands).

Ecco alcune foto.

Here some shots.

Pronto per essere infornato, ma prima bisogna fare la "scarpatura".

Ready to be baked, but first it has to be scored (the particular scoring technique is called "scarpatura").

1r

3r

Ed eccolo in forno che cresce.

In the oven it rise, a beautiful rise.

4r

5r

Appena sfornato. Poi a raffreddare capovolto per tutta la notte.

Just out of the oven. Then let it cool all the night upside down.

6r

E dopo un altro giorno di riposo si può gustare. Ricco, soffice, leggero e filante.

And after another day of rest it could be sliced. Rich, soft and light.

DSC04416 DSC04413

DSC04420

Pages

Subscribe to Recent Blog Entries