The Fresh Loaf

A Community of Amateur Bakers and Artisan Bread Enthusiasts.

Most bookmarked

pizza party's picture
pizza party

New offer wood fired pizza oven mobile Pizza Party made in Firenze-Italy

Floyd have licensed some special offers dedicated a thefreshloaf.com forum users:

the Pizza Party ovens are excellent for pizza, bread, roast and more..:


Pizzone large wood fired pizza oven mobile

http://www.wood-fired-pizza-oven.us/wood-fired-oven-mobile-pizzone-4-pizze/

- Special offer only 1440usd Pizzone + home delivery by Fedex generally 5-7 business days + all custom taxes included.

A this time there is an other excellent offer active with the shipment price a the same price of Pizza Party 70x70


Pizza Party 70x70 wood fired oven

http://www.wood-fired-pizza-oven.us/wood-fire-oven-indoor-outdoor-portable/


- To order Pizza Party 70x70, you have door with glass instead traditionl door without glass


- Dedicated to Pizza Party 70x70 Restyling 2015, is the new front oven homage, with Firenze style and large door.

(Pizzone have the new front included in the price)


Contact me by private message and i send you the coupon code to active the offers on our official shop online

http://pizzapartyshop.com/

we use a worldwide home delivery service with all custom taxes included

Simone

 Wood fired pizza oven


PalwithnoovenP's picture
PalwithnoovenP

Father's Day Fried Pies and Doughnuts

Today is Father's Day so I prepared meals for my dad. Normally, one will make some burgers for dad or prepare a carnivore feast but you know us, we love sweets and dad do not like to eat much meat anymore so I prepared some sweet and rich treats for him.

I made some fried pies. We really love fried pies especially peach and mango but I prepared a special one this time.


The dough is spiral pastry because I'm running low on butter and I still need a pretty large amount for all other things I'm going to make including the filling for this pie. Crimping the edges is my favorite part of pie making. I think I'm pretty good at it.


These are fried coconut cream pies and these are no ordinary pies. We love coconut sweets so when we harvested some young coconuts I thought of using it in a special dessert. Instead of packaged sweetened flaked coconut, young coconut called buko with soft thin delicate sweet meat is used here and it is what makes these pies special.


The filling is a milk based custard made more special by pandan extract from fresh pandan leaves. Buko pandan is a classic flavor combo in the Philippines; if you don't like it, just use vanilla but please use buko, it;s much better than packaged coconut with superb texture and flavor.


The pastry is flaky, golden, and crispy! It almost doubled and blistered after frying in hot oil. Its slightly salty flavor goes very very well with the sweet and rich custard filling.


Here it is bitten to reveal the filling and all those succulent young coconut strips! Enjoy!


-----------------------------------------------------------------------------------------------------------------------------------------------------

I served the pies in the morning and for lunch, I cooked some pancit. Again! This one has chorizo, braised pork leg and mushrooms, shirmp, and veggies! Very delicious and perfect for lunch.


-----------------------------------------------------------------------------------------------------------------------------------------------------

For the afternoon snack, I made doughnuts. Though made with commercial yeast, the overnight fermentation and quite a bit of butter makes it really flavorful. In the hotel where I had my practicum, doughnuts that were oval were considered "rejects" because of mishandling and unfit for sale and display but I see beauty in them so I purposely made my doughnuts oval. I plan this to be a my signature shape if I will ever open a doughnut shop, so don't steal it! :P I fried them right this time and learnt that a low flame is the secret for a perfect doughnut especially for filled doughnuts where no hole is punched in the center. The inside is done and the outside is golden brown and crispy.


Coffee and doughnuts go so well together and dad also love coffee so I rolled them into one dessert, coffee doughnuts! In the hotel I tasted a fantastic coffee doughnut filled with coffee whipped cream and glazed with a caramel glazed and decorated with pastry cream. It was so delicious but it costs $2.00 for a piece! I want to make something similar  and delicious. For just over $3.00 I made 4 with an extra little one from the scrap dough pieces. The filling is a coffee custard made with instant coffee powder; if I want to be fancy, I will use my own blend of coffee beans, roast them to my preference and infuse my milk with it. Still with it's simplicity, it was better than the hotel's not because of the taste (it's on par) but because of the fresh ingredients; no doughnut pre-mixes, no powdered pastry cream that just needs to be mixed with milk and no powdered glazes!


It goes great with hot chocolate. It was rainy and windy this afternoon and it's really comforting, I chose a simple dusting of icing sugar rather than a glaze since the filling is already sweet. Still, in my case it is a cold chocolate drink made from raw cocoa liquor that is pressed and dried into cakes.


The crust is crispy and light that only a real doughnut can have. Some may argue but in my opinion, baked doughnuts can be good but they can NEVER match a fried doughnut!


This is a "knife and fork" doughnut so I filled them generously with the custard. If you want to eat them on the go, fill them less. The crumb is ethereal! It so soft and fluffy and light and feathery! I think it's because of the kneading, I also think that I have improved in my kneading skills; before I spend more than an hour but now it takes just under 25 minutes for the dough to pass the windowpane. This is the first bread that I sliced using my serrated knife that my dad gave me on my birthday, without it I would be in trouble. It's like magic, it effortlessly sliced the very delicate doughnut without me applying any force, just slicing back and forth like playing a violin. Thank you and Happy Father's day daddy!


Crumb: sliced and bitten!


Thank God for this wonderful day!

Happy Father's Day to my dad and to all fathers out there!

Maligayang Araw ng mga Ama!

父親節快樂!

父亲节块乐!

DaphneG's picture
DaphneG

Reviving a refrigerated starter

Hello,

I just got started baking my own bread with natural leaven following the instructions from Chad Robertson's Tartine Bread book.The first loaves, though far from perfect, were delicious and convinced me to keep baking my own bread regularly.

However I have no time to bake on a regular basis so I decided to refrigerate my starter instead of keeping feeding a starter I only occasionally need (about once a week). Unfortunately I haven't found specific instructions on how to revive it now that I would like to bake again.

After 2 weeks of refrigeration in an air-tight contained my starter smells very acidic (vinegar-like). It was active for about a week after I put it in the fridge (I could see bubbles forming through the container's glass) but now looks completely inactive. How can I revive it? I hope it's not dead...

Thanks a lot for your advice.

Daphné.

Isand66's picture
Isand66

Cream Cheese Sourdough Hamburger-Hot Dog Rolls

 It finally feels like summer here on Long Island, so that means it's time to fire up the Barbecue and throw on some hamburgers and hot dogs.  I whipped up a version of a yeasted bun I've made many times and changed it over to use a SD starter and made a few other flour swaps as well.

These ended up great and were nice and tasty and soft but not too soft to hold up to a grilled burger and hot dog.

DSC_0058

DSC_0027

Formula

Cream Cheese Sourdough Hamburger-Hot Dog Rolls (%)

Cream Cheese Sourdough Hamburger-Hot Dog Rolls (weights)


Download the BreadStorm formula here.

DSC_0035

DSC_0073

Levain Directions

Mix all the levain ingredients together for about 1 minute and cover with plastic wrap.  Let it sit at room temperature for around 7-8 hours or until the starter has doubled.  I usually do this the night before.

Either use in the main dough immediately or refrigerate for up to 1 day before using.

 Main Dough Procedure

Mix the flours and 350 grams of the water together in your mixer or by hand until it just starts to come together, maybe about 1 minute.  Let it rest in your work bowl covered for 20-30 minutes.  After 30 minutes or so  add the salt, starter (cut into about 7-8 pieces), cream cheese and softened butter and mix on low for 6 minutes.    Remove the dough from your bowl and place it in a lightly oiled bowl or work surface and do several stretch and folds.  Let it rest covered for 10-15 minutes and then do another stretch and fold.  Let it rest another 10-15 minutes and do one additional stretch and fold.  After a total of 2 hours place your covered bowl in the refrigerator and let it rest for 12 to 24 hours.

When you are ready to bake remove the bowl from the refrigerator and let it set out at room temperature still covered for 1.5 to 2 hours.  Remove the dough and shape into rolls around 125 -130 grams each.  Cover the rolls with a moist tea towel or plastic wrap Sprayed with cooking spray and let rise at room temperature for 1 1/2 - 2 hours.

Around 45 minutes before ready to bake, pre-heat your oven to 500 degrees F. and prepare it for steam.  I have a heavy-duty baking pan on the bottom rack of my oven with 1 baking stone on above the pan and one on the top shelf.  I pour 1 cup of boiling water in the pan right after I place the dough in the oven.

Right before you are ready to put them in the oven, apply an egg wash if desired and sprinkle on your toppings.  Next add 1 cup of boiling water to your steam pan or follow your own steam procedure.

After 1 minute lower the temperature to 425 degrees.  Bake for 25 minutes or until the rolls are nice and brown.  

Take the rolls out of the oven when done and let them cool on a bakers rack if you can resist, or slather on some butter and nobody will know!

DSC_0041

Here are some more photos from my garden for those of you who are interested.

DSC_0053

DSC_0060

DSC_0062

DSC_0065

DSC_0067

DSC_0070

DSC_0078

DSC_0082

DSC_0093

Tomasrei's picture
Tomasrei

Du pain et des idees

Hello everybody! Been lurking here for a bit and looking forward to joining the discussion here!

In Paris there's a pretty famous bakery, Du pain et des idees. Their 'house' bread is called pain de amis.

I'd like to try to make something similar to it. Here's a video from the bakery: https://vimeo.com/60856705

You can see the bread just after the 01:55 mark.


I've had the bread before and what I like is the crumb structure and the crust to crumb ratio (being quite flat and all). And if I remember correctly, even though the crust is dark, it isn't too crunchy.

First thing is the shaping. How would you shape a bread like that?

Also any guess on hydration?

All contributions welcome!

(For plenty of photos just google Pain de amis)


Isand66's picture
Isand66

Durum Rye Sourdough Act 11

This is another version of bread I baked last fall.  I changed up the flour combination and used a Durum starter as well.

I was very happy with the moist crumb and the combination of flours made for a perfect rye sandwich bread.  The crumb was perfect for this style of bread and I would certainly bake this one again.

DSC_0010

Formula

Durum Rye Bread Act 2 (%)

Durum Rye Bread Act 2 (weights)

Download the BreadStorm File Here.

DSC_0013

Levain Directions

Mix all the Levain ingredients together for about 1 minute and cover with plastic wrap.  Let it sit at room temperature for around 7-8 hours or until the starter has doubled.  I usually do this the night before.

 Main Dough Procedure

Mix the flours,  and 400 grams of the water together in your mixer or by hand until it just starts to come together, maybe about 1 minute.  Let it rest in your work bowl covered for 20-30 minutes.  Next add the salt, starter (cut into about 7-8 pieces) and balance of the water, and mix on low for 6 minutes.  Remove the dough from your bowl and place it in a lightly oiled bowl or work surface and do several stretch and folds.  Let it rest covered for 10-15 minutes and then do another stretch and fold.  Let it rest another 10-15 minutes and do one additional stretch and fold.  After a total of 2 hours place your covered bowl in the refrigerator and let it rest for 12 to 24 hours.  (If you have a proofer you can set it to 80 degrees and follow above steps but you should be finished in 1 hour to 1.5 hours).

When you are ready to bake remove the bowl from the refrigerator and let it set out at room temperature still covered for 1.5 to 2 hours.  Remove the dough and shape as desired.   Place your dough into your proofing basket(s) and cover with a moist tea towel or plastic wrap sprayed with cooking spray.  The dough will take 1.5 to 2 hours depending on your room temperature.  Let the dough dictate when it is read to bake not the clock.

Around 45 minutes before ready to bake, pre-heat your oven to 550 degrees F. and prepare it for steam.  I have a heavy-duty baking pan on the bottom rack of my oven with 1 baking stone on above the pan and one on the top shelf.  I pour 1 cup of boiling water in the pan right after I place the dough in the oven.

Right before you are ready to put them in the oven, score as desired and then add 1 cup of boiling water to your steam pan or follow your own steam procedure.

After 1 minute lower the temperature to 500 degrees and after another 3 minutes lower it to 450 degrees.  Bake for 25-35 minutes until the crust is nice and brown and the internal temperature of the bread is 210 degrees.

Take the bread out of the oven when done and let it cool on a bakers rack before for at least 2 hours before eating.

DSC_0015

DSC_0021

b166er's picture
b166er

Chocolate Croissant Dough Issues

My base croissant dough is as follows. Its a very firm dough. I do the first two folds back to back. Let it rest about an hour, chilling, in between the 2nd and 3rd folds. Its pretty durable and thus far, Im really happy with the proportions.

So, I tried it with 10% less flour (10% from each AP and Bread) and the choco dough doesn't get the same gluten development and tears on the 2rd fold. Pretty badly. Should I have removed the 10% from the AP only and left the bread flour the same?

Bread Flour - 28%

AP Flour - 25%

Cocoa - 6%

Instant Yeast - .8%

Sugar - 7%

Salt - 1%

Malt Syrup - .5%

Butter (not roll in) - 2.5%

Milk - 13%

Water - 16.5% 


dabrownman's picture
dabrownman

BBD #84 - Six Sprouted Grain Sourdough With Toasted Buckwheat Porridge

Six Sprouted Grain Sourdough With Toasted Buckwheat Porridge – A Great Everyday Sandwich Bread

Bread Baking Day #84 is sandwich bread – hosted here https://magentratzerl.net/2016/06/06/bread-baking-day-84-sandwichbrot/ is kochtopf’s monthly bread challenge http://www.kochtopf.me/bbd-breadbakingday.  Sandwich bread means different things to different people and can even mean different things to the same person over the course of their lifetime.

When I was kid growing up it meant Wonder Bread – for sandwiches at lunch and toast for breakfast.  My dad worked at Continental Bakers in KCMO so we got day old Wonder Bread for free.  Even day old it was just great and a week later still fresh as could be – a real wonder.  It was the king of white, enriched, yeast, sandwich bread – nothing was even close or sold nearly as well.  Kids all over America grew up on it for decades.

With the onset of age, diabetes and learning how to make SD bread, sandwich bread is something totally different than Wonder Bread for me now.  But, one thing remains the same, most all of the bread I make today is still made for sandwiches and toast.  Amazing how some things change like the kind of bread we eat and some things remain the same like eating sandwiches and toast.

Poor health can really make a person change their food choices for the better.  No more white, enriched, yeast, sandwich breads for me – it just is not allowed.  The most important thing for diabetics is to avoid carbs and sugar of all kinds, exercise and use portion control to lower body weight.  After losing 50 pounds by walking 4 miles a day, I can have 1 slice of bread per meal as long as it is the right kind of bread.

The right kind of bread is whole grain, sprouted, sourdough bread that lowers, spreads out and slows down the blood sugar load of yeasted white bread for diabetics.  You still can’t have more than a slice so, if you are like me, you just learn to cut it in half and have half a sandwich for lunch and 1 slice of bread for breakfast toast.

It’s no big whoop since you have to eat less to keep your weight down anyway and exercise is the most difficult to actually do…… especially when it is 115 F outside like here in Arizona.  Still, this bread isn’t really one that would fit the bill.  It is only 30% whole grain.  Even though the whole grains are all sprouted and there is another 10% whole buckwheat in the porridge, at 40%, it doesn’t meet our usual standard of at least 50% whole grains for what we call white, sandwich bread around here.

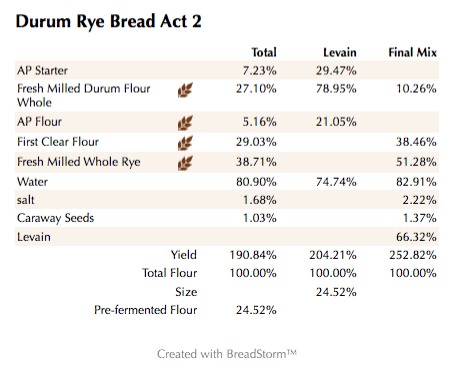
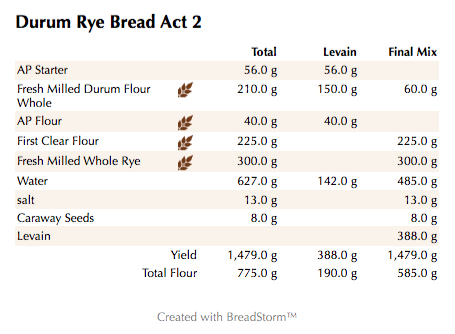
For many folks, this bread would be a suitable white, sprouted, multigrain, sourdough sandwich bread that would be a healthier and heartier choice for toast and sandwiches.  The 6 sprouted grains were white and red hard wheat, rye, spelt, oats and barley.  Barley is a great choice for diabetics because it has the lowest GI of any cereal grain.  They were sprouted for 21 hours before drying and milling.

The 24% extraction hard bits were used for the 2 stage bran levain where the hard bits were used for the first 4 hour stage and the high extraction 6 sprouted grain flour was used for the 2nd feeding.  The levain was stirred down at the 8 hour mark, doubled at the 12 hour mark and was retarded overnight.  The SD seed was 10 g of 26 week retarded NMNF stiff, rye sour.  The levain was 100% hydration with 14% pre-fermented flour

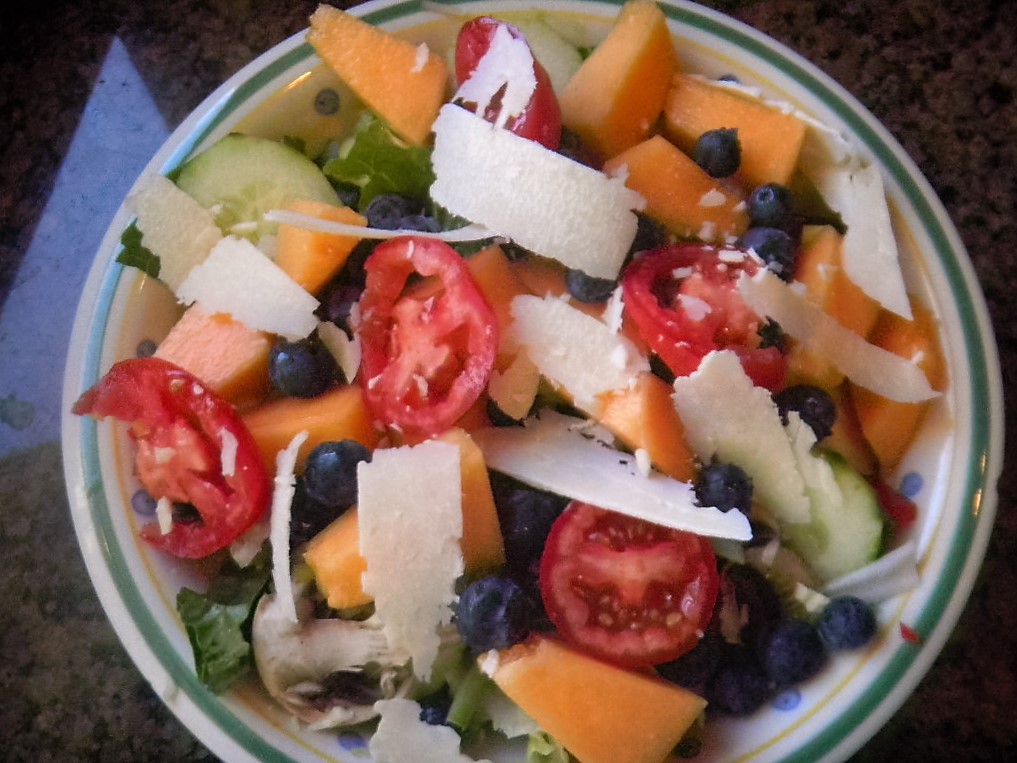
In KCMO we gew nup eating Wonder Bread with ribs.  But now we can have this bread with them and a salad too!

We stirred down the levain when it was taken out of the fridge the next morning.  The dough flour of the remaining high extraction, sprouted, 6 grain and Winco bread flour, was autolysed with the dough water and 2% Pink Himalayan sea salt sprinkled on top.  We then toasted the 10% buckwheat groats in a dry pan until golden brown.  Then we added twice their weight in water and simmered it for 5 minutes before turning off the heat, covering and letting the porridge cool.


After an hour of autolyse, the levain had risen 25%.  We stirred in the salt and then added the levain to it, stirred it in and did 30 slap and folds to incorporate the levain into the dough and begin the gluten development.  Overall hydration was 75% making the slap and folds just bit stiffer than normal.  We did 2 more sets of 8 slap and folds all on 20 minute intervals.

We did 3 sets of stretch and folds where the buckwheat groat porridge was added during the first set and thoroughly incorporated by end of the 3rd set.  Stretch and folds, of 4 stretches each,  were also done on 20 minute intervals.   After a 20 minute rest, the dough was pre-shaped and then shaped into a squat oval and placed seam side up into a rice floured oval basket.  The dough was bagged and placed into the fridge for a 16 hour cold retard.

Usually the bread fully proofs in the fridge but this one was A bit slow so we let it proof for 2 hours on the counter.  We preheated the oven with the CI combo cooker inside to 500 F. We un-molded the dough onto parchment on a peel, slashed it down the middle lengthwise and slid it onto the CC.  We steamed the dough under the lid for 18 minutes at 450 F.

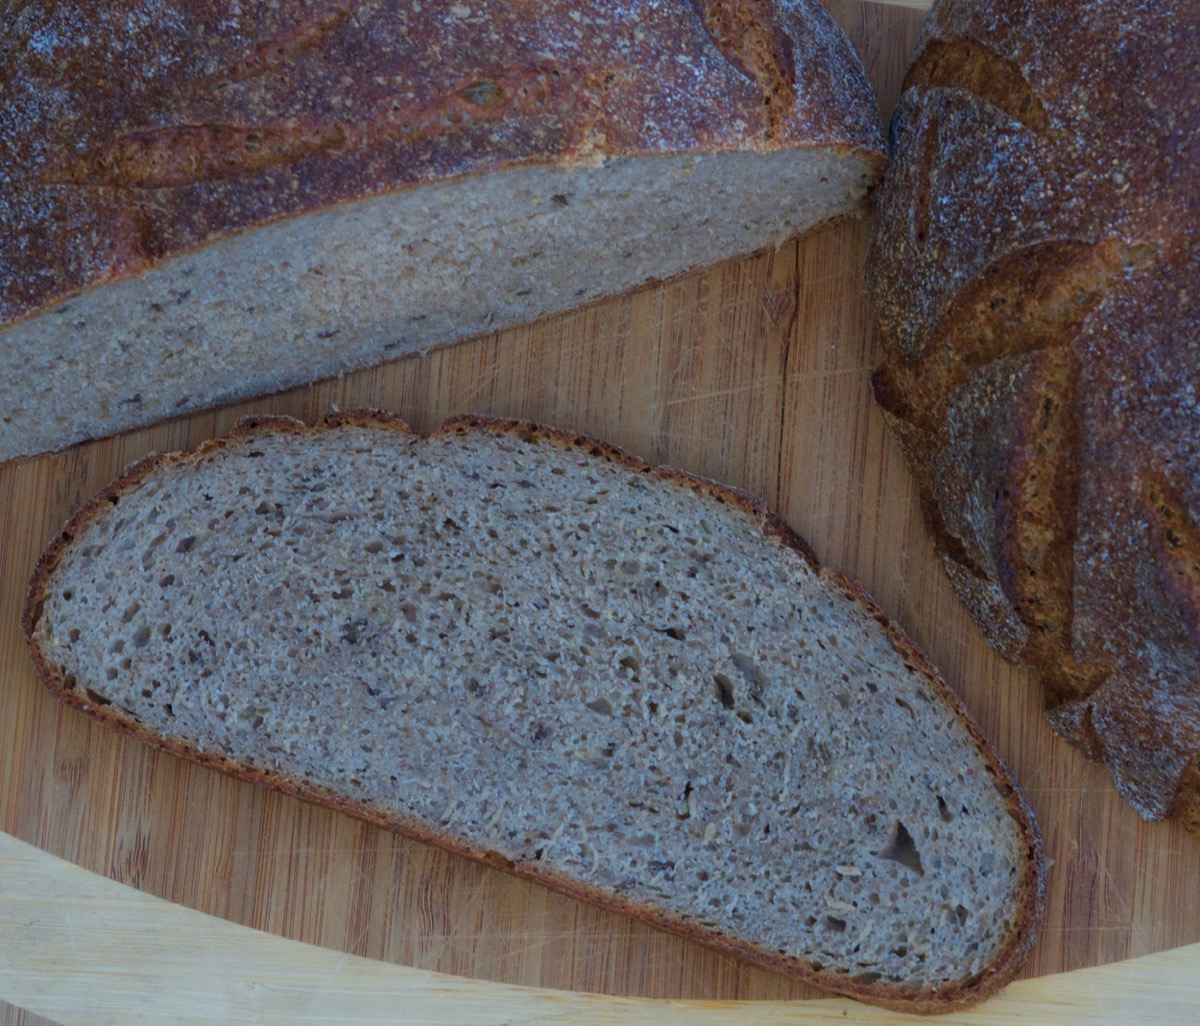
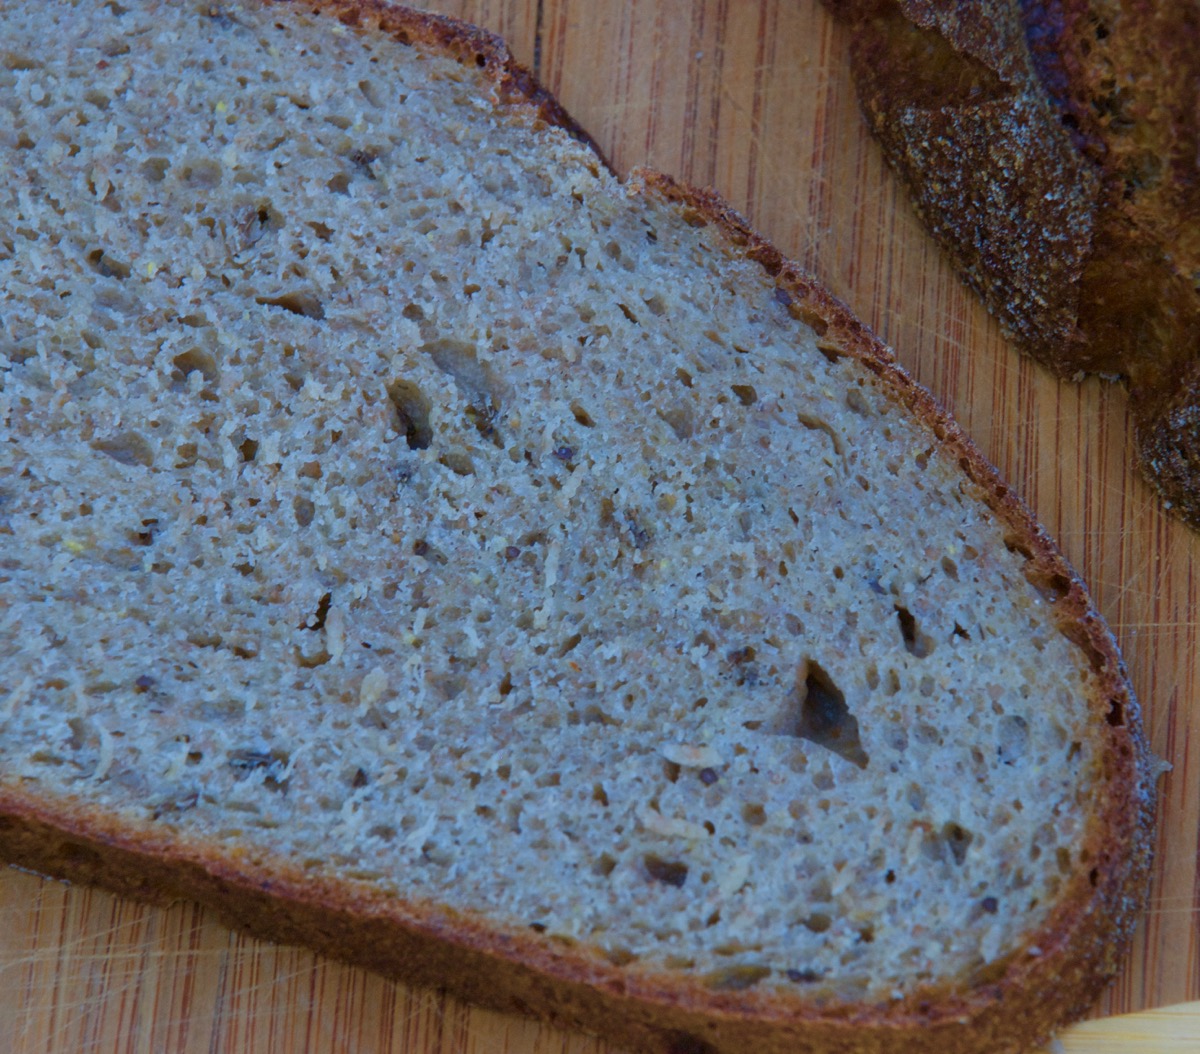
Once the lid came off, we continued to bake the bread for 5 minutes at 425 F convection and then took the bread off the bottom of the combo cooker and continued to bake the bread on the bottom stone for 10 more minutes until it reached 209 F.  It bloomed, sprang, blistered and browned well.  It was also soft, moist and open on the inside.

The taste was the best part though and the highlight of the bread.  Earthy, hearty and healthy are the hallmarks of sprouted mult-igrain breads.  The Buckwheat Toadies providing the extra aroma and flavor.  As usual, this bread was a bit more on the sour side than a normal white SD bread due to the NMNF starter and the bran levain build.

Iy is almost monsoon season again.

The extra sour really stands up too the full flavor of the sprouted grains and Buckwheat Toadies. I t is about the most delicious white sandwich bread you can make…..and you can’t buy it anywhere so you will have to make it to enjoy this bread with your favorite filling as a sandwich!

Formula

2 Stage 12 Hour Levain - 14% pre-fermented flour at 100% hydration made from 26 week retarded 10 g of NMNF stiff rye starter, with 24% extraction sprouted bran for the first build and high extraction 6 sprouted grain for the 2nd build.  Levain is then retarded overnight when it doubles after the stirring down at the 8 hour mark. In our case we made 130 g of bran levain.

Overall

30% - 6 grain sprouted flour – red and white wheat, oat, barley, spelt and rye

70% - Winco bread flour from the bins

10% - Toasted buckwheat with 20% water made into a porridge.

2% Pink Himalayan sea salt

All of the bran levain  

Thanks to Job for posting the link to BBD #84


Truth Serum's picture
Truth Serum

Phyllo Dough Technique

I thought this was a fascinating technique to make phyllo dough

https://www.youtube.com/watch?v=L-5vx98tvnA

Has anyone out there tried this?

MontBaybaker's picture
MontBaybaker

clay baker - cold oven - why did loaf flatten?

Just baked Mr. Forkish's Overnight White Bread, using a round Sassafrass, 9" banneton (maybe slightly too large for 900 gm dough), and for the first time tried a cold oven start.  Substituted 15% fine, freshly ground oat flour.  78% hydration, 13-hour bulk ferment.  Nice bubbles, not a slack dough (easily handled); tried to score quickly and deeply.  Put loaf on parchment on cold base, scored, put on lid, placed in cold 475 degree oven and didn't peek for 25 minutes.  When I removed the lid, the loaf had really flattened (photo failed).  Back in the oven and amazingly it rose another 1-12" and browned, but my score lines vanished & are even.  I don't think it was overproofed (put in oven before then, no air pocket under the crust, and crust is not wrinkled).  I've overproofed a few times and think I did OK this bake.  

Did the loaf flatten out somewhat because of a) all the steam created by having the lid on, or b) the cold oven start, or c) ??.  Crust is nice and crispy, flavor is good.  Would just like the loaf to have retained the height and scoring.  All ideas are appreciated!

 How do I add more than 1 image for the post?


Pages