The Fresh Loaf

A Community of Amateur Bakers and Artisan Bread Enthusiasts.

Most bookmarked

cor's picture
cor

Blitz puff pastry for pie crust? Yes!

Hi everyone,


Seems like EVERYONE making pies is looking for the flaky pie crust, layers and layers that fall apart as you cut into it.  Why, then, are cookbooks and tutorials filled almost exclusively with shortening crusts where Crisco is broken into tiny, tiny "pea-sized" shapes and the dough is kneaded until it's nice and smooth.  And even the same for butter crusts, cutting and cutting the butter until it resembles "cornmeal." I'm never impressed.  After working in a bakery for a bit, I decided to do a little experimenting.  I liked the recipes for basic pate brisee, but wanted something a little flakier.  Much flakier.  Blitz puff pastry.


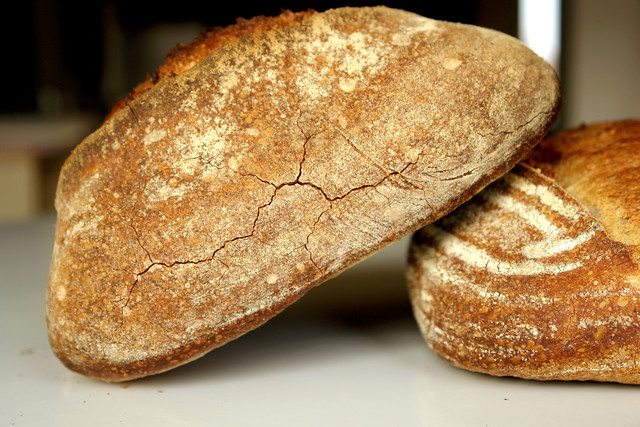
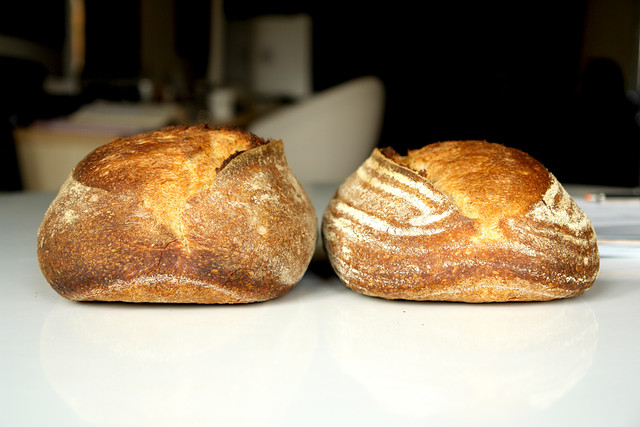
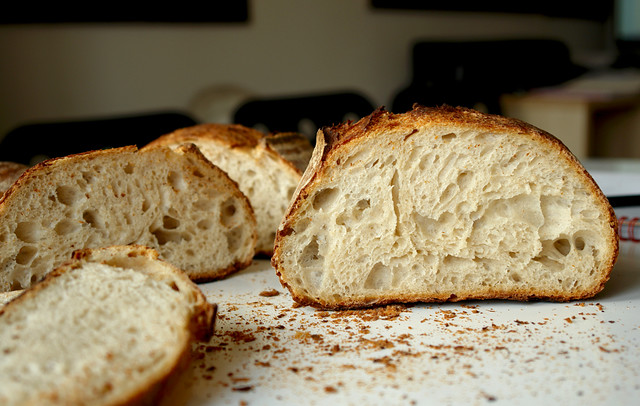
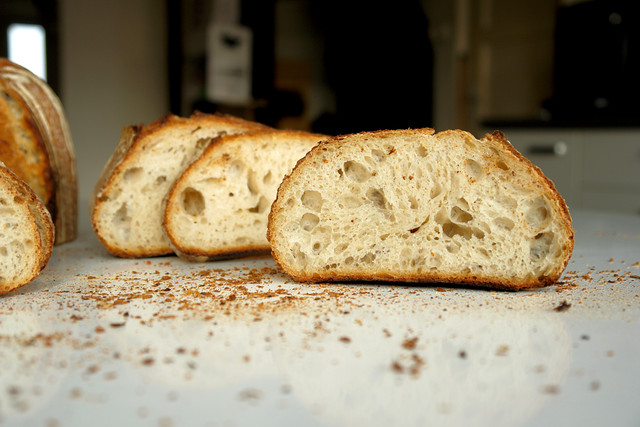
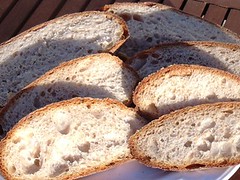
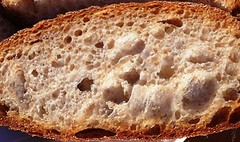
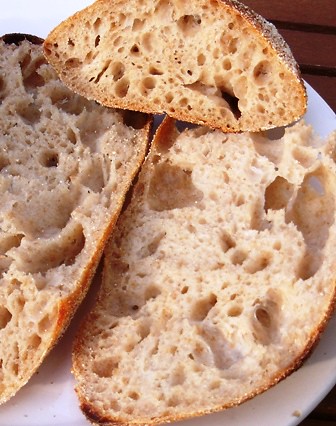
Blitz puff pastry, flakier than regular pie dough but not as flaky and puffy as the classic version.  We all know it, but I don't think it's thought of for use as pie crust.  It has everything you want.  A thousand layers that flake as you cut into it, they melt in your mouth as soon as you bite into it.  So, why not use blitz puff pastry?  Why is it never mentioned when discussing pie crusts? It works, it makes pie crust flaky, and it's simple.  Here's my recipe, adapted from The Professional Pastry Chef (Friberg).


Makes enough for 2 or 3 pie shells

570 g King Arthur AP flour

570 g cold butter

1 1/2 teaspoons salt

180 mL cold water


1. Whisk the flour and salt together in a stand mixer bowl.

2. Cut the butter into large, 1-inch by 1-inch cubes.  Add to the flour mixture.  Mix on lowest speed for about 20 to 30 seconds with the paddle attachment until the butter is flattened (it will look like thick sheets).  Stop the mixer and push any remaining unflattened cubes of butter between two fingers until they become flat.  The butter should still be in very large, flat pieces.

3. Add the water all at once.  Mix on lowest speed for 15-20 seconds, until the dough is BARELY coming together.  It will be an absolute shaggy mess of big sheets of butter, wet pieces of dough and dry flour mixture.  STOP mixing at this point and empty the bowl onto a clean, lightly floured countertop.

4. Using your hands, gently form the mass into a very rough rectangle, maybe 5 inches by 9 inches or so (and 1 to 2 inches thick).  It will still be a shaggy, wet, dry, butter cubed mess at this point.  That is perfect.  Let it rest on the counter for 10 minutes.

5. Here it's a little tricky.  Using a bench knife, collect any dry/wet errant pieces on the sides of the rectangle of dough and add them to the top of the dough.  Using a rolling pin, roll the dough out to a larger rectangle 3/4 inch or so thick, flouring lightly as needed.  Use the bench knife as needed to coaxe renegade scraps of dough back onto the mass.  It will still be shaggy at this point.  Give the dough a 3-fold as best as you can, as you would with croissant dough.  Immediately perform 2 more 3-fold turns, followed by one 4-fold turn, all the while adding to the rectangle any dry or wet pieces that fall off.  By the end of the final turn, the dough will be mostly smooth and completely incorporated.  You should see large sheets of butter throughout the dough.  DO NOT add any extra water at anytime throughout this process.  

6. Perhaps the most important step.  Wrap the dough and chill in the refrigerator for at least 2-3 hours, until the dough is very firm.  The butter must be thoroughly chilled at this point to create the layers you desire.  

7. Roll out the dough gently and use as you would any other pie dough, being careful to handle it gently so as to preserve the layers of butter and dough (never push on the dough with your hands or fingers).  (Note: I find that using disposable aluminum pie tins yield much more tender and flaky crusts than ceramic or glass ones, which seem to bake the crust too quickly and leave it hard and tough).


Next time you're making a pie, consider it.  Tell me what you think.  Use this recipe or one of your own and try lining your pie tin with blitz.  I'm eating a blitz puff pastry pie right now.
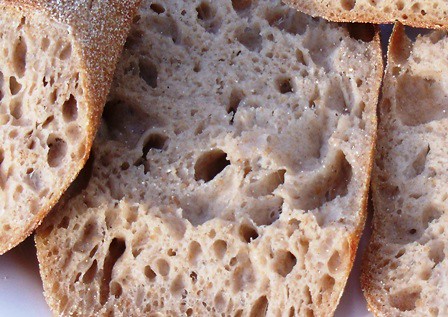
 

The result?


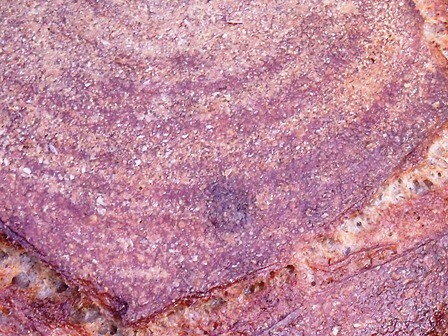
a bite-sized piece from the crimped edges of a pecan pie


Szanter5339's picture
Szanter5339

The best bread!

The best bread!
My favorite white bread, 24-hour leaven.
Beautiful foreign and domestic, and very tasty too!

Wyatt's picture
Wyatt

Interesting research article about the Gluten reducing qualities of Natural sourdough fermentation

Before I say anything this article should be taken as INFORMATIONAL ONLY!!!!!!. I don't want to imply that persons with Gluten sensitivity can consume breads from grains containing gluten simply because they have undergone a sourdough fermentation.

The following link details a study done in Italy showing reductions in Gluten, showing original gluten at almost 75000 ppm, reduced to 12 ppm after sourdough fermentation. It shows hope of new sources of nutrition, from sources such as wheat, rye etc, for Gluten intolerant persons.

The methods mentioned in this article are way beyond the home enthusiest, at least any that I know of.

I originally posted this in the sourdough section but thought it might be of some interest here.

http://www.ncbi.nlm.nih.gov/pmc/articles/PMC1932817/

grisdes's picture
grisdes

Aunt'Lillians Apple Cake

Hi everyone:


First of all, thank you so much for the responses to my inquiry about "powder bakers milk", like someone already said, this site is a wealth and well of useful information.

I came accross people talking and raving about Aunt Lillian's Apple Cake, is it possible to kindly share the recipe? I have quite a bit of different apples.


Again thank you so much and Happy Thanksgiving!

codruta's picture
codruta

Sourdough Ciabatta and San Francisco Sourdough

These are both "a first time" for me. I never made ciabatta before, and I never made SFSD before. The formula I used for ciabatta was from Txfarmer blog, the one that is made in 36 hours (I made in 40 hours), and I was so pleased with the result, I baked it twice, one after another. First time with some whole wheat in it, and second time with some rye and wheat germs, toasted. I'll defenitely make this formula again, I still have to learn when to stop the fermentation and how much to develop the gluten before putting the dough in the fridge. I'm happy with the result, but I based my work on instinct, without having a clue if I'm doing right or wrong what I'm doing.

Pictures from the first batch:

 and from the second batch


San Francisco started with David's formula from "Crackly crust and shiny crumb SFSD form AB&P" (I don't have the book, yet, but after this bread I'll save some money to buy it) - link to David's post here. I increased slightly the rye percent in the formula and I added some durum flour, and the resulting bread is extraordinary. I never tasted a true San Francisco sour, so I can't compare, but I think this bread is the best I've made so far (in white bread category). It's moderate sour, and the crust is deliciously flavored, and the crumb is cool and silky. I am very very happy I made this bread, all my good thoughts went to David everytime I ate a slice of bread.

pictures with the crust:

and with the crumb:


 Happy baking everyone! Thank you TFL members for being here.

codruta

PS. If someone is interested, more pictures and complete recipe can be found on my romanian blog, link for ciabatta here, and link for SFSD here.

varda's picture
varda

Lexington Sourdough

A few weeks ago, I gave up on the starter I'd been tending and using for over a year, and made a new one from scratch.  Instead of trying to nurse my old starter back to health, I reminded myself that despite the considerable mystique attached to it, it's really not that hard to get a starter going - particularly a wheat one - assuming a sufficient degree of attention and patience.   I finally got it going and I've been baking with it for around 2 weeks.   I have not been disappointed, as I think I had just got used to an underperforming starter and had forgotten how a healthy starter behaves.  

At the same time I've been trying to shed same old same old practices and develop a formula that everyone in the family liked, that was repeatable, and relatively easy, so I could use it as daily bread.    I borrowed from this and that and here and there, and thank gods (I've been watching Battlestar Galactica) I think I've got it.  

The formula has a bit of spelt, a bit of rye, and the rest wheat.   I used wheatgerm and malt powder (Thank you Lumos) which seem to have a good effect but I'm not sure which does which.    The resulting bread bridges the difficult gap between light and substantial, has a light crispy crust, keeps for a few days (assuming it doesn't get eaten first) has a mild balanced flavor and isn't too holey for sandwiches.   I've made it a couple times, and it seems to be repeatable. 

But now, my biggest problem - how to keep from fiddling this to death.   I think the best way to do it is to name it but Sourdough with Spelt and Rye just seems boring.    Ergo Lexington Sourdough which is pretty boring as well.   Any tips on how to name breads?  

And now it's time to switch focus to biscuits, cornbread and pie.   Thanksgiving is nigh!

The formula:

Starter

Seed

Feeding

Total

Percent

Seed

168


Bread flour

92

95

187

95%

Whole wheat

2


2

1%

Whole rye

4

4

8

4%

Water

69

130

199

101%


397


Final

Starter

Total

Percent

Bread flour

450

135

585

84%

Whole rye


6

6

1%

Whole wheat


2

2

0%

Medium rye

50


50

7%

Spelt

50


50

7%

Water

310

143

453

65%

Salt

13


13

1.9%

Starter

286


21%

Malt powder

10


Wheat germ

15


Method:

Take ripe sourdough - around 70% hydration - from refrigerator (should be domed and pitted) and feed as above to 100% hydration.   Ferment on counter (around 69degF) for around 7 hours until very active and bubbly.  

Mix flour and water by hand and autolyse for 30 minutes.   Add the rest of the ingredients and mix in stand mixer for 5 minutes starting at low speed and working up to highest speed.   Dough should adhere into a smooth mass during the mix.   Stretch and fold on counter twice during 2.5 hour bulk ferment.    Cut and preshape into two rounds.   Rest for 20  minutes.   Shape into batards and place in couche seam side up.   Refrigerate for 10-15 hours.   Place on counter and proof for 1.5 hours until dough starts to soften.   Bake at 450F for 20 minutes with steam, 20 minutes without.  

ananda's picture
ananda

Shoyu-Roasted Seed Bread; Pain de Campagne; Ciabatta; Rossisky, Panned Wholewheat Bread

Shoyu-Roasted Seed Bread; Pain de Campagne; Ciabatta; Rossisky, Panned Wholewheat Bread

This baking session took place over 3 days, beginning on Saturday at the start of the weekend, ending Monday afternoon.

I didn’t have any wood prepared, so the breads were baked in my SMEG electric oven.   I mixed the doughs on Saturday evening and retarded overnight, then baked off throughout Sunday.   The hunt for wood is now complete; I am ready to collect tomorrow!

I used both rye sourdough and wheat levain in each dough.   Each culture was given 3 refreshments from Friday night through to Saturday evening, each beginning with 40g stock.   I ended up with 900g of wheat levain and 600g of rye sour.

Formulae, recipes and methods shown below:


  1. 1.    Shoyu-Roasted Seed Bread

Material/Stage

Formula [% of flour]

Recipe [grams]

1a. Built Wheat Levain


Carrs Special CC Flour

10

150

Water

6

90

TOTAL

16

240

1b. Built Rye Sourdough


Bacheldre Organic Dark Rye Flour

12

180

Water

20

300

TOTAL

32

480


2. Final Dough


Wheat Levain [from 1a.]

16

240

Rye Sourdough [from 1b.]

32

480

Carrs Special CC Flour

65

975

Allinsons Strong Wholemeal

13

195

Shoyu-Roasted Pumpkin Seeds

8

120

Shoyu-Roasted Sunflower Seeds

8

120

Shoyu-Roasted Sesame Seeds

5

75

Shoyu-Roasted Blue Poppy Seeds

5

75

Salt

1.8

27

Water

50

750

TOTAL

203.8

3057


% overall pre-fermented flour

22

-

% overall hydration on flour

76

-

% seeds to flour

26

-

% wholegrain flour

25

-

FACTOR

15

-


Method:

    • Weigh all the seeds into a roasting dish, mix through by hand, sprinkle over with shoyu, and roast under the grill until well-browned.   Turn the seeds in order to prevent burning.   Set to one side.
    • Weigh the rye sourdough, white and wholewheat flour and the water into the mixing bowl.   Attach the dough hook and mix 3 minutes on first speed to combine.   Cover and autolyse for 1 hour.
    • Add the salt and wheat levain and mix for 2 minutes on first speed.   Scrape down and mix a further 2 minutes on second speed.   Add the seeds and mix for 5 minutes on second speed until the dough is developed to pass the window pane test.
    • Retard the dough overnight in the chiller.
    • Bulk proof for 1 hour, then stretch and fold.   Rest 15 minutes.
    • Scale and divide: I made 2 loaves in bannetons @ 500g and 1 @ 709g and four pieces @ 337g for a panned loaf in a Pullman Pan.   Mould all the dough pieces round and rest, covered, for 20 minutes.
    • Re-mould the loaves for bannetons, brush tops and sides with water, and dip in a mixture of all four seed types.   Place upside down in prepared bannetons.   Shape each piece, repeat method for dipping in seeds and place sideways on in the Pullman pan.   Set to prove.
    • Proof for 3 hours, covered.
    • Bake the hearth loaves with steam in a pre-heated oven [280°C for one hour] at 235°C for 10 minutes.   Switch over to the convection setting, and bake at 210°C [30 minutes for the large loaf and 20 for the smaller ones.]   Load the Pullman Pan at 250°C with generous steam.   Drop the heat to 200°C and bake out for 1 hour.   De-pan.
    • Cool all the breads on wires.


  1. 2.    Pain de Campagne

Firstly, apolgies for using 2 decimal places for the % in the formula.   It just took me a while to get it to balance.   Using a factor of 13.1 really did not help!

 Sadly, no French flour in the formula, but we tasted this bread for lunch, just 3 hours after baking, and it tasted so good.   The new electric oven gives such a great crust!   The photographs demonstrate very good crumb quality too.

Material/Stage

Formula [% of flour]

Recipe [grams]

1a. Built Wheat Levain


Carrs Special CC Flour

28.63

375

Water

17.17

225

TOTAL

45.8

600

1b. Built Rye Sourdough


Bacheldre Organic Dark Rye Flour

1.37

18

Water

2.29

30

TOTAL

3.66

48


2. Final Dough


Built Wheat Levain [from 1a. above]

45.8

600

Built Rye Sourdough [from 1b. above]

3.66

48

Carrs Special CC Flour

45.8

600

Allinsons Strong Wholemeal

20.53

269

Bacheldre Organic Dark Rye Flour

3.66

48

Salt

1.76

23

Water

49.31

646

TOTAL

170.52

2234


% overall pre-fermented flour

30

-

% overall hydration

68.78

-

% wholegrain flours

25.57

-

FACTOR

13.1

-


Method:

  • Weight the water, rye sourdough and the flours into the mixing bowl.   Use a hook attachment and mix on first speed for 3 minutes.   Cover and autolyse for 1 hour.
  • Add the levain and salt and mix two minutes on first speed and 7 minutes on second speed, scraping down the bowl as necessary.   The dough will pass the window pane test.
  • Retard the dough overnight in the chiller.
  • Bulk proof for one hour the stretch and fold.   Rest 15 minutes.
  • Scale and divide: I made one loaf @ 950g and one @ 1284g.   Mould round and rest 15 minutes.   Re-mould and place upside down in prepared bannetons.
  • Final proof for 3 hours.
  • Pre-heat the oven to 280°C.   Tip out each loaf, score the top of the loaf and set on the baking stone.   Apply steam.   Bake at 235°C for 15 minutes.   Turn the heat down to 210°C, move to convection setting and bake out a further 30 minutes for smaller loaf and 45 minutes for the larger one.
  • Cool on wires.


Leaven and sour had been rebuilt over the course of Saturday and Sunday ready for more dough to be mixed Sunday evening for baking off on Monday.   I made the following:


  1. 3.    “Wholemeal” Panned and Boule Loaves

Made with a white wheat levain at 25%, and the remaining 75% of the flour is wholemeal, added to the final dough.

Material/Stage

Formula [% of flour]

Recipe [grams]

1. Built Levain


Carrs Special CC Flour

25

333

Water

15

200

TOTAL

40

533


2. Final Dough


Built Levain [from 1 above]

40

533

Allinson’s Strong Wholemeal

75

1000

Salt

1.8

24

Water

54.8

730

TOTAL

171.6

2287


% overall pre-fermented flour

25

-

% overall hydration

69.8

-

% wholegrain flours

75

-

FACTOR

13.33

-


Method:

  • Combine the water and flour in the mixing bowl, and mix on first speed using the hook attachment for 3 minutes.   Autolyse for one hour.
  • Add the levain and salt, mix for 2 minutes on first speed and 7 minutes on second speed until developed.   Scrape down as required.   The dough should pass the window pane test.
  • Retard overnight in the chiller.
  • Bulk ferment for one hour with one S&F.
  • Scale and divide: 4 x 390g pieces for a “four-pieced” Sandwich loaf in the Pullman Pan, plus the remainder made as a “Boule” in a round brötform.
  • Mould round, then rest 20 minutes.   Shape and place dough pieces in tin/brötform.
  • Final proof 3 hours.
  • Bake the boule in a pre-heated oven with steam, at 250°C no fan, for 10 minutes.   Switch to convection and bake at 235°C for 20 minutes, then drop to 210°C and bake out a further 15 minutes.   For the Sandwich loaf, load the oven pre-heated to 220°C, use steam, and bake for 1 hour with the lid on.
  • Cool both loaves on wires.


  1. 4.    Ciabatta

Material/Stage

Formula [% of flour]

Recipe [grams]

1a. Built Wheat Levain


Carrs Special CC Flour

28.125

180

Water

16.875

108

TOTAL

45

288


1b. Built Rye Sourdough


Bacheldre Organic Dark Rye Flour

9.375

60

Water

15.625

100

TOTAL

25

160


2a. Final Dough -Bassinage


Wheat Levain [from 1a above]

45

288

Rye Sourdough [from 1b above]

25

160

Gilchesters Organic Ciabatta Flour

62.5

400

Salt

1.72

11

Water

35.47

227

TOTAL

169.69

1086


2b. Final Dough


Bassinage [from 2a above]

169.69

1086

Water

11.25

72

TOTAL

180.94

1158


% overall pre-fermented flour

37.5

-

% overall hydration

79.22

-

FACTOR

6.4

-


Method:

  • Combine levain, sourdough, flour, salt and water for 2a in the mixing bowl. Attach the hook and mix for 2 minutes on first speed and 5 minutes on second speed.   Scrape down as needed.   Add the remaining water, attach a paddle beater instead of the hook.   Mix 1 minute on first speed, then 3 minutes on second speed to let down the dough.   Retard overnight in the chiller.
  • Give 3 stretch and folds to the dough and bulk proof 1 hour.
  • Scale and divide 4 pieces just short of 290g.   Gently shape into the “slipper” shape, and set to proof using a heavy linen cloth.   Scatter well with Semolina, and create channels for the loaves to prove “en coûche”.   Final proof 2 hours.
  • Pre-heat the oven to 280°C for 1 hour.   Set the first 2 loaves onto the bakers stone, apply steam and bake without fan at 250°C for 6 minutes.   Switch to convection and drop the heat to 235°C for 10 minutes.   Finish a further 2 – 3 minutes at 220°C if necessary.   Repeat with the other 2 loaves.
  • Cool on wires.


  1. 5.    “Rossisky” Russian Rye Bread

Using all rye flour and the 3-stage process.

Material/Stage

Formula [% of flour]

Recipe [grams]

1a. Built Rye Sourdough


Bacheldre Organic Dark Rye Flour

30

120

Water

50

200

TOTAL

80

320


1b. Soaker


Bacheldre Organic Dark Rye Flour

15

60

Red Malted Barley Flour

5

20

Salt

1.5

6

Boiling Water

35

140

TOTAL

56.5

226


2. Sponge


Rye Sourdough [from 1a above]

80

320

Soaker [from 1b above]

56.5

226

TOTAL

136.5

546


3. Final Paste


Sponge [from 2 above]

136.5

546

Bacheldre Organic Dark Rye Flour

50

200

TOTAL

186.5

746


% overall pre-fermented flour

30 + 20 = 50

-

% overall hydration

85

-

FACTOR

4

-


Method:

  • Make the soaker 3 hours ahead of use.   Pour the boiling water onto the flours and salt and stir thoroughly to mix.
  • Combine the soaker and sourdough to form the sponge.   Ferment overnight.
  • Add the remaining flour to form the final paste.
  • Bulk ferment for 1 hour, covered.
  • Shape with wet hands and drop carefully into a pre-lined baking pan.
  • Proof for 3 hours.
  • Bake for 1 hour 15 minutes at 160°C with steam on the convection setting for the oven.
  • Cool on wires.


Notes.

  • The seed breads are full of flavour; my friendly neighbours across The Square persuaded me to let them buy one of these loaves.   They were back again today having eaten the whole loaf, and back to buy some of the ciabatta.
  • The Pain de Campagne has lovely crust and crumb.   The flavour is not over-powering, but deep and complex thanks to using a combination of 2 leavens plus generous amounts of wholegrain flour plus overnight retard.   My ideal “everyday” bread; can be used for any type of eating experience.
  • The wholemeal bread was a pleasure to make.   The grist is 75% wholewheat.   The crumb is lovely and soft and light too; ideal for sandwich bread.   Plenty of oven spring evident too!
  • The ciabattas have turned out well, as they are genuinely only made with levain, no yeasted Biga in site.   There is high proportion of pre-fermented flour, and the rye component of this makes up nearly 10% of the total flour too!   Additionally, the Gilchester Pizza/Ciabatta flour could hardly be described as “White”.   It is milled beautifully fine, but quite a lot of goodies have evidently been retained when milling.
  • No photos of the Rossisky, sorry.   It was last out of the oven, and I lost my chance to get decent photos as the light goes away very quickly round these parts in the depths of autumn.   It ended up a lovely dark colour, with pronounced sweet and sourness; always a highly flavoured bread.
  • These loaves [or some of them, anyway], are bound for a “Wine Tasting” evening over at nearby Ingram Hall on 2nd December.   The couple hosting the event do much of the marketing and selling for Doddingtons Cheese, which is made just a few miles up the road from where we live.   I met them at the Powburn Show and they seemed keen to try to forge links for the future.   Time to telephone them and let them know what I have managed to produce.

Best wishes to all, and, Happy Baking!

Andy

grisdes's picture
grisdes

Bakers milk powder

Where can I found bakers milk powder? I'm referring to the recent recipe for oat whole wheat bread.
Gracias

MarieH's picture
MarieH

Oat and Wheat English Muffin Loaf

I have been tinkering with an oat and whole wheat english muffin loaf for quite a while. I used to make this recipe with AP flour but now we try to eat only whole grain baked goods. This is my latest tinker and I am quite happy with the results. I increased the water for a higher hydration loaf hoping to get bigger nooks and crannies to better simulate an english muffin. The recipe follows the pictures. Happy baking!

  •  6 oz (1 1/2 cup) whole wheat flour
  •  6 1/2 oz (2 cups) oat flour
  •  1 TBS sugar
  •  2 tsp salt
  •  3/8 tsp baking soda
  •  4 1/2 tsp instant yeast
  •  2 oz (1/2 cup) bakers milk powder

Stir together in a large bowl.

Note: If you don't have oat flour, you can grind old-fahioned oatmeal in a food processor until flour-like.

  • 19 1/2 oz water
  • 2 oz orange juice

Heat until 120-130 degrees and add to the dry ingredients. Beat well with a wooden spoon to make a smooth batter. Batter will be quite thin.

  • 10 oz (2 1/2 cups) whole wheat flour

Add and stir in until well blended to make a loose batter. Adjust with water or flour to the consistency of muffin batter.

Grease and sprinkle with cornmeal two 5”x 8” bread pans. Divide batter evenly between the pans and lightly smooth tops with a spatula dipped in water. Lightly sprinkle top of batter with cornmeal.

Cover and let rise in a warm place for 30 - 45 minutes until about 1/2 inch above the top rim of the pan. Batter will be very puffy.

Bake at 400 degrees for 25 minutes. Remove from pans immediately and cool on a rack.

Because this bread has no fat, it should be used in a day or two. It freezes very  well and can be put in the toaster without thawing.

raqk8's picture
raqk8

Building Your Starter - Day 1

Happy Saturday! I know you’re excited. What better way is there to spend your Saturday than by making some sourdough?!? Not much I can think of.

Yesterday, I told you all about what exactly a sourdough starter is, and how easy it is to grow one! Today, we’ll begin the process of growing your very own wild yeast culture.

Let’s start with finding a place to keep your starter, preferably something with transparent sides. Both plastic and glass are okay, but don’t use metal. The fermentation of the starter will corrode the metal and can ruin your bowl over time and make your starter taste metallic.

I decided to go for a recycled pasta sauce jar. They’re nice because you can easily see if your starter has had any activity. Whatever you decide to store it in, make sure it’s not air-tight. You can cover it with saran wrap and secure with a rubber band or you can use a tupperware and poke a hole in the lid. I just stabbed the lid of my jar and that works just as well.

The next thing you want to do is weigh the empty container.....

Please see the original post at Ovenmittsblog.com for the whole tutorial!

Thanks, and have a great Saturday!

Raquel

Pages