The Fresh Loaf

A Community of Amateur Bakers and Artisan Bread Enthusiasts.

Most bookmarked

cranbo's picture
cranbo

Opinion on a few flours?

So I've made a connection thru a local restaurant that should help me get access to bulk flours. I'm definitely going to buy 1 50lb bag of GM Harvest King Flour, but I'm interested on any opinions on the following flours:

  • Giusto All Purpose Enriched Unbleached Flour
  • Pendleton Power high-gluten
  • GM Rye Flour

Any feedback appreciated, thanks in advance folks. 

flournwater's picture
flournwater

Hadn't See It Before ... Looks Like It'd Be Awesome

Perhaps this has been around for a long time, but I hadn't seen this before and when I looked at it I saw the perfect vessel for artisan breads.  Deep covered cast iron pan or shallow cast iron pan with domed lid.

http://www.amazon.com/Lodge-LCC3-Logic-Pre-Seasoned-Cooker/dp/B0009JKG9M/ref=pd_rhf_ee_shvl28

kab's picture
kab

Yeast Rolls

My Great grandmother and great aunt made the BEST yeast rolls. My father got the recipe from them (or as best as they could guess because they did it by look on everything). The directions do not look right, can you please let me know if this sounds correct.

Ingredients
3 packs dry yeast dissolved in 1/2 cup warm water
5 cups self rising flour (unsifted)
1/4 cup sugar<br>1 teaspoon baking soda
1 cup shortening
2 cups lukewarm buttermilk

Directions
Dissolve yeast and set aside
Mix flour, sugar and baking soda together in a bowl cut in shortening
Add buttermilk and yeast. Mix Well.
Place desired amount of dough on cloth and roll out. Cut using a cookie cutter or shape into rolls.
Preheat oven to 350 while dough comes to room temperature.
Bake 15-20 minutes.


Does this sound correct? I don't want to try to make them without good instructions

pmccool's picture
pmccool

Rehydrating dried starter after traveling

This was going to be a blow-by-blow account of reviving a starter that had been dried for travel.  Yeah, my eyes are starting to glaze already, too.  So this will get more of a Readers Digest treatment.  And I'll try to stay awake until the end.  What you do is up to you.

Here's the back story: Man lives in Pretoria, South Africa.  Man has sourdough starter.  Man will repatriate to his home in Kansas City.  Man does not wish to lose his starter or begin a new one after his return.

Still with me?  Good.

Having read two different methods right here on TFL for preparing a starter for travel, I chose to do (drumroll, please) both!  And knowing that some or all of my luggage would be subjected to the tender mercies of either the TSA or U.S. Customs, I wanted to make sure that I had enough with me that at least one packet got through.  Or so I hoped.

Technique #1 involves adding enough flour (if your starter is runny) or enough water (if your starter is more like a dough) to some of said starter to achieve a thick batter consistency that is still smearable.  I don't know if smearable is a word but it is the key.  The traveler (your faithful reporter in this instance) needs to smear a thin layer of the suitably hydrated starter on a sheet of parchment paper and wait a day or two for the smear to dry to until it is roughly as crisp as potato chips.  Or potato crisps, for those of you who are still in South Africa.  The dried smears / chips / crisps can be broken into smaller pieces and placed in plastic bags for eventual placement in your baggage or on your person.  Note that thinner smears = shorter drying times.

Technique #2 involves adding flour to your starter until it is so dry that it is reduced to crumbs.  Some mechanical intervention will be necessary; perhaps the edge of a spoon or maybe a pastry blender or even a food processor.  I can say that a mezzalune is effective.  The more flour you try to force into the dough, the less cooperative it becomes; hence the need for mechanical assistance to cut it into ever smaller bits while force-feeding it yet more flour.  As with the flakes, the crumbs can be bagged for travel.

I strongly recommend that you clearly label each bag so that there is no leeway for interpretation by the various uniformed officials who may have their hands in your luggage at some point.  We all know what happens when we assume, right?

Thus prepared, your faithful reporter placed a baggie of dried starter in every piece of luggage.  And, for reasons yet unclear, every bag and every baggie made it all the way to the proper destination.  On the same day.  

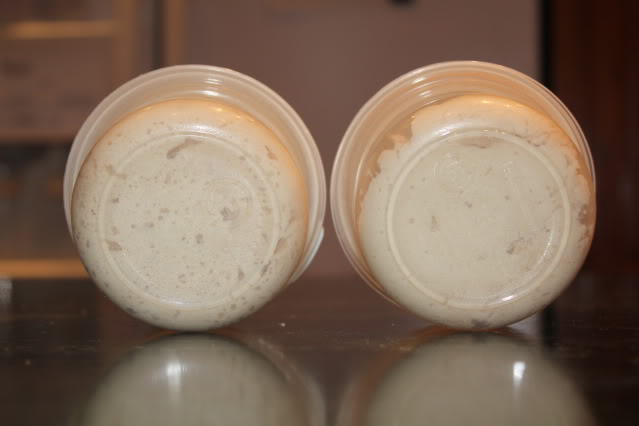
Being somewhat surprised to find myself the proud possessor of a surfeit of dried starter, I did what any American male worth his salt would do: I set up a competition.  Keeping one baggie in reserve as insurance, I combined 10g of flaked starter and 25g of water in one container and 10g of crumbed starter and 25g of water in another container.  Here's how they looked at the start of the competition, flakes to the left and granules to the right:

Pretty exciting, huh?  Other than some fogging of the inside of each jar, they looked about the same 24 hours later so I added 15g of flour of each.  At the end of the second 24-hour period, they were still pretty flat.  There was a whiff of...something...from the granules jar but the flakes jar smelled mostly of wet flour.  By the end of Day 3, there was evidence of bubbles in the granules jar and a hint of expansion.  The flakes jar was still pretty quiet; just a stray bubble or two.

Yep, that's right, the excitement continues to build!

At the end of Day 3, I discarded half of each sample and added water and flour in a 1:2:3 ratio.  I also moved them to some smaller plastic containers.  Here's how they looked after dinner and settling into their new digs:

Just to keep you on your toes, I've switched the granules container to the left and the flakes container to the right.

Some 12 hours later, there was some genuine growth going on:

And from a different perspective:

The crumbs sample has expanded noticeably and is riddled with bubbles.  The flakes sample has expanded just slightly and has fewer bubbles.

And that's pretty much how it went for the next few days.  The crumbs sample consistently out-performed the flakes sample.  Even on a 12-hour feeding schedule, the crumbs sample smelled consistently of acetone which suggests that it was burning through its food between feedings.  The flakes sample never developed a notable yeasty / fruity / sour odor in the week's time that I ran the comparison, although it did get past the wet flour odor.

If your eyes are still open at this point, you can hang on for the wrap-up.

For short-term storage, such as for travel, I would choose the granules approach to drying starter over the flaked approach.  I've done the flakes technique twice now and it required a full week to get back to a sluggish level of activity in both cases.  For longer storage, I'd use the flakes.  Why?  Because it seems to be a more stable form that is less susceptible environmental upsets.

I have some notions about the difference in behavior of the two.  First, the granules weren't as dry as the flakes.  That seems to have allowed the yeasts and bacteria of the starter to get back to work faster, possibly because they were less stressed and did not shut down entirely.  Second, although the organisms were tightly bound in a relatively dry environment, they were also surrounded by food even if they could not exploit it easily.  The down side for the granules is that their higher moisture content would make them more susceptible to attack by molds and other organisms, which militates against using them as a long-term storage option.

The good news is that there are options for the traveler, as well as for disaster recovery.  The easiest way to travel with a starter, of course, is to tuck a small blob in a plastic bag or other container.  That's probably the easiest way to lose it to a zealous inspector, too.

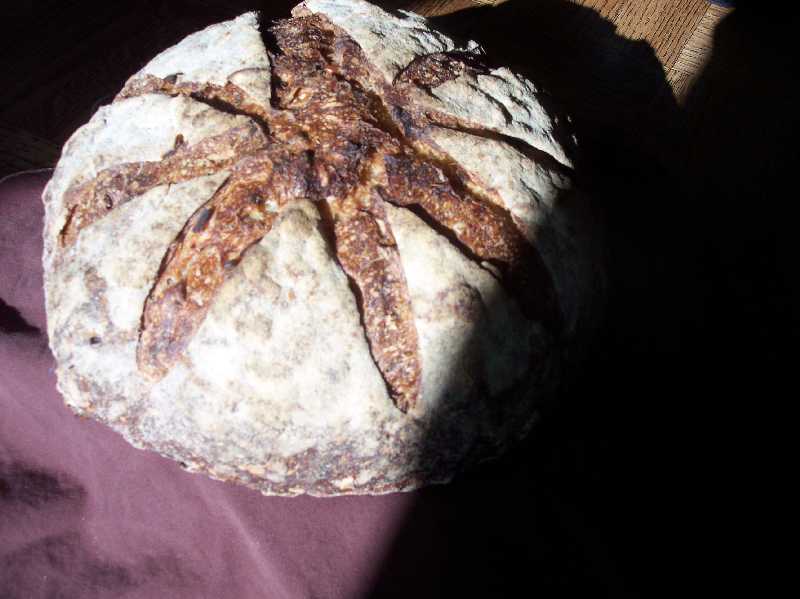
And the reward for any of you who have stayed awake through this entire dissertation?  Pictures of the pain au levain baked with the reconstituted starter, which now smells the way a healthy and happy starter should.  Note that the bread was made at about Day 7 or Day 8; not because of the starter's readiness but because of the baker's schedule.  The starter could probably have been used on Day 4 or Day 5.  First, the loaf:

And then the crumb:

Happy travels!

Paul

Franko's picture
Franko

25'ish % Sour Rye withToasted Seeds

The first time I made and tasted a rye bread with toasted sunflower seeds I was hooked. It was based on Jeffrey Hamelman's 80% Sour Rye with a Rye Flour Soaker from his book 'Bread' . I adapted it slightly by adding some toasted seeds to the mix and ended up with one of the most delicious breads I've ever made. As much as I enjoy eating a high percentage rye bread it's not something I like having on a regular basis. With this bake I wanted to see if a 25%-30% rye would do as well as a high ratio rye in terms of complex flavours. I was happy to discover that this bread is every bit as flavorful as the 80% but with a lighter texture, making it more suitable for my everyday bread. Quite often now I find with lean breads such as this one, that Chad Robertson's 'Tartine' method for making his Country Bread gives me the kind of crust and crumb that I prefer. I don't always use a Dutch oven for the baking, but on this bake I did, hoping to maximize as much of the flavour from the toasted seeds as possible as well as have that lovely burnished crust typical of Dutch Oven bakes.

Procedure:

The hydration and salt percentages were kept close to Robertson's Tartine Country Rye however I changed everything else in the original formula, but basically kept to Robertson's procedure as much as possible. The dough was hand mixed, then bulk fermented @ 76F-78F over 3 hours with stretch and folds in the bowl done every 30 minutes for the first 2 hours. The last S&F was done on the counter before a 30 minute rest and eventual shaping. The final rise was done in a floured banneton over a 3 hour period and then baked in a 500F pre-heated Dutch Oven for the first ten minutes, then at 470F for the remaining 45 minutes bake time. After 30 minutes I took the loaf out of the DO and placed it on the baking stone for the last 15 minutes of the bake, then turned the oven off and propped the door open for an additional 20-30 minutes before removing it to rack for overnight cooling.


Evaluation:

The final proof was more than it needed by 20-30 minutes to give it a higher profile, but the crust is fine with a good crunch to it. The scoring is a bit wonky I'm afraid and I really have to remember to keep to a few straight slashes when the dough has a high percentage of seeds like this one. The blade simply catches on too many of them during slashing to get any good, clean cuts for an attractive pattern. Cosmetic sins aside, the crumb I like...a lot, and the flavour is wonderful with a long lasting medium sour tang and a rich nutty taste from the toasted seeds that goes well with everything I've pared it with so far.

 The bread matched particularly well with a smoked salmon and shrimp pate that I'd made the day before, one of the results of my new interest in charcuterie. To my surprise our normally aloof feline has suddenly become my new best friend when the salmon pate comes out of the fridge for a snack. I'm not sure which of us enjoys it more spread on a piece of the toasted bread, but I know our dog is not happy with this turn of events one little bit.

Formula below and a link to the spreadsheet for anyone who'd like to download a working copy for themselves.

https://docs.google.com/spreadsheet/ccc?key=0AjicIp92YPCTdHlSZm5nSEd4R1l4S1o0LUc2TXBRcnc

Cheers,

Franko

25 % Sour Rye Bread with Toasted Seeds%Kilos/Grams

 
Ingredients  
   
Levain  
Organic AP Flour50.00%29
Dark Rye Flour50.00%29
Mature Rye Starter -100%12.50%7
Water-75F100.00%58
Total weight212.50%124
DDT- 65-70F 12-16hrs  
   
Toasted Seed Mixture  
Sunflower Seeds80.00%77
Pumpkin Seeds20.00%19
Total weight100.00%97
   
Final Dough Weight
 1200
Final Dough 
Organic AP Flour75.0%403
Dark Rye Flour25.0%134
Levain23.0%124
Toasted Seed Mixture18.0%97
Sea Salt2.3%12
Water80.0%430
Total weight223.3%1200.00
DDT-75-78F BF- 2.5 hrs with 2-3 S&F  
   
Overall Formula Kilos/Grams
Total Flour100.00%596
Bread Flour72.56%432
Dark Rye Flour27.44%163
Mature Rye Starter-100%1.22%7
Toasted Seed Mixture12.99%97
Sea Salt2.08%12
Water81.95%488
Total weight 1200


Urchina's picture
Urchina

Join the "Inside the Jewish Bakery" cookbook challenge -- starting December 1st!

Hi, everyone!

(Note to Floyd: This is a cross-post from the Books forum, since not everyone who might be interested in a new challenge hangs out there. Please feel free to move this post if it is more appropriate elsewhere. Thanks!)

Those of us hopelessly smitten with Stan and Norm's wonderful new cookbook "Inside the Jewish Bakery" are going to begin a challenge on December 1st of this year. For those of you who have not participated in a challenge before, it's  a group of people who bake recipes from a single book at the same time, and then share their results (both positive and negative). It's a tremendously fun way to explore new recipes in a supportive environment, and a great way to try things you might not otherwise have chosen. 

I'll host the challenge here on the TFL, on a blog, and will set the calendar soon. The challenge will begin December 1st, and because there are so many recipes in "Inside the Jewish Bakery" we'll do it in parts (semesters, for my school-addled brain). The first semester will go through March 2012. December's baking will focus on the simpler (and festive, when possible) recipes, since it's a busy month for many of us. 

If you'd like to join in, the first step is to acquire a copy of "Inside the Jewish Bakery" by Stanley Ginsberg and Norman Berg. The second step is to let me know here that you'd like to join in, and I'll let you know when I've posted the calendar. 

Who's in?


Kendra


wassisname's picture
wassisname

Pine Nut and Sage Sourdough

This is my salute to the land of pinyon pines and sage brush, aka home.  I can't resist buying locally gathered pine nuts every autumn, even if it means shelling them myself.  Of course, shelling them myself means my fingers smell like pine pitch for days but that's half the fun - at least I don't have to go out and fight the squirrels for them.

Not only does sage fit the theme, but it seems like a natural accompaniment to the pine nuts.  There's no shortage of wild sage brush in the neighborhood, but I'm not sure I should be eating that, so I use domestic sage from the garden. It gives a distinct savory flavor to the bread that, combined with the nuts, reminds me of bread stuffing.

The sourdough could be any sourdough.  This one happens to be 15% whole wheat, no rye.  It makes a good foundation for experimenting with different add-ins.  The percentage of pine nuts seems high, but they are so dense that the weight is a little misleading.  It isn't as much as it sounds.

This bake reminded me that the seasons have definitely changed.  Summer is well and truly over when my starter goes into slow motion mode.  I picked-up on this about 3 hours into the first rise, did some quick math, and realized that even keeping the dough warm I wasn't going to have time for a full proof.  I considered retarding the final proof but the timing wasn't going to work for that either, so I gritted my teeth and went ahead with the bake.  I must be getting better at judging my dough because this bread behaved exactly as I expected.  Woefully under-proofed but tasty! 

So close!  Another hour or two would have been magic.

It did make for some interesting photo opportunities.


I think I'll go get another bag of pine nuts and try this one again!

Marcus

Jay3fer's picture
Jay3fer

Why? Why bake sourdough?

I'm a sourdough lover, sometime bread blogger and freelance writer, and I have somehow convinced an editor that I'll write an article about sourdough.  I'd like to talk about reasons for choosing sourdough over tossing in a spoonful of commercial yeast.  I mean, it's not a crime or even a cheap shortcut to use yeast, and sometimes, my sourdough breads don't even taste noticeably different.

So... what are your reasons for choosing sourdough?  Here are some I've thought of, in no particular order:

  • connection to heritage (ie old-fashioned ways)
  • friendship - passing on a starter to a friend or maintaining one from a friend
  • superior flavour (sometimes), both from wild yeast strains and longer fermentation
  • possible digestive benefits, as longer fermentation "digests" some gluten
  • independence from commercial yeast manufacturers?
  • "Slow Food" mentality vs "Quick Rise" yeast

What am I missing?  These don't sound like much, honestly...

rolls's picture
rolls

a few questions plz :)

hi, i started my starter a few months ago following the birk st method in the book. at first i would follow the exact feeding amounts of water and flour.  but with time,  i got lazy and now i just keep it in he fridge and from time to time, refresh it, but i don't measure the flour and water.

i don't know much at all really about sourdough, but despite my neglect, it seems to bounce back nicely and looks bubbly.

i have no idea what im doing, and not sure how i can tell if its ready to go solo or not. i usually jus use a small amount with my regular yeast breads.

i'd love any insight whatsoever. is it wrong to not measure when feeding? am i stuffing up the chemistry somehow?


thanks heaps :)

BKSinAZ's picture
BKSinAZ

Storing Wheat Berries in Vacuum Sealed Food Saver Bags?

The family here has a Food Saver Machine and we were wondering if we can put wheat berries in these vacuum sealed bags for LONG term storage?

If so, do they need to be refrigerated, freezed, or can they just sit on a shelf in the pantry without going bad?

I was going to portion them out per recipe size. For example: if a particular recipe called for 3 cups of flour, I wanted to make something like 50, 3 cup bags of wheat berries.

Pages