The Fresh Loaf

A Community of Amateur Bakers and Artisan Bread Enthusiasts.

flax meal

wassisname's picture
wassisname

I gave up on this bread completely not so long ago. The dough always started out OK, but by the end of the bulk ferment it would be extremely slack and sticky, and by the time it went into the oven it was essentially a puddle. 

After several attempts it became clear that it was simply not going to work so I trashed the paper copy and deleted the spreadsheet and that was that.  Two days later I happen across this Farine blog post and learn that teff flour will do awful things to bread dough (of this fact I have become keenly aware) unless it is cooked a bit first.  So simple!  I would not have thought to try that in a million years.  (I had forgotten about theTFL thread on this subject I had read.  During this whole process my computer was having some kind of disagreement with the TFL site and wouldn't let me look for help here.  It's better now:) ) 

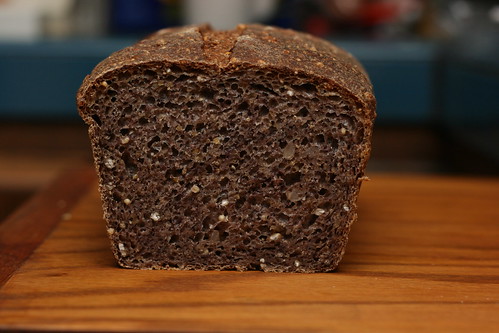
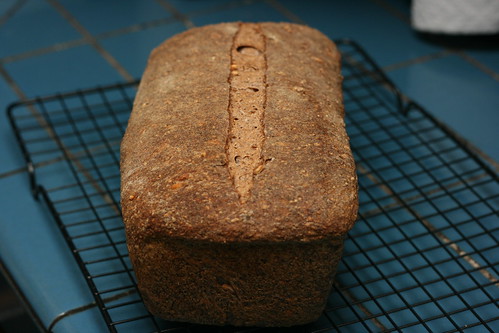
So I gave it another go and, hey, it's a loaf of bread this time!  Still not the strongest dough, it is manageable at least. 

Now that I have a starting point it's time to start tinkering and asking questions.  First off, I wonder if adding the flax meal to the scald is helping, hurting or having no effect?  I will likely leave it out next time.  I think I forgot to add the salt to the scald, so that's another change to try next time.

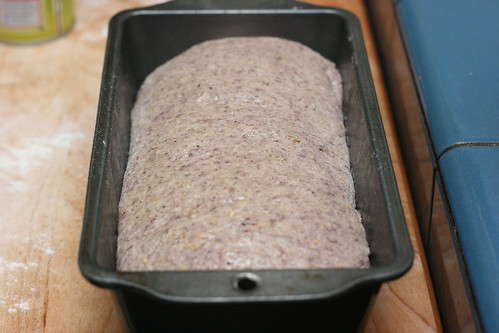
 The hydration felt pretty good, I don't think I  would go any higher.

The mixing... the dough was pretty slack by the time I shaped, so I can't decide if I want to try being gentler next time or try to develop more strength.

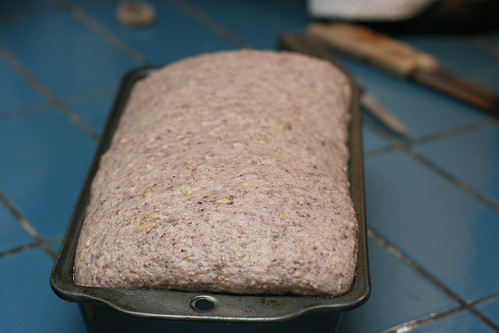
Fermentation time was, I think, at about it's maximum.  I imagine the overnight scald helped speed things up - another reason I'm thinking about leaving the flax out of the scald next time.

So many questions, can you tell I think this bread could be better?  Still, it's pretty good.  There's an extra sweetness and nuttiness in this bread that works for me.  Definitely one worth tinkering with.

Marcus


subfuscpersona's picture

Soak OR grind flax seed for bread?

November 14, 2011 - 6:31am -- subfuscpersona
Forums: 

When adding flax seed to bread, is it better to grind it into a meal (using an electric coffee mill) OR soak it in water?

Which method makes the flax seed nutrients more bioavailable? Which method better reduces the tendency of flax to interfere with gluten development?

I've spent countless hours searching the web with no definitive answer. Here's the gist of what I've found...

subfuscpersona's picture

How Much Flax Seed Meal Can I Add To a Sourdough Formula?

May 19, 2010 - 6:23pm -- subfuscpersona

I would like to add coarsely ground flax seed meal to a sourdough bread dough. I have read that too much flax seed meal can adversely affect gluten development (due to enzymes in the flax seed).

What would be a recommended amount in baker's percent? How high could I go?

SumisuYoshi's picture
SumisuYoshi

Purple Multigrain Loaf Crumb

This bread is heavily inspired by the Multi-grain Extraordinaire recipe from Bread Baker's Apprentice and really, it came out of my desire to stuff even more grains and grain flavor into that bread. I first made the Multi-grain Extraordinaire back in late September, and while I liked it quite a bit I was really looking for a bit more graininess, so to speak. I hadn't thought about that again until this weekend, as I knew I needed some lunch bread but I wasn't sure what to make. When I was digging in the cupboard for the pasta I needed for a pumpkin stew (more on that in a later post!) I saw the forbidden rice and purple barley I got a while back. Suddenly I had it, time to rework the recipe in search of more 'graininess'! In light of the supposed royal nature of the forbidden rice (although that is probably mostly marketing) and the similarity in color of the cooked rice to the ancient Royal Purple, I decided to name this Royal Grains Bread.

Purple Multigrain Baked Loaf

Royal Grain Bread Recipe

Makes: One 2 lb loaf or 6-12 rolls

Time: 2 days. First day: soaker and starter. Second day: mix final dough, ferment, degas, shape, final rise, bake.

Ingredients: (baker's percentages at the end of hte post)

Grain Soaker:

  • 4 oz. assorted grains (I used 1 oz. amaranth, 1 oz. millet, 1 oz. whole oat groats, .5 oz. corn meal, and .5 oz. flax meal)
  • 3-4 oz. water (enough to just barely cover the grains)

Stiff Sourdough Starter:

  • 1 oz. 66% hydration levain
  • 6 oz. bread flour
  • 4 oz. water

Final Dough:

  • 11 oz. of above starter
  • 4 oz. bread flour
  • 4 oz. other grain flours (I used 1 oz. forbidden rice flour and 3 oz. purple barley flour, both home ground)
  • 1.5 oz. brown sugar
  • 1½ teaspoons salt
  • 1 oz. cooked brown rice
  • 1 oz. honey
  • 4 oz. milk
  • 1-2 oz. water (this will depend on how much your grains absorbed)

Directions:

  1. Mix the grains and water for the soaker together, use just enough water to cover the grains and then cover the container and leave it to sit at room temperature overnight.
  2. Mix the 1 oz. of levain (if you aren't using a stiff levain you can adjust the quantities for whatever hydration levain you are using) with 4 oz. of water until well integrated and nearly homogeneous looking. Incorporate the water and levain mixture with the bread flour until a ball starts to form. Let the dough rest for 5 minutes covered. Knead the dough briefly, just enough to get it well mixed and smooth, no need to develop the gluten yet. Return the dough to a covered bowl or container and leave at room temperature to ferment. Depending on the strength of your starter and room temperature this could take from 3-12 hours. When I made it the room temperature was about 63 degrees and it took nearly 12 hours. If you know your starter will develop fairly rapidly, start this early enough to degas the dough and refrigerate after it has doubled, otherwise leave it at room temperature overnight.
  3. The next day remove the starter from the fridge ( if it was put in the fridge) about an hour before you plan to start making the bread.
  4. Stir the rest of the bread flour, the alternate grain flours, salt, and brown sugar together in a medium large bowl. I like to mix the starter in with the liquid so it incorporates into the final dough more easily, so stir together the milk, honey and 1 oz. of the water (reserve the rest in case needed later) and then mix with the 11 oz. of starter. Now pour the starter and liquids, the soaker, and the brown rice into to the bowl with the dry ingredients. Mix all of the ingredients together until they just begin to come together in a ball.
  5. Turn the dough ball out onto a lightly floured counter and knead for 6-10 minutes, or until you get adequate gluten development (check with a windowpane test). In my experience making this bread the dough will generally be stickier than you would expect from the hydration level and stiffness of the dough, I think this has to do with the grains from the soaker. Try to avoid adding too much flour during the kneading, as long as the dough is stiff enough that it seems to be able to hold a shape it will turn out fine, just use a bench scraper to recover any bits that stick. Lightly oil a bowl big enough to hold the dough when doubled, form your dough into a ball, roll it around in the oil, cover the bowl and set the dough aside to ferment at room temperature. Again, the time on this will vary depending on your starter, but 2-6 hours is a good estimate. No matter how long, when the dough has nearly doubled it is ready.
  6. If you want to make a freeform loaf: Now that your dough has doubled, or nearly doubled, turn it out and gently degas the dough, flattening it into a vaguely rectangular shape. Give the dough a letter fold (folding it into thirds along the long side) and seal the seam with the edge of your hand if needed. Now you have a preshape for a batard, fold once again to ensure good surface tension. Give the dough 3-5 minutes to rest before rolling it with your hands on the bench to make the ends thinner and extend them. If you have a couche use it to support the loaf as it rises, otherwise you can use parchment paper dusted with flour or sprayed with spray oil, just put objects to the side of the loaf to hold the parchment in place during the rise, and cover the loaf with oil sprayed plastic wrap. If you want to make a sandwich loaf: Starting just after the letter fold, flip the dough and gently roll it back and forth with your hands to even out the loaf shape. Once your loaf is more evenly shaped, tuck the ends underneath and briefly roll it again before placing the dough in an oiled 8½x4½ loaf pan. Cover the loaf pan and set it aside for the final rise. If you want to make rolls: Divide the dough into 6-12 of evenly sized pieces of dough, briefly preshape them into rounds and let them rest covered for 2 minutes so the gluten relaxes a bit. After the rest, shape the rolls into nice tight little boules. The method I use is to put my hand over the ball of dough, surround it with my fingers and thumb. Then while applying slight downward pressure and slight pressure with my thumb and pinky, rotate my hand a quarter turn counterclockwise, release the pressure slightly and rotate back to the home position. Repeat this until the dough forms a nice tight little ball. Place the shaped rolls on parchment paper on a baking sheet, cover, and set aside to rise.
  7. The final rise should be shorter than either of the previous two, and be careful using a poke test on this bread as the inclusion of flours with no or little gluten will make it a bit more delicate. For me, the final rise took about 90 minutes (but I had also moved to putting it in an oven with just the light off because I was going to need to go to bed!). If you are making the loaf in a loaf pan, it should rise to about 1/2 to 1 inch above the edge of the pan. The freestanding or loaf pan loaves would benefit from a very light scoring, no more than 1/8 to 1/4 of an inch deep. Preheat the oven to 350° with the rack on the middle shelf. If you wish to top your loaves or rolls with seeds or some other garnish, spray them lightly with water and top shortly before putting them in the oven.
  8. Bake for 20 minutes, at which point if you were making 12 rolls there is a good chance they will be finished. If you are making larger rolls or loaves rotate 180º (or earlier if you know your oven heats very unevenly) and continue baking for another 10-20 minutes on freestanding loaves and 25-40 minutes for pan loaves. As usual, the loaves should sound hollow when tapped on the bottom if they are finished and be around 185-190º. The color of the finished loaf will vary widely depending on the grains and grain flours you have used.
  9. Remove the baked loaves to a cooling rack (taking pan loaves out of the pan) and allow to cool for 1-2 hours before slicing.
  10. Enjoy the delicious graininess!

Note: If you wish to make this loaf without levain, skip the levain step and in the final dough use: 10.5 oz. bread flour, 5.5-6.5 oz. water and add in 2¼ tsp. instant or active dry yeast (add the instant to the dry ingredients and the active dry to the water and stir well). The rise times will of course be very different, probably around 1.5 to 2 hours for the first rise, and 1-1.5 hours for the second rise.


Some more photos:

Forbidden Rice and Purple Barley:

Forbidden Rice and Purple Barley

Shaped and Panned Loaf:

Purple Multigrain Shaped Loaf

Risen Loaf:

Purple Multigrain Risen Loaf

Baker's Percentage: Soaker:

  • Grains 100%
  • Water 75 to 100%
  • Total: 175-200%

Starter

  • Bread Flour 100%
  • Water 66.7%
  • 66% Levain 16.7%
  • Total 183.4%

Dough

  • Starter 137.5%
  • Bread Flour 50%
  • Alternate Flours 50%
  • Brown Sugar 18.8%
  • Salt 4.8%
  • Honey 12.5%
  • Cooked Brown Rice 12.5%
  • Milk 50%
  • Water (about) 12.5%
  • Soaker 100%
  • Total: 448.5%

Straight Dough Version:

  • Bread Flour 72.4%
  • Alternate Flours 27.6%
  • Brown Sugar 10.3%
  • Salt 2.6%
  • Honey 6.9%
  • Cooked Brown Rice 6.9%
  • Milk 27.6%
  • Water 41.4%
  • Soaker 55.2%
  • Total: 250.9%
Subscribe to RSS - flax meal