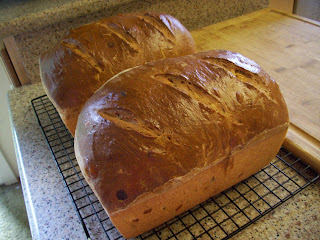
The Fresh Loaf

A Community of Amateur Bakers and Artisan Bread Enthusiasts.

Blogs

dmsnyder's picture
dmsnyder


One of my thoughts in purchasing a Brød & Taylor Folding Proofer was that I would be able to make Three-Stage Detmolder rye breads with more precise temperature control than I could otherwise achieve. After using this device for fermenting other starters, fermenting doughs and proofing loaves over the past couple of months, I my first rye by the three-stage Detmolder method employing the Folding Proofer this weekend.

My one previous bake of a Detmolder 3-stage rye was almost 3 years ago. (See: http://www.thefreshloaf.com/node/12742/hamelman039s-70-3stage-rye-sourdough) I do recall that bread as having a delicious, sweet, earthy, complex flavor. The bread I baked this weekend was the very similar 80% Three-Stage Rye from Bread. This bread has an hydration of 78%. 37.8% of the flour is pre-fermented.

As described by Jeffrey Hamelman in Bread (pg. 200), this method, developed in Germany, “develops the latent potential of a mature rye culture through a series of builds,” each of which optimizes the development of yeast growth, lactic acid and acetic acid production, respectively. The builds differ in hydration, fermentation temperature and length of fermentation.

Hamelman calls the three stages or builds “Freshening,” “Basic Sour” and “Full Sour.” The first build encourages yeast multiplication in a moist paste fermented at a moderate temperature. The second build is much firmer and is fermented for a long time at a relatively cool temperature to generate acetic acid. The third build is, again, moister, and it is fermented at a warm temperature for a short time. This build is to increase the lactic acid content of the sour. After that, the final dough is mixed.


Freshening

Wt (g)

Baker's %

Medium Rye flour

8

100

Water

12

150

Mature rye culture

4

50

Total

24


Ferment 5-6 hours at 77-79º F.


Basic Sour

Wt (g)

Baker's %

Medium Rye flour

100

100

Water

76

76

Freshening sour

24

24

Total

200


Ferment 15-24 hours at 73-80º F. (Shorter time at higher temperature.)


Full Sour

Wt (g)

Baker's %

Medium Rye flour

270

100

Water

270

100

Basic sour

200

74.1

Total

740


Ferment 3-4 hours at 85º F.


Final Dough

Wt (g)

Medium Rye flour

422

High-gluten flour

200

Water

422

Salt

18

Instant yeast (optional)

8

Full sour

740

Total

1810

Procedures

  1. Mix all ingredients 4 minutes at Speed 1 then 1-1 1/2 minutes at Speed 2. DDT=82-84º F. (Note: Hamelman's times are for a spiral mixer. If using a KitchenAid, I double these mixing times.)

  2. Bulk ferment for 10-20 minutes.

  3. Divide into 1.5-2.5 lb pieces and shape round.

  4. Proof about 1 hour at 85º F.

  5. Dock the loaves. Bake for 10 minutes at 480-490º F with steam for the first 5 minutes, then lower temperature to 410º F and bake 40-45 minutes for a 1.5 lb loaf and about 1 hour for a 2.5 lb loaf.

  6. Cool on a rack. When fully cooled, wrap in linen and let rest for at least 24 hours before slicing.

These loaves scaled to 807 g. After baking and cooling, each weighed 700 g.

Crumb and loaf profile

Slices

I sliced the bread after it had sat, wrapped in linen, for 24 hours. The crust was chewy, and the crumb was moist and tender. The flavor was very mellow and balanced. It was not as sweet as I remember the 3-stage 70% rye being, but that was 3 years ago(!). The sourdough tang was present but subdued. A lovely flavor.

I had been planning on leaving the loaves unsliced for another 12 hours, but my wife decided she wanted rye with smoked salmon as an appetizer for dinner. How could I refuse such a tempting proposition?

Delicious!

I also made a couple loaves of Hamelman's Pain au Levain today. As simple and straight-forward as it is, this is one of my favorite breads.

Pain au Levain bâtards

Pain au Levain crust

Pain au Levain crumb

 David

Submitted to YeastSpotting

GSnyde's picture
GSnyde

I hadn’t made Hamelman’s Pain au Levain with Whole Wheat for a while.  I remember that bread as one of the best I’ve ever made.  I made up the levain last night, and mixed the dough this morning, and then went to the grocery.  There, I began to crave cheese bread.  So I bought some nice dry, sharp Asiago.

I know Hamelman’s Sourdough Cheese Bread formula (like most cheese breads) calls for combining the cheese into the dough at the mixing stage.  It was too late for that.  So, at the shaping stage, I flattened one of the dough balls and spread a thick layer of grated cheese over it, and rolled it up, flattened it a bit again, added more cheese, and shaped it into a batard.

The aroma while it baked was incredible.   It was hard to wait for it to cool.  When the loaf was sliced, I saw that the crumb was nicely aerated…and cheesated, too.  The flavor is amazing!  Cat and I almost finished a 12 oz loaf as an afternoon snack.

Is this what they mean by “loaves singing”?

The other loaves also look like they’ll be good, but they’ll have to wait for tomorrow.

Glenn

dmsnyder's picture
dmsnyder

Exactly 3 years ago tomorrow, I blogged about a batch of straight dough baguettes I had made rather impulsively. (See: http://www.thefreshloaf.com/node/11925/baguette-surprise-and-challenge) They were surprisingly good being yeasted, not sourdough, and having no pre-ferment. Several other TFL members tried my formula with pretty good success. I attributed these baguettes' very nice flavor to the flour mix I used – 90% AP and 10% white whole wheat.

Although I had intended to make these again, three years have gone by … somehow. Last week, TFL member adrade posted a reply to that 3 year old blog, having made these baguettes and finding them good enough (or maybe just fast enough) to make repeatedly. This has prompted me to make some straight dough baguettes again, this time with a somewhat different flour mix and different dough mixing method.


Ingredients

Wt (g)

Baker's %

KAF AP flour

435

87

Central Milling Organic T85 flour

65

13

Water

350

70

Sea salt

10

2

Instant yeast

4

0.8

Total

864

172.8


Method

  1. Mix flours and water to a shaggy mass.

  2. Cover and let sit for 20-60 minutes.

  3. Add yeast and salt and mix at Speed 1 for 1-2 minutes then at Speed 2 for 7 minutes.

  4. Transfer the dough to a lightly floured board. Form it into a ball, and put it in a lightly oiled bowl. Cover tightly.

  5. Ferment for 2 hours at 75º F with a stretch and fold on the board at 45 and 90 minutes.

  6. Divide the dough into 3 equal pieces. Pre-shape as rounds or logs.

  7. Cover the pieces with a towel and let the gluten relax for 10-20 minutes.

  8. Shape into baguettes.

  9. Proof on a linen couche, smooth-side down, covered, for about 45 minutes.

  10. 45-60 minutes before baking, pre-heat the oven to 500º F with a baking stone and steaming apparatus in place.

  11. Transfer the loaves to a peel, making sure the smooth side is now facing up, and score them.

  12. Turn the oven down to 480º F. Steam the oven and load the baguettes onto the baking stone.

  13. After 12 minutes, remove the steam source. Continue to bake for another 8-10 minutes.

  14. When the baguettes are fully baked, turn off the oven, and transfer the baguettes to a cooling rack.

  15. Cool for at least 30 minutes before serving.


These are not the most beautiful baguettes I've ever made. The two on the left were too close to each other on the stone and stuck together. I am not sure why the cuts didn't open better. The prime suspect is under-steaming. Yet the crust was thin and very crisp. The shininess suggests adequate steam, so I'm not sure what happened.

The crumb was rather dense, as it was when I made straight dough baguettes the last time. Maybe they needed a longer fermentation. Maybe I de-gassed the dough too much in shaping. The crumb was pretty chewy but not to excess.

On the other hand, the flavor of these baguettes was totally classic – very sweet and a bit nutty. I enjoyed some with my dinner omelet and more this morning with butter and a tart plum jam. Tonight, another baguette will serve for hamburger buns. French toast Sunday is possible, if I don't make sourdough pancakes.

I think baguettes made with a straight dough are worth tweaking. It's a good tasting and versatile bread that can be whipped out in 4-5 hours. Next time, I'll increase the whole grain flour content some and extend the bulk fermentation. And get a new velvet glove.

 David

Isand66's picture
Isand66

This recipe comes courtesy of David Snyder who posted his adaptation here.

I have posted about other rye breads I have tried making previously and I have to say all of them including this one have come out pretty good.  The big difference in this recipe is that all of the rye flour is added into the rye sour and the dough is fairly high hydration compared to the other ones I have made.

I ran out of First Clear Flour so I had to substitute 217 grams using KAF High Fiber Flour instead.  I think the bread would have turned out better if I had used 100% First Clear to be honest.  I also added some dried Toasted Onions which I reconstituted in the water used for the final dough which gave the rye a nice onion flavor which I love.

One other point is that I followed Davids instructions for making a 100% Rye starter using Pumpernickel flour and I only ended up with 708 grams instead of 750 grams called in the recipe.  I am not sure if this had that much of an effect on the final bake, but next time I will make a larger batch of starter since I would have liked to keep some for my next bake so now I have to start all over again :(.  I do have to say I have made Rye starters in the past and I really like the way this one came out.  You can follow Dave's excellent instructions here if you are interested in converting your starter to a Rye sour starter.

Also, I did not have any leftover rye bread so I didn't add the Altus to this bake, but next time I will add it to see the difference.  I have made rye breads with and without the Altus and have not made up my mind if it is necessary or not.

The end result of my bake was not as open of a crumb as David achieved, but throw some pastrami and Thousand Island Dressing or mustard for you traditionalists out there and deli nirvana is at your fingertips!

Also note that most Jewish Rye recipes call for the use of First Clear Flour which is taken from what remains after the millers sift the patent flour out of the straight flour.  Patent flour is the purest and highest quality flour available.  First clear flours come from hard wheat and has a protein content of 15.0 - 18.0% which is ideal to strengthen the lower protein content of rye flours which are normally around 6.5%.

High-gluten flour can be substituted for First Clear and has a protein content of 13.5- 14.5%.

White rye flour is very important in authentic Jewish style rye breads and comes from the heart of the endosperm.  It contains only 6.5% protein.  (I used Pumpernickel or Dark Rye in this bake)

Medium rye flour is milled from the whole grain after the bran has been stripped away and is used for high-percentage rye recipes (heavier breads for sure).

Dark rye flour, is what remains of the rye kernel after the white rye flour has been sifted out.  As you can imagine it is very dark and strong flavored flour.


Isand66's picture
Isand66

It's great to be back home from my 11 day trip to China for business.  I couldn't wait to get home to my wife and my 5 kitty cats.  We recently adopted another furball named Cleopatra and she has lived up to her name taking over the household like she's been with us forever.

Anyway, I was chomping at the bit to bake some bread so after refreshing my starter I decided to make a simple sourdough Pain Au Levain, but of course I needed to add something different to the formula to make it a bit more interesting.

I had recently purchased some coconut flour from Whole Foods and decided to try adding some to this concoction and see what happens.  I also added some wheat germ, Durum flour and pumpernickel flour along with bread flour.   The levain starter was made with my standard 65% AP starter along with some whole wheat and bread flour.  I also added some dried toasted onions which I rehydrated in the water used for the dough.

The resulting dough turned out very interesting with a nice nutty flavor but a bit dense.  The coconut flour really soaks up the water and in hindsight I should have uppped the hydration level of this bread even though it is already 71%.

Starter (Levain)

71 Grams Seed Starter (65% AP Starter)

142 Grams Bread Flour

85 Grams Whole Wheat Flour

151 Grams Water (90 Degrees F.)

Final Dough

458 Grams Levain from Above

260 Grams Bread Flour

65 Grams Pumpernickel Flour

75 Grams Coconut Flour

25 Grams Durum Flour

35 Grams Toasted Wheat Germ

17 Grams Sea Salt

4 Grams Toasted Dried Onions

15 Grams Walnut Oil (You can substitute your oil of choice)

336 Grams Water, 90 degrees F.  (Note: If you want a more open crumb I would increase the water another 15 - 20 grams)

Directions

Levain

Combine the ingredients for the Levain and mix by hand or in your mixer for 1-2 minutes.  Place it in a covered glass or plastic bowl and let it sit for 9-10 hours at room temperature.  If you are ready to bake you can use it immediately, otherwise you can refrigerate it for at least 1-2 days.

Final Dough

For the final dough, using your stand mixer or by hand, mix the water with the Levain to break it up.

Add the toasted onions to re-hydrate them in the water and then add the flours and oil and mix on the lowest speed for 2 minutes.  Let rest for 15 minutes.

Now add the salt and mix for 4 minutes more on medium speed, adding more flour if necessary to produce a slightly sticky ball of dough.

Remove dough to your lightly floured work surface and knead for 1 minute and form into a ball.

Leave uncovered for 15 minutes.

Do a stretch and fold and form into a ball again and cover with a clean moist cloth or oiled plastic wrap.

After another 15 minutes do another stretch and fold and let it rest again for another 10 - 15 minutes.  Do one last stretch and fold and then put it  into a lightly oiled bowl that has enough room so the dough can double overnight.

Let the dough sit in your bowl for 2 hours at room temperature.  It should only rise slightly at this point.  After the 2 hours are up put in your refrigerator for at least 12 hours or up to 3 days.

When ready to bake the bread take your bowl out of the refrigerator and let it sit at room temperature for around 2 hours.  After 2 hours shape the dough as desired being careful not to handle the dough too roughly so you don't de-gas it.

Place it in your bowl, banneton or shape into baguettes.  I used my new banneton I found in a thrift store and made one large loaf.

Let it sit at room temperature for 2 hours covered with oiled plastic wrap or a moist cloth.

Pre-heat oven with baking stone (I use one on bottom and one on top shelf of my oven), to 500 degrees F.

Slash loaves as desired and place empty pan in bottom shelf of oven.

Pour 1 cup of boiling water into pan and place loaves into oven.

Lower oven to 450 Degrees and bake for 25 - 35 minutes until bread is golden brown and internal temperature reaches 200 degrees.

Shut the oven off and leave the bread inside with the door slightly open for 10 minutes.  This will help dry the loaves out and keep the crust crunchy.

Let cool on cooling rack and enjoy!

Feel free to see some of my older posts at my other blog: www.mookielovesbread.wordpress.com

codruta's picture
codruta

hi everyone!

A few weeks ago I tried my first 100% rye bread. I wrote about it in a previous post (click here for link). In the meantime, I received a fantastic bread pan special for rye breads from a friend from Russia, Masha (mama lunetta) and I imediately used it. I was very happy and confident, but the bread was a semidisaster. Please check my post here to see what I mean (beware, not a pretty image, my bread). I wouldn't give up so I went to Mini Oven for help. How to season the pan, how much dough do I need for this new pan, how to set the oven, etc. A lot of new factors for me, but thanx to Mini, I'm happy and proud of my first successful 100% rye bread!

And the result... voila:

I began with Andy's formula, I used some altus I had from the previous bake, I put some rye flakes and I all the four I used was rye flour type 1150. Unfortunatelly I forgot to add the honey in the scald, and I thought I'll add it next day in the final paste, but I didn't write it down and I forgot completely :(.

Good news for me, I'll receive a jar of blackstrap molasses at the end of May! I can't wait to try the real thing!


The taste is delicious. The crust is chewy, the crumb is moist, but not sticky, the rolled rye give a nice texture and contrast, the coriander is there but not dominant (I put less than in Andy's recipe, maybe next time I'll add a bit more). I miss the sweetness of honey and I sense that I'm very close to a extraordinary bread but not quite there yet. After few days the taste was better, richer and the crumb colour was darker.

Another thing that bothers me... I remember Phil saying once (click for link) he could fold a slice in half without breaking. I can't do that :( I wonder why?


I wrote the modified formula on my romanian blog Apa.Faina.Sare. (translated: Water.Flour.Salt.) (link for post here), translation is automatic and pretty bad, but if anyone is interested in more details, please ask.


Thank you Mini Oven, thank you Masha, thank you Andy, Varda, and thank you all who helped me along the way and encouraged me in my previous attempts.

codruta


ps. please stay close, I'm dreaming, negociating and planning to open a bakery here in town and I'm scared and don't really know where to begin with. All I have are my hands and my passion... will it be enough?! ♥

dabrownman's picture
dabrownman

we thought we would publish our masa recipe that folks seems to love more than others.  It is a little different and just plain delicious. Once you make your own masa, tortillas and tamales, and they don't have to be this fancy, you just won't want to buy them - even though you will.


For a dry mix, we swear by Minsa Corn Masa Harina for Tamales (make sure it is for tamales and not tortillas) made in Muleshoe, Texas - but any will do.  Dry mix may be the most available across the USA so this recipe will use it even though some Brownman have been known to make fresh from hominy on occasion, or buy fresh from the Mexican Mercado.

Masa for Tamales and Tortillas

1 C dry masa harina

3/4 C home made chicken stock - have a little extra in case it is dry - I used 7/8 C total

1/4 C  fat.  (use 1/3 bacon and sausage dripping, 1/3 butter and 1/3 lard)

1/2 tsp salt

2 T of chopped very fine Swiss chard - I grow my own

1/8 tsp each dry peppers; mole, chipotle, arbol, ancho, smoked paprika

1/8 tsp each dried oregano, cumin, coriander

1/4 tsp baking powder

Directions - Mix the fat with the harina by cutting it in with a pasrty cutter.  Add the chicken stock, peppers and spices and mix with a spoon until well combined.  Refrigerate for 1 hour.  For tortillas I use the bottom of 1 qt sauce pan to smash down a golf ball sized ball of masa into a 1/8" thick tortilla.  Do this between two oiled sheets of plastic wrap  if you don't want get mad and want to harm your baking apprentice.  Then gently peel off the top plastic and then peel off the tortilla with the pal side of your hand making sure to overlap only 50% of the tortilla.  Then lay the other 50% of the tortilla in a small dry Teflon pan heated to medium low while releasing the other 50% from your hand.  I make my tamales in banana leaves, corn husks or parchment paper.  These were made in parchment.

With this masa you can make, tacos, tamales, chips and quesadillas - some of which follow in pictures.  Salmon tacos, pork carnitas tamales and chicken  quesadillas.  All were served with; crema and yogurt chipotle roulade, home made; pico de geudo with corn, guacamole, chili tomatillo verde sauce, red pepper sause, mole sauce, chipotle sauce, seasoned cabbage, Mexican dirty green rice  and puerano, pinto, and black beans with smoked pork jowl.

And a little huevos rancheros for breakfast in the morning with chorizo, chipotle roulade and fake YW pretzel bread after sleeping on typical AZ sunset. 

Cinco de mayo sunset, moonrise and dinner.


mwilson's picture
mwilson

Those who know me understand that Panettone is my thing! I have baked this wonderful bread-like cake countless times and I have pretty much dedicated myself to the art that is making Panettone. The technical ability required to produce Panettone is the pinnacle of understanding bread dough. It forces you to understand all aspects, including; controlling sourdough fermentation to achieve the desired acidity and yeast activity. And most challenging for me, understanding dough rheology, to be able to successfully mix this heavily rich dough. I believe anyone that can make real (sourdough) Panettone can truly make any bread.

I'm still on a high as recently I managed to make what I consider to be the most difficult recipe, entitled 'Modern Panettone'  this comes from master pastry chef Iginio Massari via his wonderful book "Cresci - The Art of Leavened Dough". This is the richest one of all. 40% sugar + another 4% honey. 53% butter and 48% egg yolks.

Making this particular Panettone was no easy feat. I have experienced many moments of despair trying so hard and not understanding why it hasn't worked. Often I would chuck an over-mixed dough in the bin. So many times I declared "I am never baking again" and yet here I am. Baking is clearly an obsession. Even those things that seem impossible at the time can be achieved with endeavor!

These shots don't do it justice but here are some close ups:


Other than uneven fruit distribution and a wild and uncontrolled oven spring this Panettone is perfect. It's so light and yet firm at the same time. Sweet, feathery soft, buttery and just delicious. This truly is a celebratory cake and not just for Christmas!

Many thanks to those that follow my work and to those that have supported me. 

If there are any bakeries out there that are interested in making Panettone, I would be happy to offer my services as a consultant.

Now, where to go from here... A new path / career awaits.

Goodbye all.

Michael

dabrownman's picture
dabrownman

I wanted to make some YW rolls that had a pretzel twist so we made some pretzel bread crumbs and used them to stick to the outside of some 15% White WW yeast water rolls.   We made some rolls using 4 little balls of dough per roll and some knotted rolls.  All were; retarded overnight, proofed and baked in ramekins.  Also cut the salt in half since the pretzel crumbs were very salty.

The rolls were baked in my mini convection oven with stream and came out nicely browned, blistered, crunchy crusted with a soft moist crumb.  The pretzels were hardly noticeable,  The next time we will use the pretzel crumbs as altus to get more pretzel taste.  Will also enrich the dough with egg, cream and butter to make a nice hamburger bun  for version 2.  Cut in 3rds, toasted and buttered these are pretty tasty.  Formula and method follow the pix's.

YW Fake Pretzel Rolls    
      
YW Starter     
 Build 1Build 2 Build 3Total%
Yeast Water30403010023.81%
AP Flour30405012028.57%
Total60808022052.38%
      
Starter %   
Flour12028.57%   
Water10023.81%   
Hydration83.33%    
Levain % of Total 29.97%   
      
Dough Flour %   
White WW5011.90%   
AP25059.52%   
Dough Flour30071.43%   
Salt40.95%   
Water21050.00%   
Dough Hydration70.00%    
      
Total Flour420    
Total Water310    
T. Dough Hydrat.73.81%    
      
Total Weight734    

Yeast Water Fake Pretzel Rolls

 Build the levain in 3 stages 4 hours each for a total of 12 hours.  Retard the levain 12 hours.

 Mix the flours with the water and autolyse for 12 hours.

 Make pretzel bread crumbs.

 Mix the levain and the autolyse with the salt for 6 minutes on KA 3.  Move to an oiled plastic wrap covered bowl and rest for 20 minutes.  Do the first of 6 S & F’s on a lightly floured surface at 20 minute interval returning to the covered oiled bowl.  After last S & F let ferment in the oiled bowl on the counter for 1 hour  Form into knots or roll of your choice, 4 balls  ( I did some of each).  Dunk individual balls or or bow ties into pretzel breadcrumbs and place in (6) ramekins covered in plastic wrap - then refrigerate 12 hours or overnight.

 Remove from fridge and let come to room temp.  Once rolls have doubled in size from the time they went into the fridge they are ready to bake -  mine took about 2 hours.

 I baked mine in my Cuisinart mini oven with a 1 cup Pyrex cup half full of water in the back and I threw ½ C of boiling water in the bottom.  Pre heat oven at 500 F regular bake.  Put rolls in and steam for 10 minutes.  Remove steam, turn down to 400 F convection  and bake for 5 more minutes.  Remove from ramekins and bake for 5 more minutes or so until center reaches 205 F.   Move to cooling rack until room temperature.  


txfarmer's picture
txfarmer

Sending this to Yeastspotting.

Click here for my blog index.

Chinese Red Dates (see wiki here) can be found in Asian markets, in dried form. They are often used in soup/congee dishes, supposely have great health benefits, especially for women. I love to make them into paste as fillings for buns/breads. The process is tedious since you have to peel off the skin one by one, but it's so incredibly smooth and delicious that the effort is worthwhile. You can also buy ready made red date paste/filling at Asian markets, but this homemade version is SO MUCH better.

For these buns I used the 30% rye sourdough lightly enriched dough I have grown to love. Since I buy big cartons of heavy cream from Costco, I am always trying to use it up before expiration, which is why I like to enrich my bread with heavy cream, not butter(those are saved for croissants!). In this dough, there isn't even milk/water, heavy cream and (a tiny bit of) egg provides all the liquid and enrichment. This dough is very soft and light, perfect for soft buns/sandwich loaves.

Note: makes 8 rolls
Note: total flour is 250g

-red date paste:
dried red dates without seed, 225g
water, 3 cups
brown sugar, 1/4 cup
oil, 3 Tbsp
tapioca or wheat starch, 1 Tbsp

1. boil dates in water until soft, about 30min
2. peel off skin
3. mash and put back into pan, heat and stir until most water is gone. Add sugar, stir until completely melted and absorbed. Slowly add oil in batches, until absorbed. Add tapioca stach, stir until smooth

-levain
rye starter (100%), 5g
water, 23g
medium rye 32g

1. Mix and let fermentation at room temp (73F) for 12 hours.

- Final Dough
bread flour, 175g
rye flour, 38g
egg, 30g (I just used one egg, it's more than 30g, but oh well)
sugar, 18g
salt, 5g
heavy cream, 180g
levain, all

1. Mix everything , knead until moderate level of gluten developement. A relatively thin windowpane can be stretched, but holes can appear. (If this dough is used for making Asian style soft sandwiches, it will need to be kneaded to full developement, a strong windowpane is necessary.)

2. Rise at room temp for 2 hours, punch down, put in fridge overnight.
3. Divide into 8 parts, round, rest for 1 hour.
4. Roll flat into oval, put in filling

Seal

Fold in half

Cut in the middle, leaving ends un cut

Flip open into heart shape

5. Proof at room temperature until almost fully. About 5.5hours at 80F. When pressed the dough should slowly spring back a little bit. Wash with egg or milk.

6. Bake at 375F for 15-20min.

Made one into flower shape, this one is easy -- just fill, round, press and cut. I decorated it with white sesame seeds in the middle.

Light and soft, with super yummy filling, perfect as breakfast or snack.

----------------

One other way for me to use up heavy cream is a "not so angelic" anglefood cake.

Note: fits a 17CM anglefood mold

cake flour, 80g
heavy cream, 160g
vanilla, 1/2t
sugar, 75g
egg whites, 5, about 150 - 180g

1. fold cake flour into heavy cream and vanilla
2. beat egg whites until foam, add sugar, beat until soft peaks
3. take 1/4 of egg whites and mix with 1 to lighten
4. take 1/2 of remaining egg whites and fold into 3, take care not to deflate
5. put 4 back into remaining egg whites, fold until even, take care not to deflate
6. fill mold, bake at 340F for about 40min


7. cool upside down, unmold.

It's softer and more moist than real angelfood cake, there's less sugar, so it's also not too sweet. Perfect without any icing.

-------------

Yet another good way to use up heavy cream, and left over egg yolks (probably from the cake above), is pot de creme. I especially like this maple syrup version

I highly highly highly recommend the Darigold Heavy Cream (>40% fat ratio), so creamy and rich. I found it in Costco at Seattle, apparently it's owned by Pacific Northwest diary farmers.


Pages

Subscribe to RSS - blogs