The Fresh Loaf

A Community of Amateur Bakers and Artisan Bread Enthusiasts.

PalwithnoovenP's blog

PalwithnoovenP's picture
PalwithnoovenP

One of my last successes in 2017. I've realized that bagels are the easiest breads to make. I have used bread flour because I cannot find high gluten flour but I think the chew was perfect as is, any more and it will be too hard to eat. These bagels have a crisp crust and that distinct pull while biting or tearing a bit from it. They were soft but really chewy, my jaws were nangawit (Sorry, I do not know any exact translation, it's the feeling of muscles shortening themselves and holding it when they got overworked; cramping I guess but not as severe as that), they really got a workout after I ate two. The aroma was sweet and wheaty. The taste too was sweet and wheaty with the mildest tang. Very very good! I could eat them plain. Perhaps the only change that I will do next time was to make them bigger, I will just divide them into three rather than six, I think they will be perfect that way.

I can't upload the crumb shot and the schmear. I'll try to post them in the future. Sorry for the redundant photos, I'm just happy with this achievement. Enjoy!

Proofed bagels overnight.


After boiling ready to be baked.


Baked and Hanged with a cloth. I feel like I was selling them.


Happy Baking!

Happy New Year!

PalwithnoovenP's picture
PalwithnoovenP


DISCLAIMER: THE RESULTS OF THIS EXPERIMENT COULD BE DANGEROUS OR EVEN FATAL. I AM NOT ENCOURAGING ANYONE TO DO THE SAME INSTEAD I AM JUST SHARING MY EXPERIENCE IN THIS UNIQUE CRAFT. IF YOU WISH TO DO SOMETHING SIMILAR, DO SO AT YOUR OWN PERIL.


WARNING: EXPLICIT PHOTOS OF POSSIBLE BIO-HAZARDS. IF YOU HAVE AN IRRATIONAL FEAR OF FUZZY THINGS, CLOSE THIS TAB/WINDOW NOW!


Hello TFLers! As promised in this post, I am posting the fruit of the long culinary journey I embarked months ago which is a success! But this is in no way related to bread so I hope it does not get deleted! :)

I know many folks here are not only bread bakers; they also have many other talents/passion. Some are wine makers or beer brewers and others, occasional cheese makers. I have seen many people do those crafts at home with success but I SELDOM see someone make their OWN SOY SAUCE. I was always intrigued with the how this favorite condiment of ours is made and the idea of making my own. Now I am a "soy sauce brewer" too. Not really sure if this is technically soy sauce but more on that later.

After lots of researches, I finally knew how to make. Cook some soy beans, let them mold, dry under the sun, ferment in brine, strain and age. You read that right, let it MOLD! Soy sauce is a product of fermentation by a mold which is usually perceived as harmful organisms by those unaccustomed to it; but may delicious food items are created with the help of molds; some cheeses have molds too: more molds, more delicious! So no problem! Soy sauce brewing has also became a highly industrialized process now; made in sterile environments using pure cultures such as aspergillus oryzae so it's even safer.

Since it is impossible for me to find a pure culture and make it in a precisely controlled environment, I went the traditional route which seems even cooler! Imagine making something many think can only come from the store using simple technology and ancient know-how. 

In traditional soy sauce brewing, the native microbes from the environment are what is only used; to whoever the environment is favorable takes hold and flourishes.

Also, I do not have ready access to soybeans so I thought of using other beans and making the undergo the same process and see if it will taste like soy sauce. I even entertained the idea for a baby thesis during high school back in 2008. I decided to use mung beans because it's cheap and readily available. Not really sure if it will succeed (although now there are many "non-soy soy sauces" with each "plant" giving a unique flavor), I still pushed through despite the long time the experiment needs which will be wasted if it fails. You know when you're doing something for the first time, you get excited and impatient. :D

There are many ways to prepare soy sauce which differs by country (China, Japan, Korea), by region, with how the beans are treated (whole or mashed), the source of the microbes (leaves, straw); like I said MANY! All of the steps I did has science behind it backed up by lots of research, it will be just too long if I will explain them one by one.

This is what I did:

1. I soaked mung beans overnight and steamed them for 1 hour. While hot, I spread them on a bamboo tray lined with banana leaves.


2. I covered the beans with another layer of banana leaves and wrapped the whole thing in a thick blanket to keep moisture and heat inside, then I put it on our roof under the sun for the whole day to incubate the beans. The roof is the perfect place because it is extra hot (warm) and far from the animals below.


I took it inside our house when it got dark. Oh! There is already an offensive smell. I continued to that for 6 days; by day 3 or 4, it started generating its own heat. The smell also gets stronger each day, someone doesn't need to be a bloodhound to track where it is hidden by day 3. Here are the beans after 6 days.

WARNING: EXPLICIT PHOTOS OF POSSIBLE BIO-HAZARDS. IF YOU HAVE AN IRRATIONAL FEAR OF FUZZY THINGS, CLOSE THIS TAB/WINDOW NOW!


Various wild molds of various colors have colonized the beans. The beans are now also cemented by mold mycelia. What exact mold species they are I don't know. They could be aspergillus species because it's pretty hot and humid where I live. Some of them do not look so scary like the white one but a few others look like they could kill.  Green, yellow green, black, gray and various shades in between. Let us look at them up close.

Dark green mold. First time to see this kind of mold. Color is like the green crayon I used to have during kindergarten.


Black mold. Could be aspergillus niger.


Yellow green mold. Could be the aflatoxin (a potent carcinogen) producer aspergillus flavus. Actually, this is the mold that bothered me the most if I will pursue this project.

A gray mold. Could be the same mold as the black one but it's really lighter in real life. It's my first time to see this mold also.


This picture is out of focus, maybe the next picture offers a better view. It is the one surrounded by the dark green molds.

These white molds are the most normal and beautiful looking ones. They are also the ones who bound the beans most tightly. The beans just look like tempeh. They might be different molds that have not just reached the sporulation stage to reveal their differently colored spores.


3. I broke up the clumps of beans (they're pretty hot) and washed them with water to remove spores which can be bitter and excess mycelia. I was bathed by a cloud of spores during this process, I just did my best not to inhale them and just took a bath afterwards. I should have wore a mask together with gloves, thoughts of getting aspergillosis or fungus balls in the lungs ran through my mind for more than a week. :)

4. I returned them to the bamboo tray to sun dry for an entire day. Here is what they look like after sun drying. 


THE SMELL! OOOOOH! I transferred them to a clean glass jar right on the roof where the sun-dried. Clay jars are the traditional fermenting vessels and I would love to use that but the one we have in the house is an antique one traditionally used for vinegar that I don't want to damage that's why I just used a large glass jar. I hope the neighbors did not thought what is this crazy guy doing picking up beans on their rooftop and covering his nose with layers of towels. :P

5. I poured 25% brine over the beans and covered the jar with a net; holes large enough to allow sunlight in but small enough to keep flies and insects out. 


Trying to make the most out of the remaining sunlight for that day.

Soy sauce needs to ferment under the sun for at least 2 months to develop flavor. During this time, lots of biochemical processes which will take us to a science class if I will try to discuss take place most notably the breakdown of proteins; some folks here like biochemists, chemists, can enlighten us further.Care must be made not let it get rained, otherwise it's spoiled. It must also be stirred regularly. I forgot to stir it for a week and I got this:


Looks lovely or disgusting depending on who you are. I think, it looks like corals or a soft surface where you can jump before it swallows you. :P


During rainy days, it stays on my study table.


On sunny days, I bring it outside.


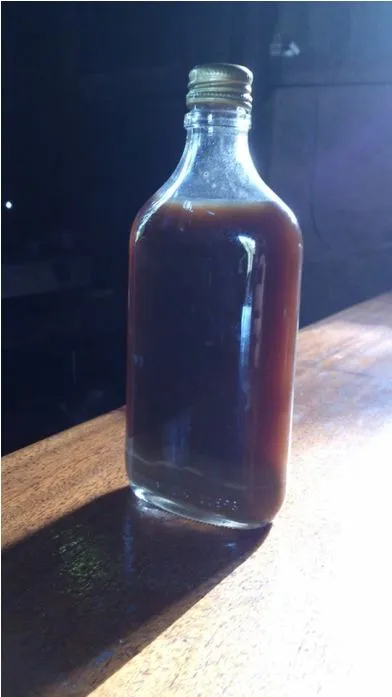
6. I fermented it for 4 months and slowly, the greenish liquid turned into a brownish amber colored liquid. It smelled really stinky but with notes of pineapple during the first 2 months so there were esters forming I suppose. After 4 months, I strained it and boiled the liquid for 20 minutes before bottling. The solids left were the miso that I kept in the same jar but insects found their way there so I had to throw it out.


Here is the finished soy sauce standing next to a bottle of commercial soy sauce. It considerably lighter due to lack of caramel color, also it is more opaque and not as refined.

At the time of bottling, it smells nothing like commercial soy sauce. Now, already aged for 4 months since bottling; it is really like soy sauce! The aroma is 80% soy sauce with 20% fish sauce notes despite being entirely of plant origin, along with a nutty note not present in commercial soy sauce. The taste is complex (possibly from the different microorganisms not limited to molds but also including yeasts and bacteria), a mix of soy and fish sauces with a pleasant nuttiness, just a tad too salty because of an imbalanced bean to brine ratio. I could have use more beans or a 20% brine, perhaps the first option is better. Other than that, very very good and I am really happy about it.

I picture this adventure using this analogy:

Commercial soy sauce is to homemade soy sauce as yeast bread is to sourdough.

I hope you enjoyed this brave or foolish journey of mine into home soy sauce brewing. Thank you and...

Happy Brewing/Baking!

PalwithnoovenP's picture
PalwithnoovenP

Hello TFLers! I missed you all along with baking and posting here. I realized that teaching is also one of my passions and I want to teach formally so I decided to study again. Yes, I am studying now to have units in education to be able to take the licensure exam and hopefully pass it so I can teach in a local high school. What's better than having a "job" where you can combine two or more of your passions; I might just teach cooking or even baking.

Just a short post, I'm in the middle of test construction and I just really want to hear from you again.

These were baked in July for a friend. She is the one who informed me about the registration for those who want to continue studying to pursue education. We took the entrance exam and we fortunately passed. She celebrated her birthday last July so as a sign of gratitude and to celebrate her birthday and our friendship; I baked these cakes for her.

Pineapple cakes are one of the most popular Taiwanese pastries; it is almost imperative to bring a box back home if you've been to Taiwan. Though called cakes, they are more akin to a tart or a cookie. What they are is a tangy pineapple filling wrapped in a crumbly shortbread-like crust. Their baking process is also unique; although baked in the oven, each cake is flipped halfway through the bake which I think is perfect to replicate in my clay pot to get even browning and crispness.

May to July is the best time here for pineapples. They're firm and crispy, juicy and sweet and tangy. We luckily found some freshly harvested excellent quality ones in a roadside stall near our house. We immediately bought nine! They come around at $2.00 for three pieces, so cheap! What's not to love?


What better way to make the pineapple filling than with 100% fresh pineapple. Canned pineapple will also work if pineapple is not in season but as I said I have the best thing in my hands. I want a filling with some texture so I approximated the size of canned crushed pineapple instead of blending it into a complete smooth puree like some recipes do. I went old school here, instead of chopping into segments and dicing it; I held the pineapple by its "stem" and made vertical cuts around, then a series of perpendicular cuts then finally, shaved the cuts with a downward slicing motion; what you will be left with is the core.It's much easier and faster but this is a messy job because the pineapples were so juicy! You have to put a container underneath your hands to catch every bit of flesh and juice. 

This is the core of the pineapple. A very nice crispy and fibrous snack to munch on. Doesn't it look like a Popsicle or an Ice lolly?


Et voilà ! Home-crushed pineapple! To make the filling, I sweetened it to my liking and added a few squeezes of lime juice. This was slowly reduced until very thick  and firm that it can hold its shape.


The dough is like a shortbread. The only difference is the addition of the egg and milk powder perhaps for more liquid to accommodate an added dry ingredient. Believe me, the dough smells like ice cream! I think it's a little too crumbly and dry due to lack of accurate measurements.


Here is the cooled pineapple jam/filling divided into six balls. It looks very different from the fresh pineapple. It has a very intense pineapple flavour; 2/3 of each ball would have been a better ratio for the cakes to taste perfect.


The dough was divided into six balls as well and each was filled with one pineapple ball. it was a little difficult to seal because the dough kept cracking because it's a little dry but I still managed to seal them. They were the pressed into my mini llaneras just like real pineapple cakes getting pressed into their square molds. The pineapple filling was so dark, you can see it through the dough.


They were baked in my clay pot for 15 minutes, flipped then baked again for 10 minutes with live fire for the whole baking time. Due to the uneven heat of the pot some of them were pale but the golden brown ones have the prefect hue. If you are wondering why there are only five of them in the "baked" photo, that is because there is a swift pair of hands that grabbed one immediately after they came out of the pot.


The rich, crisp, crumbly, buttery, milky shortbread was complemented really well by the equally rich but bright, sweet and tangy fragrant pineapple filling. A really delicious special treat fit for a special person in my life. I wrapped three of them beautifully; each in parchment paper along with a ribbon and a note for my friend. No photos because I did that right before going to school. She really loved them and it's a special feeling when you cheer someone up through your little efforts. Food really touches lives and it's great too that we both love to eat.

See you all next time. I still need to finish my test! :)


PalwithnoovenP's picture
PalwithnoovenP

Hi! Today is my birthday and I usually cook even simple meals to celebrate occasions like this but my mom underwent a D&C just a few days ago and was advised to rest for a fortnight to a month so I am the one who is manning the household now; I am doing all of my mom's chores in addition to my own so no time to bake or cook or even check your posts here this time. We just bought some stuff that I like from our favorite restaurant and stall. Pancit (of course, no birthday is complete without this), siopao (steamed buns' one with a roasted pork filling and the other a meatball one) and lechon manok (rotisserie chicken done the old-fashioned way over coals served with liver sauce), a buko salad ice cream (young coconut ice cream with sweetened sugar palm fruits/ice-apples and pineapple bits which I like to eat with some cheese; I know. Weird!), and naturally ripened huge fragrant sweet juicy mangoes harvested from our own yard to boot.


Anyhow, I just want to say I am embarking on a long culinary journey and I just can't spill the beans yet! If it fails, I won't talk about it but if it succeeds, I will post it here with link to this post! :) Maybe you will try to guess, but I won't confirm anything!

Here are some things that I think some of you may like. Last few months, while I've been dieting with nothing to do other than exercise, I became a crazy DIY freak! I experimented to make my own food stuffs that are just commonly bought because they are a little difficult to make.

A jerky style dried fish with sugar and seasoned with spices. March to May is a good time to dry because there is no rain; the wind is cold and dry (this is only true in March); and the sun shines bright and long. The texture is like tuna or even meat with very good flavor, great with rice or even bread. The only catch is this very delicious fish is full of bones! Little children are advised not to eat this because of the hazard. I hanged a boneless one yesterday but it didn't hang very well because there are no bones to support the structure of the fish, I had to put skewers multiple times to at least give some structure but some parts of the meat fell off. If I will make a boneless one again or even just a huge quantity, I think I will need to have a special perforated screen so no hanging involved and much easier for a larger production. 


Here it is hanging in the sun and wind.


My boneless one, see the difference?


Some salted mackerel. Just salt and fish, this is the kind that you eat with porridge and used to make salted fish fried rice. It is dried and fermented at the same time so it has a little pungent smell but it should smell like the sea at the same time. I experimented and took the head of one to see which is better, I should have kept the head, lots of tasty meat there. Store bought ones are one-dimensional salty, you can't taste anything but salt probably to keep indefinitely and/or to mask the bad quality of the fish. My homemade one is salty but just right, very rich and full of umami; you can really taste the savoriness and freshness of the fish. This is best for breakfast fried crispy. served with chili vinegar over some garlic rice.


Again, hanging in the sun and wind.


A slice of Lap Yuk, Cantonese air dried meat flavored with Chinese spices; also called Chinese bacon. Traditionally. pork belly is used but I used shoulder to make it less fatty but I will admit the fat is the best part! :P I will go traditional next time and use belly.


And probably the most infamous of the bunch. :P Homemade fermented krill/shrimp paste! Just krill with some salt fermented for a few days. It is one of the most scandalous smells in the kitchen; literally your neighbor knows you cooking this when it hits the hot pan to be sauteed with garlic and chilies and sugar to suit your taste. I like it sweet and spicy and I could finish a bowl of rice with just a spoonful of this. It really packs a punch!


PalwithnoovenP's picture
PalwithnoovenP

I kept my promise last year, to make an improved version of this dessert for dad but it took one whole year! :D It is always a coincidence that dates come to our house from Dad's bestfiend's son working in Saudi Arabia. This time, they were different. They were so lusciously soft, almost spreadable and very sweet with a caramel-y taste; I'm not sure if these are Medjool dates. This time too, he was the one who requested to turn most of the dates into sticky toffee pudding so he had to stop himself from snacking on them. I could make them days ago but I really intended to make this on his special day. It's his birthday cake this year!


Still all by hand and no measurements! I creamed the butter and dark brown sugar until fluffy, then add the eggs one by one then salt and vanilla extract then the flour with some baking powder. Finally the dates soaked in boiling water with some bicarbonate of soda. I poured the batter in greased and floured 7" cake pan 2.5" in height then it goes straight to my pre-heated clay pot over a wood fire for 1 hour. Yes! 1 whole hour! The cake is pretty thick and you want it to bake long and slow but the secret is in the fire and heat control. First 20 minutes over a roaring flame for maximum spring, next 30 minutes over a medium flame then the final 10 minutes over embers just to dry out the center.


The cake is tall and has a slightly crusty and crispy bottom and sides and a lovely soft, fluffy and moist inside. The greasing and flouring of the cake tin really helped the formation of the slight crust that we love and how it released extremely easily. We can't believe how gorgeous it is, it looked like it came out from an oven!


I served the toffee sauce separately instead of soaking the cake because we want to feel the cake in it's pure state to feel the dates' taste and textures which I left whole. It is really much better because it's really dates bite after bite. I just can't explain it because we really love dates! :P One little change and a whole new dimension in this simple cake.


It's a messy plate I know but you understand me right?! I think this picture says it all!


A simple dinner with livers in cream sauce with either pasta or rice and cold sticky toffee pudding for dessert. I hope you enjoyed this as much as we did. Happy Birthday Daddy!

PalwithnoovenP's picture
PalwithnoovenP

Hi TFLers! It's been a while since I last posted! That's because of my weight loss journey. I tried to avoid baking treats because it's difficult to stop once you have a taste and I need to limit my portion sizes or opt for foods with a high satiety to calories ratio so instead of eating a small piece of bread, I will just eat some rice which has the same calories but makes me feel full and contented longer. :) I also avoided stalking TFL because it will stimulate cravings!

Gladly, my efforts have paid-off; in almost 4 months from 39" I have trimmed my belly to just less than 35" and I even gained 5 pounds and when the scale goes up but the measurements drop, it is more good news! I have also brought my body fat percentage down to healthy levels form 26% to 21% the last time I checked, I hope it's at 19% now. Fat loss is very obvious in my legs and arms, some shadow of definition is even there but the fat just keeps holding on to my belly so I will still continue this journey which also means less bakes and visits to TFL. :( I'm nowhere as fit as some but I saw a huge huge improvement in myself and that's what is the most important I'm extremely happy with it. Also, my posts are usually picture heavy and long but this time I don't have much time to take pictures because of my workout and I'm keeping this short because I need to sleep to recover from my workout. :P


Today is my mom's birthday so it's an automatic cheat day! Yey! :D It is also an early Mother's Day treat. My mom and I like Korean food and I've been wanting to make this popular Korean street food for a long time so I think this is the perfect time to make Hotteok. Hotteok is like a rustic version of a cinnamon bun. Cinnamon bun was raised in a manor but Hotteok grew up in the streets. It is a simple but very delicious and comforting food. Yeasted dough filled with sugar then fried. The dough is crispy, soft and chewy and the sugar inside turn to syrup. Best and should only be eaten straight from the oil. Be careful with the burning hot sugar though!

Of course, I just don't want to make it the classic way. So I made some adjustments inspired by my various "baking" backgrounds: I made the dough flaky because I imagined the flavor combination would go well with other laminated doughs like croissants and Danishes. Then, after frying I "baked" it in a skillet preferably in an oven for extra crispness which is inspired by some Chinese treats. It seems I have a penchant for flaky treats for my mom's birthday; croissants and pains au chocolat last year and this flaky Hotteok this year. Hotteok is made with a very sticky dough for its signature rice cake like texture but I made my dough a bit drier for the ease of lamination. My filling is still the classic one; brown sugar, cinnamon, and sesame seeds though you could also use other or a combination of nuts like peanuts, walnuts, pecans but my biggest change is the use of sourdough which adds a wonderful nice tang that complements the sweet filling. Zhou Clementine also has this characteristic of making the dough taste buttery even though there's none!


Tuesday night. I refreshed my sourdough starter which has also gone meal less for the past 4 months. Starters are really difficult to kill, they are like villains in movies! Then I made the levain Wednesday morning and made the dough in the afternoon, 6 hours bulk fermentation then to the fridge. I divided it into 6 pieces and laminated each one by one before filling. I fried them until golden on both sides the crisped them on a skillet 5 minutes on each side. 


The result; very crispy and flaky and not at all greasy on the outside, slightly chewy and tender on the inside with a sweet, nutty, lightly spiced gooey filling! The best with a cup of black coffee.


Look at all the melted sugar inside! Just pools of gooey dreams!


Happy Birthday Nay!

My starter will also be one year old on May 15, so also Happy one year of commercial yeast-less baking! And..

Happy Mother's day to all moms out there! I hope you enjoyed this post! See you next time!

PalwithnoovenP's picture
PalwithnoovenP

This is the continuation of my sourdough viennoiserie series. This time I used AP flour for the dough. I also have some milk that is going to expire so that's what I used as the liquid. For all the levain builds I also used milk as the liquid and fed it with AP. 


Zhou Clementine seems to like milk and AP! She was very active, maybe the hot temperature (29°C) could add to that too. She started at just a quarter of the container this was the result just after 4 hours! I'm not use to my  levain being white in colour due to the milk and the bleached flour.


The dough is made with AP flour, milk,salt and oil. I also made it wetter than before for easier handling and to use the last bit of milk. I bulk fermented it at room temperature for 3 hours. Most croissant recipes do not do this but I have to because from past experience, my starter does not want to be put straight into the cold. The dough will be underfermented and the final proof will be very very long and the results will just be not good.


The dough doubled, and it was shaped into a square and put an hour in the freezer and 3 hours in the fridge. I have made my butter block earlier. I gave it un tour double et un tour simple then an overnight rest. The dough is still a bit too strong but much more cooperative than the last 2 times. I wonder if it's the sourdough and/or the bulk ferment that made it strong despite the use of AP.

The next day, I divided the dough into 2. The divided both into 3. For the first batch I filled them with the leftover crème pâtissière from my last bake and simply folded them over without any crimping. I mangled one and it was ripped but I still managed to pull it enough to cover the pastry cream.


They were baked super dark almost burnt because I got sidetracked and forgot to take them earlier but they were still delicious with a very very little bitter aftertaste to cut through the rich sweet custard. The crumb is not still not that good but it was soft and the crust was super crispy, shattery and flaky. 


For the second batch, I shaped them into petits bâtons. 


I proofed them eggwashed really well and they reached this point in just 3 hours at 31°C. I think this is really the best batch, the layers were clearly defined and this is the most expanded and jiggly batch that I've made. Maybe the secret is the super active levain and high room temperature.


They were baked in my clay pot for 20 minutes over live fire; flipped after 10 minutes. Two of them baked darker maybe because they were directly above the fire. No butter leaked and the spring and shape were good despite being flipped.


The crumb is definitely better! More open but there are still layers that stuck together because my lamination struggle due to the still strong dough. Next time I will knead less and let time develop the strength. Both versions taste a little richer than my previous attempts because of the milk, they were a bit softer too but just as crispy and flaky! Of course, the taste can't be beaten. Tangy and so so buttery! As I've said the sourdough tang seems to modify the buttery taste and make it more buttery.


Look at how flaky that crust is!


I'm also happy that the honeycomb look is starting to form and be obvious especially in this photos.


The new Miss Universe is... France!

Félicitations ! Miss France won Miss Universe here in my country in Manila (and Steve Harvey got it right!) so I think these French inspired treats are a perfect way to celebrate this moment historique ! When our country was eliminated, may dad and I rooted for France. Also, as a someone learning the French language, I listened to her carefully to see if I can understand even a little of what she will say and I find it cool that I was able to understand about 50% of what she said even though it was fast with many "modern" glidings like with je + verb (sorry, language loving part of myself is just taking over here) like in the "je pense" part. We're still very proud of our very own Miss Philippines!

À la prochaine !

Hanggang sa susunod!

Until next time!

PalwithnoovenP's picture
PalwithnoovenP

Another laminated sourdough, as I've said I want to practice lamination in this short cold weather so here is another variation. This is a treat that you either love or hate! I'm a raisin lover (while some really detest raisins and I don't know why) and I love raisin bread in all forms so I decided to try this super deluxe version.

I want to call this Pain au Levain aux Raisins but I don't know which characteristic defines it more: the au levain or the aux raisins so I don't know which one should come first like Pain aux Raisins au Levain;  and the au could also be replaced with avec like Pain au Levain avec Raisins (should I add des or les?) but I feel the first one is the most appropriate but these names may also not may any sense! :P So I just stuck with a simple one.


I did my first levain build at night and let it sit for 12 hours, then the next morning I did the second build and let it sit for 5 hours. With the right schedule this time, the levain was very active! :P I then mixed it with bread flour, water, salt and oil until I have a non-sticky dough and kneaded it just until smooth. I made it wetter than last time and kneaded shorter. Then it goes  to a 3 hour bulk ferment at 27°C. Bulk ferment should not be too long for laminated doughs otherwise the dough will be too strong and difficult to roll out but from my experience my starter doesn't like a cold bulk ferment so I did a bulk ferment but kneaded less to avoid messing things up.


The dough did not double but it clearly increased in size. I then shaped it into a square the put it in the freezer for 2 hours for it to get cold. This "shaping into a square" is akin to a stretch and fold and adds further strength to the dough. I then made my butter block and put it in the freezer too for 15 minutes then to the fridge.


As before I only gave it 2 turns, un tour double et un tour simple. The dough despite being wetter and kneaded less is still too strong for laminating using just a steel pipe on a chopping board. I think I still messed with the  lamination and the butter layers were destroyed but at least it's better than last time!

I said this is a deluxe version of raisin bread because aside from being made with laminated dough, it also filled with custard and plumped up raisins. You can plump the raisins in any liquid like orange juice, syrups, liquors like rum or brandy but I wanted to try the simplest method so I just used plain hot water.


La crème pâtissière


Raisins plumped in water for 24 hours almost look like grapes!

Half of the dough was rolled out, spread with custard, then scattered with raisins, rolled into a log the cut into 6 with a sharp knife. This scene is already making me salivate, it feels like I'm working in a bakery.


I put it in my mini llaneras to proof. I spread some softened butter and sprinkled sugar on 3 of the llaneras as I've seen this variation for caramelized edges. It was a little cold that day so the proofing time was a little long, 4 hours. This time they were proofed right I think, they really expanded well and the layers are very obvious in the following pictures; proofed and unproofed.


These are the ones without sugar. The llaneras were just greased.


The were eggwashed the baked in my clay pot for 18 minutes using live fire. I tried to flip some them but the filling fell so I just let the others cook only on one side that's why the tops were pale but the bottom was really flaky and crispy. The ones with caramelized sugar are a little difficult to unmould because they got sticky and stuck a little to the llaneras.

Don't you just love this tempting scene? All puffed up with the butter boiling! 


Crumb is still a little dense and bread like but the crust was very thin, flaky and crispy! And the taste, wow! Very delicious, the sourdough tang made it taste more buttery! The raisins are very juicy and taste like an intensely flavored grape that goes well with the silky vanilla custard. Texture can still improve a lot but the taste beats anything bought at that store. It was getting dark so I used some artificial light here. :)


As I love the combination honey-raisin too, I made another variation with the other half of the dough with the raisins soaked in honey. They were shaped into bâtons too so they were readily distinguishable from the classic ones.


Honey soaked raisins did not plump up as much. I don't know if macerating them longer will do.

I divided this portion into 3 pieces. 2 spoonfuls of the custard was spread along with a generous amount of drained honey soaked raisins. I really like them overfilled like in pains au chocolat but this softer filling is a little more difficult to roll evenly and nicely.


They were also proofed for 4 hours in my greased llaneras. Here are also some proofed and unproofed photos. The difference was not very obvious in the pictures, they were almost overproofed I think which is good. They almost look hollow, expanded very well with defined layers.


                                                     The Llanera Army


          ...Proofed and ready to be baked!


I think these photos are unnecessary but I'm really amused with them so I decided to include them! :P The set-up is like a bakery assembly line. 


The honey raisin bâtons were baked for 10 minutes over live fire then flipped and baked for another 10 minutes still on live fire then another 5-7 minutes over embers.


Crumb is also a little dense and bread like (another use of artificial light here :P) but still separates when eaten and the crust is good. Flavor is the same as the first one, tangy that seems more buttery. The raisins are chewier and exploding with honey flavor which the custard also absorbed. Both versions rock!

I don't know what caused them to be dense. either the lamination struggle because of the very strong dough or the flipping. Maybe the dough is too dry too and some butter leaked during proofing because of too high a temperature; but no butter leaked during baking because they were proofed right. Another experiment to be made, maybe I'll try it with AP flour and knead less and make the dough a little wetter. See you all!


By the way, Miss Universe being held here is big news where the reigning Miss Universe, Pia Wurtzbach gets to pass her crown here in her homeland. We wish to watch all the beautiful candidates just for the experience but we can't even if the venue is near. Anyway, here is a "shocking" trivia told by my dad; the very first Miss Universe (1952) Armi Kuusela married a Filipino. I checked it and its true; she even surrendered her crown and did not finish her reign to marry him. My dad knows a lot of things. :) And that's your trivia of the day! :P

PalwithnoovenP's picture
PalwithnoovenP

My sourdough version of my croissants and pains au chocolat last year. Again, it was inspired by txfarmer's marvelous SD corissants but I want to make it 100% sourdough and I can't and don't measure precisely. Last year's version made with instant yeast was definitely prettier but this SD one had a couple of mishaps along the way so I can say it was still a successful bake to start the year! I made them in the shape of the pain au chocolat for a more even browning because that shape provides more surface area in contact with the llanera and not to mention faster and easier to shape in this hot climate. Since you cannot call them croissants because they are not crescents and calling a bread without chocolate pain au chocolat is senseless, I decided to call them petits bâtons or little sticks; I hope that makes sense! :P

I planned to split the process in 3 days. Make the dough and butter block on the first day; complete the lamination on the second day; and shape and bake on the third day. I planned to use a young (4-5 hour old one) levain to lessen the sourness in the final breads but you know at some point in our lives, we enter a zombie-like state because of stress and lack of sleep and do some things that we had no idea why we had done it; before the first day, I refreshed my starter and after 4 hours, I built my levain and fermented it for 12 hours at room temperature. Only when I woke up the next day that I realized that I should have done the the reverse! The result, a slow levain! Then a sudden trip that fell on the "baking" day, I have to complete the turns and bake at the same time on the second day. Everything was rushed so most of the steps did not go smoothly and resulted in some failures but with any croissant failure, it was still delicious.


Made the dough (Bread flour, water, levain, salt and oil) at night and underwent bulk fermentation for 3 hours before going into the fridge. I was in a zombie-like state again that night that I made a long bulk ferment and even made the dough too dry resulting in a very strong dough that is hard to roll out.

Next morning, I woke up at 10 AM and performed the first turn. After a 1 hour rest in the fridge, I performed the second turn. I only performed 2 turns, un tour double et un tour simple (at 27°C / 82°F). Because the dough was too strong, 1 hour is not enough to relax the gluten so I struggled a bit in the turns but as I said before, my steel pipe and large hands are great help and I was able to roll the dough to desired dimensions. 


The turns are complete and they are ready to be shaped.

After another hour, I shaped them like pains au chocolat and proofed them for 4 hours before baking. The dough was resisting in the final roll-out so I was able to roll it only to a short length then divided into 3 so they were short and fat and do not look like sticks that much. :D Now this is where the slow levain becomes a problem, before 3 hours is enough for my breads to be fully proofed but it's already getting dark and I don't want to cook outside in the dark and cold. 


We just saw another five-foot elapid near the outside kitchen just days before and that snake has a reputation for being very venomous so we want to be extra careful so I decided to bake them even though they were underproofed.


You can clearly see they were underproofed. They should have really expanded and the layers should have been clearly defined if they were fully proofed,

I eggwashed them and baked them in my clay pot for 20 minutes, flipped after 10 minutes. One more problem is I didn't remove the pebbles from the last bake, I thought they would provide thermal mass to help the croissants spring but I was wrong, they provided an "even" controlled heat  that delayed spring; works well for lean hearth loaves to avoid burning and provide a slow controlled sping, bad for croissants where you want a sudden burst of heat to make the butter boil and puff instantly. It's the reason why the ones in the first picture are denser, not evenly browned and has more pooled butter underneath (well it's a given because they were underproofed). The next batch without the pebbles were much better; flakier, lighter, more evenly browned with less butter pooling. Most of them unrolled and lost their shape, maybe it's because of underproofing as well.


At least the layering was obvious! I haven't had the chance to take a picture of the crumb because my phone ran out of battery; we didn't wait for it to charge anymore because these are best freshly baked. It's not bad at all, of course not honeycomb like and slightly bready but still light and flakes easily. The crust is crispy and shatters at one's touch. What I like most is how the flavor improved! The aroma was not that "yeasty kind" it a special sourdough aroma and the taste is complex; sweet and tangy that works well with the heavenly buttery flavor. For those who enjoy sourdough bread with butter, you will really like this!

I hope it will be better next time with the right timing, planning and a better state of mind! :P You will see more viennoiseries and more that require lamination from me for a short while because it will be cold (21°C-24°C) here for 2 months (the only two cold months out of twelve!) so I just have to take advantage of it! It's hot during the day (27°C-32°C) which is perfect for maturing the levain, bulk fermentation and proofing then doing lamination during the night.


PalwithnoovenP's picture
PalwithnoovenP

This is my yard sourdough before. I just gave it a nicer name, "Bakuran" means yard in Filipino and I called it that way because all of the influences of this bread came from our Bakuran. It is my best and favorite bread this year so I made another batch before new year. In the whole 2016, I haven't made a bâtard so before the year ends I shaped my favorite breads into bâtards!

I built my levain in 3 builds, it was very active and triples in 4 hours! This levain is literally escaping out of its house!


I divided the dough into 2 to make 2 small loaves and I proofed them in this festive bowls, straight out of the box. They were employed first for sourdough bread rather than, like, salad; how cool is that? They were lined with a handkerchief and dusted with sticky rice flour.


I got too excited and made the scoring too deep in one of them! I need to practice more!


They were baked in my clay pot for 30 minutes each again on a banana leaf over heated pebbles. I burnt the other one because I utilized some live fire. The pretty one was baked using only embers, I think that is the secret in clay pot baking!

Here is the pretty one!


The other bâtard...


I cooked some soup too so I used some bread flour in the loaves because I will pair them with some soup so the bread won't disintegrate. They were perfect!


We ate the one on the right for dinner and here is the crumb. It was soft, chewy, and moist. The crust was crispy and and slightly slightly chewy. I will let the photos do the talking! :D It was so messy to cut! The taste is sweet with a slight tang! Very delicious with the soup!


Our simple New Year meal.


I think Filipinos have the weirdest interpretations of "western" dishes. We call this soup sopas (probably from the Spanish sopa) and it is the Filipino version of Minestrone and/or chicken noodle soup. It is made with macaroni (or any pasta actually; we used penne because we could not find any macaroni), chicken, carrots, cabbage,and evaporated milk. It is seasoned with fish sauce and black pepper. Milk and fish sauce? It is really weird for some people but it tastes really good to us! I think our sweet spaghetti and cheese ice cream are the weirdest; they are the most hated of my American and other friends who have a "western" upbringing. I love them all! The soup is especially comforting because it's cold here, about 25°C.


And of course, you gotta have leche flan for dessert! Smooth, dense, rich, and creamy!


It's 11:59 PM here right now! It will be 2017 already! So Happy New Year to all of You! 

Manigong Bagong Taon sa inyong lahat! 

新年快乐!     新年快樂!

Bonne année à tous!

Pages

Subscribe to RSS - PalwithnoovenP's blog