It is exciting to have Kristen of FullProofBaking as our featured baker. For those that are not familiar with her work, take a look at this link for her bio and other related information.
For those that may be new to our Community Bakes (CB) check out the initial post at this link for a general idea of what to expect, and also the purpose and focus of these on-line events.
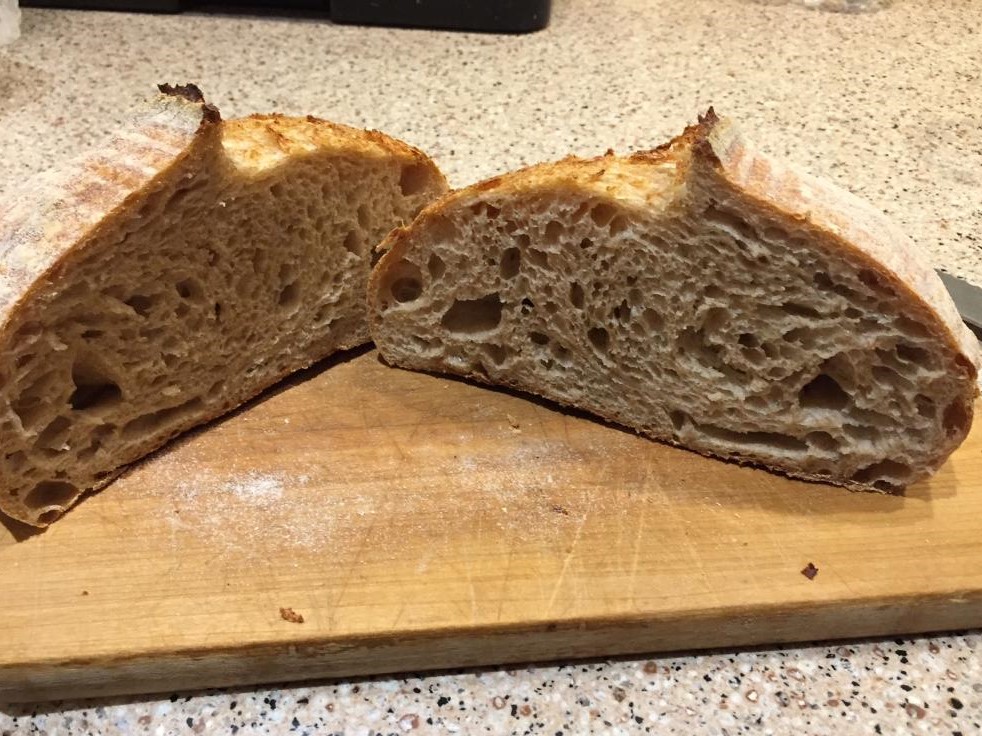
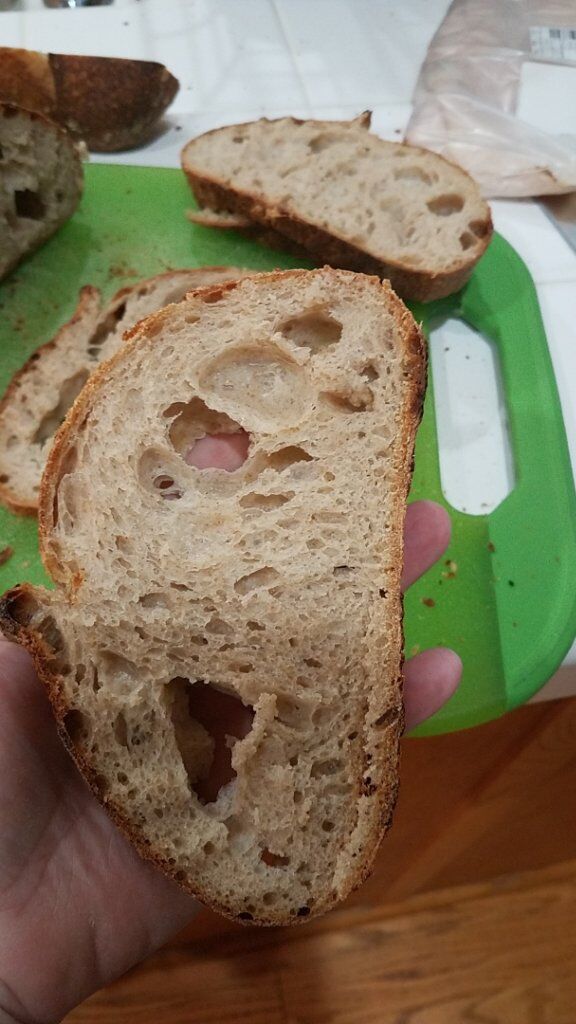
The focus bread is Kristen's Basic Open Crumb Sourdough (BOCSD). As with all CBs, I bake the bread following the author's instruction. After baking this bread over 6 consecutive times, I can say with confidence that this bread is an excellent sourdough formula. Done properly, you can expect a nice ear with good bloom, AND the potential oven spring is huge!
The spreadsheet below (published with Kristen's permission) is set to the total dough weight of Kristen's original formula. ***NOTE - Kristen uses 80% hydration, but some (me for sure) may find that challenging. So, the sheet shows 74% water and just below that 6% "Hold Out Water". For those that want to alter the hydration upwards, just add 3.5 grams of water for each 1% increase in hydration. See this link for a helpful tip.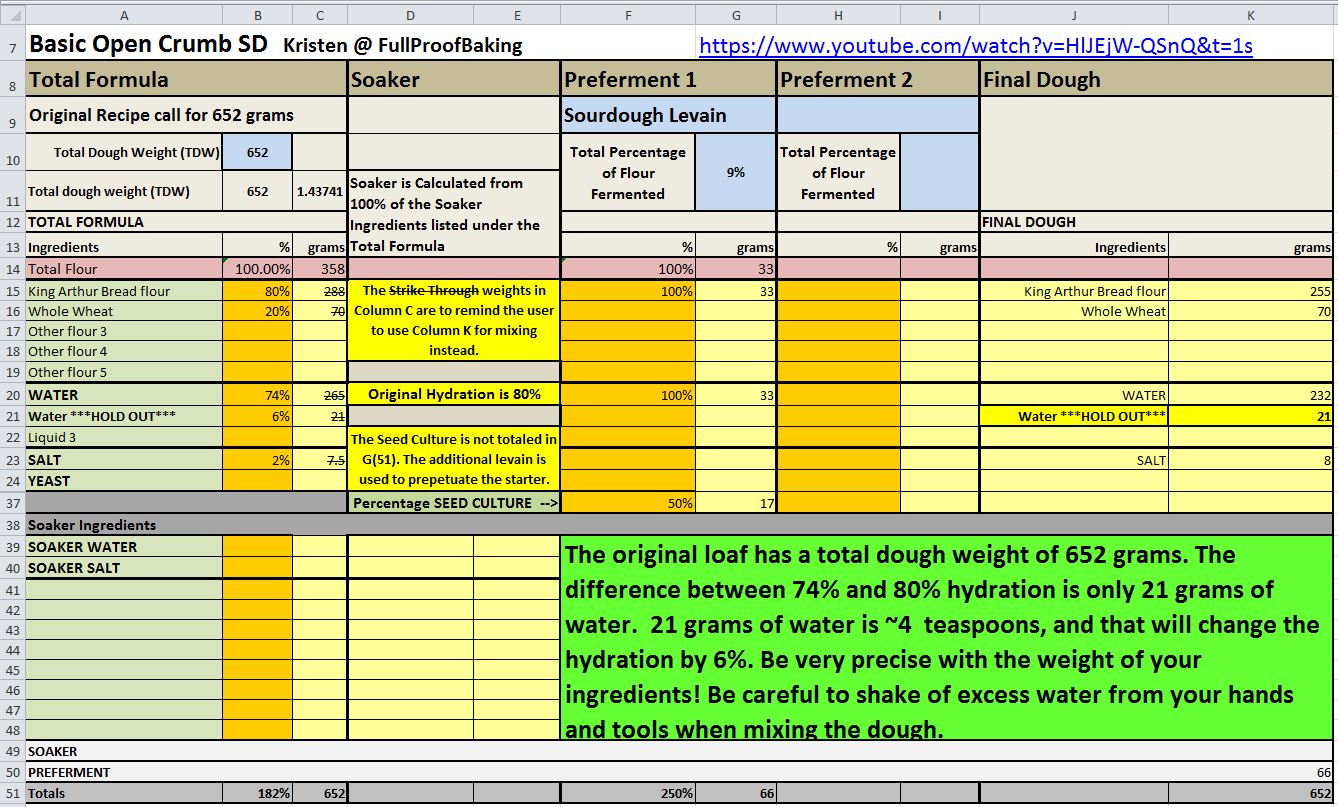
Basic Open Crumb SD
by Kristen @ FullProofBaking
Resource --- https://www.youtube.com/watch?v=HlJEjW-QSnQ&t=1s
Wednesday, October 16, 2019
1. Liquid Levain (0:00) --- I build mine at around 1:2:2 and let it sit at about 80°F until it more than triples in volume and “peaks”. For my starter, this takes approximately 5-6 hours.
Flour for my starter feeds is composed of a mix of 10% rye, 90% bread flour
2. Autolyse (+3:00) --- This is a pre-soak of the flour and water. If concerned about the hydration hold back some of the water. You can add it back later, if necessary. Leave the autolyse for anywhere from 2-4 hours (I prefer 3 hours) while the levain finishes fermenting.
3. Add Levain (+6:00) --- Spread on top of dough and work in using your hands. This is a good time to evaluate the feel (hydration) of the dough.
4. Add Salt (+6:30) --- Place salt on top of dough and work in with hands. Dough will start to strengthen.
5. Light Fold (+7:00) --- With dough on a slightly wet bench do a Letter Fold from both ways. NOTE: If baking more than one loaf, divide the dough before folding.
6. Lamination (+7:45) --- Place dough on wet counter and spread out into a large rectangle. Do a Letter Fold both ways.
7. Coil Fold (+8:30) --- Do a 4 way Stretch and Fold (Coil Fold) inside the BF container.
8. Coil Fold (+9:15) --- Do a 4 way Stretch and Fold (Coil Fold) inside the BF container.
9. Coil Fold (+10:00) --- Do a 4 way Stretch and Fold (Coil Fold) inside the BF container.
10. End of BF - Shaping (~11:30) --- The duration of the BF is a judgement call. Shoot for 50-60% rise (assuming my fridge temp is set very low). Warmer fridge (above 39F) means your dough will continue to rise... so in this case, bulk to more like 40%. Divide and shape
11. Retard Overnight & Bake --- Score cold and bake in a pre-heated 500F oven for 20 minutes with steam
12. Vent Oven 20 minutes into the bake --- Vent oven and bake for 20 or more minutes at 450F.
Everyone is encouraged to join in on the fun. We especially welcome novice baker's. It's a excellent opportunity to learn and a great chance to meet others.
Danny
As promised, for those that are more advanced and want to take a ride on the "wild side", here is a link to Kristen's Cuttlefish Ink Swirl bread. In order to avoid confusion, please post anything that pertains to the Cuttlefish Ink Swirl on that page instead of using this one.
This will be my first attempt at lamination, I will be watching and rewatching Kristen’s videos.
Benny
Lamination is really not difficult. Be patient and stretch out slowly. The biggest pointer I can give you is to stretch the dough out from the center, not the edges. Kristen’s video on lamination is excellent! Lamination starts at 1:25.
And I believe you’ve said to only lightly spray the counter with water before placing the dough onto it.
Benny
Lately I have been spritzing the air above the counter and letting the droplets fall onto the surface. It provides the slightest mist that is perfect for laminating or any other countertop manipulation with your dough. Too much water on the counter will cause the dough to slip around, which is not good. You want the dough to have some stickiness to the countertop.
I am excited to see your results, Benny. You are going to enjoy the lamination process. The dough is super supple and easily submits to gentle stretching. Every dough from 74 - 80% hydration was a joy to laminate.
I actually sprayed above the countertop without knowing any better and I think I had a reasonable amount of water on it. The lamination was pretty fun, but I think I took the stretching from the center a bit too literally and had a few tears where the dough got super thin. Anyhow, my dough is in the banneton for a cold final proof now in the fridge. It had a good BF and had developed good structure and the shaping went well, so I’m hopeful for a good result. I was tempter to add some diastatic malt powder but decided I would stay true to the recipe this time. I am looking forward to baking tomorrow morning especially since the sourdough will go very well with my tomato poached haddock with coconut curry we’ll have for dinner. : )
Benny
What a good idea to spritz above the counter top and let the droplets fall down - sometimes I end up getting too much water on the counter, and run a towel over the surface to pick up any excess water. It's ok if the dough tears a bit - it'll work itself out throughout the rest of the bulk. But you don't actually have to stretch out so far to get the benefits :) Excited for you and your haddock dinner!
The first time I read your comment I missed what you were having for dinner. Oh Boy!!! does that sound good. I just had the bread for dinner. Your bread bakes look wonderful but that dinner has me salivating.
Since there was some interest in it, here's the dinner I made, the presentation isn't super or anything but it was tasty. Tomato poached haddock in a coconut curry.
Is there something I'm missing for accessing the spreadsheet? B/c I definitely can't read it on the forum but I'm seeing no way to open it... which is probably showing my technological ignorance, but such is life.
Jay, the spreadsheet shown on the forum is an image. Can you zoom in to get a larger view?
Danny
Hello Danny,
It seems that PM'ing is not enabled by default so I just sent a request to our admin to have mine enabled.
In the interim, can you also please email me a copy of the spreadsheet as well ?
catahullic@gmail.com
Thank you,
Lance
Hello,
I guess I need a proof reader ...... Can't even spell Hello properly .... and I forgot to include me email address for you send the spreadsheet to.
Also just realized I could edit the emails so I fixed the prior one ..... :( Really need to get more sleep.
Lance
I also got your PM. Will send it out in a few minutes. I have to boot up my computer.
Hey Dan,
I've been building my own spreadsheet for this recipe based off of her PDF and just came across this forum while searching for more information on her recipe.
Would you be able to send me a copy of the spreadsheet? If so, my email is saltplustime@gmail.com.
Thank you!
Pretty good result! Here’s my bake today just out of the oven.
Benny, you are producing gorgeous loaves. Your persistence is paying off big time. Diggin’ that complimentary scoring...
What hydration did you go with?
I really want to learn to bake the original 80% hydration, but I’ll have to pick Kristen’s brain a little more. I’m missing something and I’m not sure what it is. I think I can handle the wet dough, but because of the extensibility of the dough, the gluten skin spreads so much during the bake, that the score fails to open.
Thank you Danny! It’s only been because of everyone’s help that my baking has improved, so I have many to thank including you of course as you’ve been super helpful.
The hydration ended up being about 76.5% as I weighed out and covered the holdout water which I used to wet my hands during the BF when I handled the dough. I didn’t have any problems that I’m aware of, but the crumb will be the judge, during shaping at this hydration. The finished loaf’s sides aren’t symmetrical because I tried to pull the loaf out of the DO after taking the lid off and I squashed the one side in otherwise it would have looked even better. Regarding the attempt at a decorative score, I think I needs to score more on the top of the dough rather than on the sides to make it more evident.
Overall I have to say without seeing the crumb yet that I’m very pleased with this bread especially compared to what I was baking just a couple of months ago. Every bake is a learning experience and I’m enjoying the learning.
Benny
Truly stunning - great shape and rise! Excited to see the crumb :)
Thank you Kristen that is kind of you to say. Thanks for the great recipe and detailed instructions and videos.
Benny
Love your bakes. Really great! I baked mine in a DO also. Mine could have used a few more minutes. Love yours’
Sharon
Thank you Sharon, yours looks great too, I’ve never had an ear with a boule.
Benny
What's the issue for you with the 80% hydration?
I'm happy to report my 82% hydration test so far handles just like in her video :) This is exciting! Just went into fridge for final proof, will be baking tomorrow.
Chleba, the dough handles well, just like the video. It is a joy to handle. The problem for me is the way it bakes up. I struggle to get an ear. And I do luv me sum ear... :D
But, I am a tenacious sort and have no plans to give up. Most things don't come easy for me, but tenacity is a formidable force. My wife thinks I am nuts. And she may be right!
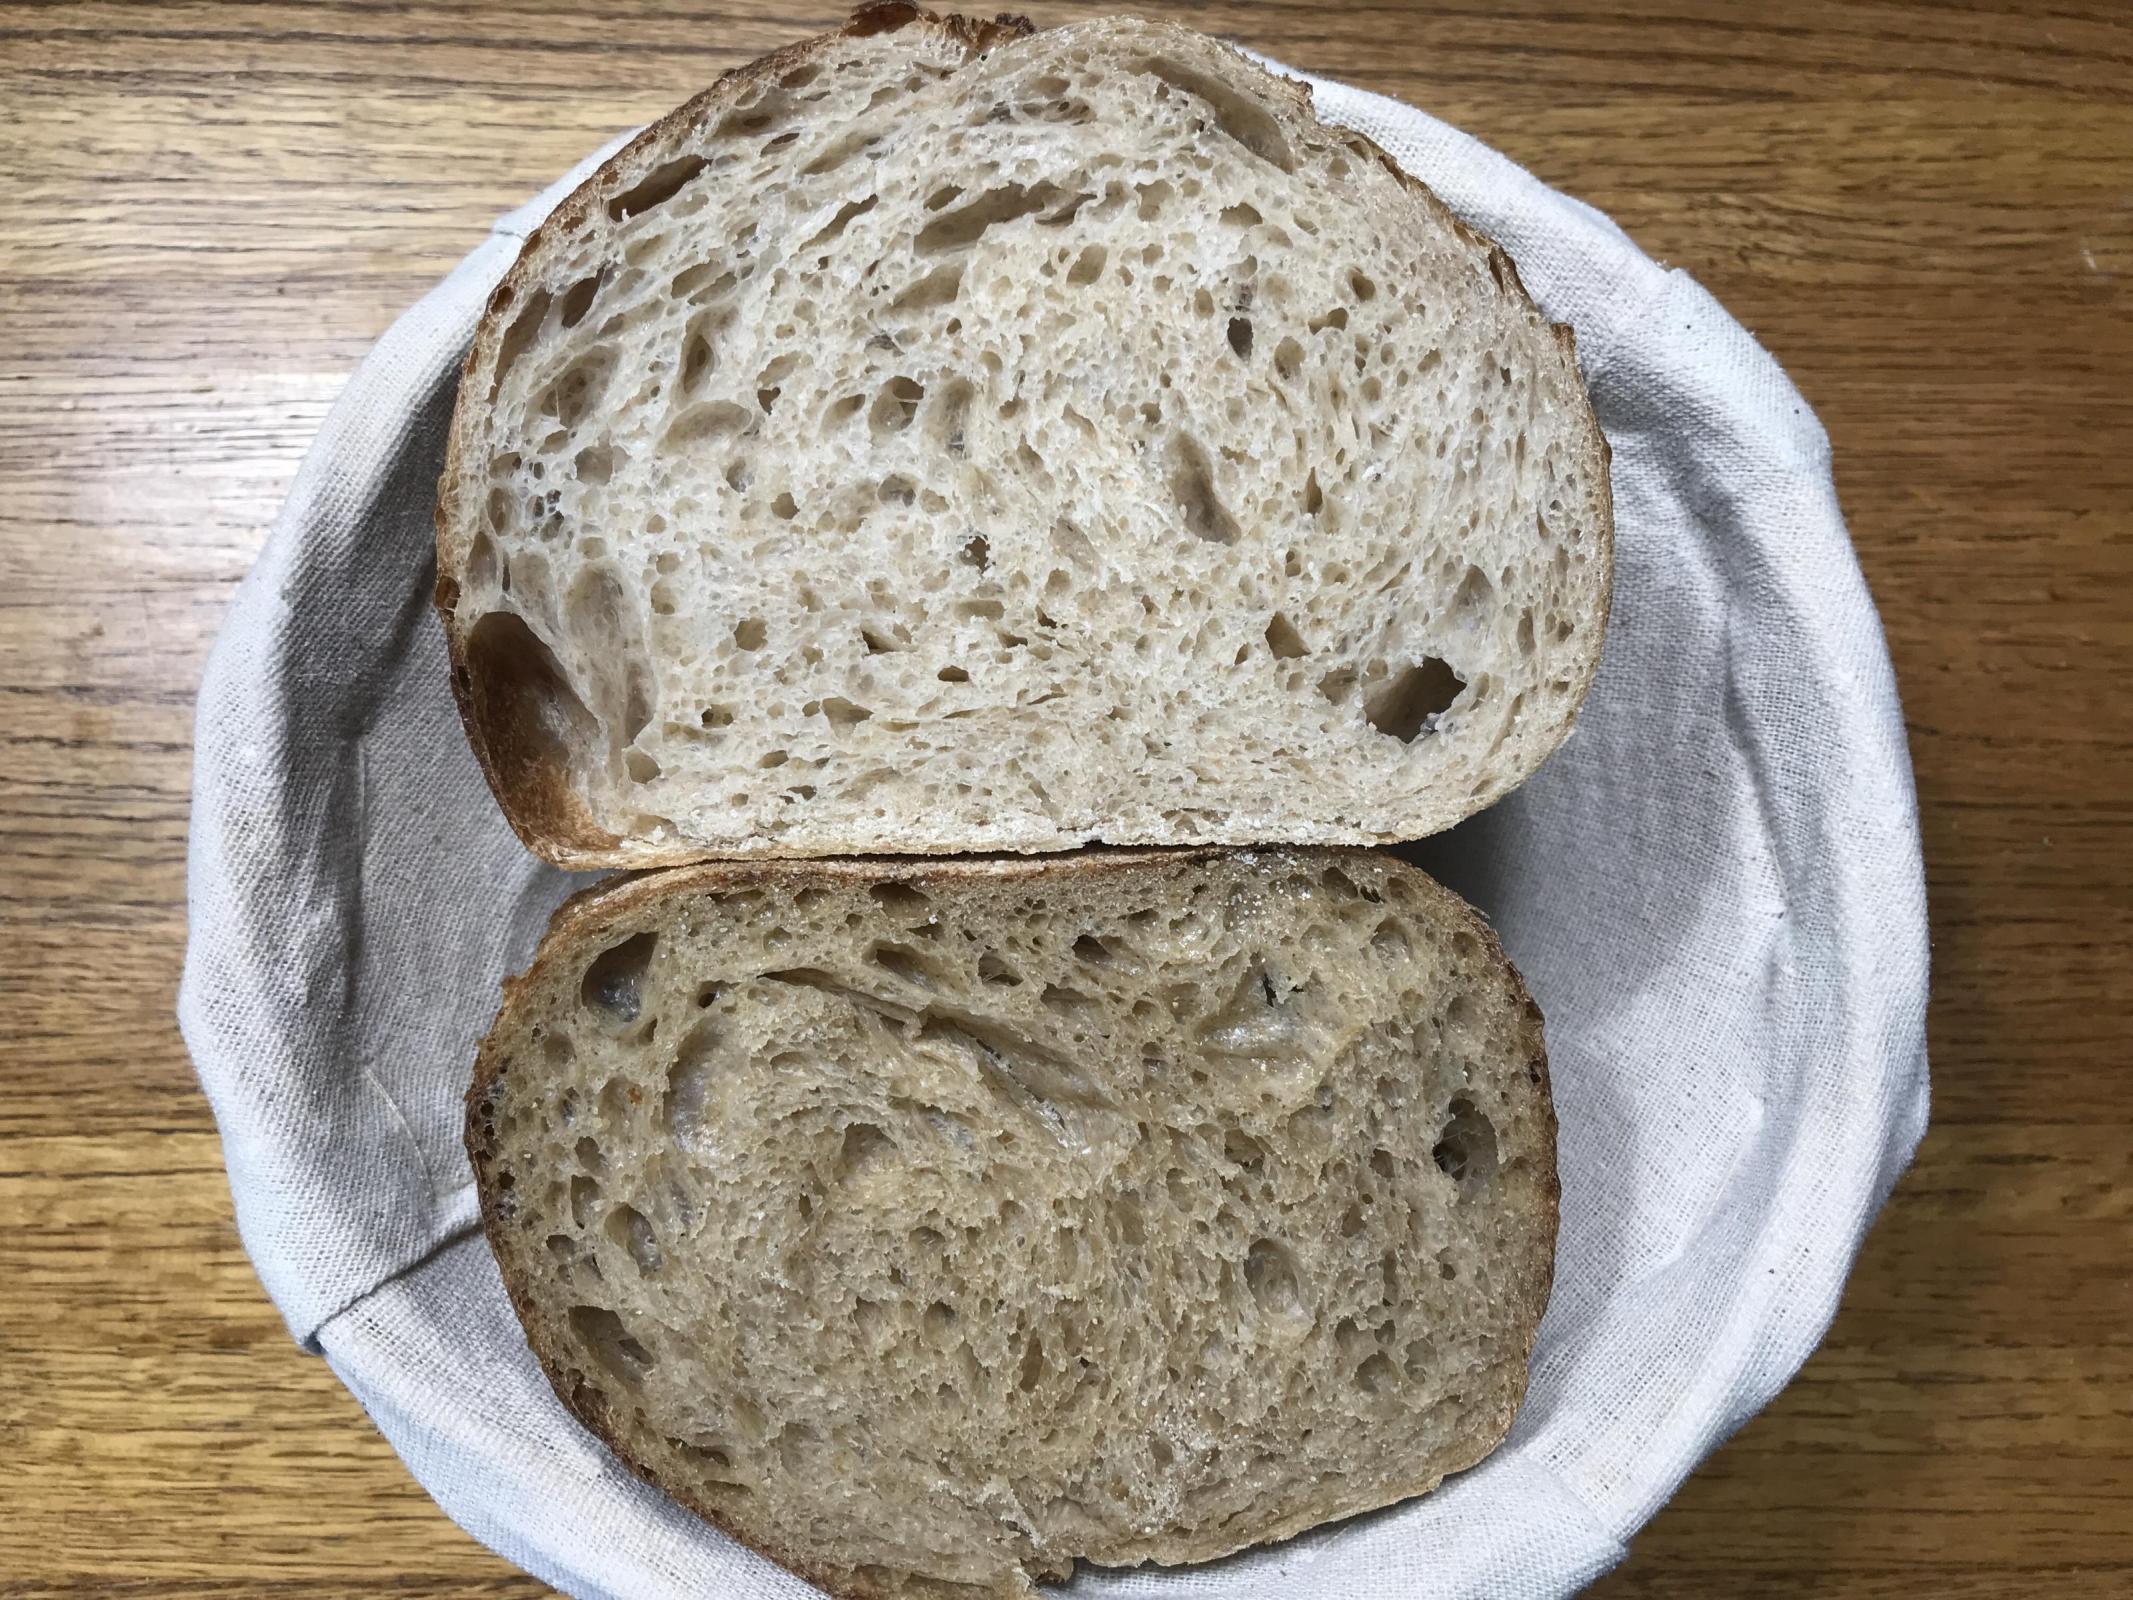
I’m delighted with the crumb, so happy that I’m now starting to have some consistency. The sourdough bread tastes very good with a very mild sour flavour and just enough taste of the red fife.
This is one of my favorite crumb structures - and lovely height/overall shape! Nice even ferment you got on that loaf. I love red fife - I'm sure it's such great flavor :)
Thank you Kristen for the compliments. My DO is a 6 quart one so I have found to ensure that there is enough steam for good oven spring for the relatively small size of my bread, usually 650 to 750 grams, I spray extra water inside of the DO trying to avoid spraying the dough. This seems to have helped my oven spring because I don’t think that the small dough produced quite enough steam for such a large DO. Of course there are other factors such as building better structure and better shaping.
The bread did have great flavour.
Benny
Really nice loaf, Benny. I haven't made this one, but I really like the Fullproof Baking method and it has definitely worked for you too!
Thank you Ilene, I will have to try lamination again and hopefully do a better job with it the second time. It does seem to build structure quite well and in some ways is easier than slap and folds.
Benny
Really nice in every way. The lamination technique seems to help everyone bake a loaf with a taller profile. Similar to the results of using a stiff starter but with a more open crumb. My guess is that the lamination step builds a better structure and prevents the gas from escaping the dough.
Thank you MTloaf.
Benny
Absolutely stellar, Benny! Gorgeous...
Thank you Dan.
Benny
My starter has been sluggish lately but feeding with it with a little rye has rejuvenated it. So thanks for that. This was my first attempt at lamination and it was fairly easy to do with this smaller amount of dough but I don't think I have enough counter space to laminate my regular sized loaf. I was pleased with the volume and the profile of the loaf but the bloom and ear was less than desired. My loaf grew while in the fridge and I may have let the bulk go past the point or perhaps my scoring wasn't deep enough so the end results were not bread porn quality but still nice loaves.
My second attempt was better but I forgot to reduce the oven temp from 500 when I removed the roasting pan and the light seems to have reflected off the crumb in the photo.
MTL, your last crumb shot is outstanding, IMO! When the shot is zoomed in, the thin cell walls, the lacy crumb, and the beautiful open crumb structure makes this one special...
Question - what hydration did you go with?
I agree with Danny your loaf looks great and the crumb ??
Benny
I went with the 80% recipe posted on YouTube with the whole wheat being milled at home. It seems to me that higher hydration reduces the bloom and ear formation while increasing volume. I would say I went to the full proof and would not have gone further, but on the next one I will try a shorter bulk to get more spring and hopefully larger holes.
MTL, you wrote, "It seems to me that higher hydration reduces the bloom and ear formation while increasing volume."
That is an interesting statement. I see that very differently and would like to hash this out. You may be right, and if so, I want to learn.
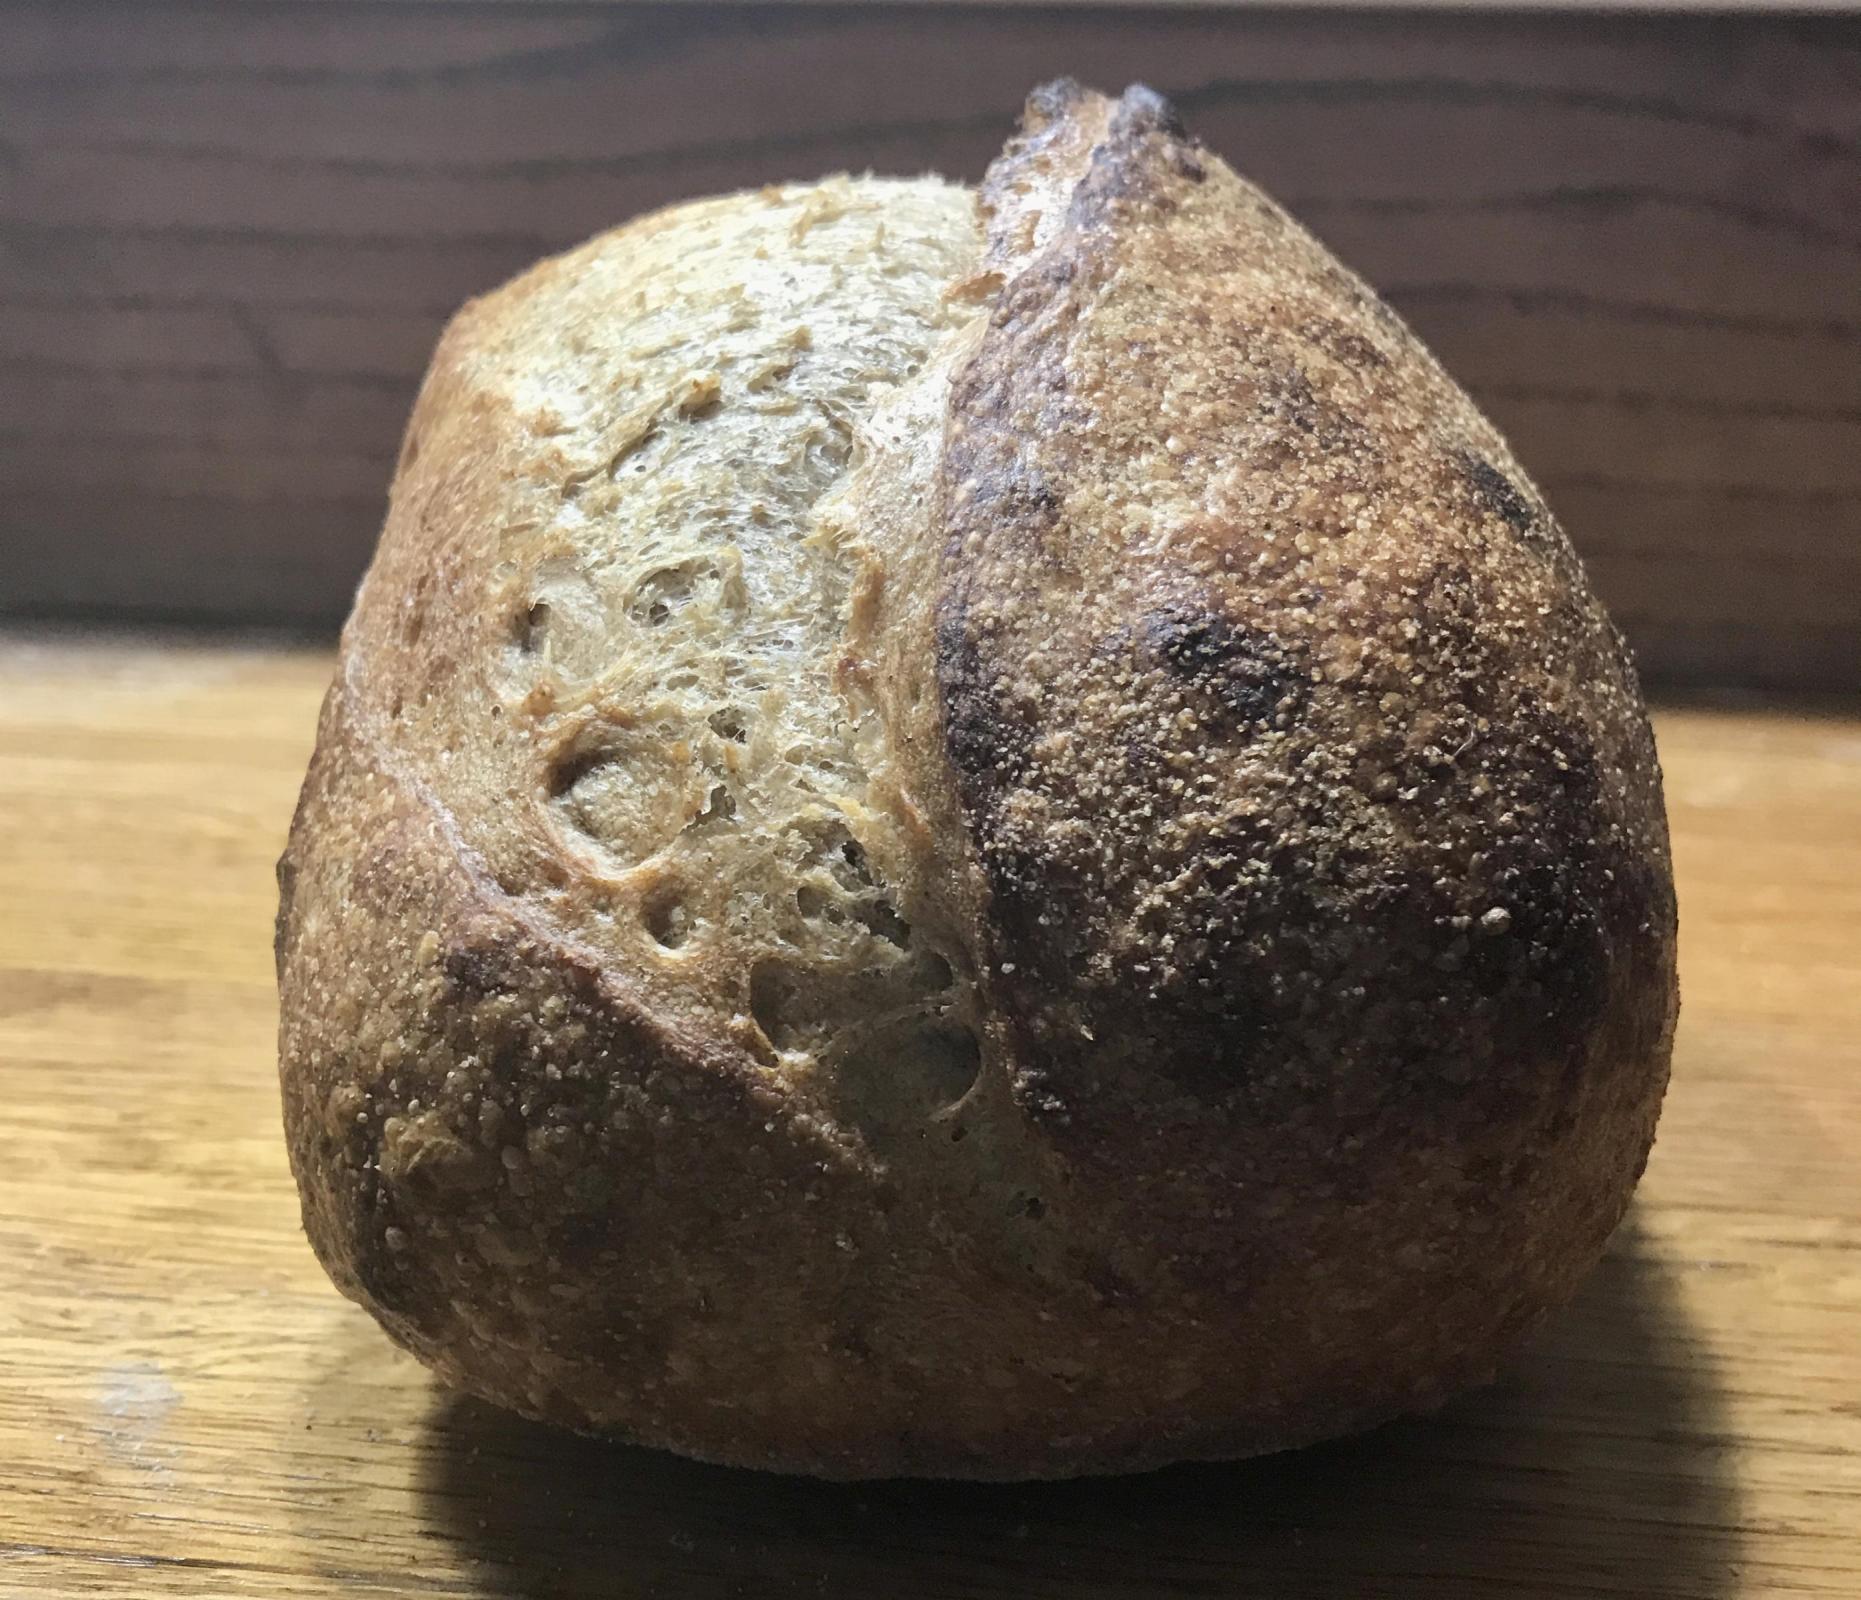
First a definition clarification. I'm not sure my understanding is correct concerning "bloom". Does bloom entail the area between the lower score line and the lower fracture line or is the the entire area from the top fracture line down to the bottom score line? Please refer to the first image below. When I think about this maybe the bloom is the area between the fracture lines only.
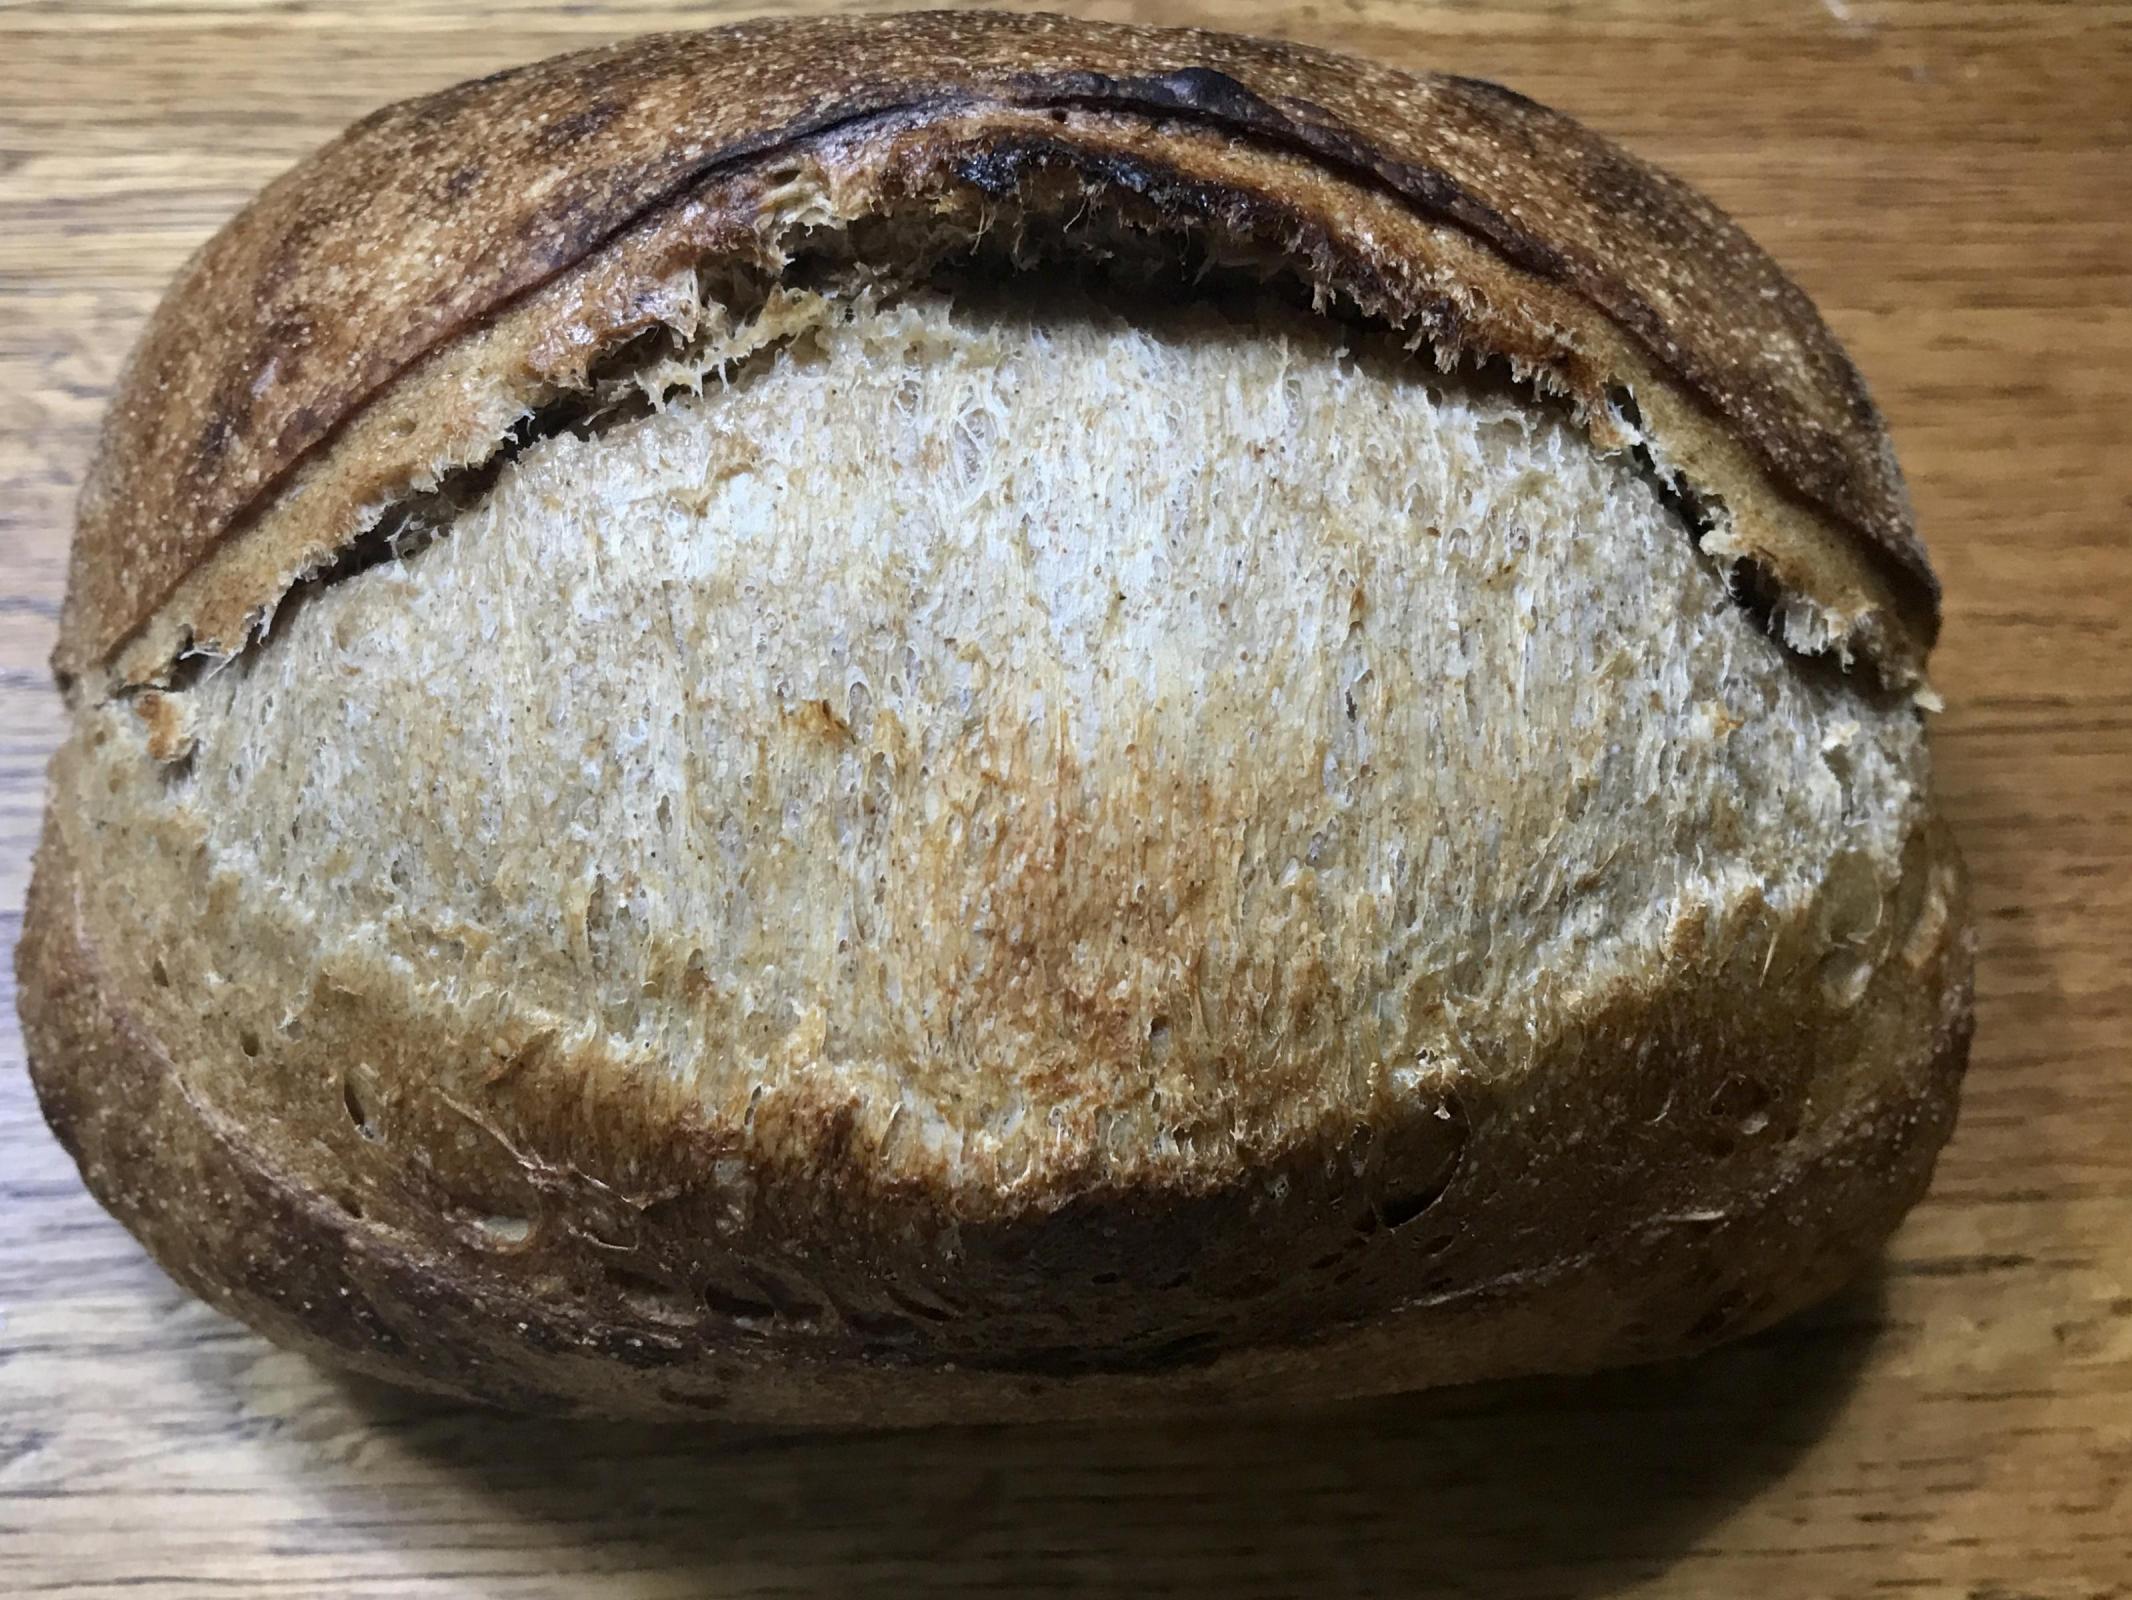
I do know, from watching dozens of breads baking through the oven window, that first the dough expands as it fills with gas and then, once the gluten skin can no longer continue to stretch (if enough gas remains) it fractures. And that fracture is what causes the ear. If the loaf doesn't fracture the score line will "melt" into the dough, with only the area between the bottom score line and the bottom fracture line showing. As illustrated in the second image below of the 2 loaves.
During this discussion it is assumed that the dough was fermented properly and has reserve gas available for the bake. It has been my thought lately that high hydration often allows huge bloom and possibly/probably large oven spring. The huge bloom makes sense because the high hydration is by nature very extensible. Since the dough is super slack and easily stretched, a nice bloom is to be expected. As far as oven spring it seems the last 2 statements apply. The only exception being the gluten skins ability to contain the expanding gas. If the gluten skin is strong enough to do so and since the skin is so stretchable, the expanding gas would easily increase the volume of the loaf - oven spring.
Now the ear. It has been my experience that wet and/or highly extensible dough tends to stretch rather than fracture (near the score line) during the loaf expansion in the oven.
But, many bakers are able to produce fantastic ears with super wet dough. Isn't that right, Kristen? :-) MTloaf is also doing pretty good in that area. I am missing something, and hopefully some day soon, someone will help shed light on this. Bread is an amazing thing...
Danny
Some of my best oven springs are with very high hydration doughs - 85-87% hydration is what I am used to working with these days. Of course, because I work with this dough often I am used to the handling. It requires very strong coil folds and a gentle but firm hand during shaping. And definitely have to steer clear from over-fermenting or it'll just wind up a mess. Have you ever tried refrigerating your dough 30 minutes before the end of bulk - maybe for an hour or so - and then used the cold, more firm dough to shape?
Kristen wrote, "Have you ever tried refrigerating your dough 30 minutes before the end of bulk - maybe for an hour or so - and then used the cold, more firm dough to shape?"
Quoting Lawrence Welk, "Wun'erful, wun'erful". Great Idea!
I plan to try that next bake.
Danny
Danny your breads are amazing. I rarely get an ear, so this bake was good for my morale! This has been fun. Can’t wait to make another one!
Sharon
I consider the width and and the swelling out of the interior to be the bloom. My experience tells me that the slightly over proofed loafs seem to have less ear but the volume of the loaf can still increase even when the cut seals. The crumb also has that gelled starch look to it that I think you are referring to as lacy. Whereas an under proofed and even an under developed dough seems to still get a substantial ear
I would add that scoring depth and angle seems critical to getting a good ear. The loafs in the lower photo may have developed more of and ear and bloom with a deeper scoring. Proper tension while shaping helps even more.
All of this happens while my loaves are in the covered phase of baking so I am only speculating.
My two cents worth
MT, that is an interesting statement, “ My experience tells me that the slightly over proofed loafs seem to have less ear but the volume of the loaf can still increase even when the cut seals. The crumb also has that gelled starch look to it that I think you are referring to as lacy.” I never considered that.
Thanks
Danny
Check these three things:
1. shorten your bulk fermentation a bit
2. shorten your final proof a bit
3. one of your flours is more extensible than strong (e.g. spelt, einkorn, sonoran wheat, etc)
Because of timing, lately I have been doing hot-n-fast bulk fermentations. I've noticed that most of these bakes have much softer ears even with my lower 62-64% hydrations - which correlates to the likelihood that my bulk is too long. I connected the dots on this moments ago after scratching my head marveling at my bread's huge ear from this bake.
My typical bake takes bulk to a full doubling per my spy glass; this time, I followed the directions and went to 50-60% height. I was concerned it'd result in a heavy loaf, but nope, it worked :)
My thoughts on less substantial ears on wetter fully proofed bread were based on my experience and also the loaves from "The Tartine Bread" book (the original quest for the holey grail) that have a less developed ear and not a bursting bloom but still a very open crumb. Kristen has accomplished both with her breads by the use of lamination and skillful use of tension. Her shaping method accomplishes the difficult stitching technique that Chad uses to build in more tension.
Sourdough bread is like the snowflakes in my yard this morning, no two are alike.
Love this crumb! Fantastic! Any time my dough continues to rise in the fridge (maybe the settings are off from time to time) I notice less spring - the dough likely going over a little bit on the ferment... This happened just recently and I had to turn down my fridge to 36 (but the independent reading on the gallon of milk with my IR thermometer reads 38). No rise with the really cold temp, but anything above 40-42 and the dough puffs up overnight.
I have found that there is a difference between top shelf and the bottom shelf of my refrigerator. Loafs on the bottom seldom grow in 12 hours and I will make room on the top shelf, if I rushed the bulk, to let it grow some more.
I want to try laminating two different doughs together next. Thanks again for sharing your inspiration
Hi Kristen, and thank you for this CB! I had nice crumb and an ear! But a couple of questions. My starter did not have rye in it - and for the whole wheat I used white whole wheat. Just wondering, if kamut were used instead of the whole wheat, how much of difference do you think it would make in terms of BF?
I also think mine need a bit more time baking in my DO.
Thanks, Sharon
Sharon, did you notice the instructions to keep the levain @ 80F for 5-6 hr?
You, I did and as it so happened, I was making pizza so I put a wooden board on my stove and put the starter on top of it and bang! Did it move! Actually I was worried that it was going to cook! I think I just forgot in watching the video over and over and focussing on the folds, etc
Hello Sharon! Happy to join you all :) Your starter does not need the rye - I add in a touch of rye (10%) to help boost activity. It rises to a much higher peak with the bit of rye (about 3.2X) vs when it used to be fed a mix of 30% whole wheat (which would rise about 2.5X). White whole wheat is great - I use it all the time... it's slightly lower protein but has a great flavor profile. Kamut is fantastic - nutty and grassy... I usually use it at 10-20%. It may tighten up your crumb ever so slightly compared to a spring wheat. I swap out the 20% whole wheat for all sorts of grains (kamut, einkorn, emmer, spelt...). The possibilities of mixes seem endless :)
What a beauty! I’d be really happy with that!
Sharon
First, I want to thank Kristen for her help and participation in this CB!
I have baked this bread at a number of hydrations, all the way from 74% up to 80%. It kills me to watch the bread bake for the first 15 minutes without that fracture in the score line and the explosive development of the ear. 80% (thus far) has been a challenge when it comes to the ear. But that's me :-(
This bake was hydrated to 76%.
I am especially pleased with the lacy crumb. The only change made to the formula (other than the decreased hydration) was 3% Brewer's Malted Barley (N/D) was added for color and flavor. The difference was subtle, but nice.
This is a truly great formula and process...
Danny
Update - Here is a crumb shot of 2 BOCSD with 3% Brewer's Malted Barley (darker) and one without. A little Brewer's Barley has a wonderful affect on breads. You should see what Chocolate Malt does to a bread! Wendy, aka "Lazy Loafer" got me into that.
Beautiful Danny, perfect crumb.
Benny
Another BOCSD - I chickened out! I baked this one a couple of days ago. I said I chickened out because the hydration was lowered to 74%. The results were still very good. Even at 74% the crumb was lacy and light. The reason this loaf didn't produce an ear and get a lot of oven spring is because it got away from me and over fermented. The loaf appeared to bloom because the dough was slack from being over proofed. Notice that because of the tight shaping, the bread still produced a very round slice. Love that shaping method!
Danny
Wow, nice bakes everyone! I’m super impressed. Kristen thanks a million for this. My joy was seeing that ear! Taste is great too!
Sharon
My boule was in the fridge for about 16 hours. I bake in a DO, so I baked it at 475 for 20 minutes - I forgot to lower the temp to 450, then removed the lid and baked another 5 minutes. It could have gone a bit longer for a darker crust, so that would be an adjustment.
Anyways here the photos - hopefully they will be in order. Of course they aren’t! Apologies! Thanks Dan for this!
Sharon
Sharon, the typical oven spring produced by this formula and process is nothing short of amazing. I am bewildered that Kristen’s simple (basic) bread produces oven spring that is second to none, that I know of...
It is rare to have a boule break an ear like this. That’s some bloomin’ spring!
Kristen, do you think the lamination is responsible for the huge spring? If not, what?
Danny
Nobody was more surprised than me! I was absolutely floored when I saw it and did a happy dance!
What a gorgeous boule, Sharon!! Dan - I have run side by side comparisons of laminated dough vs unlaminated. It's not a perfect experiment as you've got to introduce extra folds in the unlaminated dough, but I find that a single lamination is somehwat equivalent to two strong coil folds early on in the bulk. That being said, my batards that are laminated firm up/strengthen quicker, and end up springing higher than the unlaminated loaves.
Getting the right number of coil folds in throughout the bulk period is the trickiest part of the process, for me. Assuming a fairly constant temperature, I know that it takes this dough about 6 hours to bulk from experience with my starter/flour/etc. Lamination around 1:30-2hr after inoculation, followed by evenly spaced *strong* coil folds throughout the rest of the process, leaving at least 1-1.5 hours for the dough to rest and relax at the end of bulk prior to final shaping. The coil fold spacing is completely dependent on each dough, and is difficult to teach as it is so subjective.
Dan, I wonder if the coil folds you are doing could be done differently - I haven't seen a video of how you are doing them, but I know from watching bakers in my workshops that some don't pull the dough *enough* during the coil fold. This makes each coil fold a little less effective, leading to a more slack dough throughout the process. I wish there was a way we could bake together so I could see how your dough progresses with your handling.
I wished we lived next door to each other. I am eager to learn!
I may have to do a video of the Coil Folds. That may give you an idea of what is being done. I think I am doing the exact same thing as seen is your video, but maybe I’m missing something.
This morning I baked a 78.3% hydrated BOCSD (how do you like that acronym?). And once again, giant oven spring but no ear. The bread taste good, the slices are nice and large, the crumb pleases me. BUT! I gotta’ get me sum of dem ears... It’s the curse of a perfectionist. I bet you know what I’m talking about :D
I hope that you and other bakers will visit this link. I thought it best to post my problem to a separate link so as to not hijack this one. There is a YouTube video included in the post. http://www.thefreshloaf.com/node/61601/help-needed-high-hydration-ears
Danny
and comments from everyone so far and still planning to join in once digested all the comments in more detail and our visiting weekend guests have left! Thank you all for your insights...!
Just some of my pre-bake thoughts based on my past experience following Kristen's process. Like Danny I noticed that once I go towards 80% the dough tends to still get oven rise but is prone much more to glaze over without a proper ear. In some cases I did get an ear but not quite as pronounced as I normally would get with a 78% bake using the same flour combination of white and wholewheat...
I always thought that it is to do with scoring wetter dough and a bit like not so deep score for more proofed dough and getting away with deeper score on less fermented doughs. Not conclusive yet...and maybe more to do with stronger coil folds and structure required?
Did anyone take dough temps? I have in the past noticed that my dough would go below the 23/24C that Kristen mentions in her video and now aim to make the AL a bit warmer so that the temp that I seem to loose during the lamination brings the dough to 23/24C...If I have the dough at a higher temp in the past the bulk was always much shorter than in Kristen's process and I aim for lower rather than too high nowadays.
Finally, as I gather from some comments on retarding, my fridge and wine cooler are the hardest part to manage in the process and often even on the same dough batches I get different results on where the dough has been in the fridge or wine cooler, some not risen and others' risen quite a bit. So that balance between how far to let go bulk in relationship to fridge temp has been my personal kryptonite and I push my wine cooler to go as cold as it can go ...which is 4C...BUT often less in pockets when fully loaded.
Great tip about spritzing the top rather than the surface as I always felt in the past that I made the surface too wet and without intending probably upped the hydration and also during the fold outside the container had the dough slipping away without enough tension. So I shall watch that.
Kristen...I was always intrigued by your choice to do the first fold out of the container? I hope you don't mind me asking but how do you think does this affect the dough just compared to a stretch and fold in the container?
So, mentally getting ready and looking forward to baking and more amazing bakes to oogle over! Kat
P.S. Danny - Just a quick thought, should the time on step 9 not be 9:45 rather than 9:15 to allow 45 min in between coil folds?
Good catch, Kat. I made the correction. Thanks pointing that out. "I get be with a little help from my friends".
Glad to hear you are joining in...
As far as dough temps, yes. I monitored the dough during all phases of BF. In most cases it remained between 74.5 and 76F. By the way - I have noticed that using an 8 by 8" glass container as recommended by Kristen in a Brod & Taylor proofer had over heated the dough according to the setting. With the proofer set to 75F the dough registered 78F. I noticed this throughout the BF. Ended up reducing the proofer to 72 or 73F. BUT when I use a Cambro or some another plastic 8 by 8" container that the B&T is spot on. Generally within a degree at most. I think the glass conducts more heat, but have not thoroughly tested that.
Danny
The fridge temps can be so tricky - I just try to keep mine as cold as it goes... bakers have gone really really low I've heard - such as 34degF - with great results to halt the ferment and allow the dough to just rest. I've never seen any issues myself with a dough this size at lower than 38 (larger loaves take longer to cool down - so I will either cut out that room temp proof, or cut the bulk slightly to account for the slower cool down).
The light fold can definitely be done in the bowl... I really like to feel the dough during this stage. I take several notes during this time point - especially looking at how loose the dough feels and making judgments on how long I think the bulk is going to go with relation to the hydration, how many coil folds I think the dough will need to strengthen... I don't touch my dough much during the coil folds (just enough contact with my fingers to pull up the dough). A true stretch and fold in the bowl could give you pretty much the same feel as out on the counter for this step.
It's fun to delve deeper into the process with everyone!
thank you so much for your thoughts Kristen and I could not resist having a go even with people visiting and not being on top of the dough or taking any notes apart from mentally checking the time on the clock......Ha, Ha....
Certainly, I have not taken as impressive notes as Dan and really should... Vanessa Kimbell has a similar format pdf ready for print on her sourdoughschool website and that might also be helpful for some people...I used it when I was more organised...
I used 80% hydration formula with strong Canadian WW and White flour from Waitrose and Marraiges in UK.
I followed the process more or less having been distracted as all our worktops were busy with cooking for guests I did the first fold in the bowl...Then I got distracted and might have done after the lamination too many coils too closely together and this might explain the more regular not super open crumb? I will give it another go when I am a bit more focused...
As I normally bake more than one loaf but this was the only one, it also got the prime colder seat in the wine cooler and did not rise much in there.
I am happy overall but still cannot produce with intention that super oven spring like yours Kristen! :D Kat
Beautiful Kat, amazing considering your many distractions while preparing this bake. The crumb looks great to me.
Benny
and that was a great bake Benny with an all over beautifully looking loaf! I also find the scoring tricky on 80% hydration and better on something like 76-78%... You can see on this loaf how the dough gets glued a bit and the ear did not totally open evenly...well being picky here but how do I learn otherwise?? Happy baking...Kat
Kat, my dough was reading about 76 F and a bit higher because I had it situated underneath a light that’s under my kitchen cabinet, so I knew it was warm. It wasn’t directly under it. I was using my oven so it couldn’t go in there but luckily the heat from the oven helped my starter move along!
I also wondered about taking the dough out for the first folds vs just doing s & f in the bowl. Anyways it seemed to work. The dough was manageable - a bit sticky but it was ok. The lamination kind of freaked me out and my dough certainly didn’t look like Kristen’s.
Can’t wait to see yours!
was a stunner and that oven spring...WoW! I don't complain about my oven spring as ok on the whole... but it is amazing to see a bloom like that on your loaf here...and opens the heart with joy, doesn't it! Kat
Don’t know how you manage especially with company! You have a touch, that’’s for sure. Yes like I said I did a happy dance with this one! I honestly didn’t think I’d get that much oven spring or an ear! My fridge was cold, so maybe that helped!
but there are still learning bakes with mixed results happening..ha,ha....
I was always intrigued by the relationship of degree of bulk and coldness of fridge and how much to let the dough rise or not and in my early days I cannot forget how many loaves I overproofed in my fridge without even realizing at the time!
I now often have 5 loaves on one go and it makes the proofing in the wine cooler even more hazardous as it takes longer for the dough to cool down in there and I can tell where the dough was the following morning depending on position in the wine cooler..and therefore stay more in the higher 70% hydration but not beyond.....so it was a great opportunity to bake just with one loaf and experiment with more water....Suddenly scoring then is also different just with a bit more water!
My memory is terrible! I've been in the habit of writing notes all over the place. After baking so many breads it is difficult to recall what was done with which bread. Recently, a new idea was implemented that has eliminated much confusion. It is shared with the thought that others might find themselves in the same boat as me.
A newly printed spreadsheet is always used for each bake. There is now a notes page printed on the back of each and every spreadsheet and it seems to be working. Below is an example.

Now all I have to be concerned with it reading my own writing...
Danny
This is my first community bake and I was really pleased with the result. It became a crazy day with company and interruptions so I lost track of the timing a bit. I used my 100% starter but fed it with pure rye flou 3 times before making the bread. It seemed like the bulk raise from adding the starter to shaping and putting into banneton was 6-7 hours. I retarded the dough in 38F fridge for about 20 hours. Just the way my shcedule was that date. Hope i can get the photos uploaded. Also I cut into it when it was only an hour out of the oven so think the crumb was still a bit moist. But delicious.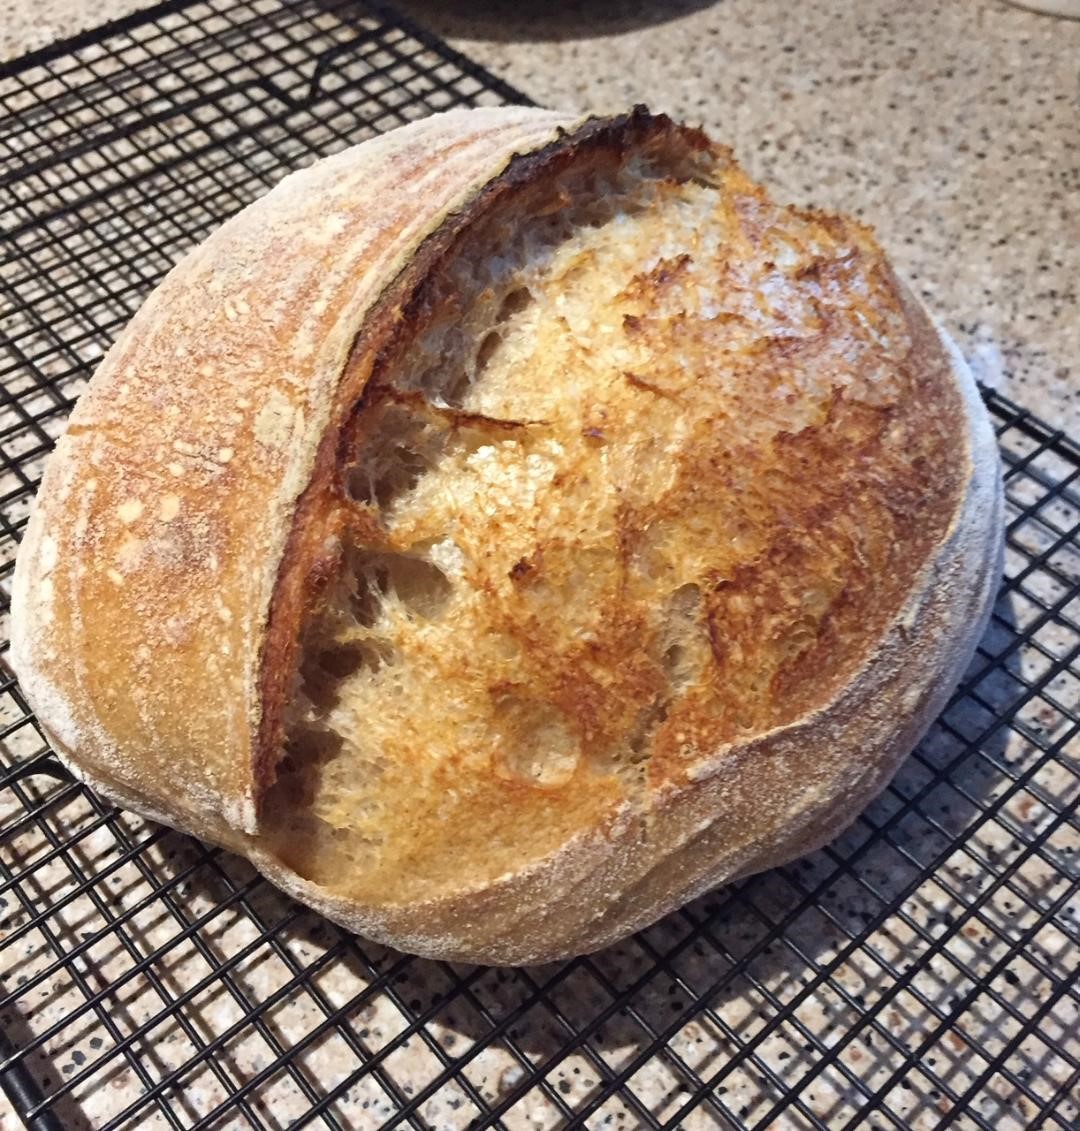
What a beauty, VJ! The “Farm Girl” can bake...
What hydration did you go with? And what temps did you bake at?
I feel the need to repeat myself. IMO, Kristen’s Basic Open Crumb SD has produced much better Community Bake results than any other bread we have featured in the past. I’m not sure what it is, but it is what it is.
Danny
Thank you, Danny. Hydration - well I could not read the spreadsheet so I went to Kristen's youtuve video and used her weights. I did not figure the percentage but used the 253g of water she suggests. so just did the math (not counting the starter) it was 77% hydration. It did not feel like a super hudrated dough. I thought it was easy to work with. It did have super oven spring. Not much raise in the dough once it was retarded. I baked it in a Lodge combo thingy. At the temps Kristen suggests - 500 for first 20 minutes and then 450 uncovered for 20 minutes. It was my first time with the lamentation method. That went mostly well, had one little tear. But I was really pleased. And I liked the idea that it accomodated the longer retard as my schedule is not always set in stone.
Really amazing! It seems you used the 80% hydration.
I am thrilled to see so many bakers getting nice ears @ 80%. It gives me hope for the future. I have 2 doughs autolysing @ 78% now, but may just bite the bullet and add the extra 2%.
I think my oven bakes hot so the first loaf may go in at 485F.
Danny
Gorgeous gorgeous! I love the soft, swirled look to the crumb - and that golden crackly crust.... You make it sound extra amazing that you sliced it while still warm - yum! So glad the tutorial worked for you and you got such a beautiful bread out of it :) Congrats!
Absolutely beautiful bread VJ!
Benny
and a beautiful loaf with an ear and lacy crumb...Just lovely VJ! Kat
We had a spate of surgeries in the family and then a really hot summer and I just... let time get away from me. Finally dug my starter out of the fridge 3 weeks ago, resigned to it having died, but the kids named Bucky, The Winter Starter well, he roared back to life after months 'on ice'. This was my first attempt to bake since getting him active again, and I have to admit I wasn't feeling super optimistic. My dough handling skills just felt bad and the dough seemed awfully slack to me, despite throwing in an extra set of coil folds (though we still call them sleeping ferret folds here). But I tossed it in the fridge last night and then preheated the oven while I had breakfast and then drove youngest to class and threw it in when I got back... and if the inside looks half as nice as the outside I have a new go to recipe, though I'll need to triple the recipe at least to get my normal 2 loaves twice a week out of it. Still, the oven spring was lovely and I even got a good ear. I'll slice it in another hour and a half or so, when it's cool, and see if the crumb's as nice as the outside is.
I'm going to try this again probably Friday, with the recipe at least tripled. Thanks for setting this up, Dan, and to Kristen for the great recipe and new techniques! It's been a really nice way to get back into baking.
ETA: The finished product, sliced: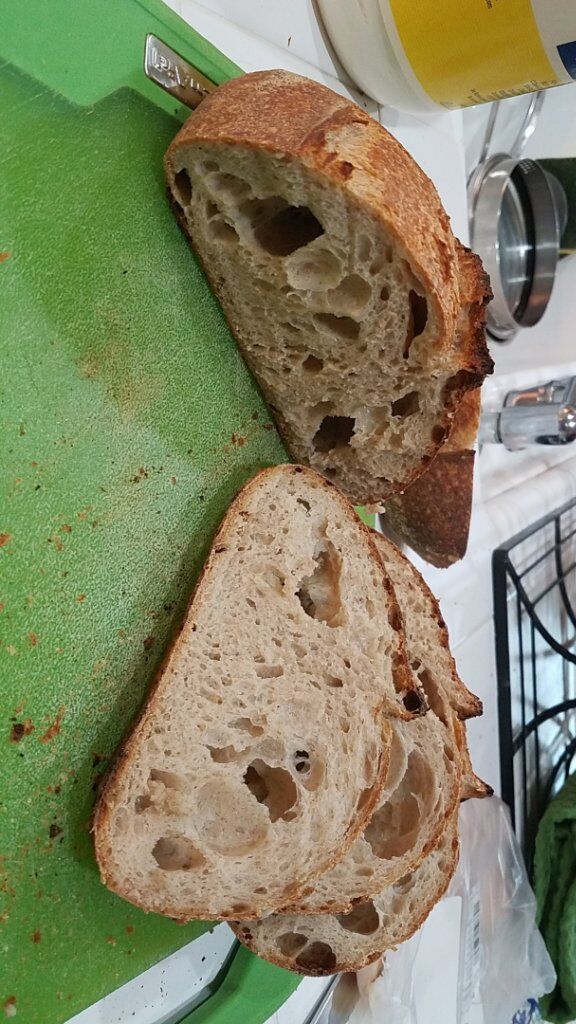
 I've got some big holes with a slightly tight crumb over all, and noticeably tighter along the bottom--over proved? Under proved? I can't remember which gives that result anymore--but the flavor's delicious and even where it's tighter it's not at all dense (plus we honestly prefer a less holey crumb, since my baking is primarily for sandwich loaves).
Definitely going to make it again on Saturday, this time with the recipe tripled to make two larger loaves, and see what that gets me. I'm super happy with this for a first try back after so long off baking, and well under a year of sourdough baking under my belt before that.
Great Jay!
Blisters, an ear, bloom, nicely browned, and great oven spring! Looks like you swung for the fence and knocked it out of the park...
I’ll be sending you the spreadsheets in a few minutes.
Kristen needs to copy right that bread.
Danny
Thanks Danny. I'm absolutely amazed at how forgiving it was, given how clumsy I was after months without baking. Still haven't sliced it yet, waiting for youngest to get home so we can make sandwiches on it for lunch. I'm going to try it exactly as written again next time, then I think I'm going to see how it works with spelt and/or rye subbed in for the whole wheat, since those are my family's preferred flours.
Jay, how did you deviate from the formula and/or process? I’m curious to know.
Make sure that baby has cooled down completely before slicing it.
Danny
Not at all other than adding an extra coil fold because the dough still felt a little slack to me, actually. Used the full hydration, did the letter fold and the lamination. I didn't do a great job getting all the air out during the lamination and had to pop a LOT of bubbles, and my shaping and scoring were just sloppy. You can see how I didn't score far enough to the ends, and so the loaf is a tiny bit compressed at either end, but it still opened up beautifully in the center during baking. About another hour until I cut it, and I'm feeling pretty optimistic about the crumb.
Jay, that shaping method will produce tight ends. Even if you score the the very bottom of the counter on each end, the score will be lifted up off the bottom because of the huge oven spring. I’ve baked this bread a bunch of times and it happens that way every time for me.
I spoke with Kristen about the short batard and the tight ends. She told me how to change the shaping a bit and now the batards are longer and the ends are looser. But, it may affect the ear. Instead of folding the left and right sides of the dough in thirds, just fold them only to the middle. Make sure you seal the seams before rolling up.
Kristen, do you think the more relaxed ends are affecting the ear?
Dod you get the link for the files?
Danny
Aha, I'll try that next time, b/c I'm going to be making larger loaves as well. The files you linked seem to be just 3 videos of loaves baking?
Great results Jay, amazing how resilient your starter was and you obviously weren’t nearly as rusty as you thought.
Benny
Thanks, I'm super happy with it! And yeah, I really didn't expect my starter to have survived almost 6 months in the fridge with no attention, but it roared back to live with just a couple feeds. I was so glad I didn't have to start from scratch again.
it is always a worry when you have not baken for a while but what a great result! Kat
Thanks! It was such a nice first time back to baking sourdough.
I'm a fan of Kristen! I'm always commenting on her posts. She must find me a stalker hehehehe. I just wanted to thank you all for this experience.
Matheus, Looking for to reading about your bake. Send us images, also. This way we all get to learn together...
I'm also a big fan of her's.
Danny
No doubt! Looking forward to participating!
One doubt, I have a weaker flour with 11.5% protein. How much hydration tell me?
Kristen's starters and levains are 100% hydration for this bread.
If you plan to use a flour that is weak, it might be best to hold out some water. Wait until you add the salt and then make your final adjustment if need be.
Thanks!
Very disappointed with myself. I did with 75% hydration (flour could not stand anymore). I just can't get big holes. Especially speaking whole wheat flour. I gave 4 (after lamination) folds and allowed to grow 40% in bulk fermentation. The result was an open crumb. I had a little degassing in the modeling, but it wasn't much. You can see it by ear (it opened a little because it didn't have a good tension), that's what the pasta let me do. Very disappointed, I accept all advice, ALL. Make as many criticisms as you can if you can. The photos below:
Image
.jpeg")
Image

Details: I cut the hot bread (nothing else could make me more frustrated hehe). Sorry for the confused English, but I'm using the translator.
Matheus, your bread looks great! BUT you messed up when you sliced it early. I know, warm bread is nice, but slicing it early damages the crumb structure and leaves too much moisture in the bread. Most of the time, my bread is not sliced until the following day.
The loaf itself looks outstanding to me. Many bakers would give their left arm for and ear and bloom like that.
I am trying to produce the opposite type of crumb. I don’t care for the large holes at all. Wished we could trade off.
Kristen and others can speak on developing the open crumb (large holes).
OH! Looks like your dogs would disagree. I bet they think the bread came out great :-)
Danny
Oh man, someone with my goals, Danny. Any advice on a good recipe to try for the more lacy crumb? My goal is actually a good sandwich bread that all the condiments won't drop out of, that I could bake a couple times a week, but all the recipes and discussion always seem to be about the great quest for the open crumb. I just want a nice sandwich quality sourdough loaf that I can include some spelt and rye in.
Jay
Hi Dan, thanks for the feedback. No matter how bad the bread comes out, my dogs always encourage me hehehe. The point is that making an aerated bread is the challenge to be met in my head. I think deep down, that's why I decided to start baking. It is a feeling of being alive, having a goal. Although it is very frustrating (really a danger to self-esteem) I feel I should try again the other day. It has no explanation
Matheus, I know exactly what you are saying. I too am extremely goal oriented. Large holed open crumb is a great skill to learn. It didn’t come easy for me, but perseverance finally won out.
I know other with more open crumb experience will join in and help out.
I think less, rather than more handling (stretch & folds, etc.) will help. Less fermentation as opposed to more will benefit open crumb. Gentle handling at all times, especially when shaping is important. And very important, is to make sure that your starter and resulting levain is very active. Kristen mentions that often, and she is a master at open crumb.
Please include more images during the mixing process, specially when trouble occurs or you are in doubt about anything. Pictures are extremely informative and help us to better help you.
Danny
Great idea Dan. Next week (schedule issues) I will try again, and I will try to take a picture of everything.
Good advice on an active starter and careful handling, but the Fullproof method seems to push the fermentation to the limits (six hours)while creating tension and strength with a super wet dough.. I have found my best success with a lively dough and tend to error on the side of going too far past the point before shaping. When to put the loaf in the fridge and for how long is critical as well.
So many steps have to come together for that elusive open crumb. I have my best success when I follow a recipe faithfully instead of winging it. Good luck in your pursuit.
Hi all,
This is from this mornings bake and I'm quite happy with it. I had a few perhaps, missteps along the way but it seemed to turn out fairly well regardless.
1) When I was half awake yesterday morning I added all of my starter left on the counter instead of my levain build which I had on the counter for seven hours overnight. I know Kirsten suggests starting the levain build in the AM and letting it go 4-5 hours but I wanted to get a jump on things. So, have no idea how much levain got added to the final dough.
2) Bulk temp in my microwave with light on was probably to warm at 82 ish degrees. I usually shoot for 78-80 and I think Kirsten suggests 75. I think I probably over bulk fermented a bit.
3) I made the dough at 80% hydro. and it was easier to laminate than I thought it would be. That said I did not get my layer of dough as thin as she does in her lamination step.
4) Overall my dough seemed wetter/stickier than hers.
I'm pretty pleased with the result, as I said, my most open loaf after chasing this style of bread for eight months. I'll most likely use the technique again but maybe size up the quantity to 500 grams flour for a bigger loaf.
Best,
wvdthree
Image

Image

Image

Yet another very good looking loaf. Lamination really is a breeze.
Even though you went off script, your bread came out pretty darn good.
Danny
I like the full bake color. I think it is necessary when the hydration is that high so that the crumb fully bakes. Congrats on the most open yet! The lamination and shaping method seem well suited to the amount of dough in the recipe. I would be interested in seeing how increasing the size of the loaf works out for you. I tried it by dividing the dough and laminating two pieces separately and the stacking one on top of the other. It seemed to work ok but. I may have messed up the proof so it was hard to tell. The room temperature proof slows things down to accomplish all of the steps.
Check out 15:23 on THIS VIDEO. It is an improved method of laminating double doughs. Kristen has some ingenious ideas.
I was working with a larger amount of the same dough and I could foresee problems with that so I divided it in half, I laminated both pieces separately and placed one on top of the other and it seemed to work fine. Kristen does have some great ideas and her ability to get an open crumb is amazing. I can never predict how the crumb will turn out until the loaf is cut into. You can't judge a book by it's cover. Most of the time I am disappointed even though it is still good bread. The obsession for the holiest of crumbs is a frustrating and impractical pursuit but the photos are just so appealing. My preference for my daily bread is a less open crumb as well because it is a more usable loaf. This CB was a fun exercise to try to get a loaf that resembles what she posts on IG. Maybe I would have better luck with Photoshop :-}
Has anyone tried or see a problem with sizing up the recipe to include 500 grams of flour in the final dough and also shaping as a boule?
Best,
wvdthree
Vance, I don’t see how it would create a problem. Are you planning to use the spreadsheet to recalculate the flour and other ingredients?
Danny
I may give the spreadsheet a whack however I have literally zero experience with working/adjusting spreadsheets! May have to fall back on my trusty iPhone calculator. It's just math after all, right? I'm sure the spreadsheets are very helpful for those used to dealing with them.
Since the flour is always 100%, just multiply the percentage of each ingredient times the weight of the flour.
Today, I am mixing a BOCSD , but adding an overnight hot soaker using 8% crushed flaxseeds and 2% poppy seeds. Counting the small soaker, the total hydration will be 92%, which is very easy to handle. I am hoping that the gel from the flaxseeds will help produce a lacy crumb. We’ll see...
Although I did not laminate it all at once because I was worried about having enough room on the counter and managing a large sheet of thin dough. I think the flour amount in the recipe is one of the keys to achieving the open crumb. Look forward to seeing your results.
MT, you are correct about smaller dough weights. It is far easier to produce Instagram quality, photogenic loaves when the the total dough weight is kept small. Kristen’s ~650g loaf is a perfect candidate.
If you really want to bake a photogenic loaf, try baking a 200g boule...Take a look at this.
Danny
After reading an astute reply by MTLoaf stating that the hardened crust was prohibiting the oven spring, I began to re-evaluate my baking process. I went back and watched a number of time lapse videos and came to the conclusion that a change in the baking process was needed. For this last bake the oven was set to 485F and steam was injected for 90 seconds. The stone was repositioned down to the second from the bottom rack height. The thought was that high heat from the stone would provide the oven spring and that less heat was needed from above to allow the crust to expand before browning (hardening) prematurely. It seems that premature browning of the crust will prevent oven spring and also the crust from fracturing. It looks like the plan worked!
I am wondering if the problem producing ears @ 80%, when lower hydration dough produced fairly consistent ears, is that the wet dough contained more water which evaporated during the bake. Is it possible the water rising from the wetter dough caused the crust to hardened prematurely?
8% flaxseeds and 2% poppy seeds were added to the BOCSD. The hydration was 80% with an additional 12% for the seed soaker. The actual total hydration was 92%, but the dough was not overly difficult to handle. The bread was sliced the following day. It tasted fair. But 2 days after baking the bread took on an outstanding flavor. I guess, like fine wine...
Once these ears are dialed in, attention will be focused on the crumb.
Danny
Update - I have noticed that when loaves are sliced in the middle, often times large holes such as the ones in upper image on the left are spread unevenly throughout the crumb. But when the bread is sliced towards the ends ( see upper image on right) those large holes many times disappear. I think it may be due to the way the dough is shaped. also it is possible that the gasses congregate towards the center of the loaf.
Some bakers are working to get the large holes, others are struggling equally as hard to eliminate them. Beauty is in the eye of the beholder.
That is big progress Danny with 80% hydration, nice ear! It seems like the idea that the crust was prematurely hardening was correct and that your changes are working.
Benny
I like the different shading as the bloom grew throughout the bake.
MT, it was your comment on the linked post that planted the seed. Too darn much heat too fast. It is common for me to search so hard that I miss the obvious.
I decided to share my videos in a separate post. Hopefully others will find value in them. We can all learn together as we share our thoughts and opinions. The Internet is a gift to those seeking knowledge!
Thanks,
Danny
Improving the handling and adjusting the fermentation, I got a good better, follow the photos:
Image

Image

In fact, the first one had a bad handling and modeling, degassed.
I am very happy to be able to participate. I strictly followed the method of Kristen, the only difference is that I had to leave 40% growth in bulk fermentation because my refrigerator can not reach 38F.
I ask you to say what you think can be improved. Always improve, divine time to find this community!
Matheus, this bread is gorgeous! That ear is standing straight up, at attention. Everything about this bread looks outstanding to me.
I have never seen a formula and process have such success among so many bakers.
Danny
That's absolutely beautiful! I'm going to be doing my second bake with this recipe in the morning (almost done with the bulk) and I hope it turns out that nice, congrats!
- Jay
Thanks so much Jay! This method is really very functional. My wishes for a great bread!
Beautiful open crumb, gorgeous oven spring and ear Matheus.
Benny
Thank you Benny! I saw the picture of your bread and found it fantastic. The shape is really impressive. You worked very well with the tension.
The white dog must deserve some of the credit because the brown dog looks like the guilty one to me.
Thank you MTL !! Hahaha, the white one was very committed to the picture, the brown one, well, I will surely find some hidden mess hahaha
Thank you MTL !! Hahaha, the white one was very committed to the picture, the brown one, well, I will surely find some hidden mess hahaha
In fact Dan. This method is the most accurate. Kristen is a bakery treasure.
And here's attempt number two. I tripled the recipe and made two loaves this time, because I wanted both more bread and a bigger loaf. I did a very poor job of dividing the dough evenly, though, and ended up with a smallish loaf and a very large loaf. I also forgot to triple my starter, so ended up using only about double the starter, but it was VERY active. Still, I gave it an hour extra on the bulk, plus a couple extra S&F. It was... a very scattered and disrupted day yesterday, so things didn't exactly to schedule, and I think I also over-hydrated it a little with my very wet hands when I handled it. Over all I'm really happy with it, though.
- Jay
Beautiful crumb, wide open. The color is very good, a question, did not burn underneath? Excellent, beautiful bread.
No, the bottom is a bit lighter than the top, actually, but that's because when I take off the stainless steel bowl I bake under at the 20 minute mark I slide a baking sheet between the loaf and the baking stone. I was finding that the bottom crust was much darker than I liked when I left it directly on the stone for the entire bake.
My life has been turned upside down over the last few months and moving house is hopefully the last big step. So new environment, new oven and new recipe!
I made 2 small loaves and followed Kirsten’s method pretty closely for loaf #1. Loaf #2 I did 100 SLAFs instead of her hand mixing method as it gives my shoulders too much of a work out. All other steps were identical including the lamination. It was a hot day here and the dough temperature was about 80-81°F. Both loaves were scaled to 550 g
this is the original method
and this is the loaf made using SLAFs.
I found the dough very slack at the end of bulk ferment even though I had added in an extra set of coil folds. I didn’t reduce hydration either.
Crumb shots -
loaf 2
So at the end of this bake I have very mixed feelings. Very disappointed at relatively flat profile of these loaves, they spread and didn’t really have the oven spring others have managed. On the other hand the texture of the crumb is lovely and taste great.
Maybe next one will be better and I will reduce hydration a little and perhaps shorten BF as we are heading into summer.
Bake happy everyone
Leslie
Hi Leslie, glad to see you joined the CB. You always have a beautiful crumb, no matter what! Can’t wait to see your next attempt!
I can safely say it’s not summer here! I’m making a 20% kamut SD and trying to use Kristen’s method. Will see how this turns out. This is a long BF and I did a lamination so should be interesting. It’s a bigger bread - 500g, so I wasn’t entirely comfortable with the gentle folds as I like the s & f’s in the bowl.
Sharon
it is hard to get here, maybe next time I go to the city I will get some.
I was aiming for a more open crumb like Kristen had but it is still great eating, hopefully I will do better with next bake.
thank you Sharon, happybak8ng
Leslie
Like the crumb on #1. Great to see you are back to baking in your new abode.
How do you like the oven?
an age to get really hot and before if I used convection I got a better bake, using a DO, just because it kept the temperature up better. I am going to get a hooded gas BBQ so will try using that outside over summer rather than heat up the oven and the kitchen. it will be a learning curve I think!
thanks Danny
Leslie
This bake taught me a few things about bulk fermentation, so I've been having fun experimenting with different starter amounts and bulk temperatures to make something with high hydration work to my schedule.
I did a slightly-more-than double quantity bulk, cut the dough in two. Shaped the 505g batard as in this technique; it was a little slack, but no matter, went into banneton. The boule was slightly heavier at 626g, and I shaped into a circle with very gentle stretch and folds. Skin was more taught! I was excited.
Sadly, the boule didn't spring much and had almost no ear, while the batard was clearly higher and a nice ear (not my best, but I'm not complaining!). Sorry, no crumb shots, but they are as would be expected (both great). Theory: either the slightly heavier weight or I must've degassed too much. The former is easy to test, next time. Can anyone suggest a good shaping technique for high hydration boules?
Sorry, camera focused on the the screen instead of the bread hahah.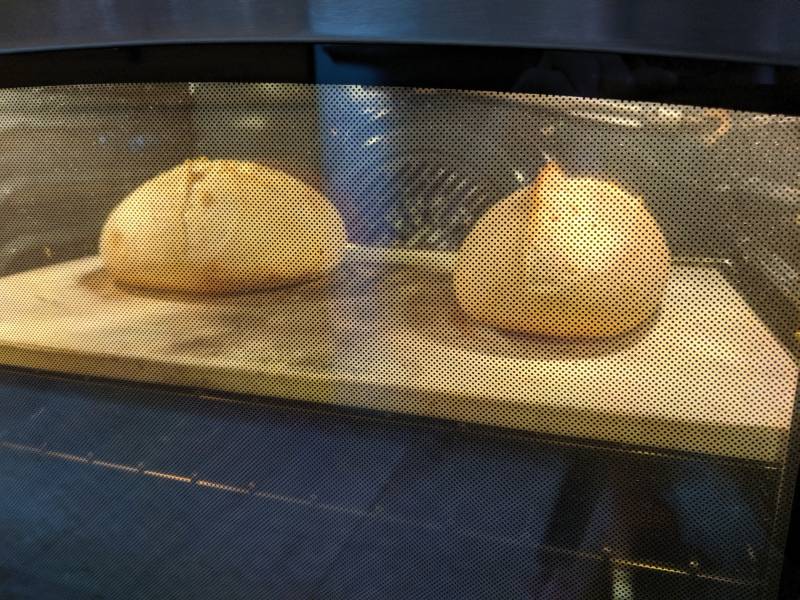
Chleba, the batard is gorgeous and the boule, IMO, is pretty darn good. The batard restricts the expansion lengthwise because of the shape. The restriction forces a higher rise. The boule, because of it’s shape doesn’t have that same restriction so it spreads in all directions.
Considering that the dough was slack, the lower sides of the boule is rounded and rising up, if it were my bread, I’d call it good. In my evaluation a boule that has lower sides laying limp against the stone with no upward curvature is lacking oven spring. ...my 2 cents.
But I bet you’re like me. There is always room for improvement. The perfect loaf is always out of reach :-)
Here is a nice video on shaping wet dough. You could use the first portion where he shapes to a round. I use it and like the method a lot. https://youtu.be/vEG1BjWroT0
Very nice bakes.
Danny
Helpful video, thank you, I'll try that.
My boule was actually very taught and held its shape, even after overnight proof in fridge. It was the batard that was slack, and despite this, poofed up a bit more. Ah well.
i love reading all the posts.. they are great. I made my first loaf (well tried to) yesterday and even thought i floured like crazy by basket and my bread stuck and was ruined. Ill try again...
So i did a first loaf (exact measurements) but it stuck to my banneton liner and had to throw everything out.
second loaf is this one. I decreased the hydration to 66% and it didn't turn out too great either... here are the pictures..
the shaping is a bit off as i didn't have rice flour so i proofed in a banneton with parchemin paper. It rose some.. Blah.. i usually make decent loaves but having no luck right now. My scoring has always been awful but this is really bad..
Thoughts on improvement?
Latanante, when you upload images you can choose a size that will make the image larger on the forum. Just fill in the width box and everything else will be calculated for you. Try a width of 300 and see if you like it.
The problems you are experiencing with the bake is not typical. Normally 66% hydration is a dry dough, not wet at all. If you can post a video that might be very helpful.
How much water, flour, and starter did you use in the last bake?
Something is not right...
thanks for the reply and the comments for the pictures.. i will do that next time.
i dont have video capabilities.
I did 255 grams of all purpose and 70 grams of bread flour and 200 grams of water (not including wet hands and whatnot) and 65 grams of levain (at 1:2:2) that morning.
I followed the instructions on video and chart for the rest of the instructions.
When i got to overnight proof i put in parchment paper and in a banneton. Put in my fridge more than overnight. I preheated over to 500 for a long time with my cast iron pan. Put new sheet of parchment, tipped bread onto new sheet, scored and put in pot with lid on for 20 mins and then 450 with lid off for 20 more mins.
As Danny said, this formula and process produced amazing results for so many bakers!! I love looking at all the great photos posted on this CB. I didn't really participate in the community bake since I like using more whole grains, but I used her method for a 50/50 whole grain/bread flour loaf and am so pleased with the results! I almost never make bread without add-ins, but the flavor of the rye/red wheat/and spelt was outstanding. I strongly encourage people that liked this community bake to try Kristen's 50/50 whole wheat recipe!
Nice bread, Ilene!
Here is the video to Kristen’s 50/50 Sourdough.
Late to the party again, but having just found these community bakes I'm going to have a crack at each one till the next one arrives.
Overall I'm pretty happy with the results. This is the highest hydration sourdough dough I've worked with so far.
I made a few mods, based on my level of experience and flour. I went with a slightly lower 78% hydration, maybe just to give me that mental edge! I also only autolysed for 2 hours. I was worried about gluten breakdown, probably needlessly.
I followed the method closely. My BF was 5 hours total and I'd estimate the dough had increased by 40%. I think in hindsight I could have pushed it longer, and then chucked the dough in the freezer for 30 mins or so to help with shaping. Something I will try next. Shaped and let it sit for 30 mins at RT before putting it to sleep for the night, approx 18 hours at 41F. When I turned it out of the banneton I felt it was fairly slack, and it did spread a little, however the oven spring saved it and the resulting loaf was quite nice.
Some notes. Maybe it's my flour, but after autolyse, the dough was beautiful and silky. After adding the starter, and adding the salt, I had to do quite a bit of work to get the gluten developed and the dough silky and shiny again. Is this normal?
I feel like my shaping and scoring needs work. What I'm longing for is a loaf where the belly is higher than the ear, so it's like a taught little package that looks like it's about to burst open at any minute. Kristen seems to achieve this most of the time. Danny, you've achieve this here:
Image

Are you able to shed any light on how you achieved this shape? I just can't get it.
I'd like to try again, increasing the bulk time by up to an hour, chilling briefly before shaping, and giving the dough a tighter shaping.
Here are my results:
Image

Image

Image

Cheers,
Harry
Harry, another excellent loaf.
”Maybe it's my flour, but after autolyse, the dough was beautiful and silky. After adding the starter, and adding the salt, I had to do quite a bit of work to get the gluten developed and the dough silky and shiny again. Is this normal?”
When the salt is added to the dough it makes it tighten up considerably. It will cause the gluten to become disorganized. This is very common result of adding salt. It is one reason it is added last.
Here is a great linkfor pre-shaping wet dough, if you need a little more strength. I like Kristen’s shaping method. She doesn’t preshape in her video, but a preshape may give you more structure/strength.
You are headed in the wrong direction with your quest for a higher, more rounded top bread. Try fermenting less not more. I used to think that the dough needed more fermentation in order to develop the alveoli (holes) during the BF. When I started fermenting less, I got more...Take a look at this post. Your thought of reducing the hydration may also benefit your flour.Take a look at this link dealing with hydration adjustment.
Kristen told me that her high hydration bread hit the deck of the oven very slack. THEN the oven spring kicks in to save the day.
Your breads are gorgeous! I don’t think your flour is a problem. As a matter of fact, I don’t see a single problem with your bread. From one Obsessed Perfectionist to another, you are excelling...
Danny
Danny,
Thanks for the encouraging words. Nice to know I'm on the right track. While I'll admit I'm obsessed, I can only hope for perfection, at least my idea of it. Looking at some of your posts, especially the one on oven spring, I'd say you've achieved it. I would love some details on that exact bake. Every detail you're willing to share (with an emphasis on shaping) that might aid me in replicating it! That is the perfect loaf to me. If I could get that shape and height, with a decently open crumb I would realise a new type of happiness!
Thank you for pointing me in the other direction regarding fermentation. It goes against your gut feeling to underfement. You want to keep increasing the bulk, believing those alveoli are getting larger and larger, that you can nurse them, and finally set them in stone in the bake. But alas, paradoxically, it seems not to be the case. I had to unlearn a lot crossing over from instant yeast baking.
About fermentation, let's say we follow what is now a standard for good oven spring - that is, we bulk to 30 - 50% volume increase, shape, and retard at a temp that sees minimal to no additional volume increase - am I to assume then that the dough is essentially proofed just after shaping? Could I bake that dough immediately and get good results? Or is something happening while the dough is retarding, but not growing, that brings the dough to life? See, I've always been confused when following Tartine recipes, and other recipes. They either instruct you to retard the dough overnight, in which case there will be minimal increase in the volume during final proof, or proof at room temp for 3 - 4 hours. If I were to do this, I would see a drastic increase in volume compared to the dough retarded overnight, and I'd imagine the results would be different. What am I not understanding? Why is the RT proof so long?
Also, I've noticed that Kristen and Trevor seem to do things differently, but get similar results? Trev seems to let his dough proof more in the fridge and it comes out puffier, and more structurally strong than Kristen's. Just an observation.
Also, how much of an effect does steam have on oven spring? If I'm baking in a dutch oven, would adding ice cubes make any appreciable difference?
I love the sourdough world. Endlessly interesting.
Cheers,
Harry
Harry, you would probably be extremely pleased with this bake. Follow Kristen’s instructions without deviating until you perfect it. I have never seen so many stellar results for any other CB.
You asked about retarding dough. If your refrigerator is cold (37-39F), the dough should not rise at all or very little during refrigeration. BUT, things are happening. Heat makes gas expand and cold make is decrease in volume. So even though the dough is not rising, it is buildîng CO2. Once the cold dough hits the oven the heat start the expansion process. This is how the huge oven spring that is so necessary for open crumb, and ears take place. If you study some of the videos in the links I referenced you’ll watch it take place before your eyes.
By the way; don’t get hung up on the steam injection. It is a great tool for baking bread and especially for videoing. But recent experiments are indicating that covering the dough on a stone or using a contained cooking vessel is probably equally as good and may even be slightly better. More testing is needed to confirm. You can get superior results with any of the methods mentioned above.
HTH
Danny
Good Morning! This is one of the points I want to talk to Dan about! It's a doubt I've always had, exactly this same comparison of Kristen's and Trevor's method!
Indeed! What is really going on here? Something else I've noticed, as I'm a member of all the facebook sourdough groups, is that there seems to be very few people out there in the world capable of producing these incredibly open, web-like crumbs. No one on sourdough Australia group can do it, and only a handful on the other groups can.
Matheus, please clarify your talking point.I don’t understand the question or comment.
Hope your breads are improving exponentially.
Danny
Still perplexed as to how Kristen is getting her wildly open crumb. I'm using the strongest bread flour I can find here in Australia, which is Laucke Euro T55 with a protein content of 12.5%. I've heard good things about Kialla organic bread flour, which will be my next flour to purchase.
I feel like, if I bulk further, I'll only degass more during shaping. If I autolyse longer, shaping with be more challenging. I really don't know if I can achieve a more open crumb, though I'd love to. Any ideas?
I'll definitely be trying this again, and again.
Harry
Force yourself to NOT get hung up on special flour, ovens, mixers, etc.. Focus your attention on the process. Fermentation, shaping, oven setup, etc.. The reason I know what I am talking about is because I’ve been guilty of it all...
Your flour is fine.
Perfect Kristen’s Basic Open Crumb SD. It’s possibly the quickest way to achieve your goals. At least that is my best opinion at this time. NOTE - you may do well to reduce the hydration from 80%. 74-76% using her percentage of whole wheat) is a good starting point.This post may provide some ideas concerning the adjustment of hydration. Your hands are an accurate tool for hydration determination. No better tool than that.
Danny
Danny, while I’ve got your ear, or eyes, Can I ask a question about gluten and sourdough?
Does the sourdough culture (or whatever it is), degrade gluten over the course of fermentation? I’m asking as I machine mix sometimes, and I skip the autolyse when I do this and mix till the gluten is fully developed. Should I be doing this? If I fully develop the gluten and go on to perform 3 coil folds, will the gluten become weaker? Should I mix to a point of less gluten development to account for the future coil folds? And does the autolyse increase the capacity for oven spring if the dough is machine mixed?
Also, I know you said not to get hung up on flours, which I taken on board, but I’m starting to wonder if Australian flour is just weak compared to US flour? In this video, the oven spring and final height of the loaf - I just don’t see this as being possible with the flours available here. I’ve never seen an example of bread achieving that kind of spring, or the kind you get for that matter, in Australia. Maybe I’m totally wrong. It’s just a curious thing. US flour seems to form a stronger dough.
Cheers
Harry
Harry, the acids in the sourdough will eventually degrade the gluten. I read that SD initially strengthens the gluten but I have not noticed that in my experience. Hydrated flour, coupled with time and acids from the levain will break down a dough into slop.
This is what I believe, until I learn better. Breads with huge oven spring and large open crumb require a delicate balancing act.
Kristen uses King Arthur Bread flour. It is high in protein, but not super high. The quality (glutenin/gliadin) of that protein is very good. Super high protein is not your solution. I think one of the secrets lie in the delicate balance gluten development and extreme extensibility.
Danny
Dan,
Why does the dough need to be so extensible? With instant yeast, you can get tremendous oven spring with a relatively tight and inextensible dough. What makes sourdough different? And why are sourdough loaves always smaller in volume and more dense than instant yeast loaves? These again are questions that I’ve had no one to ask until now.
I can’t seem to get that balance perfect yet then, of extensibility and structure. I’m taking a crack today at it. I’ve managed to get a fairly open crumb in the past with and without an autolyse, but I don’t have my full procedure dialled in enough to know what’s working and what isn’t. So much more testing to do!
Thanks
Harry
The benefits of the autolyse is to increase extensibility with the benefit of requiring less kneading to develop gluten. If you are going to fold that many times, then mixing to full development is not necessary and is detrimental to getting an open crumb. Stopping the mixer along the way and tugging on the dough will give you a feel for its strength. The amount of water is a big factor in how much mixing time is required and how many folds will be applied. When to fold is the mystery to me. If you want an open crumb leave it alone for for at least an hour at the end of the bulk
Gluten doesn't break down until the fermentation or kneading has gone too long. As Danny says it is a balancing act with many variables.
From what I have read most American flour is grown for making industrial bread that is kneaded intensively and not well suited to artisan bread. I happen to prefer the texture and performance of what we call All purpose flour that is lower in gluten protein and has a softer chew.
Looking forward to seeing your next bake
I’m going to have to start making two loaves at once using one as a control, so I can verify what is and isn’t making a difference. I think it’s the only way. Today I will try 80% hydration.
Your recent 85% loves look really good. That crumb is close. Are you going to have another crack? And do you have an idea of what to do differently?
Cheers
I won't be making one small loaf at a time but my daily bread is pretty much this recipe, in larger amounts, without trying to produce a showpiece. My problems with this method was not degassing the big bubbles. It was a nice exercise to try for the IG crumb shot and I learned to admire the talents of bakers like Chad, Trevor and Kristen even more. if future bakes meet that criteria I will post them.
I would be thrilled with the results you have gotten so far.
I think the wildly open crumb that Kristen posts on IG are achieved by upping the hydration further than what has been attempted by anyone on this CB. Many of the recipes she posts have a hydration of 85% or greater. Being able to manage or even enjoy working with such a wet dough is what holds me back. Maybe we should do a rerun of this CB that pushes the hydration to the extreme!! Good luck in your endeavors.
MT, if you do bake with higher hydration, please post your results here. All CBs remain available to any user for reference or to bake along, even though the initial bake took place some time back. The CBs are monitored and any baker that participates at any time should receive a reply and help if needed.
The CBs are intended to be a resource now and into the future for any interested bakers dealing with the featured bread.
Danny
Will venture into 85% next time but I had these loaves already in progress. I upped the total flour total to 800grams so that I could make two loaves. Wheat Montana All purpose and 20% fresh milled winter wheat that is sifted twice. (Thanks again for the spreadsheet Danny it works great) The autolyse was 3 hours and the water was 80%. I used my Bosch mixer for about six minutes on speed 2 and it was a lot of trouble with the dough sticking in the bowl and having to stop and scrape it down. I have the stainless steel bowl with the dough hook on the bottom. Next time I will hold back even more water and drizzle it in at the end. The dough seemed to have a lot of strength in spite of the sticking issues and more developed than my usual hand mixing. Scraped it into a bowl and did several folds to start but did not laminate and then three coil folds an hour or so apart. I find the coil folds easier to do in a round bowl rather than digging it out of the corners of a square baking dish. I divided it after five and a half hours and did a long bench rest because the dough still seemed kind of tight. It was retarded for 14 hours and grew slightly.
Baked at 475 on a preheated stone and covered with a cold graniteware pan, that is dripping wet on the inside, with a couple of ice cubes placed on the stone. Removed cover after 20 minutes and reduced oven to 450 for 20 minutes more.
The strange thing about this bake was that my normal angled slash with a serrated bread knife produced a double ear on both loaves.
Ponder that one Danny
I love the look of your loaves mate! They turned out really well. I have also been wondering about lamination. I'd like to do a test comparing long autolyse + lamination vs no autolyse and full machine mix. Your crumb suggests lamination may not be a critical step.
Any chance of taking a short video next time you preshape/shape the dough? It's something I really need to work on and would find it very helpful.
I should have my 80+% results up in a day or two.
Cheers,
Harry
My shaping method is basically like the one Kristen uses in the video. Their is a video from The San Francisco Baking Institute about shaping wet dough that is similar to her method but closer to how I try to do it.
I think the lamination works much like folding but I will reserve it for working in additives like integrating porridge, fruits, and seeds or another type of dough.
Like many others I believe the treasures we seek are at maximizing hydration. I am going to set the next bar at 85% and go back to the lamination method.
Look forward to seeing your bake
I would love to pursue this to the bitter end. If we can't do a rerun in a separate thread, let's do it here. You, me, Danny if he's interested, and anyone else. This would be a great learning opportunity and a chance to push us all out of our comfort zones. Tomorrow I will try this again at 80% hydration, and post my findings.
Cheers,
Harry
I will also add, thanks Danny again for the info. I'll be doing some loaves at lower hydration per your suggestion to work on shaping and fermenting skills.
Harry
So . . . I came across this recipe by way of a friend who has been preaching the merits of lamination. I started baking around 2 months ago and after finally getting a handle on no-knead, low hydration boules, I felt it was time to dip my toe into something more challenging. This post specifically has proved to be an extremely valuable resource for my attempting to perform this bake. This community is so knowledgable, helpful, and above all else, kind. So here is my first attempt at a loaf above 70-75% hydration.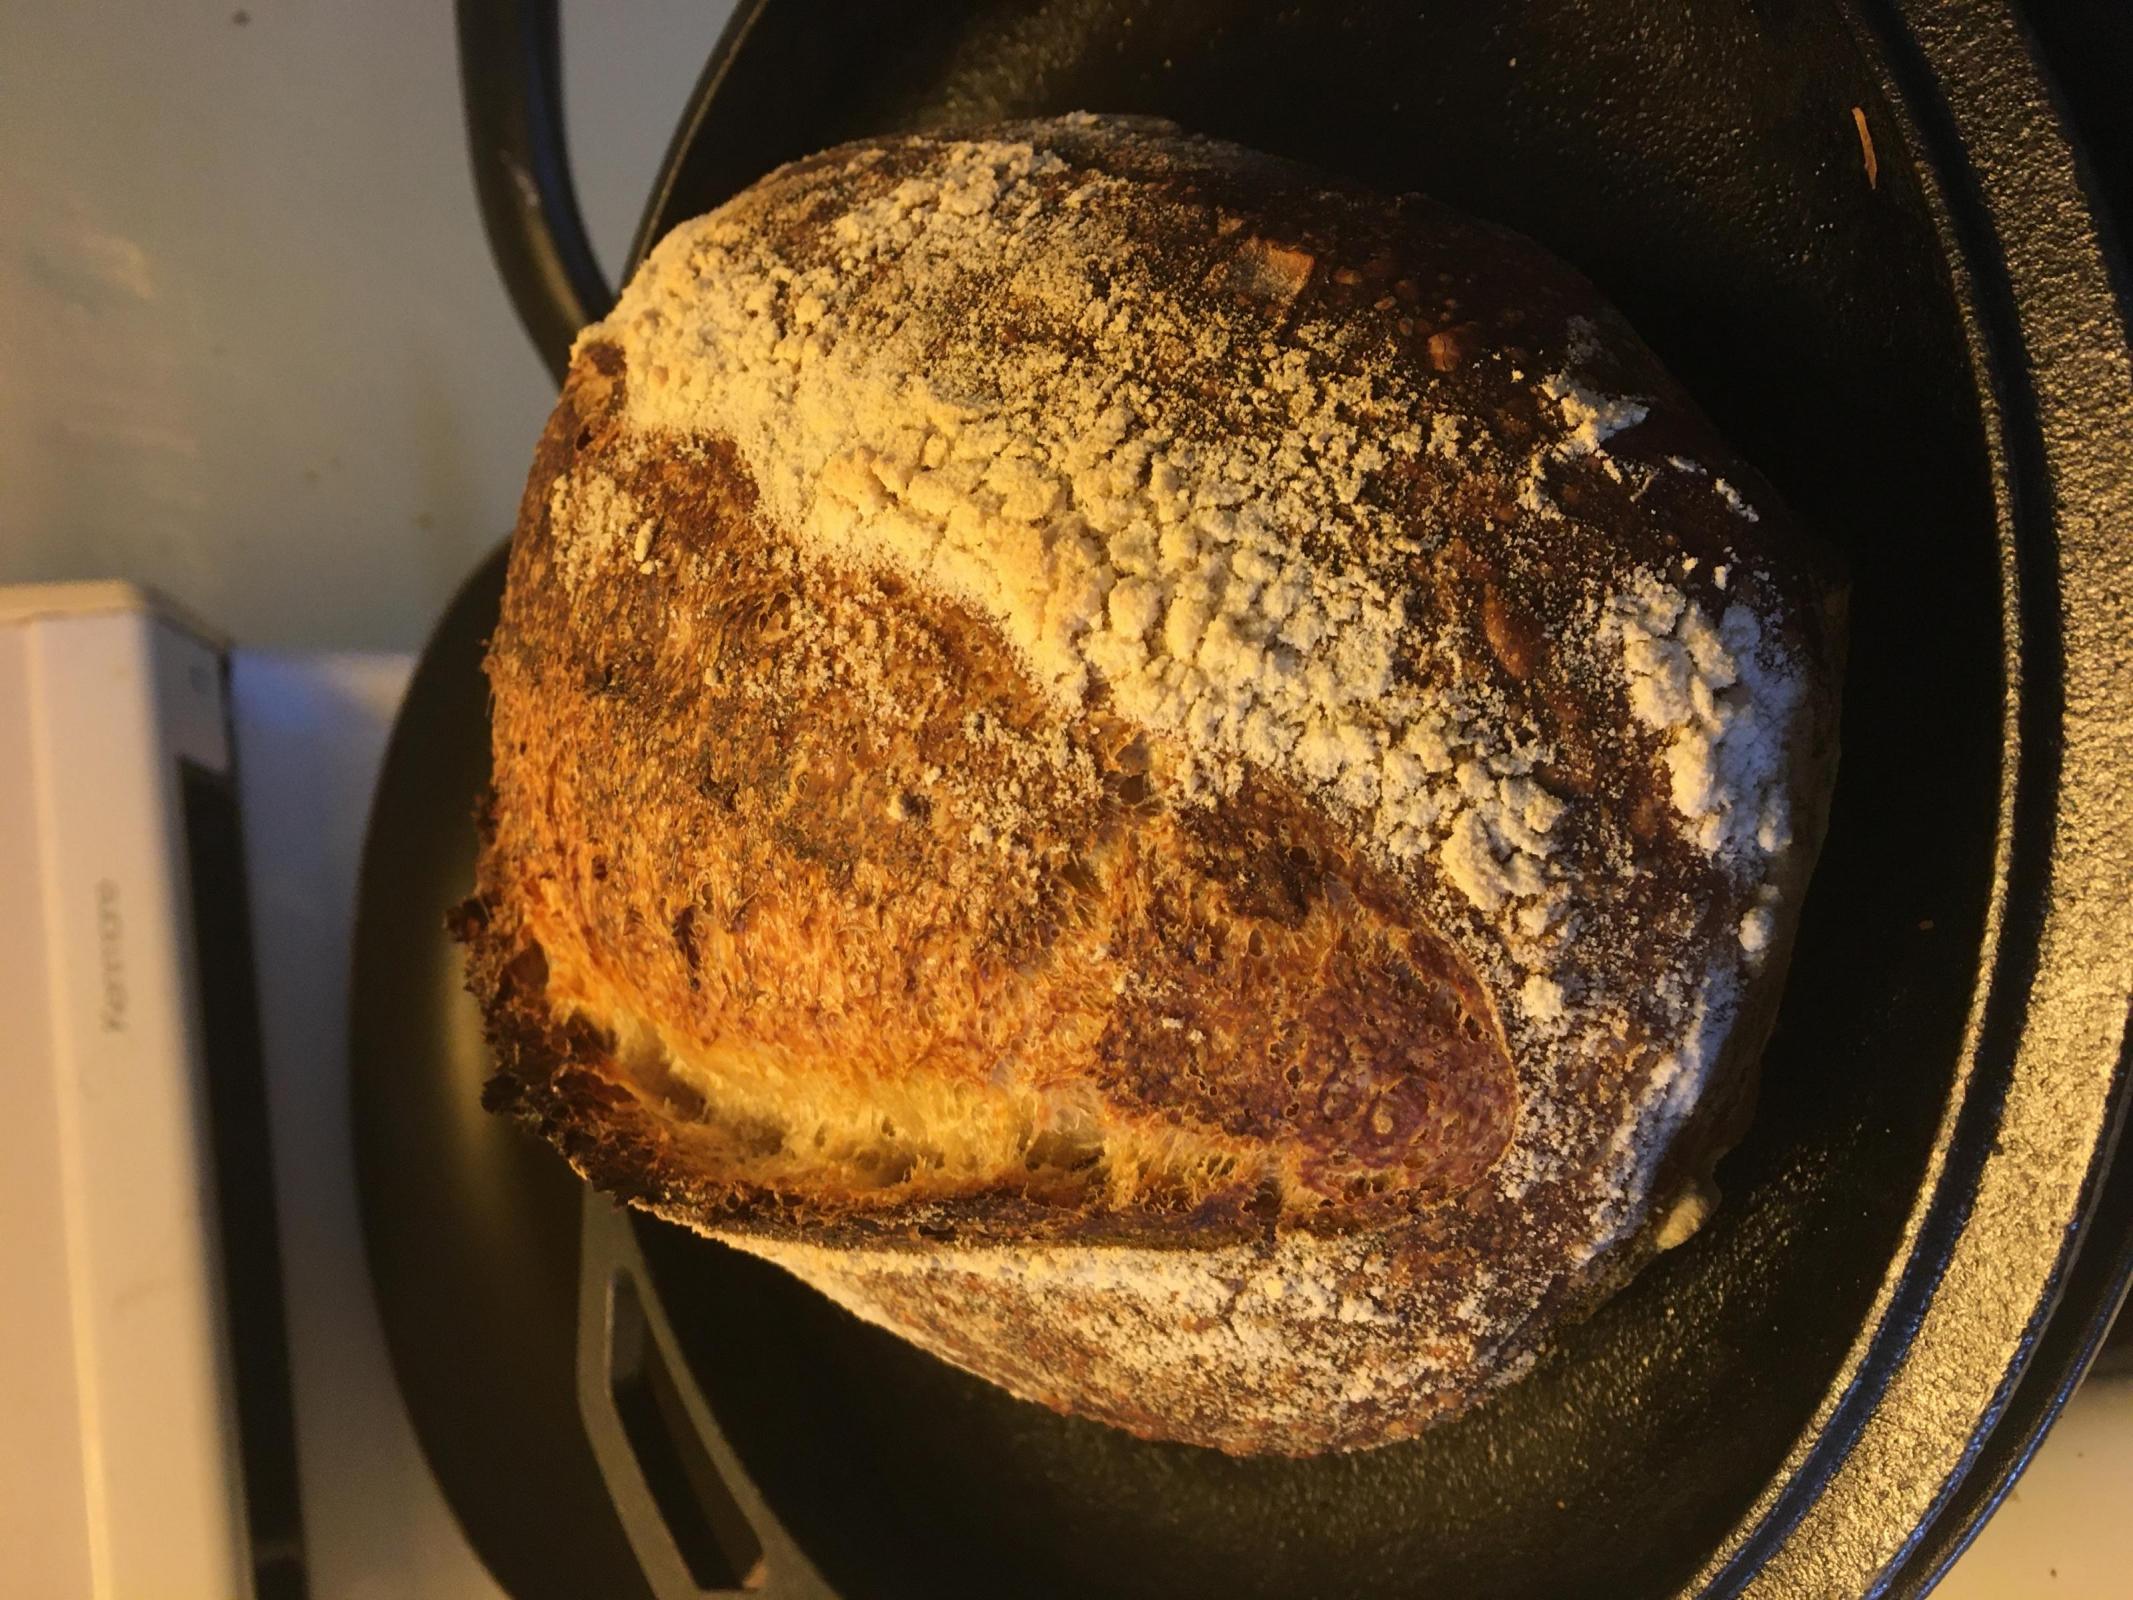 II am incredibly stoked with how it came out. Lamination was tricky, but so fun. Coil folds were also new to me, but this will be my new primary method of folding. I felt like I fudged up the shaping, but that comes with practice. The scoring went better now that I have razor blades as opposed to a pairing knife. I am also happy with the crumb. I am so knew to the sourdough community, and I would appreciate any feedback for improvements I could make. Thanks again.
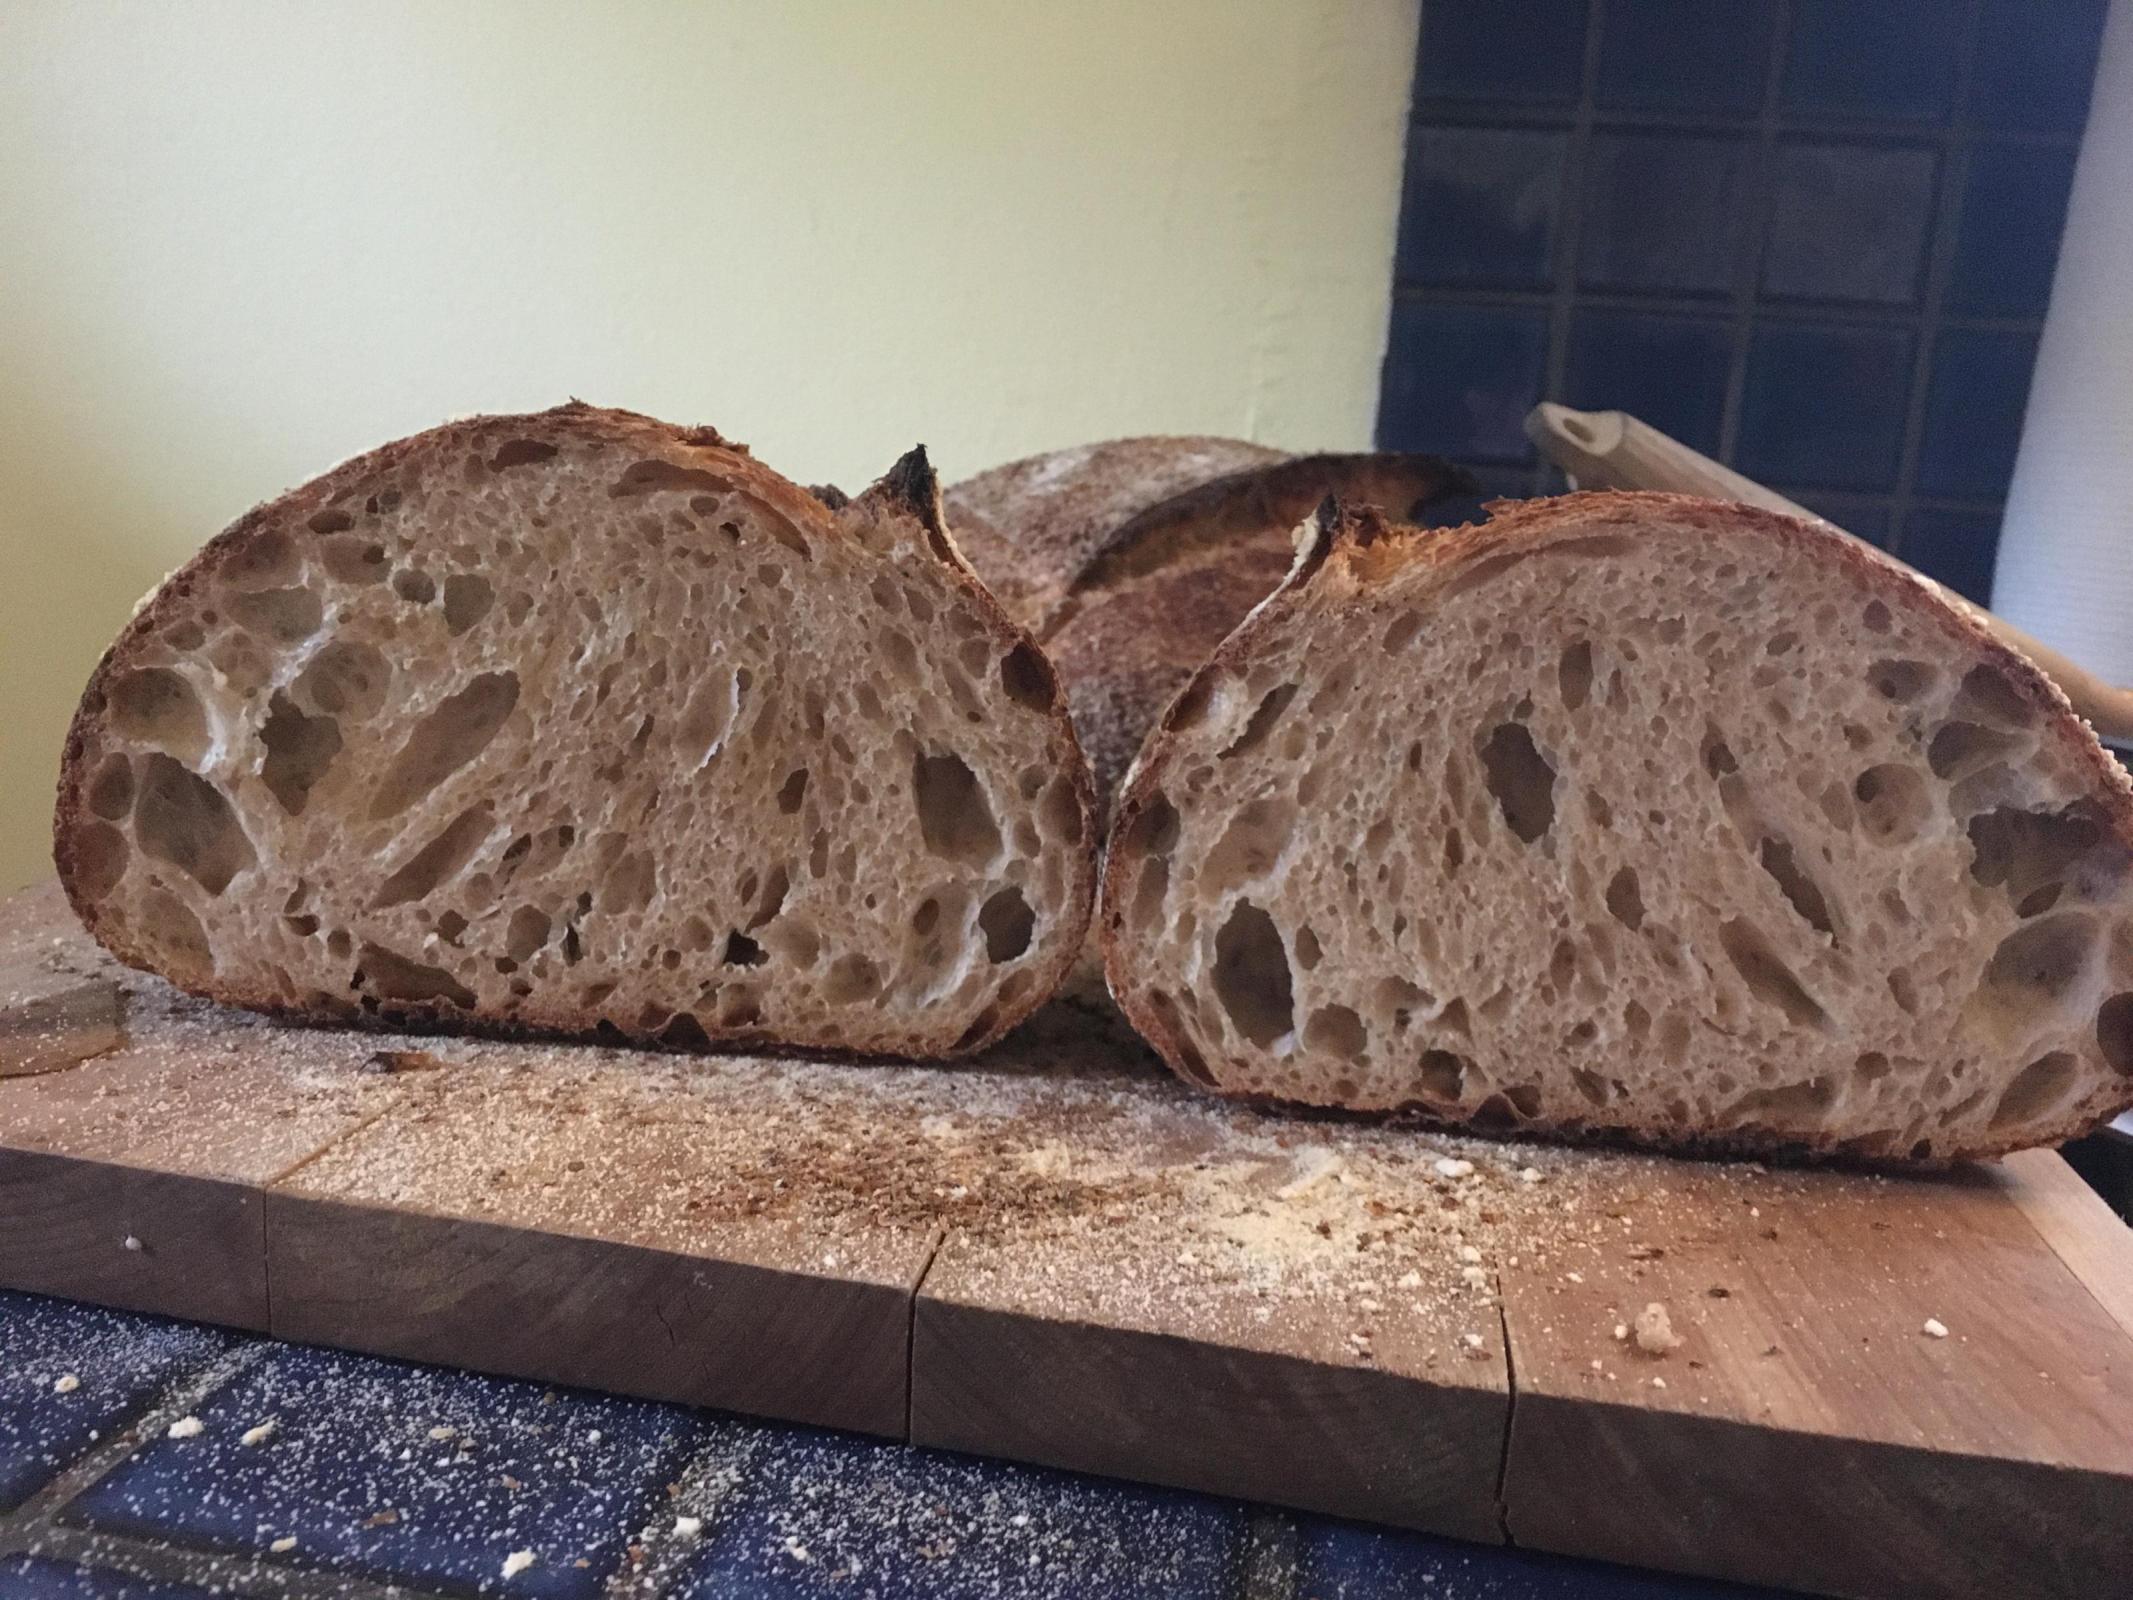
Missoula, you knocked that out of the park! You’ve baked a bread that took me years to produce. For most of us the song by Ringo Star says it best, “It don’t come easy, you know it don’t come easy”.
Absolutely Gorgeous!
Danny
Thanks Dan. That really means a lot, and even more so when there are Beatle references involved.
Shape looks good. Nice crumb and a full bake. Working with wetter dough has it's challenges and rewards. For just starting out your bread looks great. I am still up in the air about lamination but it is a nice tool to have in the box.
Thanks MT. Not a ton of sun in Missoula this time of year. Baking keeps the spirits up. I'm gonna up the H2O a tad and give it another go tomorrow. Would you saving having a mixer has made any noticeable differences aside from convenience?
I am over on the windy dry side of the mountains. I used to only mix by hand and it wasn't until I got a mixer that I realized that most of my early breads were underdeveloped. It is harder to develop gluten by hand with a wet dough. It is possible yes but I would get lazy about kneading or forget a fold here and there. Working in more water is easier with a mixer and working with larger amounts of dough is less work. The down side is more clean up involved and learning the little tricks of getting a machine to work properly.
Look forward to seeing your next bake
They are very vague about what the protein of their flour is and a dedicated bread flour would be nice. They do have new owners now so maybe things will be different. Besides it being cheap at Costco for a 10 lb bag. I like it for most breads and only use bread flour for loaves that have fruits and nuts or things like that.
Beautiful results! Not much to improve on there. Are you joining the quest for the incredibly open and lacy crumb?
Thanks! Consider my hat tossed.
My attempt at 85% hydration. The extra water was not too difficult to add in and the dough seemed to handle fine but it became very loose at the time of shaping. I seemed to be trapping large air pockets during the lamination step. I tried to pop them all prior to each of the four coil folds but was perhaps too careful during the final shape. I think the stretching and little pats that Kristen applies while shaping have something to do with her success. The big bubbles prevent the other holes from growing to their potential. I was hoping for a more even sized holes but instead got a wild disparity.
Good luck with your next attempt
It still looks lacey as all get out. Great bake. Thanks for the heads up about popping the lager bubbles. Will remember that tomorrow. Do you think popping the dough in the fridge for a bit prior to shaping could be beneficial?
I had no clue that large bubbles were hiding in there again. I suspect the lamination step, but haven't ruled out the coil folds. I did pop several along the way. Chilling the dough before shaping is an interesting idea and I think Kristen recommended that in this thread. It would have helped me because the bulk was nearly too long and I did no bench rest then placed it in the fridge straight away after shaping.
Next time I will be more assertive to pat out the folds to get a more even size crumb.
As this is a resource for learning, could anyone making this loaf, if possible, please provide a video of the shaping stages? I would be so grateful, and I think it would be helpful for others once the hydration goes up and shaping becomes more challenging.
Cheers,
Harry
Harry,see this video starting at 12:30.
Dan
Thanks Danny, I've watched all the shaping videos I could find of hers, and of Trev's too. What I'm finding for some reason, is a difficulty shaping the dough tight enough without degassing it. I'd like to see how others handle it as I think everyone does things slightly different and it may help. Possibly I just need to ferment the dough less.
Harry
The Fullproof method is about taking the bulk ferment to the limit as she states in the video before the shaping process. That is why she relies on no bench rest and a cold retard with little to no growth after shaping.The proof is more of a rest and chilling the dough to stop further proofing and encourage oven spring. Getting it out of the container intact and shaping with the proper amount of tension is another reason her breads achieve that holier than thou appearance.
Ok. So, the journey continues. In the second attempt of this recipe I changed of a couple of things. I doubled the recipe, because I have a white elephant party tonight. Who wouldn't love a fresh a loaf of sourdough? I also upped the hydration, and it ended up being around 82-83% including the massive amount of water used to laminate this much dough. I also tried to shoelace method for shaping the batard. The last thing I changed was changing the time between folds to 30 min instead of 45. This added another fold or two and ultimately led to some explosive spring (I believe). I also only have one oval proofing basket, so I got a nice boule out of the endeavor.
https://imgur.com/a/saTuKEo
I'll post the crumb once they cool.
https://imgur.com/a/1DQNZGn Here’s the crumb
Missoula, your bread is very nice. But I wonder if more heat from the top wouldn’t have made an improvement. Notice the dark bottom with the rest of the crust being lighter. Also notice how the crumb is more opn near the bottom.
How are you baking your bread? Covered or what?
Danny
I use a cast iron combo cooker and a 8 qt enameled dutch oven. My rack is in the lower third of the oven. Should I move it up?
It is definitely worth a try. Are you preheating both the top and bottom of the pots?
I am indeed. Maybe leave the bottom one out?
I would try raising the pot instead. IMO,the dough needs bottom heat to spring.
When I bake in cast iron, I use dry polenta between the parchment and the pan. It keeps the bottom from getting too dark. How long did you bulk ferment? Did you put it in the fridge overnight?
After I shaped I room temp proofed for 20 min because my fridge runs really cold, and then 14 hours in the fridge. My bulk lasted 4 and a half hours.
so this is my mornings bake. this is the best one so far...
thoughts ? and i got an ear !!!!
and popped all the big bubbles when doing the steps
I think I may have hit the limits of my abilities here. Not sure I can get a more open crumb than previously posted. I've tried bulking less, and got great oven spring but a more closed crumb, and bulking a little more, resulting in this. It's definitely open and airy. I simply don't see how I can achieve the crazy open crumb though. I really do think it might be a case of my flour not being strong enough for that though I'd love to be wrong! Any thoughts?
Harry, you are way too hard on yourself. I bet if that bread was baked by me and the picture was posted, you’d rave about it. The reason I know this to be true is because I am exactly like you. -Perfectionist-
Wildly open crumb is a great skillset to learn. It makes great Instagram pictures. IMO, it is more of an art form than it is food. I’m not knocking super open crumb, just stating my opinions. Bread freaks (like me) love looking at them, but try to sell it to the average consumer. When I give away super open crumb bread to neighbors, I feel the need to explain and even apologize :-)
But, after saying all of the above, if you want to pursue that elusive extreme open crumb, read and re-read “Open Crumb Mastery” by Trevor Wilson and follow Kristen of FullProofBaking. The more you fail and the harder you work to achieve, the sweeter the victory is when you finally knock it out of the park...
Danny
Danny,
Thanks for all your feedback and comments.
I do tend to think my bread is inferior to everyone else’s, but fortunately though I’m very hard on myself, it doesn’t stop me from really appreciating and admiring bread at all skill levels. But yes, I think had some else made my loaf I would see in a different light!
I think super open crumb is a great technical challenge, a reason to keep learning and honing your skills, and maybe validation to yourself that you do understand what you’re doing, where other validation is more subjective. Plus, for bread freaks, as you say, it’s just beautiful to look at!
I had a look over some loaves I made in the past for clues about my flour and process, and in some instances a decent portion of the crumb is very open. I trust what you say now - I’m going to stick with this flour and keep working on the process. I think it can be done. It may take 50 more loaves. Who knows. I’ll keep chipping away and update if I have noteworthy results.
On a plus, I have been working on shaping, specifically this method, and have finally got a loaf that I’m really happy with. The shape, oven spring, crust, colour, flavour are everything I want in a bread. The crumb was no improvement though so I’m not posting it. I am really pleased so far and if I can eventually get the open crumb to boot I can die happy.
Have you had another crack at this, or have you moved on?
Harry
My best shaped loaf:
Image

Harry, Your bread came out great. You should be super proud.
Lately I’ve been back to Hamelman’s Five-Grain Levain and Teresa Greenway’s SanFrancisco SD. The bread is baked over and over again in an attempt to make specific improvements.
You do well to post images, even if the bread or crumb isn’t impressive. Posting the good images feels great, but the bad and ugly ones give others visual information that encourage helpful input. We learn much more from our failures than we do from our successes. That’s for sure...
Danny
In spite of your expectations it looks like you have achieved the open crumb and the photos look great.
Thanks for the comments. I've had another go at it, this time reducing the hydration way down to 70%, and, strangely, achieved the most open crumb yet. Decided to do full hand mix. 3 hour autolyse. I think a long autolyse and really strong coil folds are helping. I really stretch the dough to its limits in the first 2 coil folds.
Trying one more at 75% hydration. Then I'm moving on to the 50-50 whole wheat community bake.
Cheers,
Harry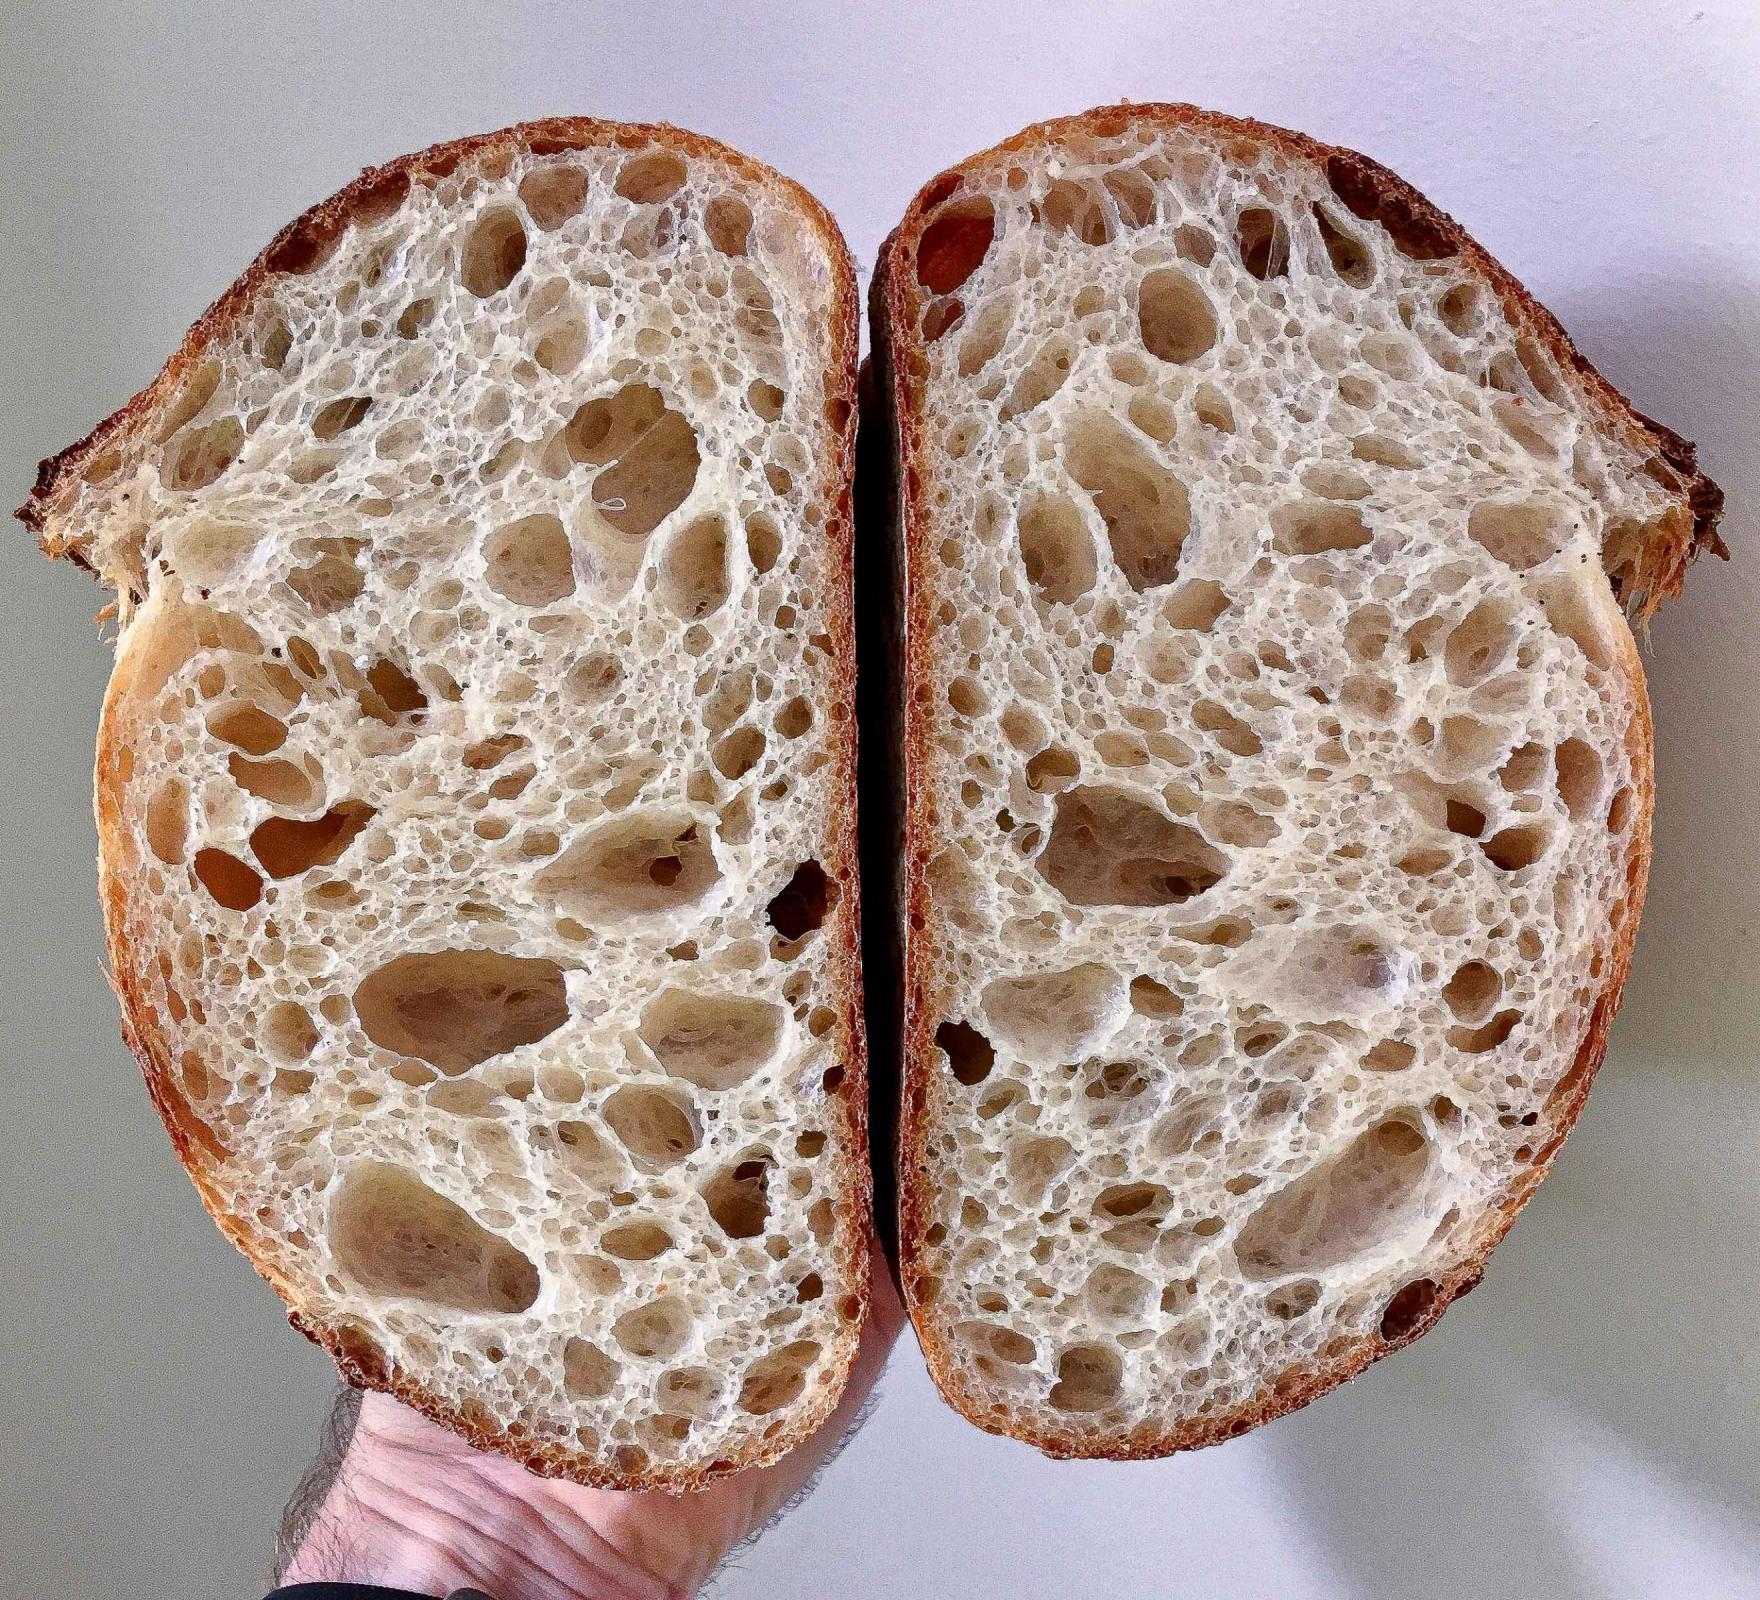
That bread and crumb is something to be super proud of.
Danny
Thanks Danny. I'm super happy with it.
Harry
Had one more crack and learned some interesting things.
Upped the hydration to 80%, which is very wet for the T55 flour I'm using. Added 5% rye. Went for a longer autolyse this time of 4 hours. The dough really needs to be extensible to get the oven spring and open crumb. Cut bulk down by 1 hour. I'd say this must have only just hit 30% when I shaped it, and had just 30 mins on the bench before going into the fridge.
So I think, long autolyse, high hydration, short bulk, short RT proof, long cold retard. Seems to be working. Finally feel like I'm getting it.
Cheers,
Harry
Amazing Harry! I really like to profile of the slice in your latest bread.
Your progress has been steady, speedy, and stupendous...
Dan
Thanks Dan, it's strange to achieve something you long thought unachievable. You shoved me in the right direction in regards to shorter fermentation. I was so certain this would be under-fermented and even gummy, but the extensibility and hydration made up for that in the oven. Very interesting stuff! The dough was surprisingly easy to work with, even though it was very wet and slack. Onwards and upwards from here! Looking forward to the other community bakes now. I will keep chipping away at the open crumb, to improve and to solidify what I've learned so far.
Harry
Harry, learning to trust the oven spring was an awakening for me also. For years I thought the dough needed to ferment enough to build the gas and large bubbles. Now, I am under the impression that the “magic” happens in the first 15 minutes in the hot oven. Many time lapse videos have convinced me of that.
Great work and fantastic improvements...
Dan
or by jove I do believe you have got it! True bread porn! Instagram fame and fortune await! Was the 5% rye in addition to the 20% whole wheat? Looking forward to seeing your attempt at the 50% whole wheat CB. If you want delicious and nutritious try the Hammelman 5 grain.
Cheers! It happened sooner than expected. Quite a surprise slicing this one in half! I used just 5% rye and 95% bread flour. I wanted to really max out the hydration for this flour, and added a touch of rye to help with fermentation.
I wish there was fame and fortune in this! Instagram is so saturated now. It would take an incredible feat of self-promotion and hard work to make any waves. I think I'm happiest just quietly experimenting away in my little bread lab.
I can't wait to start the 50-50 adventure, and and very much look forward to the 5 grain loaf too.
Will there be a new community bake soon?
Thanks,
Harry
I think there will be a new Community Bake in the next month or so. It will be posted Under “Recent Post” and that post will remain at the top of the column until the CB is complete.
Dan
You’re all doing such a great bake!
I wonder if you still have the sheet of Kristen’s BOCSD formula. Would you kindly share it with me? My email address is diakinasih@gmail.com
I’d appreciated very much!
And one question while we’re at it. It’s been fairly hot lately and I can’t control the ambient temperature (which ranging from 28-31 C during the day). Any suggestion on how to deal with this? I understand I can use colder water (how cold?) or shorten the BF (how short?) or cutting the hydration (probably will go with ur advice on the other thread and hold up the water starting from 68% and see how it goes).
My fridge is not super cold, I think it was 7-9C last time I checked. Should I also shorten the retard time?
Thank you!
K.
Had to have one last crack at this at 85% hydration, just for fun. I think the higher hydration won't give a more open crumb, but it definitely starts to give a more translucent and gelled crumb. The dough was very slack and I had to freeze it for 30 mins prior to baking so that I could score it properly. As you can see, the oven spring saved its life again, and the final result is nicely symmetrical. For this flour, I think 80% is as high as you'd want to go.
Very happy with these experiments, and have learnt so much in such a short space of time.
Harry
I'm wondering what white flour did you use? I'm trying french T65 + 20-30% whole spelt with 80% hydration but I'm thinking the flour is not strong enough for that hydration. Awesome crumb btw :)
Hi, I tried this once and I think I over fermented it and didn't get the oven spring. I can't wait to try again though! Quick question on the method and when to divide my dough. The instructions say you should divide it at the light fold stage (step #5) however, it then says "divide and shape" at the shaping stage (#10). Can someone please confirm? I would have thought that you would divide if after bulk fermentation, no?
Also, if I were to add seeds - do I add that during lamination?
Thanks
I am not sure where you are reading those instructions, but there are possible reasons to divide at one time or another. At times when I get obsessed about “the perfect loaf” I will divide before the bulk ferment. Each dough will be fermented in separate containers with the thought that dividing early will allow the cell structure of each dough to forego the later disturbance of separation after the BF. After the completion of the BF the doughs are pre-shaped and shaped, but there is no need to slice the dough in order to do so. For most bakers this is over kill.
Typically, the dough is divided into separate pieces after the BF. It is then pre-shaped and shaped.
Seeds can be incorporated during the mix, but some bakers are concerned that the seeds (having sharp edges) may cut the gluten. If you laminate it is a gentle method to add seeds or other such add ins.
Proper Fermentation
When bulk fermenting SD most look for 30-50% increase in rise. This is fairly different from commercial yeast.
This LINK may provide some useful information.
HERE is a LINK that shows a number of time lapse videos detailing oven spring during the baking process. NOTE - don’t get caught up on the Steam Generator, other methods produce excellent result.
There are many choices and options for bread bakers.
HTH,
Danny
I did my bake this morning and here are my results. I used about 78% hydration but the loaf came out super small! Any tips here? Final weight of my loaf was about 507g after baking.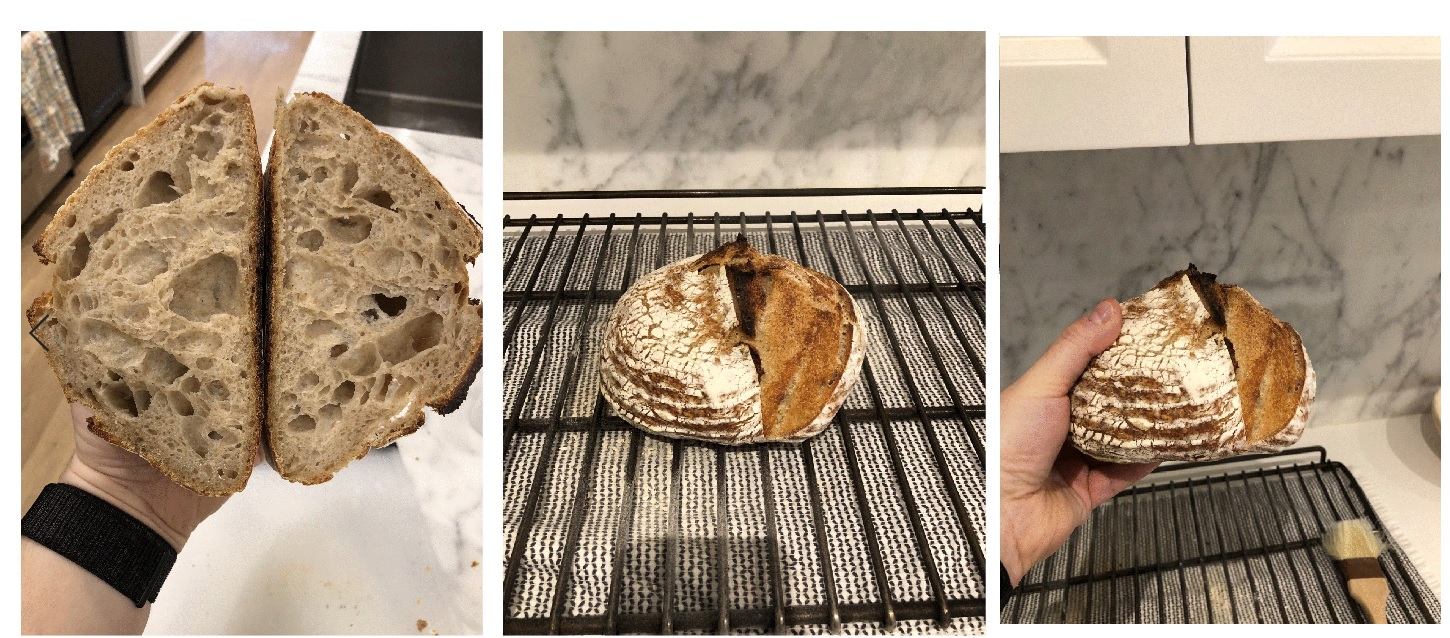
They look bigger when it is a smaller loaf. Feel free to scale up to the size you prefer. Your bake looks good.
I recently started baking (probably like the rest of the world, given the flour shortages) and made some pretty tasty loaves of bread so far (6 batches). The more I read and the more I become obsessed with sourdough and the science behind it, the more I realize I still have a lot to learn (and you're probably never finished learning). Luckily there is this very informative and open community of bakers! The amount of information out there is really amazing.
This is the bread I pulled out of the oven this morning. Although the bread is very tasty and we definitely enjoyed it, I think the crumb is pretty uneven and not structured as nicely as I'd like. Also the crust didn't stay crispy after just a few hours. My first guess is fermentation needs to be improved. I find it very hard to estimate the amount of rise of the dough (50% in bulk fermentation is what we should aim for in this recipe). I followed the instructions thoroughly and tried to keep the temperature as stable as possible (23-24°C / 74-75℉) and proofed for 6 hours. Then I did a retard in the fridge for 14 hours. The fridge was 8℃ though (47F), maybe a bit to warm? I tried bringing the temperature down with two cold packs next to the banneton.
Maybe the more experience baker can tell easily from the pictures below that fermentation or something completely different is the main factor that could be improved. Shaping? Structuring the dough during bulk? I try to pinpoint the areas I should focus on in my next batches, so all tips are appreciated!
Thanks a lot :).
Nice shape. Fermentation looks spot on. If you want bigger holes you could always add more water or let it proof it to the limit.
All the Instagrammable pictures in this thread made me a strive for something equivalent, but in retrospect I'm very happy! I might try proofing a little longer next time though.
First and foremost, thanks Kristen for the great tutorial and wonderful recipe.
I usually do more than one loaf at a time and I am so glad i finally figured out that this recipe and technique actually encourages and performs better if the dough is divided before the fold/laminating part rather than after bulk ferment. (I have failed with sticky messes of doughs because i have performed the cut countless times after bulk ferment)
Anyway really enjoying how the bread looks like.
Hi. Good day. Could you please send me the excel file? carenchin@hotmail.com
Thanks a million
Hi, is it possible to get a copy of the spreadsheet? my email is jane@wiedler.ch. thanks!
Hi Dan!
Could you please send me the spreadsheet? I don't know how to send PM, how do you do it? I will leave my email here. (marc.aurel@eclipso.be)
Thank you so much.
Greetings
I would be very grateful if you could send me the spreadsheet, please, at gaelle.grivelet@gmail.com
Thank you!
Gaëlle
I have to tell you that since a friend of mine challenged me to make my own bread recipes, I rarely follow exact recipes from others. But this recipe is one of those that is a must-try for any sourdough baker. I had then to try it myself also.
I have been inspired by the techniques that Kristen presented so well in her videos and Instagram descriptions, but I have never followed her recipes ad litteram.
From my own experience, when it comes to sourdough bread, I know that what a recipe author gets is not what I'll get. There are so many things that can go differently:
- First on the list is flour. My European flour is clearly not the same as the one of Kristen in terms of protein content, elasticity, extensibility, water absorbance and so on.
- My starter acts in its unique way, clearly not rising 4 times in volume, but maximum 3 times. It gets more or less active with a fluctuant temperature and humidity.
- My skills, although I am searching to improve them all the time, are those of a weekly home baker. Kristen has Goddess hands and a well-trained eye. Still so much to learn from her.
- My environment is simply different. I try to control it with a bread proofer but there is still daily variance.
But does this means that I can not bake a fantastic loaf with her recipe? Of course not. So, I launched myself in this challenge.
With the first attempt, I followed the recipe, by the book, no change in the hydration, ingredients, time, temperature. The result was a nice bread with an ear with an absolutely incredible taste. The crumb had several bigger alveoli (in a tunnel look) but the others around them were smaller. That was a clear sign of under proofing.
For the second attempt, I made 2 changes: 5 coil folds instead of 3 and I let it proof to 75% volume increase. Here is what I've got:
I know that there is always room for improvements but I was very satisfied with the result in terms of look, crumb and the most with the taste and flavour.
This is a fantastic recipe and is for sure one that I'll revisit often. Thank you so much to Kristen to share her tips and tricks with us.
I made also a video of this second attempt.
This is what worked for me, for my flour, for my starter, for my skills and for my environment with her recipe.
Denisa.
Great video, Denisa! I really enjoy your dark and calming backgrounds. It is definitely your signature.
Danny
Thank you so much, Danny! This is my way to combine 2 passions: baking bread with photography :)