For sure Kat, (aka, “not.a.crumb.left”) and I will be baking Trevor’s Champlain SD. http://www.breadwerx.com/champlain-sourdough-recipe-video/
We last baked this bread here. http://www.thefreshloaf.com/node/55123/overproofing-underproofing-sourdough-or-just-bad-shapingwhat-does-it-look.
Since most bakers are separated by many miles and even different countries, this “community bake” may be the second best way to share information and learn together along the way. The idea, for those who want to participate is that we document our progress with pictures and post. It is suggested that each participant start a reply to document their progress. As more information and images are available you can edit that post and append it. We’ll share our success, and just as informative, our failures. During the process we can ask questions, compare results, or offer suggestions. Both pro and novice have a place here.
We plan to start our bake today. Following Trevor’s video. http://www.breadwerx.com/champlain-sourdough-recipe-video/ , we’ll begin with an overnight premix (autolyse with salt). And get our starters fed and active for the next day’s final mix.
I hope others choose to join in. The more the merrier. Even if you don’t come aboard now you can still post your results at any time in the future. All threads are constantly monitored for recent activity. Be sure, someone will be available to assist you.
Dan
http://www.breadwerx.com/champlain-sourdough-recipe-video/ - Champlain Sourdough
Like many of you I came across Trevor Jay Wilson's videos, blog and recent book, which was a total eye opener and this loaf seemed to be a good 'beginner' type of Sourdough with 70% hydration. I tried other recipes before from other amazing people such as Chad Robertson's Tartine book, Vanessa Kimbell's sourdough school web site in UK, Maurizio's amazing 'The Perfect Loaf' blog (I am sure there are many more I should mention but those are the recipes that I came across first in my 'teach myself' approach to sourdough, but after a number of attempts, I had to admit to myself - I am just not ready for that high percentage hydration dough!!! I had some amazing results with the 'no knead' and cold bulk fermentation method but wanted to learn some of the 'hands skills' and also how I can manage fermentation better and learn about 'how to read and understand' the texture of the doughs that I am handling. So - when I came across Trevor's 70% Hydration Champlain Sourdough and his no nonsense approach to teaching in his book 'Open Crumb Mastery' and posts on IG - that was it!
Dan had a good idea last time and kept all the photos and comments in sequence of bake in one comment by editing his existing comment (whereas newbie me, sent replies and comments all over the place which must have been very confusing...sorry everyone. I try to be more organised this time).
So - Start - Pre-mix WITH SALT (which I managed to forget the first time and this causes the dough to degrade during this long Autolyse over night).
I normally have a rye starter called 'Herbert' and created for this SD a new mixed 50%/ 50% white bread flour /rye flour mixed starter (need to think of a name yet) which is more liquid than my quite stiff Rye starter. My starters are now more or less on a regular 12 hours cycle and as I don't bake that much I often arrange my bakes that I use most of my starter and then refresh to avoid waste.
There is a great link in our first bake of Champlain loaf which refers to a long discussion on starters started by Dan and since then I whisk my starter like crazy with water until bubbly and airy and then add flour and again mix that vigroursly to include air. I am sure it is a contributing factor for it's tripling.
Good morning - did not have many good omens for this bake as heating broke in the night and both dough and starter were colder than normal 64Fish...it also meant that when I added leaven to the dough I could not get the dough to warm up to the 78F it needs ideally for bulk fermentation. So, excuse the frazzled me.....NOTE: I am not going to be as organised as Dan but I'm hanging in and stick with it and try to save this dough.....
I tend to mark my starter just with a rubber band and this as an idea I've got from Maurizio on 'The Perfect Loaf' blog and he has a very good blog entry there on the 'rise and fall' of a starter with pictures etc. very helpful what to look out for.
Trevor, also has a very useful example of starter development on his IG.
6:00 AM - Mixed the 50g leaven with the pre-mix which had a good consistency - BUT although the LEAVEN had risen and also looked bubbly and had that gooey stretch _ the Float test was not totally conclusive. Some bits floated and some didn't.....I have this sometimes and the starter still works though...SO it decided to just give it a go as I had the mix and all ready - also I did actually start the leaven at 19:30 and normally let is have the full 12 hours at this rate but the heating problem woke me up too early!!!! Aghhh...maybe the starter and I were both SLEEPY!
6:15 AM Mixed/folded the dough again and now will let is rest for an hour for the first S & F. 65F - the heating is working now and hopefully will get temp up. Made up my mind, once and for all: I will def. buy that Brod & Taylor folding proofer today!!!. Temps in my house in UK are unmanageable!
7:15 First S & F - The consistency of the dough was good but it still was too cold at 72F. Getting better though and I expect that means I just have to expect a longer bulk fermentation - assuming that there was not a problem with my leaven to start with! Oh well, I shall see...
Below picture of dough before S & F
8:15 2nd S & F - Dough looks good but still not up to 78F now 75F -
9:15 - 3rd S & F
Below are picture before and after S & F - Temp. 76F - dough feels like a bit more airy but looking for more fermentation...mmmmh..
Feels a bit like watching paint dry .........looking at these pics........
10:30 4th S & F Gave the dough time to catch up and dough started to show bubbles, so starter appears to be ok - phew...there is still hope...--- needed a break and dog needed a walk - Trevor always said 'Don't let the dough run your day' so I decided to take a walk!
12:00 5th S & F AND Tension Pulls Walk took longer than I thought and the dough started really to bubble and ferment while I was gone! I decided that it looked not too proofy but had good experience with those 'tension pulls' sooo. did some very gentle S & F first, then let the dough slip out of the bowl like in Trevor's IG video and links on our last experiment. Then did approx. 3 tension pulls which left me with a ball with nice tension and bubbles underneath. I watch this dough now as should not go more than 30-50% according to Trevor's notes and might actually go for pre-shape in 30 min...and into 6 hours bulk fermentation and don't want to go too long.but due to temp I had a slow start soooo possibly can go longer or not....???
ok that's what it looked like from the bowl...
OK - I thought - what shall I do so that I don't ruin all this lovely puffiness now? I didn't trust my scraper so I used this technique that I saw Trevor use for the final shaping where he kind of creates an envelope and folds dough up...this is what I did very gently and it was like folding a little puffy cushion...once I stitched it all together with tension I flipped it over and then did very gently rounding with both hands but not much! Voila! Now bench rest for 1 hour or less...we'll see.
OK the dough has 10 min left in pre-rounding to make it a full hour and still has some tension.... I went back to a blog from Trevor and found this lovely quote:
"When it’s time to shape the loaf, the pre-round should feel ready. It should feel balanced. It should be begging you . . . “Shape me! Shape me! Please! There’ll never be a more perfect time than NOW!”
If you think your dough doesn’t speak to you, it’s because you’re not listening.
So, I went and I tried to listen........AND...I will go for the whole hours and then shape....
14:00 - Final Shape completed and dough rests in banneton
I tried to go really gently but also to create some good tension... first photo shows that the dough relaxed but still had some tension...next is the final shaped dough and then banneton for proofing...CUP OF COFFEE NEXT...
15:30 - 2nd proof finished after 1 1/2 hour - now in oven - Sorry I forgot to take a picture. It had risen a bit in the banneton and still chewing gum type bubbles were to see. When I did the test the dough still had some spring to it but the holes from my finger sprung back more slowly....So I thought it was ready although Trevor says 3-4 hours....maybe now my room at 79F is too warm.....When I scored it still had some spring and sagged a tiny bit...
Oh well.....I post a picture once I lift that dome and and.......
here it is...
I am very happy with this bake especially as I was not sure about the starter and
I hope that some of you found it useful...and the bakes I do together with Dan always turn out best for me so thank you for organising Dan!!! I would have given up otherwise this morning at 5:30!!!! I am 8 hours ahead in time zones and keep fingers crossed for your bake!
Here is today's loaf crumb shot...not quite yet the elusive 'Open crumb' but I am happy with my progress. I get consistent with this type of regular looking crumb, learn handling 70% hydration dough and judging stages of fermentation..and we all enjoy eating the bread......My Mum always said 'Es ist noch kein Meister vom Himmel gefallen'...meaning "never has a master just dropped from the sky' but you have to work for it! Mums know always best!!! Kat
Kat, it’s probably too late, but have you thought about a heating pad?
QUESTION - how did you do the 15 mix, then rest 10 - 15, then mix for 5 minutes the levain? I don’t remember him saying in the video.
Hi Dan,
Sorry for delay - had to walk the dog - he has been very patient waiting and the dough needed probably a bit more time after the 'cold' start...
On Trevor's blog http://www.breadwerx.com/champlain-sourdough-recipe-video/ there goes a written description with the recipe. In the section 'Add Starter' is says:
"As soon as you feel the dough really starting to tighten it’s time to take a break and let it relax for a few minutes. I usually knead the dough for 5-10 minutes to start, then take a 10-15 minute break to let the dough relax, then come back for a few more minutes of kneading at the end." Kat
Dan - I hope all is going well with you! This is now the key question for me - what to do next after the final shaping re. 2nd proof??
Can anybody help with this dilemma: I seem to have a lively starter and get now consistently to this stage of preshape - more or less - I also appear to get a kind of decent shape the final shaping BUT the end product after baking is often a loaf with not quite enough oven spring although I have some oven spring and kind of consistent crumb looking like the one in the picture...I was so worried to overproof as the dough in the banneton gets so bubbly so quickly? Any thoughts are very welcome? This seems to be my next step in learning as people teaching in schools would say...... (smiley face)....
I still think it is the flour. I’m saying this because your crumb is consistently very nice. You’ve got that down...
If the gluten is not strong enough to hold the dough’s shape, it will squat. At least that is my thought.
Think about this. Let’s say you have 2 balloons. One is made of very thick, stiff rubber and the other has thin, stretchy rubber. Now both are filled with water. Which one will stand taller?
QUESTION - Which flour would promote the most open crumb? Bread flour or all purpose. (I’m not sure)
I’m no authority, but I always thought this was possibly your problem THE GREAT NEWS IS, if I’m right - you don’t have a problem! If you get better flour or add additional gluten and bake he bread the EXACT same way, your results will be much improved. IF I’m right.
The only other thing I can think of is the shaping. But, if the shaping was not right, wouldn’t you have irregular large holes randomly placed in the crumb? I really like the look of your crumb.
Let’s be real. We really want that wide open crumb that Trevor bakes. I know I do. But it’s really more of a status symbol than to serve utilitarian purposes. We’d need latex gloves to eat a sandwich made from such open crumb. LOL
Having said that, I’m hopeful. I placed an order today for 100 pairs of latex gloves. hehehe
UPDATE : - First off I have baked this bread about 3 times and I never knew that Trevor had more information on his website. http://www.breadwerx.com/champlain-sourdough-recipe-video/ I only had the YouTube video to follow, imagine my surprise to read his instructions below the video. I’ve been flying in the dark! You kept mentioning things like 78 degrees. I had no idea where to were getting that.
Back to you crumb. I’m not sure any of the above is applicable. When I review your crumb shots I noticed that the first image shows a very nice crumb, but not so much the second one. Either the camera angle on the second image is not flattering OR the crumb shrank. I think it shrunk. Just yesterday I experienced “crumb shrinkage”. See this post. http://www.thefreshloaf.com/node/55248/tip-another-reason-not-cut-your-bread-too-early
IMO, your boule looks risen and well formed when inspecting the first image. The first and second crumb shots don’t look like the same bread!
Danny
Hi Danny,
I was wondering how you are getting on and blown out of my mind with your very scientific approach. Amazing...and there is ol' me just trying the 'tension pull' yet again top of my head just because I think it might be the right thing to do....He, He, He....bubbly personality/brain = bubbly dough!!!!
I am just enjoying the learning at the moment and I believe that we sooner or later (probably later in my case) will get there - I always taught my son and pupils 'effort pays' and firmly believe in that and just served me well so far! So I have to take my own advice and get on with it! AND then have to keep up with more laundry because of butter and jam dropping out of the bread!!!! Nice problem to have, I say!!!
I can't remember but I think it might have been Lechem who mentioned that I can get somewhere Canadian flour at a UK shop and this might be worth a try as similar to American flour? I will give this a go....However, dough handling is also a development area but I feel I am getting more confident...but I don't think I am ready to go all the way up to an 80% or 85% hydration dough yet after fiasco the other day.....I was wondering what would be a nice in-between....to get me 'gradually' better? Good luck with the bake, can't wait to see the loaves and maybe you will need those gloves earlier than you thought????? Fingers crossed, Kat
I read where he said that he had a harder time learning to bake than anyone he has ever taught. He says that why he thinks he is a good teacher today.
I will continue to forge on. “ what I lack in intelligence, I try to offset with tenacity”.
If you wanted to try something out before getting a stronger flour, you could try one or both of these test.
Get some vital Wheat Gluten. If you go this route you might try this. Mix your pre-mix and after it sets the required time add your starter. Mix it in as usual until it is well incorporated. Then when you start to knead (I use the Rubaud Method) very slowly add small amount of gluten. You’ll be amazed how so little will have a drastic affect to the strength of your dough. Don’t over do it. A little goes a long way.
Or, you could make the bread with AP flour! You could go the other extreme and learn the results. Did it slump more? How did it feel in hand? What was the crumb like? Etc.. I know that is a radical idea, but if you can’t get stronger flour and you don’t have gluten...?
Even if all of what I said is incorrect, you would be able to rule it out.
Consider your shaping. If that is not it, look at the flour.
THOUGHT - you said you were very concerned during shaping about bursting the bubbles. Why not throw care to the wind and shape away next time. Get a little more aggressive. Cut the dough in half and shape, shape.
Failure can be a valuable tool for learning.
For What It’s Worth,
Dan
Hi Dan,
You are totally right...I shall explore and keep experimenting...funnily enough found on IG an amazing baker and he recommended two UK flours and I shall try those.
I also shall experiment with shaping...I was happy with the preshape and how it kept it's tension but relaxed..so final shape it is... Kat
I will be starting my bread around 7 tonight. I want to try to keep the room temp portion of the pre-mix to no more than 8 hours. That means 7:30 to 9:30 I’ll refrigerate the premix and then 9PM to 5AM at room temperature (estimate 66F). My home is somewhat warm (I live south of New Orleans). I am concerned that if the flour stays wet for too much time, it may degrade enough to weaken the dough’s ability to hold it’s shape. I decided to use refrigerated water in the initial pre-mix. Trevor dealt with this concern by adding salt and cooling the dough. Even though this dough is not highly hydrated it should be very extensible due to the extended pre-mix.
For clarification - The initial pre-mix includes the salt in order to slow down the enzyme action because of the extended wet time. An autolyse is flour and water ONLY(thanks dabrownman {;-) ) . Trevor makes the distinction in his book by calling his mix of flour, water, and salt a pre-mix.
At 7PM I got my starters fed for next day’s bake. I also mixed the pre-mix and refrigerated. At around 9:30PM the pre-mix will be set out on the bench.
Oh, I decided to test the strengths of both of my starters, so I plan to bake 2 loaves. Each will use a different starter. The 2 on the left are the ones I’ll be using. The 2 on the right are my regulars.
7PM pre-mix complete and headed to the refrigerator for a couple of hours, then out on the bench till morning. I loves my Spurtle! Thanks, JustAnOldGuy for the tip. It’s only a fancy stick, but it is the best thing I know for mixing dough to a shaggy mass. No a bit of dough on hands or fingers with this baby. You could hold the spoon end of a wooden spoon and get the same result, but it wouldn’t be keeping with the Scottish tradition.
Below the starters ready for the today’s mix. The one on the left is 50% rye + 50% KA AP flour. The one next to it is 100% KA AP.
12 hour cycle from feed to recede.
Below, the premix has spent 2 hours in the refrigerator and 8 hours on the bench. NOTE: this dough is in much better condition than the dough’s in my prior bakes. I attribute the cold water used in the mix and also the bench rest was 8 hours instead of 12. I think the other doughs were degraded a little too much because they spent too much time wet. Maybe not, just a thought...
Below both doughs are pictured after the second Stretch & Fold. Rye starter on left.
Sorry, rye starter got switched to the right in the image below. Top and bottom images where taken at the same time. It would have been nice if I had 2 of the 2qt/2L Cambros. NOTE; containers with smaller diameters show the percentage of growth much better than wider ones. I use the same principle for my starters.
The doughs below are starting to show signs of yeast activity. If you look closely you might see the bubbles. They are small and not many.
My last hourly fold is due in 45 minutes. It looks like the video shows shaping right after this, no sedimentary proof what-so-ever. I think I’ll follow the video without deviation. Typically I cold proof overnight.
I think I’m giving birth to a Beaut! Didn’t cold proof this one. Bench proofed for 3hr 30min.
Any guesses as to how I shot this image?
Here is the second test bake. Images below.
Crumb shot for the second bread. “Cut no bread before it’s time”.
CONCLUSIONS
The first and second bakes where handled the same UNTIL the proof. The first bread was proofed at room temperature and the second was retarded for almost a day and then baked cold.
FINDINGS
I believe that the room temperature proof on the first loaf made a huge difference. OK, Trevor already explained that in his book, “80% of Open Crumb is attributable to two things - handling and FERMENTATION”. Oh yes, fermentation.
FUTURE BAKES
I will be highly focused on full fermentation, especially at the proofing stage. I’m considering these possibilities.
If you disagree or have suggestions to improve the process, please let me know. I want to learn.
Dan
”inquiring minds want to know”
Very nice looking loaf, Dan! Do you by chance have any pictures post final proof, right before it went in? I'd be interested in knowing how much it expanded in the banneton.
Unfortunately not. It would be nice to have a photographer shadow me while baking. LOL
I can say that it didn’t rise wildly above the banneton. But the dough was “poofy”, cloud like. It was pretty loose. I really get anxious when it comes time to release from banneton and the SCORE! High anxiety, after all of that work. I bet you know what I mean {;-) .
Dan
Oh, It’s never too late to join us. We need all the help we can get. I’ve been baking with Leslie and Kat lately and our collaborations have benefited all of us. Leslie couldn’t join us this weekend :-( .
I'm actually doing a 2 loaf bake today, but it's not the Champlain recipe. I've been documenting the process with photos, and maybe I'll post them if the result isn't too bad. :)
Knowing what not to do is very beneficial, albeit not an exuberant experience ;-). I know that all too well.
What bread are you baking?
Dan
I try to keep my recipes simple. The first is a 5/8 freshly milled and sifted Serventa wheat, with the remaining 3/8 KA AP at 78% hydration. The second is the other way around: 3/8 Serventa and 5/8 KA AP. The closer I get to 100% freshly milled, the less open the crumb. I haven't done a lot of experimenting with breads having less than 50% freshly milled flour, so perhaps it's inherently a flour issue?
High percentages of whole grain will make a loaf that is more dense. Do you sift your flours? A number of advanced baker’s here extract the large bit from the whole grains and the feed them to their starter. That way the bran and other hard bits are softened by the time spent in the starter and still keep the nutrition. Search the site for the user, “dabrownman”. He is full of knowledge on this subject and many others.
I don’t generally bake high % of whole grains, but when I do I expect a loaf that is more dense. Not a brick, but not light and airy.
Dan
Hi,
Interesting to hear what Dan said about rise in the banneton. I did not take a picture either but I you see my picture when I put it in the banneton above, after the 1 1/2 proof in banneton it almost had risen to the rim, if that helps. Is that too much? Kat
The dough was refrigerated for 13 hours and is ready to bake.
Dan
Dan,
Trying to keep up with message and absorb...That looks like an amazing loaf and I also like the little 'blisters' you've got! Can't wait for the crumb.......Kat
look forward to crumb on 2nd bake.
Leslie
Dan,
I did a very similar bake with one loaf proofed at room temp and another retarded overnight and bake cold from the frig. The cold retarded loaf was KA AP flour and WW rather than W Rye.
JUST BEFORE PRE SHAPE
LOAF #2 - RIGHT AFTER SHAPING
LOAF #! RIGHT AFTER SHAPING
I pushed the final proof for the room temp. loaf #1 based on the account of Trevor's Supple Champlain loaf to four and a half hours but I think I went too far. I was using 10" banettons and the dough had risen about a half inch from the top. When I turned out the dough into the combo baker scoring was pretty difficult and the dough was very poofy.
LOAF #1 - JUST BEFORE BAKING
All in all I happy with the results but think I pushed the final fermentation too far.
LOAF #1
LOAF #1 CRUMB
I baked the second loaf after 13 hours of cold retard at 38 deg directly into a cold combo and oven. I baked for 20 minutes after the oven temp. came up to 500 deg. Then reduced the temp to 450 deg. for 15 more minutes. The overall height was less than the first loaf and oven spring was considerably smaller. I think that I should have bench proofed this loaf for an hour or so before sticking it in the fridge. Another option is that is measured the temp. in the vegetable drawer and it's 52 deg. and may allow enough proofing so that's not necessary.
LOAF #2
Any comments or help from anyone would be appreciated. I have another loaf in premix and hope to make an improvement this time around. I've been absorbing all the knowledge available on this site and just want to say thanks to all the people that offer advice.
By the looks of the dough in the bannetons, your starter seems strong.
Are you baking the Champlain exactly like Trevor instructs? I ask because it’s best to do so when doing comparative bakes for learning purposes.
I was talking to the others that have been working to perfect this bread. We are shooting for very open crumb. I figure, if we can purposely bake bread with this exaggerated open crumb, we can better deal with other breads that we want to be light and airy.
But think about this. So we don’t get the gigantic holes with open crumb, BUT take a look at your crumb. The bread is light and very nice. It’s kind of like the person who trains to throw a spear and hit the moon. He practices and practices, but never does reach his goal. But did he fail? NO. He reached the clouds, where others are only able to only obtain a short height. As we practice, even our flops become extremely good...
Trevor mentions that open crumb is 80% fermentation and handling. Looks to me like you’ve had good fermentation. I’d suggest focusing on handling.
Do you have Trevor’s book? It is extremely helpful. Kat, Leslie and I refer to it religiously. It is downloadable and the price is $10. https://trevorjwilson.selz.com/item/open-crumb-mastery-for-the-intermediate-sourdough-baker-1-1
Hopefully others will write in with their critiques.
Another though. I have an 8” and also a 10” banneton. I’m using the smaller one for these loaves because the dough is only 800 grams. I think the larger banneton will allow the dough to spread out too much. If you think this is a possibility in your case (and you don’t have a smaller basket) you could increase the dough weight to 1000 grams or so. That may cause your bread to stand higher after baked. Trevor also mentioned that he uses a towel in the basket for 2 reasons. One so the dough doesn’t stick, but the other really interested me. He says that the towel when wrapped up around the dough ball will help to keep it more erect. I tried that my last bake and was happy with the results. I firmly believe, “it’s the small things that make a big difference”.
Let us know how you progress.
Dan
Hi Dan,
I'm following Trevor's instruction as best I can, no way I can handle dough like him. I can't figure how to get my mix with starter so it comes out like his but practice makes perfect. The second loaf with the AP flour and WW was mixed in error. I had put the formula in a spreadsheet but forgot to change the headings so I mixed up one the right way. I definitely do this for the challenge, the bread is great as is but it would be nice to develop the skill to get the crumb I want on a consistent basis.
I do have Trevor's book and I'm going through it a second time now. I find it extremely helpful and each time I bake the Champlain I go back to the book or videos and find tips I missed.
I missed the comment on using the towels as extra support in the banetton. I'll try that on the loaf I have bulk fermenting now. I used the 10" banetton because I prefer the dough not rise over the top of the basket so the shower cap I use doesn't rest on the dough but the towel will solve that problem as well. So it's 8 " banetton with a floured towel this time around. We'll see how it goes.
Thanks for the tips, I'm learning more already
Al
Loaf #1 looks like it bloomed well in the oven. I say that because of the way the scores spread apart. Loaf #2 doesn’t show near the same spread at the scores. It didn’t get much oven spring. I suspect #2 may have over proofed.
I have had good success by proofing overnight in the fridge and then slashing and baking cold dough in a preheat combo cooker.
What do you attribute the differing blooms in both doughs?
Dan
Hi Dan,
I think you're right about the overproofing though the flour for the second loaf was AP instead of BF. I've baked this bread 5 times since that set of loaves and still haven't been able to get the kind of oven spring I've seen from others. I've tried reducing the bulk ferment a little, tried a final proof of an hour before a retard and a cold oven bake and have varied the tightness of the preshape and final shape. I'm pretty much convinced that my idea of a correct final proof is actually over proof and I have a mix going now that I intend to intentionally under proof compared to my other attempts to see what happens. The one thing that has puzzled me is that as I've sliced some loaves the crumb changed pretty drastically. Here's the initial cut and the other photos are as I cut the bread. Not sure why there's such a difference but I think your initial suggestion to focus on dough handling has merit.
I've spent a lot of time rereading Trevor's book and watching the videos but that really doesn't compare to seeing it in person. Thankfully my family and neighbors are quite happy with the bread I bake so I'll keep on trying. Thanks for your help.
Al
Dan,
I didn't catch it the first time I read your post. You bake straight from the frig into a preheated combo cooker? I've been going into a cold DO and a cold oven. I think I just found my next experiment.
Al
Al, how long are you waiting before cutting the bread? The images that you are uploading appear to be low resolution. I tried blowing them up but there is not a lot of detail. It looks like the dough may be undercooked a little and wet, but I can’t be sure. It looks to me like the top image shows the crumb sunken in. Please forgive me if I’m wrong, I’m searching hard for clues.
When the bulk ferment is finished would you describe your dough as “poofy”?
Is the dough airy when you shape it?
When you put the dough in the pot does it collapse badly or hold some of its shape?
But guess what, even the loaves that disappoint us are pretty good loaves. Think about how far we’ve come. I got really good at baking bricks :-)
Hopefully Leslie and Kat will follow up. They have baked this bread a lot. Leslie has been consistently baking the most open crumb. But we’re all light years from the masterpieces that Trevor turns out. I’m starting to wonder if there is an air valve hidden in the back of his breads. Maybe he inflates them before he puts them in the oven. Hehehe
Danny
The images are pretty bad, smashed my Galaxy and picked up a crappy phone. The first crumb shot was about four hours after I pulled it from the oven. The slices are from the next day. I always double check the internal temp of the loaves and cook to 212 deg. I checked the calibration on the temp. gauge and got 210 deg in boiling water so I think I'm fully baking the loaves. Even so for the last few loaves I've started baking longer to get a darker crisper crust. Typically the dough is poofy during the preshape and I have to be very careful during shaping to not degas the dough. I've dialed the bulk ferment back some so that is somewhat reduced. The loaves that aren't retarded have been poofy and jiggle like jello, very hard to get a good score though they don't deflate. I have been trying to be gentler when I transfer the dough to the cooker because they are right on the edge. I'm going to shape a loaf now and plan on reducing the final proof by retarding in the cold part of the frig. We'll see how that goes.
Thanks for your help, I really appreciate it. Like you said little things matter and I'm sure over time I'll figure it out with help from everyone else's experience.
Al
Dan,
I think your technique of baking retarded dough in a preheated DO has helped quite a bit. Loaf today has come out much better. I also dialed back the final proof by what I would guess is 30-45 minutes. So next bake I'll try your method with a more fully proofed retarded loaf. Thanks for the insights and suggestions.
Al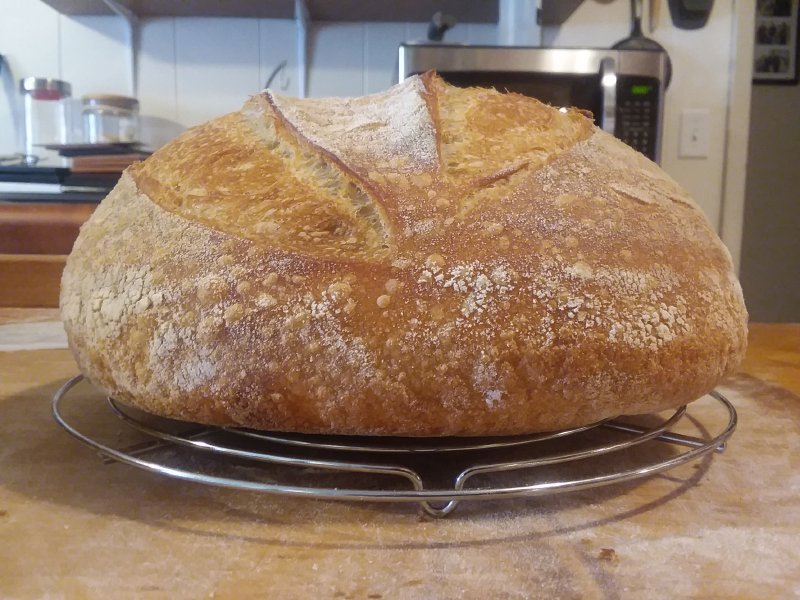
very well done
Leslie
Thank you, Dan's been coaching me.
We are going to start looking to you for help. That bake is gorgeou! Everything about it looks good. The crust, the scoring, the BLISTERS, and the crumb.
Outstanding!
Dan
Amazing - better each time...! Kat
Thank you Kat/Dan,
I think I'm going to try the higher hydration dough that you and Dan have been trying. I tried the Supple Champlain from the back of Trevor's book the very first time I tried the Champlain recipe and I fought with it the whole way and ended up with a pancake. I think I have a better chance this time. Watching the bakes you, Dan and the others on this thread has really helped.
Al
Thanks Dan, you've provided plenty of inspiration for our attempts.
When you say 'tension pulls' what do you do exactly? I'm imagining it is like the "in air" stretch and folds that were described by tx-farmer here previously - lift dough out of bulking tub and pull to the left, fold, pull to the right, fold and back into tub. Wouldn't mind a description of what you're doing, or if it is more like a counter fold.
Also think the extra 3h30 for final proof at room temp is better than the fridge, but it does make me wonder how it would have turned out if they had both had those 3h30 and then the second loaf went into a very cold fridge for the retard.
Finally, was it the rye starter bread that had the fridge retard?
EDIT: WHOOPS - WAS REPLYING TO A COMMUNITY BAKE FROM 3 YEARS AGO. SORRY FOR DISTURBING THE ANCIENT POSTS!
Please reply with the link to the “tension pulls”. I don’t remember the comment.
All Community Bake (CB) remain active. Many bakers monitor them for ant new input. I suggest you photograph and document your bake, then post to this thread.
Danny
That looks fab Dan - much better behaved than my semi-floating panic inducing starter...However, he did the job in the end...do your starter have names? I know you are too busy to respond with 2 loaves. Blimey!
The starter I created half rye half white for the Champlain did not have a name but after today I shall name him MONTY......as he was created initially for the Champlain SD who comes from VERMONT....
I almost named my dog Monty but was overruled with Barney..... Kat
can't wait for the crumb shot.
Kat your bake looks pretty good to me too! it is really fun when things don't go to plan, but it all seems good at the end.
Leslie
Hi,
Yes, I am still baking the Champlain and trying different approaches with folds... here is today's bread.
I seem to be able to produce this type of crumb consistently and this makes me really happy. Still working on more open but I can feed my family with amazing bread whilst learning! Danny and Leslie kindly helped me to work out to make that recipe with a higher hydration of 75% to SLOWLY get used to higher hydration and that dough is in the fridge right now...
Kat
This one seems to be a good deal higher. Do you think so?
Also, I noticed that your scores stay pretty high up on the bread. It is possible that the scoring made the difference is the height. I'm thinking that if the sides of the boule is not scored, the top must rise higher. What do you think?
Dan
I bet you cut the bread early, by the looks of the crumb shot with the single piece (bottom pic). Looks like the bottom crust shrunk inward. Am I right? Or is it he camera angle?
Dan
Yep - you are right! The bread making highlights one of my weaknesses and that can be 'lack of patience' and sometimes just responding to quickly to events rather than sit back and wait!
So there is a bit of character development with the baking as sourdough really 'does take it's time' and interesting that it has found me, don't you think?
Kat
Hi Dan,
I never thought about that and you might be right. I noticed that the more you score the more the risk that the boule looses shape....but never was really sure...oh dear another area to experiment with!!!!
I have the 75% hydration Champlain in the fridge and thank you for helping me! With the overnight pre-mix the dough was very wet and I was amazed how much difference 18g more water can make! 322g rather than 304g.....
I did use Rubaud twice and that helped to get some structure...but the final shape but challenging but not as bad as I thought...we'll see.
I love the effect of retarding in the fridge with the tea towel though and did it also on this loaf.. Kat
Did you use the towel only in the fridge or did you put the whole thing in a plastic bag?
the crumb looks lovely, I wonder how different the 75% hydration will be. When you say retarding with the tea towel, did you wrap the loaf or just cover with the damp tea towel
Leslie
thanks Kat
Leslie
I have been following this thread - great bakes everyone! After baking this bread, I took the plunge and emailed Trevor because I wasn’t happy with my crumb, and I also wanted to know about changing the timing for this recipe because I wanted to be able bake this in the morning. Trevor suggested to increase the levain to 100g or higher, and adjust the flour and water accordingly. He said he uses a small amount of levain because he does the long pre-mix and bulk fermentation. Trevor also suggested that after the stretch and folds, to put it back in the fridge after letting it rest on the counter for an hour if I wanted to bake it the next morning. I’d show you a crumb shot of mine but for some reason my ipad is giving me a hard time.
BTW, I don’t think I’ll ever be able to handle dough like Trevor. Nothing ever sticks to his fingers and he makes it look so easy!
”Nothing ever sticks to his fingers and he makes it look so easy!“
I think he was born with some sort of Teflon coating on his hands. It is a beautiful thing to watch.
Syros, we follow his instructions to the tee. When the dough finishes proofing we preshape, shape, put in banneton, and the go straight into the frig. The next morning, we bake the dough cold in a preheated DO. We get great oven spring even though there is very little rise during the cold Proof. Scoring on cold dough is also easier.
HTH
Dan
You have given me confidence to try that! I usually stick to a recipe to the tee as well, but I liked his recommendation to increase the levain. But it didn’t occur to me how to adjust the recipe. So you stick to his recipe exactly? Dear Abe helped me figure out the adjustment with the increase of levain. Math is my nemesis and I’m still struggling to figure out all the ratios and accounting for the flour in the starter and the preferment etc etc. So when Trevor mentioned adjusting those I was too nervous to ask him for the new formula. Luckily Abe is always here to help and I know Trevor assumes we have some knowledge of baker’s percentages. His book is great but I’ll always need to check and figure out how to adapt a recipe. It hasn’t become intuitive yet and I just want to bake bread but understand what I’m doing and why. These threads really help the neophytes.
Hi there,
I tried the bread with a higher hydration but your 100g leaven version is also interesting...Do you have the recipe for it and that would be much appreciated.
Kat
The total flour, water and salt in the formula should not change. So you wouldn't add an extra 50g starter. Rather you take 25g water and 25g bread flour from the main recipe and add that to the starter.
ORIGINAL RECIPE:
Re-Arranged for 100g starter but keeping the total flour and water the same:- 279g water
- 364g bread flour
- 38g whole spelt flour
- 19g whole rye flour
- 100g starter (50g water + 50g AP flour/bread flour)
- 9g salt
This way the hydration of the final dough is also not altered. And each version adds up to the total flour, water and salt which is...- 471g flour
- 329g water
- 9g salt
It's just the pre-fermented flour being altered.Very clear and precise.
I really feel this should be my weekend bake.
I hope you take pictures and post them. The Champlain has become a loaf for learning for us. We think that repeatedly baking the same loaf with careful observations, that we are learning to make all breads better.
Dan
Thank you!
Also might be of interest as you are in the UK. The Sourdoughschool.co.uk which is Vanessa Kimbell's site has listed a number of Sourdough bakeries in Uk including what their preferred flour is that they used....I thought that is interesting....
https://www.sourdough.co.uk/25-british-bakeries-baking-great-sourdough-bread/
I am experimenting but I think my preference is Marriage organic strong white and Shipton Mill Light Rye and for Spelt I am using Stoates at the moment. Thank you again.... Kat
And thank you Kat. I'll take a look. All good flours there!
Hi,
So...I was curious what the Champlain would look like for me in a higher hydration based on workings provided by Dan and Leslie's spreadsheet (thank you again!).
The recipe worked out:
322g water
375g bread flour
37g spelt
18g Rye
48g Levain
9 g salt
It is not quite a high as yesterday's but that was my fault for probably putting it into the oven without being at it's max. as I was in a rush this morning....learnt my lesson there and cost me that bit oven spring, I think...
I did the overnight premix as usual and boy the dough was wet....I think maybe with the added hydration the dough degrades more than the normal dough (and considering the weak UK flour too) BUT I used Rubaud persistently and the dough picked up....I saw a guy on IG do something similar with wet dough to save it and did 30 min folds instead of the 1 hour....including some tension folds. So after 2 hours the dough was back on track I thought.... I continued with hourly folds and normal S & Fs. I assume the amount of folds explains the regular crumb structure....again....not open crumb but I am still happy and the bread fills lighter and the crumb feels bouncy if that makes sense ...I think I need a new bread knife as I seem to squash all that lightness when I cut it......
I thought as with the UK flour the dough gets so weak I just try the higher hydration version just with a normal autolyse during the day....(as I have a cracking starter that needs using up).....
Kat
do you think the crumb is a little more “lacy” it looks a bit softer to me, but it is hard to be sure from your photos.
I am gearing up to mix up another Tartine style Country champlain late Sunday. fingers crossed that I can make a big step forwards with this type of bread.
well done
Leslie
Hi Leslie,
Yes with the higher hydration it felt lighter and lacier but now I need to watch the oven spring. I also find it harder to get enough tension on a pre-shape ball with wetter dough.... I manage to do the kind of 'shuffle, shuffle to the side' and form the ball without TOO MUCH sticking BUT the dough does then not hold the shape as it would in the 70% hydration champlain....hmmmmm....food for thought.....
Kat
I was just going to copy and paste Abe's formula! And he beat me to it. I'll be trying it this weekend. Kat looks good. I don't think I'm going to play around with the hydration. Increasing the starter I think will be enough for me. Here's my crumb shot from last weekend.
Image

will be interesting to see what happens with more levain.
keep us posted please
Leslie
I just took out the pre-mix out of the fridge. It went in for about four hours and now is on the counter overnight. I’m a bit concerned as to how wet the dough will be, but so far I’m following the recipe to Trevor’s instructions.
Once I finish the s & f’s and do bulk fermentation, it goes back in the fridge . I will send you some photos along the way!
just remember to watch your bulk ferment and not let it go too far.
look forward to the photos.
Leslie
Syros,
I hope all goes well for your 100g Levain Champlain bake....I am curious behind the thinking....do you need more fermentation or quicker fermentation from your starter? Isn't it great how we all in different places and keep baking!
Kat
I deviated a little. I baked the Tartine at 78% hydration. It comes out pretty close to the Champlain. I also added a small amount of Chocolate Malted Barley. See this link for more info on the Barley. http://www.thefreshloaf.com/node/55390/chocolate-malted-barley
Even though the malted barley affects the flavor and coloring, it seems like the dough behaves exactly the same as without it.
Dan
HI Dan,
That is a beautiful 'honeycomb' crumb with bigger holes - what do you think? I think it looks amazingly lacy and it has that 'shiny' SD look judging from the close up. I bet it tastes amazing with that more rye and spelt in it and the barley!
I wonder what you come up with next?? Kat
Hi,
Interesting result with this spontaneous decision to make a 75% hydration Champlain with a 45 min autolyse WITHOUT salt and add the 50g levain and 9 g salt after autolyse and mix with Rubaud. I decided to do this as I felt that the dough was almost TOO weak after the overnight pre-mix with UK flour that I used.....
I am very happy with the result and think this is the most open crumb I've had to date. The loaf did not quite rise as much but I would like but I believe this can happen with wetter dough and a balancing act. All in all, I might try this one again today as we have guest coming from London and will be eating a lot of bread this weekend!
45min autolyse
2 X Rubaud method to build gluten
after 1 hour S & F with slight tighten up little folds as in Trevor's video
after 1 hour S & F
after 1 hour S & F
after 1 hour S & F
then I had to go out and left dough for 1 hour and 15 min which was not planned and dough went quite proofy!!!
Pre-shape and 30 min benchrest....I blame the lack of oven rise that I did not a very tight preshape as I was worried about de-gasing the dough....
I also started to take photo with my scribbles of timings as I totally loose track otherwise what loaf I have done which way!!!!
That’s a nice crumb for sandwiches. It looks like your experiment paid off. The bread is nice and full also. I’d be thrilled with that one.
QUESTION - did you proof at Roma temp? Sounds like you did.
If you get consistent you could go into business...
Dan
Without the long pre-mix the dough just feels so much stronger and I can see how using Rubaud it creates gluten. It might be also making a difference that I am now using a younger levain rather than the one from the night before which is by then 11 hours ...I forgot the difference between using an older or younger levain ..need to check in the book....I keep reading passages again and again and spot new things every time....
I have another one on the go just checking as you said whether I can get consistency.....AND mabye one day an OPEN crumb..... I think we are feeding friends and neighbors very well!!!! Kat
Kat - the reason for the increase is because I wanted to bake the bread in the morning vs evening and couldn’t figure out how to work that out. So Trevor suggested to increase the levain - which he admits is a small amount due to the fact that he does this long autolyse. What he said was to either increase % of levain to 100g or higher - adjusting water and flour accordingly or increase temperature where BF is taking place. So once all s & f are done - I leave it out 1 hour and then refrigerate and bake straight from the fridge.
Initially after incorporating the starter it was sticky but now it seems better. I don’t know why I can never get my dough to look like his! Lol!
Will send photos after a while. My ipad doesn’t seem to want to let me do that for some reason.
Leslie, yes I need to keep an eye on the BF - absolutely!
Hi Syros,
That is interesting as I also retard my dough and bake it normally in the morning. I do the evening pre-mix the night before and then do the rest starting in the following morning. Once I am finished the dough goes straight into the fridge. I then normally bake around 7 or 8 in the morning the following day. I also don't rest it but put it into the fridge straight from the fridge...
I would love to see pictures once you are finished and maybe a quick summary of your timings....I am really intrigued and give this approach a go.....
Kat
So here's the timeline as per Trevor's instructions & Abe's revised formula (eventually I'll get it myself!):
1. 5:00 pm did premix and put in fridge - Day One
2. 10 pm - removed from fridge & made levain: 50g 100% starter; 50g water; 50g bread flour
Day Two:
3. 8:30 am - added levain and kneaded dough for about 10 minutes - dough was somewhat sticky
4. 9 am - start of BF
5. 10am - 1st S & F
6. 11:45 am - 2nd S & F (went grocery shopping)
7. 12:45 pm - 3rd
8. 1:30 pm -4th
9. 2:30 pm - 5th
10. 3 pm - preshape and bench rest
11. 3:45 pm shape and proof in banneton 1 hour before putting in fridge
The photos are 1 hour after start of BF, preshape and proof before putting in fridge. I'll send you all a photo when I bake it tomorrow. I must say I prefer using 100g levain. The dough was easier to work with - could be just that I feel slightly more confident 2nd time around - but it felt different - more extensible, I think Trevor would say. To be continued. Thanks, Sharon
The dough looks strong with good gluten formation. The bulk ferment looks well done too. It's definitely aerated. Looking forward to the baked loaf.
As Abe said look forward to the bake.
Leslie
Chad’s hydration is 77% hydration. He uses mostly AP flour with 10% whole wheat. If I remember right, he uses a 30 minute autolyse. In the images below you’ll notice that the crumb is lighter in color because of the mixture. The dough was wet but shaped nicely for the hydration.
Dan
Looks great Dan, I can't seem to get the oven spring you get. Did you find it an easier to handle dough with the AP?
I go offline for 2 days and come back to all these amazing bakes! Dan - I love the darker character of the crust on the Tartine and again a consistent lovely, lacy looking crumb! Kat
Nice Dan! So this morning at 8:30 I baked the Champlain SD for 20 min.@ 450 F; then 22 min.@450F lid off.
Will send a crumb shot later when we cut into it. Still cooling. I'm anxious to see what the crumb will look like. Anyways I will make it again with 100g starter and bake it according to Trevor's original schedule to see the difference when I have the time.
No kidding. The height, the score, and I bet this crumb will be killer...
Did you use a serrated knife to score?
So, you doubled the starter. I’d imagine the fermentation time was shortened. Let us know how or if it affected the flavor.
I think it’s time we start asking you questions. Your improvement is astronomical.
Dan
Having never tried trevor's champlain SD before I figured this would probably be the best place to give it a shot.
I'll update this post with pictures as I wade through,
8:00 PM Premix with flour water salt. I don't have any rye so substituted some einkorn in its place. It's currently sitting in the laundry room which is in the low 50's. I'll move it to the kitchen counter when I feed the starter right before I go to sleep
- 9:15 PM Fed starter, living overnight @ 78 degrees.
-7:30 AM Moved premix dough into proofer to bring up to 78 Degrees. (Also fed an Einkorn Miche into the oven as per theperfectloaf, with much anxious excitement.)
-8:30 AM Mixed in starter and folded/rolled the rough for a little less then 10 minutes.
-8:45 AM Second Mix
-9:00 AM Transfer to a new container for bulk and moved into 78 Degree Proofer
-10:00 AM First stretch and fold.
-11:00 AM Second Stretch and fold. A picture of the dough before being manipulated.
-12:00 PM Third Stretch and fold.
-1:00 Fourth Stretch and fold
-2:15 Fifth and final stretch and fold. I tried to be very gentle. Could be deemed ready but going to give it 15 more minutes to relax.
-2:30 Removed from tub, let it relax for a minute, then a pre-shape.
-Side note. I am not a tidy person by nature. Said amusingly because it is a hell of an understatement. But baking in a tidy environment I have control over is as important an ingredient to success for me as using a scale. I am trying to translate it to other facets of life but hey, good things take time.
-2:56-My internet died...Rural life. It did just get cloudy...
-3:00-The internet has returned. Still cloudy. Must be the government then.
-3:15-Dough hanging in there on the edges. Figure it's been an hour since I first thought it looked done so floured bench and shaped. Opted for a batard because that's what fits in the basket I wanted to use. Poofy is defiantly a good adjective. I bit of rush and some too much flour I had some trouble getting the stitches to stick so I know right now it's going to have a chubby half.
-3:20-Sealed in a plastic bag, moved to the laundry room to proof. Ambient temperature is 57 degrees so hoping it slows down to a good degree.
-4:12- Why did that dough seem so much wetter then how a 70% hydration in my head would be? Is it the spelt? Is it the overnight premix? And an edit to add to this, when I was mixing the ingredients last night I had to resist adding more water because it seemed like there wasn't enough. But it seems so just right. And also, Trevor, you have to find more ways to take my money, maybe a line of stylish Breadwerx aprons? Just saying. So lucky to have you as a resource in this community.
-6:40 PM Started preheating the oven to 500. Might be premature but better safe then sorry.
-7:35 PM APPROX- Accidentally turned off oven.
-7:55 PM Turned Oven back on.
-8:40 PM-Couldn't wait any longer and baked loaded loaf into preheated dutch oven. Maybe waited too long, Slash was scary. No pictures too hectic. Sorry.
-9:00 PM- Removed dutch oven lid. Not flat. Yay.
-9:35 PM - Removed from oven. Ok maybe a little dark. I'll cut it for a crumb shot tomorrow. Already looking forward to trying this again.
Next morning- love that shattered crust once the crumb has time to set.
And the crumb shot,
Carl, did you use 50g Levain or did you up it to 100? The dough looks beautiful with all of those airy bubbles. It looks like it is ready to take off.
Oh, the dough feels wetter than 70% hydration because of the long autolyse. It enzymatic action breaks down the dough (by design) making it very extensible and at the same time eliminating the need to knead.
I’m getting ready tonight to have another go. I’m making a few changes, maybe for the better, maybe not. We’ll see.
Dan
Hi Dan I used 50grams of levain. 100 seems like too much too me. and thank you. I am anxious over proof time. For me that's one of the hardest things to tell with a new recipe.
And that makes sense. Shucks, I was hoping it was the magic spelt.
Also love what you're doing with the chocolate malt. I'm hoping to try something like that in the next day or so with some a 50/50 Fresh Milled and cinnamon and raisins. I think the overnight autolyse will be a part of it.
Carl, the loaf looks beautiful. I wished my scores were as nice as that. How do you manage to do that with such a limp dough?
I like the dark bake...
Danny
Thanks Dan! I like the dark bake too. I actually like it more the next morning as it seems more caramelized then just "dark"
Regarding the slashing, I'm using a lame I spritz with water, a quick prayer to the fish god then a shallow slash at an angle. Slashing is one of my weak links so far but it's getting better.
That crumb is gorgeous. Absolutely beautiful.
I studied the image of your dough in the basket. Noticed that you didn’t “fuss” with it. I need to learn that lesson. Put the dough in and let it relax and take shape.
Thanks Dan. The only fussing I try to do is to sort of pinch the seam together. Other that then when it leaves the bench its done. I like proofing in the wider basket and letting it fill out instead of fill up. In my head the pressure is more evenly distributed during proof and the crumb tends to be more oblong.
I’d be rapt with that! keep doing what you did -make sure you can replicate it. you are on a roll!
Leslie
Hi Carl,
We are all suffering from crumb envy here!
I have a Champlain pre-mix sitting on the counter and now torn just to go with the 50g levain and just go with as per Trevor's recipe....I am amazed at how much your dough relaxed during pre-shape. Did you make quite a tight ball like Trevor and it relaxed in an hour that much? I am wondering whether I make my pre-shape too tight? Did you use the cinching method and stitching for the final batard? Again I might give it a go because it is a bit looser than the boule....hmmmmm....so many decisions coming up tomorrow.... Kat
Hey Kat. It's hard to say for sure from just pictures. I like to think I tighten the dough up to medium tight. I want a nice smooth surface all the way then I stop. It's all done with the bench scraper and a wet hand.
What's funny is I was actually impressed with how strong the dough seemed after almost an hour sitting out. I have definitely had dough's pancake out more in past bakes.
For shaping I fold south, east, west, north and then stitch my way down then roll away from me. I have an easier time shaping batards then boules but I think that in part liking the shape and therefore practicing it more.
Hi Carl, Thank you for answering....I used to wet also the bench as I've seen this for pre-shape and then try the 'shuffle' like Trevor to form a ball but although it made it less sticky it also created less tension with the surface which I think then made it more difficult to create tension. So I probably go back to try to do this without the 'wet' surface....With the 70% hydration I can get what you describe and the ball goes down to a puffy pancake but keeps some tension and this seems to work best.
So similar to what you describe for your Champlain....
THAT DOES NOT WORK ON WETTER DOUGHS FOR ME YET AND THEY LOOSE SHAPE QUICKLY.....
Final shape: Trying to visualize the moves you describe......
I thought I might try the one shown by Trevor on IG:
https://www.instagram.com/p/Bd5lgWnn1yB/?hl=en&taken-by=trevorjaywilson
A bit similar to yours but without the 'stitching'....
His comment says:
trevorjaywilsonCinching. 80% hydration. Trying to be as gentle as possible because this dough is so easy to degas. Trying to find the right balance of tension can prove tricky, especially for the home baker who only has one or two loaves to shape. In a production bakery, your first loaf is usually your worst loaf. Then you adjust as you go. After a few loaves you have a good feel for the dough and develop a nice rhythm. The loaves get progressively better. Home bakers typically just have one chance to get it right. If you build too much tension you run the risk of having a tighter crumb. Too little tension and your loaf may be flatter, spring poorly in the oven, or fail to open at the score or develop a nice ear. Balance is key.
Kat
Hey Kat, and of course!
I agree that it would be more difficult to create tension without that stick. I used to rub a little olive oil on the counter but eventually decided it would superfluous. I don't shuffle the dough like Trevor because my work space isn't so long once I start doing more then one loaf at a time so I've adapted to just "steering" it in a circle and dragging it maybe 6 inches in whatever direction at a time. But know I won't pretend to have the answers with pre-shape tension. I am definitely still figuring out what makes a difference and how. Getting lucky was a big part of the success here. I know with the long bench rest I want to make sure it's good and tight but the second it is I stop. To be honest I was worried I over handled this one in the moment.
I typically bench rest my higher hydration country loaf and whole wheat for 30 minutes so this was longer then usual for me.
I think my dough was strong enough to shape without the stitching but it's my favorite part so hell I'm going to do it. lol!
Thank you! I am satisfied with it, especially for the first take.
I'll try it again starting tonight or tomorrow night and see how much of it was luck.
Carl, that's a beautiful loaf of bread. I still struggle with the preshape and shaping. The pre-shape scares the heck out of me- I could never get my dough to scoot across the bench like Trevor. Not going to happen ever! But you should be very proud!
Love the dark crispy crust and the over spring and crumb is amazing.
Al
Here it is - cut from two different angles. I'm disappointed in the crumb, frankly. I think I seriously need to work on my shaping techniques, which again Trevor makes it look easy but tells you it's hard, and it is.
Dan - yes I used a very sharp serrated knife. I've ordered a bread scoring lame from Amazon which is taking forever.
As to the fermentation time, you know I struggled with that one. I didn't shorten it mainly because I got so busy with other things that day that the time escaped me. So now my debate is to make this again with a shorter fermentation time and less S & F's, or to make it exactly with Trevor's timeline but with the 100g of starter.
Personally I prefer the 100g - Trevor could make working with clay look easy - but for me- the increase in starter really made a big difference - which was so apparent during the BF and S & F. The other thing I might do differently is to do the autolyse without the salt like Kat did. However the Rubaud method is a tough one for me to do, so if I were to increase hydration it would be basically stretch and folds. My arm can't take the Rubaud method for more than 5 minutes.
All in all a delicious tasting bread. And the other thing I've noticed is that the bread flour I am using is by La Milanaise - it's organic, sifted. I wanted a whiter bread, so my inclination is to go with their All Purpose flour should I make this again next week.
Looks wonderful to me Sharon. Good oven spring and a lovely crust. Some like a big open crumb and others aren't fussed. In fact a lot of people do prefer a closed crumb. But if your preference is an open crumb like in Trevor's video I think it's down to the handling. But everything else looks spot on. How is the taste and do you notice any difference between 50g starter and 100g?
I'm going to have a look at my loaf now and I'll see you on the other page for a taste report and crumb shot with the method I used.
Sharon, that “cross” score looks so good in the proofed dough. It looks like you put it in the freezer for a few minutes before scoring. How did it not spread wide open when you cut it?
When I score mine, they spread open right away.
So your score is great and your bread stands tall. What is your secret? “inquiring minds want to know”
Dan
Hi Dan, this has become a fascinating thread! I think my fridge is very cold and that’s why it doesn’t spread. But I’m still trying to figure out why I am not getting the open crumb my first loaves got - so the journey continues....
Hi Sharon,
I think this is a great looking loaf .....
I agree with Abe that after trying different methods that ultimately achieving that open crumb is down to a lot more practice on handling in my case.........BUT huge achievement to get a good looking loaf like this, I think!!!! I had friends staying from London this weekend and they quite happily sampled some of the loaves and it made me proud to feed them with bread made by myself!!! Trevor keeps mentioning '10,000' breads that he made and still learning...so I keep baking and maybe it will happen one day.... Kat
Yes it is delicious! And it gave me pleasure to serve my family freshly baked bread. It’s so true about the handling. Kind of humbling - you just never know. I also had great results from Maurizio’s Beginner Sourdough Bread although if memory serves me correctly is more hydrated.
Interestingly enough, I was proofing my breads in a Pyrex bowl with a tea towel dusted in flour and then in a bag in the fridge. I then ordered some bannetons and I’m wondering if my results have been affected by that. Somehow I think the glass bowl with the tea towel kept the dough from getting too cold. I think next bread will go back into the bowl just for the sake of comparison, all things being equal.
As we near the end of bulk fermentation for the first time I wanted to defer to your experience.
Is a linen liner necessary for champlain sourdough or is it well behaved enough to proof in a well floured banneton?
Also trying to decide on the balance of warm to cold time for proofing. I'd like to have the loaf spend some time in the fridge but still bake tonight. Is one hour warm and then three in the fridge enough time to fully proof? Or should I do two and two.
thank you!!
Hey Carl, glad you decided to bake and document this one. We consider this a loaf for learning.
I think all of us have pretty much followed Trevor’s directions which calsls for a room temp BF and either an overnight cold proof or a room temp proof. But any deviations are welcomed. We are all interested in learning.
I’ve been using a liner or floured towel, but I really want to get to the place where I can go straight into the banneton. I like the rings.
Have you checked out Trevor’s webpage for the Champlain? http://www.breadwerx.com/champlain-sourdough-recipe-video/
Also, Trevor has a really good book (PDF) that is very popular called, “Open Crumb Mastery”. It is filled with a lot of unique and informative information. https://trevorjwilson.selz.com/item/open-crumb-mastery-for-the-intermediate-sourdough-baker-1-1
Your photos are gorgeous and we look forward to viewing your images and learning from your experience.
Dan
Hey Dan! Thanks for the follow up.
So far I have done my best to follow trevor's directions as well as a I can with the flour substitution being out of necessity, but I have decided to do a "in between" proof in a cold (57) degree room.
I also decided to use one of the wood pulp banneton's which seem to do a great job of letting go of the dough and you still have a chance for some sort of imprint. I had to deviate again because I only had these in a batard shape, so it became a batard.
Thank you! and I have been lucky to have learned so much from Trevor's website and think his book has to be one of the best value purchases you can make as a baker. So much information and so accessible. I am a big fan.
and that’s the linen vs banneton. Yes it will be fine in a floured banneton.
I will let other experts speak to your proof times - my question being - are you doing the overnight autolyse or are you planning on doing this all in one day? I honestly don’t know the answer to your question - you certainly could try that. Trevor’s recipe is for about 3-4 hours of proofing after bulk fermentation on the counter, so you could play with that and see. But that also follows a long autolyse of a few hours in the fridge and then overnight on the counter. Not sure if that helps!
Everything is happening now. I did indeed do the overnight premix and then spent the better part of the day bulk fermenting. Now it is proofing in a cold room. Currently 55 degrees with the plan of baking @ 9:00 PM. We will see.
I’m going to make another run at this. But I’m going to change things up a bit. I figure I need all the help I can get ;-)
Well here goes... If it succeeds, GREAT. If not we’ll all learn some valuable lessons. LIKE, what NOT to do.
I am so pleased that others have joined our experiment. Leslie, Kat and I started this thread with the idea of learning methods and techniques with a particular goal in mind. It seems to us that collective input through “community bakes” would benefit participants as well as readers. I for one, consider this a success! Thanks to everyone who has participated and those that may do so in the future.
I feed the starter 15g spelt and rye bran + 35 KA AP. NOTE - I am using 100g Levain for this one.
I changed things up with the autolyse. I wanted to compare the difference between the prescribed 8 - 10 hr premix to a 2 hr autolyse. So only four and water.
I mixed by rolling dough (per instructions), but finished up with 5 min Rubaud, 15 min rest and 3 min Rubaud. This dough is acting completely different from the original long premix dough. To me it feels like 65% hydration. It is developing a nice windowpane with little effort. So much so, I reduced the Rubaud and will probably spread out the S&F to an hour, maybe more.
Here is a link to Instagram showing a short Rubaud mix with this dough. Note in the video how I hold the bowl low and between my legs. It really helps to make the kneading much easier. https://instagram.com/p/BfqcoEQhGZm/ Also notice how composed the dough is. It is not very sticky and it maintains a ball quite well. The question remains, “what will this do to the crumb”?
I waited about 1hr 15min to do the first S&F. I decided to follow Alan’s (aka, Alfa so) method. I remove the dough from the bowl and do a complete letter fold on the bench. I think this is giving me more control over the stretch. I plan to be gentle with these. After the folds that dough is not shiny or very sticky. The gluten is highly developed. I attribute this to the lack of degradation caused by the overnight premix in the original instructions.
I did 4 S&F on the bench. Below the dough is pictured before the 3rd fold. It is increasing in size by about 25%.
Dough image below after 3rd fold
Below dough pictured on bench after pre-shape. NOTE - because I choose to autolyse only 2 hours the dough remains strong, even at 72% hydration. BUT, what will the crumb look like?
I baked this one in a cloche. It grew huge.
I used wheat bran on the banneton and crust to prevent sticking. It worked well.
Conclusions - The extra Levain (total = 100g) worked well for me. Flavor remained good due to 78F BF and proof. The higher temps added to the tang. In spite of the extra Levain and warm temps, I think the 2 hour autolyse helped greatly with the ferment times (remaining close to original) and the dough was much easier to handle. The dough was MUCH stronger. It also held it’s shape remarkably well. This dough came in around 72 - 73% hydration.
All in all, it seems the 2 hr autolyse made the biggest difference.
Oh yea, next time I’ll shape the dough a little more narrow and longer. On this bake it tried to “crawl” out of the baker.
AND the wheat bran might be a little dark for some. Might try cracked rye next time. I like intense flavors. You know, “go big or go home” kinda thing.
Dan
Oh, here is an interesting factoid that I think many will enjoy. http://www.thefreshloaf.com/node/55435/very-interesting-factoid
Hi Dan, Leslie,
Both you and Dan mention the 'shifting Bran' and I saw an interesting technique from a Sourdough book from this amazing baker running Illebrod in Oslo and he also is on IG. He started as a homebaker and now runs his own bakery. Inspiring guy!!! He shifts the bran from the Spelt when he weighs and then soaks the bran with boiling water separately and then adds that later with the salt.
Have you heard about this method and the benefits?
Kat
That is a soaker. I would imagine he soaks the bran so that it softens and does less damage to the gluten threads.
Lately, I’ve been inspired by Dab. I’m extracting the bran and the toasting it with other bits such as wheat germ, cracked grains (and such), and the adding back into the dough. It’s called Toadies. And it is a wonderful flavor enhancer. Although this technique will not help with the gluten cutting problem. Maybe we could try soaking the Toadies.
I’ll ask Dab to reply. See what he thinks.
Dan
this experimenting when I am out of town and can’t get involved in the baking. Toady Tom’s Tasty Toasted Tidbits are a great flavor and color enhancer as Dan says. If you don’t want them cutting gluten strands you can do 4 things.
After toasting you can milk them again to reduce their size or you can soak them separately or both. You can also use them in the leaving feeding but since they were toasted the enzymes will be denatured. They will still be food. You can also make a porridge with them and soften them up or at least get them in the autolyse or in this case the pre mix.
I’m glad to see folks starting to experiment getting the bran in the levain. Everyone’s bread is getting better and better- way to go. And Leslie is getting that open crumb and spring too! The thing about a shaped proof is that it can over proof in the fridge if the bulk or final proof is too long or the prefermented flor in the levain is too large. If this happens just reshape it and let it proof again on the counter - but the crumb will not be as open
I have gone to a bulk retro in the fridge instead of a shaped one for this reason of over proofing in the fridge while asleep.
Happy experiment baking to all
did it hold that shape well or relax quickly?
Can’t wait for the bake
Leslie
It held it’s shape.
love the contrast on the crust and can’t wait for the crumb.
Leslie
Dan,
When I did the shorter autolyse, I did come to the same conclusion that the dough seems to be less wet and built gluten very well using Rubaud. I am right now trying 100% Levain route with overnight pre-mix. It was interesting as to adjust the recipe based on Abe's calculations I used less water in the premix so the dough was much stiffer after the overnight pre-mix. I am onto my 2nd Stretch and Fold soon.
That's a great loaf and Iove the seeds....keep finger crossed for crumb shot... Kat
Dan,
Another great looking loaf..still that beautiful lacy crumb with bigger holes now?
I had a disaster bake with an overnight pre-mix with different UK flour. The dough would not get any strength and I did not give up and baked it and it will be good for croutouns....It was a brand of flour hailed by sourdough makers in UK but the overnight pre-mix totally degraded it...
So, in order to cheer myself up I started another 1 1/2 hour Autolyse Champlain with 50g younger levain and so far so good.... I TOTALLY AGREE THAT USING RUBAUD IN CAUSE OF SHORTER AUTOLYSE WORKS AMAZINGLY WELL in my case too and you can see how the gluten builds before you even start the S & F. I am now on the 5th S & F soon and we shall see.....shall post some pictures and thought I better bake another one quickly as this flour disaster totally disheartened me...I should have know as it also totally made my starter really wet and runny... quite bizarre... Kat
maybe for your flours 72-73% hydration is a sweet spot too.
Leslie
I’m convinced the big change came from the 2hr autolyse. Now maybe Trevor wants an extremely slack dough. I imagine that to be the case.
maybe the slack dough is needed for his open crumb. But it sure is hard to work with.
Dan, I want to make another one as well and do the autolyse without the salt. Thank you for your photos and results. I also liked using 100g of starter. Do you think the autolyse could be pushed even longer? How long did you proof this bread before baking? Very beautiful - impressive!
Sharon, after the last few test, I have decided not to do the long autolyse. It is causing my dough to be too slack. Maybe with more experience, I will be able to handle such dough. But for now, no. IMO, a 2 hours autolyse is great. The dough is much easier to handle.
I may go back to the longer autolyse if I further testing finds fault with the shorter one. Who knows...
Dan
That loaf came out looking great. Without anything for scale in the pictures I picture it a yard long in my head.
Nice crumb. It's like you can see exactly the turns and folds it took to get there.
Finally I plucked up the courage to have another go at Trevor's Tartine style bread - Country Champlain. It is higher hydration than the Champlain and has much higher amounts of spelt and rye.
I made 2 small 550 g loaves, treated both the same except for Stretch and folds. 1 hour autolyse using levain built over night with bran & flour at different stages. Here it is 4 hours after last build, I had to refrigerate it until I needed it!
Recalculated my formula and changed the emphasis so this time it was approx 10% prefermented flour and hydration stays at 74% as anything higher is too much.
#1 Mixed using Rubaud method then did 4 lots of 10 S & F at 30 minute intervals, 1 set 6 S & F at 1 hour.
Dough part way through BF
#2 Mixed using Rubaud method then did 4 lots 10 S & F + 3 -4 Tension pulls, 1 set of about 5 tension pulls. You could tell with the dough there was more strength in it.
Part way thru BF
The dough rested a bit and I decided it had grown nearly 30% (I had taken a small amount off at the start and placed in straight sided shot glass so I could better judge degree of proof)
Preshaped with bench knife, rested 20 minutes, shaped and placed in floured banneton in fridge now set at 4 deg C for overnight proof.
Here they are just before unmoulding. They have risen 2 rings of the banneton overnight.
Baked this morning 15 minutes lid on at 250 deg C (oven & DO preheated) and 15 minutes lid off.
#1
Crumb
#2
Crumb
Crumb shot both side by side
Much happier.
#1 was a slacker dough and harder to shape than #2 but strangely I think the crumb is a touch more open in #1
I am not sure what my next step is, could it have proofed a bit more? maybe room temperature before or after retarding? maybe even 100% room temperature proof. I would like a bit more oven spring. These are definitely an improvement - much shorter BF, colder and shorter retarding (was only 9 hours). Still struggle with shaping my preferred batard. Should I go for a boule or even no score (proof seam side down in banneton)?
Advice?
Leslie
Edit: my autolyse did not include the levain. The autolyse was all the flour and water only, salt and levain added after 1 hour.
Those look outstanding!!! Sorry I can't offer much more then that. But again, fantastic.
Finally I feel as if I have made progress. look forward to final pics of your bake.
Leslie
Loving that crumb. Your batard shaping looks perfect to me but the way I prefer, if the hydration is low enough, is to pre-shape into a boule then when the dough has relaxed i'll turn it over then roll the dough but after each turn push back to seal and tighten.
with these higher hydration doughs. I hate it when it sticks to my bench, my fingers etc so needs lots of flour and yet I don’t want that either. next time I might try oiling bench and hand and seeing if that is better. The bench knife shaped preshape was ok although it did relax pretty fast. and it was a boule at that point. I will think hard about this shaping part because it is bugging me the most - I want the dough to hold its shape better than it is at the moment.
thanks Abe
Leslie
But a dry bench. I've tried a wet bench before and it makes shaping more difficult. The friction of a dry bench helps with shaping. Try Trevor's method for realising the dough onto the dry bench with the seam down then tighten it up. Rest for 20 minutes then sprinkle the top smooth side of the dough with flour and flip over. Then carefully shape keeping the flour on the outside. When I tried a wet bench I had to reshape and bench rest again! Hope this helps Leslie.
you have pointed out a tiny detail I forget to do! flour the top of the preshape, THEN flip, shape and tighten!! one day perhaps that thought will stick. I tend to flour the bench moderately but still it sticks often at the edges. I will make a note!
thanks Abe
Leslie
Here is an article that you might like. http://www.breadwerx.com/shaping-the-perfect-loaf-or-the-zen-of-benchwork/
Flouring the bench is an art in and of itself. I studied Trevor's instructions and practice over and over with some flour. Throw it and then scrape it back up and throw it again, and again, and again, and...
I've learned that the bench flouring technique is important, and most often over looked.
Dan
I love the shape you get on your batards.
That’s some open crumb. You’ll need your latex gloves for those ;-)
I laugh every time I think about Alan’s remark, “Never forget that ancient proverb, " Large holes inevitably lead to sticky knees" (anon)
Alan”
He cracks me up... LOL
Dan
Leslie,
WoW! I would be in heaven after a bake like that! I always worry that using Tension pulls will cause less open crumb but you have proven my concern wrong! I come more and more to the conclusion that in my case it comes down to handling... I can sadly not give much advice with regards to oven spring apart from maybe looking at what final shaping method you use and whether this could give you that last bit of oven spring???? I seem to remember some references on that but need to investigate....however, what an amazing bake Leslie!!!!
Kat
still had issues, but feel at last I have made progress.
Leslie
I have baked this bread too many times to count, but I have never been sure about how to knead the dough for 10 minutes, rest, then a few more minutes. Can someone tell me if he intends a continuous rolling of the dough into itself or something like a Rubaud, or what?
”Next, you’ll knead the dough by rolling it into itself over and over. This expands the number of starter layers exponentially and spreads it throughout the entire batch of dough.
Just a warning though: because the dough sat overnight the gluten has already pretty much developed. If you roll the dough too tight you’ll begin tearing the gluten sheets.
Not good.
As soon as you feel the dough really starting to tighten it’s time to take a break and let it relax for a few minutes. I usually knead the dough for 5-10 minutes to start, then take a 10-15 minute break to let the dough relax, then come back for a few more minutes of kneading at the end.”
Dan
Hi Dan,
I've never been able to get that rolling knead going for me so I've been mixing the starter into the dough with ten plus five minutes S&F for the 70% hydration and Rubaud for the 75% doughs. Not sure if that's what he's intended.
I do tend to leave the premix on the bench for 9-10 hours so that might be part of the problem. I've been reading the posts about a reduced premix/autolyze with great interest.
Al
Hi Dan - first of all, I can’t knead the dough the way he does - I’ve tried and just can’t do it. I just keep sort of gently kneading by folding it over and then tried the turning the bowl. I don’t see the Rubaud method here at all. I think he wants us to make certain we have worked the starter totally in and so as you know dough will tighten up and then relax when left alone for a few minutes, so he takes a break and then continues. I certainly did not knead that long.
Leslie, your Country Champlain looks fabulous. You should start a separate thread on this!
Carl, waiting for your results!
Hey Syros, I baked it last night and posted some pictures in my post. Crumb shot coming later today. :)
I don't think Trevor uses the Rubaud method for his Champlain. It seems like the long premix or an autolyse would be doing most of the work and then the 10 minutes of mixing would be too much on top of it. Rubaud seens ideal for me when working with an even wetter dough and a shorter or no autolyse. Seems like he is more kneading and rolling the dough to distribute the starter into layers and using the tension against the bowl to do the work for the Champlain.
I think in the instructions he does the 'rolling' thing on itself and against the bowl and he recommends Rubaud for wetter dough as Sharon and Carl have said AND he warns not to overdo it as due to long pre-mix...
Saying that though I have tried both and found that using the Rubaud method VERY briefly has helped to get a firmer dough with more tension compared to the method he uses. I NEVER MANAGED TO GET A FIRM BALL LIKE HIM IN THE VIDEO using either method. The closest I did was when using the Rubaus method and so for me the Rubaud has worked for Champlain in the past.....but I was carefully watching the dough often just needed short period.... Kat
I will try another Champlain pre-mix tonight for tomorrow.....maybe try the 100 g levain this time...
Was wondering, are you guys adding more Levain because you want it to bulk ferment and proof faster?
I was thinking about going to 25g from the next bake to do the opposite.
I’m under the impression that people are upping the levain, in an attempt to get large and more open holes. At least that is why I am trying it.
Dan
I'm curious to see your real world results with the changes.
In my head it seems counter-intuitive and you are just introducing more spent gluten into the equation and upping the hydration slightly at the same time.
Edit: thinking more about this, I think there is success to be had with the extra levain because it's hard to keep dough at a constant 78 degrees during bulk. The extra levain will compensate for that and I think a lot of the tight crumb has to do with dough not maximizing bulk. Yesterday my dough took over five hours of bulk fermentation in the proofer @ 78 degrees steady. My room temperature was 69. I would imagine that if my dough was sitting on the counter it would of taken 8 to 12 hours before being ready to be shaped. Doubling the levain could help manage that.
But keeping the hydration so simply taking 25g extra from the flour and water to preferment. It also suits a final proof in the fridge better (I think) if you wish to do this. However I think a very long autolyse plus a very long final proof with extra levain is too much so in my last bake I did a one hour autolyse minus the salt, increased the levain and final proofed in the fridge.
That makes sense! thanks for sharing.
Did you find yourself having to do more initial mixing because of the shorter autolyse?
to the best of my ability. I stopped as soon the starter and salt seemed fully incorporated and developed the rest of the gluten with stretch and folds. The dough, after the autolyse, does seem to come apart a little first but with a gentle mixing and folding it comes back together again in a very manageable dough with the gluten development well on the way. It helps to wet your hands under the cold tap and shake off excess water. It's easier to handle dough with cold damp hands. It also stops being sticky while moving but regains stickiness when you stop so a slow continuous rolling and folding with an occasional retting with cold water helps.
Agree with the wet hands. Although I also think with Rubaud just accepting dough stuck to your hands and continue through as it get's tighter it will stick less and less. Easier then trying to keep them damp the whole time for me.
I ask because lately I've been experimenting with longer and longer autolyse and the amount of mixing that goes along with it. I like to use the Rubaud method with wet doughs in the 80% range until the dough is strong enough to catch and hold big balls of air. This usually took the full effort of the 10 minutes or so spent doing it. It was rare that I would autolyse for more then 2 hours. With the long autolyse, 6 hours+ it would seem that the dough would catch air immediately. Initially I was still mixing like I used too but feel like I destroyed a lot of gluten in the process. Rewatching Trevors videos I noticed he was much more gentle in the way he mixed his dough that benefited with the longer autolyse.
So, I think, long autolyse, knead and roll be gentle, watch for tearing, Short Autolyse, 2 hours or less(?) use the Rubaud method to build strength?
But not to the extent where the stretch and folds were voluntary. Ribaud method plus rolling and folding just until it was all incorporated with good gluten formation but needed the extra stretch and folds to finish the gluten formation off. Over 5 hours and a stretch and fold every hour worked very well.
...and yes! just accepting it will stick a bit to your hands and carrying on! Stopping and starting trying to not make it stick just makes it worse.
Again, makes a lot of sense. I am with you in that I like taking the gluten to the halfway developed point initially and then stretch and folds to take it to the finish line. It seems like the length of autolyse plays a huge part in the effort it takes to get halfway.
However things I thought I knew about baking bread a month ago, two months, etc has evolved in such a way that I know not to trust what I believe in the moment completely and that there are too many variables to think in terms of absolutes.
For example. I almost never pre-mix the salt with a long autolyse but Trevor's champlain was so nice to handle and manage it is something I am going to try doing with some other breads I am working on.
Hi Dan,
I started a second thread called Not to confuse...Champlain SD part 2, with Trevor’s email to me about the increase in levain. Don’t know if it will help!
Nice work everyone!
Mine came out of the oven at ~3AM last night.
Details:
-I needed to use this starter by noonish yesterday, and I forgot to do the premix, so I just did a 30 minute autolyse with the flour/water, then added the starter and salt. I am still tuning my starter and this was a batch I was going to toss for being too stiff, but it rose well so I figured I might as well try to use it. I'm so glad I did!
-I bumped the water content up a smidge as it looked a little stiff. Mixed to shaggy lump using Kitchenaid then did the 30 minute autolyse.
-~75g starter at 60% hydration + enough water to make it 100% hydrated. Starter mixed in with Kitchenaid for ~3 mintues on low using the dough hook. I forgot to add the salt, so I gently folded it in by hand afterwards.
-8hr bulk ferment with folds at 1,2,3,4,6.5,7.5,8 hours
-30 minute bench rest after gentle preshape
~2.5 hr proof in banneton
Bake procedure:
-Preheat dutch oven at 500 for 45 minutes. My oven struggles to hit 450F so I just turn it all the way up.
-Drop dough into dutch oven and score. Spritz lightly with water, close dutch oven. Cook closed for 20 minutes
-Open dutch oven, cook to desired level of browning. In this case, ~25 additional minutes.
I forgot to take pics after the first few hours of the bulk fermentation, but here's what I have:
After mixing:
1 hr. in:
After 1st fold:
2 hours in after 2nd fold:
3 hours:
4 hours:
And just prior to shaping:
Results:
I would have liked to get a more "regularly irregular" crumb, the big pocket on the right is about 5" long internally. With the extra long ferment it is definitely on the sour side of sourdough. I love that, but I could see kids or those less into the sour taste than me not being as excited about it. For me personally, with this being my first successful 100% sourdough bake I'm ecstatic about how it turned out and can't wait to make another. I'm going to a potluck on Saturday so I'm thinking of getting a double batch of this going Thursday evening to try the actual premix method.
Outstanding! Really love the color the crust. It's got such rich tones. thanks for sharing.
Love the color of the crust and the crumb is great and sour is definitely my favorite. I've had the same issue with tunnels and I'm not sure how to prevent them. Nice Bake,
Al
Looks like your starter was up to the task.
Dan
Congrats! Nice crumb - thanks for the photos. Looks pretty successful to me!
I baked this morning another Champlain BUT this time without the overnight pre-mix as I think the UK flour it not strong enough for it after trying it a number of times....so I tried yesterday again a 1 1/2 autolyse and adding 50g of levain and 10g of salt (I did not intend to use 1 g more but it seemed to make a difference with the gluten development using Rubaud method. Can that be? I know it tightens up the dough for sure....)
I can provide time line, if people are interested but just very excited to share the loaf and the crumb shot...as this might be my personal best and finally I might get better at my terrible handling - what does Trevor say '80% fermentation and handling"????
Key difference was that I kind of left the dough 'alone' if that makes sense.....really just the S & Fs and I think also having the proofer helped to have it at a regular temp of 78-80 but it took me a while to warm the dough up from autolyse as I did not use warm water and started with 71F.
After discussing with Carl his pre-shape and final shape I went with a pre-shape that was 'tight' but probably less tight than I used to do it before and it lost a lot of shape during the 1 hour proof on the bench.....as final shape I tried batard and the method where you just fold both sides in the middle and then roll it on top of itself without stitching (worried to tear the dough as quite proofy at the end).
Kat
Pre-Shape - 18:30
Relaxed after pre-shape - 19:30
Final Shaping - 1 hour bench rest - 19:30 and batard in toweled banneton and straight fridge bake 8 in morning straight from fridge
Looking good Kat. Are you happy with the preshape and shaping with less tension now that you've had some time of reflection?
The puffy dough sitting there on the bench after shaping is one of my favorite moments in the process. The aha! look at you. You look like raw bread. Nice.
I think you are finding the right combination of techniques to get a great loaf. the crumb is lovely and I agree one of your best.
Did you do any tension pulls?
look forward to the 75% hydration bake
Leslie
Hi Leslie, Thank you....
No I did on purpose not use any tension pulls as I was worried the might affect the crumb and wanted to try NOT to deviate from Trevor's recipe. Also, I found that if I use the Autolyse route combined with Rubaud method that at the end of Rubaud I actually had similar tension in the dough compared to when I have done the tension folds so I did not feel the need to do them as the dough had tension as it was...if that makes sense...and just the consecutive S & Fs seemed to be enough to maintain tension combined with the increased production of gases during bulk fermentation.
I also really watched out that the dough does not get too proofy as it has in the past.....I did not take any photos for 75% hydration Champlain and followed similar methods as this loaf BUT somehow the dough did not appear that much wetter...hmmmmm.....Kat
p.s. I also think that the batard shaping helps with the oven spring somehow....as I tend to shape too tightly with the Boule I think...
Very nice. Persistence pays. Isn't that what mom says?
I'm in the process of abandoning the long autolyse also. I may go back, but not now. It degrades even my flour too much, IMO. Maybe I'll learn to handle dough like (slack) that in the future...
Dan
Ended up making another champlain yesterday. I tried to do everything the same but it was cold in the house and even with the proofer bulk ferment took an extra hour. I wandered off mid shaping to find the camera (and couldn't) so...Whatever happened the dough felt a lot more slack during preshape and shape. I feel like I could tell it was not going to be quite as open when I was shaping it. Excited to try again I want a larger sample size.
But I like how it came out. Baked bold again.
Looks like you have this bread dialed in. Looks great.
Dan
Great looking loaf, Carl! How do you get that nice dark, glossy surface? When I bake my loafs, they are covered with rice flour from the banneton.
Thanks! After I pop it out of the basket I brush off the flour with a dry brush and then a trick a member here named Wartface clued me in on I brushed a layer of water onto the surface of the dough after loading it in the dutch oven. Sometimes I want that dusting with flour though. But that's what I did for this last loaf.
All right!! I was wondering about this and will give it a go..that is a great tip......saying that I normally stressed enough to get it into the oven with scoring and all that never mind the water...He, he Kat
I get this feeling of panic and excitement every single time I'm standing there right before things go-go-go. Dutch ovens hot as hell in the oven, breads sitting on the side waiting eagerly. Right in front of me is my lame, a dry brush and the wet brush in a cup of water and the spray bottle. Set up for success.
Three deep breaths.
Dutch oven out, bam, kick the oven door close, dammit already lost 75 degrees of heat. cover the basket with parchment paper and flip it and let it down gently into the oven. Hot hot hot. dry brush quickly, grab the water cup and baste. Lame next. dip in the water cup, Deep breath. Score then curse the high sides of the dutch oven then seal with the lid, grab the spray bottle, crack the oven just a smidge and spray until steam is escaping. Seal. Into the oven. Grab the other dutchie and repeat. Pour some bourbon in my coffee and do chicken chores for 20 minutes so I don't pace a hole in the kitchen floor.
AKA
I can relate.
Carl, You make me laugh so hard......and I am amazed that you still have time to breathe!!! I need to set a timer too as I otherwise I am in such a panic that I totally miss the time I put the bread in whilst catching up to breathe...
A new problem I have is that when I use the batard shape the bread now is almost TOO long for my MASON CASH pizza stone with dome...and placing it RIGHT in the middle is like winning Olympics in archery...
Oh it is all fun.... yep happy with the latest bake...as my Mum in Germany used to say ' a blind chicken sometimes also finds a piece of corn.... - you mentioned chicken so thought you might like that one.... Kat
I just loaded up a pair of 50% Whole wheat country loaves and despite your advice still did not manage to do any breathing until just now. Maybe I should play something with more zen-like feels instead of having Alanis Morissette wailing through the kitchen.
Almost only counts in horseshoes and hand grenades so...maybe time to buy a rofco? hah!
Blind Chicken made me laugh, but you should give yourself a bit more credit it looks like its getting dialed in rather nicely!
Oh...a Rofco would be my dream...I keep mentally re-arranging the kitchen where it could go.. When Maurizio from the 'Perfect Loaf' got one recently I said on IG that we need to start a 'Where is Rofco?' as they seem to spread...I even went to investigate how much they cost and my son (who is a good mathematician) pointed out how much bread I would have to sell in order to recoup the investment......
Well one can dream...I saw a second hand one the other day and maybe that's the way to go at some stage...one can dream....Kat p.s. What recipe did you follow for the country loaves? sounds good.....
My husband says that all the time!
Carl, you describe it perfectly - the scariness, the holding the breath, the anticipation..... happy baking everyone
Leslie
If you are turning the dough out onto parchment, then lowering it into the hot DO, why don't you score it while it's on the parchment on the bench, rather than trying to score it after it's in the pot (with the high sides)? Just wondering...
I go straight from the basket to the oven and just use the parchment paper as a hammock to keep it from ever going free fall then pull the basket away. I used to drop it off on the counter and score it and scoring was certainly easier but I didn't like what it took to get the bread to the oven from the counter. I guess there's going to be some form of compromise no matter what.
Hi,
I was intrigued by your list in the other 'open crumb' thread. I am always a bit nervous to do late folds with proofy dough and in principle try the dough not to get too proofy as I worry it will then get out of steam.and suffer less oven spring...and people say in general for the dough not to rise more than 30%....
How do you use late folds with proofy dough to benefit open crumb?
Also, I was wondering about super-charging the starter...especially when you see all the 'supercharged' examples on IG. Some people mention that they have their starter go overnight for 12 hours at 78F with something like 200g flour....I try to stick to a routine to feed in the morning and then in the evening and use as little of original feed as I get away with to avoid wastage and acidity...e.g. 6g is the lowest I did go so far... but if I want to avoid using lots of flour each feed I have to keep the temp much lower as I otherwise have to feed before 12hours... I hope this makes sense... Kat
Why? If the Dutch ovens trap moisture from the bread well enough to steam the bread, how will external moisture get in?
You could destress a little, and maintain oven temperature better, by skipping the spraying steps.
Actually, based on your description, I can't wait to see the video "Carl Loads th Oven". So mayb keep the spraying steps.
Paul
Get out of here with that well thought out logic Paul!
Kidding...
My issue is my dutch oven was very inexpensive and doesn't seal well.
Plus I subscribe to the age old notion of "more must always be better"....
Carl,
Another beautiful loaf and I really like the dark colour...are you using rye also in your starter?
Your bake gave me the confidence not to worry too much about the 'tension' in the pre-shape...so where I normally would have gone for another round of 'shuffle' a la Trevor...(you know where he shuffles and then picks up the dough to do it again...) I now need to do this once and then let the dough relax and don't worry if it turns into a 'pancake' as long as it has some form to it.....Yep I like the final shaping, if it goes well and you have this puffy, fluffy 'animal' on the bench! At that stage one gets an inkling what the loaf might be like......
I also like the retarding in the fridge as I find the proofing at room temperature REALLY hard to judge and more often get it wrong compared to fridge retard method.
Just shaped a Champlain with higher hydration 75% and I now tend to autolyse for 1 - 2 hours rather than the premix over night. I find that the UK flour just degrades the dough too much and prefer the autolyse method combined with Rubaud which is beautiful to see how the gluten develops.... A lot of trial and error and great when it works!!!!! Kat
Thank you Kat, no rye in the starter. I'm using the all white "mothership connection". It lives in the proofer and I feed twice daily and usually use to build Levains in the morning and rarely use it as is in a bake. But the small amount needed for the champlain makes it perfect to work into a day where I might of had to discard most of it in a given morning.
No rye in the bake at all actually, but it's because I have had to hold off buying and rye because I have 45# of rye berries showing up tomorrow (so exciting!) so I have been substituting fresh milled einkorn for the bake. I'll go back to the Rye for the next bake, do people like using dark or medium rye? or is to small an amount to matter.
I was curious on your thoughts on the preshape because to me it looks pretty close to perfect. Or at least what I have been trying for. It was a little tighter then mine this last go around but I would of preferred mine to look more like yours. Mine held onto it's curves for the full hour but just barely.
Hi Carl,
Trevor has written a very useful blog on pre-rounding and benchwork:
http://www.breadwerx.com/shaping-the-perfect-loaf-or-the-zen-of-benchwork/
And key points to me were:
"
When you see him do the pre-rounding in clips he always achieves quite a lovely round ball and I think the art is to have enough tension that that ball can relax to a pancake but does not totally deflate and has still some spring to it for final shaping, if you go for 1 hour bench rest.
So that is what I am aiming for to have some quite nice tension to the pre-rounding to proof under tension but still relax BUT my worry was that I was doing too much of it....I think in hindsight, in order to get the tension I probably in the past just handled the dough too much and my crumb suffered.....
Sorry, but I am still a novice and hope you might find this useful.....Kat
This is what I learned from following Trevor’s instructions on shape and preshape.
Dan
Hi Dan, Totally agree and you summarized so well! I am also a bit naughty and saw that sometimes people put a tiny amount of flour on the 'pancake' before flipping it...that has worked for me well....Kat
You can imagine the happy dance in my kitchen and sorry for being so excited! I am still a newbie here!
I really think that the more gentle handling of the pre-shape (but still making it 'taunt') and the shorter autolyse made a difference in my case. Also can 1g more salt make a difference? Kat
Wow!! just perfect. Lacey and wide open. Nailed fermentation on the head with this one.
very very nice... are you dancing around the kitchen!
Leslie
Well...there might have been a little bit of a happy dance...my son was NOT impressed....but must enjoy the good moments in life as tomorrow might be a flat bread day.....(smiley face) Kat
Up or down? More could give a slightly longer dough working time. Would also matter when it is incorporated and the temp of the dough. Salt plays a role in strengthening protein bonds. 4.5g is 2% of the total recipe flour.
From what I understand, a good time to add salt is during gluten formation after flours have hydrated and before trapping gas in the dough. Or in the pre-soaking of whole grain bran. Might make a nice softener for "toadies" that have been sifted out of the autolyse to toast. Na ya...
It was 1 g more and I added it after 1 1/2 autolyse with the levain to the dough and then used Rubaud to mix. I had oven spring before but had a hunch that that bit more salt helped with tightening and making stronger gluten to trap gas better in my weak UK flour ..Just a thought.... Kat
Could it get any better? Great rise and height. Outstanding, open crumb.
Dan
Looks great!
Dan and Hans,
thank you .must be the snow in the UK affecting my baking....! Kat
This is my take on the topic: 75% hydration with 20% dark rye "champlain" style bread.
Levain
10 g starter
30 g APF
30 g dark rye
60 g water
Dough:
All levain
221 g APF
34 g dark rye
175 g water
4.5 g salt
1. Mixed levain items and matured for 9 hours at 20C
2. Dissolved levain in the dough water, added dry items, mixed to a sticky dough and started fermentation (no autolyse here)
3. Applied 3 stretches and foldings 20 min apart. Bulk fermented for 8 hours at 20 C
4. Shaped a batard by stitching and cold proofed for 12 hours
5. Cold started baking for 35 min with lid on + 17 min with lid off at 220 C
Below pictures of the bulk fermentation, crust and crumb. I am very pleased with the blisters, crust texture and crumb flavor. Thanks ALL!
Thin, crusty and riddled with blisters.
How often does that get to be a compliment?
Love that crust,
I think I am going to cold proof my next one in the fridge and try to up my blisters.
crumb is great. I love rye in my breads and this one is a great bake.
love how this thread has brought so many bakes to the table.
Leslie
That looks lovely...I always use a bit of rye in my starter or levain normally 75% to 25%........The blisters look awesome! I am never quite sure what causes the creation of blisters? Kat
Thanks Carl, Leslie and Kat.
Couldn't resist baking something under this thread started by Dan. These threads are good because they are rich in information.
Carl: I started cold proofing more consistently this winter, and so far the results have been great. I will keep doing it since temperatures are rising quickly here and they easily reach 95F in the summer.
Kat: Yes, some rye in the levain enhances the final taste in my opinion. I started getting more blisters after cold retarding and also after baking from a cold start oven (not sure if that is related, but it coincides). Apparently there are other ways to increase blistering:
http://www.sourdoughlibrary.org/bread-crust-blisters/
Leslie: I am a big fan of rye too. I like it more than whole wheat.
peter
and yes a big thank you to Dan for starting this thread
Leslie
Wow amazing everyone! I’ll be posting photos soon I hope. I’m making another bread with 100g starter. The seed was made with all purpose and rye, but the levain build was with all purpose. I also opted for all purpose vs bread flour and decreased the 19 g of rye to only 9, adding the other 10g to the all purpose and kept the same 38g of spelt.
I also did the autolyse without salt for 1 1/2 hours and kneaded for about 15 minutes. There was no way I could do the Rubaud method - my dough wasn’t wet enough not to mention I don’t have the arm strength for it!
Kat, Dan, Leslie Carl - everyone - your breads are amazing. I’m almost afraid to bake mine and see the results. You all have had such great crumb results. I will proof mine overnight. I’m debating about letting it sit out before baking or baking straight from the fridge. Any opinions?
and see how you go - it is my preferred method and usually works brilliantly. when it doesn’t there is usually another factor causing the less good oven spring.
thank you ttoo.
Leslie
Hi All,
I've been playing with the Champlain for the last few bakes and I tried to do it from memory this time. Of course, I goofed it up a bit - that's why baking formulas are written down. For some reason I had it stuck in my brain that the dough was 68% hydration, instead of the 70% in the actual formula. Also, I dug my NMNF starter out of the fridge which is now 12 weeks matured, and deliciously pungent. I did a 3-stage build of the starter, first with rye, then with rye and WW mixed, lastly with just WW, and I kept it at 68% hydration too. My thought behind this was that having the levain and pre-mixed dough at the same hydration might make them easier to mix together.
At work in the ER, whenever there are a lot of things going crazy all at once on a single patient, someone will save all the data (blocking out names and ID numbers, of course) and present it in some forum or another as a "teaching case."
This bake was a great teaching case for me: First off, I used just KA BF in the premix and put all of my whole grains in the levain. I wanted to see if that would beef up the sourness of the final product - which it did, the taste was wonderful. However, there was an interesting side effect. As I mixed the levain, "Trevor style," into the dough, the darkness of the whole grain levain contrasted greatly with the white flour dough. I could actually see where the levain was going, I was able to discern layers, and it was blatantly obvious when I stretched a gluten sheet to the point of rupture. It really gave me insight into the mixing process - you should give it a try for the sake of experimentation. If you zoom in on the upper pic of the grigne you can actually see where the dough separated into layers a bit.
Trevor says in more than one place, "don't let the dough run your day." Well, on this day, time was not on my side and I ended up not able to do any folds during the bulk ferment. I was able to pre-round into a perfect little ball that I bench rested for about 30 minutes under plastic wrap. (Note to self - do NOT do that again without some kind of release agent like dusting flour, oil or whatever. The plastic stuck to the dough like poop on a blanket and was a royal pain to remove.) Used Trevor's stitching video to shape into an oval loaf and into an oval banneton for a 90-minute proof in a sunny room. Needless to say, the dough could have used more mixing and more proofing. There were only a few large holes, mostly in the center of the loaf, and if you zoom in on the holes you'll see they're lined on their interior with a thin layer of the whole grain levain. Also, you'll note that the levain is streaked randomly throughout the crumb, and is by no means homogeneous. I'm glad this was so visually apparent, to give me an idea what direction to go with my mixing technique. I think at least a couple folds would have been very beneficial.
Trevor's book also stressed greatly the effect that pre-shaping has on the final loaf. My pre-round was almost spherical sitting on the counter, and as you can see (despite other structural deficiencies) that it rose nice and high. I'm also pleased with the crust which has almost exactly even thickness all the way around.
So, some pluses and some minuses, but overall not a bad loaf and a great teaching case. It tasted fantastic and went beautifully with the homemade chicken soup for dinner that night.
--Mike
Mike, are you thinking that the Levain did not mix thoroughly throughout the dough? I really like your idea of being able to see were the Levain mixed into the dough.
I have an idea that may magnify the Levain integration with the dough. I am a big fan of using very small amounts of Chocolate Malted grains for both flavor and super dark color. I’m thinking about mixing about 5 - 10g of the dark malt into the Levain. If the Levain doesn’t fully incorporate I should see distinct streaks in the dough.
See this post for a visual. http://www.thefreshloaf.com/node/55390/chocolate-malted-barley
What do you think?
Dan
I mixed a Levain with 5g of chocolate malt. It’s the darker of the three. I plan to mix it in a dough and see if it streaks or combines with the dough. I’d hate to think that the Levain was not fully incorporating.
Danny
See the images below. If you look closely you can see the streaks. These images where taken after about 3 minutes of Rubaud.
I’m beginning to wonder if the starter is not being mixed thoroughly into the dough. I was under the impression that stretch and folds would completely distribute ingredients into the dough.
Dan
Based on my experience yesterday I would suggest you might be overthinking this problem. I used a stiff starter yesterday and felt a couple chunks that I failed to distribute enough. At least until the second stretch and fold. I maybe should of added some more water but didn't want too in the moment. After baking I was happy enough with the bread to say that it didn't really matter.
How did it look at the end of mixing when you left it go BF? and did it look more homogenous after a couple of sets of stretch and fold?
Your last few loaves have been great so I can’t see that this is an issue.
Leslie
that the levain actually did mix in fairly well, because there are gas bubbles throughout the loaf. But since I see the bran from the levain inside the larger bubbles and streaked throughout the crumb, my assumption is that a lot more mixing could have (should have?) taken place.
Like I said in the post, this day totally went sideways on me: no time for folds, no time for final proof, etc.. Also, I forgot to take it out of the fridge the night before like Trevor recommended, so it only warmed up for about 4 hours, and only bulked it for about 4 hours after mixing with the levain. We're still eating this loaf - had some with dinner tonight, it tastes great and makes excellent toast. But on my first bake of the Champlain, I was able to follow the directions exactly and I was much happier with the outcome. Funny thing is, my wife is not a fan of the big holes - she says the jelly falls through her toast (I avoid this by spreading jelly where there are no holes Haha). So the next white stag I am chasing is Trevor's "honeycomb" crumb; if I can get to the "lacy" stage, more's the better.
I think your chocolate malt idea is great. You'll be surprised, as you mix, to see the dynamics of the levain moving through the dough.
--Mike
Mike, my perfect crumb is the lacy honeycomb. But it’s a goal of mine to be able to mange the wide open holey crumb. I don’t think I’ll bake it much, but I want to be able to achieve it. I’m obsessed like that :-)
Danny
is anything but well mixed in. If you are doing Rubaud method and then S & F then I reckon it is fine. I keep an eye on my dough and even though it is a white starter, you can still see when it is not fully incorporated.
Yep, lacy is what I am after as well.
Leslie
on any of my Champlain bakes thus far. Which brings a question to mind for the group:
If I follow the original formula exactly, then follow Trevor's motions in the video, my dough doesn't look nearly as wet as Trevor's does before he puts it in the fridge. When I take it out and add the levain, the slight extra moisture it adds still doesn't make it wet enough to do the Rubaud technique. However, Trevor's fold-and-roll in the bowl technique seems to work just fine for me at 70% hydration.
The Rubaud video on www.breadwerx.com is filmed with an 85% hydration French dough, so my question is this - what hydration are you all using where you're able to use the Rubaud technique?
--Mike
Mike, I spoke with Trevor about that. He also thinks that the hydration is too low for the Rubaud Method, but many of us are using it very successfully with 70% and above. I personally use Rubaud as a favorite method.
I and others are not able to do a good job of mixing using his prescribed rolling and tucking method. It doesn’t work well for me. I don’t know how you and Trevor do that. My hands stick to the dough and I find the hand motion very difficult.
Danny
I am making Trevor’s tartine style Country Champlain. it is theoretically 83-85% hydration but that is too much for my flours so my hrdration is now about 74-75%. the method works well for this dough. The Champlain bakes I did some time ago were only stretch and fold (i could not do that rolling method) so maybe my hydration for champlain should lower as well.
Leslie
As I got more confident in handling the lower hydration Champlain Dan and Leslie provided me kindly with a formula to up to 75% Champlain. As UK flours are different anyway a shorter 1 1/2 Autolyse works much better for me and the dough is not super wet but enough to do Rubaud, which I have to say is a beautiful, beautiful way to develop the gluten. It is one of my favourite part of the process! Kat
Here is a link of Rubaud @ 73%. I have no problem @ 70%. It behaves different from 80% but works very well IMO.
https://instagram.com/p/BfqcoEQhGZm/
Danny
from Trevor’s book and Champlain bread. it was such an great idea of Dan to start this thread. we are learning so much. your bake, Mike, has added yet another level. thanks so much for joining in, I can definitely identify with how the plastic stuck to the dough! lol. look forward to your next bake
Leslie
Nice loaf Mike! I have found the dough pretty easy to work with especially with the increase in levain. The verdict is out on mine as it’s still retarding in the fridge. Trevor’s video and book has really been a learning curve!
Ok here are the pictures from the bake - I retarded it for 13 hours, the crumb shot to follow in a couple of hours. I'm hopeful I'll have an open crumb, but
Image

Image

whatever, I'm sure it'll be delicious!
Sharon, how are you getting such distinct slashes in wet dough? You told me you used a serrated knife. I’m surprised not to see wrinkles in the dough where the knife pulled through. How does the blade not pull in the dough?
Your scores consistently look the same.
I’m using a very sharp (old school) straight razor. I have a supposedly sharp serrated knife, but I’m yet to get up the courage to use it.
Dan
Hi Dan. First of all my dough isn’t that wet actually. I really don’t know. I just do a quick slash and hope for the best! Every time I do it I pray to the bread gods not to ruin it. I haven’t found this dough to be overly hydrated. Plus I put a bit too much rice flour on the towel so I had to scrape some off before I baked it.
I wish I had a more informed answer. It’s the only knife I have that doesn’t drag the dough. I guess if I try a higher hydration it might be a different story. Can’t wait to see the crumb!
Sharon,
Yep - I see what Dan means with admiring your scoring....I think it must have to do with the tension in the final shaped dough.....I seem to remember something in Trevor's book and have to re-read. Yet again.....
Beautiful loaf and I bet you can't wait for the crumb!!!! Kat
lovely score - looking forward to the crumb shot. does the loaf feel light? it is usually a good sign if it does.
Leslie
Thank you! Yes Leslie it does feel light - and I have to say that I really like the taste of this one - mild and nutty. As much as I love rye, I'm glad I reduced the amount to 9g, especially because there was rye in my starter. I think I'm getting better at judging the bulk fermentation and I'm liking this recipe! The crumb still isn't as open as I'd like but it's ok. Believe me, as to the scoring - sheer luck - that's what I attribute it to!
Sharon,
Aghh....all this amazing baking going on and I can't keep up on all the posts........Another beautiful loaf and I would think you are def on the the right track.....yippee...... Kat
p.s. I also keep re-reading Trevor's book and then it goes like: Oh this is quite important why did I not pick up on this last time.....it is an infinite loop - a bit like Groundhog Day but more enjoyable!
Even if you are aiming for a more open crumb, you gotta be happy with this bake.
It looks like you are definitely on the right track.
Well done
Leslie
I am happy with it! Practice practice practice! I’ll probably read his book and his instructions a zillion times and still not totally absorb it all!
When I get very very very brave I might just try the Country Loaf. Me thinks it’s over my head!
The bloom was great, so we should expect good things when cut.
UPDATE - I think the crumb looks great! There is nothing dense about your bread, AND the mayonnaise won’t fall out :-)
Think-about-it, if we ever do achieve the crumb we’re after, we’ll have to put cheese on the bread first to cover the holes and then the mayo. It’s crazy, but I’m going to love it. {;-)
Danny
Alrighty! Here's try two with some... interesting results. I did everything this time just as close as I could to the video. No machines involved, overnight premix.
Shaggy lump:
Floaty starter:
Start of bulk ferment:
After a few folds:
After proofing:
I actually made two loaves this time, and this is where things get weird. One is b-e-a-utiful and the other... not so much. The bad one spread a ton when I took it out of the banneton and I think I somewhat degassed it? It stuck to my hand a bit so it's handling wasn't as smooth. But I wasn't expecting such a difference. The only other difference was the time the bad one took to bake (~45 minutes, it was first) being added to the second loaf's proof and the bulk ferment being in porcelain vs metal bowls. Could the porcelain bowl have sucked too much heat out of one of them? I honestly don't know which one was the poor performer since I didn't mark the banneton. I thought I put the one that looked further along into the proof comparatively speaking in first.
Pics:
Even the sad one rose enough to be edible (it's not rubber, in other words) but obviously I'd have liked for them both to look like the one on the left. Any possible diagnoses? Both were made in tandem with the same starter, the same methods, and the same timings except for the +40 minutes on the second loaf's proof while ti was waiting for the oven.
Crumb pics in the morning.
Cheers
Nathan
Nathan did you make two separate batches or did you double the recipe? The reason I ask is that Trevor mentions about being careful when dividing the dough. But it’s just possible that when you pre-shaped and shaped that it didn’t have enough tension. In your bannetons, you had tea towels well floured? So many variables. Did you take photos of the pre-shape and final shape?
I am definitely not an expert but if the two breads came from the same batch, then it’s possible one wasn’t given enough tension during the pre-shape/shape or something else occurred- others on this thread will have a more informed answer. But hey, they look good - and the taste is good, so there’s always next time!
I did two separate batches just for that reason, I didn't want to cut the gluten up when separating the dough into two boules. Proofed sans linen because I like the ring pattern.
I think I need to work on my tension pulls/folds, looking at the crumb on the good loaf, it seems that there was a blob in the very center that didn't get as much stretching as the rest:
Center of loaf:

Slice from closer to one side:
As I mentioned in my intro thread, my starter had a run in with an oven preheat cycle due to guests utilizing my kitchen, so I'm back to square 1 with the starter and won't be doing sourdough for a few more weeks. Ah well. Sho ga nai I guess.
The other possibility I can think of is that the second loaf just got a better proof since it went into the oven ~45-50 minutes later. I'm still a novice so I might have put the first into the oven too soon. I still think a large part of the difference was in my shaping though as there was a noticeable difference in tension when I took them out of the banneton.
This morning's 75% Champlain bake. I was wondering whether I could try again similar bake as the last one....
It did grow really fast in bulk fermentation and I thought...wait..you need to go for another 2 hours...hang on.....but I just shaped if earlier and gave it 1 hour bench rest....and then muddled final shaping up and forgot to flip it over before final shape and it was sticky all over the place... managed somehow 'to stitch' it together....
So, not the oven spring like the last one but still very happy with this tricky one...My focus is now on consistency...very tempted to go for Trevor's 50% wholewheat loaf next as I got some lovely Marriage Malted Wholewheat flour this week.... BUT then I would have to leave this lovely thread with you folks!!!! Kat
p.s. links to some interesting folding techniques shown by Matts Ormsbee...he showed how you can do a mini-coiling fold with just one loaf...I always envied the guys on IG with their big trays and going for those coiling vids hands in dough....looks so much fun and pretended that is me using Matts' mini-version. Have a look and remember Trevor says: 'What is the reason for your fold?' before you get carried away like me.....
https://www.youtube.com/watch?v=VRAziKc3154 https://www.youtube.com/watch?v=xQSqgV1nrRQ https://www.youtube.com/watch?v=UneTgMtfpMsNice Kat! I’m working on #4. Will summarize and post photos probably tomorrow.
I did however end up doing a 3 hour autolyse because time got away from me. For those of you doing the Rubaud method, I dont’ know how you are managing - my dough is definitely not wet enough. Sticky, especially with the increase in levain, but no way could I do the Rubaud method. Keeping my fingers crossed this one is a success.
Dan, I will post a photo of the knife I use to score with the photos.
Sharon, if you hold the bowl low,down between your legs it makes Rubaud much easier. Keeping the bowl low reduces the strain on your shoulders. I find the method very enjoyable. I can use a little workout :-)
I posted this link above, but maybe you didn’t see it. https://instagram.com/p/BfqcoEQhGZm/
Dan
My problem is now my elbow joint and the muscles around it. I’m having a great deal of pain and that method puts too much strain. The video Kat showed looks like a kinder gentler version of stretch and fold. I’ve seen a few other variations on Trevor’s IG.
Anyways - I’ll post soon when I have baked my fourth Champlain SD. Your last bake looks delicious Dan.
This has been such an informative thread. Does Trevor know how much we are using his wonderful bread and making it ours?
I wrote him a few days ago, telling him exactly that.
a fancy kneading. Rubaud. Looks to me like the technique for kneading strudel dough! Who is this Rubaud charcter who gives his name to this kind of ancient airy kneading? :) It is a good way to bring down the hydration and develope gluten without adding flour. Anyone weight their dough before and after kneading?
Hi Sharon,
Your scoring is amazing....
I use the higher hydration 75% and with my wet hands I probably make it wetter in the process....I just finished Rubaud 1st and the photo shows the wetness....similar to Dan's video on IG.
I also find that I don't have to go really 'wild' at it but just actually if I do reasonably slow scooping it up with the hand moves the dough develops actually better and you can see how it gets air and makes those happy squelchy noises.... sorry getting a bit carried away here....Kat
p.s. Does anyone know the children's bookl We are going on a bear hunt? Well, the book should have included the Rubaud method...got to have fun!
https://www.youtube.com/watch?v=0gyI6ykDwds
your skill level is getting up there now!
I am prepping for a dough mix later today, here is my levain 5 1/2 hours after mixing. ! have popped it in fridge for now ? it is really nice and active, it obviously loves the bran feed it had overnight.
Leslie, I think that bran and heavy bits that come from whole wheat weigh down the gluten matrix and cause it to crash early. This bran also causes larger than normal bubbles that are harder to suspend over time. Judging a starter’s cycle that uses bran is not as easy as AP.
Is it possible that the recession is premature to the end of the yeast growth cycle?
What do you think?
Danny
The levain held well in the fridge and I am in process of stretch and folds etc during BF now.Later on I will see how shaping goes and the bake tomorrow morning.
It is unusually warm today so this probably influenced things.
the crumb on your latest bake looks awesome! does this have some chocolate malt in it?
Leslie
Yes, 1% Chocolate Malt.
Thank you Leslie for your praise! I wish I would have your evenly distributed crumb....and is is fun just to experiment and to see how to be able to control different crumb patterns for me.....
What is the benefit of adding the bran to the leaven? You might be interested in this:
I recently bought a book from another amazing Norwegian baker 'Sourdough' by Casper Andre Lugg & Martin Ivar Hveem Field and he describes a method where he sifts the bran from the wholegrain flour and then scalding is with boiling water.
The bran swells in the water and absorbs much more water than it would through regular mixing with the dough. THIS ALLOWS YOU TO BAKE WITH A HIGHER QUANTITY OF WATER WITHOUT THE DOUGH BECOMING UNMANAGEABLE it says in the book. The act of boiling also brings out a lot of sweetness. This method produces according to them exceptionally moist and sweet-tasting bread which keeps well for several days. They say that sifting and scalding works extremely well for wheat, spelt, emmer and einkorn.
I was wondering to do their recipe next they use 150g whole wheat, spelt or emmer, 350g strong white, 425-450g water and 75g water to boil the bran 10g salt, 100g leaven.
He does the autolysis with the leaven and then adds salt and leaven AND the boiled bran after it has softed for 4-10 hours. Has anyone every tried this approach to get higher hydration more manageable? Kat
I like ‘em dark, but maybe I over did this one a tiny bit. But I like the dark taste...
I think I’m learning to handle the dough a little better. The videos that Kat shared are very interesting to me. I’ve adopted that folding technique. https://m.youtube.com/watch?v=xQSqgV1nrRQ This is worth your time to watch. I’m using his folding under technique to shape my dough. It seems very gentle and kind to the dough. It also works well with wet dough.
THANKS KAT! You really mine out some of the best information. Keep them coming.
Dan
Hi Dan,
I really like the colour and this crumb! I am glad that you like the video and he is also on IG matts_miche and they all kind of mates those bakers....makes total sense as they share a love in what they do....
I also used the 'coiling' and Trevor does mention this method in his book with a link to a video to an IG example by a baker in London but I only saw it being used in big trays rather than my little loaf.....I am not sure when best to use that technique and tried to find it in the book but cannot find the page anymore....will share when I find it...
But I also like the folding opposite sides first method and tried this especially during the first couple of folds when the dough does not hold the stretches so much....
Danger is to get carried away with these methods and to FORGET: What is the reason for a fold??? - well at least that's very tempting for me.....keep it simple Kat...I keep saying to myself....
I have another Champlain on the go and might try this method for final shaping...have not done much stitching and check this guy out ...he is another amazing baker in Greenwich , London...must go on a recce to London sometime soon....and also visit friends in South London....
https://www.instagram.com/p/BR8T0HFAdDG/?hl=en&taken-by=season_adam
I am also using now my new bulk containers to measure the rise of the dough. First I thought the dough sticks too much rather the metal bowl but gave it a go for my last bake and used carefully wet hands.
Now - I never seem to be able to go much longer than 4 hours and my dough is proofy and so would probably go over the 50% rise, if I would wait that long....What is the average growth for people out there and how do you manage that? I use 50g leaven as per Trevor and normally start with a slightly colder dough from autolyse 69F ish which I then put in the proofer at 78%...
Below is picture in container at a stage when I decided to do pre-shape on yesterday's loaf and that was 3:45 hours into the bulk...I then gave it 1 hour bench rest. The pre-shape was really tricky as the dough would loose shape very quickly and I decided not to mess too much and just let it have the bench rest in a very quickly emerging pancake.....
At beginning of bulk the dough was just on 1PT and I wonder whether I should have waited longer but it was so bubbly already and I was worried about going too proofy... BUT when I see vids of bakers with their doughs, they never seem to be as poofy as mine and just have that more 'solid and elastic' feel to it...maybe I need to go longer and build more strength with folds I wonder? I will try that....
You can see how proofy the dough was during the final shape...the bloated little chap...makes me laugh...
I also experimented with Matt's folds the first 3 hours and then coiling in the last fold.......looks like a little less open crumb to my 'best' loaf and might go back today to do just simple folds a la usual with a longer bulk...hmmm.
My ideal (and this is really just to learn how different folds affect the dough and experiment) would be an evenly distributed open crumb as you see on Trevor's IG. One can live and learn until I bake 10,000 loaves and probably will be X years....(I had to edit this...365 days in a year...a loaf a day, maybe....) 3650 in 10 years...oh dear..I stop calculating and just have to speed up the learning curve and bake MORE loaves...ie. there is again that business case for a Rofco!!!! He, he.....
I can barely manage 1! I have to say my dough (the last two loaves) have kept their shape during the pre-shape. Pre-shaping actually terrifies me as my dough never slides across my granite counter like Trevor’s does. Even when I’ve used a large wooden cutting board - even with a light dusting of flour. But I’m managing to round it up faster and I’m not so hung up on being perfect because I’m pretty sure I’ve degassed a couple of loaves along the way.
Ok, well I’m off to work and will bake later and post photos, knife included!
Gorgeous bake there Kat!
Again the 75% Champlain and I tried to be good at documenting using my new bulk containers...Carl convinced me that I can overcome my concerns about dough sticking to plastic and how to use wet hands to scoop dough...thank you.
I made at 8AMish a new Levain 40:40:40 and this normally takes 4 hours to have a super rise...
I time Autolyse to go 1 1/2 hour when levain is ready at 12:00 ish and mix using Rubaud method.
Dough after 2 rounds of Rubaud - normally lasts 5 min round 1 and maybe less 2nd round.
Start of Bulk Fermentation 12:30
13:30 1st S & F using normal folds and then tighten up smaller folds as in Trevor's video
14:24 2nd S & F following technique as shown in Matts' video where he does the folds in opposite directions rather than clockwise...intrigued and you can see the layering effect in the see through tub....just curious to see the difference to other folds really...
15:00 3rd S & F normal dough temp 77F - had to cut this shorter as had to go out....did a very gently windowpane and dough was developing nicely and not tearing
16:00 4th S & F normal
17:00 5th S & F Matts' fold with opposite directions first north to south, south to north, west to east. east to west...
18:00 Dough had risen and showed bubbles and fermentation and came quite easily of the walls...so decided to do pre-shape... THIS IS THE POINT WHEN I WONDER WHETHER I SHOULD GO ANOTHER ROUND OF S & F OR NOT BUT WHEN I LOOK AT FINAL SHAPE THE DOUGH WAS GETTING VERY PROOFY?
18:00 Pre-Shape I try to use the method to go with the scraper around the dough and then pull forward. I wet the scraper and a tiny amount of flour on the surface. I seem to get a ball but it looses very quickly shape.....hmmmm....did this also on the last 3 loaves...so dry not to worry and let it have it's bench rest for 1 hour..
Final Shaping
Bubbles outside the dough and I tried to deflate some of them to avoid big bubbles on the outside of the loaf next to the crust? Put towel in banneton and then with dough straight into the fridge and bake tomorrow morning. I take it normally straight out of the fridge and into the preheated oven...
So...we'll see..... Kat
Here we go...crumb shot....I don't understand how this can happen after such a sloppy preshape that could not hold shape! I am stunned!
Here we go and it is morning...just out of the oven and basking in the sun singing it's lovely crackly song....
Happy with the oven spring and reminds me of a big crusty whale...
Scoring it not my strongest point and you can see the wavering nervous hand on one side...however I like how the loaves and the baking tell a story about the baker... Kat
Very nice and thorough documentation, Kat. The information was is very helpful.
I am think you have been more persistent than anyone else on this project. Thanks so much for all you do. We all benefit from your efforts.
Dan
Oh, I ordered a tub and cover also. I think it will help when stretching and folding dough. If you get the half sheet size, it will fit inside the Brod & Taylor proofer (for those interested).
No thank you! Glad if my ramblings and unorganized photos help...You should see the state of my phone! Doesn't that dough stick like superglue! I am worried about my drains!....Kat
Worried about drains. You should be. I just had to run a plumber’s snake through mine. Maybe sure you have those screened drain drop in’s and be careful.
I have been wiping out the containers as best I can, then filling with water and letting sit for a while.
Dan
Hi Dan,
You totally confirmed my weariness and I have been very careful...I hope that I have not caused too much blockage yet...and I shall be extra careful. I put out a bit of a warning in subject heading to forewarn /alert other bakers. Easily done though...isn't it. Kat
Notice how much higher your loaves are baking up. Take a look at your earlier bakes and be amazed...
Dan
True, True.....on 10th December my poor family ate my first SD bread (bless them for their support)...! If I can do it after this, anyone can....My husband kept saying...why don't you try a soda bread first and see from there.....He, He...
Kat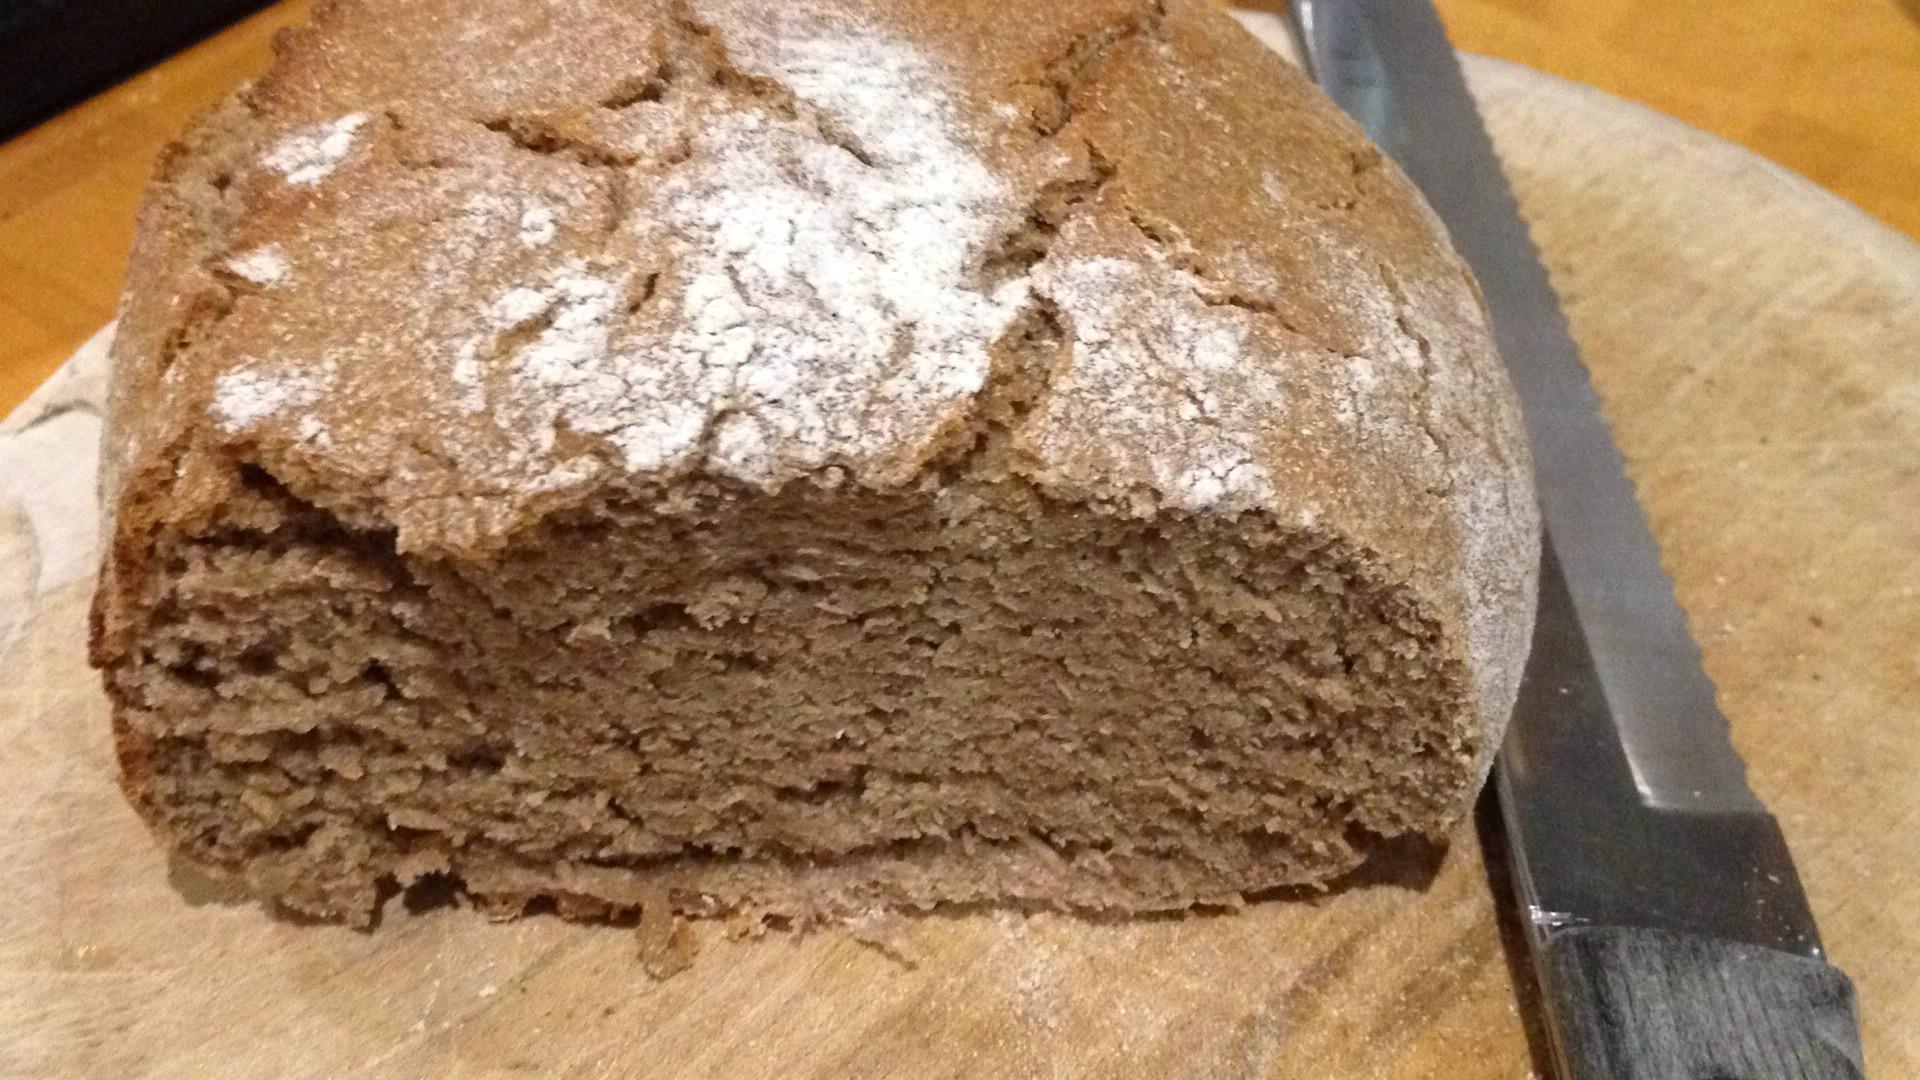
Mine is in the oven. Details and photos to follow later! Kat, you are a wonder!
So here are the latest results: I ended up doing a 3 hour autolyse (lost track of time) - no salt or levain. Then added the 100g starter - which was a "young starter" - only 6 hours old, and salt. After an initial bench rest of 45 minutes, I did 5 sets of S & F's, over 3 hours, then another bench rest of about one hour, pre-shaped and rested about 30 minutes, shaped, rested another 30 minutes and then in fridge for 16 hours. Baked at 450F for 20 minutes in dutch oven, then 20 minutes without lid.
I love the definition you get with your scoring and the oven spring. Do you do anything between the fridge and the oven to enhance the effect?
Al
I like the under developed dough to developed dough comparison. The butterfly scoring looks very nice too. Everything looks lovely from crust to crumb.