The Fresh Loaf

A Community of Amateur Bakers and Artisan Bread Enthusiasts.

rossnroller's blog

rossnroller's picture
rossnroller

I have a must-try list of sourdough breads and other goodies that I'm constantly working my way through, yet the list never seems to get any shorter. Trouble is, you guys on TFL keep posting irresistible pics, and the recipes go straight on to my list (and waistline).  O the trials of the home artisan bread baker! And of course, we wouldn't have it any other way...

When I'm not trying new breads, I fall back on my trusty repertoire of favourite breads that I do again and again. I'm sure we all have these, tweaked to personal taste. Every so often, I realise I haven't done one of my faves for way too long. So it was with Shiao-Ping's 'House Miche': I baked this again recently after somehow neglecting it for months, and it was like revisiting an old friend - familiar, but stimulating as well. I couldn't quite remember how it turned out (too many loaves ago), but I just knew it was a standout. Well, memory duly refreshed, felt I wanted to share this one with y'all. Blame it on the crumb:


And yeah, it's not a miche. I prefer batards - and the beauty of home baking is that you are free to customise as you please. I also like to take the option of adding a proportion of rye to the dough.

This crumb is spongy, which I really like, with a cool mouthfeel, nice structure and elasticity, a lovely creaminess about it, and nutty flavour tones that develop in depth and complexity the day after the bake. The crust has character, but is not so robust as to be tooth-endangering (conscious of this at the moment, having recently needed a crown due to chomping over-zealously on a pizza and breaking a back molar that had been sending me warning signals that all was not right for many months...dental phobics have unlimited capacity to ignore such signals).

This 'House Miche' - er, batard -  is an old friend that I'm going to make more effort to stay in touch with from now on. Well worth inviting to your table, if you haven't already.

Thank you again, Shiao-Ping!

Cheers
Ross


rossnroller's picture
rossnroller

As kids, my siblings and I were never permitted to eat a hot cross bun before Good Friday (or an Easter egg before Easter Sunday, or meat on Good Friday). While formalised religion and I have parted ways, I've continued to observe the Easter culinary traditions I was brought up with. I think it's no bad thing to delay gratification with treats like hot cross buns. The building anticipation enhances the experience, and I suspect you savour them all the more for holding off. Anyway...

All my adult life I've switched into Ultimate Hot Cross Bun Quest mode on the Thursday afternoon before Good Friday.  I used to search all over the city for the UHCB, then extended my forays to the suburbs. When the shops opened on Easter Saturday, the quest continued. Was always pretty hot cross bunned out by Sunday night!

5 years ago, I gave up my quest to find great hot cross buns in the shops. In the last decade or so, most of the bakeries and supermarkets here have dumbed down their hot cross buns in response to a mystifying public antipathy towards peel - hardly any commercial bakeries include peel in their doughs! What's a hot cross bun without peel? Huh?

What was I to do, then? Continue the quest in my kitchen, of course!  Sometimes it takes a long time to find the right path, no? So, I started plundering newspaper and magazine recipes, taking notes from TV cooks, googling etc. First couple of years, results were patchy due to inexperience on my part and some very ordinary recipes. Then 3 years ago, I 'discovered' home-baking of sourdough bread. Sounds like a prologue to an evangelical rant, or an MLM presentation. It very well could be the former, but I'm preaching to the converted here, so jump cut...

Most of my HCB recipes in the last 3 years have come from the generous online artisan bread community, and surprise surprise, my results have improved markedly. Being a sourdough nut, I usually include at least one SD recipe in my annual HCB bakes, and this year was no exception. I had highlighted 3 HCB recipes during the year that I just had to try when Easter finally arrived, and at this point I must make a confession. Due to extended fermentation periods in the recipes and a full fridge, I realised that I would not finish baking until after Easter Sunday unless I started before Good Friday - so I made my first batch earlier in the week without crosses! Is that cheating? I've convinced myself that it's not, since what makes a hot cross bun a hot cross bun is the cross.

As it happens, the first recipe I tried yielded the best hot (un)crossed buns I've made, and I ended up making some small tweaks and doing it again, this time crossed (on Good Friday morning)! So, this year, I've only managed to do one recipe twice, and one more yeasted recipe. Still, Easter is not over yet, so that third recipe may yet get a run.

Here are a couple of pics of the SD buns and the yeasted ones I baked the next day (in that order). The SD buns were far superior in every way. While they look a bit rustic (I'm not big on aesthetic finessing), I'd have to rate them as amongst the best I've sampled in all my years of questing after the Ultimate HCB. I'm excited by the prospect of elevating them to another level with a little more tweaking... I'm out of time right now, but will post the recipe (current tweaked version) a little later.

Sourdough hot cross buns...

...and crumb shot


Yeasted...

...and on the way to Judgment Day.

Safe and happy Easter Sunday, folks.
Ross

OK, back. Here's the recipe for the SD HCBs. I've changed hydration and made other tweaks to the point that it now departs significantly from the recipe on which it was based, which was in turn based on another on Den Lepard's site. The original link is now 'broken'. This is how it goes in the baking community - everything is in a state of flux, with the possibilities always wide open to tweak in line with your own preferences.  Goes without saying that anyone trying this recipe should feel free to continue this tradition.

SD Hot Cross Buns (makes 6 large buns)

My ambient temp was 24C.

Pour boiling water over fruit, cover and leave overnight

Preferment
Mix up 75gm of white SD starter (80% hydration) + 87g organic baker's flour + 137gm soy milk (yes! - doubtless cow's milk would be fine, but I suspect the soy lends a slight sweetness and creaminess that cow's milk wouldn't). Leave overnight to ripen - 8 hours was sufficient for mine.

Next morning, add 30gm ripe white starter (80% hydration) to preferment, or whatever is required to bring its useable weight to 300gm.

Dough
150gm organic baker's flour
20gm wholewheat organic flour
1/2 teaspoon salt (or to taste)
40gm white sugar
5gm whole cream milk powder
40 gm melted butter
300gm preferment

Spices:
1 teaspoon allspice
1/2 teaspoon ginger powder
1/4 teaspoon fresh ground green cardomom (just the seeds, not the pods)
1/4 teaspoon fresh grated nutmeg
1.5 teaspoons cinnamon

Fruit:
75gm soaked sultanas
25gm soaked peel

Method
Mix dry ingredients, except fruit. Add melted butter, mix in, then add preferment.

Knead briefly in bowl twice, 10 minutes apart. Fold in fruit.

Bulk proof 3.5 hours (adjust according to your ambient temperature), with hourly stretch and folds.

Divide into 6 (or more if you prefer smaller buns). Best to weigh them out, so you get uniform buns. Shape into balls, flatten slightly, and arrange on a greased baking tray. The buns should be close together but not quite touching each other or the sides of the baking tray. Cover well, and put in fridge overnight.

Next morning, preheat oven to 200C/390F (no fan, no steam). While preheating, make mix for crosses (can do this the previous night if preferred; store covered in fridge).

Cross mix (combine and mix well):
35gm flour
10gm canola oil
25gm water
1 heaped teaspoon cinnamon sugar

This mix can be piped on to the buns, but for such a small quantity I prefer to lay it out on a lightly oiled bench, roll it out thinly, and lay the crosses on the buns by hand.

Baking:
Bake buns @ 200C/390F for about 25 minutes. (The second time I baked these, to get a better browning, I started @ 215C/420F for first 7 minutes or so, then dropped to 190C/375F, then dropped to 175 - all depends on the finish you are after. You might need to reduce baking time, also - you just need to watch the buns during the bake and use your intuition).

While buns are baking, make sugar syrup glaze:
15gm caster sugar
15gm water
Bring to boil, stir until sugar dissolved.

When bake is complete, remove buns and with silicon or bristle pastry brush apply hot glaze (reheat if necessary) to tops of buns. As soon as possible, get buns off baking tray and on to cooling rack.

Best to wait a while before splitting and eating with bounteous spread of fresh unsalted butter. I actually prefer these a couple of hours later, cold. The flavour and structure seems to develop during that time. Gorgeous toasted up to 2 days after bake, also.


rossnroller's picture
rossnroller

I've just gotten back after a month travelling, most of which was spent in Vietnam. One of the most notable influences of French colonisation is the proliferation of baguettes in the Vietnamese diet. In Saigon (that's what the locals call their manic city, and it's a far more romantic and exotic name than Ho Chi Minh City, so I'm going with it), most baguettes are the rice flour ones that appear in Vietnamese bakeries all over Australia, and probably the States. I find these a bit boring to eat and didn't bother photographing them, but north of Saigon the baguettes are all wheat...and delicious.

Elaborate cake decoration features in some of the bakery displays, also, although I didn't bother with sampling any of the cakey stuff. Too much other interesting fare to get yer tonsils around!

I thought TFL readers might be interested to have a look at some of the baking-related pictures I came back with.


Breakfast baguette, Nha Trang


An 'American breakfast' Nha Trang style


The further north you go, the thinner the baguettes become. They all have something in common, though - they're delicious!

Hoi An breakfast baguette

...and of course a crumb shot, as best as I could manage it:


The following were taken at a Saigon bakery:

NB: 9000 VND = approx 40c AUD/American...not the greatest bargain, when you consider 'fresh beer' (made in 24 hours and surprisingly quaffable) is 25c per glass.


And finally, my favourite shot of the trip:

Basket of baguettes in Hoi An market


Good to have some home comforts back, but I'm still processing my Vietnam travelling experience. Just about every expectation I had was confounded.

I can tell you one thing - they leave us for dead with their MAGNIFICENT fresh daily produce. Fish out of the water mere hours, prawns still flipping, meat from animals slaughtered that day (and sometimes trussed up or in cages awaiting their unfortunate fate), an amazing array of vegetables picked and taken straight to market, and the most spectacular tropical fruit I've ever encountered. I had some pineapple in the Mekong Delta that triggers a salivation response just thinking about it.

Vietnam is one of the great travel bargains left on the planet, but it won't last much longer. If you're interested in going, do it soon.

Cheers all
Ross

rossnroller's picture
rossnroller

This boule version of DMSnyder's handsome miche is scaled down to 1kg, and I've altered the formula a little, hopefully while remaining fairly true to the spirit of the original.

The reasons for the mods are: I wanted a slightly more open crumb so increased the hydration a little; I do not have high-extraction flour; I wanted to include the toasted wheatgerm that was part of the SFBI formula; I prefer a less jaw-challenging, lighter browned crust. Heh heh - come to think about it, maybe the spirit of the original had flown by the time I made these mods! Anyway, using my usual biodynamic organic flours, I proceeded as follows:

Ingredients:
435gm baker's flour
15gm wholewheat flour
325gm filtered water
14gm toasted wheatgerm
9gm salt
186 gm levain (100% hydration; 15% whole wheat/85% white flour)

Method:
Roughly mix all ingredients but salt and autolyse 40 mins. Cut salt into dough with dough scraper, transfer dough to oiled plastic oblong container, stretch and fold, then again every 30 mins for first hour, then bulk proof 1 more hour (total BP = 2 hours).

(Note: My BP was short because ambient temp was 27C/81F+. Extend BP if lower room temp.)

Preshape, rest 15 mins, shape, and transfer to fridge for overnight retarding period (final proof). Bake straight out of fridge next day after scoring.

Baking:
15 mins with steam @ 225C/440F on pizza stone preheated in oven (turned to max for 45 mins)
18 mins @ 215C/420F
15 mins @ 200C/390F
Cool on rack for 2 hours before eating.

Looking at the pics, obviously my version was way inferior aesthetically. I never have managed to achieve the lovely even spread with the criss cross slash pattern that David's pic shows to such pleasing effect. Doubly difficult, I think, when making small bloues, and when the ambient temps are high - possibly my loaf was slightly overproofed, despite the vastly reduced proofing periods. The flavour of both crust and crumb was terrific, however. The crust, while clearly much lighter than David's, was nevertheless still full of caramelised character, and the crumb was open, spongy and had a nice cold mouthfeel. The wheatgerm added a nutty flavour note that was subtle but discernible. I always like to assess fresh bread with a thin spread of butter, and this one passed the taste test with distinction. All in all, a gorgeous bread. Thanks David!

Cheers!
Ross


rossnroller's picture
rossnroller

Like many here, I imagine, I like to try lots of different breads in amongst my rolling repertoire of regulars. I've been doing more new ones than regulars lately, but had a sudden urge to revisit one of my old favourites: Gérard Rubaud's bread, which Shiao-Ping brought to the attention of TFLers some time ago in a spectacular bake that was essentially her homage to GR: see here. Shiao-Ping referenced Farine's blog on Gerard Rubaud as the source of her inspiration. I acknowledge and thank Farine and Shiao-Ping for alerting me to this wonderful baker and his bread.

For those of you who have not tried making Gérard's bread, I'd strongly recommend you give it a go. It's not an easy one due to the 80% hydration of the dough. Whenever I make it, I wonder whether I'll find it easier than the last time. I use it as something of a gauge as to whether I've improved!

I'm still a bit hit and miss with the shaping. The dough can get very sticky and hard to handle. These days, I use GR's batard shaping method, which I prefer to Hamelman's or Reinhart's, but you need to be liberal in sprinkling flour over your working surface to avoid the unholy mess that can result if the dough sticks (to surface or hands, or both!). I also sprinkle some over the dough itself to make it a bit easier to manage.

Scoring can be a challenge with a wet dough like this one. I managed it quite well this time, but in my haste to finish the slashing and get the thing into the oven before it slumped flat on the peel, I scored it unevenly (see pic). Still, the rise ended up not too bad, especially considering that some ciabattas are less highly hydrated than this baby!

I basically stuck to Shiao-Ping's recipe directions, but halved her quantities, making a large single batard instead of a boule. I also altered the baking times as follows:

  • Oven on max (250C), load dough, drop to 225C. Bake with steam 15 minutes (I still use ice in a tray in the bottom of the oven and manual misting at the beginning of the bake...better results would surely result from using better steaming methods, such as those recently written up by David Snyder and Sylvia...must try them).
  • Rotate loaf, then bake @ 215C for another 15 mins.
  • Lower temp to 200C, bake 7 minutes, then out.
  • Cool for 2 hours before attacking.

The favours of this bread really are special IMO. I'd forgotten how damned good this is. Also, there's an intriguing quality about this crumb that I can only describe as a sensation of coldness when you bite into it. I've experienced that before with other breads, but not often. Tantalising stuff.

Anyway, enough of my blah. Here are a couple of pics:


Best of baking folks!
Ross


rossnroller's picture
rossnroller

It's a rainy Sunday afternoon where I am - good time to tap out a post. Besides, it's 10-10-10...gotta commemorate that somehow!

Like many here, I suspect, I love trying new breads, and have a never-diminishing must-bake list of breads I want to try - never-diminishing because no matter how many I try, I keep adding more! Thanks to Shiao-Ping's current posting hiatus, I've managed to get through most of hers now (any newcomers looking for a great source of new breads, put her name in the search window and just take your pick from any of her amazing bakes). But then along comes TXFarmer!!! Sigh...

Much as I enjoy trying new breads, I have identified 5 or 6 of the 50 or so different breads I've baked in the last couple of years that I keep coming back to as my favourites. These now comprise my core repertoire, all 100% SDs: pain de campagne (my version), Gerard Rubaud's formula (thanks to Shiao-Ping), Norwich Rye (Wild Yeast Susan's adaptation of Hamelman's Vermont SD, which I also tweak in various ways), San Joaquin SD (DM Snyder), and my version of pain au levain.

It's the last that I want to share today, because of all my favourites, if I had to pick a number 1 this would be it. Why?

  • the flavour profile - the rye component comes from the starter, which seems to add a different quality of flavour from rye that is added to a dough at mixing stage, and the small amount of wholewheat flour sweetens it up a little, while the white flour component keeps it light
  • the hydration level ensures it is a relatively easy dough to work with
  • ever-reliable
  • versatile - compatible with both savoury and sweet accompaniments, toasts well
  • the crust - nice rustic look when done as a batard (my favourite shape), but not as thick as, say, the San Joaquin, or as thin as my pain de campagne...so Goldilocks would like it!
  • the crumb - the combination of bakers' flour and AP flour keeps the structure strong, but open and slightly spongy

This pain au levain developed out of various breads that I tweaked until I ended up with the formula that follows. There's nothing remarkable about the formula: pretty typical SD bread. Actually, if I recall correctly, the formula I initially based this bread on was a camp oven SD bread that someone posted on the Sourdough Companion site. Not sure how much I've ended up deviating from the prototype, but after a lot of experimenting and tweaking, the formula that follows is the one I have found myself returning to again and again. It just seems 'right' to me. Of course, feel free to try your own tweaks. My taste may not equate exactly with yours.

So, to the recipe. Be aware that this is scaled to the weight I prefer. I like to bake batards that my partner and I can finish in 2 days, so I can then move on to another bread, and it is always fresh. If you have a larger household, you might like to scale this up accordingly.

INGREDIENTS

  • Ripe starter (100% hydration: 30% whole grain organic rye/70% organic unbleached AP flour): 150gm
  • Filtered water: 300gm
  • Wholegrain organic flour: 25gm
  • Premium organic bakers' flour: 200gm
  • Organic unbleached AP flour: 275gm
  • Pure sea salt: heaped teaspoon (or 2% if you want a standard measure of salt...I slightly undersalt my doughs)

Note: This recipe assumes an ambient temp of 22C/72F (adjust proofing times up or down, depending on your own ambient temp)

METHOD

  • Mix all ingredients other than salt, autolyse 30-40mins.
  • Mix salt into dough
  • Bulk proof 3 hours, with 2 stretch-and-folds 30 mins apart initially, then S&F once per hour thereafter
  • After BP, preshape and rest 10 mins
  • Shape
  • Final Proof: 30 mins (dough covered in plastic), then retard in fridge overnight
  • Bake straight out of fridge next day

BAKING

  • Heat oven to 250C/480F with pizza stone or baking tile, and with metal tray in bottom for ice. Bake in lower-middle of oven.
  • When 250C has been reached, drop 3 ice cubes into heated tray in bottom of oven just prior to loading slashed dough. Immediately after loading dough, spray surface of loaf and around oven with water, and shut door. Wait 2 minutes and spray again around oven. Shut door and drop oven temp to 225C/435F.
  • Bake 15 mins starting from time you loaded dough, then drop oven to 215C/420F
  • Bake 12 mins @ 215C, then drop oven temp to 200C/390F
  • Bake 14 mins @ 200C, then take bread out of oven and rest for minimum 2 hours on cake rack or similar.

I'll leave you with a couple of pics of a pain au levain I baked this morning.

Cheers
Ross


rossnroller's picture
rossnroller

I make these sourdough babies weekly, and over months have tweaked my recipe to the point where they turn out just how I like them every time. These ones were especially good, so couldn't resist taking a pic and posting.

Anyone interested in my recipe, you can find it here.

Aveagoodweegend all, and best o bakin' to you!
Ross


(Submitted to Yeastspotting - probably too late, though. Oh well...)


rossnroller's picture
rossnroller

Last Thursday evening I met up with Yozza, another resident of the eternally-just-unwrapped city of Perth, Western Australia, who has a wood-fired oven at his workplace. After some PM exchanges during which I expressed in pining tones that I would love to try baking my sourdough pizzas in a WFO, Yozza suggested a bake-off: he would bake some of his dark ale wholemeal/white bread with molasses and sprouted wheat, and I would bring along some SD pizza dough and toppings.

I’d learned through our PM correspondence that Yozza is a pro baker who has sensibly elected to extricate himself from the long hours and pressures of baking for a living, and who now has things very well worked out – he works on campus at a technical college in a non-baking capacity, but spends whatever time he has spare haunting the Hospitality and Commercial Cooking section, where he is able to keep in contact with baking in a commercial context, while contributing his knowledge and experience to the staff and students…not to mention his bread, which he hides in secret spots on site, lest it disappear before he can make good his promises of a loaf or three to multiple grateful staff members, with a couple in reserve to take home!

I’d never met Yozza in person until last Thursday, but I would have had no trouble picking him out of a line-up – he looks exactly as I imagine a baker should look! I’m not going to elaborate unless specifically pushed…but if your image of The Baker archetype equates with mine, there is really no need!

Yozza led me through a warren of rooms and corridors to a courtyard outside the Hospitality student restaurant, where a handsome wood fired oven takes pride of place. Yozza is justly proud of the oven; it was his brainchild, built by the college’s engineering students. He had fired it up earlier in the day, ready for our bake-off. It glowed beautifully from within, radiating the ancient heat of the baking ages and the promise of the pizzas and bread to come.

Back in the kitchen section, Yozza mixed his bread dough in a commercial mixer – enough for 28 loaves of 500gm each (pre-baked). This was my first glimpse of commercial baking. It struck me that the worlds of the professional and amateur baker are far apart – further than I had imagined. That gulf widened for me as the evening progressed.

The obvious difference, of course, is one of scale. I keep my starter in the bottom of a small glass peanut butter jar in the fridge, and do a build for a single loaf of sourdough bread from a couple of teaspoonfuls, culminating in 2-300gm or so of active starter in a small glass mixing bowl. Yozza’s starter, by contrast, sits in a container about the size of a large can of paint!

Mixing my bread dough, I add water out of a Brita filter jug, using a little plastic medicine-measuring cup to finish off to the nearest gram – Yozza pours in water by the bucket!

When the proofing of the dough was complete, Yozza divided it into 500gm balls, which he pre-shaped with a deft motion I couldn’t easily replicate. That was nothing - his final shaping was so fast and tricky-looking, it seemed like sleight-of-hand! I tried to do a few loaves under his patient tutelage, but my efforts were clumsy and slow by comparison, and the results were as amateur as I felt! I was a bit taken aback, to be honest. Having carefully followed along with Hamelman’s directions when shaping my loaves at home, I thought I was on top of the shaping game. Uh uh. No time for my careful folds and finicky dough-nudging final shaping rituals when you’ve got 28 loaves to bake!

And the pizzas? Well, I have to admit to a little disappointment. Perhaps unrealistically, I had expected the WFO to take my pizzas to dizzy new heights. I have arrived at my pizza dough over many months of tweaking and experimenting (see this post), and the pizzas I turn out of my domestic oven at home take some beating. The WFO did give a light airiness to the rim that can only be achieved with a fast rise driven by high heat, and added a nice char to the edge, but for some reason the overall flavour was not as good as that I achieve at home. Not by my reckoning, anyway.

We shared the pizzas out among the staff, and I was surprised to learn from Yozza later that the feedback was very good. One staff member apparently declared her sample the best pizza she had tasted! Maybe I am my own harshest critic, but I am sure I can do a lot better. As with anything new, no doubt there are aspects to WFO baking that take some getting used to. All part of the mysterious, wonderful wide world of baking…

And Yozza’s bread? In a word, delicious! Soft elastic even crumb, thin but tasty crust, and lovely as open sandwiches for my lunch next day. Great spread with butter and honey, too – as you’d expect, the molasses and honey spoke eloquently to each other.

All in all, a terrific insight into the commercial world of baking for me, and a rare chance to get up close and personal with a WFO. Many thanks to Yozza for making it all accessible to me.

Following are a few pics taken during our bake-off. Not the best of quality – digital photography is not a strong point of mine – but it’s nice to have some visual record of the night, and to be able to share it here.

Cheers all!
Ross


Q: What beats a stoked-up wood fired oven ready to rock?


A: A stoked-up WFO with pizza bakin' inside!


My first wood-fired sourdough pizza margarita!


Do I need to tell ya who's who?


Derek's malted, sprouted wheat yeasted/SD bread


And yes, it IS as good as it looks!


rossnroller's picture
rossnroller

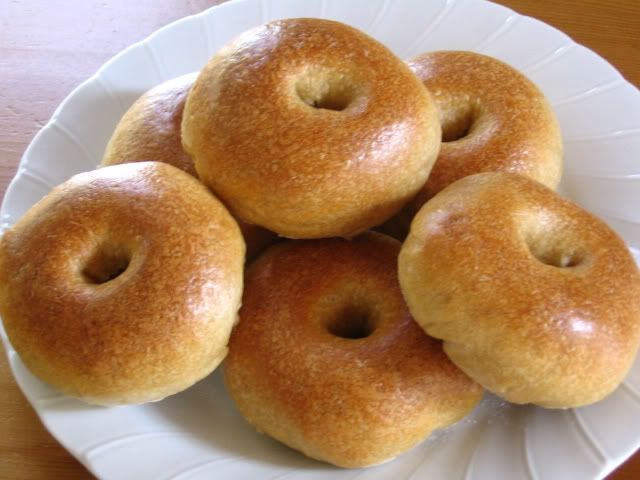
In his recent thread, Bagels From BBA, David (dmsnyder) responded affirmatively to my offer to post my sourdough bagel recipe. I’m very pleased to be able to repay him, just a little, for the many fantastic bread recipes of his I have baked over the past months. So here’s the recipe, and hope you like these bagels as much as I do, David!

Acknowledgements: I think the original source was a bagel recipe posted on Dan Lepard’s forum, but adapted for sourdough and re-posted on the Sourdough Companion forum.  Unfortunately, I have so far been unable to retrace my steps to the post in question. Once I do locate it, I’ll post the URL here.

I have been baking these bagels just about weekly for the best part of a year, and during this time have made multiple small tweaks to arrive at the recipe I am about to post.

I have to admit to being a sourdough nut, and probably biased towards sourdough as a leavening agent, but I do take the point that some types of bakery products are not ideally suited to sourdough and turn out better with dry yeast. That bias acknowledged, my firm opinion is that this sourdough bagel recipe yields better flavour – actually, an all-round better bagel - than I have encountered in any commercially yeasted version (and I speak as a committed bagel consumer from way back, not just as a home baker). 

What does ‘better’ mean? Well, for me, a lovely caramelised thin shell of a crust that crackles a little when you bite into it, and a crumb that is tightish and firm, as it should be, yet not dry – and of course, full flavoured and delicious. (I like a touch of rye nestled in amongst the flavours, so often use a starter with 30% rye/70% white flour.)

These babies are best fresh, but toast up well the day after baking, and work beautifully with butter and honey (and a nice cup of good leaf tea brewed for 4 minutes!), as well as the more traditional savoury toppings.

I usually make only 6 bagels per bake, as my partner and I prefer to have them fresh as a once weekly treat, rather than freezing any that are not consumed on the day of the bake or toasted the next day. I suspect others might prefer to make more in one batch, so the following recipe is for a dozen bagels.

Ingredients

  • 400g starter* (100% hydration)
  • 150g filtered water
  • 550g flour (plain flour if you’re in Australia, AP in the US)
  • 38g oil (I use non-GM canola oil)
  • 25g malt extract (I think this is referred to as malt syrup in the States?)
  • 10-12g salt (15g if you are not used to lower salt doughs)

*As mentioned, I like a suggestion of rye in the flavour, so I use 30% whole grain organic rye and 70% organic white plain flour in my bagel starter. However, I’ve quite often used an all-white flour starter, and the end result is just as good.


Method

  • Hand-mix all ingredients in bowl.  Will be quite a dry dough, but persist in mixing for a few minutes and only add a little extra water if the dough won’t come together. No need to rest the dough once mixed.
  • Do a couple of short kneads (say, 2 or 3 minutes) at 10 minute intervals. Use conventional-style kneading: this dough is too stiff for stretching and folding. Leave to rise for 3-4 hours.
  • Divide into 12 equally weighted portions, and pre-shape into balls. Flatten them a bit, then poke a hole in the middle with a skewer and work it around until you can use your finger to take over and create a bagel-sized hole (I prefer to keep the hole small so toppings don’t fall through, but I take full responsibility for this idiosyncrasy and don’t expect anyone else to take it on!).
  • As you complete each bagel, place it in a lightly oiled container large enough to allow the batch to sit there shoulder to shoulder, so to speak. Rub both sides of bagel on the oiled container surface to coat lightly with oil. Put ‘good side’ up.
  • Retard overnight in fridge (cover bagels with plastic, and put entire container in a plastic bag)
  • Preheat oven to 215C (420F). Fan off if you have a convection oven.
  • While oven heats up, bring about three or four inches of water to boil in a large pot, then add a couple of good dessertspoonfuls of malt extract and stir it in to dissolve. The colour of the boiling liquid should resemble weak tea (unmilked, of course!).
  • When oven is ready, plop into the pot as many bagels as will fit in the boiling malty water without piggy-backing on each other – I manage 3. Flip after 30 secs (so, each bagel gets a malt bath of 1 minute in total). Drain on cake rack or similar for a few minutes.
  • Line a baking tray with baking paper (‘parchment paper’ in the States, I believe) and sprinkle lightly with semolina.
  • Sprinkle on toppings – sesame or poppy seeds or whatever – if you want. (I prefer my bagels plain). Transfer bagels to baking tray, and put in oven.
  • Bake @ 215C (420F) for 18 mins. I don’t use steam for these bagels.
  • Let your bagels cool for 30 minutes or so before topping and attacking them.
  • Yeah, I know - I said I make the holes small!


    Whoops - this hole has closed up completely.


    Sans hole, too - but this is the best crumb shot (despite the camera angle warping the shape of the bagel), so it stays in. My photographic standards are low.


    Cheers all, and best of bageling to you!
    Ross

rossnroller's picture
rossnroller

Hi folks. ABC Rural Radio's 'Bush Telegraph' program has a regular segment called 'Food On Friday', and last year they broadcast a feature on sourdough bread. This included an interview with John Downes, the so-called "father of Australian sourdough", who is currently spreading the love in the UK.  I found the whole program compelling listening.

Because of the time that has elapsed, the segment is no longer archived on the ABC Rural Radio site, but a staff member kindly made it available to me on request. I have now embedded an MP3 recording of the segment in my recent blog post, so it can remain a publicly available resource. Thought people here might be interested in having a listen. If so, you'll find the MP3 at the following link:

Sourdough Rising - The Artisan Bread Baking Revolution


Cheers all
Ross

Pages

Subscribe to RSS - rossnroller's blog