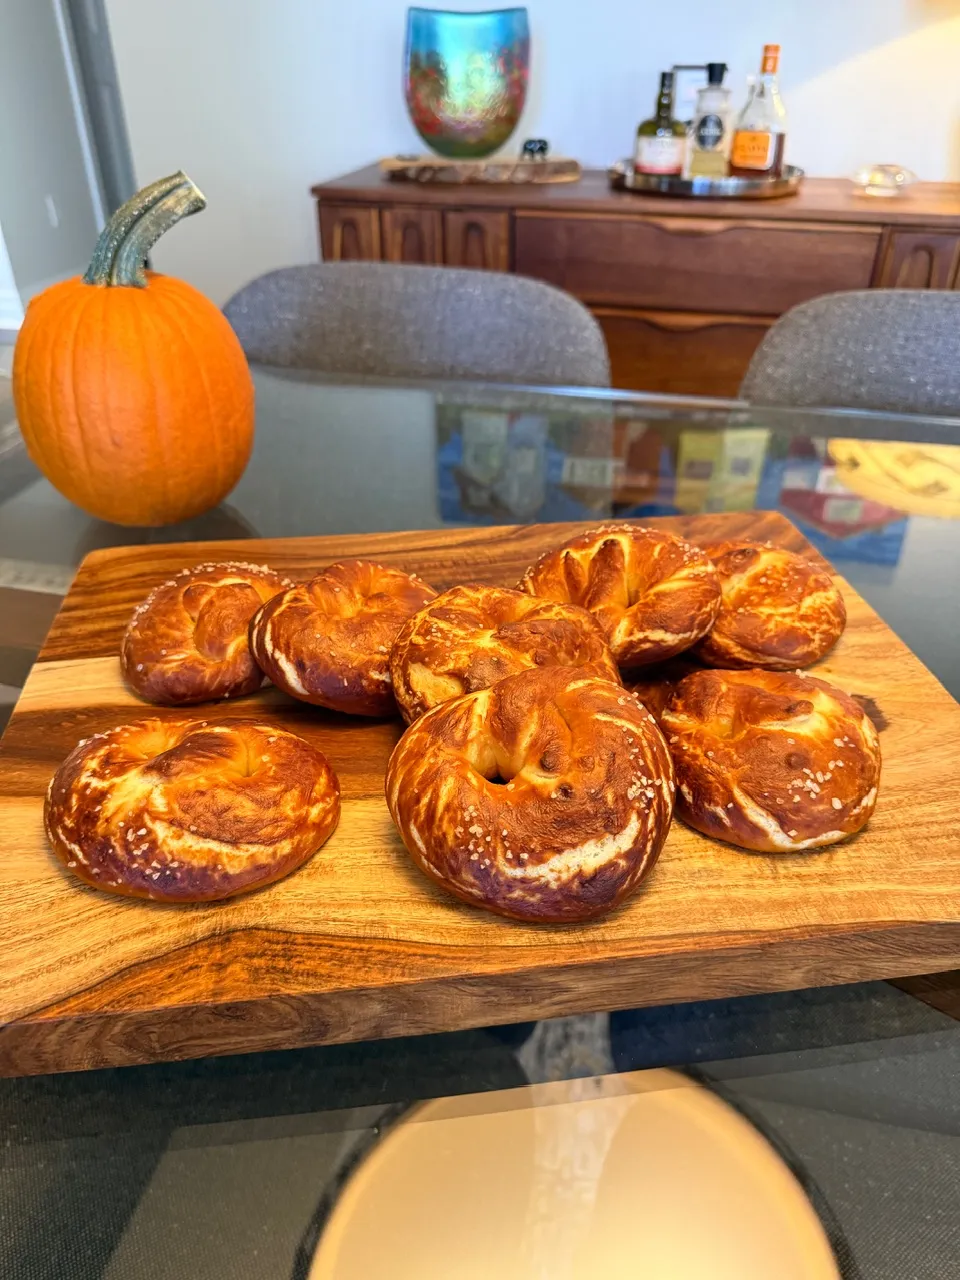
The Fresh Loaf

A Community of Amateur Bakers and Artisan Bread Enthusiasts.

Benito's blog

Benito's picture
Benito

Still enjoying ourselves in Fort Lauderdale and starting to see friends gradually.  So tonight we are hosting a dinner party and the main course has some olives in it, a chicken saltimbocca so I decided I’d bake another Fougasse, my second time baking this bread for those who love crust.  It is quite fun to make, with very little effort or skill you can turn out a fancy looking delicious bread.  Even with my lack of artistic talent the bread baked up looking like a nice large monstera leaf.  If you like crust bread give this a go.

Levain Overnight

12 hours warm room temperature 74-76°F. 


In large bowl add the water and the levain then dissolve.  Then add salt and olive oil, then whole wheat flour and mix, finally add bread flour. After 10 mins of autolyse, slap and fold to develop the dough moderately.  Towards the end of mixing add the Kalamata olives and oregano through stretch and folds in the bowl.  Finally give the dough a bench letterfold and place into the bowl.


At 30 min intervals give the dough coil folds.  After the third set give the dough 1 hour 30 mins rest.

Allow the dough to rise to about 40-50% then shape.


To remove the dough from the bowl drizzle olive oil onto and around the edges of the dough.  Then gently spread the olive oil over the surface and around the sides.  In the bowl flip the dough to oil the bottom of the dough.

Transfer the dough to a parchment lined tray, smooth side up and gently stretch the dough out into a rough triangle.  Rest for 10 mins then cut the dough.  Make 2 or 3 short vertical cuts from the base of the triangle to the top, leaving space between the cuts. While cutting, use your other hand to gently spread the dough with your fingers to encourage it to open and prevent it from sticking back together. After cutting, spread the sides of the triangle outward to widen the cuts even further. Next, make diagonal cuts from the center cuts outward toward the sides of the triangle, while spreading the sides outward so the cuts open wide.  Place into a large plastic bag and close.  Allow to proof for 1 and a half to 2 hours.  30 mins prior to the end of proof pre-heat the oven to 450°F.  (Changes for the second time - cutting soon after stretching)


The dough should pass the finger poke test when ready to bake.  Prior to baking brush the dough with more olive oil.

(Changes for second time - brushing with olive oil prior to baking)


Bake at 450°F for 25-30 mins on the lowest rack rotating partway through.


After baking brush with olive oil and you can add herbs to your olive oil to add more flavour if you wish.


Cool on a rack.


Best eaten the day of bake. Reheat a minute or two under the broiler.


My index of bakes

Benito's picture
Benito

One of my plans in bringing my homemade miso down to Fort Lauderdale was to use it in a couple of bakes.  We were out of bread and needing more bread for toast and dinners.  I’ve wanted to bake a bit more lean breads but baked in my Pullman pan since that is what I prefer for sandwiches and toast.  This is what I came up with.  I have to say that dough seems to ferment faster down here.  I’m not sure why, it is my starter from Toronto so the only differences would be the flour or the water.  I don’t think it is a temperature related thing since Toronto in the summer is bloody hot, hotter than it is here right now.  Also I have a proofing box in Toronto, while I don’t have one here.

My red miso paste is almost 1 g sodium per 20 g miso


For 1 loaf in a 9x4x4” Pullman pan.


Build stiff levain, ferment at 74°F for 10 hours overnight.

Starter 6 g, water 23 g bread flour 38 g


Bread flour 296 g, Whole Wheat Flour 83 g, Water 294 g, all levain, hold back water 13 g, salt 4 g and Red Miso 50 g


In the morning, add miso and salt to the water and dissolve.  Then add the levain and break down the levain as well as you can.  Add both the flours and mix well until no dry bits are left. After 10 mins of rest start gluten development with slap and folds then gradually add the hold back water in several aliquots using Rubaud to fully incorporate the water well.  Bench letterfold, remove aliquot, then at 30 mins intervals do coil folds until good structure is achieved.


Once the dough has risen 40% then shape the dough into a batard and place in prepared pan.


Final proof the dough until it has reached 1 cm of the rim of the pan.  pre-heat oven at 425°F .


Once oven reaches 425ºF score top of dough and then brush with water.  (I decided last minute to sprinkle with sesame seeds). Transfer to oven and bake (without steam) for 25 mins.  Rotate the pan and drop temperature to 350ºF.  Bake for another 25-30 mins rotating as needed until browned.  Remove from the pan and place directly on the rack baking for another 5-10 mins to firm up the crust.


My index of bakes.


Benito's picture
Benito

Down in Florida we are a bit more social than we are at home in Toronto.  We have friends we don’t see often so try to get together a few times each visit.  One of our close friends invited us over for dinner with his new partner so of course I offered to bring rolls to have with their Italian dinner.  Crusty rolls might have been better with Italian but I decided to use up some of my mashed sweet potato I have left over for some soft milk rolls.  

I forgot to get photos of the rolls when they were pulled apart, but I can say they turned out just as I wanted, soft, shreddable and yummy.

24 rolls in a 7.5 x 11.5” pan 


egg wash: 1 yolk and 1 tbsp milk, beaten…


Prepare the stiff sweet levain overnight or the day before and refrigerate when ready.


Prepare the butter paste by blending very soft butter with flour.


Cook Tangzhong mixing flour and milk constantly until it becomes a thick roux.  Let cool before adding to final dough.  Or add to cold milk and egg to cool it down.  Add the levain and break it up into small pieces with your spatula.  Add and dissolved IDY if using.


To mix by hand, add the flour to the wet ingredients (milk, tangzhong and egg) to dissolve.  Next add the flour and mix with a silicone spatula until no dry flour remains.  Rest 10-20 mins.  Next perform French folds until the dough is well developed.  Smear the butter onto the dough and then fold to incorporate and then perform further French folds until well developed.  Gradually add the mashed potato and knead to incorporate it well into the dough.  Form into a tight ball and place in a bowl covered with plastic or a damp cloth @ 82°F for 3-4 hours, some rise will be visible. Alternatively, you could mix the mashed potato and butter and then add the mixture to the developed dough until well incorporated.


Butter a large baking pan or line the pan with parchment.  Punch the dough down and then divide into 24 equal portions.  Form each into tight boules.  Place in the buttered baking pan seam side down.  Cover them and allow them to fully proof about 4-6 hours, they should pass the poke test.


About 30 mins before the end of proofing time, whisk your remaining egg and milk and then brush the small boules.


About 30 mins prior to end of final proof preheat the oven to 350°F. 

Immediately prior to baking brush the dough again with the egg and milk mixture.


Bake the rolls uncovered for 30-35 minutes or until the internal temperature is at least 190F. Cover if your rolls get brown early in the baking process.


Remove the bread from the oven but not the pans, brush the tops with the melted butter while hot, and then let cool for 10 minutes before pulling the bread from the pans. You may need to slide a butter knife down the sides of the pan to loosen the bread, but I have found parchment paper to be unnecessary.  Sprinkle with fleur de sel if you wish after brushing with butter. 

My index of bakes.

Benito's picture
Benito

My first bake this trip in Fort Lauderdale today was a success.  I was a bit worried taking some of my homemade miso (who knew it was so hard to find down here?) and starter across the border.

My starter survived the trip and was raring to go after one feed so I prepared the levain to bake a loaf of bread.  Although the instructions below state that I used a stand mixer to develop the dough, I actually do not have a mixer here and had to knead by hand.  I really missed by Ankarsrum Assistent but it is far too expensive to buy one for the time we are here.  Anyhow, it is probably good to hand knead once in a while.

For one 9x4x4” Pullman pan loaf.


Instructions

Levain

Mix the levain ingredients in a jar or pyrex container with space for at least 300% growth. 

Press down with your knuckles or silicone spatula to create a uniform surface and to push out air.

At a temperature of 76-78ºF, it typically takes up to 10-12 hours for this sweet stiff levain to be at peak.  For my starter I typically see 3-3.5 times increase in size at peak.  The levain will smell sweet with only a mild tang.


Tangzhong 

In a sauce pan set on medium heat, stir the milk and whole wheat flour until blended. Then cook for several minutes until well thickened, stirring regularly with a spoon or heat-resistant spatula. Let cool in the pan or, for faster results, in a new bowl.  Theoretically it should reach 65ºC (149ºF) but I don’t find I need to measure the temperature as the tangzhong gelatinizes at this temperature.  You can prepare this the night before and refrigerate it, ensure that it is covered to prevent it from drying out.


If you plan on using a stand mixer to mix this dough, set up a Bain Marie and use your stand mixer’s bowl to prepare the tangzhong.


Dough

In the bowl of a stand mixer, add the milk (consider holding back 10 g of milk and adding later if this is the first time you’re making this), egg, tangzhong, salt, sugar and levain.  Mix and then break up the levain into many smaller pieces.  Next add the flour.  I like to use my spatula to mix until there aren’t many dry areas.  Allow the flour to hydrate (fermentolyse) for 20-30 minutes.  Mix on low speed and then medium speed until moderate gluten development this may take 5-10 mins.  You may want to scrape the sides of the bowl during the first 5 minutes of mixing.  Next add room temperature butter one pat at a time.  The dough may come apart, be patient, continue to mix until it comes together before adding in more butter.  Again, knead until well incorporated.  You will want to check gluten development by windowpane during this time and stop mixing when you get a good windowpane.  You should be able to pull a good windowpane, not quite as good as a white flour because the bran will interrupt the windowpane somewhat.  Add the sesame seeds, then mix again until they are well distributed.


On the counter, shape the dough into a tight ball, cover in the bowl and ferment for 2 - 4 hours at 82ºF.  There should be some rise visible at this stage.


You can next place the dough into the fridge to chill the dough for about 1.5 hours, this makes rolling the dough easier to shape.  Remember, if you do so the final proof will take longer.  Alternatively, you can do a cold retard in the fridge overnight, however, you may find that this increases the tang in your bread.


Prepare your pans by greasing them with butter or line with parchment paper.  


Lightly oil the top of the dough. Scrape the dough out onto a clean counter top and divide it into four. I like to weigh them to have equal sized lobes. Shape each tightly into a boule, allow to rest 5 mins. Using an oiled rolling pin roll each ball out and then letterfold. Turn 90* and using a rolling pin roll each out to at least 8”. Letterfold again from the sides so you have a long narrow dough. Then using a rolling pin, roll flatter but keeping the dough relatively narrow.  The reason to do this extra letterfold is that the shorter fatter rolls when placed in the pan will not touch the sides of the pan.  This allows the swirled ends to rise during final proof, this is only done for appearance sake and is not necessary.  Next roll each into a tight roll with some tension. Arrange the rolls of dough inside your lined pan alternating the direction of the swirls. This should allow a greater rise during proof and in the oven.


Cover and let proof for  4-6 hours at a warm temperature.  I proof at 82°F.  You will need longer than 4-6 hours if you chilled your dough for shaping. I proof until the top of the dough comes to within 1 cm of the top edge of the pan.


Preheat the oven to 350F and brush the dough with the egg-milk wash.  Just prior to baking brush with the egg-milk wash again.


Bake the loaves for 50 minutes or until the internal temperature is at least 190ºF, rotating as needed to get even browning. Shield your loaf if it gets brown early in the baking process. After 50 mins remove the bread from the pan and bake a further 10 mins by placing the loaf directly in the oven on the rack with the oven turned down to 325ºF.


My Index of Bakes

Benito's picture
Benito

I am going to Fort Lauderdale for ten weeks and I’m bringing some of my starter with me to bake, but I’m also going to keep some starter in Toronto.  This is what I did to prepare my starter for a long hibernation.  I’m now down in Fort Lauderdale.

I fed my starter 1:1.5:3 starter to water to flour to reduce the hydration to near 50%.  This reduced hydration will slow the organisms down.  One time I was away from home for three weeks and I was surprised that my starter had mold growing on it.  I greatly reduce the chances of that happening now by placing a good layer of dry flour on top of the starter in its Weck jar.  The times I have done this it has worked very well and I have not seen mold since.  

I then gave John Dough 1 hour on the counter before placing him in the fridge to rest until I return.

My Index of Bakes.

Benito's picture
Benito

Another birthday get together this evening means another cake needing to be baked.  I had just enough cream cheese left over from the ginger breads so I decided to bake a popular southern US cake.  The Hummingbird cake has quite a few variations, but generally they all have bananas, pineapples and warm spices along with cream cheese icing as this one has.  Generally I don’t love a ton of icing on cakes, so I then to avoid layer cakes.  This one just has the drizzle icing on top.  Mine was a bit too thick so didn’t drip down the sides without some coaxing.  

This recipe is from Southern Living.  The only change I made to the recipe was to change the Bundt pan from a 14 cup to my 12 cup.  The recipe amounts didn’t need to change, the recipe easily fit my pan.

Active Time:

20 mins

Total Time:

3 hrs 45 mins

Yield:

10 to 12 serves

Ingredients

Cake Batter

  • 1 ½ cups chopped pecans
  • 3 cups all-purpose flour
  • 2 cups sugar
  • 1 teaspoon baking soda
  • 1 teaspoon ground cinnamon
  • ½ teaspoon salt
  • 3 large eggs, beaten
  • 1 ¾ cups mashed ripe bananas (about 4 large)
  • 1 (8-oz. 227 g) can crushed pineapple (do not drain)
  • ¾ cup canola oil (I used avocado oil)
  • 1 ½ teaspoons vanilla extract

Glaze

  • 4 ounces (113.4 g) cream cheese, cubed and softened
  • 2 cups sifted powdered sugar
  • 1 teaspoon vanilla extract
  • 1 to 2 tablespoons milk


Directions

  1. Prepare Cake Batter: Preheat oven to 350°F. Bake pecans in a single layer in a shallow pan 8 to 10 minutes or until toasted and fragrant, stirring halfway through. 
  2. Stir together flour and next 4 ingredients in a large bowl; stir in eggs and next 4 ingredients, stirring just until dry ingredients are moistened. Sprinkle 1 cup toasted pecans into a greased and floured 12-cup Bundt pan. Spoon batter over pecans. 
  3. Bake at 350°F for 1 hour to 1 hour and 10 minutes or until a long wooden pick inserted in center comes out clean. Cool cake in pan on a wire rack 15 minutes; remove from pan to wire rack, and cool completely (about 2 hours). 
  4. Prepare Glaze: Process cream cheese, powdered sugar, vanilla, and 1 Tbsp. milk in a food processor until well blended. Add remaining 1 Tbsp. milk, 1 tsp. at a time, processing until smooth. Immediately pour glaze over cooled cake, and sprinkle with remaining ½ cup toasted pecans.


https://www.southernliving.com/recipes/hummingbird-bundt-cake-recipe

Benito's picture
Benito

I am nearing the end of a batch of homemade red miso I harvested last May 2023.  Fortunately I have a full batch that has been fermenting for just over a year now so I decided to celebrate that with another bread using miso.  There rolls are delicious, soft, fluffy and super buttery, maybe not for those on a diet unless you do as I do and share most of the rolls with others.  The dough is a my standard formula that I use for sweet rolls with 15% whole wheat (or other whole grain) that is also the flour used for the tangzhong.  The tangzhong as you know helps slow the bread’s staling and also ensures that this bread is soft and tender yet shreddable. The tangzhong also allows you to increase the hydration of your dough but allows the dough to handle like a lower hydration dough.

Miso Garlic Butter Filling for 9x9” pan

Butter very soft 141 g

Miso (red) 20 g

Dash of pepper and paprika to taste

4 garlic cloves minced

2 scallions minced

½ tsp garlic powder (optional to taste)

Minced chives and parsley (optional to taste)

Black sesame seeds (optional to taste) can be sprinkled on after the filling is spread onto the dough


Egg wash - 1 egg 1 tbsp milk pinch of salt


Instructions

Levain

Mix the levain ingredients in a jar or pyrex container with space for at least 300% growth. 

Press down with your knuckles or silicone spatula to create a uniform surface and to push out air.

At a temperature of 76ºF, it typically takes up to 10-12 hours for this sweet stiff levain to be at peak.  For my starter I typically see 3-3.5 times increase in size at peak.  The levain will smell sweet with only a mild tang.


Tangzhong 

In a sauce pan set on medium heat, stir the milk and flour until blended. Then cook for several minutes until well thickened, stirring regularly with a spoon or heat-resistant spatula. Let cool in the pan or, for faster results, in a new bowl.  Theoretically it should reach 65ºC (149ºF) but I don’t find I need to measure the temperature as the tangzhong gelatinizes at this temperature.  You can prepare this the night before and refrigerate it, ensure that it is covered to prevent it from drying out.


If you plan on using a stand mixer to mix this dough, set up a Bain Marie and use your stand mixer’s bowl to prepare the tangzhong.


Dough

In the bowl of a stand mixer, add the milk (consider holding back 10 g of milk and adding later if this is the first time you’re making this), egg, tangzhong, salt, sugar and levain.  Mix and then break up the levain into many smaller pieces.  Next add the flours.  I like to use my spatula to mix until there aren’t many dry areas.  Allow the flour to hydrate (fermentolyse) for 20-30 minutes.  Mix on low speed and then medium speed until moderate gluten development this may take 5-10 mins.  You may want to scrape the sides of the bowl during the first 5 minutes of mixing.  Next add room temperature butter one pat at a time.  The dough may come apart, be patient, continue to mix until it comes together before adding in more butter.  Once all the butter has been added and incorporated increase the speed gradually to medium. Mix at medium speed until the gluten is well developed, approximately 10 mins.  You will want to check gluten development by windowpane during this time and stop mixing when you get a good windowpane.  You should be able to pull a good windowpane, not quite as good as a white flour because the bran will interrupt the windowpane somewhat.  Next add the zest of two oranges, that way they do not interfere with the gluten development. Mix until they are well incorporated in the dough.


On the counter, shape the dough into a tight ball, cover in the bowl and ferment for 2-4 hours at 82ºF.  There will be some rise visible at this stage.


Optional cold retard overnight or just 1.5 hours to chill the dough for easier shaping.


Prepare your pan by greasing it or line with parchment paper.  


This dough is very soft. Act quickly to roll, spread the filling, and cut before the dough warms and softens further. If it begins to soften, place it in the fridge to firm.

Remove your bulk fermentation container from the fridge, lightly flour your work surface in a large rectangle shape, and the top of the dough in the bowl. Then, gently scrape out the dough to the center of your floured rectangle. Lightly dust the top of the dough with flour, and using a rolling pin, roll the dough out to a 15″ x 15″ square or larger rectangle.


Spread miso garlic butter filling onto the dough.   Sprinkle green onions and black sesame seeds if using.


Starting at one of the long sides of the rectangle in front of you, begin rolling up the dough as you move across. Be sure to tightly roll the dough by gently tugging on the dough as you roll.

Once finished rolling up the dough, divide it into nine 1 1/2″ pieces using a sharp knife or dental floss which is my preference. Transfer the pieces to the prepared baking pan and cover with a large, reusable bag, place in a warm spot.  I use my proofing box set to 82°F.  Final proof may take 3-6 hours, be patient and wait until the dough passes the finger poke test.  Using my aliquot jar the dough should reach a total rise of 120-140%.


Be sure to start preheating your oven about 30 minutes before you feel the rolls will be fully proofed. For me, the final warm proof time was about 3 hours at 77°F (25°C).


Bake

Preheat your oven, with a rack in the middle, to 400°F (200°C). After the warm proof, uncover your dough and gently press the tops of a few rolls.  The fully proofed rolls will look very soft. The texture of the dough will be almost like a whipped mousse. Be sure to give them extra time in warm proof if necessary. If the dough needs more time to proof, cover the pan and give the dough another 15 to 30 minutes at a warm temperature and check again.

Once your oven is preheated, remove your pan from its bag, brush the rolls with the egg wash, then slide it into the oven, and bake for 30 to 35 minutes rotating partway through.


The rolls are finished baking when the tops are well-colored and the internal temperature is around 195°F (90°C). Remove the rolls from the oven and let the rolls cool for 5 to 10 minutes in the pan.  Brush with some butter while still warm.  Sprinkle some dried parsley after brushing with butter (optional).  Then remove from pan and transfer to rack to cool.

My index of bakes.

Benito's picture
Benito

I wanted to do a slightly different sourdough focaccia using my homemade red miso.  This bread has both miso and toasted sesame seed oil in it.  I also used 10% whole kamut along with bread flour just for a bit more complexity.  The toppings I kept pretty simple a drizzle of red miso with olive oil, rings of red peppers, yellow cherry tomatoes, onions and black sesame seeds. 

Levain build overnight

Mix starter, water and then flour and ferment at warm room temperature 74-76°F the night before.


Method

Mix

To the bowl of your stand mixer add water, miso and honey, mix to combine and dissolve the miso.

Add the levain and break into small pieces.  Add the flours and mix until the gluten is well developed. (hold back the sesame oil until later in mixing). 

Next, turn the mixer on to a low speed and slowly drizzle the toasted sesame oil into the bowl while mixing. Once all of the olive oil is absorbed, turn the mixer up to speed 2 for 1 to 2 minutes until the dough comes back together.

Transfer your dough to a bulk fermentation container and cover.

This highly hydrated and enriched dough is  wet and loose, it won’t strengthen to the same degree as a typical bread dough.

Immediately after mixing the dough is still very wet and chunky. However, it’s not falling apart or soupy. Resist the temptation to add more flour at this point.


Transfer the dough to a covered container for bulk fermentation.


Bulk Fermentation – 2 - 3 hours

Give the dough 3 sets of stretch and folds, starting 30 minutes after mixing, and a set every 30 minutes thereafter.

Every 30 minutes for the remaining 2 hours of bulk fermentation gently stretch the dough, with wet hands, toward the corners of the rectangular container. The dough will resist stretching and spring back (especially with the oil underneath), but don’t force it—each time you stretch it’ll relax a bit more and eventually fill the container.


OVERNIGHT OPTION: After two hours in proof, cover the rectangular pan with an airtight cover and transfer to the fridge. The next day, take out the dough and let it come to room temperature, and continue with the Top & Bake step below.


Proof – 4-6 hours

Transfer the dough to a deep rectangular pan or two 9” rounds that have been greased with olive oil. If you don’t have a pan with a silicone liner, make sure to heavily oil the pan’s interior so the focaccia doesn’t stick during baking.  Do not go too heavy with the olive oil otherwise you may end up shallow frying the dough.

At 76-78°F (24-25°C), the dough will proof for 4-6 hours. This time period is flexible and dependent on the temperature: if it’s cooler, let it proof longer, and conversely, if it’s warm, you might be able to bake sooner.

Every 30 minutes for the first hour, uncover the pan and gently stretch the dough with wet hands to the pan’s edges to encourage it to fill the pan. The dough will naturally spread out during this proofing period, so it’s unnecessary to spread the dough aggressively. Once the dough is mostly spread to the edges, cover the pan and proof for 4 hours.


About 30 minutes before you anticipate the sourdough focaccia dough being ready, preheat the oven to 450°F (232°C) with a rack placed in the bottom third (a baking stone is not necessary).  Aim to bake when the dough has reached 130-150% rise.


Top & Bake

Whisk 1-2 tbsp of olive oil with 1 tsp of miso and a pinch of pepper.  We will use this to drizzle onto the dough after docking with our wet fingers.

First, dimple the unadorned dough with wet fingers. Make sure the dimples are evenly spaced and go all the way down to the bottom of the pan. Then, drizzle on 1-2 tablespoons of miso olive oil. If using other toppings, add them now and press them gently into the dough.


Bake the focaccia in the oven at 450°F (232°C) until deeply colored on top, about 30 minutes. Rotate the pan front-to-back halfway through this time. Keep an eye on it during the last 5 minutes and pull it out if it’s coloring too quickly, or leave it in longer if you’d like it a little darker.

Let the focaccia cool a few minutes in the pan, then transfer to a cooling rack. It’s fantastic warm from the oven, and best on the day of baking, but it’ll keep well for a couple days loosely wrapped in foil (reheat under the broiler before serving).

My index of bakes.

Benito's picture
Benito

A friend of mine has made these for us many years ago and I remember them fondly.  His homemade versions were far better than any of the store bought ones I’ve ever had.  I finally got around to trying to make these myself.  Although they’re called cakes, they are really pastries with a pineapple jam encased in a short crust wrapping.  I purchased a mooncake press/mold to shape these. I can do a better job with shaping these before pressing them as several of them had cracks after baking.  As typical of Asian desserts, these are not too sweet but tasty.

Makes 18 50 g cakes or 12 75 g cakes


The recipe is from the book Mooncakes and Milkbread.


Equipment

  • Pineapple cake molds (I have also had success using mooncake and other plunger-style molds)


Ingredients

Pineapple Filling

  • 1 can (14oz or 414 mL) crushed pineapple (strained)
  • 100 g (1/2 cup) granulated sugar
  • 1/4 tsp coarse salt
  • 1/2 tsp vanilla extract

Pastry

  • 150 g (1 1/4 cup) all-purpose flour
  • 20 g (2 tbsp) confectioner's sugar
  • 20 g (2 tbsp) tapioca starch
  • 1/4 tsp coarse salt
  • 113 g (1/2 cup) cold unsalted butter, cut into cubes
  • 1 large egg


Instructions

Pineapple Filling

  • In a medium saucepan, combine the pineapple, granulated sugar, salt, and vanilla extract. Cook over medium heat, stirring frequently, until thick and caramelized. This will take some time since next time I won’t drain the crushed pineapple to try to get more flavour out of it.  Transfer the filling to a heat-proof container and allow to cool completely at room temperature (or refrigerate until ready to form the cakes).

Pastry

  • In the bowl of a food processor, pulse to combine the flour, confectioners' sugar, tapioca starch, salt, butter.  Pulse until sand like then add egg pulsing again until a cohesive dough forms.
  • Transfer the dough to a sheet of plastic wrap, pat into a 1-inch-thick disc, and tightly wrap. Refrigerate the dough until firm but still somewhat pliable, 30 to 45 minutes.
  • Preheat the oven to 350°F and line a large rimmed baking sheet with parchment paper.
  • Use a bench scraper to divide the dough into 18 equal-size pieces (use a digital scale if you have one). Working with one piece at a time, roll the dough into a smooth ball. Place the dough ball on a lightly floured work surface, gently flatten with the palm of your hand, and roll out to a 3-inch round with a dowel rolling pin.
  • Place a teaspoon filling in the center of the dough, pull up the edges, and pinch together to seal. Place the filled cake inside the pineapple cake mold, seam side down, and gently press down with the plunger until it evenly fills the mold. Remove the plunger and transfer the pineapple cake, still in the mold, onto the prepared baking sheet. Repeat with the remaining pastry and pineapple filling. If you have a limited number of molds, keep the dough and filling in the refrigerator until ready to form the next batch.
  • Bake in the molds until the cakes are golden brown, 25 to 27 minutes. Transfer the sheet to a wire rack and allow the cakes to cool on the sheet for 5 minutes. Remove the molds and allow the cakes to cool completely on the rack. Enjoy the cakes fresh or store in an airtight container for 24 hours to allow the shortbread to soften.


Notes

Pineapple cakes can be stored in an airtight container (a resealable bag works great) at room temperature for up to 5 days.

My index of bakes

Benito's picture
Benito

I felt like baking baguettes this week and decided to do something just a bit different, so I present sourdough baguette noir.  So the colour and flavour of these baguettes do not come from charcoal like baguette au charbon vegetal.  No the colour comes from ground toasted black sesame powder that is added to the well developed dough at the end of mixing. This brings an interesting colour to both the crust and the crumb.  The fat from the sesame seeds also cause the crumb to be softer and the crust to be thinner and super crisp compared to my usual SD baguettes.  The nutty scent is evident as soon as the ground sesame seeds are added to the dough.  Each time I did a coil fold I enjoyed that lovely scent.  There is a nice subtle sesame flavour in the baguette.

Levain 

starter 15 g

Water 22 g

AP flour 45 g


Final dough

AP flour 451 g

Water 329 g

Bassinage water 20 g

Salt 9 g

Diastatic malt 5.0 g

Ground Black Sesame 50 g


To make 50 g of ground black sesame add 7.1 g sugar and 42.9 g of black sesames to a grinder and grind until a paste develops.  Can make extra but use about 6:1 ratio of toasted black sesame seeds to sugar since black sesame has a drying effect in the mouth that the small amount of sugar can balance out.


Overnight Levain build ferment 75°F 10-12 hours

78°F 9 hours to peak


In the morning, to your mixing bowl add water and diastatic malt  to dissolve, then add levain.  Use your spatula to cut the levain into small pieces.  Next add AP flour and mix to combine.  Allow to fermentolyse for 10 mins.  Slap and fold x 100 then add salt and hold back water gradually working in until fully absorbed by massaging and then Rubaud kneading the dough, then slap and fold x 200.  Once gluten well developed add ground black sesame, knead until well incorporated.  Can also use your stand mixer.


Bulk Fermentation 82*F until aliquot jar shows 20% rise.

Do folds every 20 mins doing 3 folds

Could do cold retard at this point for  up to overnight. (Aliquot jar 20% rise)


Divide and pre-shape rest for 15 mins

Shape en couche with final proof until aliquot jar shows 60% rise then (optional) cold retard shaped baguettes en couche for at least 15-30

 minutes for easier scoring.  I often do this for convenience as the oven is pre-heating.


Pre-heat oven 500*F after 30 mins add Silvia towel in pan with boiling water.

Transfer baguettes from couche to peel on parchment

Score each baguette and transfer to oven, bake on steel.

Bake with steam pouring 1 cup of boiling water to cast iron skillet dropping temperature to 480*F. 

The baguettes are baked with steam for 13 mins.  The steam equipment is removed venting the oven of steam.  Transfer the baguettes from the baking steel to next rack completing baking directly on a rack to minimize the browning and thickening of the bottom crust.  The oven is dropped to 450ºF but convection is turned on and the baguettes bake for 10 mins rotating them halfway.  The baguettes are rotated again if needed and baked for another 3 mins to achieve a rich colour crust.

My index of bakes

Pages

Subscribe to RSS - Benito's blog