Benito's blog
John Dough has an infection
Unfortunately John Dough my trusty starter of many years has a fatal infection. Finally returning home after 3 months away, I found grey mold on top and some orangey discolouration. That orange mold is said to be quite dangerous so I tossed the whole thing. Fortunately, I had dried him over the past 2 years and kept the dried flakes of starter in ziplock bags in the freezer.
Milk Rolls - IDY version
I didn’t bring my starter down to Fort Lauderdale with me this season, so any bread baking I do here will be with IDY. For our dinner party yesterday I decided to make some simple milk roll. These use a tangzhong and King Arthur’s AP flour. They were soft and fluffy and seemed to be enjoyed by all. The smell of the dough is so different when using IDY, I often forget how different it is from my starter until I use IDY which is rare.
Limoncello Tiramisu
We hosted some friends here in Fort Lauderdale to a dinner last night. For dessert, I kept a recipe for a limoncello tiramisu from Bake From Scratch that I’ve been meaning to try. I made some homemade limoncello since we don’t really drink liquors much and I had a bottle of vodka for years down here that wasn’t even open. I should have planned even further ahead than I did and start the limoncello 3 weeks ahead to give it more time, but it turned out well despite the shortened timespan of 1 week.
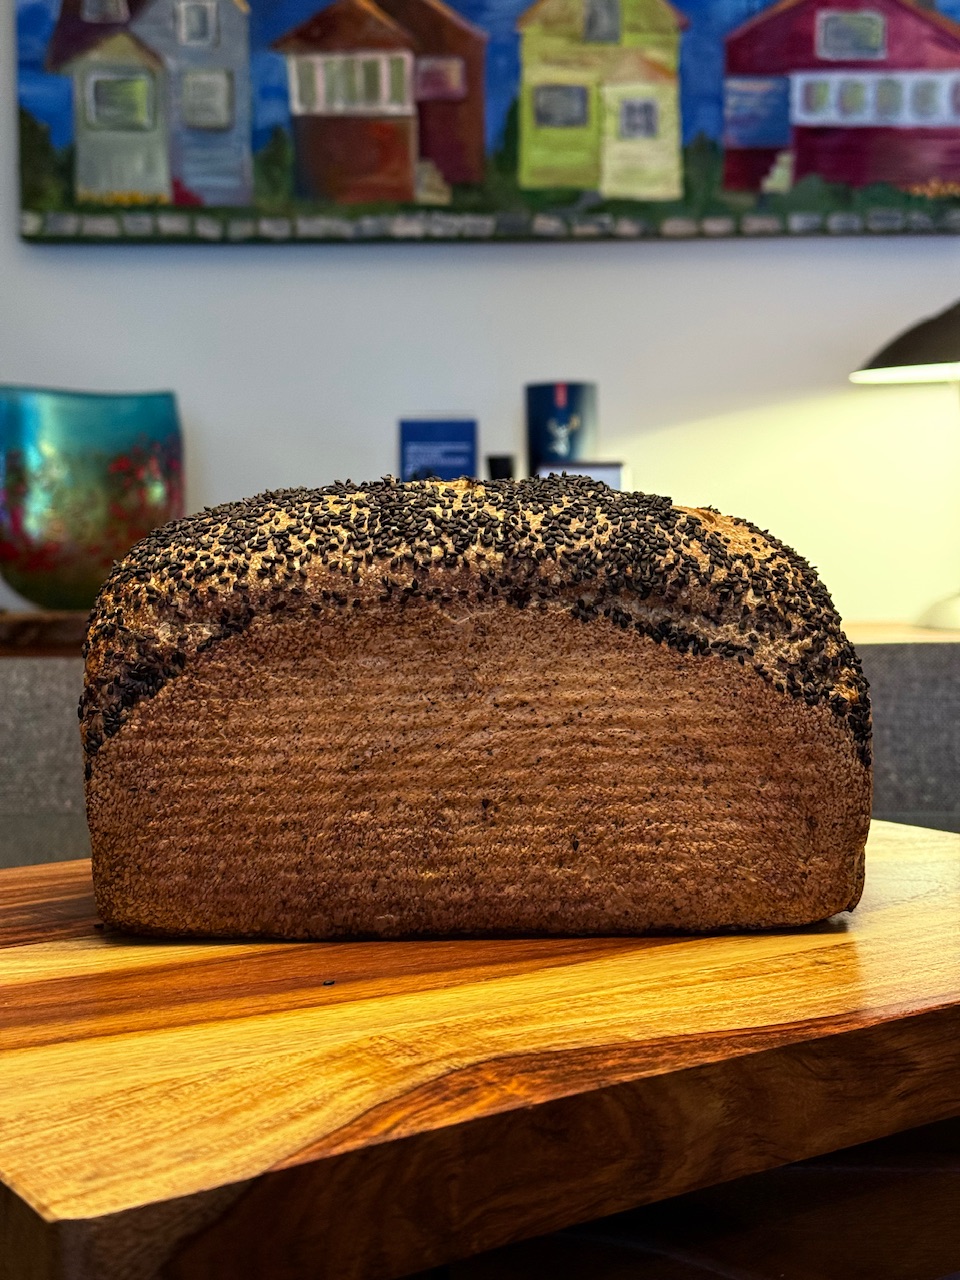
Whole Rye Wheat Sourdough Hokkaido Milk Bread with Sunflower Seeds
Tony’s recent beautiful rye loaf reminded me that I still had some whole rye flour in my cabinet. So for this bake I used whole rye for the tangzhong which is 20% of the total flour and hydrated at 200% of the rye. This creates a cement like consistency to the tangzhong that bakers who work with rye would be very familiar with so you have to get your pot soaking in water or else it can be challenging to clean. I hadn’t baked a 100% Wholegrain bread in quite some time so I was overdue.
Shrimp Scampi Spinach Sourdough Roman Pizza 20% Whole Spelt
I’ve been busy in the kitchen recently and today had two things to bake. For this SD Roman Pizza, I’ve made adjustments to my pizza formula to increase hydration by 3% and increase the PFF from the original 8% to 15%. Next time I’ll up that again just so the dough will be ready for baking early enough for our typical early dinner time.
Panettone - Sourdough - Giorilli - My Second Panettone
After my first rushed attempt at a naturally leavened panettone without much research, I decided to try again, but with more planning and using what I think is a more respected formula, with all due respect to Gluten Morgen. However, I am still reluctant to try to build a LM. I invigorated a new 50% hydration version of my starter over two days with feedings of 1:0.5:1 at 82°F to ensure that it could triple in 4 hours. To deal with the overnight, I decided to try using a sweet 50% starter by adding sugar to equal 50% of the water (not the flour).
Sourdough Panettone
I know panettone really does require quite a lot of planning and research as well as knowledge, so my first time doing it and attempting it last minute probably wasn’t going to turn out well for all involved. On top of that, I didn’t use a well-regarded recipe. Also, I didn’t create a LM and didn’t get good panettone flour. So many strikes against this turning out well.
Hybrid Sourdough Cruffins with Cinnamon Black Sesame Sugar
A friend of mine on Instagram was kind enough to share her formula for sourdough and hybrid sourdough cruffins/croissants. My first attempt at making a laminated dough was my Danish loaf. I unfortunately fermented the shaped dough in its pan at slightly too high a temperature so the better melted and was absorbed by the dough. With that in mind, I chose a season with cooler weather, kept my range hood exhaust fan on, and opened my balcony door a bit to keep my kitchen temperature around 72°F.
Cinnamon Sugar Coated Blueberry Strawberry Jelly Filled Doughnut Cake
I believe I found this recipe in Bake From Scratch if I’m not mistaken. I love the idea of emulating a jelly filled dough in a cake. The filling is homemade and although I increased the fruit in the recipe significantly and dropped the sugar by 50%, the filling I think could still be less sweet. I like making extra jam for my morning yoghurt which is why I doubled the amount of fruit. I also used frozen fruit since fresh is very expensive this time of year. I haven’t sliced the cake yet since it is for a dinner party tonight.