The Fresh Loaf

A Community of Amateur Bakers and Artisan Bread Enthusiasts.

sweetbird's blog

sweetbird's picture
sweetbird

I haven't been baking lately because I'm on a health regimen (for three weeks!) under which I have to jettison all joy-inducing things like wine, bread and cheese, to name just a few. All self-imposed, I'm not ill, just trying to be healthy. So I haven't been as active on the site, but I've been cheering you all on from the sidelines. It's funny, I've done this regimen quite a few times before and don't miss eating bread as much as I miss the process of making it!

Anyway, I'm working on a project of cataloging and repairing some photographs my mother took way before she was my mother, while she was living in Mexico City in the mid 1930s. Her name (later, after marriage) was Eleanor Ingalls Christensen. She had just graduated from Wheaton and would go on to do graduate work in fine art at Radcliffe, and in between took a job tutoring the children of an American couple living in Mexico. She took many wonderful photographs while living there, and now that she's gone I love looking through them. I'm trying to get an album of them ready to honor her memory on Mother's Day (will also try to even out the variation in overall tone; they have aged differently from one another). I thought you 'TFLoafers' might like to see some of the ones related to baking, so I'm posting them here. The one at the top I have framed and hanging in the entrance to my kitchen. It's my favorite.

Below: "The tamale maker."

Below: This appears to be a wood-fired oven.

And this one just because I like it:

Happy baking to you all!

Janie

sweetbird's picture
sweetbird

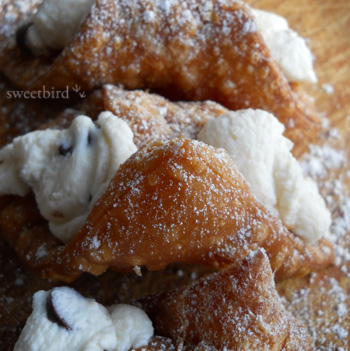
It all started when Angelo put ricotta on the shopping list because he likes to have it on pasta sometimes and we didn't have any in the house. I was the one doing the shopping that day, a day or two prior to Easter, and I found the ricotta on sale, with the large tub marked at a lower price than the small tub. So the large tub went in my basket, and then my mind started dreaming about what I was going to do with all that lovely ricotta.
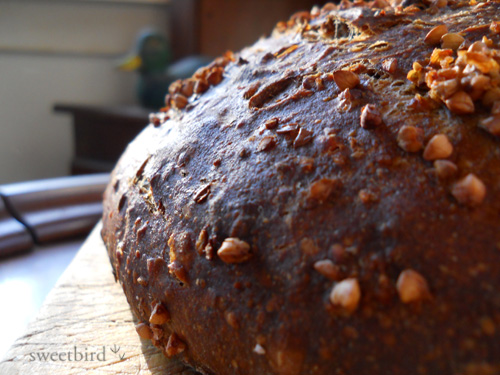
Cannolis turned out to be the answer. I married into an Italian family from the New York City area, and that automatically means that in my lifetime I've eaten a lot of the best cannolis in the world. Since we moved to the country north of the city, we haven't had easy access to all the special things that city people accept as their birthright -- the best bagels, the best pizza and the best cannolis (to name just a few). The cannolis up here are pale, lifeless, overly-sweetened imposters.

So . . . I consulted all my resources and came up with a recipe for shells and filling and made some cannolis on Easter day. I gave myself a mediocre grade that day, even though we both loved the shells and loved the idea of having homemade cannolis (and Angelo sweetly never gives my efforts anything less than flying colors...). But I knew I could do better, so the next day I did more research and picked up some mascarpone, and then I think I hit the jackpot, or at least close enough to make us very happy.

It turns out that regular ricotta is not what you are getting when you buy a cannoli from a high-end shop or restaurant. They're using a special type of ricotta called impastata. It's creamier but at the same time drier than what you find at most markets, and it's used for all sorts of Italian specialties, savory and sweet. I asked around and found out I could place a special order with a local cheese shop, but since I realized I was spinning away from the original idea of using up all the ricotta I had bought, I tried a different strategy. And I think it came out very well, so here's what I did. I drained some ricotta in a fine sieve in the refrigerator for about 8 hours, then beat it thoroughly with the whisk in my KitchenAid to approximate the creamy texture of the impastata, and once it was beaten into submission I added some mascarpone. We thought it was great.

SHELLS (recipe from Chef Anne Burrell, with slight changes):

1½ C. AP flour (I used King Arthur unbleached)
1 Tbs. sugar
½ tsp. ground cinnamon
Pinch of kosher salt
2 Tbs. cold butter, cut into pea-sized pieces
1 egg yolk
¼ C. marsala
¼ C. cold water (approx.)
Oil for deep frying

Pulse the flour, sugar, cinnamon & salt in the food processor to combine. Add butter & egg yolk and pulse until the mixture looks like grated cheese. Add the marsala and pulse to incorporate. Begin to add water in small amounts, pulsing between each addition, just until the dough forms a ball. You may not need all the water.

Knead for about 5 minutes, until silky and smooth. Form a flat disk and wrap in plastic wrap. Refrigerate at least 45 minutes.

Start heating your oil when you take the dough out after its resting period. It should reach 350°F - 375°F. Get your cooling rack ready for the finished shells.

Separate the dough into two pieces and put one piece back in the refrigerator, wrapped. Using a pasta roller (I used my Atlas), roll out the dough, starting at setting #1. I like to put it through a couple of times at that setting, folding it in between times, until it seems completely smooth. Use flour as needed to keep it from sticking on the rollers. When the dough comes out of the roller, handle it with your palms down (in other words, drape it over your knuckles) to avoid stretching it. Continue to roll it thinner and thinner until you have something no thicker than 1/8″. That should be about #5 on the dial (but next time I may try it one notch thinner, or roll it with a rolling pin before cutting into squares).


It can also be rolled by hand if you don’t have a pasta roller.

 Cut into 3″ squares. I used a pizza cutter for this.

Put a metal cannoli tube across the center diagonally and moisten the tips with water or egg white before rolling together. Press slightly on the tips to ensure a good seal. Drop into hot oil and fry for several minutes until well browned. You can fry several at once, depending on the size of your fryer. Push the shells under the oil from time to time to achieve even browning. You’ll notice that the shell stops sending out moisture toward the end of frying; that's a clue that it's ready to come out. Drain on rack. Sprinkle with confectioner's sugar.

 When cool enough to handle, remove the tube and use for the next batch. Since I only have four cannoli tubes, I needed a quicker turnaround, so I removed the hot tubes with rubberized pads and put them in the freezer for a minute to cool down.

Waiting to be filled:

FILLING (enough for about 4 cannolis):

About a cup of whole milk ricotta, drained at least 8 hrs.
          (or ricotta impastata, if available; no need to drain)
1 tsp. Madagascar Bourbon vanilla
1 Tbs. confectioner’s sugar
3 Tbs. mascarpone
Chocolate chips or shaved chocolate (optional)

Whip the well-drained ricotta by itself for about 5 minutes on fairly high speed with a whisk in the KitchenAid. Add the vanilla and confectioner’s sugar and whisk briefly to blend. Add the mascarpone and whisk another 2 - 3 minutes. Stop frequently to scrape the sides down into the bottom with a spatula, and occasionally remove the whisk and shake out the filling that is stuck in the middle. Taste and adjust flavor.

Add dark chocolate bits. (I used Guittard dark chocolate chips.) Hold filling in the refrigerator until ready to serve the cannolis, then pipe into the shells from both sides with a pastry bag or plain plastic bag with a corner cut off.

Above is my second-day filling and below is a photo of my first-day filling. I think you can see the difference in texture. It is lumpy. I hadn't beaten it; just folded the ingredients together with a spatula. And it is brownish because I followed a recipe that added cinnamon to the filling. I won't do that again, because I think the flavor contrast with the shell was lost. A great cannoli has a gorgeous, creamy whiteness to it, and it's perfectly balanced against the flavor and texture of the shell. Here's what the first (much less successful) filling looked like:

The amounts for the filling are approximations. I played around with the flavor and texture until I liked what I had, then I reconstructed it into a recipe. The end result is very lightly sweetened, since that's what we like, but you may prefer to have a bit more sweetening in both the shells and the filling. It's all personal preference at that point. I like using confectioner's sugar because its fine texture disappears in the filling.

There are many ways to flavor a cannoli, including orange or lemon rind, liqueur, pistachios, etc., so it's something you can play with to suit your and your family's palate. In fact, since you shouldn't fill the shells until the last minute (so they don't get soggy), you can mix up a batch of the basic filling and then let everyone create their own filling variation and pipe it into the shells. Kids would love that.

I decided to make cannoli shells with just the first half of the dough. That gave me about 10 - 12 shells, which seemed more than enough for us. With the second half, I rolled out the dough as before but cut it into rough rectangles and dropped it in the hot oil, then sprinkled with confectioner's sugar. I think these would make great appetizers. Hardly any sweetness; just crispy, airy deliciousness. We liked having a few with wine as we were putting dinner together.


One day I'll try it with homemade ricotta, which I love more than any ricotta I've ever tasted!

Happy baking to all,
Janie

sweetbird's picture
sweetbird

I was starting to feel morose as I watched my last bread, http://www.thefreshloaf.com/node/27700/buckwheatapplecider-sourdough, dwindle down to nothing, so I knew I had to make another one right away. I adore that bread! I thought it would be fun to try a Buckwheat-Pear variation, and since I needed to pick up some more hard cider, I decided to see if the Woodchuck company in Vermont made a pear hard cider. I was delighted to see that they do. (And not only that, but they also make a raspberry hard cider -!!- so I may be dreaming up some way to try that out.)

I also picked up some organic dried pears, then started my liquid levain that night and baked the next day. I used the same local raspberry honey as I had done in the Buckwheat-Apple loaf.


I followed the same formula, simply substituting the pear hard cider for the apple hard cider and the dried pears for the dried apples. The only thing I changed was to make sure to dice the pears into smaller pieces, as they seemed to have more heft to them than the apples, and I thought large peices might be hard to chew.


Also, I used KA bread flour, which I had neglected to do the last time, and it gave the dough and the final loaf more integrity. Since buckwheat is a very weak flour it needs a boost from stronger flour; the vital wheat gluten is added to this formula for the same reason.

I had an appreciative audience while I worked, my sidekick Bigwig:

The house was filled with the same deeply wonderful aroma of roasting buckwheat when the bread was baking, and the loaf came out looking exactly the same as the other one, not surprisingly. I could hardly wait for it to cool so I could see what the difference would be in the flavor.

As it turned out, the differences were subtle, but definitely noticeable. The pear bread has a more delicate flavor, and slightly more natural sweetness. It's hard to pick a favorite -- I love them both -- but I would probably give the grand prize to the Buckwheat-Apple and the runner-up with honors to the Buckwheat-Pear. Either one is well worth having around, and the toast is a very, very, very special treat.

I'll submit this to Susan's yeastspotting: http://www.wildyeastblog.com/category/yeastspotting/

Happy baking to all,

Janie


sweetbird's picture
sweetbird

While reading the article in New York Magazine on artisinal bakers in New York City that I posted in the forums yesterday (http://nymag.com/restaurants/features/new-wave-breads-2011-12/), I saw the photo of a buckwheat-pear bread and was reminded of this one that has become a favorite in our house. It's a buckwheat-apple bread dreamed up by a Swiss baker/blogger and posted on yeastspotting a few years ago. The blog post was so charming that I had to try it immediately. I have loved it and baked it many times since.

Here is the original blog post that captured my imagination:

http://oventv.wordpress.com/2009/08/27/buckwheat-apple-sourdough/

I've made some minor changes based on what I have available. Here is the formula that I use:

Buckwheat Apple Sourdough

(by oventv.wordpress.com)

Liquid levain:
100 g buckwheat flour
125 ml hard cider
15 g mature starter (mine was 100% hydration)

Dough:
385 g bread flour
15 g vital wheat gluten
230 ml hard cider (start with 200 ml and add more cider as required)
12 g salt
a little less than 1 tsp. instant yeast (I used SAF)
1 tsp. pear honey ("Birnel"), can be substituted by any sweetener
40 g dried apple rings, chopped
85 g (½ cup) whole buckwheat groats


Mix the ingredients for the liquid levain and leave at room temperature for 12 hours.

Pour 1 cup of boiling water over the whole buckwheat and let it soak for 10 - 15 minutes, until cooked through.  Drain well and set aside.

Mix the liquid levain, flour, vital wheat gluten and cider and let it autolyse for 15 to 30 minutes. Check the consistency and adjust as necessary; you’re looking for a tacky but not sticky dough.

Mix the final dough, but don’t add the apple chunks and the buckwheat yet. I processed for about 6 - 7 minutes on medium speed in my KitchenAid. At the end, mix in the apple pieces and about 2/3 of the soaked buckwheat groats. The rest are reserved for the top of the loaf, if you like (if not, go ahead and add them all to the dough).

Let the dough ferment in a warm environment (I kept it at a temperature in the mid-80sF) for about 1½ to 2 hours, with two folds at 30 and 60 minutes. The original recipe calls for one fold at 40 minutes, but I thought my dough needed more. I let it ferment about 2 hours.

This dough weighs about 1,050 g, and I bake it as one large hearth loaf. It can be divided into two smaller boules if you like. Bench rest and shape, and start your oven and stone preheating to 430°F at this point. I found that the final rise was fairly quick -- about 40 minutes. In fact, it took me by surprise and my oven wasn’t quite ready, so I ended up over-proofing slightly.

I used the dough ball trick that I mentioned in my previous post.


Bake the loaves on a preheated baking stone with steam at 430°F, checking and turning at around 20 minutes and lowering the temperature if the loaves are taking on too much color. I turned off the oven when the loaf reached an internal temperature of 205°F and let it sit on the hot stone with the oven door ajar for 10 minutes.


Ingredient notes:

I use a wonderful hard cider from my part of the world, the northeast U.S.  It's Woodchuck Hard Cider from Vermont and comes in a 355 ml bottle, which is just exactly the amount that is needed for this bread. About one-third goes into the levain and the rest is used in the dough. I use it at room temperature.

The flour I used in this loaf (besides the buckwheat flour) was King Arthur AP, even though the formula calls for bread flour. I would have been better off using the Sir Lancelot I had, or something else to offset the weak buckwheat flour, but even so this came out very well.

I use a raspberry honey from a local beekeper instead of the pear honey in the original formula.

This bread has a deep, somewhat nutty and subtly sweet flavor. It is outstanding as toast. I tried to capture the extra depth of color that it has when it comes out of the toaster. It's spectacular with butter and marmalade or with cheeses. I encourage you to try it! Thank you to the sweet baker from Switzerland (who doesn't seem to be blogging any longer, sadly). I'm grateful for this very special bread.


All the best,

Janie

I'll send this back where it started from, to Susan's yeastspotting:

http://www.wildyeastblog.com/category/yeastspotting/


sweetbird's picture
sweetbird

I can’t seem to resist any opportunity to watch a sourdough culture get its start. I’ve made many starters over the years but it never loses its fascination for me. I love watching the miracle of wild yeast emerge. That’s what drew me to this formula in Joe Ortiz’s book The Village Baker. It had the added charm of being an authentic formula that has been passed down through the ages. According to the author, it has been in use for hundreds of years by home bakers who gathered once a week in the French countryside to bake in communal ovens. I was drawn to it like a moth to a flame.

It takes about 6 days to complete this, but that’s because you’re building a sourdough culture from scratch. You could substitute an already thriving sourdough culture of your own, but you’d miss out on all the fun (and probably end up with a good but different-tasting loaf). This deeply wheaty and tangy levain lets you know, without any doubt, that it is there in the final loaf.

As I did with my previous Joe Ortiz formula, I’ve done metric conversions while still providing his original measurements for anyone who prefers those. I didn’t convert the tiny amounts to metrics. Also, as in my previous Joe Ortiz loaf (the Pumpkin Seed sourdough), I’ve increased the quantity of salt from 2½ tsp. to a rounded Tbs. and have used Celtic salt.

He isn’t very specific about temperatures, instead using terms like “warm” or “very warm.” I used my judgment and generally took “warm” to be in the mid- to upper-80sF and “very warm” to be anywhere from the 90sF up to 100F. Of course, it also depends on the weather, etc., so it’s best left up to the baker.

This makes one large 2-lb. or approximately 1034 gm loaf.

Chef (2-3 days):

78 gms organic whole wheat flour (½ C.)

46 gms warm water (scant ¼ C.)

1/8 tsp. cumin

½ tsp. whole organic milk


First refreshment (18-24 hrs.):

117 gms organic whole wheat flour (3/4 C.)

72 gms warm water (1/3 C.)

44 gms chef (2 Tbs.)


Second refreshment (10-12 hrs.):

115 gms levain from the first refreshment (½ C.)

117 gms organic whole wheat flour (3/4 C.)

70 gms organic unbleached AP flour (½ C.)

115 gms warm water (½ C.)


Dough:

420 gms organic unbleached AP flour (3 C.)

342 gms levain from the previous step (1½ C.)

285 gms very warm water (1¼ C.)

15 - 16 gms finely ground Celtic salt (approx. 1 slightly rounded Tbs.)


For this loaf I used organic Central Milling whole wheat flour and King Arthur unbleached AP four. And spring water, which I always use rather than tap because it gives me better and more consistent results.


To make the chef:

His method (presumably the method used for hundreds of years) is to make a mound of flour on your work table and make a well in the center. Into the well pour about two-thirds of the water, and then add the cumin and the milk. With one finger, start mixing and pulling the flour in from the outer ring. Adjust as necessary until you have a firm but somewhat sticky dough. Knead 5 - 8 minutes.

I did it a little differently: I mixed the flour and cumin in a large, wide bowl, made a well, added the liquids and incorporated the flour from the outer ring slowly with a small spatula. I kneaded it right in the bowl; more of a stretch-and-fold technique than a traditional knead.

Transfer to a ceramic or glass container. (Don’t coat with oil.) Cover and let sit in a warm place free from drafts for 2 to 3 days.

A crust will form on the top, but when you peel that back you’ll find a spongy, inflated chef. He describes the aroma as “slightly sour but fragrant and appealing,” which is exactly what I found.

I did my first refreshment after 2½ days, and that happened to be at 8 o’clock in the morning, which turned out to be perfect timing for the rest of the steps, leaving me with a baking schedule that would suit most of us I suppose, which is to bake during daylight hours. I can’t say I planned it that way but once in a while we non-planners get lucky.

First refreshment:

Remove the crust and take 2 Tbs. (about 44 gms) of the sponge. Make a well of the flour, put the chef into the well and add the warm water. After the chef dissolves, begin to draw in the flour from the sides of the well. You should end up with a very firm but still slightly moist ball of dough. You may not even be able to incorporate all the flour. Try to do so, but don’t worry if you can’t.

Transfer to a ceramic or glass container, cover, and let stand for between 18 and 24 hours. I left mine for the full 24 hours. When ready it will have risen noticeably and fallen a little. It will have a “pleasing, alcoholic aroma.” Mine did.

Second refreshment:

Discard any crust but use most of this levain (should be about 115 gms). Hold back some of the flour until you’re sure that you need it. It should be slightly moist to the touch but firm, as the first refreshment was. Let this rise, covered, for between 10 and 12 hours. Mine became active very quickly and rose like a champ throughout the day. It was raring to go by 10 hours, so I went on to the next step, mixing the final dough, which I did in the evening in preparation for a bake the following day.

Beginning of 2nd refreshment:

After 4 hours:

After 8 hours:

Dough:

Make a well in the flour, add all the levain (broken up into pieces) and all the water and mix as before, stopping when you still have about a cup of flour left to incorporate. Add the salt and then incorporate the rest of the flour. Knead for 5 minutes until firm and elastic.

Let rise, covered, for 8 to 10 hours. It should double. I left mine overnight in a cool room (probably about 66°F, give or take a few degrees throughout the winter’s night) and it had doubled beautifully by morning. It was domed, so it hadn’t begun to fall, and it smelled nicely of fermentation.

Deflate gently on your work surface and save a walnut-sized piece of dough for your next bake. About 44 gms or 2 Tbs. is a good amount. You can refrigerate this for a day or two or begin another loaf right away if you like. To make another loaf you would let it sit at room temperature for 4 to 8 hours and treat it as the “chef,” using it in the first refreshment, then continuing on with this formula.

Pre-shape the dough and let rest for half an hour.

Cool trick: when you’re ready to shape, remove another small walnut-sized piece of dough and put it in a Mason jar (or any medium-sized glass jar) filled with room temperature water. Shape your dough and put the dough and the jar with water together in the same warm place. When the little ball of dough pops up and floats in the water, the bread is ready to bake.

Joe Ortiz calls for an 8 to 10 hour rise, but I found mine was ready to go at 3 hours, so you need to be checking your dough as you always do (even if you’re using the Mason jar trick). The important thing is to have your oven and baking stone ready when your dough is ready, so some educated anticipation is called for. The author makes the point that the final rise plus the previous step (the dough rise) should total 16 hours, but I found my levain to be too active to push it that far. That seems like it has to be left up to the baker.

By the way, for large loaves like this one, I’ve used an Easter basket lined with cloth for years and it works great. It cost about 99 cents. I searched around for one with the size and shape I wanted; this one is nicely rounded from rim to rim, and once the handle was removed it was perfect.

Preheat the oven and stone to 450°F about 45 minutes before you expect to bake, and prepare for steam. Score and load the loaf and adjust the temperature down to about 400°F or 425°F if your oven tends to bake hot. Mine does, so I went down to 425°F. Remove steam apparatus after 10 - 12 minutes and rotate halfway through for even browning. He recommends baking for a full hour, but mine was ready at about 40-45 minutes or so. I turned the oven off and left the door ajar for 10 minutes.

When I transferred this loaf to the peel, I had a bad feeling that I had over-proofed it. It seemed flabby. That may—or may not—account for my inelegant scoring:

I didn’t think I was going to get any oven spring, but I ended up getting a moderate amount. Not perfect by any stretch, and a bit of a clumsy shape, but not a disaster. The color was deep (somewhere between the film noir shot at the top and the sun-drenched shot just above) and the crust was nicely blistered with signs of fermentation. The real joy came when I tried my first slice. I LOVE this bread! It has a genuine, pronounced sourdough tang and the flavor of well-developed, long-fermented wheat, which is brought about by the leisurely development of the levain, but also by the generous proportion of levain in the final dough.

My husband Angelo especially loved it too. He has a wheat sensitivity (but not an allergy, thank goodness), so he’s not supposed to eat much wheat, but he can’t resist trying some when I bake. I am thrilled with it and will make it again and again. Someday I’ll try it with one of my standard starters and report back on the results. At the moment, I’m in the process of refreshing the “old dough” from this bake in preparation for another loaf in a few days.

This little sweetie seems to like the smell of freshly baked bread, because she has a habit of showing up when I do my "photo shoots." Now I have a good shot of her face so I'll know who the culprit is if some of my bread mysteriously goes missing!

Happy baking to all,

Janie

p.s., submitted to Susan for yeastspotting http://www.wildyeastblog.com/category/yeastspotting/

sweetbird's picture
sweetbird

I’ve made this bread before and loved it, just as it’s written up in Joe Ortiz’s wonderful book, The Village Baker. His formula begins with a sponge that uses commercial yeast and it results in a delicious bread. But I was recently looking for a way to use some active sourdough starter (I hate to waste it!) and decided to try it as a sourdough loaf. For some reason it escaped my notice until after I had embarked on my experiment that he already has a sourdough version of this bread in the book(!), but it was interesting to see how mine differed from his. (For example, he uses a full cup of 100% hydration sourdough starter, making adjustments to flour and water to compensate, and mixes the sponge a bit cooler than I did mine; I will try his method the next time I make this. I also use a bit more salt than he calls for; he calls for 2¼ tsp. in the direct method and 2½ tsp.—scant—in the sourdough method. I use about a tablespoon, and I like Celtic salt in this.)

This bread’s most unusual (and, I think, brilliant) feature is the seed mixture, which Joe Ortiz says he learned from Kurt König, a baker from the Bavarian village of Miesbach, who describes himself as “your organic grain madman.” There is a fun and fascinating profile of Kurt König in the book. His bakery has existed in the same spot in Miesbach since 1650! Anyway, the seed mixture is deeply toasted and has the added magic of soy sauce, which is mixed and toasted with the sesame seeds. I want to try this mixture in a Tartine loaf one of these days.

The Village Baker came out near the beginning of the artisinal bread revival in the U.S. (copyright date is 1993), and I think that’s probably the reason that his formulas are based mostly on measures rather than weight, since weights would have seemed strange to most home bakers at that time. Now I don’t think you’d ever find a serious book without weight formulas. In any case, I’ve converted it and will also try to indicate the measurements in case that’s helpful for anyone.

By the way, for anyone not yet familiar with The Village Baker, one interesting part of the book is the final section of professional formulas (which are given in weight) and which result in serious amounts of bread!

Here’s the formula & method I used for my sourdough version of this bread:


Makes 1 large 2-lb. loaf or 2 smaller boules in 8″ brotforms

Seed mixture:

75 gms (½ C.) unhulled sesame seeds

2 tsp. soy sauce (I used San-J naturally fermented tamari)

152 gms (1 C.) pumpkin seeds


Rye sour (sponge):

25 gms sourdough starter (100% hydration)

566 gms (slightly less than 2½ C.) warm water

198 gms (1½ C.) organic dark rye flour

134 gms (slightly less than 1 C.) unbleached organic AP flour


Dough:

All of the rye sour from previous step

374 gms (2½ C.) unbleached organic AP flour

11 - 12 gms fine Celtic salt (approx. 1 Tbs.)


To make the seed mixture:

Toss the sesame seeds with the soy sauce until well coated and toast them in a 350°F oven for between 15 and 20 minutes until just browned (not too dark). Toss a few times while roasting to keep things even. Toast the pumpkin seeds dry in a separate pan at the same temperature for 10 to 15 minutes, stirring around a couple of times for even browning. Don’t worry if some are darker than others—that’s normal—but don’t let any of them get too dark or they’ll be bitter.

Let all seeds cool down completely, and then grind half the sesame seed mixture and one-third of the pumpkin seeds until you have a medium powder. Add that to the whole seeds, mix together and set aside. This can be done the night before when you set up your rye sour or can be done the morning of the bake.

To make the rye sour (sponge):

Mix all the ingredients together, cover with plastic and let sit overnight at moderate room temperature for 12 hours.

To make the dough:

Transfer the rye sour to the bowl of your stand mixer, but begin the process by hand with a wooden spoon. Slowly add the flour, a handful at a time and stir vigorously after each addition. When you still have about a cup of flour left, add the salt. At this point I switched over from hand mixing to KitchenAid mixing (with the dough hook) and continued to add the flour. I don’t really see any reason why this couldn’t or shouldn’t all be done in the KitchenAid, but Joe Ortiz recommends hand mixing the whole way. The dough will be moist and sticky. The seeds will absorb some of that stickiness in a few minutes, so don’t give in to a temptation to add too much flour. You’re aiming for a slightly stickier dough than you might otherwise want. I did find that I needed to add a few tablespoons of extra flour, though, in spite of that. I decided to add whole wheat flour for my last few tablespoons because I thought it would be delicious in this bread. I didn't add that to the formula, since that's based on how your dough performs.

Flatten the dough on your board and add all but ¼ cup of the seed mixture. Incorporate by kneading and folding into dough. This is difficult! Next time I will try adding the seeds at the end of the KitchenAid mixing and incorporating them gently on a very low speed.

Here are the seeds waiting to be incorporated:

Here is the first attempt at incorporating them:

Here they are trying my patience:

And here is the finished dough trying to pretend it was always a little angel and never once misbehaved:

Place in lightly oiled bowl or container of some sort and bulk ferment for about 3 hours at 85° or so, with two stretch-and-folds at 45 and 90 minutes.

Remove to lightly floured board and roughly pre-shape. Cover with plastic wrap and allow to rest for half and hour. Shape into desired shapes, coat the loaves with the remaining seeds* and let rise in a warm area until ready to bake. Mine took a little less than an hour and a half.

* Note about coating with seeds: I lightly sprayed the loaves with water and turned them over into a shallow bowl with the seeds, but I don’t think I’ll do it that way again. They didn’t adhere too well and didn’t look attractive. In fact they looked downright ugly. Joe Ortiz recommends glazing the top just before they go into the oven with 1 whole egg whisked with 1 Tbs. milk, then sprinkling with the seeds. I'm not a huge fan of glazed breads but this is probably a good idea! However, be careful about the baking temperature. He bakes at 350°F (seems like a low temp. to me), and that may be because of the glaze. I baked (without the glaze) at a more normal temperature for hearth bread.

Begin preheating your oven and baking stone to 500°F about 45 minutes before you expect the dough to be ready, and prepare for steam. Load the loaves and lower the temperature to 450°F. Bake for 10 - 12 minutes with steam and then remove the steam source. Turn halfway for even browning. Bake for about 30 - 35 minutes more or until internal temperature is at least 200°F. Let sit in hot oven with door ajar for about 10 minutes. Cool completely on rack.

I don’t like to badmouth any of my bread “offspring” but I have to admit this one just wasn’t a pretty sight coming out of the oven. It looked like something that had been dug up out of the earth with mud and twigs and pebbles still clinging to it. I was a little crestfallen when I first saw it. But once it cooled down and I got to taste it, my happiness returned. It wasn’t perfection, but I loved the tang of the sourdough against the texture and flavor of the seeds, which are deepened by that tiny bit of soy sauce that is roasted into them. And the best part was that it turned out to be one of those breads that improved with age. I liked it better each time I tried it. It was baked on a Monday afternoon, and my favorite slice was on Wednesday morning.


Now I want to get this post finished so I can hurry up and write my next one. I took another Joe Ortiz loaf (a Pain de Campagne) out of the oven last night and it's wonderful! I’m looking forward to telling you about it.

All the best,

Janie

sweetbird's picture
sweetbird

I’ve been raiding my freezer for slices of homemade bread lately and decided it was time to make some fresh loaves. There will never be a shortage of frozen homemade bread in this house but there are times when I just can’t stand it—I have to bake! I picked Glenn Snyder’s San Francisco Country Sourdough as my project and I’m so glad I did. It’s a lovely formula. Here is a link:  http://www.thefreshloaf.com/node/25402/sf-country-sourdough-%E2%80%93-my-best-ever%E2%80%A6not-sure-why.

I had made this once before with excellent results, but ended up making some minor changes both times. Not from any desire or need to improve the formula, but just because of “conditions on the ground” as the generals say in wartime.  First time around I had to refrigerate the dough after 1½ hours of the bulk ferment. I took it out in the morning, did a rough shape, bench rest and final shape and it came out beautifully.


Flours used were King Arthur AP, Central Milling organic whole wheat, Bob’s Red Mill dark rye. Also spring water and Celtic salt. My sourdough culture was at 100%, so I made a minor adjustment to the water to compensate (Glenn calls for 75% culture).

This time I decided to follow a kind of Tartine-style handling of the dough. After the autolyse I added the salt (in my case I used fine Celtic salt) along with a tiny bit of water (I had held a little back in the earlier stage) and did a rough mix by hand in the bowl, finishing up with quite a few stretch-and-folds. Since I hadn’t mixed it quite as thoroughly as the formula calls for, I changed the S & F schedule and did one every half hour for the first two hours of the bulk ferment, then I left it alone for the final hour. At the end of that time, it was lively and pillowy and it smelled of gentle wheaty fermentation.

I divided into two halves and pre-shaped, then left it to rest for about 45 minutes. Then shaped into two boules and placed into 8″ brotforms. I put one in the refrigerator and kept one out to rise and bake.

Since I was already in a Tartine frame of mind, I decided to bake the first loaf in my Dutch oven. Preheated the oven to 500°F with the Dutch oven on the lowest rack. Turned the boule out onto a rectangle of parchment paper lightly dusted with a 50/50 blend of AP flour and white rice flour, took hold of the corners and lowered it—carefully!—into the Dutch oven. Then I closed the lid and returned it to the oven, reducing the temperature to 450°F. Glenn calls for a reduction to 460°F but I though it best to go a little lower since I was using a blazing hot Dutch oven. As it turned out, I could have reduced it even a bit more; the lower crust was somewhat overdone.

That loaf was a wild thing, with explosive oven spring. It felt almost weightless when I removed it to the cooling rack. As with my Tartine loaves, this had gorgeous, deep caramelization. The flavor once it cooled was a real delight—a crust that crackled when I cut through it and released deep caramel-wheat flavor when I bit into it. The interior was sweet and somewhat moist. Not much sourdough tang. I assumed I would get more of that in the loaf that was resting in the refrigerator overnight, but that turned out to not really be the case.

I baked the second loaf the next morning in the more traditional way on a heated baking stone on the middle shelf, with steam for the first 12 minutes. It also had exuberant oven spring, but was a little more controlled. I had taken it out of the refrigerator for about a half hour before baking, as it seemed to need it. This was my favorite of the two loaves. An incredibly deep, blistery, crackly mahogany crust, loaded with flavor and texture, with a soft but substantial interior. I really loved this crust, as you can probably tell from the overabundance of pictures! This one also felt as light as a feather after baking (+ its 10 minute rest with the oven off and the door open).

This is a great sandwich or toasting bread, and last night I made croutons by roughly cubing up several slices, crust and all, and putting them in a hot cast iron frying pan with extra virgin olive oil, garlic, parsley and basil. These got sprinkled over a homemade escarole-bean soup and made for a memorable, comforting meal on a wintry day.

Thank you for the formula, Glenn!

All the best,  Janie

p.s., sending to Susan for yeastspotting http://www.wildyeastblog.com/category/yeastspotting/


sweetbird's picture
sweetbird


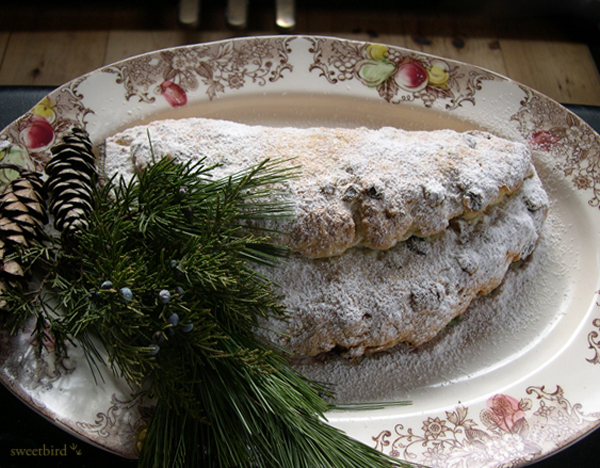
One of my most beloved cookbooks is the original Vegetarian Epicure by Anna Thomas. It began its life with me in San Francisco in the early 1970s and has traveled with me ever since, now nestled on a bookshelf in upstate New York. It is in tatters with no binding left, but that only makes me love it more. It is well used.

 I’ve made the Christmas Stollen from that book every year since I first got it, and it’s something that my family and I look forward to throughout the year. Because it’s an unyeasted “quick bread” recipe, it’s different from any Christmas Stollen I’ve ever tried, and from the first bite it stole my heart. It’s deeply rich from the butter and cream cheese, gently sweet from the fruit, rum and a bit of sugar, all balanced by the tang of lemon, mace and cardamom.

 A few years ago I decided to write a note to Anna Thomas letting her know that her stollen had become a treasured tradition in my family, and to my delight she wrote back a lovely note! Her newest book Love Soup is wonderful too, by the way.

 I made some changes way back in the 70s based on availability and personal preference and since it turned out so well I kept making it the same way. Here’s the version I’ve made all these years:

 Christmas Stollen

(my adaptation of Anna Thomas’s recipe from The Vegetarian Epicure)

  w/metric conversions:

  352 gms (2½ C.) unbleached AP flour

2 tsp. baking powder

125 gms (¾ C.) (or slightly less) sugar

½ tsp. salt

½ tsp. mace

seeds of 5 - 6 cardamom pods, crushed (I usually use green) -or- ¼ tsp., rounded, powdered cardamom

100 gms (¾ C.) almond meal (or ground blanched almonds)

½ C. butter, cold

226 gms (1 C.) cream cheese (reduced fat OK), softened at room temperature

1 large egg, room temperature

½ tsp. pure vanilla extract (I use Madagascar Bourbon vanilla extract)

1/3 tsp. pure almond extract

2 Tbs. Bacardi light rum (original recipe calls for brandy, which I haven’t tried yet)

85 gms (½ C.) seedless dark raisins

85 gms (½ C.) golden raisins

finely grated peel of 1 organic lemon (use a rasp for the finest consistency)


Preheat oven to 350°F.

 Sift together the flour, baking powder, sugar, salt, mace and cardamom. Stir in the almond meal. Cut the butter in with a pastry blender until mixture resembles coarse sand.

 In a blender, cream the egg with the softened cream cheese, vanilla, almond extract and rum. Pour it into a bowl and mix in the fruit and lemon peel. Gradually stir in the flour mixture until everything is more or less incorporated, then turn it onto a lightly floured board and knead it for a couple of minutes -- just until smooth. At first it’s more like “smooshing” or squeezing things together than kneading. It will seem dry and you might have the urge to add some liquid, but resist if you can.

Flatten into an oval about 10″ long by 8″ wide. With the blunt edge of a knife, crease it just off center, length-wise. Fold the smaller side over the larger side and form it into a slight crescent moon shape.

Bake in preheated oven for about 45 minutes, or up to an hour, depending on thickness. This year I made mine a little thicker than usual and needed the full hour. Turn at 20 minutes. Watch closely after 40 minutes or so and protect it with strips of aluminum foil if it’s getting too brown at the edges. Allow it to cool before dusting it with confectioner’s sugar.

Happy New Year to all!     Janie


NOTE: The differences in my recipe from Anna Thomas’s original are:

 - I use light Bacardi rum; she uses brandy (same amount)

- I omit the candied lemon peel and substitute grated peel of 1 lemon

- I use seedless dark raisins instead of currants (same amount)

- I reduce the sugar somewhat (¾ C. is the original amount, but I usually use a well rounded ½ C.)

- I use Bob’s Red Mill almond flour if I have it available because it’s good and it’s easier than grinding blanched almonds

- I usually substitute slightly reduced fat cream cheese

sweetbird's picture
sweetbird


I've loved this site from the sidelines for so long and have been nourished again & again by everyone's passion and generosity, so I thought it was high time to stop being an innocent bystander and post something. I pulled two beautiful breads out of the oven tonight based on this formula by txfarmer: http://www.thefreshloaf.com/node/19830/36-hours-sourdough-baguette-everything-i-know-one-bread. What wonderful bread!

My plan was to follow the formula exactly but my starter was pokey on the morning that it was destined to meet the cold autolyse, so I had to leave the autolyse mixture in the refrigerator for 5 hours longer than planned, for a total of 17 hours. Finally the starter was ready (after getting a boost from a fresh feeding) and I worked it with the salt into the cold flour & water mixture. I almost wanted to apologize to it for the shock of the cold! Because the two mixtures seemed to resist being joined, I decided to do a Dan Lepard-style stretch & fold every 10 minutes for the first half hour, then settled into the s&f every half hour in tx's formula. That worked well. Then the dough went into the refrigerator for its 24-hour cold rise.

But because the extra-long autolyse threw my timing off (and because I had to bake today, not tomorrow), I realized that I would have to take the dough out today before the full 24 hours had passed, judging that it was also going to need some time at room temp. I took it out at around the 18 hour mark, gave it about 2-1/2 to 3 hours at room temperature and then went on with the dividing, pre-shaping, resting & final shaping. It was a lovely, soft, active dough.

My shapes are somewhere between baguettes and batards because of the constraints of my oven and baking stone. I tend to make mostly boules and now realize I need to work on my shaping and scoring of this type of bread! Because they were a little fatter than tx's baguettes they needed a longer bake time, and at the end I turned the oven off and left the door ajar with the baguettes still on the stone for about 5 more minutes. As it turned out, I could have left them a little longer to allow the interior to dry more. But . . . wow . . . the flavor!

Crackly crust, creamy crumb, weak-in-the-knees flavor. My husband and I had planned on Indian food for dinner but couldn't resist some slices before dinner.

My camera tends to turn everything into a golden wonderland in low light, but here are some more photos. I hope I haven't made them too huge. Tried to follow the 800 x 600 px rule but they seem absolutely gargantuan.  I'll need to work on that for next time.

Thank you for this bread, txfarmer!! And thank you all for your constant inspiration.

All the best,  Janie

Subscribe to RSS - sweetbird's blog