The Fresh Loaf

A Community of Amateur Bakers and Artisan Bread Enthusiasts.

tattooedtonka's blog

tattooedtonka's picture
tattooedtonka

My grandmother used to make this back when I was a wee little runt.  She called it Peek-a-boo.  So thats what I call it.  It has a very simple list of ingredients and the kids love it (and so do I).

This is a Cherry Peek-a-boo

The ingredient list-

2 Sticks butter  = 226.8 Grams = 8oz.

2 Cups Sugar   = 426 Grams    = 15oz.

3 Eggs

1 Teaspoon Vanilla Extract
3 Cups Flour    = 492 Grams    = 17.3oz.

And then 2 cans of your favorite pie filling

20-21oz. Cans  = 567-595 Gram Cans

Directions are just as easy.

1) Cream butter, sugar, eggs, and vanilla.

2) Mix in flour until all incorperated

3) Spread 2/3 of dough into a 12x18" greased cookie sheet

Spread both cans of pie filling across top of dough.  Then take remaining dough from bowl and flatten little pieces across top of filling.

Bake at 375' F. for 30 minutes (tops should be lightly browned)

Final product is kind of like brownie consistency. The Peek-a-boo is named from the fruit kinda peeking through the dough on top.

Not very fancy, but goes good with vanilla icecream or as a stand alone dessert.

Blueberry and Cherry Pieces

Total prep time - 10 minutes and thats doing everything by hand (Remember, I dont use a mixer for anything)

Bake time- 30 minutes

Cool time- 10 minutes

Time for kids to realize its done- 5 minutes before it even comes out of the oven... ;)

TT

tattooedtonka's picture
tattooedtonka

Here are some photos of this weekends bake.

I started off with a sponge being made on Friday night for the cranberry bread.  I used a recipe for Pain Rustique bread with modifications made to it for my purposes.  On Saturday I mixed up the the final dough and let it set while I made a couple bagel sponges


Mixed up Cranberry bread dough.


Dough and bagel sponges


Bagel balls


Finished cranberry bread


Now the top bagel is one of a batch that I let set in the fridge for 8 hours after shaping.  The Sea Salt bagel on the bottom is from a batch I boiled and baked 20 minutes after shaping.  You can see how the seams go away after setting in the fridge.  Also the color difference in the Sea Salt one is due to an egg wash being put on the bagel with salt.  I have found this works the best for me so I dont have the salt absorbed into the bagel during baking.  The plain bagels have no egg wash.

I dont mind the seams too much, especially when I am out of fresh bagels...

Here is the photo of the pickled garlic, from Saturdays pickling fiasco..


TT

tattooedtonka's picture
tattooedtonka

Well, I dont want to hijack Erics thread so I figured I would put up a new blog for my latest crazy idea.  Pickled garlic.  Now I know, its not bread, but heh, I had bagels proofing when I got into this so it must count somehow.

After talking Garlic with Eric, I thought to myself "self, I can surely figure out pickled garlic". And off to the world wide web I go.  I get hit with about a hundred or so recipes, not two alike, so great.  Lets go with what seems to be the best rated.  So I settle in on a nice Garlic festival website, with a pickled garlic recipe that the folks seemed to love.  Now here is the basis of the recipe.

4 cups White Distilled Vinegar

1 1/3 cup sugar

Then anykind of flavor additive you would like to add, mustard seed, hot pepper, dill, whatever.

You take a sterilzed jar, and you mix up your liquids, bring to a boil in a non-metal pot (which I used a teflon coated pot) And once at boil, you boil for 5 minutes.  Then you add your peeled garlic cloves and boil for an additional 5 minutes.  Then you pore into your jars, put the covers on and place in the fridge for 3 weeks before consumption.

Easy enough it sounds right.  So here I am with 30 heads of garlic, and the big grin on my mug of me making pickled garlic.  After setting at my kitchen table for what seemed like 30 or 40 years I look into my jar to see I have only peeled about 25 cloves.  So I do what any smart fella does and I recruit backup.  In comes my 13 year old daughter, who after looking at me like I just told her she had to change the oil in the truck in a snow storm, she sets in to help.  So now the two of us continue to peel garlic cloves.  The outer dry parts come off easy, but the fine skin, well that just about makes a man cry after a while.  So after what seemed like forever, I have 4 jars of peeled garlic cloves.  I swear my kid grew a couple inches while we were there.  So now onto making the liquid.

Now let me let you in on a little secret.  When you boil vinegar, in your kitchen, for 10 MINUTES, you should probably invest in a gas mask.  Or maybe a jet engine to force fresh air through your home.  Now being a fairly smart fella, I was really surprised to see that I didnt see this coming.  SO after about 6 minutes into boil, my daughter pleads mercy, and begs to be released from the kitchen.  I kindly inform her that "darling, were in this together, you stay.".  Sometimes being a parent is rough.....

Now at 7 minutes in I add my flavorings.  I like hot and spicy so in goes.  2 Teaspoons Mustard Seed, 2 Teaspoons of my own grown, and ground Thai hot pepper, and 3 cut up Habeneros.  So by minute 8 you can already imagine what my kitchen is like.  If you close your eyes and imagine a swat team is about to raid your house but before they enter they throw 4 tear gas grenades in through the open window that you have because you are trying to get a strong vinegar smell out of your kitchen. 

So now, my back door is open, my 2 kitchen windows are open, snow is blowing in through the windows, and my daughter and I are trying to maintain some sort of normal breathing pattern.  The 10 minute mark couldnt have gotten there any sooner.  When that buzzer went off saying my 10 minutes were up, the time that pot came off the stove to the time the 4 bottles were filled, outsides wiped clean, and into the fridge was about 2.5 seconds.  Well, maybe not not quick, but I barely remember any of it, it was so fast.  The dogs are no where to be found, they are hiding in some far off part of the house.  My youngest is watching tv in the living room in her jacket, and thank god my wife was out for the afternoon doing a craft fair.  We cleaned up my mess, I went back to my bagels, we shut the windows after our house temp dropped to about 40.  And 5 hours later when my wife returned she says "Honey, the house kinda smells like hot wings" 

Me and my great ideas.   I'll post photos later today of the end results, along with my Cinn./Cranberry bread I made (another idea).  The worst part is I have to wait 3 weeks just to see if the garlic is any good.   Ha,ha,ha......

TT

tattooedtonka's picture
tattooedtonka

After a lonnnnggg summer of gardening, working on the house, and work in general. I am back, and I am glad to see alot of the old gang still here.  JMonkey, ehanner, browndog, AnnieT, bluezebra, bwraith, and the rest...HELLO... Nice to see you still around. And of course hello Floyd, nice to see some of the neat tweaks to the webpage.  To everyone I have missed out on meeting, hello, I look forward to talking bread with you.  Hope everyone had a great summer...... Its nice to be back.

tattooedtonka's picture
tattooedtonka

I dont really know if these photos will help anyone. I wanted to post them so some folks who may be having problems with shaping batards and baguettes and transferring to peel could see how I do it (I'm not a pro, I'm just using this as the way that works for me). And on with the show....

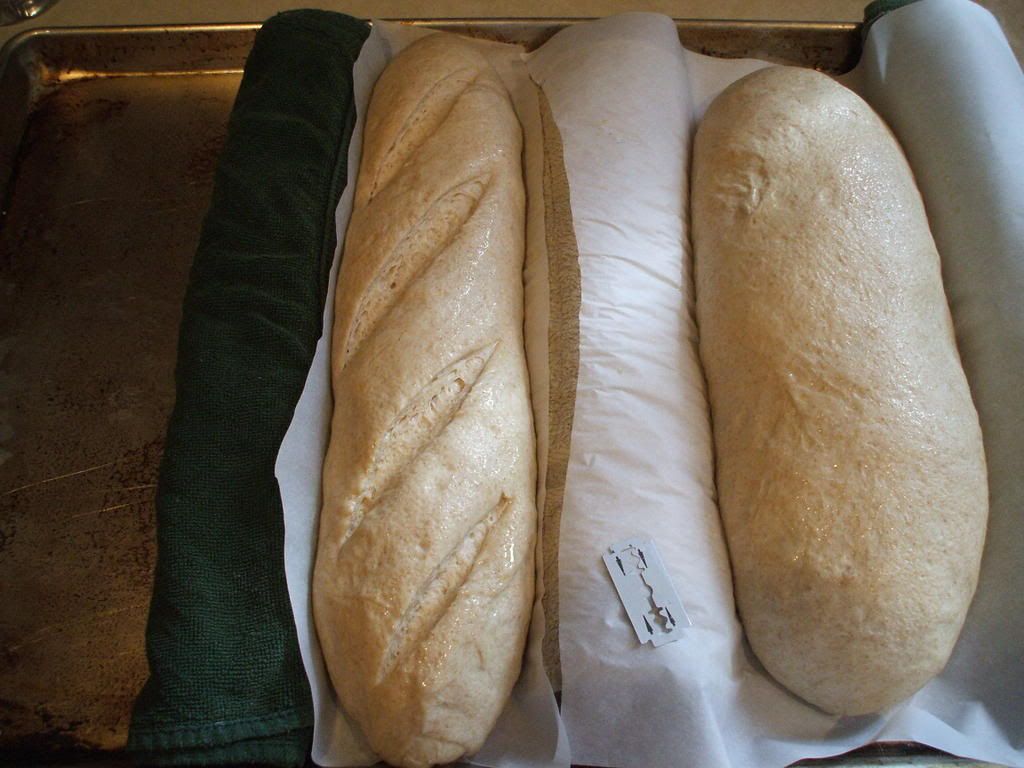
I start with a 3/4 sheet pan and take a dish towel and roll it up into a cylinder laying it against one side. Then I take a sheet of parchment paper and lay across the top of the rolled towel. I then take another towel and roll it up and place it under the paper against the first loaf. Then repaeat first step in placing next loaf, followed by another towel.

After the loaves are done with their final rise I use a razor to cut the paper around the edges of the loaf.

Second loaf is done the same way.

After the paper is trimmed I transfer loaf, paper and all onto peel.

Half way thru bake I turn the loaf 180 degrees on the stone pulling the paper out during the process.

And here is the sourdough baguette coming out of oven.

Here is the sourdough batard after bake.

And another photo of baguette after bake.

Here is a hodge-podge of this weekends bake. Whats left of my daughters two white loaves. Whats left of my Sourdough boulle, a SD batard and baguette. And a dozen bagels getting ready to go into the boil.

And I still have another boulle of sourdough in the fridge waiting to be baked after chillin for another 24hrs. I think I need to start thinking about wearing a kilt. Its getting awfully warm by mid day in my kitchen. And from what I understand, I can even get one of those cool little hanging pockets for the front to keep my measuring spoons in...... :-)

TT

tattooedtonka's picture
tattooedtonka

I started my weekend bake on Fri. night by mixing up a starter for a Hamelman Sourdough.  Sat. morning I started mixing the final dough when my 13y.o. daughter came in the kitchen and asked if I was making any of my Plain ol' White Bread.  Since I was already dedicated to what I was into I told her to wash up she was gonna make some bread.  I had her weigh out each ingredient as I read her my recipe, and told her how to mix, then knead and such.  She really got into it and once it was in the bowl I wrote out each of her times she needed to degas and fold.  She did very well, and is very proud of her results, which she should be.  Made two nice loaves, one of which was given away to a guest we had last night.  The other is here.

After all was said and done, I was able to get my Sourdough fired up and here is a final loaf of it.


Its probly not the nicest sourdough ever made, but boy it sure is good. 

So far today I have my Reinhart SD coming along from Crust and Crumb.  Made the stiff starter last night, making the final dough today, suppose to bake following day from making final dough.  I believe that I will end up baking it later tonight though.

Here it is before and after final mixing.

And here it is after rising

TT

tattooedtonka's picture
tattooedtonka

After some encouragement and ideas from BlueZebra, and Kjknits, here is an oddball bread.

Apple-Onion-Bacon Sourdough

The brownish color crust is due to large amounts of Spelt flour.


In below pic there is Apple to the right, Some onion and bacon on the left, and you will see bacon up top. With a mild apple cider flavor throughout. In case you were wonderin..


Well, if your interested in the recipe, dont even bother askin, it all went by in a blur.  I COULD give the recipe for the original Normandy Apple Bread, but not this....I even measured all the ingredients on a scale, and each time I thought something along the lines of "ok as soon as I add this in I gotta write down the amount" but it was kinda like, Attention Deficit.  Oh look at the apple cider, boy that stuff is good, where was I, oh yeah I gotta put in more flour.. Dang it forgot the weight of the bacon..

So now Im thinking, heh this might work...

So now I have this mixed and kneaded mass, and split it in half.  Placed two halves in bread pans, let rest for 1 hour 30 minutes, and fired it right into the oven at 375 for 50minutes.

And the best part is, its great........Dang I wish I wrote it down....

TT

tattooedtonka's picture
tattooedtonka

Today was a good day so far.  I was able to produce two great loaves of Normandy Apple Sourdough, two loaves of Brownbread, and I have a Olive Sourdough in the fridge for baking in the morning.

Here is the Normandy Apple Sourdough, using my starter Miracle Max for the build.

The crust browned up real nice, but I feared it may be a bit too crunchy.  As the loaves cooled though the crust softened up nicely.  The crumb is nice and moist with the apples making a really nice kick of flavor.  The loaves arent even fully cooled yet and the first loaf is half gone.  The family loves it.  And to think they all looked kinda puzzled when I had so many starters growing in the kitchen.

Next up was Boston Brown Bread.  I deviated from the recipe in that I used frozen blueberries in place of dried ones.  I thawed, drained excess juice and then added with my liquids.  I was hoping for a very overpowering blueberry flavor.  I didnt quite achieve that though.  The molasses in the recipe came out a little stronger than I would have thought.  They are good still the same, but not exactly my cup of tea.


Okie Dokie, after that, I have a loaf of Olive Sourdough that has already been shaped, it is just doing an overnight retardation in the fridge.  I will update the finished product after Mondays Bake.

TT

tattooedtonka's picture
tattooedtonka

Well today has not been my day.  It started out o.k., fed the starters, took my photos, and set out to start constructing a Marbled Loaf.  The goal was to take 3 different colored doughs, (green, white, pink) and mix them into a wonderful round loaf with the colors swirling throughout.

Well I got as far as having all 3 doughs made out.  The green dough was a Spinach dough.  The white was a plain sweetened dough, and the pink was a tomato dough.  This recipe was out of Bernard Clayton's "New Complete Book of Breads". 

Now I have seen photos of this finished bread in another book at the bookstore, but it didnt post a recipe for it.  How elated I was to find it in this book.  However, soon after the three were in their seperate bowls my mutitasking began.  Unfortunately, my muti's surpassed my abilitites to task.  And my poor doughs sat waaayyy tooo looonnnggg before I was able to get back to them.  About 2 1/2 hours too long.  When I finally got back home, I did what I could to salvage my debacle.  I just did a simple braid, baked and hoped for the best.

Oh well, I will try again next weekend.

I just cut open the loaf, it tastes good, the spinach section is my favorite.  The tomato, would be my least favorite.  This however could be because of my errors.  I will try this again, just to see what it tastes like done correctly.


tattooedtonka's picture
tattooedtonka

Here is my Mocha Java bread.  The bread has the color of WW but only contains white bread flour.  It is infused with chocolate and coffee.  The crust is soft, with a very soft creamy crumb that has melted chocolate and caramel throughout.  With a nice flavor of coffee to go with the chocolate.

Sponge:

  • 20oz. Bread Flour
  • 20oz. Brewed Coffee; Cooled ( I used Green Mountain Coffee Roasters - Mocha Java)
  • 1oz.   Finely ground coffee  (same as above )
  • 1/2 Teaspoon Instant Yeast

Mix all together and let rest on counter for 1 hour.  This is not really done for yeast activity as much as it done to help start the extraction of the coffee oils from the grounds. This allows plenty of time for the hydration of the coffee and start blending the flavors in a wet environment)

Dough:

  • 2lb. 8oz. Bread Flour
  • 16 oz. Brewed coffee; cooled (Mocha Java)
  • 8oz. Milk
  • 4oz. Sugar
  • 1 Tablespoon Vanilla Extract
  • 3 1/2 Teaspoons Instant Yeast
  • 10oz. Bag of Milk Chocolate/Caramel Morsels (I used Toll House)
  • All of Sponge from above recipe

Mix all items together in large bowl, cover with plastic wrap, and let set for 1 hour. 

After hour is up, dump contents onto lightly floured counter top and spread out only lightly degassing.  Fold top towards you into the middle, then fold the side closest to you into the middle, then fold left in, then right in.  Then place back into bowl seam side down, and cover.

Do this again two more times, folding at 1 hour intervals.

After this third hours fold, cut dough in half.  Shape two loaves as you wish, I used a basic batard type of shape but a round loaf would work as well.  After dough is shaped I put them right into a cold start oven and did the slashes just before putting them in. Both loaves opened up nicely.  (basically after fold, cut-shape-score-bake, no waiting around for final resting.....daaaa)

I Baked at 375' F. for 40 minutes until  internal temp of 202'F.

Image of SpongeSponge Image

After 1st mixing all ingredients

After 1st rise before folding

After first fold

After final fold

Finished product


TT

Pages

Subscribe to RSS - tattooedtonka's blog