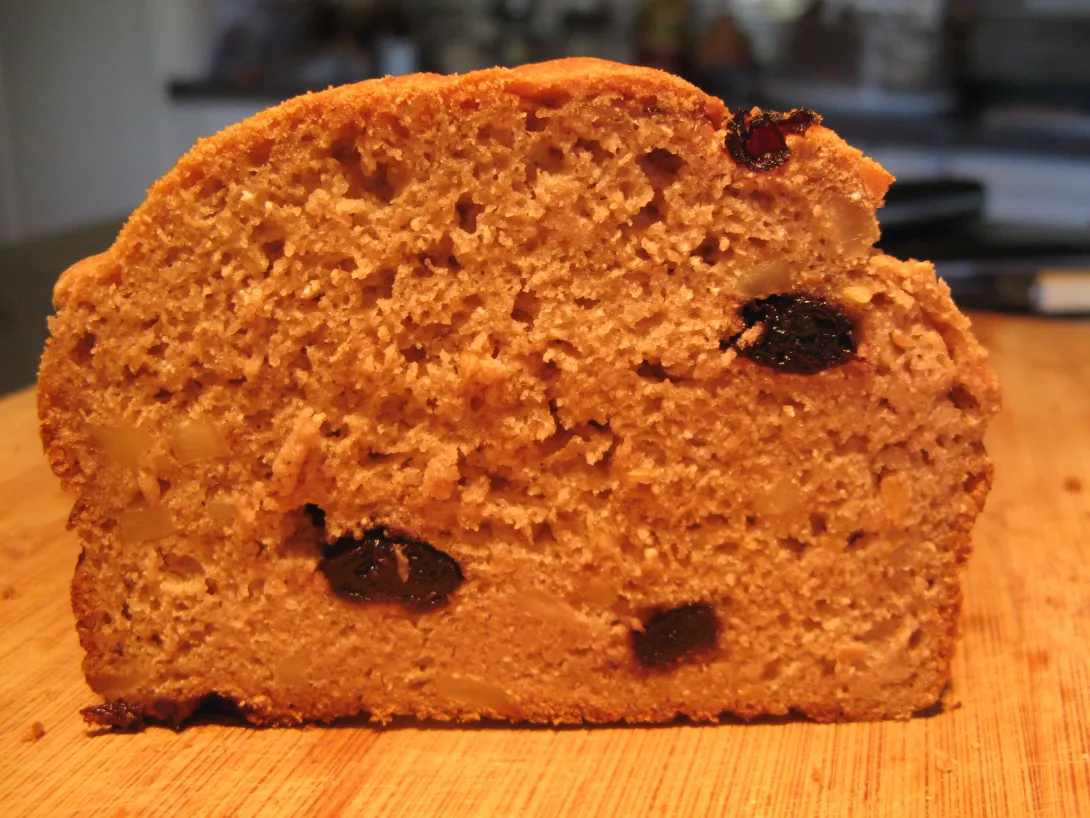
The Fresh Loaf

A Community of Amateur Bakers and Artisan Bread Enthusiasts.

Lazy Loafer's blog

Lazy Loafer's picture
Lazy Loafer

I have a profusion of rhubarb (and other things, but that's another story) from the garden right now, so I've been canning and preserving. Yesterday I made a batch of sweet pickle relish and another of rhubarb chutney. I've been thinking of how to use rhubarb in bread, so I decided to do a test loaf of sourdough ('cause, I had, like, nothing else to do, right?) with some of the chutney ingredients.

I started with my go-to formula when I'm testing ingredients rather than technique or formula - a simple 1-2-3 country sourdough.

  • 100 grams of 100% hydration wheat starter
  • 200 grams of water
  • 200 grams of bread flour
  • 50 grams each of stone-ground whole wheat and whole rye flour
  • 6 grams of salt

The chutney ingredients were

  • diced (fairly fine) rhubarb - 1 stalk that I had left
  • small handful of raisins
  • a bit of finely chopped crystallized ginger
  • about a tablespoon of organic cane sugar
  • a bit (didn't really measure, maybe a couple of teaspoons?) of spices - some lightly crushed cardamom and some toasted, crushed fennel and anise, leftover from a rye sourdough I made a couple of days ago

I mixed the starter into the water, along with the sugar (easier to dissolve) then added the flours and mixed to get everything wet, and left it sit for about 30 minutes. Then I dumped everything else in and squished and folded it until all was incorporated. No fancy technique for me! :) I stretched and folded (and a bit of scooping and rounding as well) about three times over the next hour or two, then put it in the fridge overnight. It's pretty warm here right now so I didn't want it to overproof.

This morning, in the middle of making large batches of dough for the weekend bake, I remembered to shape the dough and pop it into a banneton. About an hour and a half later I slid it onto a stone in a 475F oven and covered it with a steel pan for 20 minutes, then uncover, rotate the loaf and turn the oven down to 425F for another 20 minutes.

Nice spring; nice crust; smells really good!

Couple of busy hours later and time to cut it open.

Wow, was I happy with this one! The crumb is fabulous and moist, and the taste is really, really good. The bits of rhubarb didn't quite dissolve so there are little pink bits in the dough that have a tart zing to them, along with the sweet spicy ginger bits and the juicy raisins. I think the spices are just right too. This one will be a seasonal offering in the bread shop, I think!

Lazy Loafer's picture
Lazy Loafer

I don't bake a lot of gluten free bread, but I've got a couple of regular GF customers that I bake for weekly. Usually I bake a nice Olive bread and GF "Not Rye" (sort of a deli rye style). I use recipes from Bread in 5 Minutes a Day (Healthy Bread in 5M and Gluten Free Bread in 5M).

One of those customers asked if I ever bake a GF fruit and nut bread. I hadn't, and didn't see one in my recipe books that I liked so I set out to create a brand new GF recipe. That turned out harder than it sounds, as I don't know too much about percentages and the effect of all the ingredients of GF bread but I figured I knew enough about it now to give it a try.

After three iterations I think I've got it. Here's the winning recipe:

  • Brown rice flour - 50 g
  • Whole sorghum flour - 50 g
  • Whole Teff flour - 50 g
  • Tapioca starch - 25 g
  • Coconut flour - 25 g
  • Water - 150 g
  • Milk (I actually used home made kefir) - 50 g
  • Egg - 50 g (1 large)
  • Butter - 20 g
  • Honey - 15 g
  • Fruit (I used dried blueberries for this one) - 30 g
  • Nuts (chopped almonds) - 20 g
  • Salt - 4 g
  • Active dry yeast - 4 g (1 tsp)
  • Xanthan gum - 5 g (1.5 tsp)
  • Golden flax seeds - 10 g

I mixed the flax seeds into 50 g of the water and let it sit until the water was a bit thick (mucilaginous). This helped with the crumb and texture of the bread. I then mixed all the wet ingredients (including softened butter) and the yeast, added the fruit and nuts, and then all the blended flours and salt. I mixed it well to aerate it and let it sit, covered, for two hours. It was then smoothed carefully into a greased pan and rested for another half hour.

Given that it was an enriched bread (with kefir, butter and honey) I baked it at 350F. For the first 20 minutes it was covered with an overturned steel pan, then another 20 minutes uncovered.

I'm pretty impressed with the crumb, crust and flavour of this one. I'm not much into gluten free bread but I like to get it as close to gluten flour bread as I can, and this one is pretty close. I guess I'll add it to the baking rota! All the 'rules' are different for GF breads. The hydration is something like 125%, for example, and I had little idea how much xanthan gum to use. The soaked flax seeds and mucilaginous water made a big difference too.

I forgot to take a picture until half of it had already gone to one of the customers, but managed to get a couple quick snaps before the other half was gone. :) Note that I had to cut it in half before it was really cool (one of the customers came to pick up her other bread), so it looks a little gummy in the top photo.


Lazy Loafer's picture
Lazy Loafer

I really like making porridge breads - they allow the flavour of whatever grain is in the porridge while keeping the texture of a nice wheat-based sourdough. Creamy, moist, chewy and with a nice crust. I especially like using rye flakes this way as rye flour can be notoriously difficult to work with and really changes the texture of the bread.

Today I baked a batch of Rye Porridge bread a la Tartine 3. However, I've also been inspired by reading about Swedish breads with rye, orange and different fragrant seeds. So instead of adding nuts and flavoured oil as Robertson suggests in the rye porridge bread, I added orange zest (grated, dehydrated), toasted anise and fennel seeds (crushed in a mortar) and some chopped candied citrus peel. I really don't know how it's going to taste but it smells absolutely wonderful! I baked it in cast iron pots and I'm very happy with the appearance (oven spring, crust) as well.

If there is any left from the bread shop / market tomorrow I might keep one and cut it to check on the crumb. Otherwise I'll just trust to experience that it will be fit for my customers. I know, taking a bit of a risk doing this but life needs a little risk sometimes, right? :)

Lazy Loafer's picture
Lazy Loafer

Back home now, with all my baking equipment, so I thought I'd re-create the no-measure bread I made on holiday last week, only measuring stuff this time so I could bake it again, and scale it for different sized batches. The original adventure is recorded in my blog post here.

This time, just for something a bit different, I made the poolish with white whole wheat flour. It's 100% hydration, 100 grams each of flour and water and about 1/4 tsp of active dry yeast.

Next, the soaker - 50 grams of bulk 12 grain cereal (a blend of mostly cracked grains and seeds, with a few flakes) and 100 grams of boiling water. Both the poolish and the soaker were made in the morning and left to sit for most of the day.

Later afternoon / early evening, I mixed the poolish and soaker with 450 grams of bread flour, 250 grams of water, 1/2 tsp dry yeast and 11 grams of salt. The dough itself (just counting the dough water and flour) was 56% hydration, but if you count the 12 grain cereal as flour and calculate hydration with all the flours and water from dough, soaker and poolish, it's 75%. That was probably the main difference between this batch and the no-measure batch, as the latter was probably much higher hydration (I ran out of flour!).

The other difference was that I could happily mix the dough in the Ankarsrum, rather than dealing with the sticky mess by hand. The roller and scraper did a fine job of mixing and kneading. I should have recorded it, actually, as it was a very good demonstration of how dough develops nicely with the roller. Medium-low speed for 8 minutes made nice, stretchy, soft dough that was still a bit sticky.

I let the dough sit for about an hour then did a few stretch and folds, and it looked very nice, starting to form a nice round shape. In hindsight I could have done two sets of S&Fs, 30 minutes apart, and had an even nicer dough, but, after 1.5 hours on the counter I put it in the fridge for the night (it's pretty warm in the house right now).

Nice bubbles in the dough, so it's got a good start on fermenting.

This morning I took it out; it looked very nice. I turned it out on the bench and divided it into two 500 gram pieces, pre-shaped and let it sit for about 15 minutes, then shaped into rough batards. I was debating baking it in pans, or rising in baskets but decided to just put it right on the peel on parchment to proof. I let it proof for about an hour and 45 minutes but that was probably a bit too long. The slashes didn't open up too much but oven spring was fairly respectable. Five minutes at 475F with steam, then down to 425F for another 20 minutes, turning halfway through the bake.

I'm very happy with the crumb on this one. It's quite even in consistency but still open, soft and moist. If it keeps like the no-measure version it will stay this way for two or three days. Very nice flavour with just unsalted butter, so I expect it will also be nice with a lot of other things! All in all, a keeper and one for the bread customers.


Lazy Loafer's picture
Lazy Loafer

Well, we're on holidays again. I usually try to bake at least once during any week that we're away, and have to make do with whatever equipment is available. We're at our usual resort (nice units, good kitchens but a little dated now) and I was expecting a certain number of baking items to be available. Alas, it was not to be!

I brought a small amount of bread flour with me, a strip of instant yeast packets, a dish of salt and another bag of 12-grain (I think; it was from the bulk store) cereal. The latter is a hot cereal blend with mostly cracked grains and seeds, and a few flakes of something. Mystery ingredient!

I did have a couple of bowls available, so I mixed up some flour, water and a tiny bit of yeast into a poolish (the hydration was probably about 100%, given the consistency), and added some hot water to the cereal mix in another bowl. After sitting most of the day the poolish wasn't terribly active but did show some signs of life, and the water in the cereal had all been absorbed. So on to mix the dough. Here's where I was a bit silly - I dumped some water into the poolish and stirred it up, then added a bit more yeast and the soaked cereal. Then I added the flour. I ended up adding all the flour I had brought with me, and the hydration was still very, very soupy. Whoops, no more flour! Silly me, too much water initially and too late to take it out. :) Oh well, let it sit for half an hour or so, add the salt and try to develop some gluten. This was very difficult, and I ended up using a rubber scraper to turn and mix the dough (more like batter) in the bowl. I did this several times over the next few hours then covered the bowl and put it in the fridge for the night, hoping time would be my friend.

In the morning the dough had visibly risen but was still wet, sticky and unable to hold any kind of shape. Added to this was the fact that I had no more flour to ease the shaping, so I poured the 'dough' out onto a wet counter and folded it a couple of times as best I could. I think this was even wetter than my ciabatta dough! And then came the really tough part - turns out there are no baking pans of any kind in this kitchen! All I had was a small casserole dish. I knew this wet dough would stick like glue to the dish, so I greased it as well as I could with both butter and oil, and dumped (poured, more like it) the dough blob into the dish. I covered it and left it to rise for an hour or so, preheating the oven to 450F. I put the dish in to the hot oven, covered, and set the timer for 15 minutes.

Well, it rose beautifully! And, of course, stuck to the glass lid of the casserole dish. Taking it off was a bit tricky and I tore the top crust a bit, but it wasn't too bad. I turned the oven down to 425F and let it bake for a further 20 minutes. It looked quite nice at the end of this time so I took it out (no thermometer). Of course, it was very stuck, but running a knife blade around the side several times (well, sawing was more like it) unstuck the side and, miraculously, the bottom released fairly well. Then I had to search for something to use as a cooling rack - how about an upturned colander?

I was also surprised to see that it wasn't burnt (it smelled burnt at the end of the baking time). The top crust indicated a lot of air bubbles so I was a bit impatient to cut into it, but we went out for lunch so that helped me wait. :) And I was pleasantly surprised - the crumb is wonderful! Open but not too holey, and very soft and moist. Nice flavour too.

Just goes to support the oft-given advice - always bake it to see how it turns out, no matter how much of a disaster you think the dough is!

Lazy Loafer's picture
Lazy Loafer

I did another bake of FWSY Overnight White again today, with a couple of differences. One was caused by scheduling difficulties, the other by absent-mindedness! But at least they show that I feel I now have enough experience as a baker to make changes and still feel confident of the results!

I really love this recipe - just flour, water, salt and a tiny bit of yeast. I mixed the flour and water yesterday afternoon, but I had to go into town for a meeting so it autolysed for close to five hours instead of 30 minutes. When I got home I added the salt and yeast (just 1/8 tsp. per 750 gram loaf) and mixed it well in the big mixer (I was doing seven loaves). I didn't like the way it looked, and thought maybe I had made a mistake measuring the flour, so I dumped in some more until the dough was how I wanted it. The original recipe is 78% hydration, I think. This version is probably closer to 75%. It was quite lovely, and after two stretch and folds it was perfect - strong, silky and forming a beautiful big ball. I covered it and left it overnight in the cool basement.

This morning it was well-risen with a nice dome. It was a bit sticky so I had to flour the bench and my hands, but it was very soft and stretchy too. Pre-shape was a double letter fold, and then the loaves rounded into beautiful tight balls. Into floured baskets for about a one hour proof, then into preheated cast iron pots to bake.

Because I had dumped in the extra flour I ended up with a piece of dough about 350 grams, so I baked a little mini-loaf. I'd only pre-heated seven pots in the big oven so I improvised to bake the little guy. I put my little cast iron frying pan into the toaster oven with a steel bowl over the top to preheat, then put the little loaf on parchment into the pan - perfect! It baked at 450F for about 30 minutes.

I removed the bowl lid 15 minutes into the bake - looks good!

The crumb on this bread is fantastic. This is one of those breads that I could eat the whole loaf at one sitting! Moist and surprisingly flavourful for the simple ingredients.

A few big holes, but I wasn't careful about popping all the bubbles when shaping. So yummy!

Lazy Loafer's picture
Lazy Loafer

Today was the first day I really had time to start playing with the new Ankarsrum mixer. I had a small (four loaves) batch of multigrain sandwich dough to make, and we're out of bagels. That sounded like a fair test to start with! I did make a small batch of 50% whole wheat pizza dough on the weekend which was also a pretty good test of a small amount of wet dough. It handled it quite well, using the dough hook and scraper. Oh yes, and I made two batches (2 loaves each) of gluten free 'dough' using the plastic bowl and cookie dough whips. That was awesome. :)

So, essentially there are four ways to mix bread dough - with the dough hook, or the roller, and with or without the scraper for each.

First, the multigrain sandwich bread. This is an enriched dough (milk, honey and brown sugar) with all kinds of good things in it (cooked wild rice, durum semolina, ground flax seed and spelt flakes) so it's a bit soft and sticky and needs to be well-mixed to get everything distributed well. I put the water, milk, honey and yeast in the bowl first and let it mix while I measured all the dry ingredients into a bowl. Using the dough hook and scraper, I found that the yeast didn't dissolve very well, so I put the roller in instead and let it run against the side of the bowl. This worked better to mix the liquids. I then started to put in the dry ingredients, a scoop at time. This is so nice to do in the Ankarsrum because the motor is not overhead and in the way, so it's very easy to dump stuff in while it's running. I let it run with the roller for a bit, adjusting the distance between the bowl and roller a bit as the dough developed. I found that the dough didn't seem to be 'kneading' very much, so switched to the dough hook. I was happier with this. It's fascinating watching the dough roll around the stationary hook as the bowl revolves - so different from the action of a planetary mixer! You think it isn't doing much of anything, and when I took the dough out after about 5 minutes it seemed to be well-mixed (everything distributed well) but quite sticky (not unusual with this dough). However, after four stretch & folds at 10 minute intervals I was impressed how soft and silky the dough was. Even nicer than when I make this dough in either of the planetary mixers (the KA or the big Univex). And just the fact that I can do four loaves in this instead of firing up Max is awesome!

Next, the bagel dough. This was a great challenge - a batch of 24 (so, 2400 grams of dough) using a blend of bread flour, stone-ground whole wheat and stone-ground coarse whole rye. With the stiff starter the dough hydration is something less than 50% - stiff as a board! Once again I started with the dough roller and scraper to mix the water, stiff starter and honey. Then I added all the flours and the salt, and let it work for a bit. And once again I ended up switching to the dough hook. Part way through I removed the scraper (the dough seemed to be stuck in a ball between the two). That worked very well. I poked it with a spatula every now and then, and occasionally moved the dough hook manually. The action was slow but steady and it was really interesting to see how the dough moves and develops over time. I let it knead at a fairly low speed for close to 15 minutes. The machine itself was slightly warm after this, but the dough temperature hadn't risen much if at all. That in itself was impressive after 15 minutes! About 30 seconds of hand kneading and the dough was smooth and ready to rise. Again, very good result. Had I done this batch in the big mixer (30 quart Univex) the dough would have just climbed up the hook. And it would not have fit into the KA.

The only slight downside I found was that it is more difficult for me to get the dough out of the bowl after it's finished. That's because there is no handle on the bowl and it has a slight inward lip at the top edge. Also, the bowl itself weighs about 1.5 kg and a batch of four loaves is another 3 kg, so it's heavy! Minor detail though.

I'm sorry there are no pictures but stills wouldn't have added much to the description and videos of a mixer running can be a bit boring! Boring for me recording it anyway. :)

Lazy Loafer's picture
Lazy Loafer

Okay, okay, I know it's not bread, but today's experimenting touches on a couple of interests to do with my bread baking. One, I'm trying out the new Ankarsrum mixer in all kinds of different ways, and two, I bought a bag of durum atta flour to play around with. And as we needed something for dinner tonight, and the garden is starting to produce a few things, I thought I'd make pasta!

First, the Ankarsrum. The pasta dough was made with the dough roller and scraper. It didn't do a bad job (much better than the KA with dough hook would have done), but the food processor is still the best way to make pasta dough in my opinion. And I confirmed that I don't want to try many of the bread recipes that came with the mixer - their measurements seem to be completely out to lunch! The pasta dough recipe said to use 350 grams or 1.5 cups of durum flour. 1.5 cups was less than 300 grams, so I went with the weight measurement. In that case, the two eggs they recommended was not nearly enough, so I added another egg and a bit of water to get the dough to come together. Never mind, I have lots of bread recipes!

Next, the durum atta flour. I'd never used this before. This is a whole-grain flour from Canadian durum wheat. It's finer than semolina but still a bit gritty with the bran in it. Using it for pasta, I found it to be very, very stretchy but not very strong, so I expect that will hold true when making bread dough as well. The pasta smells divine though; I can hardly wait for dinner! I'm going to put some of the flour through my fine sieve to see what comes out (or stays in), and then start using it in bread. I know some folks on this site have made 'Attamura' bread so maybe I'll try that. The colour and aroma are quite irresistible!

Lazy Loafer's picture
Lazy Loafer

I baked a batch of six Sunflower Flaxseed Levains from Tartine 3 this morning. I made the dough last night and let it sit in the basement (my version of 'cellar temperature') overnight, then shaped it and proofed in baskets this morning. It proofs a lot more quickly than the five hours Robertson recommends so I had to have the oven and the cast iron pots hot and ready. The dough was quite sticky this morning but stretchy, and it shaped well into boules. These were 750 grams (wet dough weight) boules, baked in 3 quart pots. Turned out very nice!

Lazy Loafer's picture
Lazy Loafer

Many of you will be familiar with different versions of Peter Reinhart's Struan, a multigrain sandwich bread that he seems to have a version of in each of his books. I have often made the version from "Artisan Breads Every Day" and my customers (and I!) find it very tasty. I make it quite a bit.

I decided to try a version with some different ingredients, just for a different flavour profile, and I think I've hit on a winner. The original had corn meal, oats, wheat bran and cooked brown rice (I used basmati rice). This time, I substituted durum semolina, spelt flakes, ground flax seed and cooked wild rice. Here's the formula:

  • 351 g bread flour (I use Roger's Silver Star)
  • 23 grams durum semolina (fine)
  • 16 grams spelt flakes
  • 12 grams ground flax seed
  • 31 grams cooked wild rice
  • 31 grams brown sugar
  • 10 grams salt
  • 10 grams yeast (active dry)
  • 16 grams honey
  • 187 grams water
  • 62 grams kefir (could use any milk, or milk and yogurt blend)

All ingredients were mixed in a stand mixer for 2 minutes, then rested for 10, then mixed for another 2 minutes. The dough was stretched and folded at 10 minute intervals 4 times then bulk fermented in the fridge overnight.

Lovely stretchy soft dough...

By morning it had risen to fill the little container I put it in, and the dough was full of nice bubbles.

In the morning I shaped it and let it proof until an inch above the rim of the pan. I scored it down the centre (I do this for most of my pan breads so they don't split at the side) and baked at 350F for 40 minutes, rotating the pan halfway through baking.

It had nice oven spring and a good colour when baked.

I could hardly wait to cut into it, see the crumb and taste it - it smelled sooooo good! Also, I had orders for seven loaves and had to make sure it was good before making the dough for that order. :) And I was not disappointed...

The crumb is very moist and soft (mind you, I didn't wait until it was fully cool before cutting it, but still...), and a beautiful soft warm yellow hue from the semolina. The crust is thin and easily cut. There is enough texture from the slightly undercooked wild rice and the spelt flakes and the flavour is simply wonderful. I could eat half a loaf just with butter! Tomorrow I'll have a couple of slices toasted for breakfast (that's my second test). And bake another seven loaves!

Pages

Subscribe to RSS - Lazy Loafer's blog