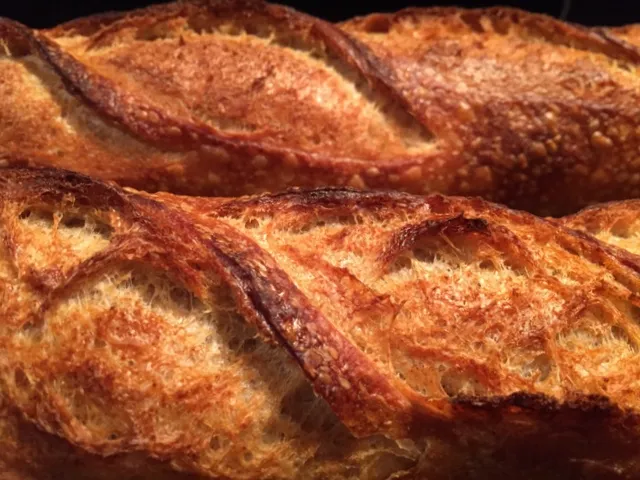
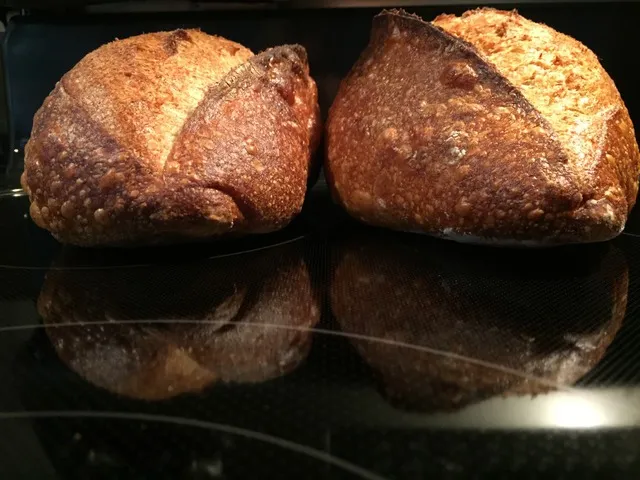
The Fresh Loaf

A Community of Amateur Bakers and Artisan Bread Enthusiasts.

alfanso's blog

alfanso's picture
alfanso

Continuing on my quest to reverse boule and batard formulae to baguettes, here is my take on Ken's Artisan Bakery's country blonde.  But instead of as boules or batards, which is what he sells them as, I fashioned them into baguettes (and a batard).  

Almost, but not quite as compliant as my take on the Hamelman WW levain baguettes and batards, it falls short on both looks and shaping.  But only by a few fat hairs.  The Hamelman's have an incredible delicate finish to them.

Once more, I am on a mission, albeit not much of one at that, to convince the Dutch Oven and banneton bound masses out there, to take a few bakes and shape some batards and baguettes and retard/proof them with a linen couche.  Perhaps frustrating at first, but in the long run, you'll be glad you did.  Or - be cursing me...

The batard (as if I had to tell you!)

The baguettes (as if I had to tell you!)

alan

alfanso's picture
alfanso

To anyone even casually glancing at the most bookmarked pages on TFL, Jason’s Quick “Coccodrillo” (sp.) Ciabatta Bread is akin to the great thoroughbred Secretariat running against all puny comers.  I’d been avoiding trying it out, for who knows why, but just this week adrianjm added to the list of those posting their version of the bread.  So, I guess it was gravity that brought me to try it out too.  And I did.  Twice in one day.

The first time was a trial run to get my feet wet with this dough.  And it certainly is quick, living up to its posted name.  So quick in fact, that I probably over proofed because the dough is so active.  A few other things too, on my trial run, revealed in the photos.

Because I thought that I could do better on a second try, I made some mods to the formula as laid out way way back in 2007 by LilDice, the O.P.  And I liked the results a second time through a lot more.

I left the dough at 95% hydration, but substituted out 15g of water with 15g of olive oil, and also added ~3.5g of diastatic malt powder because I wasn’t happy with the pale shade of the first run, regardless of how long I left it in the oven to darken – it just never happened.
 
I find that, for my tastes, this bread doesn’t carry that heartier, sweeter and more developed flavor that a long fermenting or pre-fermented bread does, as this is a direct method bread, start to finish in a morning’s time.  Nor does it have a robust enough crust for my personal liking.  But it is tender and a bit sweet, will make excellent toast, bruschetta or croutons when it has aged for another day or so, and is a good addition to my growing folder of breads.

A few other changes as well, all part of the methodology, added at the tail end of this post.

With one hand in the dough and one on the camera, this is the best I could do for a photo of a good window pane.


Comparing the first, trial bake to the second modified bake.  The earlier bake is pale and was more difficult to shape.  From the crumb shot it is plain as day that it also had minimal loft.

Updated 6 Oct.

A new bake, but due to what I perceived to be a lack of depth of flavor in the bake above, I subbed out 150g of bread flour for 150g of semolina/durum flour.  Otherwise just about everything was the same.  Except that I decided to support the sides of the dough in a couche during the proofing, as I mentioned in the formula notes.  One other thing was that the mixing took another few minutes longer, and I'll posit that this was from the introduction of the semolina flour.

As you can see, not only did I get a fantastic oven spring, which I did expect, but the top didn't just brown, it burned.  It was as if there was too much of a good thing.  And I'll take a SWAG at what it was.  The too much, I'm going to guess, was that the diastatic malt powder was still in there.  Perhaps the addition of the semolina requires the subtraction of the powder.  So until I know better, as in running another bake without the powder, I'll take a leap of faith and say that is what it was.

The crumb still seems tender and pretty open, but I really didn't like how the open crumb mostly seemed to congregate at the top of the loaf.  Now, how to balance out the best of the two bakes to build a better crocodile trap.  We shall see...

Supporting the couche lined parchment: 

 Not quite charcoal briquet territory

The crumb is not nearly as dark as the cameras filter makes it to be.

 When I mentioned that this bake had fantastic oven spring I'm not just Whistling Dixie.  Here is a side by side with the remnants of the last bake, albeit a bit deflated by time.  And that prior bake had great oven spring as the lead picture shows.


alan

Ciabatta

By Jason Molina

  • 500g bread flour*
  • 460g refrigerated cold water
  • 15g olive oil
  • 2 tsp. yeast
  • 15g salt
  • 5g diastatic malt powder

 Total time: ~4 ½ - 5 hours

 Method:

  1. In mixer with paddle: Mix all dry ingredients first to distribute.  Add liquids and mix until combined, the consistency of a thin batter.  Rest for 10-15 minutes.
  2. Mix on high speed with dough hook until dough separates cleanly from the bowl and slaps sides of bowl.  Scrape down bowl and hook a few times during the mix.  In my Kitchen Aid 4 qt. it took ~13 minutes total mixing time on speed #8, 2-5 more minutes on speed #6.  Look for a strong window pane.  If not well developed or breaks easily, mix dough more.
  3. Place into a well oiled square or rectangular container and let it triple in volume, <2 - 2.5 hours.  Beware, that once this dough starts moving, it rises rapidly.
  4. Gently apply a 4 fold and flip dough inside container at 40 and 80 minutes.
  5. Empty onto a floured surface.  Fold dough in half, squaring the shape if a rectangular container was used.
  6. Divide into 2 or 3 pieces. Use dough scraper to form the loaf shape.  Keep shape short.  Dust with flour.
  7. **Transfer loaves to a parchment covered oven peel.  At this point, the dough can be gently stretched out to a longer length.
  8. Cover and proof for ~45 minutes.
  9. Preheat oven at 500dF.  Sylvia’s Steaming Towels 15 minutes pre-bake.
  10. Load into oven from peel.  Bake at 500dF with additional steam, about 25-30 minutes total.  Release steam and rotate 180 degrees after ~12 minutes.

Notes:

  • *Can substitute 150g semolina for 150g bread flour
  • **Next time I may sit the parchment paper inside of a couche to support the sides of the dough so that it doesn't spread out as wide during the proofing. 
  • This is a 95% hydration dough, almost like batter until it comes together.
  • Use cold water because of mixing friction.
  • Keep an eye and hand on the mixer so that it doesn’t walk off the counter.
  • Loading the dough onto the oven peel for proofing avoids unnecessary handling.


alfanso's picture
alfanso

I'd mentioned that I was probably going to bake a batch of SJSD (or as I use my own levain mix, soSJSD) baguettes for my wife to feed to the hungry in-laws up north later this week.

The trio are the Hameleman Pain au Levain, the (soSJSD) David Snyder Italian sesame, and these.  Once more the explosive nature of the bloom on these baguettes, as with the Pain au Levain, is really quite something.

 The final shot here is the minor horror show demonstrating why a good preshape is essential to the final product.  The second that I was done preshaping, I knew that it was game over for this poor soul.  The shaping was subsequently affected, and so just for the fun of it, I did a single score down the length of the beast and baked it anyway.  

Now, by this time, I think that a fair portion of you will agree that I can roll and score a baguette reasonably well, but this little fellow is proof positive that a good preshape is so important to the eventual final shaping and scoring of the dough.  Submitted as Exhibit "A", your Honor.

As I decided to bake 5 baguettes together, the width of my oven was barely able to accommodate them.  But if you take a close gander you may be able to see that the sidewalls are too lightly colored, thanks to their left/right proximity during the bake.  They never touched, and it doesn't matter that the oven and baking stone were at 460dF, the baguettes themselves provided insulation that was unwanted.  Exhibit "B".  I rest my case.

alan

alfanso's picture
alfanso

Another trip up north, but this time I'm staying home to tend to the dog.  However some baguettes will be accompanying my wife on the journey - destination in-laws, as usual.  The recent bake of Hamelman's Pain au Levain are scheduled to travel, and now these baguettes based on David Snyder's SJSD Italian Baguettes.  Next up will probably be my take on his SJSD baguettes.  That should hold the Old Folks over for a few meals.

These didn't open quite as much as the P au L baguettes did, but the bloom on those were really outstanding.  However, nothing to complain about here.  The taste of these is just truly spectacular.  They might just be #1 on my palate's hit parade.

alan

alfanso's picture
alfanso

I've loved the feel of the Hamelman Pain au Levain dough during every phase of the prep.  French Folds, Letter Folds, shaping, couching, scoring.  And, of course, seeing what comes out of the oven as bread.

And so it was time for another indecisive bake.  Batards or baguettes.  Hmm, why not both.  Again, I've not seen this bread done as baguettes anywhere on this site before, so maybe I can start a movement.

A bit of a mix up began the whole soiree.  I was building the Hamelman levain at the same time as building up my on "proprietary" levain, and as bad luck would have it, both in the same type of vessel sitting alongside each other.  When it came time to add the goop into the autolysed flour & water, well, I mixed the two up.  But I was darned confident that my own levain was robust enough for this mix.  No harm done. 

For those who love this formula, and really now, who doesn't, it is an exceptional dough to try your hand at rolling and scoring baguettes.  "Man does not live by batard alone..."

Adding a crumb shot from one of the batards.  The other is in the deep freeze.

I was also so pleased with the above bake that I had trouble controlling my impulse to "get back Jack do it again" (re: Steely Dan) the next day.  And so I did, now with the Hamelman levain having been incorporated into my own, yielding a mix of both.  

The combo batard/baguette bake came in 2 batards @500g ea. and 2 baguettes @250g ea.  This time I scaled it down to 4 baguettes @300g ea.  As you can see, the results are easily replicable.  This dough almost wants to shape itself.  

Please do give the Jeffrey Hamelman Pain au Levain formula a try either as a batard or baguette without using a Dutch Oven or even a proofing basket.  If you don't already bake that way, it'll give you a whole new outlook on what you can do baking and add another dimension to your baking skillset.

My version of the formula is posted below.


Method

 Day 1

  1. Mix stiff levain (7-12 hours).  Refrigerate.  This levain is very slow moving.

Day 2

  1. In large bowl add flours and water, mix to shaggy mass.   Dough will be wet and sticky until levain is added.
  2. Cover and autolyse for at least 30 minutes (or more – to suit your personal schedule).
  3. Add salt and stiff levain, pinch and fold to incorporate.  Levain will be rubbery & thick, break into pieces to add. 
  4. Correct the hydration up depending on absorption of WW & Rye. Consistency of dough should be medium - neither dry nor overly moist.
  5. 300 French Folds.  Dough will be billowy and smooth, but not wet.
  6. Transfer dough to a lightly oiled bowl, and cover.
  7. Bulk ferment for ~ 2 ½ hours with 2 stretch and folds at 40 & 80 minutes followed by 40 minute rest. *My kitchen is a pretty steady 80dF, so a cooler kitchen will need an “appropriate” amount more time to bulk ferment.
  8. Retard for 1 hour (or more – to suit your personal schedule).  Sometimes depending on my personal schedule I’ll retard for as long as 3 hours before the next step.  In general, it just plain doesn’t matter all that much!
  9. Divide, pre-shape and shape.  Onto very lightly floured couche, seam side down.  My couche sits on a smaller jellyroll pan and I cover in an enclosed bag.  I use two plastic bags, one from each end of the pan.
  10. Refrigerate for 8-12 hours.

Day 3

  1. 45 minutes before baking, pre-heat the oven to 480ºF with a baking stone.  Place Sylvia’s Steaming Towel(s) into the oven 15 minutes pre-bake.
  2. Score and transfer the loves to the baking stone. Steam the oven pouring ~2 cups of water into a pan of pre-heated lava rocks (or whatever), and turn the temperature down to 460ºF.
  3. After 12-15 minutes, remove the steaming towel(s).  Continue baking for another 12 minutes for baguettes, or as much as 20 minutes or more for batards, or until the loaves are nicely browned (and the internal temperature is at least 205ºF – I never do an temp, as after a very short while you just know!).
  4. Transfer the loaves to a cooling rack. Cool completely before slicing.

alan

alfanso's picture
alfanso

Always up for a challenge (except when I’m not) I recently came across TxFarmer’s fantastic Laminated Sandwich Loaf blog entry from Dec. 2011.  As I am now a new inductee into the Lamination Game via my two recent forays into croissant making, I though that I’d give this a whirl as well.  I'm also a sucker for trying other things that she's displayed on TFL.

And there is much to be mastered in learning the minutiae of laminating breads, both step-wise as well as the necessary skill set acquisition.  I decided to jump into the Lamination Game too.
 
A word of warning – trying to equal TxFarmer’s skills at these breads will be a bit of a frustrating situation.  We may approach her incredible output, even equal it occasionally, but in general it is the shiny star that probably will always remain just out of reach.

As usual she is quite detailed in her descriptive steps, including how to do the intensive mix necessary for this bread.  I had to scratch my head a few times as I was attempting to transcribe her steps into my standard format.  Added to that was the game plan for creating the braids that comprise the bread.  I eliminated all iterations except for the 8” x 4” x 2 1/4” tin and went about diagramming the final details.  I’ve included my version of her detailed steps as well as the diagram.

Some of the trickier aspects that I will need to take special note of are how to create my laminated layers without having small blocks of butter incorporated – to have the butter more consistently distributed within the layers.  Also how to be gentle with the final rolling out of the dough to attain the 3/4” depth of the dough while still getting it to roll out to a 16” x 9” rectangle.

The dividing of the rectangle was pretty straight forward, thanks to my pizza wheel and using my hand peel/flip board as a repurposed measuring tool and straight edge.   This formula makes two 8” x 4” 2 1/4” loafs.  The second half of the dough is dozing in my freezer right now.


Testing the intensive mix - not windowpane enough.


Photo snapped just after the pane broke.  Windowpane enough?  Check!


Diagram of the dough for dividing.  My repurposed hand peel with measurements.

The braids will sit one atop the other inside the loaf pan.  Here's where my wife's expertise came in handy.  Here is also where it is critical to have the appropriate depth of the dough so that the laminated layers can be oriented upward.  My dough did not completely make the grade here.  Better luck next time...

Unproofed with egg wash.  I will probably forego the first egg wash next time.

4 1/2 hours later.  Now proofed and a second coat of egg wash is applied.  You can see some lamination here, but it is a world away from TxFarmer's version.

Just out of the oven.  The top browned really fast, so I had to tent the dough for the last 30 minutes of the bake.  The lighting on these few could have been better.

Some of the braiding is also visible from the side view.

Not nearly as open a crumb as she gets, but a pretty decent first attempt.  The flavor is sinfully rich and buttery, and the crumb is as tender a silken handkerchief - but way tastier!

As long as I mentioned trying my hand at croissants, these are the result from a collection of inspired sources, most notably The Weekend Baker and (wouldn't ya just know it) TxFarmer.  Still a work in progress, especially the honeycomb interior.  But I seem to be getting a handle on these pretty quickly.

alan

alfanso's picture
alfanso

In a recent post David Snyder mentioned that his Hamelman pain au levain would qualify for a final four if he had only one bread he could make/eat.  I suggested a few other qualifiers, including his marvelous Gosselin baguettes with an SD twist added for good measure, not to mention good flavor!

As I hadn't made these for quite some time, I figured that it was high time to get my act in gear.  My issue is that a few months ago, I put aside my baguette obsession interest for my batard obsession interest.  What to do, what to do, what to do.  

I've now been deviating for quite a while by putting my own twist on most things baked around these parts.  Most recently by turning the Hamelman pain au levain from a batard into a baguette, an especially enticing thought in that I couldn't find any prior reference on TFL of it having been done before.  So this time I decided to turn the SD Gosselin baguette into a batard, also no reference to this switcheroo existing on TFL either.  However, being somewhat indecisive about this scheme, I just hedged my bets and did both in the same bake.

I rescaled the whole operation for ~1500g , figuring two ~500g batards and two ~250g baguettes.  And everything went dandy with minor exceptions, all pointing to the same culprit. The batard on the left was the poster boy for all the mishaps.  It could have used better shaping, and although It received the same loving care and treatment as its brethren, when I removed the plastic bags covering the couche, the end of it was dried out as if the skin had been exposed to the air.  Hmm.  As we all should know, early mistakes are often magnified with each step down the production line.  Therefore it didn't score as well, and didn't act the same during the steaming portion.  Indeed, when all was said and done, the dry area looks it on the baked batard, and the bloom was just a bit weird on that one batard.

 Both batards reacted with an incredible bloom and grigne, like something out of a sci-fi B-movie from the 50s.  Or maybe from one of my goofy 3rd grade science projects.

Changes I made to David Snyder's formula and process:

  • The obvious – batards as well as baguettes.
  • I use my own stiffer than liquid levain rather than his SJSD liquid levain formula.
  • No overnight retard after the initial mix – a mere 5 hours is all I gave it.
  • After the bulk fermentation it went into the refrigerator for ~90 minutes before the divide and shape phase.
  • Then retarded overnight on a couche.  Total retard time at this step was 10 hours.
  • Scored and baked directly out of the refrigerator.

Dry area in upper left batard.

Steam released and bread rotated.  The Blob-like explosion on the batards is already evident.


And just for comparison, here is a shot of the Levain Gosselins from last year...


Crumb shot added.  This is from the Frankenstein batard, as the other was a give-away.  Not as open as the pure larger baguettes made last year, but to a large extent other than the being able to get a larger holed crumb, it really doesn't matter that much to me.  As long as the crumb isn't tight and wet.

alan

alfanso's picture
alfanso

As this August has unofficially turned into the Hamelman Pain au Levain batard month, I thought that I'd submit one more entry to the mix.  I did a TFL search for hamelman pain au levain baguette after baking my version as a batard.  And in the vast compendium of our website here I could not find a single reference to anyone ever having done his batard as a baguette .  A sinful omission which I have gladly undertaken to correct as part of my quest to "do something different to make it my own" mantra.

Scaled down from the original formula for 4 300g baguettes each, again mixing in a few more grams of water to increase hydration just a tad.  Employing my standard way of long retards of dough already shaped and couched.  From retard to score to bake, in 5 minutes' time.  I bumped the oven temp up from the prior bake's 440dF to 460dF for this bake as I wasn't content with the prior coloration or crumb structure.  I may still have to nudge to oven dial to 475dF or 480dF next time.  As stubby as they may look, they are all between 11" and 12" in length.  

Still would like another shade of dark to these, but that is, sadly, another of my mantras.

steam released and rotated

And, just as I was about to slather on the mustard in prep for my mini salami & pecorino sandwich (yep, that is the size of my sandwich!), I decided to take a crumb shot.  The taste is "wheaty" but not too much so.  "Cereal-like" says my better half.  

The crumb is still a little moist inside, so indeed I will look to bake these at a higher temp. next time.

UPDATED on 8/15/15

I decided to make the same Pain au Levain baguettes, but this time with my own levain instead of that which Mr. Hamelman uses for this bread.  A little less stiff at 75% hydration.  I went against my personal grain here and changed two parameters at the same time.  One is the levain and the second is that I again bumped the temp. up by another 20 degrees to 480dF, rather than the previous bump to 460dF.

The value to using my own always stocked-up-on levain is that it saves me the first step in making this bread.  As I always have it ready to go, I can either scoop out what I need straight from the refrigerator, or just do a quick refresh of a small batch, which takes only ~21/2 hours instead of the formula's 10-12 hour build. 

I wonder if the baguettes set too quickly due to the higher temp or if the different levain played the role in these opening nicely, but not quite as nicely as the earlier version at the top of this entry.  I suppose that more testing (and tasting) is going to be in the works.  Just for the fun of it all, I also threw some raw flour on top of these just before scoring for that rustic look that I don't often do.

Of the four baguettes, one is displaying a really goofy bloom.  At first I thought that it was a pair of scores that had overlapped too closely, but on closer inspection, it doesn't seem to be the culprit.  Maybe I'll just refer to it as a tree burl and leave it at that.

alan

alfanso's picture
alfanso

My tendencies are to find and try to duplicate interesting breads coming from our talented lot of bakers on TFL.  But over time, especially quite recently, it is hard to not notice that there are a lot of folks who love to bake Jeffrey Hamelman's Pain au Levain.  So the carrot was placed before the donkey and I took the bait too.

As the notes indicate, the stiff levain itself was quite rubbery and needed to be pulled into small pieces to facilitate incorporation into the autolysed flour & water.  The dough also felt dry to the touch, so I added a few grams of water here and there, probably bringing the total hydration up to ~70%,

Everything went along just dandy.  300 French Folds followed by two Letter Folds at 40 & 80 minutes and a final 40 minute bench rest before loading into the refrigerator for somewhere ~90 minutes.  Divide into 3 at ~500g, pre-shape and shape on the couche and back into the refrigerator for a long beddy-bye overnight.  Scored and baked directly from the retard.

I've yet to taste or cut into them, as they are destined for others (and me!).

steam released and rotated after 15 minutes

Crumb shot added

alan


alfanso's picture
alfanso

Another batch of soSJSD bread.  After the last quasi-embarrassing batch of 105% hydration goop the other day, I needed to get something that looked more like bread on my countertop.

Two baguettes scaled at ~300g each, and one sesame encrusted batard at ~600g.  Tha-tha-that's all, f-f-folks.  (there, I feel better now...)

Steam released and stock rotated.

alan

Pages

Subscribe to RSS - alfanso's blog