TFL Community Bakes are the result of CB founder Dan. Of his own creation and nurturing, to interest and help others, and in turn be helped, as we all strive to improve our baking skills and widen our baking horizons. Kudos to him for this lasting gift to us all.
For this CB I’d like to try a different tact, and I don’t know if it will really take hold. If it does, then I was onto something. If not, it will soon fall by the wayside, I’ll lick my wounds and call it a day on this one.
My own preference when it comes to baking is to stick with the tried and true. Not necessarily keeping a tight grip on any one formula, or two. But rather adhering to my admittedly limited ingredient list. Usually focused on FWS, levains and little else - with the flour components rendered to my own limited comfort zone. And so I rarely stray far from “home" when it comes to challenging myself with the unknown. Recently I came across the video of the Kingdom Bakery Pain au Levain with Polenta bread, and it provided me with the idea for this bake.
Which is to ask you to take yourself out of your “Comfort Zone”, try something that would be foreign to you, and maybe just a bit uncomfortable. Whether it be a significant change in a hydration from fairly high to fairly low, a new form or format, a new tool employed and especially to take on ingredients that you’ve shied away from using or hadn’t considered using before. In other words, I’m asking you to place yourself in some new territory.
There's a consistent smattering of TFL islanders who, on a regular basis, do just that. Everything but the kitchen sink seems to be fair game for them. You know who you are and so do we! For those folks it may not be as easy to find a new “thing” to try.
We might all be able to prosper from someone else’s newfound bake, whether it be to try it ourselves, or to coach someone who gave it a try but feels something is lacking and looking for our support. In other words, somewhat like business as usual in the CBs.
When you post your bake, please mention what there is about your choice that interested you, and Why this is out of your Comfort Zone. In the companion CB blog I’ll share what I’ve been doing recently, all in the name of softly pushing myself into some unknown territories. Not necessarily as a model for anyone else, but rather to provide some general ideas of where I’ve gone, where I’ve recently grown, and perhaps provide you with the same for your own ideas and bakes.The companion CB blog is here.
The fine print...
As always, the CB occupies a corner of TFL. Created to be a collaborative effort, both to enhance one’s skills as well as to help others with their skills. By no means is any formula provided meant to be the be-all-and-end-all of the CB. Rather, they are a framework of distinct ways to achieve a bread that meets the general criteria. I encourage you to experiment and explore, to modify and to introduce to our CB participants your own experiences and versions. And most of all, to learn and help all of us to better ourselves as bakers. I also encourage you to find something you like, change one or many things about it and to make it your own!
And as our Community Bake founder Dan said:
All bakers of every skill level are invited to participate. Novice bakers are especially welcomed and plenty of assistance will be available for the asking. The Community Bakes are non-competitive events that are designed around the idea of sharing kitchens with like minded bakers around the world, "cyber style". To participate, simply photograph and document your bakes. You are free to use any formula and process you wish. Commercial Yeast, sourdough, or a combination of both are completely acceptable. Once the participants get active, many bakers will post their formulas and methods. There will be many variations to choose from.
Here is a list of our past CBs.
They remain active and are often monitored by numerous contributors that are ready, willing, and able to help if assistance is needed. A quick browse of past CBs will provide an accurate picture of what these events are all about.
**********************************************************************
Since many of the CBs grow quite large, it can become difficult to follow the progress of each individual baker. Things get very spread out. In an attempt to alleviate congestion and consolidate individual baker’s bread post, the following is suggested.
Links to baker’s BLOGs that have posted a compiled list of bakes for this CB
*For the original postings please click the links above.
**********************************************************************
For those who wish to limit or disengage from the flood of email notifications associated with long threads such as these CBs produce, Dan had written up how to do so
http://www.thefreshloaf.com/node/66354/tip-how-stop-email-notification-any-topic
**********************************************************************
OK so I think I’m one of the bakers who frequently bakes new things, I like the variety, the results aren’t always ideal. I’ll join in, I still haven’t had any luck with a 100% whole grain after three unsuccessful bakes. I wasn’t planning on trying again so soon, but in the spirit of the CB I will. Does that count?
Benny
I'm just trying out these new "shoes" to see whether they fit. If so, we have a CB to run with, if not into the refuse bin the CB goes and I'll move on.
Thanks for being a trooper!
You know me, I’m usually up for a challenge. Usually they make you a better baker even when you haven’t succeeded yet (looking at you ciabattas ?).
Count me in! I can think of several things to try.... A porridge bread came to mind right away, followed by focaccia. And Benny's suggestion about ciabatta struck a cord. ?
I’m in! Summertime is coming and I’ll be breaking out the smoker. I’ve been watching all the baguette posts and was planning to look into making baguette or ciabatta buns to use in a pulled pork sandwich. Have never made a baguette or a ciabatta and have never made buns.
OK. Thinking cap on. The last 6 months have been full of new bread I haven't baked before and I've enjoyed the experience. Also, I'm part-way through building a peel dough loader a la Lance's (albacore) post in 2017, that should count as a new tool I guess. Watch this space..........
Still trying to improve my 100% whole grain baking. In this iteration I changed two things I believe needed to be addressed. I’ve lowered the hydration and reduced the final proof. I believe those changes have helped but still not quite where I want this to be, particularly the oven spring. Despite the dough coming out of the banneton and standing tall, there was still more spread during baking than I want to see. So it is still overproofed. As some more knowledgeable whole grain bakers have identified, red fife doesn’t seem to be very fermentation tolerant.
This time did a morning levain build 1:3:3 15 g + 47 g + 47 G
Morning saltolyse starting in fridge and then taking out before going to work.
Greatly reduced hydration from 86% to 80%
1220 pm bulk started levain added and in bowl Rubaud done
1250 pm 500 slap and folds completed with good gluten development
110 pm bench letterfold
140 pm lamination
210 pm coil fold
240 pm coil fold
310 pm coil fold
Shaped at 60% 445 pm
510 pm 75-80%
The dough was fermenting very rapidly, I wanted some bench time before cold retard, but barely caught it before it was almost at 80%.
I think I’ll need to shape when the aliquot jar shows 50% and start cold retard at 60-70% next time. I’m not sure that I need to reduce hydration more or not. I’ll have to look at the crumb later to assess.
Anyhow, better than my previous, but I really need to shape a bit earlier and cold retard sooner or bake after the bench rest without cold retard.
Looking forward to seeing the crumb. And thank you in advance, I think all your experiments will help me refine things once I get to try this again. I have been restocking the freezer with sandwich bread lately (so convenient to have frozen slices ready for use when desired). And sadly we have a few things on the calendar that will prevent baking until late next week. I'm planning on a bake-a-thon as soon as time permits. ?
Mary
It is nice to know that these bakes are helping others, that makes them even more worthwhile Mary.
Looks like a nice loaf Benny and keeping my fingers crossed that the crumb turns out like you want. Agree with Mary too. Appreciate all the experimentation. I’m benefiting from it as well!
Glad you’re getting something out of these bakes too Troy. Fortunately we all learn from each other which is one of the great things about the TFL community.
No more fails 1 win chalked up now! Just beautimous.
Thank you very much dab, nice of you to say. I certainly loved the crumb on that one. Near the end of this thread I did finally bake one with 100% whole red fife that looked like a better loaf on the outside but with slightly tighter crumb on the inside. So fermentation sort of figured out and now hydration needs to be adjusted back up.
Benny
So definite signs of overproofing in the crumb confirming what the outside already signaled. I am still shocked at how intolerant of fermentation this flour really is. I have to say I saw no signs of this while baking with it over the past year when used at much lower percentages. Now this is definitely an improvement from my first two goes at this formula so at least I know I’m making progress. I just have to reduce bulk and final proof. By how much though....
See I think I would have been happy with that crumb. Do you mind sharing the signs of over fermentation you saw?
A couple of things Ilene, the overall shape of the loaf being flattish. Then also the signs of gluten breakdown. You can see it on either end of the sliced loaf photo just under the crust where you can see gluten sheet breaking and multiple alveoli becoming one larger hole. The crumb on this one is good but overall I'd like to have a better proofed loaf with a higher profile.
Benny
Thanks Benny! I would have picked up on flatter loaf, but the alveoli comment is very interesting. I think I've seen the same thing on some of my loaves. I'm going to try 100% ww again soon. Quick question, which worked better for you - more or less work on gluten development (lamination, slap and folds, coil folds, etc.) with this 100% ww versus a more white loaf?
I think moderate gluten development without the lamination and with less fermentation worked the best so far. The crumb isn't as open as with more fermentation but then the profile of the loaf is better with less fermentation. I was worried that the lamination would stress the gluten too much so left it out.
Benny
My initial post for this is a new tool. Usually I make all my bread by hand. however recently I fell while away on a biking trip and cracked a bone in my left wrist. what to do about bread making? I had been thinking about a nnew mixer for some time but very put off by the high price tag. On my way home I spent a day my cousin and ended up buying a Kenwood Kmix - their 70 year anniversary model. I gotta say I am really happy with it and the price tag was very reasonable.
Here is my first attempt at using it. Mostly white with a little rye and spelt, basically 1:2:3.
2nd attempt with mixer was Hamelmans Hot cross buns. no photos of this but I got good dough development in much the time time frames indicated plus the dough did not ride excessively up the hook and need scraping down.
Will think of something else new in the way of bread to try.
happy baking everyone
Leslie
Not much better than New Bike Day... except maybe New Mixer Day!
Sorry to hear about the wrist, but looks very much like you’ve rolled with it and found a way to keep making beautiful bread! Good luck on the healing process.
and inconvenient but luckily not a major break. Important to keep baking isn't it.
Leslie
Hope you heal quickly Leslie. Now do you think once you’re healed that you’ll keep on using your new mixer for your bread, or that you’ll go back to hand mixing? Lovely loaf as always.
Benny
for the near future I will use the mixer but really don’t know if I will carry on. I had been thinking about using a mixer for a while and was really undecided as to which mixer to purchase. Now I just have to learn how much mixing is needed - :)
thanks Benny, for a first try I was happy with the result
Leslie
I have exactly the same. It is the extension of my right hand... Very helpful for medium and high hydration dough. For stiff dough... it starts to sing, so I avoid using it in this case.
Beautiful shaping scoring and consistent open crumb.
I recall you writing about your upcoming biking trip and then the aftermath. Glad to see your new work-around toy. The photo of it reminds me of a picture I saw somewhere years ago now. Some fellow was snapping a photo of a steel bowl of some sort to sell, likely as part of an advert. Problem was that he didn't notice his naked reflection in the bowl (or maybe he did and that was part of the allure!). It was pretty funny.
thanks Alan - highly reflective surfaces make photography a wee bit of a problem....
Its interesting how much better this mixer is than my old one (which was also a Kenwood) and now because I don’t make big batches it will probably get used a lot more. the bigger challenge for now is what type of new bread to try out....
Leslie
A very nice result indeed. The first time using a mixing is guessing how long low speed and how long higher speeds. I've put off buying a mixer so far but I'm slowly developing arthritis in my hands, so I guess not too far into the future.
On my first attempt at Hamelman's traditional hot cross buns, the bake was a bit bold, but the second was better as I backed off the temperature partway through the bake.
Cheers,
Gavin.
is all new for me so it will be a bit of trial and error. I guess a couple of minutes at speed 1 until all incorporated then however long required for dough development.
with the hot cross buns I had found in the past they got a bit dark so baked at 200°C - colour good but maybe could be a little hotter with my next batch - the neighbours are wanting more, lol!
Leslie
I hope your hand is healing well and so sorry to hear...
That is an amazing result for the first time using a mixer. I have been adjusting different times when starting to mix more with my spiral mixer and felt like quite a different modus operandi...
Still getting a feel for it...especially the degree of mixing you get with starting with lower hydration and upping water or using all the water and potentially using faster speed at the end...soooo many ways...
I find that it is not quite as easy to overmix as I thought and feared but more mixing leads to more regular crumb and bulk will also be shorter with a more developed dough in mixer...
Have fun, Kat
Interesting idea, makes me think where my comfort zone ends! I'll have a think...
Wow, this is exactly what I am always doing! Once I get a satisfactory recipe, I go for another challenge.
Very excited about this CB that falls right on time because I plan to test my extreme skills. How soon I'll post it will depend on how successful I'll be :D:D:D
But the idea is to post all the bakes whether or not they are successful, we learn as much from our “failures” as we do from our successes.
I think we learn much more from failures. Do not worry, I'll keep track and provide the entire journey and lessons learned. Showing off is just for Instagram :D, here is about learning.
Details of my contribution to this CB in my blog post.
Working with this hydration definitely put me out of my comfort zone!
EDIT: Crumb added. I'll take it for the first attempt. They are nice and soft, and they smell delicious!
and should nicely envelop a fat hamburger (if you're into that sort of thing - I am). Getting an even division of weight on ciabatta dough can be a tricky endeavor but these look pretty close in weight.
Thank you Alan, and yep, getting them equal was a bit of an issue until I stopped worrying about them being shaped “perfectly”.
I weighed the dough and dish and then just the dish after emptying the dough on the counter. Took the difference and divided by 8. Target was 71g each (called anything between 70-75g close enough). I put a plate on the scale and generously floured it. I cut off a chunk of dough and put it on the plate. Added or took away as needed. Fortunately, the dough was still so “sticky” that the little chunks easily melded wherever I put them. Sprinkled flour on the top side of the dough before removing from plate and putting it on the parchment.
They sure look great to me Troy, and much better than any ciabatta that have ever come out of my oven.
Benny
Thank you Benny. Will cut one open for a crumb shot a little later. They feel nice and soft, but not sure if that’s good fermentation or massive air pockets. ?
Great work. They look delicious. It's a bit tricky to scale and round ciabatta without compromising crumb. The crumb shot looks very good.
Thank you Gavin. Yeah... On the first two, I sat there looking at the small piece of dough and trying to even think how to "shape" it. In the end, I just went for the rustic look.
Those came out great!!
Thank you. I’m happy with them for the first attempt!
I just saw this and thought, Wow, a bake just for me! Every bread bake is out of my comfort zone. I usually do cakes and cookies. What is the deadline? I've been reading bread books instead of actually baking.
No deadline whatsoever. These community bakes go on as long as there is interest. Many of us still post to older CB like Hamelman’s Five Grain Sourdough.
Ditto, what Benny said. Also, we post what went well and what didn't work well so you can get constructive feedback and advice. All in the interest of improvement and learning.
Wouldn't say it is very far outside my comfort zone, but still - as far as I remember, this is the first time I managed a loaf with high % spelt that didn't turn into a pancake a bit. Almost 40% spelt (just all I had left), total 60% whole grain - also unusually high for me, I rarely go above 40%. Also used some old stiff wheat starter (wanted to use it for another bake, and decided instead of discarding just to use it), and added a little fresh rye starter to ensure fermentation moves along. Here is the approximate formula (was adding things and weighing, and wrote down afterwards, so hope I didn't mix up any numbers): https://fgbc.dk/1ftc
Just mixed everything without any autolyse, did some slap&folds until partial development, then did some folds in the first couple of hours, and left to ferment. Perhaps because of high whole grain %, and addition of diastatic malt, bulk was done within 6 hours (total from mixing) despite low inoculation (<5% PFF). I kept it warm too. Might have been just a little overfermented even: was OK to shape, but just a tad more sticky than I expected. Coated in sesame seeds and retarded overnight. Baked covered for 20 min at 250C, uncovered until I liked the colour at 230C with convection (~15 min).
[url=https://ibb.co/SQZ82tj] [/url]
 [/url]
[url=https://ibb.co/fDpnjNn]
Not the tallest loaf, but I am very pleasantly surprised with the crumb for such high % whole grain! Don't often get it this open even for more typical for me formulas. Flavour is unsurprisingly very pronounces, but not overpowering. Sesame seeds as usual provide nice contrast.
All my bakes for this CB are here: https://www.thefreshloaf.com/node/67832/outside-comfort-zone-cb
That baked up really well Ilya, well done. I agree the crumb is just lovely, just like my bakes more 75 and 80% whole grain the crumb was better than my usual 25-30% whole grain, funny isn’t it?
Thanks Benny! Indeed, very unexpectedly nice crumb, not sure what to make of that. Does it mean we are doing something wrong when using lower % whole grain?
I suspect we are under proofing somewhat in comparison to these fast moving high % whole grain breads. Although as you've seen I've been now over proofing my 100% whole grains. I think with less whole grain and strong flour those doughs benefit from more proofing/fermentation.
Yeah, I agree, that's a very possible explanation. Should try to push bulk further.
I like the look of that one (crumb and crust). Did you bake it seam side up? I recall reading Forkish uses that practice to encourage this type of look.
No, seem side down - not sure why the opening is sometimes a little rough like that... Let's call it rustic.
Nice looking bake Ilya! Even crumb, and the sesame seeds are a nice touch on that loaf. How did you apply them? Before or after final proof? They are really evenly distributed.
Thank you! I apply the seeds before final proof - just scatter them on a tray and turn the loaf upside down onto them, and move it around a little to make them stick. I guess I degas the dough a little, if it's on the extensible/soft side (like this one was), but with stiffer doughs I don't think there is any issue at all.
Hand mixed pizza dough
I always mix my pizza dough by machine, so I thought I would move out of the comfort zone and try a handmixed version. This was prompted by a simple recipe I found on the Gozney site.
Ingredients
305g Water, at 85 degrees Fahrenheit
1.5g Fresh Yeast or 0.6g Dry Yeast
10ml Olive Oil
500g 00 Flour
12g Fine Sea Salt
Method
Step 1;
Put the water, yeast and oil in a bowl and break apart with your hand. (I used idy and just mixed it in with the flour)
Step 2;
Gradually add the flour a little at a time and use your hand continuously to mix the dough together.
Step 3;
Once ⅔ of the flour has been added, add the salt before adding the remaining flour, continuously mixing with your hand as you do so.
Step 4;
Knead the dough for around 3-5 minutes or until smooth, cover with a clean towel, and leave to rest for 10 minutes.
Step 5;
Knead the dough one final time for a minute or so before dividing into 230-240g pieces and shaping into dough balls.
Step 6;
Place the dough balls into a tray or individual plastic containers and leave in the fridge for between 6 and 24 hours.
Step 7;
Remove the dough balls from the fridge at least 2 hours before attempting to open into pizzas.
The messy delights of hand mixing:
Cat waiting for pizza:
And the end result (we only make Margheritas):
Was it better than machine mixed dough? I'm not sure, but it was tasty! Soft dough with a nice fluffy crust. I was also boosted by watching maestro Enzo Coccia making pizza dough on the BBC TV Pizza Boys series and he said it had to be made by hand!
Lance
Marvellous. We love Margheritas and is usually the first one made for the session.
Cheers,
Gavin
OMG Lance, I wish I had an actual pizza oven, you cornicione looks incredible, I just ate and now I’m hungry again.
Funny you mention the Gozney site, I just watch Bertinet make a fougasse on YouTube by Gozney.
Benny
I challenged myself to bake bread using the same great flour at different hydrations:
- at 85%, the dough was tricky but managed to get a good result
- at 75%, I felt being the most comfortable and the loaf turned as expected.
- at 65%, I've got a bit out of my preferred hydration range but I was totally impressed by the capabilities of the flour to relax.
I continued the challenge, to, guess what, 55% hydration. This is waaaay out of my comfort zone and it is far from being a preferred way of doing bread. However, if you are wondering why I am doing it, it is to test the limits, just for learning reasons.
Therefore, I ran the first test a few days ago and this is the recipe and method used for it:
Ingredients: 175g starter, 100g spelt flour, 880g Manitoba (Mulino Caputo) at 14%proteins, 500g water, 20g salt
Method:
- late evening, mix flours+water+salt and let it overnight for the saltolyse
- 12pm, add starter in the dough, kept the dough during bulk at DDT 25ºC
- 2pm, divide; 10% increased volume
- 4pm, S&F ( a kind of coil fold performed in the air), 20% increased volume
- 6pm, 2nd S&F, 35% increased volume
- 9:30pm, shape, 75% increased volume
- 10:30pm, put it in the fridge overnight. 100% increase in volume
Overnight, the volume did not raise in the fridge, it was kept at the same level.
Baked straight from the fridge in Dutch ovens with 3 ice cubes inside in my wood fired oven (wood fired oven is another challenge I deal with). Unfortunately, the temperature was very high in the oven (I suspect +300ºC, and I couldn't wait for longer for a cooldown) and in 20 minutes I fully baked the loaves with the lid on.
OK, so these are my observations so far:
- after the initial mixing, the dough was that stiff that I could certainly break a window with it
- after the saltolyse, it became manageable and I've reached a great windowpane test (see photo)
- relaxation time between steps is essential for such hydration
- at the shaping, although at 75% increased volume, the dough felt slightly under proofed in my hands so, I left it grow to 100% after shaping. I used an aliquot jat to measure the increase. However, I could have been easily fooled as I am not used to the stiffness of this dough. Difficult to say, still wondering what is the sweet spot of proofing for this dough as I see signs on both sides overproofed and underpoofed.
- dough didn't have a huge oven spring, although it was not surprising for such low hydration.
- the crumb did not look bad at all and despite the extremely high temperature of the oven, it was fully baked. I wished it would have been more open though...
- looking at the crumb, I see it denser on top rather than the bottom. I think that a more simple shaping (just a roll) would relax the tension on the surface and allow it to expand more.
- adding a lot of steam in the oven (ice cubes in my case) helps to avoid a hard crust, that on top of the improved oven spring. I knew this from previous bakes but such a thirsty dough I think it benefits more from extra steaming. The downside of extra steaming is that the flour on top tends to disappear. Stencilling works for me with only one 1 cube in DO to preserve the pattern. For 2+ cubes, the flour absorbs the steamed water and only scoring can be used as design.
Here are some photos from this experiment:
Although I was not disappointed with the result, I'm repeating today the test thinking to improve the following: reassess the fermentation time (+/-), keep the shaping very simple, add more ice cubes in the DO and of course get a lower, more appropriate temperature to bake in the wood-fired oven.
I'll keep you posted with my second test result...
Very interesting going lower and the bread looks great. Your photography is so top notch. Looking forward to your further experiments.
Benny
Thank you, Benny!
For the second bake. here are the changes:
1. I reduced the bulk time to 8 hours. Why? I simply felt that it was ready. After the first experiment I had a doubt: was my bread over or under proofed. As I had arguments for both options I trusted my intuition. In fact, in the second test, I reached the same 100% increase in less time. More, with the first test, I felt it still under proofed and with the second, just on time. Could the loaves from the second test still accept more fermentation... I do not know... maybe...
2. Shaping was a simple roll + stitching on the back. I think this trick had some improved effect.
3. I added 4 ice cubes inside the DO to create more steam and the flour didn't disappear from the top completely. I think it helped with the oven spring.
4. I baked it at a lower temperature, 30 minutes with the lid on and only 10 without.
Some additional comments about this experiment:
- the crumb was fluffy, reminding me of sandwich bread
- the crust was actually not at all very strong or thick. Here I think that the extra steam and reduced baking without a lid helped.
- the flavour was good (however I feel that high hydration loaves perform better here)
- the aroma was just wow. I didn't expect to get such a strong aroma from a stiff dough. I guess more flour, more aroma, right?
The second test got a bit better. I resonate with the comment of Benny on the 100% whole red fife, that is a bit frustrating sometimes to do some improvements with small improved results.
I will conclude my tests on this very low hydration because this is not the type of loaf that I would bake regularly. I keep the lessons learned and move on. Who knows, maybe one day I'll come back to it as I feel there is room for even more open crumb on this 55% hydration loaves but for the moment, I have other wished recipes on my list.
Here are some photos and the video of the full process:
Denisa.
Very interesting. The crumb on that second loaf just looks ideal to me!
Thank you! In fact, the bread was not bad at all and I and my family enjoyed it a lot. What was weird was the feeling of handling such a stiff dough. Or at least, I was not used to it.
Denisa.
(Old melody.) "The look of love is in your eyes... A look that loaf can't deny...."
Love the scoring. Beautiful!
I find that lower baking temps yield stronger aromas. High temps burn up many aromas.
Lower hydration doughs take longer to ferment and take longer to puff up. Think of water in the dough as transportation highways, food, bacteria and yeast, fermentation by-products transport more readily when hydration is higher. Slower when hydration is lower. I can allow for a longer and more volumous final proof with a lower hydration dough. ..and less if any folding, going straight from a bulk ferment into shaping. In the video, I feel the 55% hydration dough was rushed along. Try a slower tempo, just for the learning experience. :)
Thank you, Mini Oven. I made this bread as an experiment with flour. It is not at all my preferred hydration, but I absolutely wanted to try this extreme. I could have chosen a low protein content flour, but I needed to feel in my hands the changes of the dough for such low hydration with the exact same flour. It comes with such a great experience and, as you mentioned there is always room to learn even more. I love your association of hydration with highways. Thank you very much for sharing your experience with me, and with the community.
Denisa.
My first time making buns and also first time making filled buns. Most Asian people will have fond memories of these types of buns from their childhood, I certainly do. I still crave these on a regular basis but seldom get to Chinatown to have one. I decided that I would do a mashup and adapt two recipes, one for a Tangzhong bun and the other for the bbq pork filling and combine them to make these. I wasn’t able to find a decent sourdough cha siu bao recipe.
I decided to use Maurizio’s soft sourdough rolls recipe and the Omnivores cookbook bbq pork filling recipe and general formula. However, I will say that following the baking proceedure from the Omnivore website led me astray. Their baking temperature was 350ºF and was a brief 12-15 mins. At twenty minutes they were far from done so I had to extend the baking for probably close to 40 mins. Next time I would bake as I have written below.
Overnight sweet levain build 76ºF 12 hours to peak. This was way too long, the levain was way past peak at this time. I assume that Maurizio found that his levain was slow to ferment because of the sugar, I would change the ratio to do an overnight in the future.
Take butter out of fridge before bed.
Prepare Tangzhong first step next morning and allow to cool.
Mix room temperature butter 69 g with 69 g AP flour. Set aside. This makes incorporating the butter much quicker.
Mix in a mixer until well developed gluten
131 g water
All Levain
54 g Bread flour
Use 223 g AP flour (69 g of flour used to mix with butter) so total AP flour as in chart
All Tangzhong
8 g salt
28 g sugar
Then add butter AP flour mix until dough nice and strong.
At 76ºF bulk ferment the dough until almost doubled in size about 3.5 hours, dough should be smooth and puffy. Do 3 sets of coil folds at 30 mins intervals.
Will be chilling the dough at the end of bulk to make it easier to shape.
Make the Filling
Filling Ingredients
Garnish
Place dough in fridge for 15 mins chill to allow easier divide and shape after bulk fermentation is complete. The longer it is chilled the longer it will take to come back up to temperature to complete final proof.
Divide dough into 12 equal pieces rolling each into tight ball, cover with a towel until used.
Shape the buns
Prepare egg wash
Beat one egg with a bit of milk.
Bake
Store and reheat
Now that I have eaten three, yes three, I can see that my shaping needs to be adjusted. In order to have a nice amount of bread around the filling you leave the center of the circle of dough thicker than the edges. However, from this photo below you can see I over did the thinner edges leaving too little bread on the bottom of the bun. Considering this, I did do well and only had one leak any filling, so there is that! The pork filling is so delicious and exactly I was hoping for.
Very nicely done! Excellent job on the shaping of each one and the crumb looks nice and uniform. Pork looks good too. Enough sauce to know it’s there, but not so much to make the bread soggy.
They look great and give me ideas for my summertime rotisserie chicken and turkey cookouts!
Thank you Troy, they truly were tasty. Your chicken and turkey suggestions also sound delicious. Can’t wait to see them.
These look divine. Can't believe it's your first time making them. These would be great to have in the freezer.
Vickie, thank you very much. They’ll be gone by the end of the day today so none in the freezer this time.
Benny
so I’m going to have to really think about this. 100% whole grain loaf or go the other way with just plain unbleached bread flour? Maybe forgoing the sourdough and use yeast? Options... ?
Do a 100% wholegrain Danni, I’ve been working on this lately as well.
Benny
I was checking out the Whole Grain Spelt Pan loaf on The perfect loaf. I seldom make a pan loaf and when I do, they don’t rise very much. So this might be something to try: 100% wholegrain and in a pan.
I’ve been working on a 100% whole red fife sourdough, not in a pan. After three bakes I’m honing in on the proofing as I’ve overproofed all three times but getting closer with my last. I’ve posted the formula in my blog. My first two attempts were over hydrated, my most recent the hydration feels right. Hopefully my next bake with be on the money. Baking 100% wholegrain has been quite a challenge for me.
Benny
I have red fife here so this is definitely an option.
The only time I baked 100% whole grain (apart from rye) was when I tried that recipe. I think I figured out I am not a big fan of 100% whole grain bread (although can't be sure from one attempt of one formula), but still it was quite good. I guess spelt has a milder flavour than whole red wheat, so that helps.
I think Maurizio makes it with freshly milled spelt? I used commercial stone ground spelt, so that could make the difference in the flavour...
Had my first 100% whole grain bread been the stoneground whole wheat I baked as my third attempt, I probably would never have tried again, the flavour was just off putting. The stoneground red fife on the other hand actually tastes quite good which is why I have persisted and have baked it three times.
I know what you mean! I've had a hint of some strange flavour when going to higher percentages with regular whole wheat, even not 100%. That's why I haven't tried 100% again so far: want to get my hands on some heritage variety first. Or use an ancient grain like spelt of course, but I suspect they really need to be made as pan loafs for good structure...
Selkirk wheat which is their hard red spring wheat. It a variety from the 50s before the major hybridisation of wheat started. I find it has a very nice mild flavour.
You are in the UK. I don’t know why I thought you were in Canada. ??♀️
Indeed! No worries :) Maybe someone else will fins this information helpful.
Thank you, but wrong continent unfortunately! I want to try this wheat before leaving Scotland/UK: https://scotlandthebread.org/product/balcaskie-landrace-organic-flour/
Sowing varieties and letting natural selection and hybridization take place.
Yeah, it seems like a cool project! I got some of the baking kit from their shop, but still haven't tried the flour, and sounds like it should have a great flavour, although probably a little challenging to work with.
It says it’s good for bread, and cookies as well as other things. Sounds a lot like our Canadian all purpose flour which we use for everything. I use my strong bakers flour in everything including cakes and it all turns out fine.
Could be. They explain it has higher amylase activity and weaker gluten, so maybe it's a little different from that, but shouldn't be too challenging.
Yes there are some great UK heritage varieties to try, Ilya. I've bought from Heritage Wheat a couple of times. The first one I got was Red Lammas, which is highly rated by many, but a bit too "branny" for me.
But currently I'm using Millers Choice, which has an excellent flavour and some strength, too.
Lance
A sourdough class I attended had us make pitas from freshly milled flour and from some expensive brand of whole grain flour. The difference in flavour was incredible. You could pick out the freshly milled flour pitas instantly. That’s what sold me on getting a flour mill.
Sounds great! I wish I could get one too! Maybe eventually.
I won’t post the formula because it is the same as I did last time. The changes I made were all related to proofing. I reduced bulk and final proof shaping at 50% and starting cold retard at 60%. Despite these changes, the loaf still spread more than it rose. I am now starting to wonder whether my hydration is too high. I haven’t sliced it yet but that would be another consideration as well. If I bother to try this again, I’d drop the hydration to 75-76% and maybe go to cold retard immediately after shaping giving no room temperature proof, or perhaps shape even earlier at 40%.
On the other hand, I’ve had much better success with this flour when adding just 25% of bread flour and the flavor of that bread is so similar to this 100% I’m not sure it is worth the trouble.
This is still close, but not where I’d like it to be.
I think you are on the right track with reducing the hydration a bit and shaping sooner. I would suggest that you try shaping after a 30% bulk rise and pop in the fridge right after shaping. I seem to get better oven spring if I don’t do any proofing on the counter. Mind you, I’m not dealing with 100% wholegrain so my suggestions might not be applicable. But you won’t know unless you try... ?
Thank you Danni, it is just a bit frustrating that I wasn’t able to get it to improve from the last time despite reducing the proofing. I was hoping that this time it would show some improvement but really it is almost the same.
Benny, it reminds me very much of the loaf I make that contains the non gluten flours. Very hard to keep it from spreading vs springing in a free standing loaf. I have to drop the hydration a bit and give it some stronger folding throughout BF to keep any structure in it.
Still a good looking loaf and hoping it has the open crumb you're looking for!
Thank you Troy. Well this crumb is actually better than the last one I did. Yet, it is still overproofed as evidenced not only by the profile of the loaf but also just under the crust at the sides you can see the gluten breakdown with smaller holes becoming one larger one. I’m just surprised that the crumb is actually a bit more open despite there being less proofing.
This has been a challenge to dial in and I’m still not there yet. One things though, I had been adding honey to balance what I expected to be some bitterness from the bran, but with this bake I left it out and don’t miss it.
I’m still overproofing this amazingly. I forgot to mention that I did leave out the honey for this bake so that is the other difference along with less bulk and final proof. The profile of the loaf and the crumb still indicate that this is overproofed. I think the crumb though is surprisingly more open which is odd with less proof.
I’m not sure what the ideal parameters for this flour will be with my methods or if my methods need to be scraped. I will reduce hydration, bulk and either reduce or eliminate final proof in a future bake.
Congrats Benny! Looks like you're getting closer!
Thank you Troy, after lifting the lid, I felt a bit defeated, but having seen the crumb I feel a bit better about this. I’ll try again in the near future with less hydration and less proofing. I didn’t have lemon around and I had wanted to try some of that as well since I no longer have any Vit C in the house.
Benny
That crumb is beautiful!
Curious about the lemon and Vit D... Are they used to strengthen the gluten?
Sorry Mary, that was a typo, it is Vit C. Both Lemon juice and Vit C can strengthen the dough.
The same thing happened to me once. I took very flat loaves out of the oven and was super disappointed. Then I cut one open and it had a great crumb. ??♀️
What can you do right? Try again with some changes to hopefully improve.
Benny
(he says emerging from his week-long torpor).
Been following all of this. And yes, it would be nice to have a beautiful bake like this show some further loft, but overall it is a beautiful bake.
My most recent bake finally isn’t overproofed and has risen more. I’ll tinder with this some more in the future but I need a change, I’m not used to baking the same thing (other than with baguettes) so many times on a weekly basis.
Benny
I have to commend you for not giving up. I’m sure I would have said Forget it after the second try.
Hi Danni, the most recent bake is further down this page and has photos of outside and the crumb. I hate giving up on things so kept trying and now a decent 5th bake, not perfect though so more tinkering will be needed eventually.
Benny
After viewing THIS LINK, I became curious about non-gluten 100% Rice flour bread. The videos showed nice looking slices and I was curious as to how it taste. This bread was completely out of my comfort zone. The results stand to validate that :-)
Rice Bread
失敗しない!ふわふわ米粉100%パンの作り方 How to make gluten free rice bread
NOTE weights expressed in “(xx.x g)” are for a small USA Pullman pan
Rice Paste
Batter
Either I mis-calculated, the pullman’s sloping sides, or the author missed it. 240g batter was removed from the Pullman in order to get the pan half full.
The proper hydration is tricky. Add water slowly , the evaluate the ribbons.
Plastic covering touch the dough causing damage.
A Pirate’s Treasure. A sunken chest...
If I was shooting for bread bowls, I would have knocked it out of the parl. LOL
Possible causes of failure
At least I got an idea of the taste, which is very different from typical bread. Prior to this, I thought that non-gluten bread was not for me. Now I KNOW! LOL
It was super easy to make and I learned something new.
Really interesting. I have a family member with celiac, might try this for her. I wonder if it just can't handle the larger volume amount for the pullman, i.e. too much weight per sq in for the rice flour? I have some mini tins, I might try that.
Thanks for blazing the trail with your experiment!
Mary
Let us know how it turns out.
Good idea, it could be the larger mass of dough that caused the collapse. I’ll add that to the list in the OP.
if the rice loaf video you posted earlier covered the top of the loaf with parchment before covering with foil. A narrow small loaf may be key, using the sides to get height on the loaf.
I was just explaining the other day why an Angel Food cake pan with the center tube (high 2 piece cake pan) and upsidedown cooling is important to the volume of an Angel food cake. The cake is then cut from the form after it has cooled completely.
Definitely outside of most of the TFL bakers comfort zone, good of you to try this Dan.
Benny
A few more details at my blog. This tasted SO GOOD! To the point I had to freeze some, we were grazing our way through it way too quickly, lol.
Looks so soft and tasty, and I love blueberries baked into some cake or pie . When we lived in CA we had Meyer lemon bushes in the back yard and loved picking them off just before using them.
The crumb seems more cake-like than focaccia. What is it?
Mine is just a beginner loaf. I was very distracted due to lots of meltdowns and tantrums this weekend. Starting this bake was the only thing that snapped my son out of it for a while. It is a slightly modified "Lesson 2" bread. I saw in Reinhart's BBA book that he uses a sponge for one of his white bread variations so I thought I would try it out with this. I have also been wanting to use purple potatoes, but the color came out in the water so I used that instead (alas, still no purple). It is hot here, so my rise times are probably a little faster than what some of you are used to.
Here's what I did to my slightly under baked loaf:
Sponge:
Let sit until frothy (it was about half to a full inch of froth, about 3 hours)
Dough
Mixed all but oil and let sit for 10 minutes. I did bucket folds in my big mixing bowl and when I saw it looked a little dry (it was probably fine) I added a little more water. Then I saw my mistake and drained the water out and added the forgotten oil and more all purpose flour to compensate. I folded it over a few more times then left it for an hour while I made dinner. Then I did more bucket folds and it started to feel the dough strengthen, less slack, held a round shape. I then left it for it's second rise and went to eat dinner. I shaped it after dinner about an hour. It was doubled or almost there, hard to tell in a big bowl. I baked it in a dark loaf pan at 350F for 10 minutes and then 325F for 30 minutes. The goal was a white sandwich bread my kids would eat.
Results:Crust was a bit too chewy for the kids and had to use the frozen waffle setting to toast it normally. Texture was very soft, so soft it was falling apart unless toasted. My husband and I thought it was good. My oldest like it a lot, but only with butter (Natures' Own honey wheat still gets the pb&j approval). Not too bad, my worst loaf so far. But considering I usually make muffins or cakes and this was a hard weekend, this bread was pretty good. Next time I'll try the buttermilk version in the BBA as I like to have buttermilk around for muffins.
With no new comment or post since (perhaps) April 4th, it seems that interest in this CB has hit a roadblock.
At the outset I mentioned that it might not be able to sustain or even generate a mild interest. The first point appears to have been borne out. The second was, to some degree, successful. Whether you participated, were curious enough to peek in on or perhaps even inspired to think beyond your own comfort zone, at least the CB generated some thought. Just not enough to warrant the CB's prime position at the top of the Recent Posts.
Thanks to all who stopped by this way. In a few days I'll ask Floyd to unpin this post and it will drop off the top of the Recent Post list. As with all CBs, it will continue to remain active for anyone wh wants to review or further comment within.
Alan
I haven’t had time to give it a shot yet! And I’m sure I’m not the only one!
I'll give it another week or so. Not disappointed in the general response compared to prior CBs because I figured that it was a shot in the dark. But with neither hide nor hair (Hyde nor hare?) in a full week, it seemed as though the lights had been sufficiently dimmed.
My attempt will be using Emmer flour - very hard to come by here (and expensive!) but 1 kg bag arrived on Friday so hopefully this coming week.
Any tips on how this will perform? It is organic, stoneground flour.
Leslie
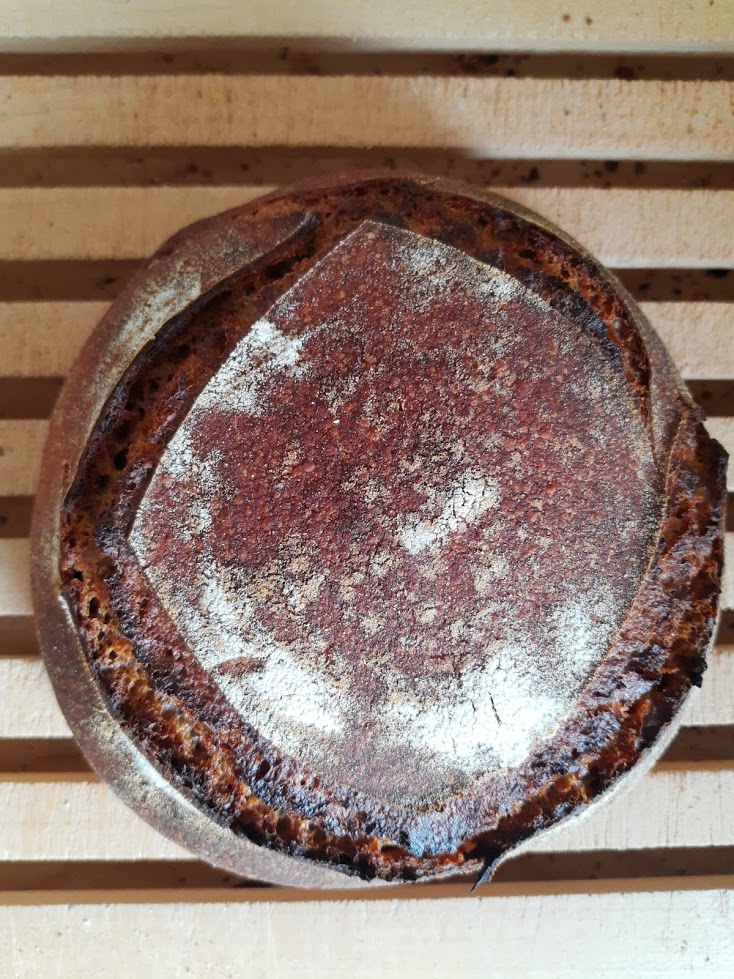
You may know my frustration with this grain and trying to learn to bake with it at 100%. With much advice and good helpful suggestions from many here and elsewhere, you know who you are so thank you, I think my fifth bake is the best so far without having seen the crumb.
Image

So what changed with this bake? First was a drop in hydration from 80% to 75%. This really did seem drier than I am used to dealing with and now that I think I have the fermentation a bit better figured out, I think I would increase this back up and next time try 78-80%. The dough was so NOT sticky that I didn’t really need to wet my hands to do the coil folds. Perhaps the problem wasn’t the hydration at 80% but purely the fermentation alone. I still did a fair number of slap and folds, but I didn’t do a lamination. The reason for this is that I was worried about the gluten and didn’t want to stress it by doing a lamination. Whether or not that was a good thing to leave out, who knows. I did four coil folds during bulk after an initial bench letterfold and ended bulk at only 40% rise in the aliquot jar. Other than for baguettes where I end bulk at 20%, this is the lowest I ever end bulk. But for this flour going to 50% was too far. Then the dough was shaped and left for 30 mins on the bench until the aliquot jar reached 45% and then placed in the fridge at 3ºC. After a few hours in the fridge I noticed that the dough had risen further which I’m not used to seeing in my cold retarded doughs. So after a short for me 8 hour cold retard I decided to bake. This is what came of all of this.
As Mariana pointed out to me elsewhere, based on the course ear, the hydration of this loaf is too low. I think this will be reflected in a tight crumb. I’ll post that when I finally slice this at lunchtime.
Benny
Is perfect! Waiting to see the crumb.
Thank you Danni, I’ll need to go back up on the hydration now I think though so I don’t have high hopes for the crumb which will be tight for sure even for a wholegrain loaf. I really should have just changed the proofing and not two things at once. But being so damn frustrated with this I wanted to try to get something that looked like bread and not a large pancake baked.
look forward to the crumb
Leslie
Thank you Leslie, I forgot to post the crumb photos here, I’ll do that now.
Benny
I can’t say that I’m too disappointed in the crumb, sure I’d like it to be more open, but for a 100% wholegrain and this particular wholegrain I’m happy with it. I would try to increase the hydration while maintaining the degree of fermentation with the next bake. This one isn’t overproofed or underproofed to my eye.
Image

Image

Image

Image

Definitely not a disappointment Benny. Great crumb for 100% whole-grain. I can't see a flaw.
Gavin
Thank you very much Gavin, I appreciate that. Hope you’re well!
Benny
That crumb looks great Benny! Beautiful loaf and way to stick with this recipe. Your perseverance is paying off!
Thank you Troy, I think I need to adjust the hydration now. But I also think I’ll take a break from this recipe for a while.
Benny
it's absolutely gorgeous! Inside and out.
Thanks so much Mini, much appreciated. It only took 5 bakes to get here LOL.
Benny
and get caught up. So many good loking bakes!
I'm missing a lot of good stuff in here, Wow!!
Made Sourdough doughnuts using 'Patrick Ryans' yeasted recipe. Converted to sourdough and used stiff starter. First day and newly cooked there was no sourness to it but on the 2nd day, yup there was a hint of sourness to it.
500g strong (bread) white flour
75g caster sugar, plus extra for coating
12g salt
Zest of 1 lemon
200g Stiff Starter
250ml milk, room temp
1 large egg
75g butter, diced
8 Hour Ferment
8 - 9 Hours Proof
Definitely needed to adjust something on this recipe.
Wow those look delicious Carlo, is that a chocolate filling?
Nutella Benny, didn't mentioned it on the post. Thanks!
Those look sooooooo good!
Went out of my comfort zone on this bake with hydration, using lamination for inclusions, and using my temperature probes for smoking meats to better understand what's happening during a bake. Lesson learned: Trust the aliquot until you learn how to read your doughs!
Details on the bake here and details on the temperature data here.
I hope you like blisters Troy!! Wow, look at those amazing blisters. Yes it could have used more fermentation, but I’ve baked much less fermented breads at times than that one.
Thanks Benny. Want to try this one again to see if I can get the hydration right and to see if bulk takes that long again or if it was just a fluke.
Deleted
OK, here goes with a big step out of my comfort zone: as a "lurker" on the forum over the past several months, I'll join a community bake for the first time!
Inspired by Leslie's comment above, I tried baking a 100% whole wheat emmer loaf for the first time. I've only used this flour so far as a 20-30% inclusion in wheat or spelt loaves, generally with nice results. Recently I tried baking a couple of 100% einkorn loaves, and was curious how the emmer would compare, as it usually resulted in an easier-to-hande/less-sticky dough than einkorn when used as an inclusion.
Recipe:
100 g emmer levain (40g emmer, 40g water, 20 g rye starter)
500 g whole wheat emmer, 350 g water, 9g salt
I was nervous about how the flour would handle water, so I let the emmer autoyse with 315 g of the water for a couple hours before adding the levain, then gradually added extra water, still staying conservative with hydration. The dough was actually quite easy to handle: it has much less strong gluten than wheat or even spelt, but still much more than einkorn (at least for the flours I have used), so it can be worked more like a wheat dough than like a rye.
Due to some other "life" factors conflicting with the bake, I ended up letting it bulk longer than originally planned - 5.5 hours, after which it was very puffy and delicate. During shaping of the boule I ended up tearing the outside skin a bit. I put it directly in the fridge for a cold proof until the next morning.
Upon baking, didn't get too much oven spring - perhaps a combination of the properties of the flour, some overproofing and inexpert shaping. The crumb is not open, but also not unpleasantly dense - nicely chewy. The bread has a markedly dark brown color relative to wheat or spelt, and a nice nutty flavor.
Not sure I'll repeat the experiment, but it was nice to experience the behavior and taste of the emmer flour in its pure form. If I were to do it again I'd perhaps dare to go a bit higher hydration, and also try to monitor the proof more closely (both in bulk and by doing a direct bake instead of cold retard).
Thanks for the inspiration all!
Mike
Mike, congratulations on your first Community Bake, we’re glad to have you join us.
I’ve never tasted or baked with emmer and keep seeing it at the store where I get my red fife and it keeps tempting me to buy it. Good for you trying out a 100% whole emmer loaf. I think you baked a handsome loaf, the crust is a beautiful rich mahogany and is very inviting. The crumb shows no signs of overproofing which I’m all too familiar with and is nice and even. Well done.
I hope you become less a lurker and more an active participant. You have a blog function on this site that you should feel free to use to post your bakes. It’s a great way to go back and monitor your progress as a baker over time.
Benny
glad to have helped inspire to to join in ?. the colour of the loF is wonderful!
I will try my Emmer flour tomorrow but my first effort will be about 30% and then see what I think. I will watch hydration and up it if it looks as if it can handle it.
happy baking Mike
Leslie
I haven't baked with emmer yet, so I appreciate your willingness to experiment with it. From all appearances, you've hit a home run.
How would you compare/contrast the flavor of this emmer loaf to one made with modern whole wheat?
Paul
Mike, Welcome to the Community Bakes! You picked a great first post, and your 100% emmer loaf looks tasty. I like a good whole grain loaf, and that crumb looks great to me. Anything that makes a good slice of toast and a good grilled sandwich is a loaf well prepared in my book.
Looking forward to seeing more of your posts!
Thanks for the compliments all! Maybe I will indeed give the blog feature a try for the next community bake.
Paul, I actually hardly ever bake with "normal" whole wheat, so it is hard for me to say - normally I use spelt flour for the whole grain part of my bakes. (For me it's a "regional specialty" crop and hence easily available from local growers and millers). Compared to spelt I would say the emmer has a somewhat more pronounced "nutty" flavor, but the difference is relatively subtle. Would be interesting to do a direct head-to-head comparison, as I normally don't bake 100% whole grain spelt either.
I baked my usual Norwich sourdough, but I shaped, refrigerated, and baked straight from the fridge. I normally do a final room temp proof and bake. The extra flexibility in the baking schedule and ease of handling the cold dough was great. My family prefers no sour sourdough but the slight tang of this method was deemed acceptable. Assuming I have fridge space, I will continue this way.
Congrats on making this jump! I planned to try this with tonight's bake, but I just can't get over the fear of over-proofing and losing a loaf, so I baked it anyway. Did you follow the same temps/times you do with your normal bakes?
I did. Did a room temp final proof about half as long as normal, then into the fridge for about 15hrs. Baked normal time/temp.
A basic 1:2:3 with 30% emmer flour mixed in my new Kenwood mixer. Still learning how long to mix. The loaf actually look darker than this photo shows. Details in my blog https://www.thefreshloaf.com/node/67981/first-try-using-emmer-flour
Not too far out of my comfort zone on this one, but this was the first time using a mash. Got a little closer to that perfect Pullman pan loaf, but not quite there yet. Details are in my blog.
The mash added time to the start of the bake, but it definitely added moisture and "creaminess" to the texture. The crumb felt moist when I sliced it this morning, but not a thing stuck to the knife. Rheinhart's description of creamy seems about right! Best part of the bake... The smell of beer coming from the oven for the first 15 minutes. :-)
Nice sandwich loaf Troy, you are zeroing in on your target.
Benny
It took me a while to get to it, but I finally tackled porridge bread. Details of my bake are on my blog here.
Actually this does double duty. I have only done an overnight cold retard once before. Will see how the crumb and taste are tomorrow.
Meanwhile, fresh out of the oven:
Update with crumb below. The crust is still crisp but not overly so, with a very soft and moist crumb. It leaves a little gummy residue on the knife, but neither of us notice any gumminess in the chew. Hubby really loves this one, which fits. He's a big fan of any bread with seeds or decorative toppings. All in all, a successful bake. ?
Ohhh... That looks delish!
Well done Mary, good to tackle a porridge bread, you’ll have a nice creamy soft moist crumb. I like the oats on the crust.
Benny
I only have two previous experiences with 100% whole rye bakes (Volkornbrot), so this Finnish ruisreikaleipa from Daniel Leader's Living Bread should qualify as out of my baking comfort zone (if I even have one).
details: https://www.thefreshloaf.com/node/68011/ruisreikaleipa
Perhaps I can use this CB to squeeze in the sprouted grain bake I've been meaning to try.
I've never heard of this bread before, and I find the storage method fascinating. I'm used to the storing of cured meats, herbs, root crops, etc. from the ceiling, but bread never occurred to me.
I am a bit late to the party, however, today I baked my first spelt loaf. Hamelman’s Honey Spelt Bread. This is a 75% whole-spelt flour I milled from spelt berries yesterday. 25% of the flour was pre-fermented in a pate fermentee and was taken from the spelt. The 72% hydration dough felt much stickier than I was expecting as I hand mixed. The dough became much lighter towards the end of the bulk fermentation. The loaf rose nicely in the oven and took on a good dark colour.
The sliced loaf revealed a darkish light textured crumb. The taste was very pleasant and reminiscent of the brown bread loaves my mother bought when I was a child. I am very satisfied with this bake.
And the color of the crust is just beautiful!
Thank you. The first-time surprise with a whole spelt.
That’s very impressive oven spring Gavin considering the 75% whole spelt which is so known to spread and be so extensible. In a way similar to my final 100% whole red fife in that when I finally reduced hydration and fermentation I got a good loaf. It’s so funny when I first tried baking with mostly whole grains I was using very high hydration which is what one reads about when using whole grains, but that often causes the loaf to really spread. Reducing the hydration really seems necessary at least for me with these types of loaves.
Next time I do a high whole grain loaf, I’m going to use the same type of scoring, Maurizio Leo recommends it in these types of loaves saying that he thinks it reduces spreading during baking.
Well done Gavin.
Benny
Thanks, Benny. I was not sure what to expect from the dough handling and development but was pleasantly surprised that it allowed me to develop some structure through stretch and folds. It was very sticky so I had to use a bench scraper for the first 5 minutes of mixing. The scoring was an experiment as I used it previously about 12 years ago on my early sourdough to keep some lift in the oven. I think lower hydration is the key to a tall profile with whole grains. The process for this bake is below.
Cheers,
Gavin.