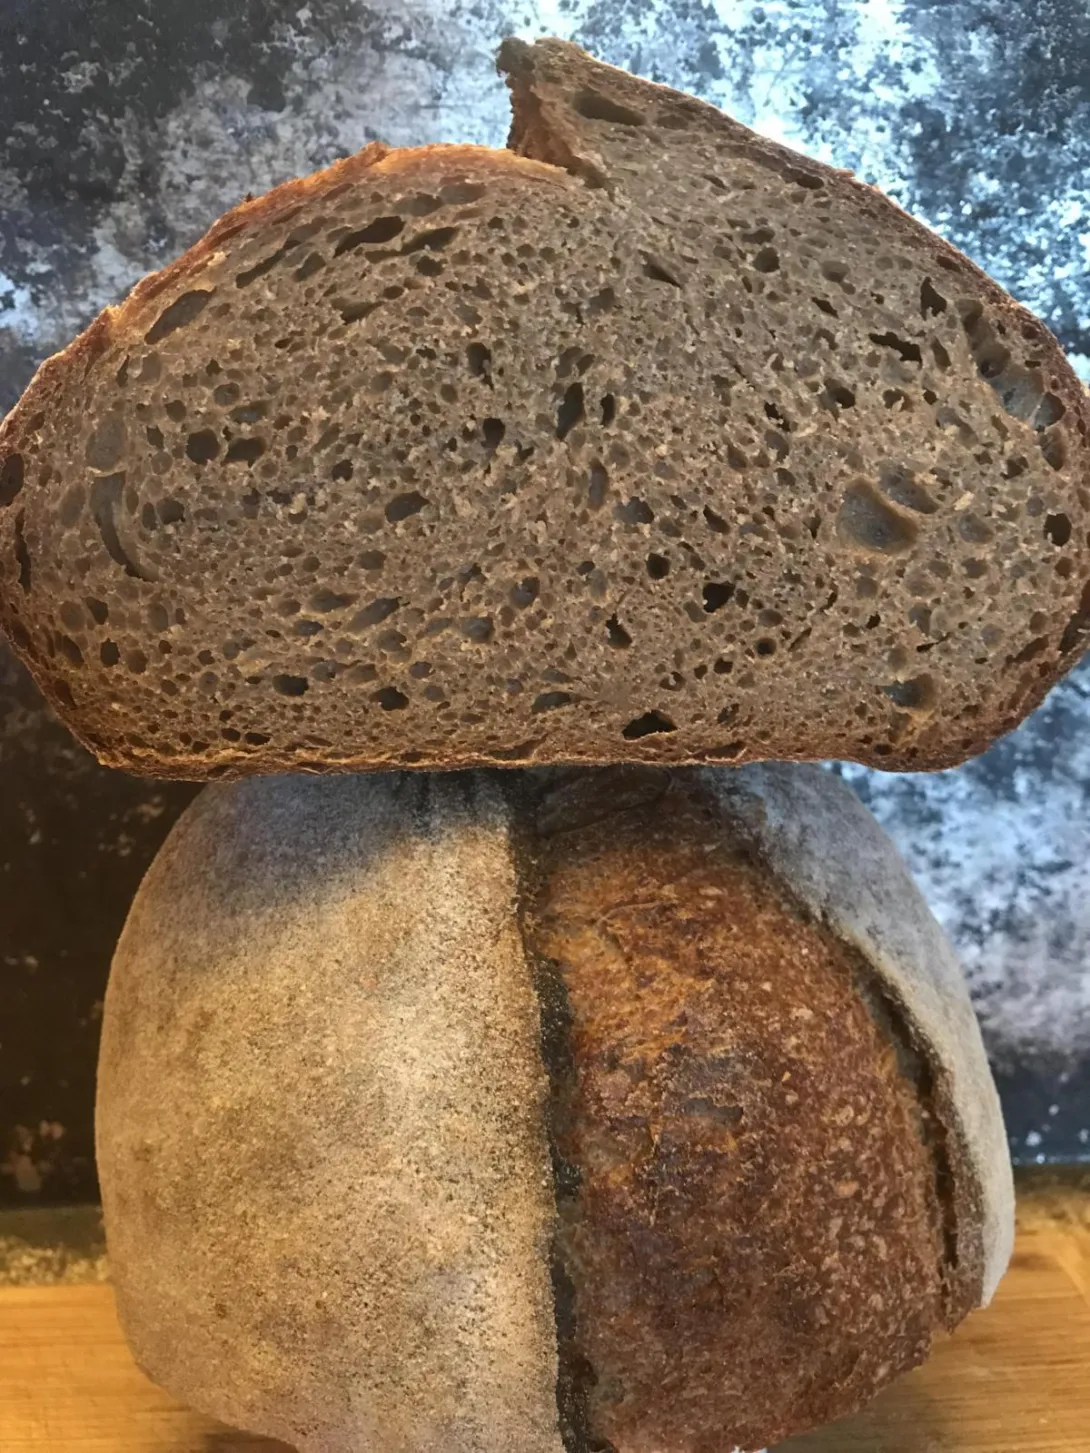
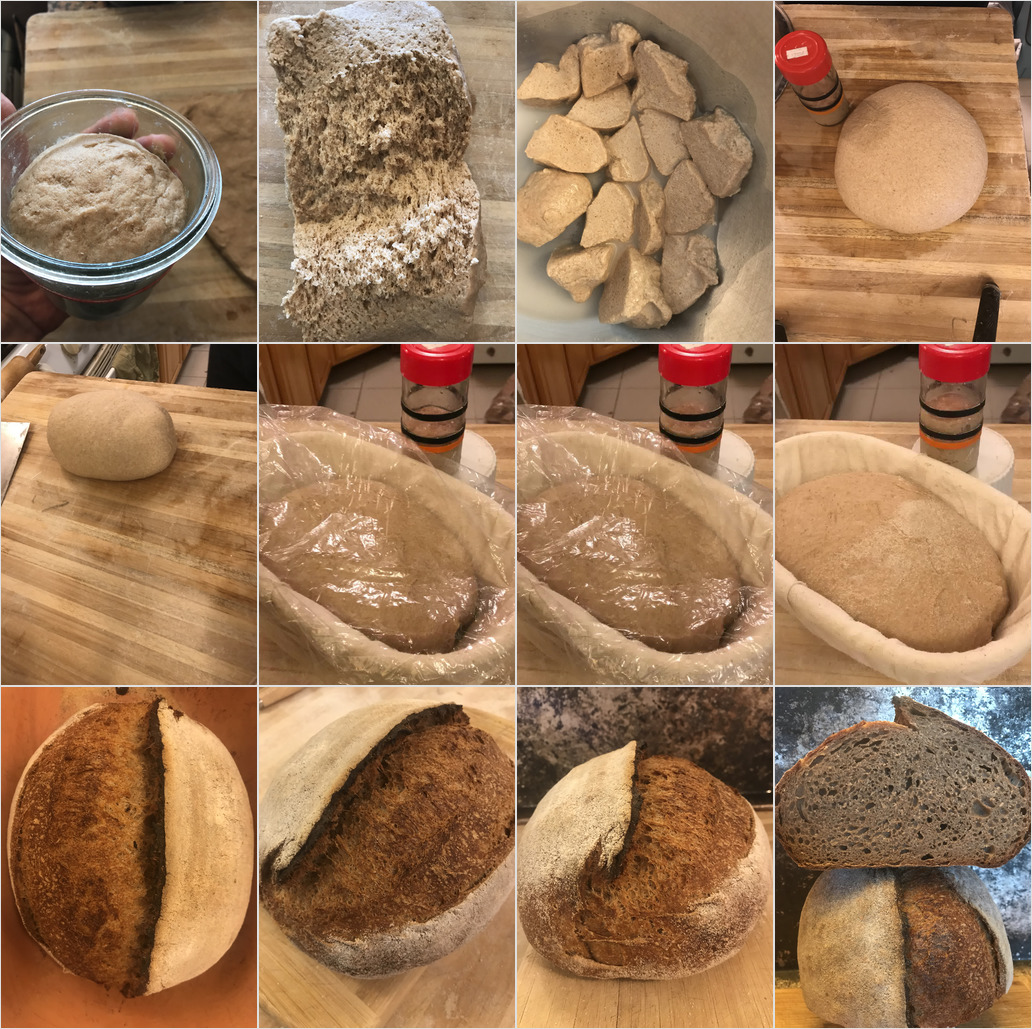
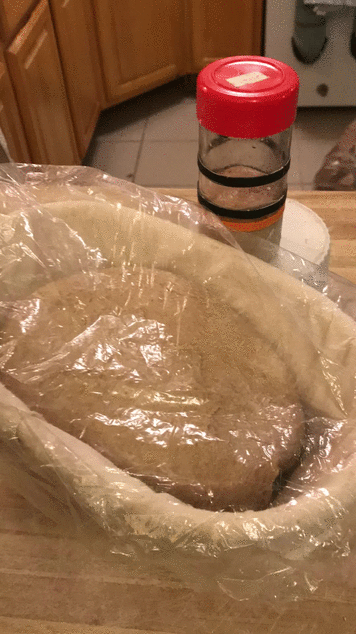
A continuation of JMonkey's Desem with a whole wheat soaker (the epoxy method outlined in Whole Grain Breads) and an aliquot jar for proofing. Bulk fermentation ended at <= 25% and final proof ended at around 75%.
Notes:
- the aliquot jar markings in these images represent the starting height, 1.25x and 2x, even though the final proof was started at 1.75x -- in subsequent experiments and their images the final proof line was adjusted to 1.75x.
- updated bakers percentage formula for these experiments in this link (84% hydration)
- headupinclouds's Blog
- Log in or register to post comments
Very nice slo-mo! I like the way you marked your aliquot jar (25 & 75%) in advance.
When mixing a very dry starter (biga) into the water, have you ever tried dicing up the biga into small pieces with a dough knife and then mixing in the water with either an immersion blender (stick blender) of a food processor?
Thanks. I use the OCD aliquot jar volume via water weight trick, which I learned from Benito, who I believe learned it from you.
Yes! This is the main downside to the wild yeasted biga approach (low temperature makes it even worse). The starter really seems to like these conditions, although I can't say I have systematically compared it with higher hydration room temperature starters in any way. I have tried lamination mixing with a rolling pin (to increase surface area contact with the main autolyse before mixing), hand mashing with a potato masher, and pulsing with a blender mixing jar (BlendTec Twister) to rehydrate the thing for mixing. The latter is probably my favorite. It is another thing to wash, but I think it ends up saving time in the long run and it seems to result in a more uniform consistency with lots of stretchy gluten prior to mixing. In my first attempt at desem, I probably spent 30 minutes in the final mix to identify and squish dense gluten strands by feel. I've been using the same mixing jar approach to process autolysed "bran" (really #50 middlings) at higher hydration, which really seems to help transform the fine sand into viable gluten before mixing.
I hope to find or perform some controlled experiments to compare these various whole pre-bake steps. I'm still waiting for The Sourdough Bakers Book of experiments.
Very good looking loaf, it seems that you are really enjoying doing the desert and it is paying off with wonderful results. Nice to see another baker using their aliquot jar, I have found it very educational and I’m finally starting to get a much better feel for fully proof dough by using it. However, doughs with a lot of inclusions are harder to read so good thing I still use the aliquot jar.
Happy Baking
Benny
Thanks. A comment in Trevor Wilson's book about baking the same loaf repeatedly made sense to me. A TFL comment in a post from dabrowman about baking as many different loaves as possible also makes sense :) The community bakes will help with that. I've been trying to bake this one on a daily basis with small changes here and there and hope to start documenting them better.
I saw your video with the water trick. Very handy. Using this jar is probably the single biggest thing that has improved my baking recently. The markings are quite helpful, as I suspect it is very error prone to do by eye. We use thermometers/thermostats for dough, oven and room temperature measurements. We use scales for dough weight and hydration calculations. Having a more reliable meter for dough rise seems to be a good standard practice, even if other measures are just as helpful. Since target volume changes relative to a starting point are likely to change according to the dough and recipe, I'm curious if there are other approaches worth considering that might be more universal, such as establishing targets relative to the total volume increase (after an initial test jar), or perhaps even via rate of change.
I think more baking books should suggest this practice. I started baking in the hot and humid NYC summer (often > 90 F), and after eventually finding some early success with a very short bulk fermentation and extended fridge retarded final proof, I settled into a groove and largely skipped over learning to read the final proof at room temperature. This has been a great tool for that feedback, and I can use it to corroborate other measures, such as the poke test.
How much fine tuning have you done with bulk fermentation and final proof cutoff lines? In particular, I'm interested in observations regarding how BF and FP targets relate to crumb structure and oven spring. I watched the Full Proof Baking 100% whole wheat sourdough video you shared and noticed she aims for a 100% rise (in a wine fridge) before terminating bulk fermentation. My attempts to push things in that direction with this desem warm BF + final proof resulted in very poor oven spring. Her slow hands off approach is quite different (low temperature + minimal handling), and it could almost be argued that her dough is really a 100% preferment that is eventually shaped and baked. It is still an interesting difference.
I'd love to see various doughs baked for a range of BF + FP targets. I've been trying various things to improve the crumb in this desem loaf. Attempts at pushing hydration haven't been too helpful and result in compromised oven spring *and* crumb. I'm trying to terminate bulk fermentation earlier, relying more on time based gluten development from the soaker and an earlier and lighter final shaping with limited success. Thanks again for your videos.
You are one of the few people I see reporting aliquot jar values. For the sake of comparison, Can you clarify if the bulk fermentation and final proof targets you report are relative to the same initial dough, or do you "reset" the dough after shaping?
This one was another epoxy method desem, but I sifted the flour after grinding and maintained two separate overnight soakers in a wine fridge: (1) a salted soaker with the bulk of the main flour at 75% hydration; and (2) a wetter unsalted 100% hydration soaker with the "sandy" middilngs (#50 sieve). Recently, I've been adding the bran to the starter, but I'm not sure that approach is as beneficial in the case of the low 60% hydration desem starter. So many potential tradeoffs! An initial lamination mixing was performed with the blended/rehydrated starter, and then after a first S&F the bran soaker was re-incorporated. The idea is that the bran will benefit from additional water and delaying re-inclusion in the mix will improve things with a good early gluten development. It did feel that way during mixing, although I can't say I notice a big improvement from the previously yecora rojo desem bakes using a single salted soaker. I've also been using the blender mixing jar (as mentioned above) to rehydrate the dense starter, which makes mixing a lot easier.
Note: I had logged an initial extraction rate of 80% with this flour and have been grinding and sifting in larger batches. I store the the fine flour and sand middlings separately, which allows me to process the bran in different ways before remixing a 100% whole grain flour. I ran out of bran after my last bake while I still had a fair amount of flour left, which shouldn't have happened. I've been pushing the second stage milling finer after a cool down in the freezer (approximately -2 on the MockMill 200 Lino). I just measured extraction again and got something closer to 88%. So the last 3 bakes have actually reproduced something in the spirit of dabrowman's 107% whole grain loaf.
A more hands off version with fewer stretch and folds (I believe 1x after mixing) and looser shaping. This was slightly under-baked due in part to a late oven pre-heat cut short by the fast final proof in this dough. The impact of this more relaxed dough on crumb structure seems noticeable and is worth repeating. The final shaping clearly impacted crumb structure in the center portion, and it is worth trying to do this earlier, possibly paired with looser shaping. Once the aliquot jar indicates a 1.25x rise, things are already moving pretty quickly with this dough, and a 15 or 20 minute rest after pre-shaping may push the final shape a little later than it should be. The pre-shape could be shifted a little earlier to accommodate this.
Summary:
This one seems slightly better. After re-reading Laurel's Desem chapter I took care to setup a 95 F final proof with the covered banneton on top of the pre-heating stove (buffered by a few pots). I also sharpened my bread knife for cleaner slicing. The starter is maintained at 56F and appears to be ready the night before. I can trying lowering the temperature to get a slightly younger starter for the morning mix.
Summary:
I need to start including aliquot jar photos at the end of BF (point of pre-shape) and at the end of the final proof. The last few loaves have been slightly underbaked and I added another 5 minutes (30 covered, 10 uncovered, 5 at reduced temperature).
First, thanks for posting this evolution as you work your way through different scenarios.
This last bake appears to still be slightly under-fermented. My off-the-cuff suggestion would be to allow the bulk to go to 50% expansion, rather than the 25% of this bake. It may also benefit from some additional expansion (compared to this version) after shaping, too. While I like a fairly tight crumb, these pictures show that some areas weren't given enough time to aerate entirely.
Dropping hydration appears to have helped the final bread. It might still benefit from longer, or hotter, baking but I would check the effects of longer fermentation before playing with baking temperature and duration.
Keep up the good work. You are getting very close to cracking the code for this flour and bread.
Paul
Thanks for taking the time to read through this meandering thread! I'm grateful to have some feedback to help guide what otherwise feels to be a random search at times. Your input on extending the BF and final proof is very helpful. I think I've become overly conservative on the proofing for some reason. I'll bump the 25% BF to 50% and perhaps increase the final proof from 75% to 100% and see what happens.
The aliquot jar bands were adjusted to 50% and 100% rise levels, which triggered the end of bulk fermentation and final proofing respectively. I used a 30 minute bench rest after the pre-shape again in an attempt to increase extensibility for the final shape. I was concerned a 100% final proof wouldn't have anything left for oven spring, but it still opened up reasonably well. It is good to know this is still within the limits of the dough. If nothing else it will make me less conservative in pushing beyond the 75% mark. With the additional time at the warmer 95F final proof this loaf got pretty sour, and is probably leaving desem territory. Perhaps I can observe the impact of just extending bulk fermentation to 50% and keep the 75% final proof (or thereabouts). That is very close to what Benny is doing with many of his bakes.
I had reduced the bulk fermentation in the previous bake (for the same fixed target final proof) on the assumption it would reduce degassing, which would translate to more openness, and because I was extending the pre-shape bench rest. I guess a consequence of early shaping is that the shaped dough can be trapped in a smaller form via increased tension as it tries to expand? I did notice that shaping at 50% the dough was more fragile and my fingers did break the "skin" slightly in a few places during shaping. Perhaps that suggests a compromise of 40% or so.
I believe this somewhat "rumpled" exterior occurs with overproofing.
The initial slice through the middle looked a bit wilted, but these slices from the same loaf looked better.
This was essentially the same as the previous effort but with a 40% bulk fermentation in the low 70's and 80% final proof at 95 F. The aliquot jar bands were adjusted accordingly. This felt like a good compromise. I may need to work on standardizing the measurement process for more fine grained experiments (miniscus vs mid-point, etc). At 40% it still felt slightly pillowy but seemed to hold up better to handling. The overnight soaker didn't happen, and I made a same day soaker for a couple of hours at room temperature with lamination mixing of the blended rehydrated starter followed by a copule rounds of early Rubaud mixing and regular S&F's during BF. I've tuned the wine fridge to a setting that keeps the starter at about 59 F, and I've been sticking with a 1x/day feeding. There was also no sifting or special bran processing in this one. It isn't clear to me if any of that is advantageous from a dough performance standpoint, and I still have questions about the role of the milling process. Lately I've been milling in slightly larger batches and freezing it. I read one post suggesting that is sufficient to overcome poor gluten development attributed to freshly milled flour, but haven't done any comparisons. I've ordered 50 lbs of yecora rojo berries so I can test some of this after settling on a fermentation plan and perhaps revisit hydration. I planned ahead and managed a more controlled 95 F in my makeshift digitally controlled light bulb powered styrofoam proofer. Adding a pyrex container of 100 F water gave it a head start with enough thermal mass so the little light bulb wasn't overwhelmed this time. This should be a lot more uniform than the tower of pots, pans and bannetons I was using on the stove to achieve 95 F. I often have slight irregularities from pre-shaping that make final shaping more challenging, and the dough lacks the extensibility I see in most shaping videos even after a 30 minute rest (few of which are whole grain). The oven spring looked as good as it has for these yecora rojo bakes.
https://www.thefreshloaf.com/node/66132/oven-spring-bulk-fermentation-and-experiment
https://www.thefreshloaf.com/node/65176/bulk-fermentation-experiment
https://www.thefreshloaf.com/node/59543/results-rise-during-bulk-ferment-experiment
https://www.thefreshloaf.com/node/59459/proposed-experiment-bf-rise
https://www.thefreshloaf.com/node/61560/pushing-bulk-fermentation
I had a starter and soaker (pre-dough) ready and I'm queuing up another attempt. Of all the bakes in this thread, I think this one is best:
https://www.thefreshloaf.com/comment/479413#comment-479413
I agree with Paul's comment that this could use a little more aeration (red areas) but some sections seem better than others (green areas). It doesn't seem too far off track. Perhaps some of the tighter areas are due to handling as much as fermentation timing? It might be worth dusting with tumeric or paprika after the pre-shape to help visualize the dough skin where degassing from handling is more likely to occur. My original thought was that shaping on the early side would help to avoid any handling related degassing as long as the dough strength held up to the longer final proof. This dough seems fairly tight, so that seems plausible.
Although I had the aliquot jar marked for a 25% BF and 75% FP in this test, I actually ended the bulk fermentation (started pre-shape) earlier to accommodate the longer pre-shape bench rest I wanted to test to further relax the dough before shaping. I was thinking it would reach 25% by the time shaping actually started. Unfortunately, I don't have a photo of the aliquot jar after the pre-shape rest. In this case I probably over compensated. The bands on the aliquot jar are placed such that that tops correspond to 25% and 75% markings. From the photo below we can see the bulk fermentation probably ended at 10% or so. A 30% number is commonly reported in TFL whole grain discussions. I'm going see what happens if I end BF (i.e., start the pre-shape) at 30%, and then bake at 75%.
This bulk fermentation was actually stopped at less than 10 percent or so. Perhaps it is worth repeating this version, but with a pre-shape beginning at 25%, which is more or less consistent with the suggestion of doubling.
Same as above but with a true 30% BF and 70% FP. The tumeric dusting was added for diagnostic purposes to better understand impact of shaping on crumb. It may have had a somewhat Heisenbergian effect, as it seems it actually caused some separation where the pre-shaped outer skin was rolled up. The bottom was too dense again. Is this a sign of: (1) underbaking; (2) overproofing; (3) seam stitching/shaping?
I might unintentionally lead you astray. However, this still looks underfermented to me.
When I use an aliquot jar, I typically only do so for the final fermentation since that is usually harder to gauge. If I’m concerned about tracking expansion during bulk fermentation, I usually put the dough in a container that has volume marks or that can be marked. My impression is that you are using the original dough sample in the aliquot jar throughout both bulk and final fermentation. If that is the case, it may not be as helpful as it could be.
Think about what happens at the end of bulk fermentation. Whether deliberately or as the result of handling, the dough is at least partially degassed. That means it begins final fermentation with less gas than is present in the dough in an untouched aliquot jar that is carried over from bulk fermentation. Consequently, the aliquot jar will indicate more expansion than actually exists in the main dough mass.
If, however, a sample of dough is pinched from the degassed mass prior to shaping and placed in the aliquot jar, it will begin at very nearly the same condition as the dough in the shaped loaf. When the aliquot sample shows 50% expansion, then the loaf is likely to have expanded 50%, as well.
Back to my original comment: I don’t know this particular flour. Therefore, I can’t offer specific guidance as to how much expansion is optimal. From the photos, it appears that it would tolerate, and benefit from, more than has been allowed so far. How much more is what your experiments will establish.
Best of luck as you carry on baking.
Paul
This last one was definitely on the wrong track, but I posted it for reference. I ran the 30/70 test largely to complement the 40/80 and 50/100 tests. The 50/100 looked somewhat "wilted", and I had assumed it was due to over-fermenting. I appreciate it is hard to read with so many unknowns, but if that still looks under-fermented I can take another look at the longer times.
I suspect the stiff starter has suffered a little recently as a result of migrating from thermos maintenance to the wine fridge, which I'm still tuning (I believe I reduced the temperature too much for a 24 hour cycle in an attempt to further reduce acid load). If I'm right, some of these tests may be inconclusive, if not misleading. I'm giving it a couple of days to avoid cutting it short with a premature feed. I need to include some indication of starter state in these posts for them to be meaningful.
There are other differences worth noting. In some cases flour is milled and frozen for a couple of days, while in some cases it is milled more on demand. I have read that can play a significant role in flour performance, but haven't done any comparisons myself. I also have questions about how repeatable milling is when I manually rotate the hopper to "the finest setting" each time. None of that is well documented here, but I'm guessing fermentation is still the biggest variable. It will be better to setup a same day bake (same starter state, temperature, etc.) at some point with a few different bulk fermentation and final proofing schedules for comparison. Another question, of course, is how consistently I can bake each particular "experiment."
I appreciate your comments about differences between the handled dough and the bulk fermentation and final proofing marks in the untouched aliquot jar. I have thought about this, but my assumption was that the relationship would at least be regular and consistent enough to use for the purpose of repeatable timing, even if the absolute values didn't match the dough. Maybe that is a bad assumption. Using a second jar would have the advantage (at least) of matching percentages reported in standard bread recipes, and is probably easier for others to read and interpret. It is worth a try.
Thanks again.
A Sourdough Rise Time Table adapted for 60% hydration (via bwraith's spreadsheet) using a 5:6:10 feed (@ 23.8 % PFF) indicates expected doubling times of:
Although the starter needs to be modeled for more accurate numbers.
60% hydration
55% hydration
50% hydration
I have been performing a sort of starter rehabilitation and have returned to feeding the starter at the increased 60% hydration and a wine fridge setting of 58 F with a middle shelf location, which seems to result in a starter temperature very close to 60 F. I've been sticking with 5:6:10 feeds for now (a close match to PiP's 1:1:2 for 60% hydration). In parallel, I have started some offshoot experiments with lower inoculation to see if a one-feed-per-day-24-hour-peak might be viable. There should be an inoculation, temperature and hydration combination that achieves this within the often reported 50-60 hydration % and temperature (Fahrenheit) windows, but it isn't clear how this will impact the culture in terms of leavening power and flavor characteristics. My hunch is that pushing things too low in the 50-60 %/F window may cause problems.
I've been reviewing various desem articles, and posts, including the desem section in Laurel's Kitchen Bread Book. (I have also ordered The Bread Builders and The Bread Book on Debra's suggestions for additional desem information.) In all of these references, there appears to be consensus on an ideal 4 hour cool bulk fermentation and a 2 hour hot final proof. While the criteria used to determine the end of bulk fermentation and final proof may always be subject to interpretation, my starter seems to be taking much longer. I think this discrepancy, in part, and combined with huge differences in look and feel of a warm final proof vs retarded final proof, has lead to a tendency towards underproofing, as suggested by Paul. I believe a few recent bakes have confirmed this (to be posted below).
Here are a few quotes from pointers from Laurel's Kitchen Bread Book to help save me from rereading this:
It does seem she has had good success with a 50 to 55 F maintenance temperature, and I will try to nudge things in this direction again, although this may require changes to the inoculation formula.
With regard to bulk fermentation, she states the following:
I believe stretch and folds will largely accomplish the punching down she mentions. From recent experiments, mine appears to be much closer to the 8 hour figure she mentions.
Gauging these stiff starters is a little more challenging. I configured a time lapse camera to help me record the slow domed peak expansion for this stiff starter, which was occurring in the middle of the night, to track any improvements in starter health. I've also attempted to more accurately measure relative volume changes of the domed starter expansion using water weight (a la Archimedes). The first day of rehabilitation was unrecorded. On the second day I measured a peak after approximately 22 hours with a relative volume increase of 1.83x. The third day I measured a peak after approximately 17 hours with a very similar volume increase of about 1.76x. Since it is so slow moving it can be hard to guess whether or not it has truly peaked, or if I should wait another few hours to confirm this. I have been reviewing bwraith's rise time models. At this low hydration, they have never truly doubled, which is the criterion required for calibration with bwraith's model. I'm going to keep the starter maintenance parameters constant for now and will configure the time lapse camera and Archimedes volume tests in a few days time to track progress with a hope of getting closer to the recommended 4 hour fermentation.
Related discussion:
https://www.thefreshloaf.com/node/66840/tfl-index : general info about stiff low hydration starters with helpful comments from Debra Wink
https://www.thefreshloaf.com/comment/186049#comment-186049
https://www.thefreshloaf.com/node/27806/desem-starter-when-it-ripe-how-use-it
https://www.thefreshloaf.com/comment/217777#comment-217777 : w/ references to parameters in Laurel's Kitchen (1:0.68:1.32) and PiP's (1:1:2 and later 1.12.2) maintenance
https://www.thefreshloaf.com/node/27999/honest-bread-100-wholewheat-desem-bread-and-some-country-bread?page=1
In this bake, after giving the starter some R&R time, I revisited Paul's underproofed diagnosis. I was getting low on Yecora Rojo, but had enough to finish this bake. Previously, lowering hydration from mid 80's to 80% seemed to have a positive impact. I decided to test a hydration of 75% in this bake, which is towards the lower end of any whole grain bake I've seen. I used an overnight soaker in the wine fridge again at 58F. I was a little concerned about such a low hydration with freshly milled whole grain flour, but the hydrated pre-dough handled fine and gluten development was good, although it was noticeably stiffer during the pre-shape and shaping. Based on Paul's feedbak, I decided to "reset" the aliquot jar between the bulk fermentation and warm 95F final proof, to better reflect the behavior of the degassed dough after shaping. While the relative volume measurements are useful, the glass aliquot jar also provides an opportunity to visualize the internal aeration, and I noticed a significant difference in the bubble distribution between 60% and 70% rise. I suspect this visual feedback may be at least as useful and perhaps more universal across recipes than the volume change itself. I stuck with the 30% BF and 70% FP targets using this new approach. There was a noticeable improvement in crumb for this bake, and I believe I have been consistently underproofing. This is probably due to a number of factors, including: the ideal 4 hour BF + 2 hour FP from Laurel's Kitchen Bread Book (mine takes much longer), my familiarity with dough look and feel from refrigerated final proofs, fear of wasting the dough, and poor feedback from use of the poke test too early in the final proof.
I fed the starter with yecora rojo, but had to augment the remaining Yecora Rojo with Montana Wheat Prarie Gold to make the soaker. I started late in the day and instead of the usual lower 70's mid winter temperature I used the digital controller w/ a light bulb to boost the bulk fermentation to 80 F in order to have a chance of finishing at a reasonable hour. I bumped hydration back up to 80% for this one, and used a degassing reset on the aliquot jar sample again. By the time pre-shape bench rest was complete, the aliquot jar was probably close to 50%. I used a 95F final proof again. I was looking for more aeration in this one and the aliquot jar indicated a rise of approximately 75% rise before I had to terminate it in order to avoid staying up all night. These measurements are relative to the initial post-mix state and the final proof measurement includes the pre-shape aliquot sample degassing, which removed most, but not all of the initial 30% gain from bulk fermentation. (Recalibrating the final proof band precisely via water weight for the new degassed starting point is possible but would be an added chore.) For variety, I was more conservative with the banneton dusting, which made for a bolder looking crust. I was happy with the way this one turned out, which seems to approximate the original effort While I haven't done extensive testing, the impact of the added Montana Wheat Prarie Gold on dough handling seems noticeable immediately after mixing. The Yecora Rojo does provide a nice nutty flavor, and the two seem to be a good pairing. A new 50 lb bag of Yecora Rojo has arrived, so I can continue experiments with more 100% Yecora Rojo loafs, so that test are comparable with previous efforts. Thanks again to Paul for suggesting underproofing. Things appear to be improving again.
Even with a warm 80 F bulk fermentation and 95 F final proof, this one took about 9:15 from mix to completion, including the 42 minute bake. I believe this made it more sour than it should be under ideal circumstances, but it was still much milder than I expected. I'm still curious whether the bulk fermentation and final proof criteria I'm using here really could be reach in 4 hours (low 70's) and 2 hours (95 F) with a more vigorous starter, or if the fermentation goals I have are different than those in Laurel's Kitchen Bread Book. Continue feeding? Higher innoculation? Catching starter at a more optimal peak time? The bloom is still good, although I think I need to aim more for top centered score "angle" of 12:00 to 12:30 instead of 2:00.
Looks like you've cracked the proofing issues. This and the previous bake both show well-aerated crumbs, so “resetting” the aliquot jar for the beginning of the final fermentation is obviously giving you a better representation of what the dough is doing.
All that is left now is to define your own sweet spot for crumb characteristics, working within what the flour can support.
Nice work! Your persistence has paid off.
Paul
Thanks for the help. I think things will become more repeatable now. I probably will converge on a sweet spot for the crumb, but will continue to experiment with cause and effect. The biggest variable now is probably the starter and dialing in the maintenance. It isn't clear to me how the 4 hour bulk fermentation and 2 hour final proof is possible for the same percentage of prefermented flour. Maybe it will improve with enough time in the current hydration and temperature configuration.
Yeast, wild or commercial, can't tell time and they don't give a fig for anyone's schedule.
As you acquire more experience, you will recognize that time is a variable that results from fluctuations in temperature, quantity of prefermented flour, type of flour, and other environmental factors. Time does not control those factors; the factors control time. Observing visual, tactile, and aromatic changes as the dough ferments will provide you with the information you need to gauge its readiness, even if you don't have an aliquot jar. And you will gradually come to understand that a particular combination of factors will usually result in a bulk fermentation time of x hours. Usually. Hence the adage "Watch the dough, not the clock."
You've already begun to see some of this in your bakes so far. Future bakes will add to your knowledge base; enough so that you will be able to rely on what you see, feel, and smell as the dough ferments.
Paul
The desem starter has changed in the last few days. I have been sticking with 60% hydration maintenance (5:6:10) and a wine fridge setting of 57 F. That seems to result in a dough temperature between 60 and 61 F. For now I am postponing the experiments aiming for a 24 hour peak and feeding cycle. I have also been changing the feeding slightly. I use 240 g for the morning mix and place 80 g back in the fridge to ripen further and then feed it after dinner for baking the next morning. Initially, this happened due to schedule constraints, but this was the first day I noticed an increase of more than 2x, so I have been sticking with it.
This schedule is consistent with a target of mixing 10-12 hours after feeding -- the suggested sweet spot mentioned in Laurel's Kitchen Bread Book. With this regimen I have been getting an expansion of roughly 2.4x or more in the Weck Jar overnight (via the approximate Archimedes test), whereas previous tests plateaued at 1.8x or so several days ago. It is softer and more pillowy at the time of use and I find it dissolves in water more easily. The first day after noticing this behavior I was able to finish the bulk fermentation, proof and bake in a little over 6 hours.
[UPDATE: I've added this as a reply to my comment to keep the order chronologically correct.]
I believe this was a starter made with Prarie Gold and a soaker made from Yecora Rojo, although I am typing from memory several days after. The Yecora Rojo soaker is fairly identifiable by appearance in the photo of the pyrex container below. It is never quite as smooth as the Prarie Gold. For example, I can do lamination mixing directly out of the wine fridge with the Prarie Gold soaker at 75% hydration, but the Yecora Rojo soaker is more ragged and prone to tearing and at a similar point. I'm curious if lower the hydration will help. I believe the Yecora Rojo has more a "fine sand" bran than the Prarie Gold. I need to do more side by side test dough comparisons to better understand differences. This is a short snapshop to keep a record of the starter state, the aliquot jar state after the bulk fermentation and final proof, and the final bake. This probalby had a 30% rise prior to the pre-shape, followed by a degassing reset, and another rise to 70% before baking. This one was also at 75% hydration.
It was too late to mill when I finally got around to bread preparation for the next morning, and I didn't have enough pre-milled Yecora Rojo in the freezer for a small loaf. I did find enough Prarie Gold for both the starter and soaker, so I went ahead with it. I think there may have been 75 g of Yecora Rojo in total. I fed the starter w/ 80:96:160 and placed it in the fridge for use the next morning. I made a soaker with 350 g wheat, 10 g salt, and 262.5 g water and placed it in the wine fridge next to the starter. The following morning I mixed everything with an additional 25 g of water (75 % hydration) and proceeded as usual. The bulk fermentation ran around 6 hours (including pre-shape and bench rest) in the low 70's followed by a warm final proof at 95 F for 1.5 hours. The aliquot bands in the photos are still at 30% and 70%, but it rose to a little more than 50% by the time I shaped, and somewhere between 85% (contact w/ jar) to 100% (peak) during the final proof after a degassing reset during shaping. It felt like an inflated balloon after the final proof and stood up well after removing it from the banneton. I consistently get better bakes when using Prarie Gold or a high percentage of it with the similar process. In comparison, at the same hydration and innoculation, the Yecora Rojo feels wetter and more fragile. I think more adjustments for the 100% Yecora Rojo are required. The score sealed over, but I was very happy with the loaf itself. When I removed it from the oven it felt very light, like an inflated ball. The crumb was not particularly open but, was uniform and lighter than any bake to date. The crust was thinner and crispier than previous attempts, and the bread knife produced more of a classic "hollow" sound while slicing the day after. The flavor was very nice -- mild but definitely not bland. I would be happy to make this one repeatedly (perhaps with some adjustments to the ear), and my sense is this is closest to the mark so far. Another challenge will be to make something closer to this with the Yecora Rojo.
This one had a short second accidental second bake. (It was cooling in the oven when the broiler got turned on for dinner preparation, but made it out alive.)
You can see the improvement from the earlier photos :)
It is good to get a taste of what is possible when things go well.
This was a relatively unsuccessful attempt to apply the extended fermentation from recent Prarie Gold bakes to 100% Yecora Rojo dough using the latest starter.
I pushed the aliquot jar to 50% for the bulk fermentation, followed by a degassing reset, and another rise to 70% in the warm 95F final proof. It seemed fairly well aerated, with larger bubbles relative to the PG dough for a similar total rise, and since the YR dough feels wetter and less cohesive, I didn't want to push it further. The bake had fairly poor oven spring, the ear sealed over (I believe the score was too deep for this dough), and I could tell it was much denser immediately after picking it up. I *think* it was overfer-mented.
I haven't attempted a side-by-side bake of YR and PG, and have no direct quantitative comparisons, but there are some qualitative assessments that are worth noting. The YR soaker feels more fragile or ragged than the PG soaker (or pre-dough) immediately out of the wine fridge at the same 75% hydration. I believe the salt and low temperature are supposed to protect it, but perhaps this is worth revisiting. Within the first hour of mixing and stretch and folds, the differences become more apparent. I don't aim for any gluten development prior to soaking (maybe I should), but the PG typically feels relatively smooth right away. The YR is less cohesive, it is more prone to tearing early on (it doesn't stand up as well to lamination mixing, for instance), and leaves more of a paste behind on my hands and bench. The latter issue doesn't seem to be something that can be corrected with additional gluten development. Maybe a shorter final proof would be sufficient to improve things, but I do think achieving a lighter crumb with a higher percentage of YR may require deviating from the formula used for the previous light and airy PG bake. I think it will require a stronger dough later in the fermentation process to push things further. A few options:
My sense is the YR bran contents is fairly different than PR, and sifting + re-inclusion may be worth revisiting.
Related discussions:
https://www.thefreshloaf.com/comment/371735#comment-371735 (thumper256)
https://www.thefreshloaf.com/comment/413025#comment-413025 (barryvabeach)
https://www.thefreshloaf.com/comment/479359#comment-479359 (Debra Wink)
The one-loaf-a-day approach gives a lot of space for background thinking and analyzing: bake, observe, hypothesize, read bread books and TFL posts, change a variable or two, bake, repeat. I have been revisiting Debra's comment suggesting an inverse relationship between hydration and prefermented flour HERE. I believe this is especially relevant to the YR. I had wanted to try a very low (for whole wheat) hydration version with the YR flour, but found myself past the milling time without enough YR for a bake. I did have enough premilled PG in the freezer for the soaker and starter, so I went ahead with a 70% hydration version just to see how it would behave. I have never seen any whole grain naturally leavened bakes at such a low hydration, but I was surprised to find it quite manageable. The desem approach is somewhat of an outlier, and most formulas I've seen are well below the 30% PFF used for these bakes. It is understandable it would require a different line of thinking. As an example, this breadtopia YR sourdough post I checked early on uses a target hydration of 88%. In the back of my mind, I may have been thinking it would be necessary to work up to that. I think this may have influenced my thinking in the desem bakes early on, believing that very high hydration would be necessary to avoid baking bricks with naturally leavened whole grain bread. This one came out fine, although there were some signs that 70% hydration was perhaps a little low for PG (stitching was challenging), I suspect it will be even more suitable for PR, which I've queued up today.
Test formula: https://fgbc.dk/1a74
The PG dough is fairly tight in general, and especially at this low 70% hydration. (In contrast, the YR is generally much more extensible, which should make a complementary blend.) This property poses the biggest challenge during shaping. I allowed for a long post pre-shape bench rest of 30 minutes or so, and I spent a few minutes carefully circling the inverted boule on the backs of my wrists and forearms, as if shaping pizza dough, to allow gravity to produce a suitably elongated rectangle for shaping. After letter folding and rolling up it ended up producing a very tall loaf (overstuffed burrito) and it took a little more effort than usual to stitch it up, but all in all it wasn't too bad.
The dough is noticeably stronger at lower hydration at this stage of proofing, and I'm curious if the proof could be extended even further. For example, what would have happened if I baked at this stage:
I noticed that you are degassing slightly after the pre-shape. I'm curious what your goal is here? Is this for a more even crumb distribution or is this something inherent to the desem process?
In this context, I am degassing the aliquot jar dough sample (I remove it, stretch it, fold it, and replace it) after shaping to better reflect the state of the main dough. I do this "reset" after the final shape. Thanks for calling it to my attention, as it wasn't clear in my brief update. After I tuck it back into the bottom of the jar using chopsticks, it is usually close to the starting point, which at least makes the process repeatable. I suspect the smaller sample is a little less robust to this handling than the main dough, and it probably underestimates the rise of the main dough slightly. Previously, I left it untouched (after initial gluten development) throughout the entire bulk fermentation and final proof. In that scenario, it probably overestimated the dough level. I switched to this approach after a discussion on the subject with Paul above. Initially, I did this to see what would happen, and have continued the practice since then as I think it allows me to visualize something a little closer to the actual state of the dough itself (both rise and distribution of CO2 bubbles).
https://fgbc.dk/1b1j
Temperature tracking https://share.fireboard.io/269E05
Since the finger poke indentations didn't fully return, I took that to indicate it was fully proofed or slightly overproofed, and I terminated the final proof before achieving the target 70% rise I have been using in recent bakes. For context, the aliquot jar targets were 30% for pre-shape, followed by a 30 minute bench rest leading to a rise of 50% at the time of shaping. I then "reset" the aliquot jar dough sample by removing it, stretching it, and replacing it. At this point the dough sample is close to the initial starting point. I start a warm 95F final proof with a target rise of 70%. The oven spring seemed to suffer in this one and the ear didn't quite make it. Does this seem like a correct read of the poke test, or should I have stuck with a longer final proof as planned?
IMG_5952 from headupinclouds on Vimeo.
Should the next one proof more or less?
The next day:
I'm going to try a shorter proof next time.
My pH meter has arrived and is now calibrated. The final bread pH was 4.61.
I found one mention of desem and a final pH of 4.7:
Slice 1:
Slice 2:
I typically bake my aliquot sample. I cut it open out immediately out of the oven and measured a pH of 4.19, well below the 4.7 reference. The next day I cut the full loaf open and was surprised to measure a pH of 4.67. Either there was a significant difference between the main loaf and aliquot sample (perhaps due to quicker warm proofing of the smaller aliquot jar thermal mass) or the pH dropped by 0.48 overnight (or some combination of the two).
I was looking for crumb vs proofing time images and found this video from DanDayo which has me wondering if my push for a longer proof to improve the crumb has compromised oven spring:
IMG_5988 from David on Vimeo.
Lower hydration seems to be key for solid oven spring, and I suspect the poke test behavior is heavily dependent upon the dough hydration. Whether this is due to inherent dough/flour properties, lack of skill, or process (milling technique) isn't clear to me. The YR feels very extensible at even 75% hydration with 20% PFF and my current home milling process. At 70% hydration for 100% extraction with a 4x remilled bran powder levain ("-2" on MockMill Lineo 200) this one was fairly stiff to shape, but the dough felt very strong during bulk fermentation and I was able to patiently achieve a very strong pizza shaping lamination by gravity without any tearing. It isn't clear this will translate to a nice crumb, but I think it does in part explain the lackluster oven spring in some of the recent 75% hydration bakes, which feel very slack. I didn't have an aliquot jar for this bake and followed a somewhat blind 4 hour bulk fermentation and 2 hour hot 95F final proof. I did jiggle the dough and try a poke test. Will see the crumb tomorrow morning.
In my early desem attempts, I was using a room temperature final proof instead of the hot and humid 95F final proof as prescribed in Laurel's Kitchen Bread Book. Several of those were at much higher hydration (85% or so) which is more typical of most whole wheat bakes. It occurred to me that many of the issues I seem to be facing with weak oven spring at higher hydration in recent versions may be due (at least in part) to the hot final proof, as the dough becomes very slack. A side effect of lower hydration is a tighter dough, which allows tighter shaping. I believe lowering hydration has allowed me to compensate, but perhaps a very tight shaping at higher hydration could also be used.
Additional early stage post-mix kneading (in addition to later S&F's) is still beneficial, despite the strong passive gluten development from the overnight soaker. The dough held up better to shaping at 50% rise, whereas previous efforts felt very fragile. I believe this may help explain why previous poke tests "failed" at such an early stage. The dough now has a strong gloss or sheen halfway through BF after the first few folds. I think this should allow for more aeration via longer fermentation times, however, the 50% BF may not be entirely compatible with the desem approach. Laurel's Kitchen Bread Book mentions a 4 hour BF and 2 hour final proof. The time may vary, of course, but we can use the 2:1 BF:FP ratio as a guideline for the desired flavor profile. With this 50% BF, the hot + humid 95F final proof reaches an 85-90% rise in just 30 minutes. At a 50% rise, we are already at or past the "knee of the curve", so it may be better to cut the bulk fermentation shorter to allow for a longer time in the proofer, which should also shorten the overall fermentation time.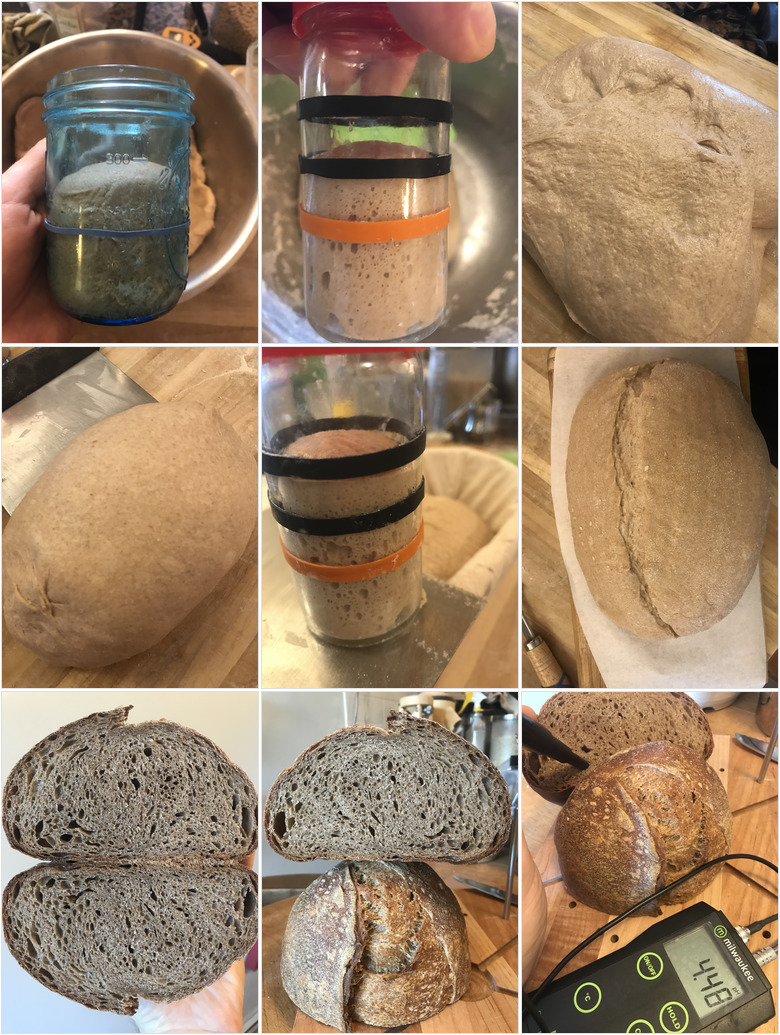
The profile on this loaf as well as the crumb is probably your best yet. Great improvements!
Benny
Thanks. For the Yecora Rojo bakes, I think you are right. I'm curious if this one might benefit from a little longer baking. My favorite crumb so far was with the Prarie Gold (HWSW), which seems very forgiving and delivers exceptional performance compared to all other varieties of whole wheat I have tried. I'm sure I can do better with this YR, which has a really nice taste (I ordered 50 lbs of berries) and will revisit some of the earlier fermentation experiments (which I now consider null and void) with more intensive early kneading based on the recent discussion in your post. The best long-term approach might be a blend of red and white, which seem to be complementary in several respects.
I'd love to see a table of crumb photos from the same baker, ideally with the same mix, for various BF + FP combinations to help guide experiments. The recent reference to Trevor Wilson's post is one of the few sources I've found giving a qualitative description of the effect of various BF + FP combinations. One thing I noticed recently is that the most active starter (in terms of visible rise) was fed with PG -- it was peaking at 2.4x (60% hydration < 60F) -- whereas YR never seems to get to 2.0x (it is probably lower now that I'm using 50% bran/middling starter). I guess this could have as much to do with gluten properties and trapped CO2 as it does with the actual starter activity itself, but I immediately recalled a similar post from you about your Red Fife fed starter, which made me think about this more. Actually, in The Bread Book , Thom Leonard suggests that high gluten hard spring wheat is counterproductive and prefers reserving hard winter wheat for the starter, although he doesn't explain why. I guess gluten is harder to break down and inhibits microbe feeding?
I’m unsure what Thom Leonard means and why that would be. I don’t have that book so I’m unfamiliar with his teachings.
But going back to your starters or levains fed with the PG vs Yecora, if the Yecora is lower protein, then its certainly possible that it is losing more of the gases produced during fermentation. You should make two small levains and for one mix really thoroughly to develop the gluten and the other just mix to hydrate the flour. See if the one with developed gluten rises more.
Benny
Here is the line I was thinking of:
You should make two small levains and for one mix really thoroughly to develop the gluten and the other just mix to hydrate the flour. See if the one with developed gluten rises more.
I don't question that. I'm fairly sure there will be a measurable difference, and I think the more thoroughly kneaded starter will have the added benefit of more consistent distribution of the inoculant (especially at low hydration). I was mostly interested in the possibility of selecting grains specifically for starter suitability, and whether there might be measurable differences in leavening power. The quote above is fairly vague, so I may be reading into it too much. It did seem to be potentially relevant to observations about HRSW maintained starter (Red Fife) in THIS THREAD.
Will try to contrast this with an earlier shaping in a follow up bake.
Notes: This image was captured with HDR enabled on the camera, which reduces the intense contrast in the alveoli.
Very nice bake, I like that oven spring you achieved with this. I also like the nice even crumb.
Thanks. It does seem to be improving, with an occasional step back (or two).
After recalling some discussion about the impact of bran in whole-grain bread, I posted some links in THIS THREAD.
One of these links points to an academic paper, where the abstract makes the following claims:
https://www.thefreshloaf.com/node/56958/fine-vs-coarse-ground-flour
I have been remilling sifted bran several times at a very fine setting, tightening the stones only after the hopper is loaded and the bran bits keep the stones out of contact. This is done to create a fine bran powder in preparation for a mostly bran levain. Based on the above paper, it is worth considering if this might be counterproductive, as it may further integrate the inflexible bran bits directly into the gluten network at a much lower level. My original thought process was that the smaller bran bits would be more accessible to the starter microbes and therefore more likely to break down. I'm not sure if they are actually breaking down, and, if they are, in fact, breaking down in some way, it isn't clear that the components they break down to don't also interfere with gluten (i.e., the "reactive components" issue above). Intuitively, it seems larger bran flakes have the potential to behave more like an inclusion, which the gluten network can develop around.
In the case of desem, the low hydration starter may be suboptimal for the bran, which I expect would benefit from higher hydration. With the two-pass (coarse mill, freeze, then fine mill) approach I extract about 50g of bran and middlings (on average) using the #30, #40, and #50 sieve stack, which I then augment with another 50g of flour for a feed of 50:60:(50+50=100). It may be worth pre-hydrating all 50g of the bran (as is) with all 60g of the starter water first, then working in the additional 50g of flour after it is fully absorbed, potentially increasing hydration as needed. Another idea would be to "sous vide" the bran as in this borodinsky recipe post to further soften it and/or break it down before inoculation, although that is becoming a somewhat elaborate process for our daily bread.
In contrast, in this theperfectloaf.com post, Maurizio sifts the bran and delays inclusion until after the first fold. The idea is that the gluten can more fully be developed without the bran, and is more robust to bran inclusion once it is fully developed. It also supports independent hydration of bran and flour, which seems to be a good idea. I have tried that earlier in this thread, although it is worth reconsidering this in the current evolution of my process. The bran levain and the delayed inclusion would seem to be mutually exclusive, although there is still the potential of attempting to develop the un-inoculated pre-dough gluten beyond what is typically achieved with the passive soaker before mixing in the bran levain.
To better understand the best-case bran processing scenario in my current home milling and baking process with this wheat, I'm going to exclude the sifted bran/middling from the next bake.
Given that sifting is playing a role in the recent process, it is probably worth experimenting with some simple tempering approaches to help with cleaner bran separation during the milling process as discussed in THIS POST
I don't currently have a moisture meter. I do have an inexpensive one at our cabin for seasoning wood, although I'm not sure if those inexpensive meters are suitable for a pile of wheat berries. In general, it seems most stored wheat benefits from some additional moisture, and I could attempt some blind experiments misting the wheat with 2% additional hydration by weight a few days before grinding to see if this helps extraction rates. I'm also freezing to help reduce the final stage milling temperature. I recall reading some concerns that this could potentially lead to excessive fragmentation of bran. That seems plausible, and it may be worth cooling at a temperature above freezing to see if this might also impact the extraction rate.
I recently came across this discussion of milling temperature in the Mockmill FAQ.
https://mockmill.com/eu/faq
I milled a batch of 600g of Yecora Rojo in preparation for a bake this weekend. I was curious if eliminating the pre-milling freeze might be possible (or even advisable). I milled the first stage at a setting of 8 on the Mockmill Lino 200 and recorded a maximum temperature of about 95F to produce a very coarse flour. This was immediately followed by fine milling slightly below 0, as usual, and the temperature generally held below 130F, with occasional spikes to 132F or so. I generally don't lower the stones to a fine setting until they are protected by flour, so the process will have some variance but I expect it is approximately repeatable for reasonable volumes of flour. I used an IR gun and recorded at the location of the highest temperature I could measure, which was at the point the flour accumulated in the bowl.
I then sifted with the #30, #40 and #50 sieve stack and the extraction was about 84% (that is 94g which is nearly 1 cup bran+middlings) instead of the 90 to 91% result I usually get with the coarse frozen flour. It does seem to contain more pure bran flakes. I have seen lower extraction rates like this before, and I'm now curious if it was due to a shorter period in the freezer that prevented freezing. I don't consider this conclusive, but it does lend more evidence to the possibility that milling frozen berries leads to higher total extraction rates. It isn't clear if the lower extraction rate at room temperature contains less bran or if it just produces larger particles in general (both bran and endosperm).
The above test seems to be safely below the 140F cutoff recommended in the Mockmill FAQ.
The final bread was remarkably similar to the previous 100% extraction effort. It is probably a little bit lighter, but I was expecting more of a difference. I took 100g of sifted bran+middlings reserved from the last two milling sessions, sprinkled in some salt and quickly mixed to 100% hydration. I threw it in my mixing jar for a minute at the lowest setting and this is the result:
It is fairly fragile, and not very close to a windowpane stage (there is clearly a lot of bran in there), but there is also a very high percentage of endosperm based on the amount of viable gluten. I'm sure commercial millers have a higher percentage of bran separation, and my 90% extraction may be closer to a commercial miller's 95% extraction. It will be interesting to see if tempering improves this and it does beg the question if there is a more quantitative measure of bran separation to help validate changes. This little test could suggest my whole grain vs sifted experiments are not as different as I initially expect, and it also has me curious about revisiting separate bran vs endosperm hydration (more accurately sifted stuff vs extracted stuff).
This loaf is actually very close to the multi-purpose "table bread" I'd like to eat on a daily basis, but I would like to be able to achieve a more open crumb if desired. I feel I could easily increase hydration on this loaf, as the dough felt very coherent. While it makes sense that proper fermentation is the real key to an open crumb (and not high hydration), there may still be limits to what is possible at this hydration. I may increase hydration in a follow-up experiment. In previous efforts, this seemed to result in more problems with ears and oven spring (in part due to the high % PFF), so I've been sticking closer to the 75% hydration (and below) from the initial post. Some of these issues may be remedied by additional early stage gluten development.
The next bake will be another sifted experiment but without the freezing (the follow-up to the milling post from yesterday).
What is the percentage of PFF that you're using now? I felt like my last one was too high so I dialed it back down to 20% for the next one.
A few weeks ago I switched to 20% PFF (from the initial 30% PFF). I started this project at 75% hydration + 30% PFF with reasonable success. I spent a long period trying to open things up with higher hydrations of 80-85% at the same 30% PFF with very limited success (sealed ears and lackluster oven spring), thinking that was well within normal hydration levels for whole wheat.
This discussion, and a related section in The Bread Book, made me consider an inverse relationship between hydration and % PFF, and I lowered the hydration with immediate improvements in bloom and oven spring. (It still seems odd working at 73% hydration, as I worked at 75% with Central Milling bread flour (Old World type 80) this summer.) As the starter seemed to become more comfortable in these conditions (as measured by BF + FP time) I also lowered the PFF to 20%. I haven't tried to increase hydration for the Yecora Rojo significantly since then.
I can confirm anecdotally from my limited experience that the hydration behaves differently with my new routine. I've used the same hard red at 80% for about 18 months (it was higher originally but I also found the oven spring improved when I lowered it). But the 80% loaf I just shaped definitely felt higher and I think I'll drop it next time. I can't even begin to guess why, there's so many variables and each one impacts the rest. The high preferment is involved I'm sure, since I've gone from 5%ish to 26% last time, and 20% today. But time and temperature are surely involved as well.
I sifted YR to 85% extraction with no freezing between coarse and fine milling stages. The highest recorded flour temperature was slightly above 130F in the final stage. I increased hydration to 75% (74% mix + 1% estimated increase from handling) and did intensive early stage gluten development (2500 Rubaud "scoops" in 3 sets) followed by coil folds every 30 minutes or so until it held its shape. I ran bulk fermentation to 50% and the 90F final proof was pushed to 105% or so, which seemed to be too far. I tried a straight top score in this one with a straight razor. There was fairly poor oven spring and no ear or ears to speak of, which I think was due to slight over-proofing. I am curious if an off-angle score with more of a standard curved razor might have more chance of lifting for this dough state. The starter more than doubled with the sifted flour and felt noticeably lighter. It had a pH of 4.46 just prior to the final mix. Sifting the bran has had a smaller overall impact than I would have expected, although the dough did feel a fair amount slacker relative to whole grain dough at similar hydration.
This was another sifting experiment (to help establish a sort of upper bound for the flour with my current process) at the lower 70% hydration that it seems to prefer (especially with reduced bran). The BF ran to a little less than 50% in 3:15 (post-mix) in the low 70's with a short 1 hour hot final proof to 95% or so at 90F, followed by a quick 2 hour chill in the fridge to firm up the dough, assist with scoring and improve the oven spring. It does seem to be noticeably lighter although the crumb structure itself is quite similar. The final bread pH is 4.34. I'm not overly concerned with increasing this, but I would like to taste a few loaves at the 4.7 level I found in one reference. I think I can afford to reduce the bulk fermentation to 30% or so and perhaps add a morning feed to refresh it before the final evening feed.
In parallel, I'm preparing a tempering experiment. I also found a TFL milling post (TODO: reference) suggesting that milling cold wheat is a bad idea as it leads to excessive fragmentation of the bran. (I've been freezing wheat inbetween coarse and fine milling after reading about this practice in Flour Lab, although the book only mentions chilling.) The same principle may apply to the milling itself, and I'm curious if aiming for very fine flour at 100% extraction might be counterproductive due to a reduction in the final bran particle size. (A previously mentioned academic article mentions smaller bran particles are, somewhat counterintuitively, more detrimental.) I'm curious what particle size commercial millers aim for in 100% extraction stone-ground whole wheat, and if any attempts are made to treat the bran separately. In a follow-up bake I'd like to compare my home-milled flour with professionally milled flour using the same wheat. This was explored somewhat in this article.
I'm going to explore the shaping and baking temperature hypotheses more in follow-up bakes. It is interesting how similar the crumb for these recent YR bakes is, and I'm surprised how little the crumb is affected by changes in BF/FP. I have been relying on minimal use of coil folds for gentler dough handling and to replace an on-the-bench preshape. I like to circle the pre-shaped round on the backs of my knuckles, wrists, and forearms a la pizza shaping to get it ready for final shaping. Using gravity in this way feels more gentle than tugging on the corners, although I haven't actually seen this used before so it may be worth revisiting. I then fold in the left and right sides and roll it up from back to front using a little bit of tension to get things started. In this bake, I tried to use minimal tension but I'm curious if this shaping is still too much for the dough. At this point, a wider pre-shaped dough sheet will take more turns to roll up, which may produce more tension under expansion. A plumper dough blob would take fewer turns to roll up and might result in less overall tension during expansion. That seems to be worth exploring, and the openness of the periphery with respect to the center seems to corroborate this (although there are other plausible explanations, such as outer to inner temperature differences).
This was nearly identical to the previous effort but with two changes:
I finally had Trevor Wilsons Open Crumb Mastery printed and bound so I could read it more thoroughly (I really don't like reading on the computer after work). I noticed how often he relies on a short BF of 30% (or less) and wanted to revisit shorter total fermentation time to see how this wheat would react. I also tried to be even gentler in the fold and roll this time, which didn't have the impact I had hoped for, although it did seem slightly more open on the periphery.
I've been baking with a covered clay baker set on top of a 3/4" Fibrament baking stone, which should provide the steam and thermal mass needed for a reliable oven spring. I've been relying on a digital probe for temperature readings (FireBoard) as the actual temperature in this oven is radically different than what the dial is requesting (by 100 degrees or so). The Fibrament stone does have the recommended 1 1/2" border on the edge for heat to rise, but I suspect the large observed temperature gap is due at least in part to the presence of the Fibrament stone, which sits between the lower gas burners and the top-mounted thermostat. I have been setting the dial to 450F for a long preheat and for the first 10-15 minutes of the bake. I then lower it to 350F for the next 30 minutes, followed by a brief period uncovered on a rack to brown at the same setting or slightly lower. The starting bake temperature can be seen in the snapshot of the FireBoard below, where (4) and (5) are the temperatures from probes at the left and right side of the stone (528F and 494F), and (6) is the temperature at the top of the oven near the thermostat (541F). I do preheat the clay baker in the oven prior to baking, but assume the temperature inside is quite a bit lower than the external measured temperatures. I'm curious if this might be too hot and am considering lowering this further by dropping the dial another 50 degrees for the first and second phase of the bake (400F and 300F on the dial).
I didn't bake the day before and the 50g starter remnant was neglected for a full day, so I refreshed it that morning before feeding it later that night. The pH of the starter the following morning was 4.69, and it expanded pretty well, although I think the morning + evening feed produced a slightly young starter and it was not quite as soft on the inside in the mix the following morning and the BF took slightly longer than usual (7 hours from end of the mix to end of the FP). I used a short 2-hour chill to firm things up slightly after the 90F final proof. This really does make scoring much easier and I find it gives me more flexibility to warm up the oven. The short hot final proof moves so quickly that I've delayed the bake a few times to wait for the oven, so I tend to preheat earlier than needed which heat up the entire apartment. The quick chill gives me a little more flexibility with scheduling, although I suspect it is lower the pH and I may need to remove the dough even earlier. The final bread pH was about 4.35. This isn't sour by most standards, but is a bit below the 4.7 reference I'm targeting. I can postpone that journey until I'm satisfied with the crumb.
This was similar to the last two bakes but with the following two changes:
I believe I have been shaping with too many rolls (at least for this dough) so no matter how loosely I shape the relatively strong ("muscly") dough will always tend to compress the alveoli in the center during expansion. I've read lots of shaping descriptions but realized I haven't actually come across any specifications to the number of turns for a given size dough. The relative openness of the outer crumb to the inner crumb in the last few bakes led me to this conclusion. I'm fairly sure this is the case and this is probably yet another shift that will largely invalidate many of the previous fermentation-oriented experiments, which will have to be revisited with looser shaping (or perhaps unshaped dough). The final loaf looks slightly more open and more consistent throughout, and the inner crumb compression from the prior bakes has been eliminated. I'll also have to revisit the whole grain bakes with looser shaping, as I suspect the shaping was more of the culprit than the bran was.
Summary:
It is interesting that the aliquot jar shows less aeration for similar rise levels relative to previous bakes in the attached photos. I forgot to create the aliquot jar immediately after post-mix kneading as usual, but it was still within a 1-hour window or so (well before any measurable dough expansion).
Very nice improvement in the openness of the crumb at the center vs the outside of the loaf. There are just too many variables to consider in trying to improve our baking isn’t there?
Agreed. Too many! I'm trying to think of what to change for the next bake. I want to return to 100% whole grain experiments soon, and revisit bran treatment options, but would also like to try extending the final proof a little for this configuration. This one was with BF @ 40% and FP @ 80%, and it seems to be holding up fine, so I could probably try something like BF @ 40% and FP @ 90-95% next time, although these longer fermentations are increasing acidity.
An infinite number! And of course there's a butterfly effect. I think that those with the most success are the ones that have reduced the most variation from their process, whether intentionally or not.
Looks great! You've led me to question once again the importance of the final shaping. If you consider the variations between no-knead, tartine, Trevor Wilson, and the methods we settle on individually, what exactly is it about the process that is affecting change? I've read Trevor's book a few times and still have a hard time understanding how to put some of the concepts into practice.
I feel like I do develop a little more intuition from OCM, but still find it very difficult to read the crumb in a practical way once the bake is in the pretty good but not great range (i.e., not obviously overproofed or underproofed). I'm unsure what is the main factor responsible for the remaining dense pockets of small alveoli in this bake, or what the limitations of the flour are. I think I'll repeat this one and try to push the final proof a little longer. After bumping up the post-mix kneading, I've been most surprised by how similar the bakes are through various changes. Neither bolting nor the cold-proof had quite the impact I was expecting.
I think these "single origin" heritage grains vary quite dramatically in their properties (and likely from crop to crop) and there is still a lot to be gained from a grain-specific group bake. Since we are currently using a fairly similar process, I ordered some of the Rouge de Bourdeaux berries you had been using (and a small bag of flour to compare with my milling process) to see how those perform before reading you didn't like the flavor :) It will be interesting to try a different heritage grain with my latest process in any case.
I've also been thinking a little about simple blending of complementary flours. For example, Would a little extra gliadin from 10% spelt provide more extensibility to allow these alveoli to expand a bit more? I'm sure there is still lot of untapped potential from proper handling and fermentation. After further reading and some of these recent discussions, I've been trying to be extremely gentle in my handling: coil folds, minimal handling, gentle fold-and-roll shaping, but still have some doubts. This video was called to my attention a while ago, and would seem to be a good test bake to eliminate shaping and handling related variables:
Exactly why they were bred out of existence (mostly).
More confirmation for Trevor's theory that it is 80% fermentation. 100 bakers may have 100 different recipes and all produce the same thing.
I really hope you enjoy the Rouge de Bordeaux! I'd feel awful if I led you astray. Though selfishly I'm very excited to see and hear about your results with it! I will say that I enjoyed the last loaf much more than the previous, so maybe the maturation of my starter has had an effect.
I think there's no doubt this would have an impact, I started thinking about this after following a different thread, maybe the durum CB I don't recall. But ultimately whether that's the case or not it's another path than the one I'm on now, so will remain in the back of my head until I feel like I've completed the current journey. Probably.
By the way I'm enjoying the Rouge de Bordeaux more now since I've stopped feeding my starter rye. I like rye generally speaking but it caught me off guard when it suddenly became 20% of the flour used. I just fed the starter 15:60:90 to provide 150g for 20% of my final Rouge de Bordeaux loaf tomorrow. This gives me a consistent 1:4:6 feed in 24 hours with 15g leftover to do it again tomorrow if I decide to go back to back again. So in theory my starter will be a bit healthier than the one used last time at 1:2:3.
I’ve been following your work/progress and went for it. I started my desem buried in fresh ground Yecora Rojo, tomorrow is day seven and hope to make a “practice” loaf this weekend. The desem smells amazing, much more fruity and fresh than when I tried converting a standard stiff starter a few weeks ago. Anyways, thank you for taking the time to post, what a great thread.
I'm so glad you find some value in it, despite the long arch and wrong turns. I'm even more glad you'll be joining the ongoing TFL desem bakes (a kind of decentralized/loose multi-decade community bake) since we can learn a lot from each other by sharing a common process and baking notes -- especially with the same wheat. Kudos for attempting the desem-from-scratch approach. I've been curious about what potential differences might exist between the bonafide desem build and the starter conversion, but haven't tried it yet.
I have been busy lately, but have a desem update worth sharing, after a short hiatus. Recently I discovered my clay baker doesn't seal properly and is most likely leaking steam (I confirmed both the top and bottom rock very slightly on a flat countertop), which I believe has been a limiting factor in oven spring and crumb openness. This is my hypothesis in any case. I was fairly sure this wheat and process had more potential for lighter loaves, especially with the bolting experiments, and have been examining and re-examining nearly every aspect of my process to squeeze out improvements with very limited success. In accordance with Trevor Wilson's 80% mantra (fermentation and dough handling), I had been assuming the limiting factor here was the baker (me), but in this case, I believe it was the clay baker. While there is still lots of room for improvement, this recent bake, with the same process (and a slightly sluggish starter due to minor neglect) is much lighter than my previous YR loaves, including a recent one with nearly identical bulk fermentation and final proof levels. I could tell it was better when I first picked it up. I gravitated to the clay baker hypothesis after watching some commentary and crumb analysis in one of The Bread Code videos. I'll have to follow up with a link to the video. After a lot of debate, I took the plunge and purchased a Challenger baker. This is the result from the first bake:
The oven spring, crumb, and crust are noticeably improved in this one. This bake used bolted YR that was in the fridge for a few days. For various reasons I mixed this one by feel but would estimate it was somewhere between 70 and 75% hydration. The process was otherwise very similar to recent efforts. Of course, a sample of one doesn't mean much, but I will try to repeat it again this weekend.
I was reading The Bread Builders again recently, which mentions a desem pH of 4.2. In this thread, I previously cited an online article that specified 4.7. I'll have to correct that. The language of the article closely resembles that of The Bread Builders, and I'm curious if it was a typo. In my experience, 4.2 seems to be a more appropriate target.
edit: final pH 4.21
That is a mighty impressive loaf you baked there. Amazing oven spring and bloom and look at that beautiful crumb. What a difference good steam made to your loaf. I’ve always wondered what the benefit of using a clay baker over other materials would be. Well done figuring all of this out and baking such a perfect loaf now.
Benny
I really thought I had the steam category checked off. Let's hope I can confirm this theory with a few more successful bakes. I'm not sure there is any benefit to clay in general, and if I'm correct about the steam issue, it is probably more of a quality control issue related to the fit of this model in particular. I'm guessing clay bakers with tight-fitting lids would do better. If I had a tight-fitting oblong dutch oven to accommodate batards, I probably wouldn't have gone down this path.
I'm enjoying this success vicariously through you. I also use the Challenger pan but have for a while and before I started paying as much attention as I do now. I'm not sure it's better than your standard combo cooker but have no complaints (well one, it's heavy and unwieldy - my oven racks wilt beneath them). However I do collect cast iron of all sorts so this was a no brainer when it became available.
Edit: PS I was wondering where you were and glad to see you back
It was a busy week. I planned ahead and baked a Volkornbrot in a 15 inch Pullman last weekend to get us through the week.
At 22 pounds, the heat retention on the new pan is impressive, and I can believe that also makes a difference in my vented gas oven. This loaf did bake faster in the new pan with a similar temperature profile. When I removed the lid at the usual time to brown it, it was already fully baked with a nice thin crispy crust. I considered a few other options for trapping steam that I have seen in various posts (dutch ovens, Magnaware bakers, inverted stainless steel bins on a baking stone) but since I didn't have anything suitable for batards already, and pandemic thrift store scores aren't happening, the added baking features and price reduction sold me on it. I've always had concerns about lowering pre-scored dough in sagging parchment paper slings, so it is nice to be able to load and score. This should also give me a way to get started with (demi-)baguettes in my vented gas oven.
The Rouge de Bourdeaux berries have arrived, as well as a small bag of premiled flour for comparison, although I have fewer doubts about my milling process now. I have some tempered berries I need to get through but am eager to try out the new stuff soon.
It's was nice to read the well documented trials and tribulations of your bake progressions. The latest one looks like a keeper. I applaud all of you 100% guys for your efforts.
Thanks for your comments. It has been a long journey. I bolted the flour for this bake with a stack of #30,#40,#50 test sieves, as I've been experimenting with tempering lately to improve the bakes, although most of the previous bakes were whole grain. I'll try a whole grain version again soon with the new pan and will be curious to see the difference. After reading about your improvements from postponing the salt inclusion, I am interested in comparing that with the extended overnight wine fridge soaker/saltolyse I've been using.
Desem with professionally milled Rouge de Bordeaux
edit: I noticed I've been using the starter before peak with my 5:6:10 evening feeds, and this one was allowed to go a bit longer before use (whether peak or slightly young is preferable is another question).
edit: final pH 4.4
This is slightly higher than the 4.2 specification in The Bread Builders. I should consider using pH in combination with the aliquot rise to judge the final proof, as it gives an indication of the final flavor and the proximity to proteolysis. This value of 4.4 indicates I could have pushed the final proof longer, although oven spring is another consideration (it was adequate but not excellent in this case). I recall a TFL pH discussion about someone using pH to determine bulk fermentation and final proof levels. It will be interesting to try. I also believe I have measured pH changes between the pre-bake dough to the post-bake cooled sliced bread, and will need to understand this better if I want to use pH actively.
That's a nice looking bread. How would you compare the eating quality to your other breads? Personally, I love Rouge de Bordeaux. I find that it performs well and has great flavor with lovely baking spice notes – like Turkey Red only more so. The water bath for the aliquot jar is an interesting idea. Also interested to see where the pre- and post-bake pH line of thought goes.
I do enjoy reading your posts. Thanks.
-AG
Thanks. I'll take it for my first RdB, although I think I would prefer a slightly more uniform crumb. Maybe later shaping and/or a longer final proof? I'm really curious to see how the home-milled version comes out. I just had another piece, and it definitely has a nice flavor. I wish there was a better way to represent flavor in these posts. I'll have to work on my tasting notes. The seller describes it as "nutty and earthy with notes of cinnamon and baking spice", and I'll go with that. I started with a bag of Turkey Red wheat last spring, which I recall really stood out. I liked working with it just for the smell, which reminded me of a confectionary, although it didn't fully translate to the taste. I'll have to try it again now that I have a better idea of what I'm doing, and I think I can find a more local source (close to NYC).
I thought the jar would be a step in the right direction if I want the sample to track the main dough, but I think there is probably an even better reusable dough surrogate. Maybe a freezer gel pack of some kind? I can try to measure them to see how closely the temperatures match.
I recall some previous breadtopia posts where you were focused on home-milled heirloom wheat varieties and another where you started using a stiff and low hydration bread flour starter. That's quite close to my current interest, so I was curious if you are still pursuing this and if you have settled into a favorite approach?
FWIW, I just found the original pH TFL post I was thinking of from @albacore.
You are right. Last year I messed around with my starter and did some experimenting with my home-ground flour. After reading in Trevor Wilson’s ebook that some variation in the particle size can improve a loaf, I started playing around with that. These days, I mill 90% - 93% of my wheat berries very finely (either on the finest setting or within a click or two) and then open the stones about 5 or 6 clicks and grind the remainder. All the flour is then sifted through a 60-mesh screen and the “bran” is soaked for a couple hours to help soften it. When there is about 45-60 minutes left in the soak, I start the autolyse. I think this method does lend a certain toothiness to the texture and helps with moisture retention. I’m a tinkerer though and will probably always play with it. I’ll undoubtedly try even larger particle sizes, but probably in smaller amounts.
The stiff white starter was an aborted experiment. It seemed really great for a few bakes, but after a short time it wasn’t doing a good job at raising dough. After a bunch of dense loaves, I tossed the new starter and changed the way I manage fermentation, which is what I should have done in the first place. That’s a lesson it seems I have to relearn every few years for some reason. The flavor of high percentage whole wheat sourdough is a bit much for my family, so I make it with commercial yeast. I will probably always have the desire to produce a mild tasting, naturally leavened 100% WW bread and have been very curious about Desem for that reason. It seemed like too much effort though. A blogger that I used to read occasionally posted about it a few years back and probably put me off the idea for good, or so I thought. Your posts on the subject have reopened my mind to it. I will read up on pH posts too. So many intriguing rabbit holes, so little time.
This looks wonderful! What do you think of the flavor?
I like the flavor, and the loaf is a good first step. The flour performs really well too. The gluten is strong, and I'm curious if it might benefit from the more passive approach you have been using lately.
Same as above, with a slightly younger starter and two rounds of lamination mixing (the Rouge De Bordeaux tolerates this very well) but I lowered the hydration to about 72.5% for a slightly stiffer dough. (The lamination mixing may have bumped this up slightly). I find the hot and humid 90 F final proof tends to make the dough very slack towards the end. The previous bake had a much shorter final proof (< 60 minutes) before it started to feel slack and I rushed it into the oven. Perhaps it would tolerate tighter shaping? With lower hydration and tighter shaping, I was able to keep this one in the 90 F proof for closer to 90 minutes. Starting with a stiff room temperature dough seems to help compensate for this slackening effect, allowing to push to a higher final proof rise while providing a pre-bake dough that feels lively (still well domed). I also shaped this one slightly tighter. I prefer the taller shape and more regular crumb in this one, but the crumb does look somewhat compressed. I left this one with the oven dial at 400 F covered for the entire bake. This produces a baking stone temperature between 475 and 500 F with an upper/ambient temperature much higher. (I'm still slightly unsure where and how to best measure oven temperature and how these readings translate to temperature in the baker.)
Simply gorgeous, love the tall profile of this loaf. The crumb is nice and even, more my preference than super irregular and hugely open.
Benny
Thanks. I also like the basic structure in this one, and it definitely has a light and hollow feel in my hands relative to the appearance. I get the impression it started out really well, and that the proof was in the ballpark, but that it ended up getting a little compressed or trapped by the crust relative to what it could have been. This one had two ice cubes and I sprayed it quite liberally in the Challenger pan, so I don't think steam was a problem. Perhaps I should bump the hydration a little and bake at a slightly lower temperature? Shape a little looser? So many things to try.
I have a backlog of links and questions I wanted to jot down, and will be dumping a few of them here.
Simple and concise steps for tempering (I used this as a guide in lieu of a moisture meter):
home-tempering-and-bolting-wheat-get-high-extraction-flour
It also states the following:
I have found this to be the case. I was previously freezing wheat berries in between coarse and fine milling to reduce temperature based on reading about a similar practice in Flour Lab (he mentions cooling and not necessarily freezing). In any case, I believe that flow restriction is as effective at reducing milling temperature and produces a flour that is friendlier for bolting. I now use a funnel to scoop wheat and slowly coax it through the spout and into the mill hopper in semi-continuous bursts with gentle shaking. I'd like to find a contraption to achieve this that allows a dump-and-forget approach, but it is tolerable for now. With this approach, I'm able to maintain temperatures of about 100F (or slightly higher) as measured with an IR gun at the exit spout at the finest settings. I've seen various reports about temperature, but the Mockmill FAQ mentions a lab they partner with does not find adverse effects on flour performance with temperatures below 140F. For nutritional sensitivity to milling temperatures, I have been assuming these milling temperatures are well below baking temperatures and won't introduce any adverse effects (assuming a same-day mill-and-bake process). Extraction is improved at room temperature. I can't prove this is necessarily providing better bran separation, but I believe it to be the case from the feel of the sifted particles.
I've been curious what commercial millers do for 100% whole grain flour. No doubt, in order to produce bread flour, the milling process is a complex art. But what about whole grain flour? I haven't seen much about what commercial millers do with it. I was curious about what they do with bran in particular, and whether or not sifting to retain larger bran flecks would produce flour that performs better, as suggested by this article (originally shared by TFL user @barryvabeach HERE):
The effect of particle size of wheat bran fractions on bread quality – Evidence for fibre–protein interactions)
Based on this article I would think that keeping bran in larger pieces would produce flour that performs better, but would expect this practice to be reflected in commercial milling of whole wheat flours. I haven't seen it. I was curious what this recent bag of commercially milled Rouge de Bordeaux would look like, in comparison with my home-milled flour. It was uniformly fine, including the bran, and it felt like powder, even compared to my finest multi-stage milling. So, at least, in this case, it all appears to be milled uniformly.
This post asks a related question, which is whether or not tempering is useful in the context of whole-grain baking:
not-tempering-and-whole-grain-flour-milling
It mentions that Dave Miller also mills uniformly in his whole-grain breads:
(I have always read the aged flour performed better, but read recently in an article posted by @mariana (HERE) that in the case of whole wheat, fresh flour actually performs better.)
Are there any millers that mill non-uniformly or who bolt and re-include bran for improved flour performance?
There have been a few recent discussions addressing the efficacy of a long autolyse, soaker, saltolyse, or pre-dough with whole wheat flour.
These posts include interesting relevant discussion:
whole-wheat-long-autolyse
what-are-problems-exceptionally-long-autolyse
I briefly experimented with a sifted bran soaker at high hydration earlier in this thread but was also making a lower hydration flour soaker in parallel. Based on recent discussions and these earlier threads, and @AnotherGirl's practice of keeping a bran soaker, I'm inclined to try using a bran soaker again to soften the bran and to allow for better hydration of the remaining flour. The hope is that the shorter autolyze or (salted) soaker should improve the performance of the flour. If the bran largely removed it really shouldn't take much to hydrate the remaining flour when the bran is separated and the benefits of a long slow passive gluten development may outweigh the additional work required from active gluten development. The final mix can be performed without the bran at lower hydration for stronger gluten development, and the bran can be included later.
In the above threads, I also noticed an interesting comment from @mwilson:
I recall @dabrowman mentioning this practice to enhance flavor ("toadies"), but hadn't considered using this (in addition to refrigeration and salt) to neutralize enzyme activity. That also sounds worth a try.
Impact of wheat bran micronization on dough properties and bread quality: Part I – Bran functionality and dough properties
https://www.sciencedirect.com/science/article/abs/pii/S0308814621004131
This study aimed to investigate the effect of wheat bran micronization on its functionality including physicochemical and antioxidant properties, and dough properties. Coarse bran (D50 = 362.3 ± 20.5 μm) was superfine ground to medium (D50 = 60.4 ± 10.1 μm) and superfine (D50 = 11.3 ± 2.6 μm) bran, accompanied with increasing specific surface area and breakdown of aleurone layers. Bran micronization increased its soluble dietary fibre content, ferulic acid liberation, and antioxidant properties including total polyphenol content, ABTS•+ and DPPH• scavenging activities, while decreased its water retention capacity and insoluble dietary fibre content. Moreover, bran micronization impacted dough rheological properties. The dough with superfine bran had higher water absorption and gelatinization temperature, peak viscosity, final viscosity and setback value, lower stability time, resistance to extension, and extensibility than the dough with coarse bran. This dough furthermore exhibited more solid-like properties characterized by decreased loss moduli and frequency dependence (n’).
How manipulation of wheat bran by superfine-grinding affects a wide spectrum of dough rheological properties
https://www.sciencedirect.com/science/article/abs/pii/S073352102030535X
The present study explored the effect of size reduction by superfine grinding on the performance and rheological properties of bran-enriched dough. Coarse (D50 = 328.98 μm) and superfine-ground (D50 = 50.76 and 28.37 μm) wheat brans were incorporated into the wheat dough to replace 10–30% of plain flour. Both fundamental and empirical tests were performed to assess the mixing properties, pasting properties, large deformation rheology, small deformation rheology, and stickiness of the dough. With the increasing amount of bran added, dough water absorption capacity increased, while the dough became less sticky and more rigid. Superfine grinding reduced the water retention capacity of the bran by 17–20%. Dough fortified with the finest bran (D50 = 28.37 μm) showed an overall better stability and uniaxial extensibility. However, the results suggested that superfine grinding not necessarily improve every aspect of dough performance, particularly the pasting properties. High peak and final viscosity were observed for dough fortified with superfine bran, indicating their end products, such as noodle, might exhibit high stickiness after cooking, and a high degree of starch retrogradation. Results of this study contributed to a better understanding of the modification effect of superfine grinding on dietary fibre.
https://www.sourdoughhome.com/grain-mill-test-results/
Example: https://youtu.be/SS4GigDY630
This produces very hot flour. Finding a reliable automatic intake restriction mechanism would be very helpful to free up hands for this and to reduce temperature.