As I write this, we’re in the midst of the Covid-19 Pandemic and many of us are home baking bread. Whereas a few short months ago large numbers of us were focused on “The Perfect Loaf”, now we are happy to be able to bake our own nutritious sandwich bread for utilitarian purposes.
I have become hooked on Covered Pullman Pans. By the way (at this time), Amazon has a great deal on 2 large covered Pullman Pans. Anyway, in an effort to simplify and streamline the sandwich bread I wondered if the dough could be shaped immediately after mixing and then placed in the Pullman to BF and later bake. I supposed that the pan would constrain the dough from spreading so shaping might be done at the beginning of fermentation rather than towards the end after the BF. With typical free formed loaves the dough is pre-shaped and shaped after the BF in order to build structure and strength back into the slackened dough. With SD many bakers are careful to maintain as much of the gas created during the BF as possible. With the method above the dough is never touched again after the initial mix, so maximum gas retention would be expected.
For those contemplating baking in a large Covered Pullman (13x4x4”), this 70/25% (WW/BF) used a total dough weight of 1550. I didn’t weight the actual dough before panning but it started out at 1550g. When determining your dough weight for a covered Pullman you need to consider the type of flours used. Obviously whole wheat will require more dough than and all white flour dough.
How to calculate Total Dough Weight (TDW) for a different sized pan. This method should at least get you in the ball park.
Since we know that this formula at 1550 fills a larger (13x4x4”) pan and bakes up well, we can easily calculate the cubic inches of the pan and determine how much dough will be needed to fill a pan of a different size.
It is important to note that different doughs with produce different crumb structure and densities. A light and airy all white flour formula may only take 1200 grams to fill a large Pullman. Experimentation is needed to dial in your particular dough. It is probable best to guess a lower weight of total dough and proof and bake with the top off initially.
An example -
- 13*4*4=208 cubic inches.
- 1550g of dough is needed for 208 cubic inches. For each cubic inch 7.45g of dough is needed.
- the smaller USA Pullman is 9x4x4” and that equals 9*4*4=144 cubic inches.
- Since the smaller pan is 144 cubic inches, it will require 1073g of dough (144*7.45=1072.8)
For an even more accurate method of converting Total Dough Weight for a different sized pan.
The beauty of grams (weight) and milliliters (volume) is that 1 gram of water is equal to 1 milliliter.
- Put your pan on the scale and tare it out
- fill the pan with water and record the weight in grams. If the pan leaks try lining with plastic wrap
- Weigh your next pan as above
- Divide the two weights as shown above using the same math
Since many bakers use USA Pans here are the milliliter weights for the small and large Pullman pans -
Large USA Pullman 3185
Small USA Pullman 2266
(9x5x3") USA Bread Pan 1460
NOTE - I like the Pullman pans much better because they are both 4" high and the Bread Pan is only 3" high.
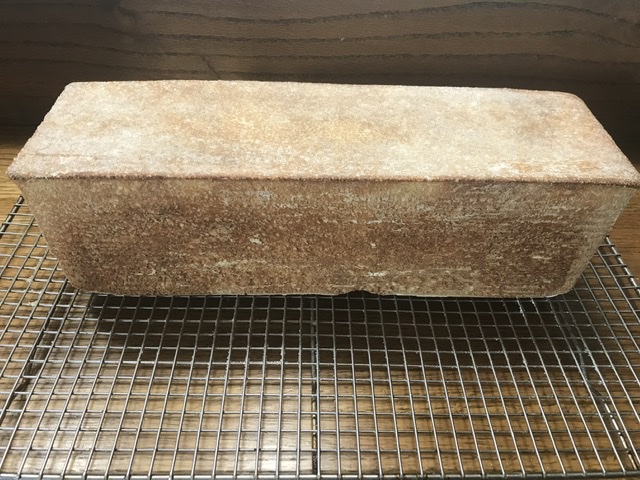
I am dangerously close to the end of my frozen bread stash. The dough above was thrown together in “Easy Peasy” fashion. I figured if it baked up a brick, I’d eat it anyway :D Thank God! That wasn’t the case.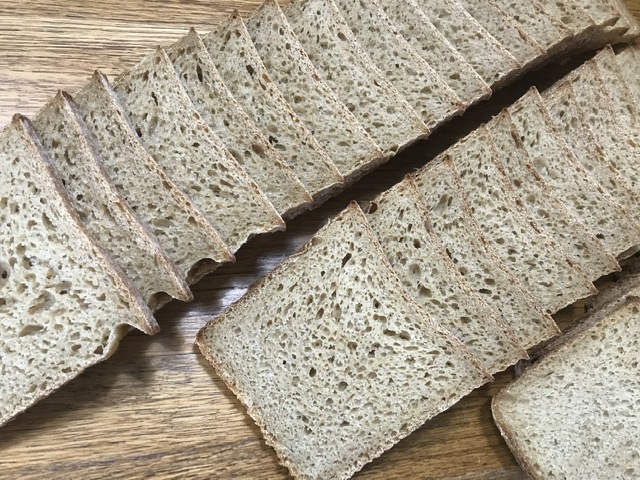
This large loaf produced 36 thin slices. They will be frozen individually and uncovered for ~1 hr on a cooling rack, then separated and placed back in the freezer in a ZipLok for our supply of daily bread.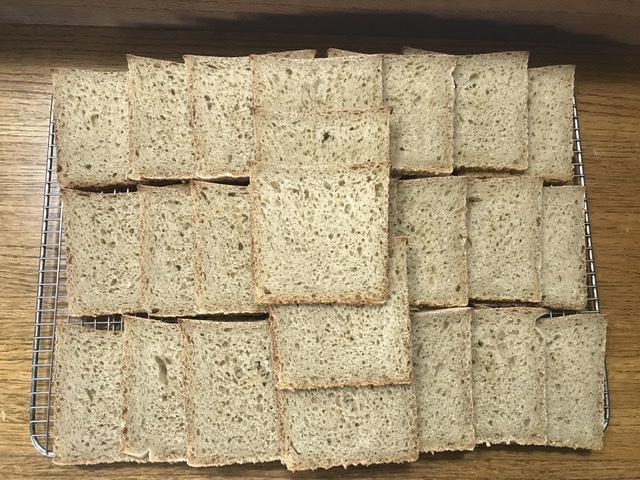
I may never again bake pan breads any other way.
Dan
Yes, stressing over artisan bread perfection seems frivolous for these times of just bread. I have found it harder to do both and have been focusing on getting to the right Approachable loaf. I have gotten better at not over proofing and the oven spring has really improved. Baking almost daily for friends and neighbors has helped get the timing down on yeasted bread. I haven't figured out why I need less than half of the yeast called for by most recipes.
The recipe for WW that came with my Bosch mixer called for putting the dough into a pan straight from the mixing bowl but I never tried it. I look forward to seeing how this one turns out.
Here is yesterdays blooming Approachable
"I haven't figured out why I need less than half of the yeast called for by most recipes."
In my experience...
Store-bought WW flour ferments faster than store-bought white flour.
Home-milled WW flour ferments faster than store-bought WW flour.
I am so grateful for my Mockmill 100 and buckets of grain. The Approachable loaf recipe came along just in time and suits me just fine. The faster fermentation matches my attention span these days.
Hey MT, those two loaves look like a blooming success :D
Very nice indeed.
As SD bakers, we have a longer time line for fermentation. To most of us longer fermentation is to be desired. Speed does not bode well for flavor.
I have been doing 1/2 tsp yeast per loaf and it has been about three hours before it is ready to bake. When it is only risen just above the rim before I bake it seems best. If I wait until it is an inch or more above the rim there is way less oven spring. If I use less yeast the dough doesn't rise enough before breaking down. I am reluctant to try retarding it for fear it will be goopy in the morning. I did use half rye flour in todays levain to bring more sour and flavor. Did you retard your pullman in the fridge or your cold proofer?
Yes, I did retard the dough overnight @50F because I was concerned it might over proof before morning, but since it used 4% pre-fermented flour (sd levain) and no CY it probably would have lasted through the night.
After the dough was mixed, I did 100 slap & folds then immediately shaped the dough and put it in the pullman with a clear plastic bag for cover. I prefer to watch the dough until it nears the top instead of putting the cover on right away.
As far as I can tell so far, I am thrilled with the loaf. Slicing tomorrow will complete the story.
In Laurels Kitchen Bread Book she says that some honey (non Pasteurized) can degrade gluten or halt rising during longer fermentation times. I have switched to brown sugar at 5% and increased the amount of water slightly and can tell no difference.
I was thinking about another way to simplify - dropping the double volume dough (1700 grams) straight into dutch oven after 2 hours of folding at room temperature, let it proof for 16 hours in the fridge and bake right out of the fridge, undisturbed, just scoring it... Haven't tried though.
As long as the dutch oven was sized properly to confine the sides of the dough forcing the dough to rise upwards.
The nice thing about shaping before fermenting is, the cell structure remains undisturbed from BF to bake. At least, that’s the theory...
Another thought - since some pots (cast iron) have rough interiors, you may want to grease and flour the vessel well before placing your dough.
I am thinking of lining it with parchment paper, to avoid the seasoning on the cast iron impregnating the loaf and to avoid DO rusting if sour dough ruins the seasoning.
Uzbek, that may work. Are you familiar with crumpling the parchment paper so that it takes the shape of the pot? It works great.
Crumple the paper completely, then push into the pot to conform to it’s shape. Flour bottom of dough and place into pot.
You may want to flour the bottom of the dough before putting on the parchment.
... the dough will collapse first anyway, because it wasn't shaped, and then go up during BF, the way I see (imagine) it.
When I mentioned confining, I was talking about the inability of the dough to spread outwards during fermentation and also the bake. It is forced to rise upwards because it is unable to spread outwards.
... and the volume of dough (double the size of traditional loaf), combined with hydration, will make it fill the bottom of the pot and BF-rise upwards anyway.
Great advice on crumpling the parchment paper, I take it )))
Most sourdough breads are turned over before baking
... but I am being lazy here. High hydration, tight lid, quick water spray before baking and then scoring should address the potential drying out of the surface. Gosh, the more I think about it, the more I want to proceed right away, with commercial yeast (My starter is not getting ready any time soon).
"They" say you can put it in a cold oven and just add some extra baking time.
Do you have a link(s) that I can read up on this. I wonder why whole wheat is specified and not white flour?
It was within a recipe for whole wheat bread or the blog associated with the recipe. I am pretty sure I also read it here in a discussion a long while back when giants roamed the pages.
I am familiar with comparative testing of pre-heated and cold oven baking. But I don’t recall mention that it was more suited for whole wheat.
Yesterday I made the Pullman bread from Hammelman. My pullman pan is 9" not 13", so I had to figure out how much dough that pan would take. Some searching here on TFL answered that question for me. I used 1.75 pounds and it came out perfect. It's a straight dough but quite delicious. It made great PB&J sandwiches. We finished it off with French toast this morning. Best ever!
It was my first time with that recipe and that pan. I'm very happy.
Had quite a bit of left over dough so made a boule out of that. Haven't tried it yet.
GW, it would be good to note the weight of the dough for that bread. You may find that other breads using different flours and/or rising agents make require more or less dough to fill the covered pan.
I make two loaves of Hamelman’s Toast Bread every week in my 9” Pullman pans . 1lb 9oz in each pan leaves enough over for two dinner rolls. This bread not only makes great toast but is good for sandwiches too.
Merlie
As with most innovators, the vast majority of ideas fail miserably. BUT not this one...
Wow, DanAyo, beautiful looking loaf, and I am sure they are delicious ) Envy
What were the temperature and baking times?
20 min @ 450 (for oven spring), then removed the cover. 10 min @ 375, then removed bread from pan and placed back in the oven for 15 more min @ 375. Internal temp was 205F.
This, if it works, will be the ultimate lazy loaf. Just mixed everything with hand mixer, 5 minutes, didn't touch by hand, and transferred to the DO. It is CY dough, so will let it 3 hours and then straight to oven.
Please post an image of the dough before it is scored and placed into the oven. I would like to see how much it fills the pot.
Looking Good...
It is a 70% hydration 20% Rye + 80% AP dough, with 2% salt, 1.5t yeast, 2.5% sugar, 3% fat. Will probably put in oven to rise at 30C
This is how it looked only 50 minutes later, and finger poke test says it is ready for oven. Put in the cold oven, it will take about 15 minutes for the oven to heat up to 245C, this will be my "compensation" time, then will let another 10 minutes under lid, then 25 minutes at 235C without the lid.
30 minutes later
WooHoo!
Looking good. Betting the crumb will also be nice.
And this is the final product! All it took was 2 minutes weighing, 5 minutes mixing, 50 minutes proofing, 1 hr 15 minutes baking (including oven heat-up). Started in cold oven with lid on, heated up to 245C (took 20 minutes), baked further 10 minutes with lid still on, then removed the lid and dialled temp down to 230C, waited until crust was brown (20 minutes), then brought down to 190C and kept baking until total time was 1 hr 15 min (having no thermometer I figured that's about how much 1700 grams of dough would need to heat all the way through.
... the crumbshot! Not artisan, but this being zero labour, ultra fast, commercial yeast bread to feed the family on quarantine, I couldn't be more happy.
Easy, Peasy...
for the push and inspiration.
Next time you might try shaping the mixed dough and then placing it it the pot with the seam side up. That way you don’t score the dough because it will crack at the seam lines. A very skilled baker, Danni (the other Danny) using this technique for all her bakes and they are gorgeous. ...and when you thought things couldn’t get easier :D
Your minimalist bread was a leap of faith. No bulk, no preheat, no basket, no worries. I suppose you could proof your lidded baking vessels inverted and then bake right side up. At least that would be one more step away from a bread machine. Keep it simple
Dan that is very cool that this works so perfectly, I can’t believe how little work it is.
I’m wondering for those of us who don’t have Pullman pans how to calculate the weight of dough needed? You calculate 7.45 g of dough per cubic inch and for a Pullman pan you can easily calculate the total volume since it has a top wall. For regular open loaf pans we want the volume of finished bread to expand over the top of the pan edges. How would you calculate dough weight for a 8.5x4.5” open top loaf pan?
Benny
Benny, you pose a great question. This calculation is for a particular formula. It won’t work for an all white flour bread, for example.
I think this the rationale of this calculation is best used by each baker using their calculations. So, if you are baking the same bread you could calculate the cubic inches of your pan and then add an additional percentage for rise over the top of your pan.
Nothing beats experience. But once you dial in a formula these calculations can be helpful when choosing to bake in a different size pan.
That makes sense Dan. One could extrapolate on the extra volume you want over the top of the pan and then calculate the dough weight needed to fill that. Thanks.
Benny
EDIT: If you need volume of pan alone, without the expanded part of the loaf, then just tare it, fill with water, number of grams will be equal to volume in cubic centimetres, then divide by 16.4 and you got cubic inches.
Of course, that makes sense, thanks.
Baked a Five-Grain Levain using the “Easy Peasy Pan Fermentation”. I am completely convinced that this is a simplified, efficient method to ferment pan breads.
The circular crumb pattern is a result of shaping the dough after laminating and rolling up tightly. my goal with pan breads is a uniform crumb with even cell distribution and spacing.
The image on the bottom right are individual slices that will be frozen and then separated and placed in a large ZipLok in the freezer. Microwaving the frozen slices for 20 seconds or so and you’ll soon be enjoying “fresh baked” bread.
NOTE - for my taste this bread should be baked less dark. My oven bakes fast. It was set to 450F and baked 50 minutes. Next time 420F for 40 minutes, then check internal temp.
Danny
Your method for making sandwich style bread is da bomb Dan. I will definitely use it when I eventually make a sandwich bread in the future. It really simplifies the process, super simple and yet that simplicity enhances the result, even perfect crumb. What’s not to like about that.
Benny
Personally I quite like the ‘domed’ top to my loaf baked in a tin, and it makes the sandwiches/toast look more natural :-)
For what it’s worth, I do about half the bulk fermentation on the counter, then shape and do the rest in the tin.
The only thing to watch out for in my experience is that when you ferment in the tin it really does love to stick, so it’s worth greasing the tin carefully :-)
Apologies for the rotated image...
Martin, I was also concerned about sticking, but the pans are always greased and lightly coated with rice flour. The baked breads have never failed to fall right out of the pan.
Super nice looking loaf...
Danny
I am a happy camper! As I write this post my sister messages me to ask if I would like to have her large USA covered Pullman Pan. Care to venture a guess as to me reply :D
The “Easy Peasy” pan fermentation method has taken me by force. Every result so far have been outstanding. Speaking from a formerly free formed loaf only guy, I may have experienced a semi- conversion. The pan fermentation method is so easy, efficient, and utilitarian.
When I noticed that the dough was rising so much, I decided to bake this loaf with the cover off. Next time 1150-1200g with the cover. Many of these slices were 6 inches high. The bread is very soft and easily chewed. The crust is also relatively thin. Great sandwich slices.
I know this is sacrilegious, but here goes... Sourdough square sliced sandwich bread. Da neurve of em’.
SFSD in a bread pan.
34 slices of smooth sour tasting goodness.
Danny
Update -
It has not been necessary to line the pan with parchment paper. The doughs are baked in a greased and floured USA Pullman and has never stuck.
Wow that's great Danny, you've really done well with your new method.
Benny
Function before form... I'm a firm believer in it, and sounds like you might be coming over to the Dark Side. :-)
Great looking loaf and I'll have to do a little digging on the "pan fermentation method". Sounds like it's working very well for you.
Congrats!
Elegant simplicity and the results speak for themselves. I might be sliding mine in the oven too soon judging by the level of proof in your pan. The other thing I am curious about is that my pullman pans have square ends not sloped like yours. Nothing fancy sandwiches are in order, baloney, American cheese and some Miracle Whip or of course a PB&J.
Just don't tell me you can't be bothered by baguettes!
Don
Don, I am using the Large USA Pullman pans. They have square corners and very little or no slope. I think they are straight sided.
I am really enjoying the texture and taste of this last 90 minute bake. I plan to over bake again (maybe 60 min).
The dough pictured directly above proofed in the pan roughly 2.5-3x.
Interestingly, my recent bake here used this process of mixing the dough, shaping it immediately and placing it into the pullman pan to ferment/proof and then bake once proofed. It certainly works a charm for even swirled mixed flavored milk breads.
Thanks for letting me know, Benny. I use this method more often than not these days. My neighbors are not “Instagram enlightened”. So Pan breads are every bit as good as free form. To the “unrefined” even the ears and scores are meaningless :-)
Now I love well formed and well scored breads. But then again, “I’m Refined” <LOL>
I tried a version of your simple method with a few modifications of course.
It came out pretty nice but slightly over proofed. I should have scored it I guess to bleed off some of that gas or used slightly more dough to get a full rise without it taking so long. Nice bread overall and an easy way to retard a sandwich loaf.
When I saw the nice domed top I was not expecting to see the dreaded tunnel under the crust. I can't decide if I should have scored it or would that have caused it to deflate.
Soft mellow bread good for PB&J or egg salad. Dan your idea has merits and may require a little tinkering on my part but it is nice and simple. Thanks
Don
Don, don’t have any suggestions. I’ve never had that problem using this method.
Have you any ideas as to what caused the cave?
maybe too much top heat too early in the bake. Just a guess...
Excluding the cave, the bread is excellent
I forgot to turn my oven down from 425 to 350 until twenty minutes into the bake. Maybe it got too much top heat. I don't have a lid for mine and I should have put it in the oven sooner. I noticed your dough was 1350.
It makes great toast except the top part burns and so I just lop it off. I really like the way the melted butter brushed on softens the crust.
Don, dough weight will vary for the same size pan. For instance a whole wheat dough will require more weight than a lean sandwich loaf made of white flour.
once the bread density per cubic inch is determined, then you can use that to calculate the dough weight for any size pan.
Have you tried baking a pan dough starting out in a cold oven? If not you may be surprised.
Math is not my strongest suit. I mean I do love the bakers math but beyond that I'm lost. In my 13"USA Pullman I start with a basic ideal number for white bread of 1100gr and then bump that up for sourdough and whole grain. I am shooting for the finished loaf to be no more than an inch above the rim.
What I am try to figure out is why pan breads are so good when you first slice them but they loose that charm and the crumb seems to congeal after a day or two unlike the freeform SD that seem to improve in texture and taste as the days go by. I thought butter and sugar would act as a preservative in a pan loaf.
I will try the cold start next time with an Approachable loaf and prepare to be suprised.
I slice and freeze my bread right after it is cut. IMO the bread losses nothing by freezing. I even freeze bread mid morning when I plan to eat more for supper. Taste the same to me.
I mentioned I believe that I’ve used this method with a single rise for my swirl milk breads now a couple of times very successfully. I’ve now also bake up a loaf pan version of Eric’s Sourdough Deli Rye. Again, Dan’s method of mixing and putting the unshared dough into the pan totally works. Especially for the Deli Rye where so much of the flavour comes from the fully fermented rye sour, a long fermentation isn’t needed, so much so that IDY is added to speed up the fermentation.
First attempt with 100% Whole Wheat using Easy Peasy Pan Method.
Apart from over-fermenting, it was a success.
100% Whole Wheat
~83% Water (or whatever hydration you like)
2.2% salt (to retard the ferment some)
2% Pre-Fermented Flour
Mix ingredients and thoroughly develop the gluten
Once the gluten is developed shape the dough (no need to rest) and place in baking pan.
This will work with a covered Pullman or and uncovered pan.
Ferment for 8-9.5hr @ 77-81 (my room temp) with some type of cover to retain moisture.
Bake at 425.
Unfortunately I forgot the crumb shot. Thebread was sliced and frozen after it cooled. Taste was outstanding, especially toasted…
1225g TDW was perfect for a large USA Pullman Pan (either covered or uncovered).
The 2 browned spots on the crust were from polking the dough to test proofing. Using this method the stage of proofing is not as important as free form artisan dough be uase the dough is not disturbed after panning. Not need to polk.
I was inspired by a post Trevor made a good while back. He purposely didn’t mill his wheat super fine. I set my stones 3 clicks from touching to produce a slightly gritty flour. The results were nice.
I am not aware of an easier way to make sandwich bread. If this interest you it is worth a try.
Dan, so what do you think milling coarser did for you. I have read one paper that suggested that if you mill too fine it reduces volume, but I don't know how fine is too fine? I used to grind very fine flour, but over the last year or so, I have backed off a little and don't really notice a difference.
I’m not sure, Barry. Haven’t been baking a lot of 100% WW lately. The crumb is definitely not dense. It made a nice sandwich type crumb, which has become my crumb of choice. The bread has a wonderful flavor and it is healthy!
The loaf rose very well for 100% WW. I’d estimate it rose 85% as high as white flour. I bake a lot of bread in this pan with the same TDW, so the estimate is probably pretty accurate.
Barry, I found an image of the dough right after it was placed in the pan. Check the post above. That’ll give you an idea of the rise.
Really nice! And thank you for posting this. I had forgotten all about it.
I have been baking pan breads almost exclusively the last several months. It started out of necessity during a kitchen and bathroom makeover (no time to fuss with things) and I just kept going. Usually my bakes are 80-100% home milled whole grain (mostly wheat, sometimes spelt or a mixture with others). Turns out these are our favorite breads for daily eating (shape and grain both).
My biggest challenge is figuring out fermentation. It's warm here too (AZ), room temp ~ 76 (AC is so appreciated). I have been limiting bulk to about a 60% rise. Proofing has been been the hard part - it's often too much and occasionally not enough. I can't seem to find the sweet spot. Perhaps bulk is going too long too? They have all been edible, some are just more pleasant than others. I may try this method again and see how it goes.
Thanks again!
Mary
Mary, If you have a covered Pullman pan give that a try. I think the covered pan compresses the dough to produce a nice, even sandwich type crumb. This last bake didn’t use a cover (and over-fermented) and the crumb had some large holes in it. With a top, this doesn’t happen.
I am beginning to think that if the cover is not used, it is probably best to BF a few hours with some stretch and folds. This should even out the crumb. I haven’t proven this out yet, but is my present belief.
Please report your results, so we can learn together.
Danny
Yes, I have a small (9 in) Pullman. I don't often put the lid on because I don't care either way about the square top, but can give that a try. It will be a few days, I just did my usual bake. I am hopeful about that one, I did something different. Rather than using warm flour right after milling, I refrigerated it for a day. DT was 76 after hand mixing, a little cooler than it has been. And I think I caught bulk before it went too far. Had done my usual S&F/coil folds, did a quick shape at 60% rise, into the pan, covered and into the fridge overnight. It was baked this morning, but I haven't cut into it yet. Will and add a crumb shot here for eval tomorrow.
Also - after re-reading your formula, I had a bit of an epiphany. I have been baking bread a little under a year, so this is my first time baking in summer. I have been (mindessly) using the same amount of levain, 22% PFF. It struck me when I saw you used 2% - cut mine down and it may help prevent overproofing. Will try that on the next bake in a few days. My freezer is dangerously low on bread, so if life allows, maybe sooner. 😉
Edit to add photo. This one was baked in the 9 in Pullman, no lid, using cooler flour/DT. I thought it had over baked (crust was harder/drier than usual), but the crumb is just a tad gummy. Not bad, and it certainly made a good sandwich a minute ago. The bubble just under the crust is localized to just that section. Any analysis appreciated, will definitely do as you suggested (and drop my PFF% a tad) on the next bake.
I think lowering the PFF will have a real benefit. Also, shaping after mixing will help, because the dough is never handled or disturbed after that.
Good Luck!
Danny
BTW - the covered pullman should produce a more even and smaller hole crumb. My last bake over-proofed and was backed uncovered. The crumb had uneven and some large holes in it.