It's that time again, this will be our second "Community Bake". The FIRST ONE was a great success! This time we are baking Maurizio's Fifty-fifty Whole Wheat Sourdough. Guess what? As luck would have, today Maurizio celebrates the 5th anniversary of his website, The Perfect Loaf.
Since most bakers are separated by many miles and even different countries, this “community bake” may be the best way to share information and learn together along the way. The idea, for those who want to participate, is that we document our progress with pictures and post. It is suggested that each participant start a new comment to document their progress. As more information and images are available for your bake you can edit that post and append it. We’ll share our success, and just as informative, our failures. During the process we can ask questions, compare results, or offer suggestions. Both expert and novice have a place here.
We plan to start our bake today. We will be following Maurizio's well documented instructions. They can be found here. https://www.theperfectloaf.com/fifty-fifty-whole-wheat-sourdough-bread/
I hope you choose to join in. The more the merrier. Even if you don’t come aboard now you can still post your bake and results at any time in the future. All threads are constantly monitored for recent activity. Be sure, someone will be available to assist you.
Some may prefer to bake small loaves. It seems 500 grams loaves are the choice of many. Below I setup the spreadsheet for 1050 grams of total dough. This would make (2) 500 gram loaves or divide the ingredients weights in half to make a single 500 gram loaf. NOTE - the total dough weight is slightly increased to account for loss. On most of these bakes I choose to omit the Diastatic Malt and they baked well. I know many don't have this ingredient in their kitchens.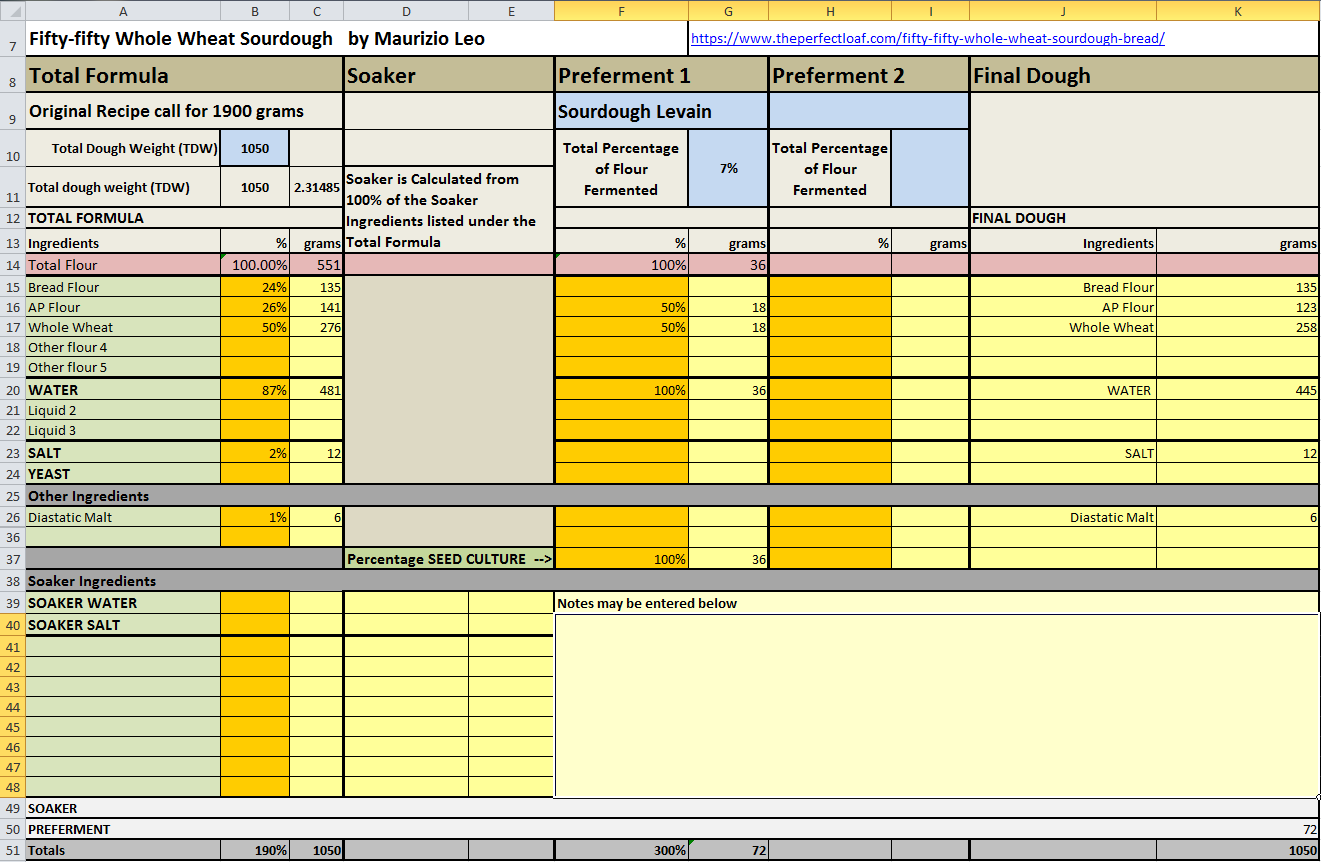
Dan
Always remember this, "we learn more from our failures than we do from success".
Post it all. The good, the bad, and (if you dare) the ugly.
I decided to test bake the 50/50 sourdough. I am concerned that I may have included too many large pictures. My intention is to show those that are new to this type of bread as much information as possible. If enough people find this post too long and large, I'll be happy to edit it at a later date.
The instruction for this bake can be found here. https://www.theperfectloaf.com/fifty-fifty-whole-wheat-sourdough-bread/ I got Maurizio's permission to post his instructions. He did a great job of providing loads of details. If you have any questions or comments, give us a shout.
I did my best to follow his instructions without deviating. I built the Levain as instructed and 4 hours later it was extremely active. NOTE - it is important to consider temperature when working with any dough. He recommends 80F for all fermentation.
In the past I have chosen to abstain from Slap and Folds. Leslie convinced me to give it a try. After 300 slap and folds the dough was gorgeous. I am converted... I really don't think the dough needed that many cycles, but I found it hard to stop. I had a blast.
The dough shown below had under gone 5 Stretch and Folds. It is moderately strong and has good structure. Even though the hydration looks scary wet, the large amount of whole wheat made the dough a dream to handle.
UPDATE: Since originally writing up this bake, I have baked the 50/50 a total of 4 times. Each time I used a different whole wheat grain. I have found that some grains absorb water better than others. I was able to make all 4 using the hydration stipulated, but some where much wetter than others. It might be best to hold out a little water in case a slight adjustment is necessary.
My Bulk Ferment went quite a bit longer than Maurizio instructed. But then again, I forgot to warm the dough water to 90F (old habits) so that may have affected the timing. But you will read this quite often on the site. "Watch the dough, not the clock". Update: I mixed another dough today and followed his instructions to warm the dough water to 90F. This time I actually over fermented at 5 hours. It got away from me :(
This baby rose. The dough was strong and resilient.
As I frequently do, I lightly oiled the bench, tools, bowls, and my hands. For me, it works very well. The dough turned out nicely and the pre-shape went well.
When you take into account the Levain this dough is 87% hydrated. Despite the massive amount of liquid it handled well.
After the BF I decided to proof the shaped doughs about 45 minutes on the counter. Then into the frig @ 38F for an overnight rest. NOTE - the dark specks on the dough are from the dusting flour. I had some chocolate malt and rice flour available to I put it to use.
The breads baked up very dark. Probably because of the diastatic malt. Next time I'll try without and compare the outcome. BUT, dark is good. I love dark, but not sure about the neighbors.
The bread baked beautifully in all ways. I have room for improvement, but that can be said for all of my breads :-)
The 2 images below are the crumb shots from the boule.
Sorry about the color shift. My iPad did it's own thing on this one.
Here is the crumb shot for the batard.
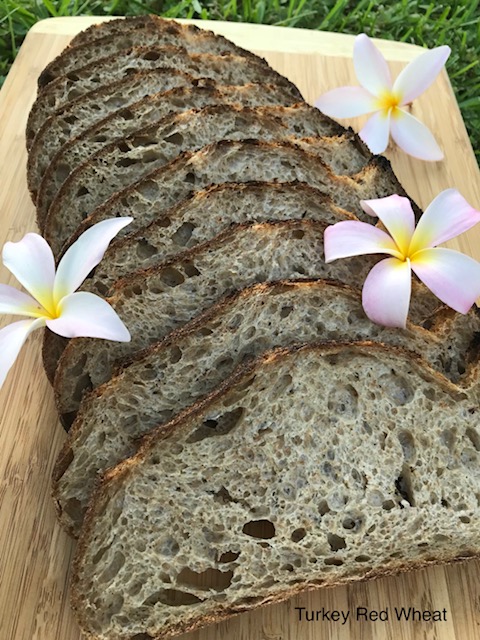
TASTE. Boy is it good! I actually had to go and cut another slice. I ate the one that was planned for the taste critique. The bread surprised me. It was creamy and had no bitterness what so ever. Hard Red Wheat was used for the whole wheat portion. My next bake will use Turkey Red. Normally I don't get a great deal of sour with a bread that has warm fermented for a relatively short time. Probably the HRW brought out the sour notes. At any rate it was a pleasure to eat and with each chew the flavors kept coming. For me, good sourdough hits you at the back of the tongue when you bite down. This bread didn’t let me down.
I wish everyone great success!
Danny
TASTE TEST I am planning to test the formula using a number of various grains. For sure, Hard Red Winter Wheat, Turkey Red, White Sonora, Hard White Winter Wheat, and Red Fife. After each bake I am saving a few slices in separately marked bags in the freezer. After I have exhausted my supply of grains, there will be a taste test comparing the flavors against one another. I will post my findings.
bread looks amazing with that rustic crust and that lovely crumb! Great idea for another community bake and well timed as I believe it was Maurizio's 5h anniversary for his blog 'The Perfect Loaf' this week judging from some posts on IG!
We can make it an anniversary celebration bake! :D Kat
of them. I used to start out with 600 and then cut it back to 300 and now 150 is about all that is needed especially with 5 sets of stretch and folds over 2.5 hours and 3.5 hour total bulk. I'm pretty sure the malt that is in the recipe is white diastatic malt but he Chocolate non diastatic would add a lot of color and flavor and Lucy would use both both since she is a floozy. it came out really nice even with the changes. Nice job. Nothing beats slap and folds. It is fun and works the best in my book plus you can do anything the first 10 minutes to dough and it is too stupid to know any difference or care that it is being slapped around.
Happy baking Dan - Maurizio is one fin baker and a very nice guy too!
Your loaves look amazing!! I love the dark crust.Can't wait to try it!
Thanks for organising.
Happy baking!
Ru
.
Danny, Thanks for the detailed post and pictures and for organizing this community bake. I would love to get that kind of crumb with this recipe. It is one I would like to perfect for baking regularly. We like the taste and the fact it has a good proportion of whole grain flour, without being too virtuous. :-) But, my results in the crust and crumb department last year were less than satisfactory. Time to pull out my starter from the fridge, I guess.
Since we are all sharing a kitchen via the community bake, I thought it might be helpful to share some of my lessons learned during this bake. As new tips and/or thoughts come to mind I plan to post them here. Hopefully I’ll be adding to this list.
These are my thoughts at this time. It is not the only way, and maybe not the best way. Let me know if you have a better or equally alternate method. It might be helpful if others started a post similar to this so we could all learn together.
1) Hold out some water in case the flours and whole grains are not as absorbent as Maurizio’s ingredients.
2) This is a preference. I prefer “Coil Folds” to Stretch and Fold. It is a technique that is relatively new to me. It seems more gentle than the S&F, at least the way I do it :) Thanks Kat for the idea. See Video Here
3) The Coil Folds seem to work better when the bowl or tub is lighly oiled.
4) LIGHTLY Oiling the counter top, tools, hands, and vessels allow easier handling of the wet dough. It also avoids the danger of adding too much flour.
5) For those milling their whole grain, consider sifting in order to remove some of the bran. I hope to use the sifted bran in my levain. Since I sift more than needed for the levain I am considering rolling the shaped dough in the bran to get the full nutrition and benefits of the bran. Please let me know if you have other ideas for the bran.
Dan
Like the best. I like a mix of at least 5-6 different ones bui everyone has their favorites. I'm not a big fan of a few foi sure like Einkorn bit ohers love the stuff. They are insane though:-)
Can't wait to hear about the blind taste test. Make sure it is a blind taste test. too. Otherwise you might lie to yourself and be forced to eat bread you really don't like fiorver!
.
The crumb looks really good, now I really want to bake this but it will have to wait till my next bake day :(
Had to laugh about the slap and folds - that is exactly how I felt too. I had done several doughs where the slap and folds were 80 - 100 but this time though Dabrownman & alphanso do more, so why not. I will keep on trying to see where it goes. The dough has to have high enough hydration for it to work though!
Well done Dan, hope lots more folk join this bake -
Leslie
Really happy to see you guys tackling my 50/50 whole wheat recipe, it's one of my favorites! Excited to see and hear what you all think as you get to baking.
Dan: really awesome results there! Crumb and crust look fantastic. Flavor-wise that's exactly what I was going for when I created the formula: some sourness, a creamy interior, no bitterness. It sounds like you're a firm slap/fold convert now... It sometimes takes a little practice, and potentially some bits of dough here and there, but I love that method for building strength early on.
Happy baking everyone!
.
Since this thread is getting large and I expect will grow much larger, I decided to put a link to the post I am replying to. http://www.thefreshloaf.com/node/56742/community-bake-maurizios-fiftyfifty-whole-wheat-sourdough-everyone-welcome#comment-411880 I got the idea because I read where Ru made a reply to your post. I had to scroll up a bunch of post to see what she was talking about. When I found the post in question I clicked the subject line to get the exact link to your post in my browser address bar. Copied that link and referenced it above. Hopefully this will help others navigate large post more efficiently.
TO YOUR QUESTION - It is nice to have everyone on the same page for a community bake. But then again we are not the gestapo ;-))
It seems to me that Maurizio’s 50/50 would work with any whole grain. Knowing your history of exploration, it wouldn’t surprise me if you tried ground walnuts for flour <LOL>
Experiment away. Everyone loves reading about your baking adventures... You too, Ru!
Dan
interesting to see and form an interesting part of this community bake I expect as we all use different flours from around the world. I was wondering to use different wholewheat flours and to see how it may affect the bake... :D Kat
.
I am in the process of mixing up a 50/50 with Soft White Whole Wheat. Things are not going well :( The SWW is not strong in gluten. I had to use less water and also increased the flour (a little) as I Slaped & Folded. It wasnt a pretty sight. I can only imagine the fun fest trying to Slap a& Fold spelt :)
I am going to post the results of my testing soon. I baked HRW, HWW, SWW, White Sonora, Red Fife, and Turkey Red. The fours behave quite differently. I saving a few slices from each in the freezer. When all are baked a taste test will be performed. BUT it looks like the Hard Red Wheat and White Sonora are taking the lead.
Abe, I have some Eikhorn. How would you use that grain in this formula? Or would you recommend against it?
Danny
It was a day that was not ideal for baking due to 'life' going on but I did give it a go and tried to stay as close to Maurizio's formula as I could. If too many pictures, shout and I can reduce photos...
1. I used Marriage's Organic Strong Wholewheat Flour and their Strong Organic White...
7:30 AM made leaven as part of morning refresh but without coffee first somehow got muddled and only ended up with 120g leaven...never mind did give it a go anyway....as it turned out bubbly and happy... well I remembered to use warm water and in Brod & Taylor at 80F
8:40 AM AL with 711 g water warm, dough temp 83F and in proofer at 80F - I held water back as I was nervous about the hydration and wanted to see how the flour is absorbed....
12:00 MIX AND I LOVED THE SLAP AND FOLD WHICH I STARTED TO USE RECENTLY AFTER SEEING IT ON MAURIZIO'S IG. I am normally more a Rubaud type of character but when making more loaves at once my muscles just not strong enough! I ended up to hold the last 50g of water back but probably used that when wetting my hands for the slap and fold in a way....
Maurizio says to aim for 'medium gluten development' and I also found this mentioned on other sites...how do I know, I wondered? Any thoughts?
https://www.instagram.com/p/BhHqpKMgkbZ/?hl=en&taken-by=maurizio
12:15 Start bulk Dough temp 79F, in proofer 79F
I tried to stick to the 30 min S & F but ended up doing them as different intervals and less than suggested and I also ended up doing coil/tension fold tucking the end in on each side...
I need to find a better less deep container that also makes it easy to measure the extend of rise.
13:30 coiling – tension pull 77FC
14:15 coiling – tension pull 79FC
15:20 Preshape - with - 20 min bench rest – making parcel method - looked for that bubbly, domed look....
15:40 final shaping – cinching -
https://www.instagram.com/p/BXDu5UvheBU/?hl=en&taken-by=maurizio
https://www.instagram.com/p/Be1FTx9lnkw/?taken-by=matts_miche
Then comes the bit that is NEW and STILL A BIT SCARY! Retarding in the wine cooler and baking in my new B20 oven!
This time as I thought the dough will proof faster I went for:
15:50 into wine cooler set to 6C - turned cooler up and down to make display to stay on 6C
after 1 hour in wine cooler dough temp was 18C at 6C in cooler
18:30 still 18C and turned cooler down to 4C and turned oven on..(the oven needs to warm up 2 hours so....oh, oh what if I overproof by then!!!!!!)
baked at 20:00....and here is result....hmmmm...I wished for a better ear...did not take photos of scoring which looked ok at the time...so....not sure what happened...but the taste is great and I like the crumb! I will keep trying that again!
Version 2 below from today....I stuck all the way with Maurizio's formula including timings and temps apart from doing coil folds rather than S & Fs.
I also did not do the 38F cold retard over night but this one ONLY had 2 hours in the wine cooler at 6C.....I am still learning about my wine cooler and how best to use and was very much thinking '85% rise' for whole wheat ...hmmm probably still could have baked it earlier or do I need to cut bulk shorter....as dough was quite proofy.....
But the taste is great and my son who often says 'I don't like brown bread', munches this without even realizing it is 50/50...Ha, ha, Ha..... Kat
What a crumb. Ear, or lack of, is completely forgotten about after seeing that beautiful crumb. Love the write up too.
This is a young levain so did you do a pre levain starter feed allowing it to mature before going onto the levain build? I'm wondering if it's necessary when a starter has been sitting in the fridge for a while.
I am glad you enjoyed the write up too.....as we pretend 'to bake with each other ' virtually' this would mean in my case that there would be a fair amount of chatting...so therefore 'wordy' entries from me, I am afraid!
I re-fresh my 100% hydration starter twice a day at room temp and in this hot weather even had to do this three times. I do this and often use most of it for regular baking rather than building another leaven.
For the 50/50 I followed the process and made a separate leaven using wholewheat/white flour and then used it young. Normally my leaven can be around 8 hours and I use it as part of re-freshing routine and avoiding waste...
I am not be best person to ask about the fridge as I rarely keep my starter in the fridge but isn't there this amazing 'no fuss starter' thread about refreshing starter from fridge? Happy baking... Kat
would have exploded out of its shell but the crumb wasn't harmed much at all - nice! Has to taste great! Well done and happy baking
how do I know? Any tips? I assume now I know what the dough got up to in the wine cooler for 4 hours at 6C(ish) and what it looked like during scoring etc. I can now reduce that time ......I need to get some see through plastic covers so that I actually can see the loaves sitting in my cooler with their ambient lighting!!!!
Get ready..my next loaves will be underproofed! ha, ha Kat
rather than using a shaped final proof in the fridge. You could be sleeping oir not paying attention i=or can't see it and then next thing you know that dang thing over proofs. Next time you have a better idea as long as teh it is the exact same bread and temperature of the kitchen and fridge are the same temperatures. But if the dough is a different size or different grain and different hydration - now it is a guessing game again and dumb luck which Lucy relies on more than anything:-)
I got tired of having to reshape and proof again when it over proofed as a shaped loaf in the fridge - better to just plan on it and handle it less to get a better spring, bloom, and crumb.
I got tired of having too many breads look like this one on the outside and it was all Lucy's fault too!
as my very first bakes were based on cold bulk fermentation and I had some amazing results...
I seem to remember a formula posted by Drogon that used that approach and might revisit...that might be another interesting community bake to do one day....I was looking into this direction too as it seems to be easier to bulk more dough just in cold bulk as you don't have to worry about getting a lot of bannetons in the fridge at one time....room for thought... Kat
was the one to popularize the cold modern cold bilk process in his 1995 book if I remember right. He pretty much single handedly with Jeffrey Hamelman brought modern SD baking back to the rest of us amature bakers. I always wanted to do a shaped cold proof because it would be so much faster to do in the morning of bake day but it has its drawbacks if faster. I know Ian is a big PR and cold bulk ferment guy too but I am coming around tioit ,
Those look amazing!! Love the crumb :)
You're so talented!!
Happy baking
Ru
it is that ear again! Inspired by your loaves managed somehow to get them for the 'mainly white' and now on to the 50/50! :D Kat
I think the crumb is outstanding. 50% whole wheat and a light and airy bread. The second version is a major improvement.
I came to the same conclusion as you. I am over fermenting, I think... My current thought is, whole grain is a heavier flour. Because of this the BF and proof need to be complete a little earlier than our white breads. Does anyone agree or disagree?
Dan
Hey, I have started using the Coil Folds. I like how gentle the dough stretches. I think there is less chance of over stretching the gluten. I can be hard on my dough :-((
Both you and Kat have made great loaves.... hope to be able to post a good bake too.
Leslie
this will be a very interesting bake. now I have to check Maurizio’s IG
Leslie
you will like this bake...where I used a certain technique I put the link into my post as I thought it is then all in one place...I love watching his slap and fold! I know I was also raving about Rubaud and still do but now I do bigger batches and it is very 'satisfying' depending on my mood!
Watch this post from a baker on IG and the noise is sooooo mesmerising!
https://www.instagram.com/p/Bk4p6kMFD4u/?taken-by=leocorbo_baker
Slap, squelch, slap ...bliss!
I'm going to do a pre feed when I try this this weekend, my starter might be sleepy after only fours on one feed after being in the fridge.
Best of luck :)
or not. Maurizio's 50-50 as baguettes.
I posted these in early 2018, but they still fit the bill.
The diastatic malt was eliminated, and the hydration dropped from 87 to 82 for reasons explained in the original post.
I've been doing 300 French Folds for years now. 150, a 5 minute rest, and a final 150 before the BF starts. never fails.
Alan
gotta try what alphanso does. very happy with my progress. Will use it in this bake soon.
Leslie
Still lovely after all if these years! Now get them down to 150 with 4 sets of S & F's every 30 minutes or even better, 4 gentle slap and folds of 4 slaps each and you will finally get some SOOPER DOOPER Great Baguettes (SDGB's) instead of Just Stupendous Ones:-)
I have increased the autolyse time to about 3 hours and reduced the overall hydration to about 83% as I am using local Slovenian flours which don't support so high hydration. The final rise was on the counter (no retarded proofing in the fridge). I haven't used diastatic malt. Baked in Lodge iron-cast skillet.
The picture is not the best one, but still good enough to see the openness of the crumb.
Such a beautiful crumb. Just look at those thin shiny membranes of dough. Any pointers as to why you increased autolyse time to 3 hours? Thanks!
Thanks GrinChaser!
The extended autolyse gives more extensibility to the dough. The autolyse works in two directions: strengthening the gluten bonds and at the same time due to enzymatic activity of protease it starts to break the gluten bonds. So the final effect is more extensible dough which helps to get more open crumb.
Happy baking GrinChaser!
Joze
What did you use for your whole grain? I like the look of your bread.
Dan
The whole-grain wheat flour I have used is milled on a roller mill and not on a stone mill. Thus the bran particles are of bigger size and fewer so they don't affect (cut) the gluten network as much. The extended autolyse, by my opinion, softens the bran particles and therefore one can get better crumb structure. At the same time the extended autolyse gives more extensibility to the dough so you can get bigger alveoli.
With extended bulk fermentation in the fridge for about 6 to 8 hours (putting the dough into the fridge at the end of bulk fermentation) one can get even more open crumb structure. Shaping chilled dough helps a lot to prevent air bubbles to escape during shaping process. Here is the picture of 80% whole-grain wheat bread using exactly the same whole-grain flour, and the rest 20% of four is the same type 500 wheat flour. The same ingredients, the same oven, just slightly modified process including extended bulk in fridge, shaping of chilled dough and first part of final proofing in the fridge for about 20 hours makes a big difference.
Hope this answers at least partly your question.
Happy baking DanAyo!
Joze
looking at that bread!!!! Very, very beautiful and I am intrigued at your process with the extended cold bulk in the fridge and then shaping and if I understand after that ambient proofing?
Cold bulk is something that Dab also mentioned as well as other members on the forum. I have to say when I started on this SD journey my early baking phase was based on cold bulk fermentation and I had some great results but felt in order to learn more I have to 'extend' my techniques...
Joze - how far to you let you dough rise in bulk fermentation before you put it in the fridge? Do you know whether your fridge is very cold ie. 3C or warmer? When you have a moment it would be really appreciated, if you could share a bit of a process with timing...I really would like to give this a go.... Kat
Here are the answers to your questions:
How far to you let you dough rise in bulk fermentation before you put it in the fridge?
It is hard to say but likely between 20-40%. When I see all the signs of the dough and the dough is well aerated and billowy I just put it in the fridge and let it ferment further for some hours - this would be from 4 to 8 hours. The top shelf in my fridge is at 10-11 dC, at the bottom about 6-7 dC. Usually I put it on the top one but if I let it ferment for longer time during the night I might decide to put it on the bottom.
After this process the dough is really well fermented and aerated and also chilled so shaping is really simple. I handle the dough very carefully not to degas it too much. This dough is quite "runny" in warm state but in cold state it is really easy to shape it.
So the final proof could be in the fridge or at room temperature or both, depends when I have to bake. If I have time then I let it proof in the fridge otherwise i take it out and proof at ambient temp. The time required for final proofing is very dependent of the state of the dough when I interrupted the extended bulk fermentation. Sometimes you will get more aerated dough and you will need less final proofing and vice versa.
I hope I have answered your question.
Happy baking not.a.crumb.left!
Joze
and also sorry for my late response...now I am back from holidays I will have to experiment with cold bulk fermentation more and also spotted your blog with a new bake and really good explanation...
This reminds me of an Italian baker called Matteo Festorazzi and on IG called https://www.instagram.com/ca_mia_breadlab/?hl=en Have you come across his baking?
He has a ebook Natural Leavenings and also suggest to use retarded starters in his formulas...I am now intrigued and have to look at that book again in more detail.....
I have found that a warm premix turns my UK flour into soup but a long colder pre-mix creates a nice open crumb even at lower hydration such as the Champlain....
At the moment my starter is waking up after holiday but oh this might be a new exciting project...
Thank you for sharing....Kat
Your process has given me something to think about. I used to retard the BF. It is a lot easier to store a single container in the fridge rather than a few bannetons. But, the reason I opted to retard the proof (and not the BF) is because it was my thought that alveoli would not be disturbed after the shaping. I also liked the benefit of easy scoring and, since the dough is baked straight out of the frig, timing the pre-heating of the oven was not an issue.
On the other hand, shaping wet or highly extensible dough would be much nicer to handle if chilled. But what does this cold shaping do to the aveoli? Are they crushed in the process? Do you shape straight out of the frig, or do you take the chill off first?
I’ve asked a lot of questions and hope to learn more about this. Your crumb is beautiful and your process obviously works. Please elaborate more concerning the timeline of your fermentation.
Thanks for posting...
Dan
Joze, it seems a number of us are interested to learn of your process. This is what the community bake is all about. Would you document your timeline and all processes, so we could duplicate it in our kitchens?
A thought for all that mill grain. The bran and other heavy large bits can be a hindrance to the crumb and rise. My latest bake used home ground Hard White Winter Wheat. I ran it through a #50 (fine) screen. I think it extracted about 85%. I plan to use the extracted bits for levain and also I want to try rolling the shaped loaves over them, similar to applying seeds to the outside. NOTE - in the past the bran has burnt on the outside. So this bake will be cooler, maybe 460F covered and 425F convection with the cover off.
I was on vacations in the mean time. I will try to document the timeline and the process this week trying to bake another loaf. However, I have a warning here that the flours we use are quite different and thus what works good for one flour doesn't work for another. I am using Slovenian flour which is like other Europeans flours and from past I know that this is quite different from the American flours.
So regarding shaping the chilled dough: you should be gentle trying not to degas the dough with exception of some big alveoli. It means that you do not perform a tight shaping.
Happy baking Dan!
Joze
I am very curious about refrigerating the dough at the end of bulk fermentation. As already asked: How much do you let your dough rise in bulk before throwing it in the fridge? Also, what is your schedule for folds during the bulk? Oh one last one maybe: How much more does the dough rise in the fridge? Nope, one more question: how much does your dough weigh? I make batches of 3 loaves the equal between 2250 and 2400 g of raw dough. That would take a lot longer to cool in the fridge than a single loaf of ~775 g.
Danni,
I have been putting dough in the fridge after bulk fermentation for pizza dough making for a while. I usually see a significant slowdown in yeast activity. The same amount of rise that might have happened at room temp seems to take maybe 10x longer.
Essentially, I assume that unless I plan on leaving the dough in the fridge all day or overnight, that I can assume negligible rise in the fridge. Even though there is very little rise, I think there is still significant flavor development and gluten development going on while in the fridge.
I guess if your amount of dough is big enough, there would be a lot of residual heat that the fridge would take some time to remove, and that residual heat would allow some rising when the dough is initially put into the fridge.
Learning about refrigerated bulk ferment pizza dough changed my pizza world. The same recipe went from dough that was tough to work with to dough I could throw into the air with confidence, dough that was fun to work with.
Still, I am still to see what Joc says about his process.
The extended bulk in the fridge can take from 4-6 hours or even more when it is done overnight. I regulate the temperature by putting the dough on the top shelf in the fridge or at bottom. So for longer timing I putt it at the bottom where I have about 6-7 degrees and at the top 10-11 degrees Celsius.
I dpon't do any folds during the extended bulk in the fridge, I just do 4-6 folds at the beginning of bulk phase in 30-45 minutes interval. I might skip some if I see that the dough is strong enough and I don't need to work more on the tenacity (elasticity) of the dough or in other words the dough strength.
My dough would usually be below 1kg so it chills faster. If I would work with bigger batch I would use larger vessel (plastic box) so the area of the dough would be much bigger and the dough height would be relatively small about 2-3 centimeters and that would chill fast as well. The S&F are then done slightly differently. I always use olive oil to oil the container what helps me a lot during the S&F and later on to tip out the dough.
Happy baking Danni!
Joze
you have set the bar very high indeed. Beautiful bake!
Leslie
I think this can be easily replicated :-)
Happy baking Leslie!
Joze
Here comes version 3...still following the Maurzio formula but this time
Dan was wondering how to get a loaf with 2 ears and after looking at some examples and previous trials it was more or less fairly deep (5mm) straight cut in the middle that I tried...Loading is always a bit hectic but tried to take photos of before wine cooler, after 2nd proof, scoring and then baked! Crumb tomorrow!
Wanted to compare before and after visually this time....
Into the wine cooler at 4C for 1 hour and 15 min and I can see when the temp goes up and down on display...went for ambient lighting as
green - signifies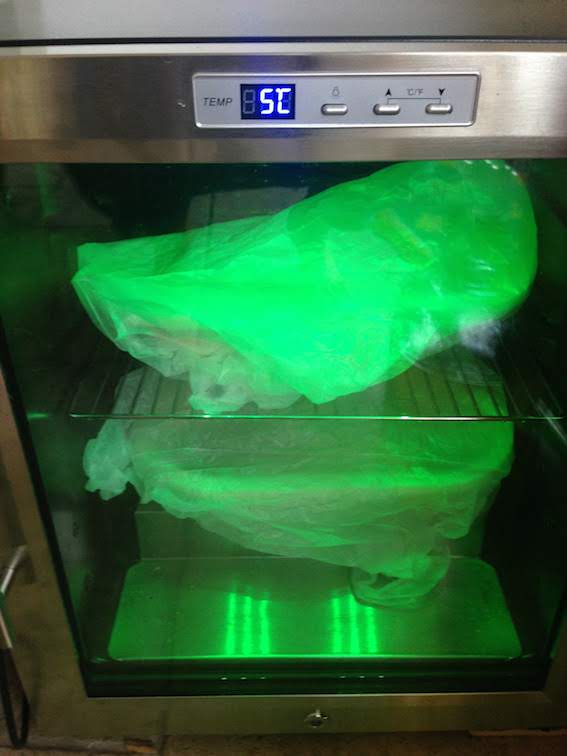 hope....
I thought about what Maurizio said about 'the dough rising somewhat but more just filling the basket and not having much rise'.......
Scoring - down the middle with a razor!
Oh, oh.....
Not quite sure what conclusions to draw but overall happy that I am moving in the right direction and to have a more balanced loaf with an ear and nice crumb...maybe I could have pushed a little bit longer.and probably would bake it a bit darker but have to watch that I don't get a burnt bottom with that baking stone in the oven........ Kat
p.s. it's the weekend and looking forward to lots of bakes from everyone!!!!!
p.p.s 2nd loaf ...
How long did you leave the dough in cooler after your final shaping?
Did you find that chilling the dough at the end of the BF made it easier to handle?
Ru
and thank you for reminding me as I thought I included the time....the loaves were in the wine cooler set to 4C for 1 hour and 15 min...now I believe the temp in cooler is accurate but I noticed that the 'warm' dough holds a lot of residual temp and noticed the temp display to go up to 5c and then down to 4C again....
When I took the temp after that 1 hour and 15 minit still was 20C. However the dough was more chilled than rather letting it proof at room temp in the summer. I thought about what Maurizio had said about the dough having risen a bit but 'more just filling the bannetons' or something like that and combined with just lettting it go 85% I thought ...oh well I might underferment but give it a go.......I had translucent plastic covers though and kept a close eyes on those fast moving beasts!!!!
Does this help? Happy Baking... Kat
you got an ear an all! the crumb is great!
will see how my bake has gone. it isjust out of the oven.
This thread is great!
Leslie
and lovely to all bake together again! Kat
two bakes are tomorrow's enriched Naan for Tikka Masala and then Sunday's killer Kamut pizza. Both are in the fridge buking away with the pizza getting 48 hours in cold bulk - both are yeast poolish breads too! Then We will do a 50/50 bread b8it half will be sprouted:-)
Hey Dab,
I recently got a pizza oven that will go up to 950F. Long cold ferments seem to be very popular in the pizza world, but not in the bread community. Why is this? All my pizzas are sourdough, but I never push the fermentation past 30 hours or so. Typically, I start with very little inoculation, 3% or so. and go for around 24 hours in the low 60deg Fs.
Bread is not Pizza but i know that some folks that make a huge amount of dough and keep it in the fridge all week and take 500 g of it, proof it and bake a loaf of bread every day. So long DF in the fridge aren't that uncommon. I am making pizza tomorrow that will have bit more than a 50 hour BF. 24 hours is fairly standard for BF for pizza. I do a lot of BF for bread at 18-24 hours.
The longer the BF the more extensible the dough becomes. too much extensibility for bread is not that great but for pizza you really want it to really stretch out easy and thin but still be strong enough (High Gluten flour) So it doesn't get holes in it.
High gluten flour really need a long cold bulk ferment to make it extensible enough to make a good pizza dough and getting the gluten well developed in the beginning is a must so you can windowpane the dough when you stretch it out huge for the pies. The whole pie is a windowpane:-)
Here's my go at it.
50% freshly milled Serventa berries, finely milled and not sifted.
50% KA BF.
8% liquid mature levain
2% salt
86% hydration.
1 hr Autolyse.
4 hr bulk, shape, 20 min rest, into banneton, and retarded overnight. Baked at 475/20 and 425/15.
Now for the second part of the recipe!
Cabbage Sourdough Gnocci
Cut the loaf in to slices and soak all but two slices in two cups of raw sheep's milk for 5 min, then drain.
Blanch 1/4 head of cabbage in boiling water, then chop finely. Meanwhile, brown some hot Italian sausage with a clove of smashed garlic. Mix together with with the bread, 100g flour, and 2 duck eggs. Refrigerate for 2+ hours.
Toast the reserved slices in olive oil until golden brown and break in to crumbs.
Roll the batter in to balls in a bowl of flour, then place on a floured baking sheet.
Boil for several minutes, then top with the bread crumbs, PR, and EVOO.
We can all learn from you. If you have time and are inclined, it would be great to have you detail the steps and accompany with images. Step by step, blow by blow.
You’ve nailed the bake and I’m sure many of us would appreciate the information. I know I am looking forward to your help :-))
Dan
I was pretty happy with the bake. We can certainly all learn from each other.
I will bake this again and document it more, although I'm not sure the result will be quite the same.
Several other points about this bake that I forgot to mention:
There was really no kneading. Mixed the salt/levain after 1hr of autolyse until just incorporated, and then left it to the stretch and folds after that. I forgot how many stretch/folds there were. I think 3-4 in the first two hours. I think with these high percentage wheat breads, excessive kneading can hurt the gluten if there's already been sufficient gluten development via autolyse.
I'd like to try to make this bread several more times, with different WW and white flours. This one was 50% KA BF, since I've found that freshly milled flour needs more strength than store-bought WW, and KA BF provides that. Next time I might try reducing it to 25% to see what happens.
I'm looking forward to your taste test between the different wheat varieties.
you did an overnight proof! I want to try that. Thanks!
and what a great bake! Beautiful all around! Kat
I love the crumb - amazing how well this recipe is performing with so many different flours and styles. look forward to your next bake
Leslie
That is a beauty!!
Well done!
I followed Maurizio's method as closely as possible. As I cannot get the same flours, and my local ones are lower in protein I added a bit of gluten flour to bump the bread flour protein to 13.5%, the AP at 11.5% I had. I did 200 slap and folds and dough looked good at the end.
I kept the dough in microwave at 80 deg F, 5 set of coil folds every half an hour. Here it is in bowl after last stretch and fold
an hour later I decided it had finished BF and preshaped
I rested it for 20 minutes, shaped and retarded overnight - 13 hours in total. Baked this morning in DO
It bloomed well in the oven but sadly no ear. Will see how crumb is a bit later today.
Reasonably happy as this is a first bake of this formula and for me a high % wholegrain flour.
Leslie
Yep, you are the batard gal :-))
I think bringing the gluten to 13.5% for the BF portion is a good idea. I baked a Soft White Wheat loaf thaat had lower protein and had a heck of a time working with it. It was way too wet. I ended up cutting 25g water and adding a little more flour.
If anyone wants to add vital wheat gluten and is unsure of the amount, we can show you the formula or calculate it for you. Just ask.
It looks like those that have had the nicest rise have not proofed the dough to extremes. I’ll keep that in mind for the future.
Leslie, are you using diastatic malt for this formula? How about others?
Tomorrow I will have my grand daughter over for a blind taste test. She has a very discerning palate. We are taste testing Hard Red Winter Wheat, Hard White Winter Wheat, Soft White Wheat, Turkey Red, White Sonora, and Red Fife. I’ll be posting the results.
Dan
sorry forgot that. Next time I might shorten BF a touch. will see when I cutIt!
Leslie
I did use diastatic malt for my bakes as it was in the formula. I have to admit that I tried it on and off in the past and not sure whether it makes that much of a difference and open for thoughts. I noticed that Vanessa Kimbell also recommends it for bakes in her new book. Kat
really quite happy with this
Just couldn't wait any longer to see how it was.
Leslie
Congrats for the big success!
That is to die for! Well done!!!
lacy and open and I would be so happy with that result. I also will consider Mini Ovens advice as I seem to have a similar experience with the 'ears'....Like you I was wondering about overproofing...letting bulk go only to 30% and or the advice on medium development of gluten during slap and fold from Maurizio...
then there is the comment from Joze about hydration and how much water his flour can absorb and knowing your flour? All this thoughts swirling in the head...
They will settle like that snow globe in the end and bread we bake! That crumb is truly stunning, slice by slice....Kat
That is amazing! Mine has just come out the oven and really look to your crumb at how I wish mine to turn out. If only!
This is a lovely recipe.
Everything about your bread is absolutely beautiful. I bet you could bake bread with 100% whole wheat and produces holes large enough place your thumbs through ;-)) It must be all that fresh New Zealand air.
Can’t wait to hear what Maurizio says about all of this...
Dan
What a beautiful country to live. It is breath taking. I just went to Wikipedia to research that special air :) https://en.m.wikipedia.org/wiki/New_Zealand#/media/File%3AEmerald_Lakes%2C_New_Zealand.jpg
Kudos to you for managing this difficult bread with your oh-so-different flours. It's a beaut!
Wendy
Very nice bake Leslie, it looks wonderful!
Happy baking
Ru
Well done, great crumb!
Congratulation Leslie, that is a great crumb.
Joze
I am a bit relieved to have this crumb after all the other gorgeous bakes.
Leslie
surface of the loaf just before you scored it? Think back.
I might keep track of this texture asking myself, is the dough skin elastic enough to not score? Is it dry enough to lay a stencil on it instead? If too moist, fear of stencil sticking, skip the scoring.
Not all doughs require scoring and I find that the high hydration doughs with a thin yet soft skin when turned out rise in the oven with smooth lovely crust surfaces. Same goes for those sandwich tinned doughs. Sometimes they get scored if their skin is strong or dry to direct or increase volume during baking and sometimes they don't get scored because the skin can/will stretch evenly. Evaluate the skin of the loaf, make a decision and then take notes after putting the loaf into the oven. Oven temp and the covering over the loaf will make a big difference too. There is more protection of the loaf skin in a DO (Dutch oven) delaying the setting of the crust.
probably never had. it is a really good point though. I had been watching Teresa Greenway Udemy course and she brushed offthe rice flour then brushed with water before scoring. From memory, yes it was very soft and the razor dragged so I thought oh dear I have overproofed. I am wary of blowouts if left unscored but you are so right it would have given a beautiful smooth top.... food for thought.
thank you for that suggestion - your broad knowledge continues to amaze me. Bake happy Mini
Leslie
Your prespective is often very unique. Until reading your post the thought of not scoring a bread was unthinkable to me. The way you think out of the box is “mind blowing”, as we used to say in the 70s. I can’t imagine anyone not learning from your regular postings.
And then on top of your knowledge, you throw in a dose of humor...
A resounding THANK YOU!
Danny
many with not all that that much experience, baking some of the best bread to be found anywhere, one after another using a fine formula that isnlt that easy to do and get right. It just shows the deep talent, determination and commitment on the Fresh Loaf and why it is the best place for serious, amature bakers to do their thing and discuss what's happening - because it is happening right here! Nice!
Happy baking Fresh Lofians
.
I bet the crumb is good too. look forward to seeing crumb
Leslie
I was looking through other posts and found yours. That is an amazing crumb and hope mine is even half as good as yours. I'm really flabbergasted at how good your crumb is.
Thank you Leslie. Hope I haven't jumped the gun.
I can’t ever wait too long before I cut - 4-5 hours usually before I cave in. I wasn’t at all sure about my bake, just like you. It rose well so I reckon you have a good one too.
thank you for the compliment, I think the stars were aligned yesterday ?
Leslie
I actually managed to participate in this bake this weekend, despite also making six different breads for the little bread shop on Saturday and dealing with a bunch of family stuff. The schedule did affect my bake a bit though. Key points (to not make this post too long) are below, along with pictures.
Here is the dough after mixing in the Ank:
After the bulk ferment:
Beautiful colour, adequate spring and bloom:
Gorgeous crumb!:
The crumb is very moist and creamy (mind you, I cut it a bit too soon; I was putting one of the loaves in the shop and wanted to make sure it was edible beforehand!) and the flavour beautifully sour - just right! It made awesome toast this morning too. I will definitely make this one again, with a shorter bulk ferment and a bit lower hydration if I keep this flour blend.
It sounds like you were a little concerned about it as it went into the oven. It's really nice to know that it turned out so beautifully anyway!
amazing and that crumb...just want to put butter on it straight away...I find it amazing how we use the same formula and get so many beautiful different breads! Kat
Great write up, Wendy! I’m reading along thinking, this is going to be a mess. And then I get to the picture of the baked bread. GORGEOUS... Isn’t amazing how slack dough can get a phenominal bloom?
I think you did well to half the malt. I used the requested amount for the first bake and there were color differences in the crumb. I believe the malt caused this. I’ve seen this before.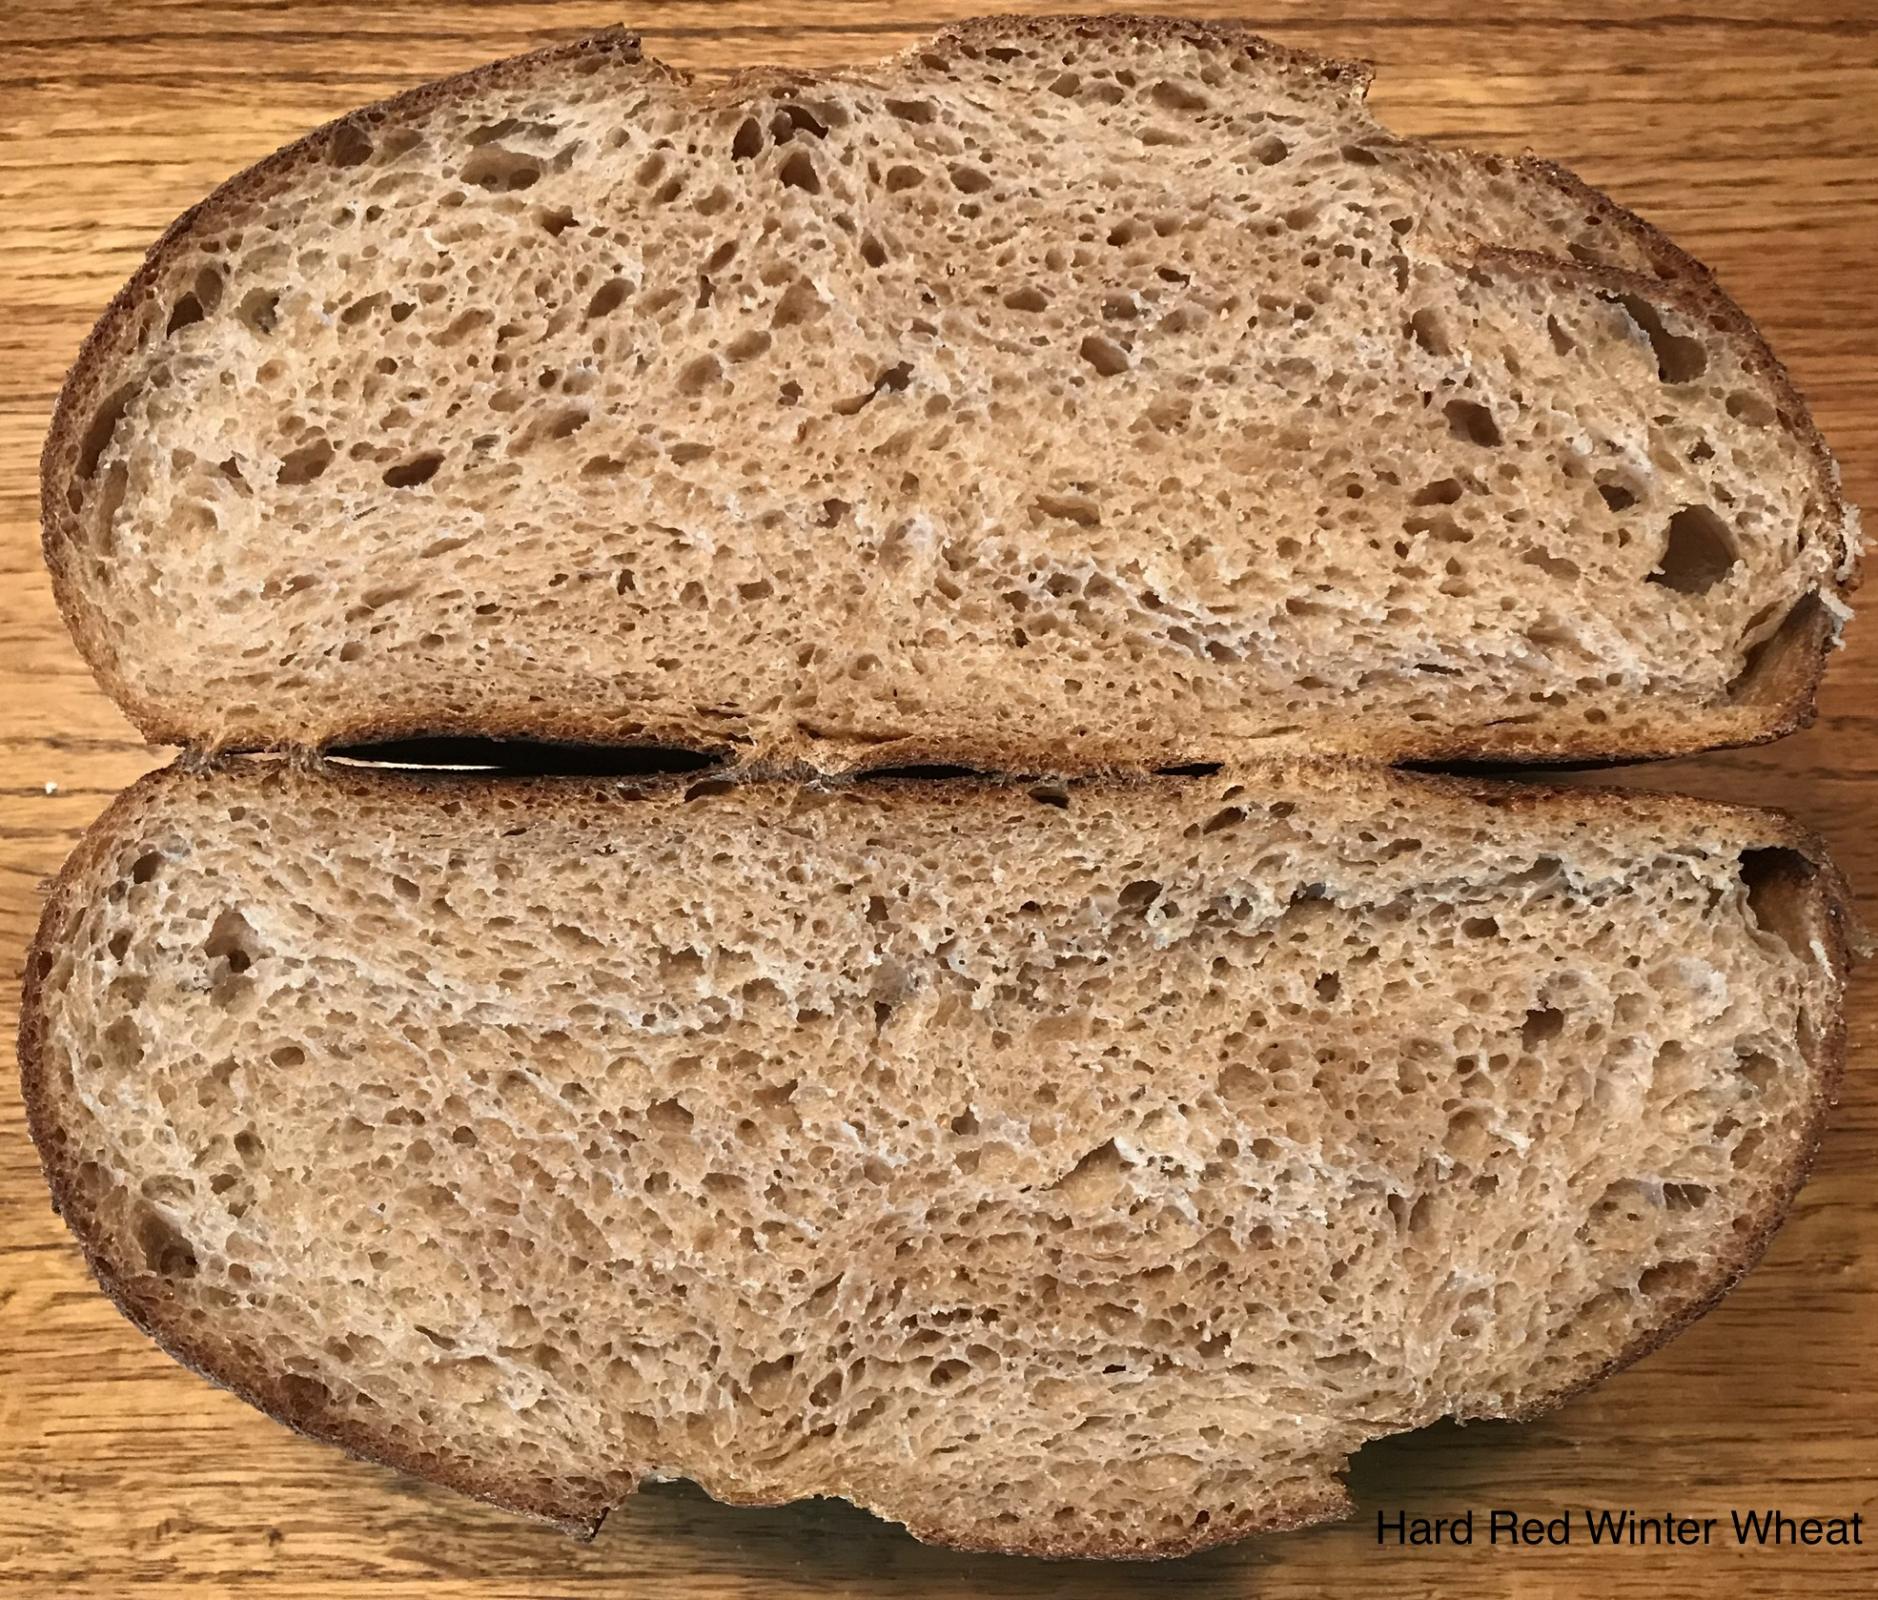
Also, we I read you used soft white wheat, I cringed. In one of my 50/50 experiments I used SWW and had to leave out some water and also add a bite of flour in oder to get a workable dough. I tested 6 different wheat grains and the SWW absorbed much less water than any of the others. But it did produce a wicked bloom. Do you think this is because the weaker flour allows the dough less resistance to rise?I have not used Spring Red Wheat, but isn’t it weaker than Hard Red Wheat?
Your bread sure baked up beautiful.
Dan
A word of caution - if anyone is using a soft wheat (lower in protein) you would do well to hold out some water and adjust the hydration as the dough starts to come together. Maybe higher protein BF might offet the whole grain, but haven’t tried it.
I think hard red spring is actually higher protein than hard red winter wheat, but there's probably not a lot of difference between them. There is certainly a bigger difference between either hard red wheat and the soft white wheat though. :)
Our Canadian flours tend to be higher protein anyway which is why I went ahead and mixed the high-protein bread flour with AP flour for the unbleached half of the mix.
it has baked up beautifully! Interesting how the different flours respond. The crumb is lovely though, great for toast and sandwiches ?
Leslie
I did not plan to bake but then it just kind of happened....the following bugged me...the degree of 2nd proof and how it relates to medium gluten development that Maurizio mentioned and then the degree of rise during bulk...and the amount of hydration...
I thought...my dough or flour is kind of 'tired' by the end and this might relate to the lack of rise or ears and oven rise...
So..
1. Reduced water to 765g rather than 805g
2. Really tried not to over do slap and fold and aim for 'medium' gluten development
3. A post from Danni also reminded me about that important 30% rise ONLY and after 2.5 hours I did a WP test and there were bubbles and I finished bulk and preshaped, 20 min bench rest
3. Final shape and into wine cooler at 4C but dough basically kept residual head of 20C and proofed 1 hour and 45 minutes...
Would be very happy to hear about people's thoughts on relationship between end of bulk and 2nd proof in particular and gluten development during mixing.
Very happy with those loaves and can't wait to cut tomorrow morning!
It is morning and here are crumb photos:
Enough bread to eat and time to absorb and let findings sink in....I think 'shorter bulk' works for me but then need to extend the '2nd proof'....also I pre-shaped only 15 min after last fold and that probably affected the crumb...
However, very happy here with my learning and result! Now....spotted again more new entries....! Kat
p.s ha, ha couldn't resist as I was making packed lunches in the morning and big eye roll from son!
Looking forward to the crumb shot. :)
It looks like you used a similar procedure as my bake, but instead of using higher protein flour you lowered the hydration.
I agree on the degree of proof: these high percentage WW breads really need to be proofed to a lower degree than more straight white loafs, or else the gluten network will begin to degrade and not support the final oven rise.
Interesting that you mention the kneading and gluten development. For my loaf, I actually didn't knead at all. Recently, I've been going with minimal to no knead in favor of extended autolyse and/or a longer bulk fermentation at lower inoculation or temperature.
has me intrigued....it is funny how the more you learn you suddenly stumble across another variable with it's nuances that needs to be considered...
There is another amazing baker called Matteo Festo and he talks often about the development in gluten and he has one post of a very poofy wheat loaf on IG where he mentions the amount of gluten development to pull this of for an open and even airy crumb....
https://www.instagram.com/p/Bj4O4BaglCP/?taken-by=ca_mia_breadlab
So I shall experiment a bit more with this..
1. get gluten going but not too much...
2. let bulk go 30% or less not more...do WP test if not sure....
3. make sure I let dough go longer than the last one in 2nd proof in wine cooler at 6C...I think the crumb looks good but I could have given it a bit more time....I am getting a feel for what the dough looks in the banneton when it comes out of the cooler...I am not that scientific a baker so need to learn what the dough tells me!!!!
Would love to hear about your experiments and timings with the longer AL and longer cold bulk fermentation.
Interestingly enough Matteo has a number of formulas in his ebook 'Natural leavenings' where he bakes with 'refrigerated sourdough'. I need to absorb but he states that by keeping the liquid sourdough starter at a low temperature (6C) for a few day we force the activity of the bacteria and dampen the growth of yeasts. As a consequence the internal structure of the bread is different to normal with a lot of irregular holes and compact between them. When shaping the dough it is very easy to handle, he continues, and it will also have risen far less. The cold proofing and baking at high temperature will cause a severe thermal shock which will considerably increase the volume of the bread....
I really must look into this more....maybe contact Matteo and make the 'refrigerated method' another community bake...... Kat
how many have you made now? it gets better all the time. Look at the lovely ears you got! can’t wait for the crumb shot!
Leslie
I was aiming for a loaf that is 'balanced' from the outside and inside....and what a balancing act it is...
This was 4th attempt and I think I get a feel for the flour and what is needed....:D Kat
Well done!!
attempts but kind of got a feel for the timings in the end.......Kat
Here is one of her favorite ones from gogli70 - Josh in 2014 who was a great pro baker who posted here for awhile
http://www.thefreshloaf.com/node/37174/lucy%E2%80%99s-take-josh%E2%80%99s-version-pane-maggiore-valentines-day-2-ways
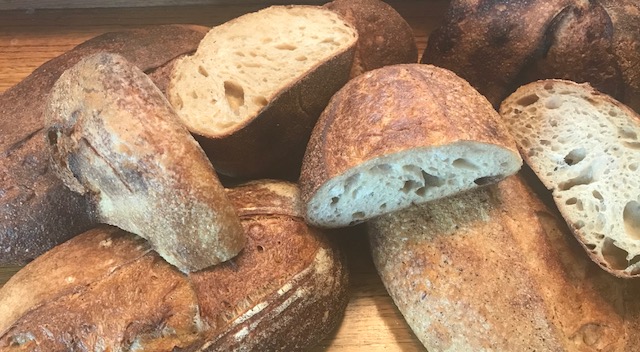
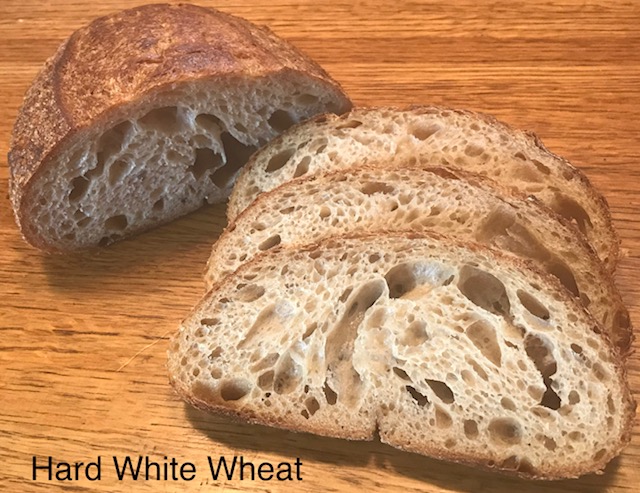
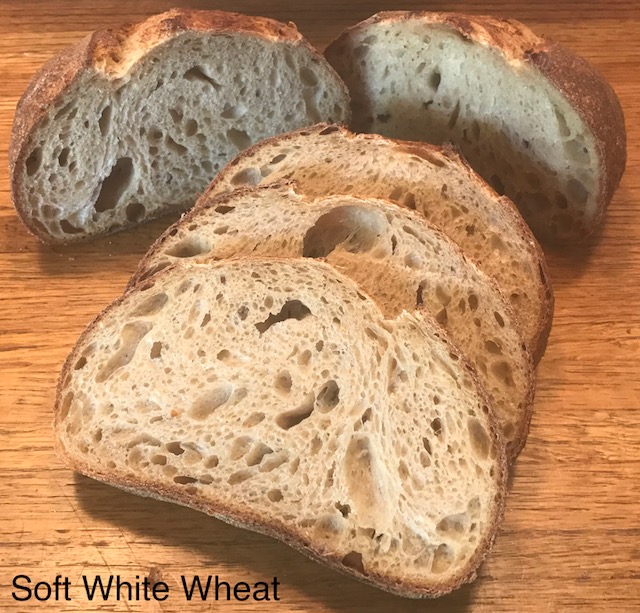
I decided to compare the following wheat berries in the 50/50. Each test used a single 50% Whole Wheat according to Maurizio’s instructions.![]()
A few pieces were sliced from each of the 6 bakes and frozen in labeled bags.
My granddaughter sat in on the test. She has a discerning palate. 6 plates where number and my wife, Patsy placed a slice from each bag in random plates. The results were informative for me, but when it comes to taste all things are subjective.

As expected , the white grains where most mild and the reds most intense. Below are our thoughts on each grain. It surprised us both that our opinions were often very much in agreement.
From most preferred to least.
#1 Turkey Red - We both agreed that this grain was our favorite by a long shot. The smell stood out from the rest. Very pronounced. Sweet, with a hint of cinnamon. I thought it smelled a little like fine pipe tobacco (my best description). Slightly bitter crust, soft textured and a moderate chew. Tangy and over all very complex.
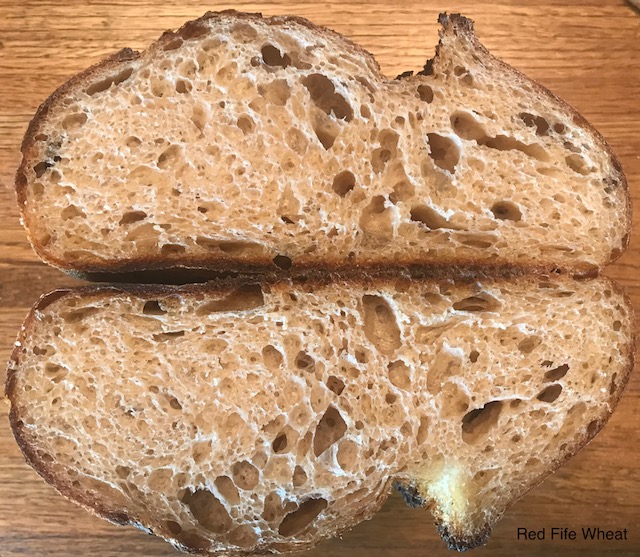
#2 Red Fife - This one had a sweet flavor. As you chewed the yogurt like flavor began to build in the back of the mouth. The more you chewed the better it got. It had a faint wheat smell and a medium texture, not chewy and not spongy. Actually the crust on all of the breads had the slightest bitterness. I really think the dark bake attributed to that.
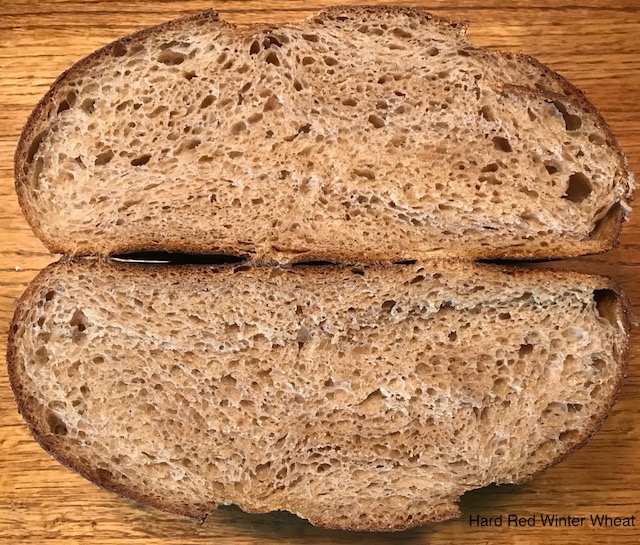
#3 Hard Red Winter Wheat - We thought this bread had a very nice and noticeable acetic tang. Like the Red Fife, the flavor continued to build with each chew. It smelled of mild wheat and was medium dense. Side Note - notice the different layers of color in the crumb below. I think it may be because of the diastatic malt. I used the full 1% for this, the first bake, but omitted it completely for all of the rest. If you have a different experience, I'd like to hear from you.
The remaining 3 grains are all white. It seems we strongly prefer the more robust flavors of red wheat. For those that prefer a more mild flavor the bottom 3 may be more appealing. The closest to store bought white bread was definitely the White Sonora. It have a very clean flavor that was mild in all respects. The last rankings are difficult since we favor the Reds so much.
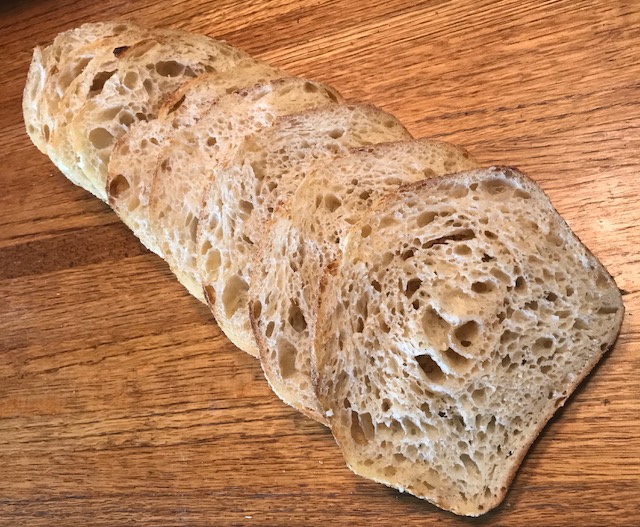
#4 Sonora White - We placed this at the top of the 3 whites since the flavor was so clean. For those preferring a mild sandwich type bread, this may be the ticket. It absorbed water well during the mix and produced a fairly strong dough similar to the Hard White Wheat. Key descriptive word is, mild.
#5 Hard White Wheat - Non-eventful (to those that like the strong flavor of Red Wheat), but it did have a light tang. Once again, a mild flavor, which can be a great thing for those looking to bake a 50% whole grain bread and not run off the average person :-))
#6 Soft White Wheat - It had a mild taste. Taylor thought is was slightly malty, which was nice. This whole grain does not absorb a lot of water. I had to reduce the water and also add additional flour during the mix. The dough was more slack than the others, but boy, did it spring in the oven? I am beginning to think that weaker gluten springs better. I imagine the weakness can work to a benefit. Not sure about this, but it is my present thought at this time. I think this is why Trevor uses such a long premix for his Champlain.
Everyone's taste are unique. It is possible that your choices would be just the opposite as our's. Neither of us are professional taste testers, but we know what we like. I hope you find something valuable in the review.
I want to thank Maurizio for sharing his formula, it seems that many participating in this bake are giving it rave reviews.
Danny
and what a beautiful selection of bread! I cannot taste it but I feel like eing in a sweet shop and wouldn't know which one to choose! I am also again amazed by the choice of flour and their beautiful names which all makes me want to try to bake with them...next we are shipping flours to each other for community bakes to swap flours! Ha, Ha, Kat
what a great set of bakes you have there. In my book, all are winners!
very well done Dan, love the photography too.
Leslie
Those are all beautiful. I'm really looking forward to (some day in the probably far future) being able to bake such lovely bread. And also, I really love reading your detailed process posts, they're incredibly informative and helpful.
Jay
and just bake, bake and bake and then eat , eat and eat and you will get there without a doubt and people on this forum are incredibly supportive! Kat
What a great thread.
Since I love the flavor of Red Fife, I might like the Turkey Red even better. I did bake a 50% WW loaf with Red Fife once, and found that its flavor was really diluted by the 50% bread flour. My son liked that loaf quite a bit, but I really missed the full flavor of the Red Fife. But it's not a really strong flavor.
I've been using White Sonora for blueberry muffins, where it works great. I don't think anyone would realize that they're made with whole wheat. It's good to know that it works well for bread, too.
I'm really tempted to try this community bake, even though I'm really committed to my 100% WW project. I do feel like I'd learn a lot by participating. I'm worried about the overnight proof in the fridge, though, because: 1) I don't want to develop much sourness, and 2) I'm already having enough trouble with overproofing, I'm focussing on observing the fermentation process. If I didn't proof in the fridge, would it still be in the spirit of the community bake?
that is my thinking! In fact, I think it is a great idea to observe the fermentation process and Vanessa Kimbell recommends ambient proofing to learn about the dough. I probably need to do more of this thinking about it..........Looking forward to your bake! Kat
Twelve hours in the fridge would be difficult for me. I wonder if I could let it go longer, and maybe re-form the loaf and do a short re-proof on the counter before baking. So many recipes call for 12 hours in the fridge, and that's just really difficult timing for me, besides the fact that I'm trying to learn what proper fermentation should look, smell, and feel like.
and it proofed overnight in the fridge. I did not get a huge amount of rise in the fridge though even though it proofed 13 hours. I think watch your ferment temperature and follow Maurizio and it should be fine.
Wish I could try all the lovely wheats you guys get! nothing like that available here that I know of.
Bake happy Jay, look forward to your loaf, just do what works best for you - that is the fun of this bake, everyone has their little quirks, adaptations etc but it work!!
Leslie
I'm still thinking about this. A lot of recipes call for 12 hours in the fridge, either during bulk or during proof. But 12 hours would be very difficult for me to manage, 18 would be much better. I would like to learn how to revise recipes for that. Since this one proofs in the fridge, and yours survived 13 hours just fine, I wonder if I could let it go 16-18 hours, re-form the loaf, and then bake? Would I need to let it rise a little at room temp after re-forming the loaf (lol, I'm starting to like the idea of loaf reform... quite a few of my loaves could benefit from a bit of reform... )
Fran, IF your refrigerator is cold 18 hr should not be a problem. I’ve gone longer. But your frig needs to be very close to 38F. 41F is too warm in most cases. You can do a final d plaace in a basket. Cover with a plastic bag to keep humid. At 38 you should see no indication of rise. And here’s the good part. You can bake it straight out of the refrigerator. Pre-heat your oven and when it is ready pull the dough, score it and bake. No need to let it warm up. This is the procedure many of us use. You will be surprised at the oven spring.
Have faith..l Give it a try.
Dan
NOTE: To test the refrigerator temperature, place a glass of water on the bottom shelf and leave for about 3 hours. Then read the temp of the water with a good thermometer. Proof the dough on the bottom shelf.
I know that things in the upper left back corner actually freeze sometimes, so I'll start with the bottom shelf, as you recommended. I was going to stick my room thermometer in the fridge, but I think your method will be better.
Getting good advice on how these recipes can be adjusted is an enormous help :-)
Thanks!
Fran
I recommended the bottom shelf because cold air falls, but maybe your sweet spot is somewhere else. Shot for 38F.
What a tremendous event - so many bakers, and so much success! Congratulations to everyone who participated and offered support. Surely, you've inspired others to test their skills, as well. Hope to see more entries come in.
Dan, you selected a terrific formula, one that works for nearly anyone. And your own bake and photos set the stage - just beautiful.
Cathy
But I must give credit where it is due. During the initial planning phase of the community bake, a number of bakers were contacted for their opinions. It was Kat that suggested the 50/50. Ain’t she a genious?
The Community Bakes are a community effort. I am not a Hillary (US politician) fan, but in this case, “it takes a village” <LOL>
Dan
and better not share some of my original ideas as people will never again join a community bake! ha, ha....But without your persistence and organisation it would not have come off the ground!.... .Kat
you have all produced! I'm absolutely green with envy and longing. This was a tremendous event!
Congratulations to all of you!
and the more the merrier! Kat
Hey Carole, this is (not was) a tremendous event. I hope to decide to join. Really, the concept of the community bake can prepetuate long into the future. Even if someone stumbles upon this post 5 years from now, they can still join the bake. If they publish their bake it will come up on the front page of the site. I think most (if not all) of the active posters monitor this page for new post. Surely someone will reply to the late come baker with help.
We are looking forward to a beautiful 50/50 with your name on it :-))
Dan
As for beautiful? I'll certainly try! Thanks for having noodled this through, Dan.
Carole
I am enjoying the heck out of this dough, it's been an absolute joy to work with and I can't wait to bake it in the morning. I have definitely done a remarkably poor job with the pre-shaping and shaping, but that's inexperience and the only thing that'll fix it is practice. I am hoping to get a pair of decent loaves out of this and will edit all my progress pictures into here in the morning. Thanks so much for organizing this.
Okay, progress pics and commentary ahoy!
The two pictures below are the dough before and after the autolyse (and after the starter had been incorporated as well).
The image below is after I finished mixing. I used the Rubaud method, b/c even with a coat of oil my dough stuck way too badly to my board (it hadn't been oiled in over 8 years, apparently. I really really liked that method, though. It was a bit hard on my shoulder, but the dough handled beautifully with just a super light coat of oil on my hands (thanks for the advice). I maaaaybe should have kept going a bit longer here? I'm not good at telling just yet, but it's honestly been the easiest handling of my attempts so far.
Here we have after the last set of stretch and folds, and I was pretty happy with this too (though again, maybe I didn't develop it enough? Guess knowing that will come with more practice.)
And then below is the preshape, which, again, handled so much better than anything else for me so far. Not sure how much is the dough vs. me starting to develop some minimal dough handling skill, but it was pretty satisfying. I'm sure I didn't get the boules even remotely tight enough, but it's still better than I've managed previously and I was pretty happy with them. (Though that one in the foreground of pic 2 was pretty misshapen and attempts to fix it were just failing and overhandling, so I left well enough alone.)
And then both doughs going into their improvised bannetons. I definitely screwed up here and am going to have to watch a lot more videos to work on this part, because I had a heck of a time lifting them into their bannetons and I definitely degased them a bit in the process.
Here's the boule after it's (unfortunately very extended) stay in the fridge. (I had an autoimmune flare-up last night and the amount of benadryl I had to take to get it under control made me too much of a zombie to get things going at 7 this morning as planned, so I didn't get the oven preheated until almost 9:30).
I thought I did a fairly decent job with the scoring, but as you'll see in the picture below this next one, instead of opening up nicely it just sort of stretched out flat. I got much more oven spring than I expected, though, after realizing how badly my scoring had gone. (And I was using a brand new razor for this bake, so it shouldn't have been dull, in case that could be a consideration.)
The scoring on the (rather misshapen) batard is doing the same, it's in the oven now, and I'd appreciate any advice on what I did wrong there. This isn't a problem I've had before and I"m not 100% positive if it's actually my scoring or possibly my dough handling. I'll add a pic of the finished batard when it comes out of the oven. But so far I'm super happy with this bake over all and hoping it tastes good b/c I'd love to do it again.
And here's another example of how badly my scoring did. Also, despite putting foil on top of them both for the last 20 minutes or so, both loaves are much darker than my family prefers, so I might experiment with lowering the temperature in future if the taste is as good as I'm hoping.
And there's the crumb shot on the boule. It's a little bit dense and gummy, which I'm sure is part from handling but also probably part from me taking it out earlier than I should have b/c even with aluminum foil the crust was darkening more than we tend to like around here. The taste is amazing, though, and it's definitely going to get eaten.
I'm definitely going to make this recipe again soon, I think the dough is excellent for me to work on my handling skills and hopefully I'll be able to really track my progress with it. Also, it's flat out delicious.
You seem to be making improvements by leaps and bounds! The bread rose nicely and I’ll bet it will taste great.
Since your family likes lighter bread, give dabrownman's temps a try. I did a while back, and use them on a regular basis. 465F covered for 20 minutes and 10, maybe 15 minutes with the lid off using 425F (convection if available). The bread turns out with a nice soft crust and crumb. If you like soft, maybe store the bread on the counter in an opened plastic bag. Works for me.
I really enjoy watching you succeed. What will the future hold?
Dan
Thanks, Dan, I'll give that a try next time. Right now the future will definitely hold more of this bread, that's for sure.
For the step of putting the shaped loaf into a banneton, slide that nice big dough knife (on the right side of one of your photos) under an edge of the dough and lift it up while letting it invert and fall into your free hand. Quickly put the dough knife down and cradle the dough gently with both hands. Then place the dough into the banneton, taking care not to drop it and also trying to keep the dough oriented (either seam side up or down and centered in the banneton). If you sense that the dough is at all sticky, it is ok to lightly flour your hands for this step, but eventually you will not need to do so, especially if you incorporate a bench rest after the pre-shaping.
You have made great progress from the looks of your photos. Keep at it. Well done.
Yeah, I tried that, I'm just not that coordinated yet for managing something that large gracefully. I flipped it onto my hand and then it was basically sagging down off my hand until I managed to awkwardly drop the bench knife and get my other hand under it... and then I kind of dumped it into the banneton... and kind of dumped it out onto the parchment paper at the end too. Just going to be a matter of figuring out the technique.
For getting the dough out of the banneton and onto a sheet of parchment paper, put the parchment on top of the banneton and hold it there with an open palm. Then lift the banneton (keeping your parchment hand in place) and invert everything. At this point your hand is under the parchment, which is now up against the dough, which is still somewhat in the banneton, but in the process of releasing. Lower everything so that the back of your hand is on the countertop. Holding some portion of the parchment in place, slide your underneath hand out. Lightly lift the banneton to see whether any part is still sticking to the dough. If it is, then gently tilt and lift the banneton to let the dough slowly unstick, and eventually you will feel the banneton completely released. (One tip for the whole process is to check for stuck places before you start this process. Tilt the banneton slightly so that you can check around the edges for stuck places. If there are any, then let the dough come free from the banneton, but let that happen slowly so that there is no tearing of the surface.)
I'll definitely give that a try next time, thanks!
I think your dough looks well at the end of bulk...if you want to create more structure give coil folds a try instead of the S & Fs....
https://www.instagram.com/p/Bju7aazn27T/?hl=en&taken-by=trevorjaywilson
they give the dough a lovely structure and a bit more tension...and I think this also makes it easier to handle the dough.
What method are you using for the final shaping for the batard? I seem to see some bubbles under the surface so you seem to have some nice fermentation going on which is great...?
In my experience to be able to score well you need to get the balance between tension of the final shape right and then hit the right spot with the 2nd proof....do you know the temp in your fridge? I am now going to ask everyone this question as my fridge was too warm in the beginning without me realizing and I overproofed so many loaves...so good to check whether your fridge is on the cold side 38F /3C or warmer....
I really like your spirit and look forward to crumb photos! Kat
I've watched that video before, I think I'll give it another few viewings before my ext attempt and give it a try.
I shaped the batard per the instructions in the recipe, but I think I was too tentative about it and didn't get it rolled tight enough, and I probably did overproof given it got 3 hours longer in the fridge than I'd planned. I don't have a thermometer for my fridge, so I'm not sure about the temp, but it's definitely pretty cold, as things left in the bottom drawers can end up a bit frozen.
Thanks for the suggestions!
I too tried to follow Maurizio’s shaping instructions but found it gave insufficient tension so patted the dough out a little and then did my usual routine. I was much happier then even though my loaf spread a bit during the bake.
We have been eating this bread too, and I agree the flavour is great and I too will definitely be making this again. I actually have no bitterness or sourness at all, it is plain outright yummy!!
Well done Jay
Leslie
I think I'm going to keep trying Maurizio's shaping instructions and just try to improve my technique with them. They sound like the same thing I've seen watching a couple of Trevor J. Wilson's videos and I think I just need to get more confident to achieve the result I want. We'll see though.
I'm just ridiculously glad to have decided to give sourdough a try again after an almost 30 year hiatus, and to have found so many good recipes and such a great community for it. It's a great, cheap hobby with the wonderful bonus of getting delicious food out of it. I'm hoping to eventually replace all our storebought bread with homemade.
I had to chuckle when I read about 'coil folds' and watched Trevor's video. I've been doing this for some time (I think I first saw Theresa Greenway at Northwest Sourdough do it), and didn't even know it was a thing with a name! When I teach beginner classes in artisan bread, I tell my students, "Pick up the dough like it's a sleeping ferret; let it droop down from your hands then put it back down with it's head and tail tucked under." :)
It is a great technique for smooth, wet dough and results in a lovely strong skin.
Like the sleeping ferret, Wendy! What a great way to describe the technique.
These crumb mmunity bakes have taught me a lot. I think it helps when everyone is on the same page working towards a common goal. Focus and determination are a powerful combination.
Dan
I’m going to remember your ferret :D
we had some, a lifetime ago ? they could be docile and playful, but boy did it hurt when they bit you. Just as well bread doesn’t bite but your comparison is spot on!
Leslie
as of now! If anyone ask I shall refer to this thread! That made me laugh...and I had that picture in my head of youngsters picking up cats grabbing them in the middle when picking up! Kat
I love that image, will definitely try next time.
became a coil fold. When did that happen? Lucy needs to pay more attention to this stuff or back to 3rd class baking apprentice she goes!
Barney he could tell her all the lingo! He lives with a trendy teenager! That trendy teenager taught me the other day what a 'style beast' is!!!! I love language and the way it changes........Kat
looks good! Kat
The first loaf was exceptionally tasty and disappeared pronto. Thanks!
That does indeed look yummy; good enough to eat!
I don't think your scoring technique is an issue, particularly, though you will find you'll need to experiment with the depth and angle of the score to get the results you want. In this case, just looking at the crust and crumb, there might be a couple of other things going on:
I haven't uploaded the picture yet, but my second loaf had a MUCH more detached roof than the first one, so whichever it means, over or under proofing, that was definitely an issue. There was a massive bubble under the top crust and the crumb below it was tight and gummy. I think you're right about the rack height, though, I think I forgot to lower it before baking. Thanks for the input!
Thank you to Dan for the wonderful idea of this community bake and Maurizio, from the perfect loaf, for the recipe here is my second attempt. Instead of 78% hydration (proceeded cautiously the first time) this is the original 86.4% hydration (I don't believe the malt is counted when calculating hydration in the original recipe, which places it at 87%, but it's flour so why not?) and with Birra Moretti Lager in place of the water.
The Levain Build:
Dough Formula:
This is the highest hydration dough I've done to date. Decided on slap and folds and it worked a treat. The gluten was strong and the dough behaved so well. Added in the stretch and folds for good measure but really didn't need it. The recipe suggests to pre-shape with no flour. This was a surprise to me as I've always needed to use flour to prevent the dough from sticking. However not this time. Did a gentle letter fold one way and then the other, inside the bowl, and the dough released from the bowl immediately when turned out onto the bench. I've had more issues with lower hydration in the past. Tightened it up into a round and let it bench rest for 20 minutes. Held it shape very well. Lightly floured the top and inverted the dough. Shaped into a batard, placed in the banneton then into the fridge for 12 hours.
Fully expecting the dough to spread out like a pancake, as with other really high hydration doughs in the past, this one held its shape and had great oven spring. Freestanding on a wire rack with tin foil as a base to-boot.
Very happy with this recipe. Feel with slap and folds I can handle hydration that until now has been out of my depth.
P.s. instead of making another post I have updated the two photos from my first bake. Here is my latest bake with more in depth detail of the whole process. Apologies to all comments below where they make sense for my previous bake. I just thought it'd be less confusing with multiple bakes and posts.
glad you found the photos. I don’t remember your original post, did you hold back water? You got a great crumb though, really practical for sandwiches but I get the feeling you were aiming for a more open crumb?
Look forward to the next one
Leslie
The photos appeared on my phone. Apparently I have a backup of things between my tablet and phone. I'm really quite 21st century but just haven't realised it yet. I did hold back water as I was 'testing the waters' and didn't wish to dive into 86% hydration. But the dough handled so well I'm confident I can go higher. This is actually a crumb I like. Going higher hydration and holier is more for my own personal self esteem proving to myself I'm able to do so. For this 78% hydration loaf relied on handling for an open crumb rather than just hydration.
Watch this space, Leslie.
Abe, I have baked the 50/50 seven times now using a different whole wheat each time. The formula really handles the water well UNLESS you use a soft whole wheat (low protein). In that case the hydration is too high.
Maurizio sure produced a great formula. Nice bread, Abe.
Dan
I have just been looking through your very helpful and impressive test bakes. Each one a success. You've given me confidence as the whole wheat I have certainly is strong and I'm sure will handle all the water from the recipe.
It really is such a lovely loaf and I thank you for this community bake Dan.
Just had some toasted and dipped into avocado oil.
and that is a nice and airy crumb and loaf! Kat
An enjoyable bake all round. A lovely recipe.
Just come back from Lina Stores. Methinks an Altamura bread is just around the corner.
and I have not quite plucked the courage but I think it will be my next too ....do you find durum flour is similar to Kamut? Kat
I'm only a 10 minute walk away and it's nice to go at lunchtime to treat myself to some durum flour. There's loads of other stuff but it's all in Italian so other than the durum flour I'm reluctant to try much. shameful, I know! What do you suggest I buy?
It has similarities but they are different. Golden colour and fermenting times are similar but it does handle differently. I think durum flour feels stronger (although not necessarily as high in protein) and has more extensibility. It'll certainly feel more like regular wheat flour than kamut. So if you can handle kamut then don't be afraid of durum.
It just a little tricky to catch that perfect sweet spot for fermentation time. Not enough and the crumb/flavour will suffer. Won't be soft enough. Too much and it degrades quickly. In normal wheat I think there's a big enough range for timing to still get a good loaf. Durum is less forgiving IMO.
The Caputo White flour looked interesting and was high in protein I thought...I just couldn't carry anything more on that day. We are going to Cornwall soon so I expect I will come back with flour from there!!! Kat
In Covent Garden area. Just a short walk into Soho. I too saw the Caputo white flour and while it says "soft 00 wheat flour" the protein is 13%. So just what is it that makes it soft? I know that the protein percentage doesn't mean its all gluten but can the protein percentage be on the high side while the gluten low?
You’ve worked with that a lot.
Dan
I'm thinking of doing this recipe again not this weekend but the one after. Just in order to vary my bakes. It'll be an Altamura bread next. Should I try spelt in this recipe I'd drop the hydration to 65-70%. Only increase if I feel the dough needs it. Also I wouldn't do a very long autolyse as suggested for whole-wheat but keep to 20-30 minutes. And of course - watch the dough and not the clock.
but I am not sure...shall investigate a bit.....Kat
Looks great!!
I do like this recipe. Went with crystal rye malt as that was all I had. Not sure if it's diastatic as it's very close to red rye malt. Think it's more for colour and flavour when used in rye breads. Certainly made a nice addition.
Followed the recipe, but without the malt and less 10g of water. Worked with slap and folds for about 5 minutes and this is what she looked like.
After the 5 modified S&Fs (coil folds) over the recommended timespan. Can't say it rose much during that time, but my kitchen temp was closer to 72. I left it for an extra 30 minutes. I'd guess the rise was half again, but not doubled.
Dough sat for another 30 minutes and looked like this before pouring out and dividing.
Divided
One loaf was worked to achieve tension on the surface. The other was just folded gently and placed in the basket.
This was the folded loaf! Scoring was nice. Oven spring was spectacular.
The "tension" loaf was flatter, and less oven spring.
Still, the results are nothing to complain about. It was the first time I'd tried using the slap and folds followed by the coil folding.
The flavor and texture are spectacular. The crumb below is from the round, flatter loaf.
What do you see that I can improve on? What are the air tunnels telling me? My thanks to Dan Ayo for walking me through this challenge and mentoring me along the sourdough path. Hope to join you in the next challenge.
Laura, I have 2 SFSD fermenting now. I am definitely going to try folding the dough only and then placing in the banneton for one or both of the loaves. If you slice the other one soon, please post crumb shot.
The image of your dough that is rounded up and sitting in the glass bowl is a beaut!
Dan
I'll post as soon as it's sliced, Dan. Yes, I love my heavy glass bowl. The bowl outlived my grandmother's mixer and was eventually passed down to me. I've given it a serious work out for the last 30-40 years.
2 of the center pieces looked like this, but most of the rest of the loaf looked more like photo #2
I’ll be shaping 2 SFSD in the morning. I am thinking about rounding up the dough and going straight into the basket with no final shape.
Thinking back, some of my best blooms came from very slack dough. They looked pitifully slack and yet, they bloomed like ballons. What’s with that?
Dan
I've found that to be true with some of mine as well. The more I think I understand about bread, the less I really do.
That crumb is gorgeous, a perfect sandwich loaf. Or munching loaf. Or bread and butter loaf.
The toast is superb, as I'm munching a slice right now. I have been surprised at the soft and almost creamy texture. There is no sour, but a full flavor taste. I am truly sold on this recipe.
That crumb is gorgeous, a perfect sandwich loaf. Or munching loaf. Or bread and butter loaf.
amazing and beautiful inside and out! Amazing lacy crumb! Also you have a beautiful ear on that batard. Did you retard in the fridge, just curious? I can't find really any area to improve...looks amazing! Kat
Yes, I tried to follow the directions as closely as possible. It called for 10-11 hours in the fridge at 38 degrees. Our fridge temp is lower, so I left them for 12 hours.
I wanted to join in on the fun and I welcome everyone's feedback. This is my very first all leaven bake, I have used SD in the past, but I always cheated with some commercial yeast. As Dan already knows, I am terrible at following directions when it comes to making bread.
My approach was to replicate the 50/50 recipe using the same quantities, but making some substitutions for what I had in my pantry. I didn't have any malt and I only had soft white wheat. Below is my final recipe:
Leaven:
I double built the leaven using 25% bread flour, 25% soft white wheat, 50% water. The first feed was 50 g seed King Arthur SD strain, 50 g flour, 50 g water. I slept with the sourdough so I could get a feel for how quickly it rose throughout the night. My SD and I are expecting LAB children soon :-), the leaven took about 8 hours to double and then start collapsing. Then I fed it again 100 g flour and 100 g water. Once again it took about 8 hours to double. Upon doubling I mixed it into my autolyse.
Autolyse:
Mixed the autolyse shaggy. Then immediately put in fridge for 16 hours.
Final Mix:
I mixed everything together to combine the ingredients and then let the mix rest for 30 minutes before I worked on building gluten.
Then, I folded within my square plastic tub. Folded in 4 sessions. Each session lasted about 10 minutes with a 10 minute break in between. I would fold until the dough seemed to not be improving in elasticity, and then I would take a break. After the 4th session, I could make a good window pane.
Bulk Ferment:
5 to 10 folds every 30 minutes. After about 6 of these 30 minute intervals, the dough was starting to look quite bubbly, so I decided to preshape, bench rest, shape, and proof.
Final Proof:
Using my bench knife I split the dough into two and used the bench knife to roll each loaf into a taught ball. I used the same approach shown in the San Franscico Baking Institute Video. This worked really well. The dough was bouncy and fairly taught for being so extensible. Then I did a 10 minute bench rest. The dough didn't flatten at all during the 10 minutes, I was giddy that it was holding up so well.
And then... boom. Mistake 1: I messed them both up during shaping. The preshape dough had more tension than the final shaped dough. I got frustrated and gently oozed the dough in the bannetons.
I waited about 1 hour for the final proof to finish. I decided they were done using the finger poke. Basically, when the dough went from having a firm-ish poke, to having an airy poke, I decided they were ready.
Bake:
Baked both loaves in dutch ovens. I tried a suggestion from somebody to get the dough into the deep dutch ovens. I used parchment paper as a sling to lower the dough into the dutch oven. This worked ok, except that the parchment paper crinkled a bit in order to fit into the round dutch ovens, and this caused both loaves to be a bit misshapen.
Mistake 2: I should have read the baking instructions. I baked these loaves the same way I have baked my last loaf. 500 dF oven with dutch ovens also preheated. Cook dough at 500 dF for 10 minutes and then 460 dF for 20 minutes. Remove lids of dutch ovens after first 20 minutes. Then, measure the dough at the end of bake to ensure 208 dF internal temp. Well... if I had read Maurizio's instructions, I would have seen he cooked his loaves for much longer. Still. The final crumb was a bit chewy and slightly undercooked. Which I find a bit surprising since my instant read thermometer said the dough had a temp of 208 dF. I waited about 5 hours before cutting into the loaf.
Take Aways:
Final Flavor:
The bread tastes pretty good. Because it was slightly undercooked, the crust isn't as crispy as I would have liked. I think, that had I baked the bread for the proper amount of time, this bread would taste 40% better. Having said that, it still tasted pretty good.
Photos:
This 50/50 bake has reminded me that I have been pretty consistent in my inability to shape wet dough. Preshaping has gotten much easier now that I k ow about using the bench scraper to roll the dough into a nice ball. I struggle getting the right shape, and then I struggle again transferring the shaped dough into a banneton. Any suggestions, videos, etc are much appreciated.
Never too late to the game. Lovely bakes! Love the crust and crumb. Looks delicious and a good write up.
It's really down to practice. Also if the gluten isn't formed properly it can give one more trouble shaping than need be. So high hydration will always be more difficult than lower but if everything else is done fine then it should make it easier.
But I don't wanna practice. Is there a pill I can take?= :-)
Thanks for the encouragement!
You do not mention whether the countertop had any flour on it when you did your pre-shape and final shaping. For the pre-shaping, I eventually settled on dumping the dough onto an unfloured countertop and then lightly flouring the top surface of the dough. (This procedure is similar to Chad Robertson's description in Tartine.) Then I divide the dough and flip it over (floured side down) and then do a pre-shaping along the lines of the SFBI video (i.e., just enough to form some surface tension and create a boule shape). After the bench rest, I again very lightly flour the surface and then use my dough scraper to flip the dough over before final shaping. I again follow Robertson's method for forming the final boule shape (but there are many other completely fine ways to form a boule).
Then -- and this is the step that for me led to much better final shaping -- I find an unfloured portion of my countertop and transfer the boule to that spot. Using my lightly floured hands, I put my pinkies together behind the boule and pull it steadily toward me until I feel the near edge grab a bit on the unfloured countertop and continue pulling another inch or two. What that does is tighten the boule and increase by a bit the surface tension. Rotating the boule as I pull toward me also tends to seal the seam on the bottom. A few of these pulls is all that it takes to get a nicely formed boule.
As for getting the boule into the bannenton, see my comment above in this thread in response to Jay's identical question.
Happy baking.
"Floured Countertop?"
I don't flour for preshape and that has been working great, using the bench scraper to roll the dough around until I get a a modestly taught boule with zero fuss and minimal effort.
I have been flouring the counter for the final shaping.
"Then -- and this is the step that for me led to much better final shaping -- I find an unfloured portion of my countertop and transfer the boule to that spot. Using my lightly floured hands, I put my pinkies together behind the boule and pull it steadily toward me until I feel the near edge grab a bit on the unfloured countertop and continue pulling another inch or two. What that does is tighten the boule and increase by a bit the surface tension. Rotating the boule as I pull toward me also tends to seal the seam on the bottom. A few of these pulls is all that it takes to get a nicely formed boule."
I am having trouble visualizing this, but... if you made a video! :-)
"As for getting the boule into the bannenton, see my comment above in this thread in response to Jay's identical question."
I just went up the thread and read you suggestions. I have tried your method before. I can't tell if it is because my dough is poorly shaped or it is just how very extensible high hydration dough is, but, I still feel like I am being too rough on the dough during the transfer into and out of the banneton. I'll have to scour youtube for more videos and see if there are any that really resonate with me.
For your first 100% (no yeast) SD Levain this looks great! I can’t help much with shaping, still struggling with that myself.
You mentioned wet crumb. At 208F the bread should be fully cooked. I’m wondering if the SOFT White Wheat wasn’t the culprit. I ask because in one of my test bakes I used SWW and it didn’t absorb nearly as much liquid as the other grains I tested. I ended up having to reduce the water and adding more flour. Soft Wheat has less protein (gluten) than hard wheat. I remember reading that someone else on this community bake used SWW. Maybe it was Lazy Loafer, not sure.
I have an idea that might work for you. Try putting your bread on the pre-heated stone and then covering it with the pre-heated deep portion of your cast iron cooker. In truth, a light weight stainless mixing bowl (pre-heated) would work better than cast iron for a cover. I think you already read THIS LINK explaining why I believe light weight material is better than heavy cast iron.
Dan
"For your first 100% (no yeast) SD Levain this looks great! I can’t help much with shaping, still struggling with that myself."
Thanks for the kind words :-)
"You mentioned wet crumb. At 208F the bread should be fully cooked."
Hrm... I know I measured 208 dF on both loaves. Maybe I measured 1 wrong, but measuring both wrong seems unlikely. I am confused. I read on another thread (http://www.thefreshloaf.com/node/25262/internal-temps-bread-not-exactly-advanced) that someone else said you might need to go all the way up to 215 dF. Maybe my dough just needed a few more degrees.
"I have an idea that might work for you. Try putting your bread on the pre-heated stone and then covering it with the pre-heated deep portion of your cast iron cooker. In truth, a light weight stainless mixing bowl (pre-heated) would work better than cast iron for a cover. I think you already read THIS LINK explaining why I believe light weight material is better than heavy cast iron."
I like this idea a lot. I tried doing this once and I accidentally had to bowl touch the dough, but, other than that, it worked out fairly well. I think being careful about putting a bowl on top of a loaf is still much easier than lowering extensible dough into a deep vessel.
I saw your experiment with a steam machine. I'd happily pay $50 for some sort of steam injection system. I am even up for building something myself. We hatch our own chickens and turkeys and I made a homebrew incubator that had electrically controlled humidity and temperature. That build broke down some mental barriers for me, and, building something for the oven could be kind of fun. Like... maybe a tea kettle build to survive the high temps of the oven... could turn into a bomb if the outlet clogged, that would be bad :-) I bet someone has already invented something like this... going to check amazon now...
Closest thing I could find... not very novel
https://www.amazon.com/Man-Law-BBQ-Products-MAN-CH1/dp/B00CX5MMK6/ref=sr_1_19?ie=UTF8&qid=1532318695&sr=8-19&keywords=oven+humidifier
More googling found this defunct website that uses a pressure cooker to produce stem:
https://web.archive.org/web/20170920191811/http://cookingwithcrack.com/bread/steam/index.html
And this thread which has some cool ideas:
https://community.fornobravo.com/forum/pizza-oven-design-and-installation/tools-tips-and-techniques/3142-steam-injection
The more I think about it, an easy way to do this is to take an vessel with a loosely sealed lid. Calculate how much how heavy the lid has to be to counteract the pressure of steam at your desired steam temperature. Add weight to the lid to match the steam pressure, then viola, once the water in the vessel reaches that temp, it hisses out steam until the vessel is emptied of its water. sounds crazy dangerous. Maybe I should just stick to lava rocks, rolled up towels and a water sprayer.
One of my favorite past times is over engineering things :-)
TXB, I’m not sure it is very easy to bake a bread to an internal temp of 215F. If it is possible, you would have to bake all of the water out of the bread. Because water boils @ 212F. Hopefully others will confirm or correct...
Also for the cover touching the side of your bread, I have dealt with that problem, too. Here is my solution, and it is easy and works great. http://www.thefreshloaf.com/node/56763/tip-exact-positioning-roaster-cover-over-bread
Dan
Dan,
Good idea with regards to marking the stone. I am going to have to settle on a steaming plan. I feel like my emotions are being pulled in many directions. I hope I don't have to do a lengthy experiment to determine what works best for me. My kids miss me :-)
As for the baking temp... I think it must be like candy making, as the water starts to boil off, the temperature rise stalls, then, and then, at some point when the water is almost gone the temperature starts going up fast. There might be some benefits to a high temp crumb, like... the crumb might caramelize, which could have some interesting flavor benefits. You should be able to force all of the water out of a loaf and get past the boiling point, but, I'm not sure how you do that without charring the crust too much. My take away from that post and the temperature range is that I still had some room left to go to try and dry out my gummy crumb.
My father-in-law enjoys a bakery in St. Louis Missouri that supposedly bakes their bread for 24 hours at a low temp. And they produce a loaf that looks like typical artisan style on the crust, but the crumb is very interesting and full of flavor (kind of caramelized). He brought a loaf back to Texas for me and I enjoyed it immensely.
Thanks for the way this bizarre bread recipes.[url=http://ufa007.com][size=1px]พนันออนไลน์[/size][/url]:p
Hey guys, we talked about this community bake ages ago and I suggested maybe one of Maurizio’s recipes with Leslie and Kat! Then summer kicked in and I’ve been AWOL! Now I’m going to have to bake and join the fun! So glad you decided to get this going Dan, and tha you’ve picked one of Maurizio’s breads. Great work everyone. Such a great thing to do. - community bake - we all learn from each other.
Congrats to all!
Hey Sharon, if you haven’t baked this bread yet you are in for a pleasant surprise. Everyone has had outstanding results.
Looking forward to see your bake.
Dan
Hey Dan, a couple of questions. I think the answers are somewhere in this thread but I’ll ask anyways. I don’t have the diatastic malt. How much will not including it impact the flavor? I have white red fife as I prefer it to the whole grain red fife. Again, what are your thoughts on this?
I’m so impressed with how everyone gets into this. And Dan, I loved your reviews swapping out the different flours and their taste and texture. That’s a lot of baking!
Again, great contributions everyone.
There are a few changes from the original recipe. Mainly, i sifted my home milled Selkirk flour and used the bran for part of the Levain, and I added yogurt and ground flax. Overall, I am very pleased with it. Hopefully, I’ll be just as happy once I see the crumb. Full write up is here!
I missed the community bake, so did a make-up this weekend with a twist. Ru’s seeded sourdough loaves in recent times were such a delight that I decided to follow Ru’s method of stretching out/folding in mixed seeds (90g sunflower, sesame, flax and pumpkin soaked in boiling water for an hour, then drained) and resting as a parcel for the second of five stretch and folds suggested in Mauritzio’s recipe.
A very satisfying outcome, and delicious to boot!
Boy Joe, that bread is beautiful. I like to color of the crust. Did you use diastatic malt, and if so what percentage?
Dan
Yes, I used 5g diastatic malt for a one-loaf bake, which translates to about 0.5% baker's percentage. But Dan, the photograph was done with a flash so the result is probably a false representation of what it looks like in real life; nevertheless, it still delivered a lovely, tawny brown!
As many of you wanted to know how to get open crumb structure with relatively high degree of whole-grain wheat flour I created a separate blog entry with the detailed instructions.
http://www.thefreshloaf.com/node/56967/50-wholewheat-community-bake-jozes-version
Happy baking!
Joze
That bread is crazy beautiful!
Dan
Thank you Dan!
Happy baking!
Joze
you are very talented indeed. will read the detail shortly. A beautiful beautiful bake - something to dream about.
thank you for sharing.
Leslie
Thank you Leslie!
I am not so talented as one might think but I am very persistent in trying until I get the result. After reading a lot of stuff and trying to implement that I have learned a lot. Some breakthroughs just come unplanned as kind of unplanned activities.
My procedure is adapted to the properties of local flours which are not high in protein content. So a minor adjustments may be needed when using different flour.
Happy baking Leslie!
Joze
I followed Maurizio’s instructions once again except this time I increased the number of slap and folds. I thought about Mini’s suggestion re scoring but thought it would be ok to repeat the same pattern. I did get miniscule ears - just! Although this crumb is not quite as open as my first attempt, it is none the less a really nice crumb.
crumb shot
love this bread, it will be bake again, that is for sure but maybe I will drop slap and folds back a little and maybe proof a little on the bench before retarding.
Leslie
as usual! Everything looks terrific, and your shaping is perfect.
Enjoy!
you are probably now on your way to Switzerland and I must have missed all those bakes whilst I was on my holiday in Cornwall. Looking good and probably all gobbled up by now! Kat
just about to board our flight! now just have to survive the next 24 hours☹️ oh well, it will be great after that.
bake happy Kay
Leslie
Let me start by saying that I love Maurizio's recipes and this one is delicious, the crust is lovely, but I was not able to get that rise. This is my 2nd attempt - the first was a brick. This one would have been a knock out if it had the oven spring. I am not sure what went wrong.
Levain build - 50g.mature 100% starter; 25g Bread flour; 25g Red Fife White flour and 50g water @90 degrees
I autolysed the flour and water for 2 hours, then added levain and 50g water and did stretch and folds for about 6-7 minutes, added the salt and another 15g water. Let it rest for 30 minutes then S & F - every 30 minutes - 5 sets. BF went on for another hour and a half - might have been too much. But I had a lot of nice bubbles but the dough was very hydrated. I think I should have only added 50g with the levain and no more.
Preshaping was sticky and it flattened out quite a bit. I managed to shape it and into the banneton and into the fridge for 12 hours. It came out of the banneton looking good - forgot to take a photo.
Baked @500 for 20 minutes with lid, 10 minutes without and then @450 for another 15 minutes. I don't bake with steam - haven't had good luck with it.
30 minutes later, I had to cut into it and the taste is there, the crumb is good but no height.
Help!
Image

and lovely to see your loaf! Looks delicious...
My only suggestion could be that I really let the 50/50 not go too far in bulk maybe 30% and also watch the final proof very carefully...I seem to remember Dab to say 85% or something like that rings a bell...
WW moves rather fast and I think this might have happened here....like you also thought yourself....
I think also I saw one of Maurizio's IG posts where he says he now uses 'stiff' starter for WW to control fast fermentation ....I have not tried that and followed his formula as per community bake but room for thought.....
https://www.instagram.com/p/BldsgIBFx38/?hl=en&taken-by=maurizio and in comments he states:
"I use a stiff levain when I’m making a dough with lots of whole grain (fresh milled also). I find it helps keep fermentation activity in check. It also adds a lot of flavor!"
Happy baking and lovely that you joined in.... Kat
Thanks for your input. If I make it again, I'm also contemplating dropping the hydration a bit. The other thought I had was if the salt was added at the same time as the levain, would that have had an effect on the result. Not sure about using a stiff starter - I think I've tried it a couple of times but haven't really gotten comfortable with it. I'll check out the links.
I have also dabbled with a stiff starter but not seen a real difference at the time...
I got into the habit of adding the leaven first and then the salt with more water, if needed. So if hydration is your concern you could do that and add water later with the salt. As WW is more 'thirsty' I am surprised that hydration would be an issue...I normally worry about hydration with my UK flours with Maurizio formulas but interestingly enough it was not an issue with this one and I think it was the WW element. Happy Baking...
Hey Hester. The image is small, but from what I can see the bread looks like it came out well. I really like the flavor of this bread. How did yours taste?
Btw - Maurizio’s bake was so well liked, that we’ll be starting a new Community Bake tomorrow. We’ll be doing his Sourdough Baguettes. I’ve already tested it and the baguette has a wonderful flavor with an extremely open crumb. I’ll be baking up my second run of his SD Baguette in the morning will be posting the results. I hope you give it a try.
Dan
It's delicious. Half the loaf is gone already.... lol
hester
Hope all the cakes and ale haven't gone. Anyway here is my attempt at the 50/50.
I stuck fairly close to Maurizio's recipe, only leaving out the malt and reducing the water content to give me a 77% hydration dough, (including levain) which is about as much as I thought I could handle in this first attempt.
So the recipe used was:
500g home milled Priors wheat grain.
500g Marriages strong white bread flour.
750g water.
21g. salt
150g. Levain (50/50 strong white flour and whole wheat at 100% hyd.).
I mixed the flour, salt and water minus 50g and left it to autolyse for five hours before adding the 150g levain together with the 50g water that had been held back. Then bulk ferment started with stretch & folds every half hour, interrupted by the unexpected arrival of a visitor. Actually it wasn't unexpected,- I had completely forgotten about it......( It is an age related thing!) so only 3 s & f's were completed and a longer than planned rest period followed. Temperature was kept at 78°f and bulk ended after 3 1/2 hours.
Then dough was divided, pre-shaped, rested for 30 minutes, shaped and then proofed for one hour on the work surface before being placed in the fridge overnight. Baked next morning in 2 cast iron casserole pots, lids on for 30 minutes then off for further 20 mins. And here is the result.
And the crumb
So thank you Dan for setting up this community bake. I have been reading through all the previous bakes and comments with real interest and not a little envy. I am quite pleased with my result though and these loaves are disappearing quickly enough to encourage me to try this 50/50 again. The long autolyse helped to make the dough quite easy to handle and I know that I can increase the hydration a by few percent next time to open up the crumb a little more to achieve a slightly more lacy texture which is what I aim for.
PS. Must remember not to invite visitors on baking day!
Love the color and blisters. I like Maurizio’s formula and method. IMO, it is a great comprise between all whole grain and all white flour.
Did you bake them cold; straight out of the frig?
It’s never too late to join any Community Bake. The information remains available and the post are always monitored. I’m glad you joined and had a complete success the first try.
Dan
Yes straight from the fridge. On past bakes I have tried a one hour and two hour warm up with little apparent difference to the end result. Now I sometimes leave the cold dough on the work surface uncovered for the half hour it takes the oven to heat up, hopefully to dry the surface a little to help with scoring. Not sure it does though.
I'd be interested to hear what other FL community bakers do.
Alan
Being newly back to SD baking, I noticed this thread pop up this week and decided to give the recipe a try. What a delicious bread! I made a lot of errors/necessary adjustments to schedule (life! hours in the day! oh my!) - here's a summary and some pics.
Firstly, I made the error of starting too late in the day. So I let my levain kinda double and a bit, but it probably needed another hour or so. (Lesson to self: don't rush the levain.) I did an autolyse with warm water. I read somewhere that you can use honey as a substitute for diastatic malt, so I used 1 TBSP honey in the mix, as well as 2 tbsp olive oil, as I find a little oil goes a long way to helping my breads last a few days without drying out.
Then, when I got to the bulk ferment, the timing caught up with me - I was about 3 or so stretch and folds in, when I realised it would all get too late at night to fit into the weekday schedule, so I adjusted to do the last of the bulk ferment in the fridge, and then do the proofs in the morning.
I was curious to see how much rise I'd get in the fridge. Answer: none. Anyway, I took it out again at 5.30 am and divided it so that the two halves would come to room temp more quickly. Let it proof with half-hourly (or so) S&Fs til about 9.30am, feeling altogether clueless about how long to leave it going, then shaped and left to do final proof for about 5 hours, after which it looked well proofed to me.
Baked as directed. Here are pics of the finished loaves...
As you can see I did one in a round basket and the other freeform... I prefer the longer oval loaves for slicing and freezing (big family! many sandwiches!) but the baskets make the prettiest ones. Also, my silly small oven was a bit squashed, so the loaves bumped each other, causing soft "open" sides...
(Question from newbie SD baker... Does this stretchy business on the side indicate something about the proofing? too much? too little?)
Crumb not quite as open as I might have liked, but still passable. The flavour of this bread is really great though! I was super happy with the sweetness added by the autolyse and the honey, and the mild caramel crust. Thanks so much for this recipe all :-)
Nice bread Lisa! Isnt the refrigerator a great friend to the baker? It really helps to manage our schedules.
Dan
Where does one get that awesome spreadsheet?? The accountant in me does love a good Excel spreadsheet!
This is the recipe that I've been trying to get good at for a few years. That said, I don't bake sourdough too frequently - maybe 2 or 3 times a year.
I baked with this recipe last month and some neglect towards the end of bulk and perhaps too cavalier with hands dipped in water while doing S&Fs resulted in really overproofed sludge. I could've cried while trying to shape it. When baked up it had the classic signs. So going into a redemption bake last week, I really really needed a win. I decided to drop the hydration a tad to 80%. (Increased bread and whole wheat flours by 25 gms each and decreased water by 20 gms.) I watched everything like a hawk during bulk.
Dough handled well during pre-shape and shaping. Scoring went better than before. And here is the result. Heading in the right direction now I think. Will drop bake temps next time to get a less dark crust.
GrinChaser, I’d say you got complete redemption with this bake. The crumb is absolutely gorgeous, in my opinion.
Danny
There's a lot of information to mine on this thread. Before I attempt this formula again, I'm going to read through a few times. I'm intrigued by the longer autolyse some mentioned. For the flours that I usually use though, right after mixing my dough looks a lot pulled together than what Maurizio gets in his picture (even with hydration as prescribed).
I finally fixed my chewy bottom crust problem baking in an enameled Dutch oven. Based on Maurizio's tips, the magic combination for my set up seems to be double layer of parchment and a light sprinkle of semolina in the pot.
SO glad I stumbled across this thread, let alone this haven of sourdough enthusiasts.
Tonight I decided to stay home from work and its safe to say that as a relative new comer to the sourdough game, this has just filled the past 4 hours for me perfectly!
Thankyou for all the insight and technique nuances. There's just enough information on here to both blow my mind and light my curiosity to try some things a little differently.
What a great and thriving community, keep up the great bakes people ✌
Ash, use this link to see all of our Community Bakes. They are a great source of information from a vast group of bakers. Glad you found value in the 50/50...
http://www.thefreshloaf.com/node/61187/list-past-and-present-community-bakes
For those that like whole wheat breads, the link to The Approachable Loaf is a must see.
Danny