Progress is being made!
After my disappointment with the Kline, et al San Francisco Sourdough method, I re-read and re-digested what I know about time, temperature, ingredients and the care and feeding of sourdough flora. I suppose the principal new concept to sink in was that the fermentation temperature matters a whole lot, and what's best for yeast growth is not best for lactobacillus growth, and what's best for lactobacillus multiplication is not what's best for acid production. In a way, I rediscovered something I found out several years ago but neglected to pursue. (Reading old blogs was interesting.) Those very smart fellows at Detmolder were on to something: You can have it all, if you do it in stages. I'm pretty sure that what I did was not the only way to achieve pretty much the same result. It may not be the best way, but it worked for me. Note that I achieved the necessary temperature control with a Brød & Taylor Folding Proofer, but you can achieve this with a home-made proofing box as well.
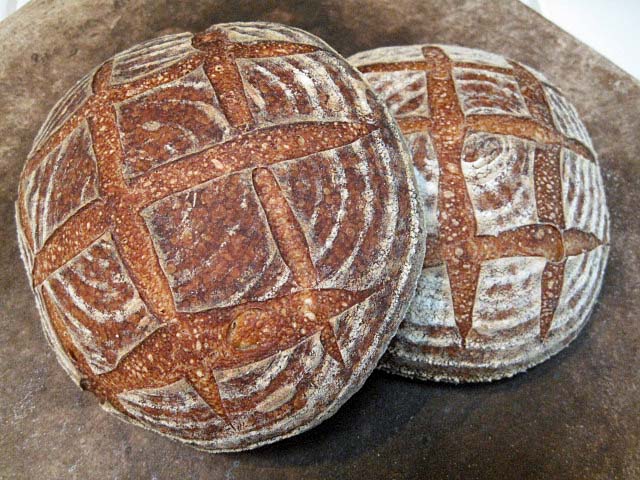
My goal has been to make a moderately sour, mostly white “San Francisco style” sourdough bread that has a crunchy crust, an open crumb and a nice, sweet, complex flavor, not just sourness. Today's bake achieved all of these characteristics, and I'm a very happy baker (and bread eater)!
I started with the “San Francisco Sourdough” formula in Michel Suas' Advanced Bread and Pastry, but modified the method, as described below:
My stock starter is 50% hydration. My sourdough starter is fed with a mix of 70% AP, 20% WW and 10% whole rye.
I started by refreshing my stock starter with 40 g starter, 100 g water and 100 g flour mix and fermenting it at room temperature for 12 hours. I used this to build the stiff levain. (Note: This is a liquid starter - 100% hydration.)
Stiff levain | Bakers' % | Wt (oz) |
Bread flour | 95 | 2.5 |
Medium rye flour | 5 | 0.15 |
Water | 50 | 1.25 |
Liquid starter | 80 | 2.15 |
Total | 230 | 6.05 |
Dissolve the starter in the water. Add the flour and mix thoroughly until the flour has been completely incorporated and moistened.
Ferment at room temperature for 6 hours.
Cold retard overnight.
The next day, take the levain out of the refrigerator and ferment at room temperature for another 2-4 hours. The levain is ready when it has expanded about 3 times, and the surface is wrinkled (starting to collapse).
Final dough | Bakers' % | Wt (oz) |
AP flour | 100 | 14.85 |
Water | 72.8 | 10.85 |
Salt | 2.53 | 0.35 |
Stiff levain | 40 | 6.05 |
Total | 215.33 | 32.1 |
Method
In a stand mixer, mix the flour and water at low speed until it forms a shaggy mass.
Cover and autolyse for 1-2 hours. (Yup. I autolysed for 2 hours.)
Add the salt and levain and mix at low speed for 1-2 minutes, then increase the speed to medium (Speed 2 in a KitchenAid) and mix for 5 minutes. Add flour and water as needed. The dough should be rather slack. It should clean the sides of the bowl but not the bottom.
Transfer to a lightly floured board and do a stretch and fold and form a ball.
Place the dough in a lightly oiled bowl and cover tightly.
Ferment at 78º F for 3 hours with a stretch and fold at 1 hour.
Divide the dough into two equal pieces.
Pre-shape as rounds and rest, covered, for 10 minutes.
Shape as boules or bâtards and place in bannetons. Place bannetons in plastic bags.
Proof at room temperature (68-70º F) for 1-2 hours.
Cold retard the loaves overnight.
The next morning, proof the loaves at 85º F for 2-3 hours.
45-60 minutes before baking, pre-heat the oven to 480º F with a baking stone and steaming apparatus in place.
Transfer the loaves to a peel. Score the loaves as desired, turn down the oven to 450º F, and transfer the loaves to the baking stone.
Steam the oven.
After 15 minutes, remove the steaming apparatus, and turn down the oven to 425º F/Convection. (If you don't have a convection oven, leave the temperature at 450º F.)
Bake for another 25 minutes.
Turn off the oven, and leave the loaves on the stone, with the oven door ajar, for another 10 minutes.
Transfer the loaves to a cooling rack, and cool thoroughly before slicing.
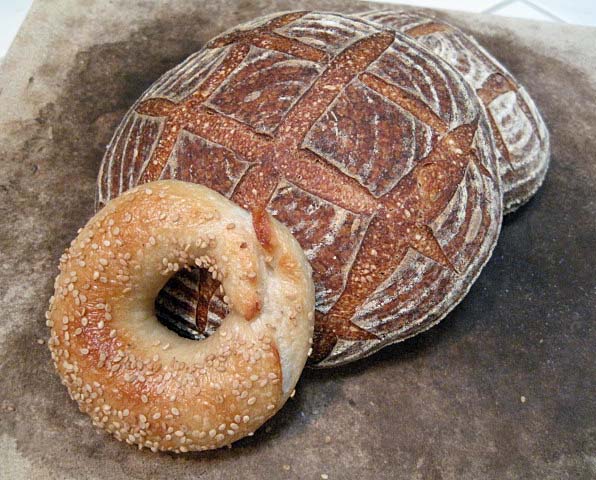
San Francisco Sourdough (and New York Bagel from ITJB. This weekend's "Coast to Coast" baking.)
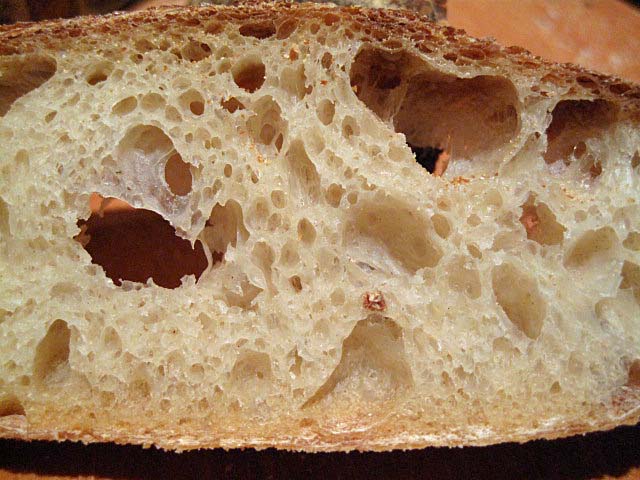
San Francisco Sourdough Crumb
These loaves had a rather flat profile but did have fair oven spring and bloom. When sliced after cooling for 4 hours, the crust was crunchy. The crumb was open. The aroma was decidedly sour. The crumb was tender-chewy and cool in the mouth. The flavor of the crumb was a bit sweet and wheaty with a moderately sour after taste. The crust was nutty, but I would have personally enjoyed it more had it been darker, even though that would not have been strictly in the the “San Francisco Style” of old.
This method is spread over 3 days, so it requires some advance planning. Since it requires little time, except on the second day, it should be easy to fit into almost anyone's schedule. It this is the kind of bread you're after, it's definitely worth the effort.
Future plans
Substitute 5-10% whole wheat for some of the AP flour in the final dough.
Make some larger loaves.
David
Submitted to YeastSpotting
Addendum added 2/4/2012: Please see My San Francisco Sourdough Quest, Take 2 for my next bake. The modifications resulted in improvements in the crumb and a more assertively sour bread.
- dmsnyder's Blog
- Log in or register to post comments
Beautiful loaves (especially the shiny crumb!) and great write-up, David.
"Amoderately sour, mostly white .... sourdough bread that has a crunchy crust, an open crumb and a nice, sweet, complex flavor, not just sourness" is exactly what I'd like for my sourdough bread, whether 'San Francisco' style or not, so what you 're-discovered' is really intriguing and enlightening for me. Thank you for sharing your experience.
Great Bake David! About as perfect as a white sourdough gets!
I think retarding the stiff levain did the trick here.
You were refering to the Detmolder method, and i though you have built your leaven through stages...Nevertheless, yours looks very appetizing, David!
What wonderful bread!
Looking forward to reading about your next steps.
Jürgen
Lovely sourdoughs, David! So interesting to follow your sourdough projects. Love the shiny walls visible in the pic of your crumb, makes me yearn for a slice!
Thanks for the reminder on temperature and microbe activity! It's time I re-examined some of those wonderful articles on lactobacilli. :)
Very nice, David. May I toss it up on the home page for a bit?
-F
I'd be happy to see it on the front page. Thanks!
David
Great write up! From personal experience the 85°F final proof in the B&T has made a big difference in my sourdoughs. Thanks for sharing and look forward to more. ~ Jim
I too have been experimenting with a mostly white SF Sourdough, but as usual, you are far ahead of me. I think I will try this method soon. Good luck with your ongoing quests.
Michael
David
does it have the chewy crumb of San Francisco Sourdough (ala Reinhart's Crust and Crumb formula using bread flour)? It looks a bit too airy to be the blue collar bread of San Francisco's wharves.
Thanks for the reports on your SFSD experiments.
Glenn
Well, these are less dense than the traditional SF SD. I wanted to try a higher hydration version after the last few attempts. My target is probably somewhere in the middle of the range - about 68-70% hydration.
I haven't calculated the actual final dough hydration, but the dough acted like it was 75-78% hydration. I might try it with a higher gluten flour, too. Maybe KAF Bread (12.7% protein).
David
Hello David,
Oh my, those loaves are beauties, and so good to hear you got flavor you were happy with, as a result of your fermentation schedule.
That crumb looks lovely. What a wonderful bake!
:^) from breadsong
I wouldn't say I've "got it all," but I did get the sourness I wanted. There's still lots of room for tweaking. Isn't there always?
David
I can't wait to try this one myself. Thanks for the post and the great tips.
If you do try it, please let us know how it works for you.
David
Hi David,
Beautiful looking bread, well-deserved front page feature.
Your development ideas at the bottom of the script look spot-on.
One other thought, since you mention Detmolder. Have you thought of adapting Hamelman's Detmolder instructions to produce a wheat-based levain which you could use for this type of bread?
All good wishes
Andy
Yes! I have thought about applying the Detmolder procedures to a mostly-white flour dough but haven't gotten around to it. Have you tried this? Would you predict similar results for wheat as for rye with the same time and temperature controls? Rye fermentation is so much more vigorous, I'd wonder.
David
Hi David,
Don't see why you would not reasonably expect similar results as the principles of developing wild yeast, acetic and lactic bacteria in 3 distinct stages would apply equally to wheat and rye-based cultures.
But you are correct about the fermentability of rye, so time factors may vary. However, I do distinguish in one fundamental way; my wheat culture I describe as "levain", whereas the rye is a "sourdough". For high rye full fermentation is essential to protect the pentosans. But for wheat, excess acid will result in protease rampant activity, so the dough structure will breakdown. For that reason, I would expect a wheat levain built on Detmolder principles would be built over a shorter time period, not the longer one you might at first think would be necessary.
Best wishes
Andy
I think a trial of the Detmolder approach applied to a wheat SD bread is well worth trying. I need to work out a schedule. I'll bounce it off you, if I may.
This won't happen for a couple weeks. I've a date to visit Glenn and pick up some flour from Central Milling next weekend.
David
That's fine David,
either pm or use this post, which ever suits best
Andy
After having such fine results from your San Jouquin I have great hopes that this will also prove outstanding. Just put the loaf in the fridge for retard along with one of Zola Blues Nury's light rye to compare the two. I used home ground; 1/3 rye, 1/3 WW, 1/3 spelt starter with AP used to build the levain for both and retarded the levain overnight for both too. Otherwise, I tried to stay with both recipes. Can't wait to bake them off tomorrow and expect both to be excellent. The Nury did rise more before it went into retard. Once again your baking is exemplary and results terrific. Your methods applied to my multi grain Challah turned it into one that I am very proud of.
Fortunately, one doesn't have to choose only one bread. This bread has not yet been through all the tweaks and trials to which I subjected the SJSD over the years. It has room for improvement.
david
I used my new modified parchment containment for ZB's and David's was placed in a floured basket to retard and rise. I slashed both but the SFSD was tough and dry on top, it may have been over proofed, so I botched the slashing and it deflated a little which my have caused it not to spring at all in the oven. ZB's spring was terrific. I baked them together with a 500 degree preheat, 475 degrees regular bake for the first 15 minutes with a Pyrex bread pan full if boiling water and 12" screaming hot cast iron pan with a cup of water and then 425 degrees convection for the remainder after removing the steam at 15 minutes. I baked ZB's for 30 minutes and David's for 5 minutes longer which was 5 minutes less than David recommended.
Both had the same sourness, David's had a slightly more open crumb even though it didn't spring. I like both very much and they seem to be twins except for their shapes . Why this is I have no idea when one had rye and the other didn't.
Sorry the photos are so bad. It is as good as the cell phone can manage with my total lack of understanding.
Thanks to both you and ZB for your fine breads the rest of us can only hope to match in our dreams.
David,
The next day the sour was much more prevalent and the color of the crumb was a deeper brown than ZB's. (even though she had rye in her formula. It tasted more SFSD by far as well. It is a much better bread the next day! I'm really liking it today . With your future tweaking and formula changes it can only get better. Thanks again
but wanted to have a chance to read your write-up carefully. One question: you start with a 50% starter, bring it up to 89% and then down to 72%. Is this part of your regime, or are you just synching up with the original Suas formula? Of course, your results are beautiful and this is just a detail but I'm curious about it. -Varda
These details were provided in the interest of completeness. My starting point was the starter I keep in the fridge at 50% hydration, according to the recommendations of my SFBI instructor. I then followed Suas' formula for the SF SD.
David
In the midst of day 2 and struggling a bit with the ounces.... any chance you could repost in grams? Thanks.
Otis
There are numerous calculators online.
For example, you can quickly convert from oz to gram using the Google search box. Just type in say "2.5oz in grams" then click search.
btw do you use Evernote? Very easy using the Evernote web clipper to clip a web page (or section of it) and file it for future reference. Once you have clipped the section, it is editable so in this case you could quickly add a grams column for your own reference.
I have Evernote on my mobile, but not PC... I'll check it out. Amazing the things you can learn on TFL!
The best part: I went out for awhile after baking and when I returned the room had the distinctive and wonderful aroma I remember driving past the Larraburu bakery in San Francisco many years ago. It was right off Highway 101 as I recall, at the bottom of Potrero Hill...
I'm glad it turned out to your taste!
David
I recommend you try the version posted most recently: My San Francisco Sourdough Quest, Take 3
David
SD Bread.
I did a small version loaf last night . Had a nice chewy crust and a moist mild tasting crumb. The recipe was 1/2 of the recipe from Baking with Mike at Sour Dough Home. Not as Pro. or brown crust as it should be but the end result I guess with taste is all that matters. Not a real sour taste and I did not use any wheat flour.
David,
I am a long-time lurker on TFL but have recently started documenting my life in bread and find that I really enjoy having the pictures. I think they will help me to improve my skills, or at least I hope it will. And having nice pictures may encourage me to contribute more to this wonderful forum, where I've already learned a lot. I am mostly a whole grain baker, but I've tried SF sourdough several ways. I liked the results of your formula a lot! These came out of the oven just a couple of hours ago and will be enjoyed by my family and neighbors for dinner. You experiment, and the rest of us benefit. Thank you!
Ellen
I'm glad you are enjoying the SF SD!
Unfortunately, your photos do not display for me. They appear to be stored in dropbox, maybe not in your public folder. Or maybe you need to upload them from a photo sharing site like Picassa or Flickr.
Happy baking!
David
So sorry. Let's see if this works. Now it's yesterday's bread. Only one loaf left, for sandwiches and croutons!
Worth the effort, Ellen. Your crust and crumb are gorgeous!
David
OMG!!They are beautiful. I have been experimenting with sourdough and make some pretty good sourdoug english muffins. My starter has a great aroma and has become my new house pet. My problem when I make bread is it becomes so slack when it is fermenting that I end up with cibatta --flat but good. Got any suggestions? Your bread is really beautiful I love that carmalized crust you achieved. Best baking wishes, Pam
Hi, Pam.
If you want to make bread with a high-hydration dough, you should let your loaves proof in a banneton. Their sides need to be supported while they rise. Shaping to get a really good, tight gluten sheath on the loaves is also important.
If you share the formula you are using and your current procedures, I bet we could help. I suggest asking for help in a new topic to attract more input.
David
David: Just baked the loaves....Here is a photo. I'll do a posting with the crumb on my blog later. Thanks for the great instructions. I missed your follow-up note at first and had already started to retard the starter, so continued with the original instruction for the starter. I was able to add 10% whole wheat flour, however. Can't wait to see the crumb. Best, Phyllis
I'll look for your blog posting!
I have posted a version of this with 30% WW. In fact, that's our favorite version and the one I make almost every time these days.
David
David: We just had it for lunch, and my husband loved it. The crumb was very nice and uniform. I'll be sure to try the 30% WW version. Thanks again. Phyllis