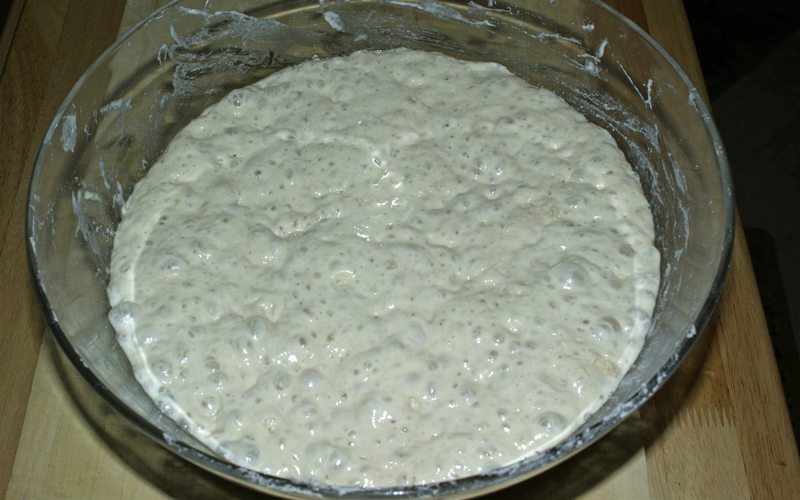
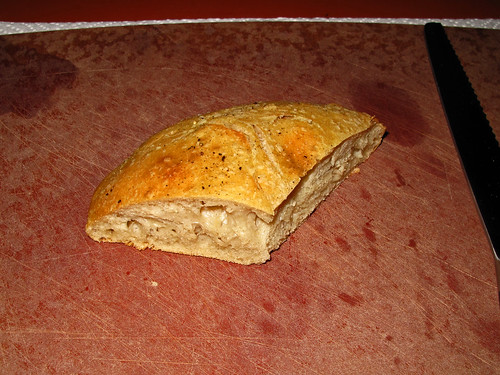
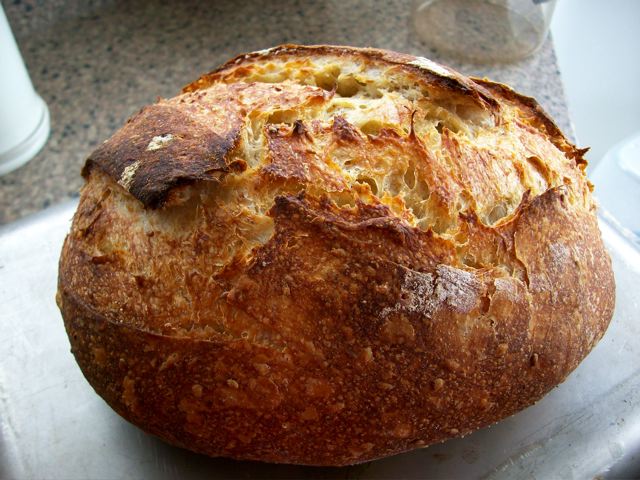
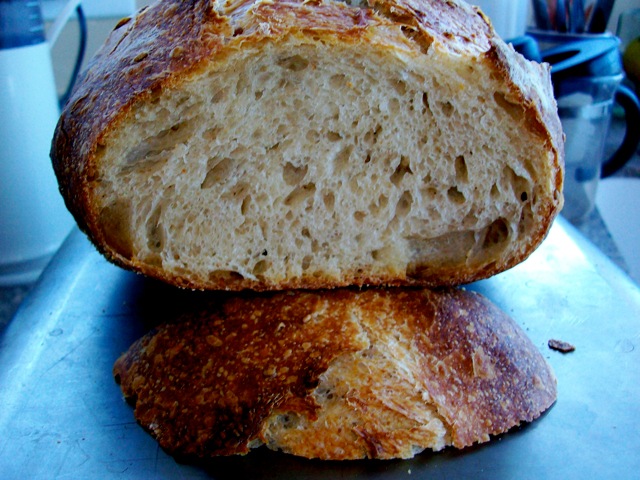
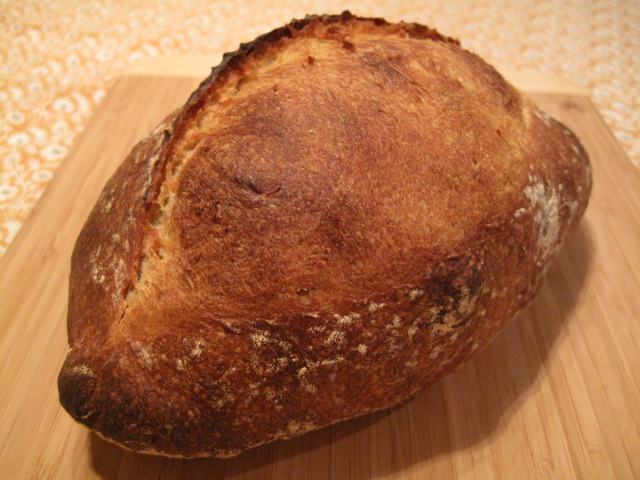
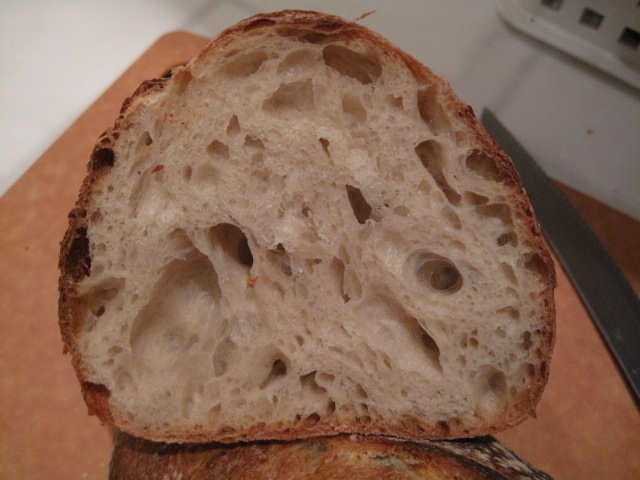
The Fresh Loaf

A Community of Amateur Bakers and Artisan Bread Enthusiasts.

Blogs

Manang's picture
Manang

I received an email several weeks ago about this contest to come up with original recipes with sweet potatoes as the main ingredients. While I grew up in a country where sweet potatoes were more commonly used than regular potatoes in cooking, the contest prompted me to experiment in baking with sweet potatoes.  Whether I win or lose, I have come up with several definite keepers.  I came up with 5 recipes (recipes should be easy, and quick enough to make it to mealtime and be a part of daily meals).  There was no limit to the number of recipes to submit. Deadline is March 31st. I have made 5 and to me, that's enough, although I will still cook and bake with sweet potatoes. It was a pleasant learning experience.

Sweet Potato Rolls (Pandelimon)Sweet Potato Breakfast Rolls (Pandesal)

 On the left is pandelimon (as we call it in the Philippines), which is what we would refer here in the US as some dinner rolls. The softness and taste is unbelievable; it rivals the rolls served in one of our favorite family restaurants here.

On the right is pandesal (a Filipino breakfast staple). The only difference is the way they are cut, and that pandesal is rolled in breadcrumbs.


Both can be enjoyed with butter or jam, or just plain, dipped in hot cocoa or coffee.

Recipe can be found in my blog.

Next thing I made was the Sweet Potato Cream Cheese Wheat Bread.Sweet Potato Cream Cheese Wheat Bread

It is a dough (of course, made using sweet potato again), with cream cheese filling combined with sweet potato (inspired by a pumpkin cream cheese filling).

While the photo looks tempting, I was not too happy with it.

Sweet Potato BakeThen I made this dessert of baked sweet potato. While this entry will not qualify for  a "baking" post here in freshloaf, this delightful and rich dessert would pave the way for a baked "Hot Pockets" inspired sweet potato snack.


But first I had to make another dough to be able to make those sweet potato pockets.

Enter the Sweet Potato Cinnamon Rolls.Sweet Potato Cinnamon Rolls

It was probably the best dough I have ever made for any cinnamon rolls.  So moist and soft, even after refrigeration!  And the best thing was that, the recipe could make a batch of three logs. A log could be frozen for use in another day. Everything is described in my blog. So the recipe I have there is good for 3 batches of 7-8 pieces cinnamon rolls. Sweet Potato PocketsBeing able to freeze them enables me to have them for at least 3 meals.

Since I had some leftover Sweet Potato Bake and I had enough dough from Sweet Potato Cinnamon Rolls to experiment with, I came up with a sweet vegetarian version of Hot Pockets, which I called Sweet Potato Pockets.  One or two pieces of this delightful snack is enough to fill my tummy in between meals.  They are also good as accompaniment to my evening coffee.

These are all the 5 entries I submitted to that contest. And like I said, whether or not I win or lose, I have already several keepers here, that I feel like a winner. One of my blog readers already tried the Sweet Potato Cinnamon Rolls, which happened to be her first ever baked bread/rolls, and she was so thrilled that everyone liked it. I guess I "recruited" her now into the world of baking. Maybe I should recruit her to the fresh loaf as well.

alyaman's picture
alyaman


hi

this is my fresh loaves
it made of the artisan bread.
the dough is mixture
flour
water
salt
and...yeast

mix... leave it 2 days ..chilled
then make delicious bread
and here... i stuffing it by shredded cheese
....
the round loaf
made of
120 g sourdough starter
3/4 cup lukewarm water
1 1/4 tsp salt
1 1/2 tsp sugar
1 tsp instant yeast
1 cup bread flour
1 1/2 cups all-purpose flour
crumbled or shredded cheese, optional


Combine all the ingredients
except the cheese
in the bowl .
and then knead to make a smooth dough.

Flatten the dough on surface.
Sprinkle the cheese over it
and roll up the dough.
and shape it .
let it on the greased or parchment-lined baking sheet.
cover, and let rise until doubled, about 90 minutes.
until very puffy
and bake in a preheated 425 degree oven
for 25-30 minutes

:D

this is the fresh photos
*


*


This is my natural own sourdough
It worked .. Organized life and an environment suitable for months ago


i make many things by it
bread
pancake
Bulgarian bread
focaccia
pantennone
Cinnamon rolls
buns


ques2008's picture
ques2008

I don't know if it's my love for bread baking or my new camera that keeps me in the kitchen, but here's another attempt I just completed tonight.  The recipe is from Lory of Maine whose web site is:  http://kusinanimanang.blogspot.com/2008/01/potato-peasant-bread.html.  She says people can copy her recipes but she'd appreciate it if they would include a link to her web site.  So my thanks to Lory for sharing.  She's got over a hundred recipes there - goes to show what a dedicated wife and mother and foodie she is.

Since the recipe was for 2 loaves, I decided to make a loaf with one half of the dough and dinner rolls for the second half.  For the loaf, I added shredded cheese and green onions, then I rolled the loaf jelly-style and put it in a pan.  For the dinner rolls, I divided the dough into tiny balls and put three balls in each muffin cup. 

These were what came out of the oven:

loaf and dinner rolls

When the loaf cooled, I sliced it.  Here's what it looked like:

sliced loaf


And here's the final picture - a closer look at the slices:

slices

Here's my question:

Can anyone tell me why that slice has a hole at the top, right below the crust?

Overall, I am happy with the recipe.  I probably shouldn't have spread the shredded cheese and green onions before rolling; maybe it would have been better if I incorporated the cheese and green onions into the mixture during the pre-kneading stage.

I must say though that the cheese and green onions spiked the taste a few notches up.  The loaf definitely had a sharper and more flavorful taste than the rolls.  And Lory did say that potatoes tend to make the bread soft and chewy inside and crisp and crusty on the outside.  I agree.  Those slices were really soft!  I left the potato skins on by the way - so they look like bacon bits but they're not.  A bacon loaf is next on the agenda, though!


audra36274's picture
audra36274

It has rained for 4 days now. We are all stir crazy, so we made pizza. The kids did their own toppings. This one was just pepperoni. As they say in the papers, " A good time was had by all" .

pmccool's picture
pmccool

My wife has been an instructor in some women's groups recently that have had, as one component, some instruction in cooking.  She was a bit surprised to find just how much interest there was among the women who attended these sessions in learning more about cooking.  For some, it was an opportunity to expand their repertoire with new recipes or techniques.  For others, it was a chance to learn basic skills that they had not been taught previously.  

Based on those experiences, she has begun a series of classes in our home that will cover a range of topics; including meal planning, cooking and baking.  The first class met yesterday and I found myself instructing three students on the finer points of how to make a honey whole-wheat bread.  (My work schedule gives me every other Friday off.)  It's an old pattern; she has an idea and I have work.  ;-)  

We kept everything low key.  I had baked a loaf yesterday morning prior to class so that they could see and taste the finished product.  They got to see the differences in measuring by volume and measuring by weight, and were more than a little surprised to see that their normal measuring methods produced some significantly different quantities of flour, on a weight basis.  We allowed the whole wheat flour a short soak (not a true autolyse) and explained how that would affect the texture of the dough and the finished bread, as well as the amount of kneading that would be required.  We also covered the basic differences between enriched, straight doughs (yesterday's subject) and lean and delayed-fermentation doughs.  Although we weren't focusing on sourdough yesterday, I showed them my starter and explained some of the differences between naturally-yeasted and commercially-yeasted breads.  While their dough was rising, we sampled the finished bread that I had baked.  My wife also demonstrated some spreads and toppings that they could easily make, and provided those recipes.  By the time we were done, each student had mixed, kneaded and shaped their own loaf of bread, which they took  home to bake.  Although I stressed the importance of allowing the bread to cool to room temperature, one already e-mailed back to say that her loaf disappeared that same afternoon.  However, she is planning to make more!  

There's already talk about future classes for cinnamon rolls, pretzels, bagels, and sourdough.  We'll have to see how all of that plays out.  The good thing is that there are now more converts to baking their own bread at home.  And, yes, I pointed them to The Fresh Loaf as an excellent resource for additional information and help.

Paul

koloatree's picture
koloatree

Pictured below is a sourdough raisin walnut bread. the recipe i copies is from ehanner at http://www.thefreshloaf.com/node/6629/raisin-walnut-sd-delight. i sliced it thin, toasted + butter + a little extra cinnamon sugar on top = YUM! i was hoping to get a larger ovenspring but i dont think my oven was hot enough. i also didnt score the bread properly.


below is another attempt at baguettes. these were also sourdough using KA All Purpose flour. Once again, my oven was not at proper temp so i am sure that contributed to the lack of oven spring. also, this time i used a large alluminum pan to cover the bread and also placed a small cast iron skillet inside for additional steam. i still need to learn proper shaping technique and i want to try a better flour with 11.4% protein. does even a few tengths  of protein contribute to color and oven spring?


deep dish pizza for later that day. credit goes to BTB on pizzamaking.com. here is what i use for a 9Inch round pan 2 inches tall. i sauteed onions and green peppers, used italian sausage, red pack whole peeled tomatoes, preshredded maggio mozzerella, lots'a spinach, and a sprinkle of parmesian ramano. cooked at 480 for 30-35 minutes.

Flour and Semolina Blend* (75% 25%)
Water (47%)
ADY (.7%) convert to IDY use ~25% less
Olive Oil (6%)
Corn Oil (18.5%)
Butter/Margarine (1%)
Sugar (1.5%)
Salt (1.5%)


dmsnyder's picture
dmsnyder


Susan from San Diego, of “Magic Bowl” fame, has posted two of her basic sourdough bread recipes. These have been on my lengthy “to bake list” for a long time. The photos of her breads are stunning, and many other TFL members have baked from her recipes and enthused about their results.

This weekend, I baked two boules of her “Original Sourdough” - to be distinguished from her “Ultimate Sourdough.” The latter can be found here:

http://www.thefreshloaf.com/node/6927/well-i-finally-did-it

I made some modifications in procedures which I will describe, but Susan's original “Original Sourdough” formula can be found here:

http://www.thefreshloaf.com/node/8884/susan039s-original-sourdough-3262007


David's Un-original Sourdough after Susan from San Diego's Original Sourdough

Note: This recipe involves 3 “builds” - a “starter,” a “sponge” and the “dough.”

Starter

Active starter 1Tablespoon

Water           15 gms

Bread flour    25 gms


Sponge

Water           240 gms

Bread flour    173 gms

Whole wheat flour 50 gms (I used KAF White Whole Wheat.)

Starter All of the above


Dough

Bread flour      284 gms

Water              60 gms

Olive oil           14 gms

Salt                7.5 gms


Procedures

(I did my mixing in a KitchenAid Accolade.)

Make the Starter by dissolving the active starter in the water in a small bowl, adding the flour and mixing until all the flour is well hydrated. Cover tightly and allow to ferment for about 8 hours. It should be puffy and slightly bubbly. Refrigerate for up to 3 days if you are not ready to use it immediately.

Make the Sponge by dissolving the Starter in the water in a medium-sized bowl. Mix the flours and add them to the dissolved starter. Mix thoroughly and then cover the bowl tightly. Allow the Sponge to ferment until it is bubbly and has expanded - about 8 hours.

Make the dough by dissolving the Sponge in the water and mix in the olive oil in the bowl or your mixer. Mix the flour and salt, add it to the wet ingredients and mix with a spoon or spatula or with the paddle at Speed 1 to a shaggy mass. Cover the bowl and let it rest for 20 minutes to an hour. (This will allow the flour to hydrate and the gluten to start developing.)

Switch to the dough hook and mix at Speed 2 until you have moderate gluten development. (This took me about 10 minutes.) The dough should clean the sides of the bowl but stick to the bottom with a diameter of about 6 inches.

Scrape the dough onto your lightly floured bench and do a couple of stretch and folds. Transfer the dough to a lightly oiled bowl and cover tightly. (I use a 8 cup glass measuring “cup” with a tight-fitting plastic cover.) Stretch and fold the dough 3 times at 30 minute intervals, then allow to rise in the bowl until double the original volume – about 4 hours in my coolish kitchen.

Divide the dough into 2 equal parts and pre-shape into rounds. Cover and allow to rest for 10-15 minutes. Then, shape the pieces into boules and place each in a floured banneton. Cover with plastic wrap, a towel or place the bannetons in food grade plastic bags.

At this point, you can either allow the loaves to proof until 1.5 times their original size or retard them for 8-12 hours in the refrigerator. (For this bake, I proofed and baked one boule immediately and retarded the other.) If you retard the loaves, allow an extra hour or two for proofing – about 4 hours from when you take them out of refrigeration until you bake them.

Forty-five minutes (or 45-60 minutes, if using a baking stone) before baking, pre-heat your oven to 480F with a sheet pan or baking stone in the oven. (Make sure your sheet pan is large enough to form a base for the cover you will be placing over the loaf. See below. I used a heavy-gauge black steel, non-stick sheet pan that is larger than the standard “half sheet” size.)

When the loaf is proofed, transfer it to a peel dusted with semolina or corn meal, load it onto your sheet pan or stone and immediately cover it with a stainless steel bowl that has been pre-heated with hot tap water. (Dump the water but do not dry the bowl just before loading the loaf in the oven.)

Bake for 15 minutes, then remove the bowl from the oven, close the door and lower the temperature to 450F. Bake for another 15-18 minutes until the loaf is nicely colored and its internal temperature is at least 205F. Turn off the oven and leave the door ajar with the loaf in it for another 5-10 minutes to dry the crust.

Cool the loaf on a rack completely before slicing.


The loaf that was baked without overnight cold retarding was much like a French pain au levain. Right after cooling, it was only very mildly sour and had a nice wheaty flavor. Thirty-six hours later, it had a more pronounced but still mild sourness. The flavors had melded and were improved, to my taste. As you can see, the crust was rather light-colored. There was almost no coloration at the point I removed the bowl. The boule had moderate oven spring but great bloom. This is typical of the results I get when I bake loaves covered in this manner. The crust was crisp, and the crumb was nice and open but chewy.

Susan from San Diego's SD boule

Susan from San Diego's Sourdough (Not cold retarded)

Susan from San Diego's Sourdough (Not cold retarded) Crumb

I baked the cold retarded loaf the next day. This time, I baked the loaf covered for the first 15 minutes, but on a baking stone rather than a sheet pan. Also, I preheated the oven to 500F then turned it down after loading the loaf. I baked at 450F for 30 minutes total, then left the loaf in the turned off oven with the door ajar for another 5 minutes.

As you can see, the second loaf had significantly greater oven spring. I think this was due to the hotter initial temperature and, maybe, the stone. Also, the crust is significantly darker, which I prefer in this type of bread.

Susan from San Diego's "Original Sourdough" baked after cold retardation.

Susan from San Diego's "Original Sourdough" baked after cold retardation - Crumb

This loaf had a crunchier crust and significantly more sour flavor than the loaf that had not been cold retarded. The crumb was chewy but maybe a bit less than the loaf baked the night before.  To my taste, this loaf was just about perfect - very close to my personal ideal sourdough bread. I bet it's going to be even better the next day.

Thanks Susan!

David


TeaIV's picture
TeaIV

this is my first Sourdough: (san fran SD, i think it was pretty good for a first time). All of the sourdough things that I baked I used with the starter that I grew with Sourdo Lady's recipe, using dulled lemon juice.

sorry for the blurry image...

This is my first Pizza... very Garlicky Pesto (home-made) with moz cheese, mushrooms and pine nuts. oh, and a cheese-filled crust! I love those! sadly this is taken pre-bake. It didn't last long enough to take a picture of it when it was ready. we were hungry that day...


and last but not least, My Sourdough Pizza. all I can say is it was Amazing... best pizza dough I've ever tasted... the toppings could have been better, but oh well. cheese filled crust again. this time I insisted that I take several pictures, but someone's hungry fingers were running towards the pizza already. both of these were using the pizza primer recipe on this site.

TeaIV's picture
TeaIV

I made baguettes with poolish using one of the recipes on this site, and It was delightful!! my family all agreed that this was some of the best bread I've made!


compare to my first try with baguettes:

Way better!

Floydm's picture
Floydm

I worked from home Wednesday and used it as an opportunity to refresh my starter and bake a couple of loaves.

The dough I made was a "little of this and that" dough.  I threw some leftover mashed potatoes in, the last couple of ounces of a bag of rye flour I had, a bit of whole wheat flour from another bag I needed to use up, and a couple of cups of AP flours.  I made the dough very wet, 70+ percent hydration.

I folded a few times throughout the morning and tried to shape a couple of freeform loaves in the early afternoon.  It was amazingly sticky.  No amount of water on my hands or flour on my board (or vice-versa) was working for me. 

After 10 minutes of sticking and swearing and being about ready to dump it into the compost, I dumped the gobs into a couple of loaf pans.  Two hours later, I came downstairs to the kitchen and was pleasantly surprised by how much it had risen in a loaf pan despite the way I had abused it.  So I baked them.

sourdough loaf

Not my most beautiful loaf, but pretty darned good.  I don't think anyone else but me could tell this was not what I'd intended to make.  And the sourdough flavor was tremendous: the extra abuse and longer rises let it develop more.

Pages

Subscribe to RSS - blogs