The Fresh Loaf

A Community of Amateur Bakers and Artisan Bread Enthusiasts.

Blogs

jleung's picture
jleung

Full post here.

Sausage Buns

Ever seen something like this in a Hong Kong style bakery?

The breads I loved as a child were not peanut butter and jam Wonder Bread sandwiches, but the assortment of breads made from Hong Kong style bakeries: cocktail buns (雞尾飽) , raisin twists (提子條), plain sweet bread (排飽) and pineapple buns (菠蘿飽), just to name a few. Baking yeast bread was a complete mystery to me until recently, but it always seems so magical - and comforting - to walk into a bakery and inhale the wonderful aromas of freshly baked, still-warm bread. Hong Kong style buns are often variations on the theme of a basic plain [semi-] sweet dough that is twisted, stretched, stuffed or topped with a number of different fillings.

Sausage Buns - 腸仔飽, or pigs in a blanket (?)

Dough recipe from Food For Tots - Sausage Rolls

Ingredients

-300 g bread flour (I used unbleached all-purpose flour and had to add a bit more to get the right feel to the dough)
- 5 g instant dried yeast
- 10 g white granulated sugar
- 6 g salt
- 1 egg, lightly beaten, plus enough lukewarm milk to weigh 220 - 230 g

- 30 g unsalted butter, softened

- 8 pieces of sausages (think hot dogs)

- egg wash: 1 egg, lightly beaten
- sesame seeds, for topping

Directions

1. Mix the flour, yeast, sugar and salt together in a large mixing bowl. Gradually add in the egg and milk, and combine, stirring until it comes together in a rough dough.

2. Knead with lightly floured hands for 3-5 minutes until you start to feel the dough coming together.

3. Add the softened butter and continue to knead until it is thoroughly incorporated into the dough.

4.Place the dough back into the mixing bowl, cover with a damp cloth, and let rise at room temperature for around 1.5 hours, or until roughly doubled in size.

5. Gently deflate the dough and divide into 8 pieces, one for each of your sausages. You'll want to roll these out into little logs, and then let them rest for 5 minutes or so to relax the gluten.

6. Roll out each log again and gently stretch them into thinner, longer logs. They'll need to be long enough to wrap around your sausage.

7. If you want the middle bulge of your bun to be bigger, you could also at this point taper the ends of your dough log by rolling the very ends a bit thinner until they form a point at each end. Wrap the log around the sausage and try to leave both ends on the bottom. That way, you can easily form a better seal by pressing the dough-wrapped sausage down on the ends. You'll want to place the shaped buns on a greased baking sheet, parchment paper or a silicone baking mat.

8. Cover the buns with a damp cloth and let them rise until roughly doubled again. When they start to look puffy, brush them lightly with the egg wash and sprinkle sesame seeds on top.

9. Bake on the middle rack of a preheated 200C (~400F) oven for 8 minutes, and then 180C (~350F) for 5 minutes or until they're golden brown.

ericb's picture
ericb


For the last few weeks, I have moved away from sourdough levain to straightforward yeast recipes. However, this weekend, I decided to revive my starter and try out something new: Eric's Favorite Rye (ici: http://tinyurl.com/d4v344).


As usual, my starter bounced back with alarming predictability. By Monday morning, it was active, bubbly, and delightful to smell. I made the rye starter per Eric Hanner's directions, set the bowl on top of the cabinet (the one the cat can't get to...), and left for work, excited about trying out a new recipe that evening.


Around noon, though, I got a call from my mom: my grandfather of 80 was in the CCU at the hospital. He had been having trouble lately, but we all kind of figured he might bounce back.


I don't know about your family, but in mine, we talk circuitously about death. My parents would never say, "you need to come to the hospital if you want to see your grandfather before he dies." They always try to be optimistic, or at least realistic about the facts as they stand at that moment, never ruling anything out. But when you hear phrases like, "they're talking with the nurse about what they want to... do," it becomes clear that "do" does not include "go home and start building model railroad houses again."


What followed was a typical family freak-out session at the ICU. I've been through a few of these in my life, but not as many as some of you. You know the drill: family start filing into the ICU waiting room, where speculation about the patient's health condition runs rampant. What did the doctor say? But the nurse said this... which one is right? Didn't the cardiologist say something different? Grief builds as the topic turns to "what to do." Grandma and Pappaw always said they didn't want to go on a ventilator... but nothing's easy during the critical time. The family becomes like an Ouroboros, a snake eating its tale, but without the symbolism of regeneration and rebirth. We feed on each other's grief. We took turns making frequent trips to his room, two-by-two, where we held his hand as he struggled in a rage induced by oxygen depletion. In an effort to calm him, I asked him about his first car: a chartreuse Ford. I asked him how to set up his old model railroad trains. I told him how we enjoy using his 1960's-era Central Bell rotary phone, which he wanted to throw out in a recent move. This seemed to help.

To make a long story less long, my grandfather did not die that night. He was given morphine and is now resting comfortably in a hospital room. He will never leave that room, and I think we're all OK with that. He may live another day, or several weeks. Either way, it is a blessing to have the extra time.


This afternoon, after too many hours in the hospital and too much drama to emotionally process anything, I realized that my rye starter was still waiting for me. When I got home, I decided to continue with the recipe, despite the fact that the starter was 24 hours too old. I threw in a bit of extra yeast, and indulged in the therapy of the familiar actions of mixing, kneading, and shaping the dough.


Finally, after struggling with the sticky rye and making a complete mess of my kitchen, it was time to bake. The first loaf slid in beautifully, and I had visions of a tangy, perfect deli rye. The second loaf, however, was a disaster. When I slid it in, I miscalculated and let it slide too far. It bumped up against the first loaf, and instantly combined into a giant, doughy blob.


In that moment, all of the fear and frustration of the last two days exploded. I suppose up to that point, I was in emotional denial about the impending death of my grandfather. Anger is the next stage of grief, and I took it out on the dough. I entirely lost my cool, and with a spatula, stabbed into the seam between the two, forcing them apart, making a racket and cursing my situation. In frustration, I slammed the oven door, which caused the  dough to slide off the baking stone and into the back of the oven. I was able to retrieve the dough before the oven caught fire, but not without ruining the loaf. In my grief, I somehow equated the dough with my grandfather. It made sense at the time.


At the risk of sounding preachy, I have heard that the Christian idea of resurrection does not only apply to death. They say that every loss in life is like a death, and that the recovery from these losses is like resurrection. In that way, they say that they are prepared for their final resurrection throughout their entire life. It's a nice thought. I don't mean to be melodramatic, but it was comforting to think that the death of this loaf was not the end. I can try again tomorrow, this time with more patience and thoughtfulness. In the same way, the pending loss of my grandfather is not the end, either. I can take my memories of him, my regrets and happiness, and carry them with me. Instead of wishing I had spent more time with him, I can choose to actively be with my grandmother, my aunts and uncles, my neighbors and friends. Life, like bread, is more forgiving than we might expect, and is always filled with second chances.


Stephanie Brim's picture
Stephanie Brim

I had to restart my sourdough starter due to neglecting it recently and, this time, I've made some interesting observations.

It's much more active this time around. I mean, really, really active. I fed it at around 10 AM and 3.5 hours later it's already doubled.  This is the 8th day and last time it took me 14 days to get to this point.  Also, the starter was taking 6 or so hours to double completely.  The only change from last time was that the house was warmer in the first days of the starter's life.  The 3rd day it was 80 degrees outside, and the 4th it was almost 90. The house got up to 75 the first day and 78 the next.  That would've been the time that the yeast would've started taking over. It seems that having the temperature warmer those two days helped the good stuff kill off the bad stuff without a problem.

The other observation I've made is that a 10 degree temperature fluctuation hasn't really mattered much to my starter. Once it got going, it has been nothing but smooth sailing since.

I can only conclude that if I keep my house between 70 and 80 degrees this summer and feed my starter twice per day that I will have a great one this time around. But the bread will be the real test. Tomorrow's bake will be Susan's Ultimate Sourdough. :)

sharonk's picture
sharonk


Why Boosted Brown Rice Starter?


When I first had to give up gluten I had successfully been making seven-day sourdough rye bread (unfortunately full of gluten) using 100% dark rye flour. This goopy no-knead bread had an easy starter routine: once a day for seven days. The starter bubbled quickly and was quite beautiful to watch grow. I thought I could transfer my rye bread sourdough baking knowledge to gluten free baking but after many failures (that ended up in the compost pile) I realized I had to experiment. A plain brown rice flour and water starter took almost 6 days to start showing signs of activity and often by that time it was molding. The heaviness of the rice flour causes the starter solids to sink leaving the liquid on top. It seems hard for the bacteria to make their way through the heavy solids. I consulted with a knowledgeable gluten free sourdough baker who suggested I feed the starter every 8 hours and use a fermented drink called "Water Kefir" right in the starter on the first day.  Water Kefir is a culture that is used to make a dairy free drink much like lemon soda. I purchased my grains and made the water kefir using water, sugar, raisins and lemon. It fermented in less than 48 hours and I put a few tablespoons of it into brown rice flour and water. I built the starter gradually feeding it every 8 hours until I had the amount I needed. I was happy to see activity beginning shortly after 48 hours. Each subsequent feeding created increasing activity with large and small bubbles and hissing sounds when I stirred it down. This very live starter easily leavened the bread recipe without the use of eggs, commercial yeast, baking soda, or baking powder which was of prime importance to me being allergic to eggs and sensitive to the other ingredients.


 I call this starter "Boosted Brown Rice Starter" because I have boosted its activity with Water Kefir.  I find I can get a dependable starter every time when I use water kefir as a booster.


Here are very succinct directions for making Water Kefir:

Nearly fill a wide mouth quart jar with water.

Add 2 tablespoons sugar, stirring to dissolve, 20 raisins and a slice of lemon or lime.

Add the contents of your bottle of water kefir grains into the quart jar.

Cover with a paper towel or cloth and secure with a rubber band. 

When raisins float to the top, scoop them and the lemon slice out and discard.

Ferment the water kefir for 6 more hours on the counter with the paper towel.

Then store in fridge and use as needed.

When you have used the liquid down to about an inch in the jar start a new batch in a new jar and pour the water kefir grains plus the liquid their in right into the new jar, cover and ferment.


Water Kefir is a good tonic that strengthens the digestive system. Drink in small amounts before meals.

2 tablespoons is enough for bread starter. Water kefir gets fizzy with time and reminds me of super healthy 7-Up! It's a good tonic being full of probiotics and enzymes.


Water Kefir grains are available at Cultures for Health.


Good Luck,

Sharon

http://glutenfreesourdough.com


davidg618's picture
davidg618

(You can, if you wish, skip all my mutterings. The recipe is at the bottom.)


My little Welsh grandmother was a gentle soul with streaks of stubbornness, impishness, and independence just below the surface. Born in Wales in the 1883 she sailed to America, with her coalminer father and her mother in 1894. By the time I knew her only her baking, and a light lilt in her speech hinted her origins; she had become American, through and through.


My grandfather died the year I was born, leaving my grandmother a widow. She spent the rest of her life living with her oldest daughter, Alice, also a widow due a horse drawn milk wagon falling on her husband, who was the duo’s bread winner. She held a good paying job. They lived comfortably, and quietly—until the grandchildren started to arrive. I was the third grandchild born amid six—two each among her other three children—and the first boy, fathered by her oldest son: oldest son of the oldest son. I came to learn that gave me important status in the Welsh culture that shaped grandma. She spoiled me rotten. Childless, Alice spoiled all of us.


Grandma was grateful to Alice for providing hearth and home, but refused Alice’s money to pay for gifts for her grandchildren. To earn money—a necessary tool to spoil grandchildren—she marketed her crafts. She tatted doilies; crocheted doll clothes; made stuffed dolls from working men’s tall, white socks; and she baked. The Third Welsh Congregational Church's white elephant and bake sales were her initial outlet store. By the time I could drive, she had nearly twenty loyal customers throughout the city. I was her delivery boy.  Every Thursday, after school, I drove to Grandma’s house; loaded the family car with bagged, wax paper wrapped loaves—white and whole wheat—and drove her route. The smell leaking from the bags was my teen year’s drug of choice. I got high sniffing bread once a week.


Her prices, for the times, were expensive: fifty cents a loaf, but no customer complained. Wonder Bread’s predecessors sold for about eighteen cents a loaf in the stores. Despite the city’s highly immigrant population, European style breads were missing from the shelves of local bakeries. The phrase “artisan breads” wouldn’t be invented for fifty years.


In the month before Christmas, and only for “special” customers, she also made Welsh cookies—$1 dollar a dozen.


A brief tutorial: England and Wales had many mines: tin, lead, and coal, Miners worked hard, and needed energy to keep going. Mine owners were cruel despoilers. (Ref: watch How Green was my Valley 20th Century Fox, 1941—I find fictional references contain much more imaginative examples than those in nonfictional references.) Miners carried there lunch and snacks into the depths of the mines, and ate lunch on the job.


Tin mines are especially hazardous, tin ores contain arsenic compounds. Tin miners can’t risk touching their food with their dirty hands. To the rescue, the Cornish pastie: a pot roast en croute; eat the innards; throw away the crust. Live for another day of mining.


Coal is mostly carbon, just like we are. A little coal dust never hurt anyone (discounting Black Lung), right? Welsh coal miners carried Welsh cakes in their pockets; loaded with lard (more about lard, later), and butter, and sugar the cakes were packed with energy almost as dense as that in the dynamite used to harvest the coal: energy to mine more coal, or run like the devil when the roof starts falling (see above reference.).


I haven’t the slightest idea what lead miners ate in lead mines (can’t find a reference.).


Welsh Cakes: the recipe.

The original recipe, complements of Aunt Alice. Grandma’s eyesight had failed by the time I asked for the recipe. Alice only sent the ingredients. I was flattered she had assumed I knew how to assemble them. The inelegant, heavy-handed printing is my notations. Trivia question: What the hell is saleratus? (Answer below.)


Ingredients

12 cups    all-purpose flour (51 oz.) (More may be needed to achieve a stiff dough)
¼ tsp.         Salt (if you use unsalted butter increase to 1-¼ tsp.)
4 cups        sugar
1 lb.         Butter
1 lb.        Lard
6        eggs
½ tsp.    nutmeg (I like the flavor of nutmeg, reduce to a ¼ tsp. if you choose, but don’t leave it out entirely)
1 lemon    zest (Grandma always used lemon, orange doesn’t have it for me.)
2 tsp.    Vanilla
1-½ tsp.    baking soda (answer to Trivia question.)
2 tsp.    cream of tarter
4 tsp.    baking powder
1-½     cup currants (I substituted dried cranberries once, delicious but not tradition!)

Directions

Let’s first get the lard issue out of the way. I had coronary artery bypass surgery twenty years ago. Subsequently, I tried, over and over again, to reduce the fat in this recipe. I failed. Every attempt was a disaster. Then I tried substituting butter for the lard; better, but the texture was heavy. Like good pie dough's flakiness, this recipe benefits from the lard. Trust me; don’t waste your time experimenting. Besides, I think you should really challenge your Lipitor once in a while to keep it at peak performance. Incidentally, most supermarkets carry lard; you will find it where Crisco is displayed, not in the refrigerator section.


Cream the butter, lard and sugar until light and fluffy, add the eggs one at a time, nutmeg, lemon zest, and vanilla and combine thoroughly.


Mix the flour, salt and other dry ingredients; whisk to distribute evenly.


Combine the wet and dry ingredients. Add the currants. Work gently, only until a homogenous, stiff dough is formed; don’t overwork it.


Note: the original recipe calls for milk if the dough feels too stiff. That’s never happened for me. I always need to add a bit more flour to achieve the desired stiffness.


If you are making the whole recipe—I never make less than a half recipe—divide the dough into four equal pieces, roll into balls, and flatten into 1 inch thick discs (just like pie dough). Wrap in plastic wrap and refrigerate for at least three hours. (I sometimes leave it overnight.)


Work with one disc of dough at a time, leaving the others in the refrigerator. Roll out evenly to ¼ inch thickness on a lightly floured board. Cut out cookie size circles. (I use a 2-3/8 inch diameter biscuit cutter; Grandma used a Welch’s grape jelly glass)


Preheat your griddle. I use an electric, non-stick griddle, with the temperature control set to 350°F. For a stove top griddle, or a nonspecific heat knob equipped electric grill, you’ll just have to experiment. Start with medium. On a non-stick surface no oil is needed, and I highly recommend you use a very light coating (an oiled, paper towel wipe) on other surfaces only if needed. (I make pancakes on a seasoned cast iron griddle with no oil, and no sticking. I think I did the same with Welsh cakes in long past years.)


Fry until deep golden brown on both sides, turning once. Cool thoroughly. Expect a light, almost flaky texture, and a clean taste with hints of lemon and nutmeg.
This recipe makes about 10 dozen. The cakes freeze very well.


One final experiment NOT to try: Do not try baking Welsh cakes; even my dogs wouldn’t eat them!

Sorry, I don't have a picture of the final product. I'll post one in December.

Update:

Here is the promised pictures. We started our annual Christmas cookie bake today.

Rolled out, and cut.

Six or seven minutes on a side at 350°F.  An electric grill sure beats the top of a wood-fired stove Grandma learned on.

Ready for Christmas.

David G.

davidg618's picture
davidg618


My oldest son bought a bread machine in 1988. A, Rube Goldbergesque device that, after a fashion, produced an oddly shaped loaf of bread reminiscent of a miner’s lunch pail: tall where it should be short, square where it should be round, and round where it should be square.  Its white bread cycle produced a soft-crusted loaf, with a crumb akin to Wonder Bread. I don’t recall if it had any other cycle choices. I promptly lost interest in bread machines, and for the next decade remained a smug, hands-on baker.


Until I went rideabout in a 5th-wheel trailer—for six months.


When I was younger I backpacked; I lived out of a sack for a week or more three or four times a year. A 30-foot 5th-wheel trailer has more room than a hiking sack, but not much. But they come equipped with stoves, with sinks, with refrigerators; and the stoves have ovens. Backpacking, one expects to eat freeze-dried grub, reconstituted with water faintly tasting of iodine, and gnaw on biscuits resembling hockey pucks in shape, size, and texture. That’s the price—along with the occasional blister—for the freedom of the trail. An oven’s presence raises one’s expectations. “I can bake bread!” you think. Ha! Fat chance!


My trailer’s oven has a knob divided seductively into ten-degree divisions beginning  200°F and ending at 450°F.  “It’s just like home,” I thought, comforted. I soon learned differently. At 350°F my oven could melt lead, but the crucible had to be placed in the innermost left hand corner. Placed in the right hand corner, next to the oven door, for an hour-and-a-half a Pop Tart barely warmed. My first (and only) attempt to bake bread resulted a misshapen lump, charcoal at its north end, and drooping to  the south. I went to a local trail outfitter’s store and bought a supply of hockey pucks.


In a few months I learned from other RV owners I was not alone. I met veteran trailer-hounds, full-timers, and disillusioned newbie’s, like me, who used their ovens for storage room, a place to keep the picnic-table grill, baseball gloves, or the cat’s litter box.


And then I thought of bread machines.


Reluctantly, with skepticism rampant in every thought, I bought one, but not until I’d researched carefully. A decade after my son bought his bread machine, many bread machines still clung to the miner’s lunch pail loaf shape. Only a very few had by then acknowledged that the common loaf shape was here to stay, and adapted their designs appropriately. Ironically, this trend seemed to be led by the Japanese. I’m not sure they sell bread in loaf form. In my brief travels to the Far East I’ve only encountered bread rolls, and I’ve never seen a loaf in a samurai movie. 


Nonetheless, there was still something lacking: control--control over time and temperature. I solved the first, control over time; I never did solve the second—in the trailer. Once home for the summer, I had my trusted oven.


Control over time: I like to think I invented the dough cycle, now commonplace in bread machines, and the yet-to-be-realized “retard cycle”. It was very simple: take the dough out of the machine, and turn the darn thing off. It’s done its job; give it a rest. Proof the dough in a bowl; retard it in the refrigerator.


I bet you’re wondering how I got the machine to bake the proofed and/or retarded dough. That was simple too. Good thing, I’m not a rocket scientist. When I was nearly ready to bake I ran the machine empty through its early cycle steps, i.e., “Preheat”, “Knead”, “Rise”, and “Knead”. Silly? Yeah, but it worked. Besides, the cat box was in the oven I’d given up on. Listening to the machine’s unimpeded motor whirl while “Knead”ing was soothing, not as good as hand kneading, but still soothing.


I’d shape the loaf, tuck it back into the bread pan—I’d take out the paddles; that made removing the baked loaf easier, and left only two little round holes in the loaf’s bottom—just before “Bake” started. For the final three months I wintered in the San Antonio—my real mixer and oven were in Connecticut—I ate good bread, not great, but I knew all its ingredients to the gram, and having time control I would nurse all the flavor and texture I could out of each loaf’s flours.


Today we still own a bread machine, and it get’s used every week, sometimes twice in the same week. We mostly use the dough cycle. My wife, Yvonne, makes our everyday bread, mostly white or whole wheat, and she too knows the flavor secrets revealed controlling time. She bakes three loaves each time, the machine does the kneading and the first proof. The rest is in her hands. One loaf goes to the breadbox, one to the freezer, and one to our recently widowed neighbor—home made bread is healing, even bread-machine bread. She also makes sweet breads we take to potluck dinners, or give to friends. For those she fills the machine with ingredients, and forgets it until the machine beeps.


I’m the artisan baker. Oops, that sounds arrogant. Let me rephrase. I’m the free spirit baker. That’s better. Most of my breads—sourdoughs, ciabattas, baguettes, etc.—are hand (and Kitchenaid) wrought, but sometimes I use the machine.


This morning, over coffee, Yvonne said, “ Make some focaccia, with sun-dried tomatoes.” I did.

The basic recipe comes from, “Bread Machine: how to prepare and bake the perfect loaf” by Jeannie Shapter. (Y bought it at a Barnes & Noble book sale, for five bucks.) My take is a variation: sundried tomatoes, capers, and rosemary in both the dough and the topping, in lieu of sage and red onion topping only; all else is the same. I put the bread machine on dough cycle. When its finished the dough gets a few minutes of light hand kneading, twenty minutes rest, and directly to the pan, stretched to the corners. After a final proof, nearly doubling, it goes into a 400°F oven. I don’t use bread flour for this recipe, preferring all-purpose flour. The finished crust and crumb are soft: a great sandwich bread. Tonight’s diner is home-cured-and-smoked ham, with Swiss cheese, panini. I’ll mix up some Dijon mustard and honey, but Yvonne won’t use it. The focaccia’s flavor is enough for her.

Most of my breads take 12, 18, even 24 or more hours, but…Let me put it another way. I love fly-fishing, but I still use worms on occasion, and catch big fish.

Here are some pictures of this morning’s focaccia.


Tuesday (or Wednesday), Grandma’s Welsh cakes recipe.


Ready for the oven

Cooling

Ready to eat

hansjoakim's picture
hansjoakim

...but bread is alright.

I wanted to experiment a little this week, so I decided to bake two new loaves. I think both turned out rather well, and I'll probably add them to the list of loaves I'm baking quite frequently. The first one is a loaf that goes remarkably well with most kinds of fruit, preserves, a wide range of cheeses and besides your dinner plate: A sourdough rye with toasted hazelnuts and raisins.

Sourdough rye with toasted hazelnuts and raisins

This loaf is based on my favourite 40% rye recipe, with a healthy filling of toasted hazelnuts and raisins. For this loaf, I used 15% each of nuts and raisins, based on the overall flour weight.

Sourdough rye with toasted hazelnuts and raisins

Above is the crumb; the significant amount of nuts and raisins makes sure you get a healthy bite of nutty sweetness in each slice :) And as I said, this loaf is spectacular with most kinds of cheese (trust me when I recommend goat cheese and/or strong blue cheese), and they're a great treat on hiking trips if you shape them into rolls:

Sourdough rye with toasted hazelnuts and raisins


The next loaf on the list, is a pain de campagne-style loaf with roasted tomatoes and sun-dried tomatoes:

Roasted tomatoes

I had some tomatoes lying around that I wanted to put to good use, and figured I could put them in some loaves. I cut them into cubes, tossed them in olive oil, salt, pepper and basil, and roasted them good and long... to add more punch to the loaves, I also added a bit sun-dried tomatoes. I wanted a "rustic" look on these, so I didn't shape them into anything particular after their bench rest; I simply patted them into two rectangles on top of parchment paper on my peel. Still, they sprung up quite significantly in the oven:

Roasted tomatoes

A very tender and moist crumb, with a crunchy crust. I really like how tomatoes colour the crust and infuses it with dark spots... A great loaf for salads or pasta dishes!

If you're eating at my house, there's a good chance there's dessert waiting... It's been a gruelling long winter around these parts, and, in a desperate attempt to force spring upon these shores, I opted for a "fresh fruit" charlotte. "Fresh fruit" in that I had to resort to frozen berries to make the charlotte... Hopefully there's real fresh fruit around for my next attempt at this one ;) The recipe is taken from Suas' ABAP, and below is a photo of the mise en place for the charlotte:

Mise en place charlotte

Here's a 15cm cake form lined with a ladyfinger bottom and ladyfingers along the sides (trimmings and unused, wrinkled ladyfingers on the right). That was a time consuming task - getting all those fingers standing upright at the same time... I'll admit that my piping skills are not all that, so most of the ladyfingers had some "blisters" or wrinkles to them. Still - they lined up! Over the form are the two frozen discs that go into the charlotte: A berry compote on the left and a frozen disc of lemon crèmeux on the right. Not shown is the diplomat cream that is used for filling (I had to stash the bowl with diplomat cream in the fridge while lining up these guys). The filled charlotte (after the diplomat cream is set) is topped with berries (again, I had to resort to frozen berries... still tasted good though):

Fresh fruit Charlotte

And another one:

Fresh fruit Charlotte

English accent: "I got blisters on my fingers!" Seriously, this charlotte tasted great. The berry compote insert and the diplomat cream go extremely well together, and the lemon crèmeux adds a lot of fruity summer vibes to each spoonful. Yum.

The final bake, was some Paris-Brest pastries. I've never tasted the real thing (I'll do on my next trip to France), but I was immediatelly intrigued when I read about them in my pastry book. In short, this pastry was created in 1891 by a pastry chef called Pierre Gateau (no kidding!), who piped pâte à choux in the shape of bicycle wheels, and filled them with the most rich cream you can imagine (a comination of pastry cream, butter and praline paste). As monsieur Gateau owned a patisserie along the route of the Paris-Brest-Paris bicycle race, he made this pastry to honor the riders of the race.

Praline paste, which goes into the Crème Paris-Brest, is something I've never seen in stores around here. Luckily, I found a recipe for the paste in Friberg's pastry book (I love that his book contains a recipe for basically any pastry component you'll ever need):

Crème Paris-Brest

Above on the left is the butter/praline paste mix (it's a bit spotty in places, because I had a hard time grinding the hazelnuts fine enough in my processor), and on the right is my pastry cream. So, left + right (folded together) = Crème Paris-Brest:

Crème Paris-Brest

Now, if you've ever banged your head in the wall in utter frustration of never getting large holes in your crumb, I would prescribe making some choux pastry. That'll get your spirits up and help you regain your confidence:

Paris-Brest

No sourdough in these ones however... it's all about capturing the steam. Now, piping the cream in the middle of the choux "wheels" resulted in something amazingly decadent and rich:

Paris-Brest

As I haven't had these before, I can't say if I nailed the design or the look of a genuine Paris-Brest, but the taste was incredible. If anyone here has tried them, or made them, I'd love to hear from you! There are some things I'd like to discuss about this choux business. Anyways...the Paris-Brest: Light choux pastry with that rich praline cream sandwiched in between... ohlala. Tres bien! Bon appétit!

Paris-Brest

davidg618's picture
davidg618

Curiouser and Curiouser

Recently, I was on the short-list--I don't think they had enough people show interest to ever have a long-list--for the editor's job on a carriage driving magazine . The organization's Executive Director interviewed me, via telephone.  Among her many questions was one that struck a nerve, my pleasure nerve: "Dave, I don't get it," she said. "You're retired. You got the world by the a**; why do you want this job?"

Without a moment's thought I answered her. "I'm seventy-two," I told her, "and I'm as curious today as I was when I was five. However, now I know there's a lot more to be curious about than I did then." Despite this brilliant answer, I didn't get the job. ( I do, however, write for the magazine.)

Among my many curiouslties is bread: eating it, buying it, storing it, serving it, and, most of all, baking it. I baked my first bread in a frying pan, over an open fire, in Northeast Pennsylvania. I was twelve, a Boy Scout, and taking one of the tests for the Cooking Merit Badge; the Boy Scout Handbook called the bread "Bannock". My finished Bannock's bottom was burnt, its innards were doughy, its outside crunchy and dense. It was delicious.

In my teens I watched my little Welsh grandmother bake bread, and rolls, and near the holidays date pinwheels, Welsh cakes (a fried cookie), and currant bread. On birthday's she made tortes from stacks of froice (welsh crepes) When I earned my driving license I delivered her makings to church bake sales, Saturday morning breakfasts, and a few regular customer who ended each week with a loaf or two of grandma's white or whole wheat. She charged fifty-cents a loaf--expensive, but worth it. I offered to help her, but she only smiled and kept kneading. Her small hands set a beat; her eyelids nearly closed. No way would she share that soul-mending meditation.

Married with children, on weekends, or home from the sea, I'd bribe my children with homefried doughnuts, white bread ala grandma, and near the holidays I continued the tradition: Welsh cakes, and date pinwheels where, and are, my signature offering in our commuity's Christmas cookie exchange. My children fled the nest, my months at sea grew, and my curiousity turned to new hobbies, among them beer brewing, and wine making. I just can't get away from things fermenting.

A decade retired, I have the the time now to do it all: cook, bake, brew, vint (is that a verb?) write, watch the Science Channel, and occasionally nap. And, curiouser and curiouser, my vocabulary, and knowledge grows and mutates; e.g, hydration, proof, and retard have taken on new meanings; wort, sparge, rack, sourdough, mirepoix, and King Aurthur populate conversations. I'm expected to show up at community potluck dinners with a bottle and a loaf; I've been sent home to fetch when I haven't. Until I found The Fresh Loaf I'd no idea this baking virus I suffer is endemic.

This is fun; I've never blogged before. If you chose to waste your time reading my mutterings DON'T expect daily entries. I'll drop a recipe now and then. Any one interested in Welsh cakes?


dmsnyder's picture
dmsnyder

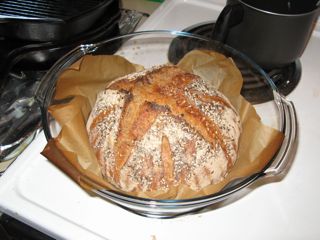
Hamelman's Sourdough Seed Bread is basically a pain au levain made with rye and bread flour to which is added toasted sesame and sunflower seeds and a soaker of flax seeds. It has a crunchy, rather thick crust and a pretty dense crumb. Its flavor is delicious - mildly sour, even when cold retarded overnight, with well-balanced overtones from the seeds. Its flavor is not as complex as Hamelman's Five-Grain Levain, which is simply amazing, but it is a wonderful bread.

This bread has enough substance and flavor to be eaten plain. It would be wonderful with a flavorful soup or stew or with cheese or a salad. And it makes delicious toast.

It's another bread, like Tom Cat's Semolina Filone, that I like a lot but have not baked for quite a while, having been otherwise occupied by a baking agenda with way too many breads.

I baked these boules on a stone, pre-heated to 500F. A cast iron skillet with lava rocks was used for steaming. The oven was turned down to 460F after loading the loaves, and I baked them for 40 minutes.

Sourdough Seed Bread

Sourdough Seed Bread crumb

David

pmccool's picture
pmccool

I finally remembered to take a camera with me while grocery shopping this afternoon.  For almost two years now I've been thinking "Gotta remember to  take a picture to show the other Loafers."  So, finally, here goes.

The Hy-Vee supermarket located at the intersection of 135th St. and Antioch Rd. in Overland Park, KS has an in-store unit from Wheat Montana that contains two micronizer-style mills.  One is fed from a hopper with Bronze Chief wheat kernels (a hard red wheat) and the other is fed from a hopper with Prairie Gold wheat kernels (a hard white wheat).  A customer places a bag from the center of the display on the stand beneath the wheat variety of their choice, and then pushes a button to grind the wheat into flour, which falls into the customer's bag.  See photo below:

Wheat Montana In-store Mill

This particular installation is in the middle of the "health foods" section of the store, in case any of you are close enough / curious enough to go take a look at it.

If you want fresh-ground flour without having to splurge on a mill for yourself, you might want to see if you can cajole your local grocer into getting this kind of set-up for a store near you.  Probably wouldn't hurt to check with the folks at Wheat Montana first to see if they are still making these units; no point in wheedling your grocer into getting something that isn't available.

Gotta run.  The hamburger rolls are ready for shaping.

Paul

Pages

Subscribe to RSS - blogs