The Fresh Loaf

A Community of Amateur Bakers and Artisan Bread Enthusiasts.

Blogs

dmsnyder's picture
dmsnyder

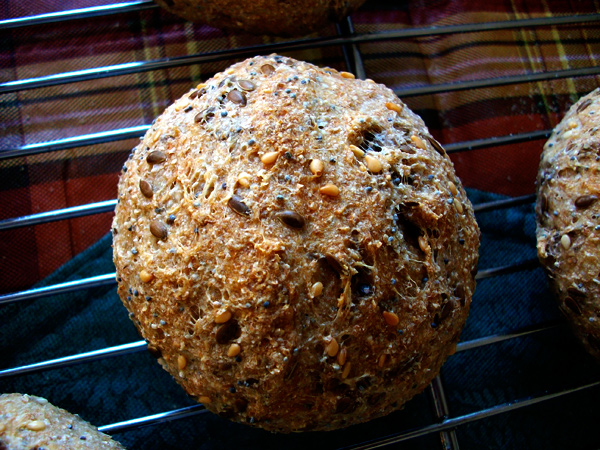
Hamelman's Sourdough Seed Bread is basically a pain au levain made with rye and bread flour to which is added toasted sesame and sunflower seeds and a soaker of flax seeds. It has a crunchy, rather thick crust and a pretty dense crumb. Its flavor is delicious - mildly sour, even when cold retarded overnight, with well-balanced overtones from the seeds. Its flavor is not as complex as Hamelman's Five-Grain Levain, which is simply amazing, but it is a wonderful bread.

This bread has enough substance and flavor to be eaten plain. It would be wonderful with a flavorful soup or stew or with cheese or a salad. And it makes delicious toast.

It's another bread, like Tom Cat's Semolina Filone, that I like a lot but have not baked for quite a while, having been otherwise occupied by a baking agenda with way too many breads.

I baked these boules on a stone, pre-heated to 500F. A cast iron skillet with lava rocks was used for steaming. The oven was turned down to 460F after loading the loaves, and I baked them for 40 minutes.

Sourdough Seed Bread

Sourdough Seed Bread crumb

David

pmccool's picture
pmccool

I finally remembered to take a camera with me while grocery shopping this afternoon.  For almost two years now I've been thinking "Gotta remember to  take a picture to show the other Loafers."  So, finally, here goes.

The Hy-Vee supermarket located at the intersection of 135th St. and Antioch Rd. in Overland Park, KS has an in-store unit from Wheat Montana that contains two micronizer-style mills.  One is fed from a hopper with Bronze Chief wheat kernels (a hard red wheat) and the other is fed from a hopper with Prairie Gold wheat kernels (a hard white wheat).  A customer places a bag from the center of the display on the stand beneath the wheat variety of their choice, and then pushes a button to grind the wheat into flour, which falls into the customer's bag.  See photo below:

Wheat Montana In-store Mill

This particular installation is in the middle of the "health foods" section of the store, in case any of you are close enough / curious enough to go take a look at it.

If you want fresh-ground flour without having to splurge on a mill for yourself, you might want to see if you can cajole your local grocer into getting this kind of set-up for a store near you.  Probably wouldn't hurt to check with the folks at Wheat Montana first to see if they are still making these units; no point in wheedling your grocer into getting something that isn't available.

Gotta run.  The hamburger rolls are ready for shaping.

Paul

gavinc's picture
gavinc

I now get week by week repeated success with Hamelman's Vermont Sourdough which is our regular bread I bake each weekend.  My take-home message to all sourdough newbies is to persist and pay attention to detail.  It's tempting to skip and make do with estimates and a "she'll be right" attitude, but if I want consisency week after week with sourdough, I have to do all the below:

  • Always have a fully active starter to build a fully active levain.
  • Use baker's percentage and scale all ingredients-
  • Take the time to measure the temperatures of the room, flour and levain and work out the desired water temperature so you can achieve a final dough temperature after mixing of 24 to 25C. (Believe me this doesn't take long and is not difficult).
  • Fold during bulk fermentation. (I do two at 50 minute intervals and shape after a further 50 minutes).
  • Final ferment for 2 hours; (or retard in the fridge until the next day works great for additional flavour, but not essential).
  • Bake in a hot oven 235C for 40 to 45 minutes (I find lower temperatures will not get the oven spring).  Use steam.

This never misses.

cheers,

Gavin.

SylviaH's picture
SylviaH

This is the first time to try this bread and first bread I have made from Bread Alone by Daniel Leader & Judith Blahnik.  I wanted a nice loaf to go with a variety of cheeses and this made a nice choice...like it says thinly sliced it makes a nice compliment to cheeses.  It's delicious, I think the grated walnuts in the dough,  plus the fact that I have access to some very fresh nuts in my area made this bread even more tastier.  The crust also has a very pleasing crunch, chew and lot's of flavor.  The crumb was pleasing and so is the color the toasted walnuts lent to it...  I was surprised at the size of the two hugh torpedo shaped loaves the formula made.  Next time I will try his formula for Pain Au Levain with Pecans and Dried Cherries, we have cherry pie so I didn't want overkill on cherries...though I do love them.

I Definately need to pitch my lame for new sharp one!!

Sylvia


chahira daoud's picture
chahira daoud

I am a little bit late but it became my habit now !! Hahaha

We celebrate sham el nessim the day after coptic easter. I would like you to read about it more in my blog here

http://chahirakitchen.blogspot.com/

This time I made some new shapes in sweet bread

, I sold some sweet buns


On my blog there is some pics for this occasion food like salted sardines and of course what I baked for this occasion .

Happy easter for all of you and happy sham elnessim too .

Chahira

http://chahirakitchen.blogspot.com/

gothicgirl's picture
gothicgirl

Posted on www.evilshenanigans.com on 4/17/2009

Cheddar and Garlic Drop Biscuit 

Often when I make dinner I skip any kind of bread item.  It isn't that I don't like bread with dinner, on the contrary I love bread with every meal, but I usually forget to make or buy bread and so we skip it.  I justify it by thinking of all the calories I am missing.

However, sometimes I remember the bread and when I do I usually make these biscuits.  They take five minutes to prep and get into the oven, they bake in 15 minutes and, if you have left-overs, they keep pretty well for a second meal - just reheat them in a 325 F oven for ten minutes. 

Cheddar and Garlic Drop Biscuit 

These biscuits are perfect for a homey meal, and they are good for when you have company for dinner.  During the week they are not a chore to get into the oven, and you can easily double the recipe for a large gathering with little additional effort.

For the most part I am a traditional flaky biscuit kind of gal, and I will post a recipe for traditional cut-out biscuits one day, but these fluffy cheese streaked biscuits hold a special place in my heart because they are quick and delicious.

Garlic Cheese Drop Biscuits     Yield 12

2 cups all-purpose flour
1 tablespoon baking powder
1/2 teaspoon baking soda
3/4 teaspoon salt
1 teaspoon sugar
1/2 teaspoon garlic powder
1 stick unsalted butter
1 cup cheddar cheese, grated
1/4 cup parmesan, grated
1 cup buttermilk
4 tablespoons butter, melted

Heat the oven to 350 F and line a sheet pan with parchment paper.

Cheddar and Garlic Drop Biscuits - Dry Ingredients 

Blend the flour, salt, sugar, baking powder, baking soda, and garlic powder into a large bowl.

Cheddar and Garlic Drop Biscuit - Ready to Rub the Butter inCheddar and Garlic Drop Biscuit - Butter Rubbed In 

With your fingers, blend the butter into the dry ingredients until it resembles coarse sand with pea sized lumps of butter in it.  Stir in the shredded cheeses.

Cheddar and Garlic Drop Biscuit Dough 

Make a well in the center of the dry ingredients and pour the buttermilk in.  With a spoon, gently mix until the dry ingredients are just moist.  Do not overmix.

Scoop the biscuits onto the parchment line sheet (roughly 1/3 cup - I used a large disher) and bake for 12 to 15 minutes.   The tops will be pale, but the bottoms will be lightly golden brown.

Cheddar and Garlic Drop Biscuit - Cooling 

Brush the tops with the melted butter and place under the broiler for 1 to 2 minutes, or until the tops become golden.

 Cheddar and Garlic Drop Biscuit 

ehanner's picture
ehanner

For months I have been trying to decide on buying a good quality grain mill and grinding my own fresh grains. I really don't want to buy what I can purchase easily locally, but we live in a rural area and it's a drive to a decent store that carries Organic. Jmonkey, Bill Wraith, Proth5 and many others have raved about how much better their fresh ground organic flours are. Today I baked up my first batch of Organic  Fresh Ground 100% WW bread. I used Peter Reinhart's Whole Grain Breads Master recipe.

I'm still a little cynical about all this Organic and fresh ground stuff so yesterday I made a batch of the same recipe using Bob's Red Mill Stone Ground WW, which has been my usual WW flour. I was able to save half the loaf to compare with todays results. The bread was delicious on its own.

Today I used the flour I received from Country Creations mail order flour service. The price is right and due to a regional shipper I got the flour on my door step in 2 days for less than I would pay at TJ or Whole Foods. Rhonda took my order and ground the 2 bags I bought that day. The product is slightly grainy instead of the silky smooth KA brands but I think is fine for my use. I got good gluten development in the short mixing time and a nice rise during my over proofing :>(.

My family was asking what is in the oven since the aroma was stronger than my usual breads. The house filled with a rich wholesome aroma I have not experienced prior. When the loaves came out of the oven I was really surprised at the wonderful smell. I have always expected this kind of aroma but never experienced it. Knowing how much of our taste comes from sense of smell, I have high expectations.

Finally the taste test. My wife had been gone and so she was able to objectively try both versions and pass judgement. The overwhelming consensus is that the fresh ground is way better tasting and smelling.

So, I'm sold. Country Creations has a wide variety of the products I like to use and their prices are more than fair. To me it's a bonus that her farm is Certified Organic and also the taste test winner. It's a win win situation for us.

On another thread several members are discussing the changing flour situation and how hard it is to get a straight answer from TJ's. The Whole Foods is a huge place but they don't move that much product so I question how fresh it is, plus it is priced at double what I paid through these folks. I can't think of a reason not to support the small farmer/mill. Hey, it's Earth Day right? I'm taking a stand!

Eric

I was distracted and this got over proofed, sorry.

Yippee's picture
Yippee


From 'The 65 C Bread Doctor",  by Yvonne Chen        
           
           
Water Roux Starter          
           
any amount is fine as long as bread flour 50 g    
the 1:5 ratio is followed water  250 g    
           
  Whisk both until well mixed        
  Heat it up on stove, keep stirring         
  until temperature reaches 65 C or 149 F        
  (Yippee uses the microwave, about 4 minutes, stir halfway.)     
  (Final product should leave a trail when stirred.)      
  Put a plastic wrap directly on top to prevent forming a 'skin'.    
  Must be cooled to at least room temperature before use.    
  Refrigerate up to 3 days.          
  Do not use if turns grey.        
           
           
Makes 1 big  loaf  (Yippee makes 2 smaller loaves)        
Original recipe uses water roux starter only, sponge not necessary.         
Yippee threw in an additional step of developing the sponge out of the total, see side column for her portions.    
           
          Yippee's Sponge
A. bread flour 474 g   350
  dry milk powder 15 g   15
  sugar 40 g    
  salt 9 g    
  yeast 10 g   7
B. milk 195 g   195
  water roux starter 156 g   Add at a small increament just enough to form the sponge
C. butter 40 g    
D. black sesame 50 g    
  (Yippee washes the sesame, leaves it out for 10 minutes before patting it dry with paper towels)    
           
Knead: Combine A. and B. until a ball is formed.         
  Add C. and knead until the dough passes the windowpane test.    
  (Yippee says:  use your judgment, each machine is different)    
  (Yippee kneads her dough in her Zojirushi breadmaker for 30 minutes.     
  Add D. at the last 5 minutes of kneading and knead slowly     
           
1st Fermentation: About 40 minutes at 28 C or 82.4 F, 75% humidity      
           
Divide:  into 5 pieces if making one big  loaf, each at 180 g      
  (Yippee makes 2 log loaves, each at 450g)        
           
Relax: 15 minutes at room temperature        
           
Shape: For one big loaf        
  Degas        
  Roll each dough into an oval        
  With the long side facing you:        
  Fold 1/3 from top to bottom, press to seal        
  Fold 1/3 from bottom to top, press to seal        
  Turn seam side down        
  Roll and elongate the dough to about 30cm or 12 "       
  Upside down and roll into a cylindrical shape        
  Seam side down, into the big loaf pan        
           
  For log loaves:        
  Shape like regular sandwich bread        
           
Final Proof: About 40 minutes at 38 C or 100.4 F, 85% humidity       
  (Yippee lets the dough rise for 20 more minutes to get a taller loaf)    
           
Bake: 350 F, 35-40 minutes        
  (Yippee uses whole egg wash)        
Yippee's picture
Yippee

Formula - Japanese Style White Sandwich Bread - Water Roux Starter / Sponge


 http://www.flickr.com/photos/49353374@N06/sets/72157623866998940/show/


From 'The 65 C Bread Doctor" by Yvonne Chen    
      
      
Water Roux Starter     
      
any amount is finebread flour50g  
as long as the 1:5 ratio is followedwater 250g  
      
 Whisk both until well mixed    
 Heat it up on stove, keep stirring     
 until temperature reaches 65 C or 149 F    
 (Yippee uses the microwave, about 4 minutes, stir halfway.)   
 (Final product should leave a trail when stirred.)   
 Put a plastic wrap directly on top to prevent forming a 'skin'.  
 Must be cooled to at least room temperature before use.  
 Refrigerate up to 3 days.      
 Do not use if turns grey.    
      
      
Makes 2 loaves     
Original recipe uses water roux starter only, sponge not necessary.     
Yippee threw in an additional step of developing the sponge out of the total, see side column for her portions.  
      
     Yippee's Sponge
A.bread flour540g 400
 sugar86g  
 salt8g  
 yeast11g 8
B.whole eggs86g 86
 whipping cream (can substitute with either half n half or milk)59g 59
 milk54g 54
 milk (recipe calls for flavor enhancer but Yippee uses milk instead)9g 9
      
 water roux starter144g 2 TBSP out of the 144g
C.butter49g  
      
Mix:Combine A. and B. until a ball is formed.     
 Add C. and knead until the dough passes the windowpane test.  
 (Yippee says:  use your judgment, each machine is different)  
 (Yippee kneads her dough in her Zojirushi breadmaker for 30 minutes.  
      
1st Fermentation:About 40 minutes at 28 C or 82.4 F, 75% humidity  
      
Scale: into 4 pieces if making twin loaves, each at 265g   
 (Yippee makes 2 log loaves, each at 530g)    
Rest:     
 15 minutes at room temperature    
      
Shape:For twin loaves:    
 Degas    
 Roll into an oval    
 With the long side facing you:    
 Fold 1/3 from top to bottom, press to seal    
 Fold 1/3 from bottom to top, press to seal    
 Turn seam side down    
 Roll and elongate the dough to about 30cm or 12 "   
 Upside down and roll into a cylindrical shape   
 Seam side down, into the loaf pan    
      
 For log loaves:    
 Shape like regular sandwich bread    
      
Final Proof:About 40 minutes at 38 C or 100.4 F, 85% humidity   
 (Yippee lets the dough rise for 20 more minutes to get a taller loaf)  
      
Bake:Whole egg wash, no water added    
 350 F, 35-40 minutes    


Sponge preparation:


a.                   Use the ingredients listed on the side column, mixed until all are well incorporated

b.                  Leave at room temperature ~ 76-80F for an hour

c.                   Grease a food grade plastic bag, pour dough in, leave enough space to allow the dough to expand to about 160% of its size, reinforce the bag with double or triple bagging before tightening it, retard overnight

d.                  Subtract the above ingredients from the main formula, whatever remaining will be mixed at the 'Mix' stage with the sponge.  Follow the rest of the formula. 


However, if your dough feels cold after mixing due to the refrigerated sponge, instead of following the time suggested in the formula, watch your dough:


1st Fermentation:           Completes when the dough has risen to about 180% of its size


Final Proof:                   Completes when a dent is formed and very slowly bounces back

                                    when dough is poked with a floured finger


To make rolls:

Scale: 60g each

Bake: 350F, about 15 minutes

rest of the procedures unchanged

Choice of fillings, if preferred: bacon, roast chicken, cheese, red bean, pork, curry and custard cream.

Pictures of assorted buns I made before:


http://www.flickr.com/photos/33569048@N05/sets/72157617619002761/show

Pages

Subscribe to RSS - blogs