The Fresh Loaf

A Community of Amateur Bakers and Artisan Bread Enthusiasts.

PalwithnoovenP's blog

PalwithnoovenP's picture
PalwithnoovenP

November 11, 2010 was the day Fedra was born and she's five years old today. Coincidentally, we had some nice stuff in the fridge as well so to celebrate her day I cooked some dishes for us, her and her other four legged friends. I had no more flour to bake with so this week is a test of my cooking skills.


The birthday girl!


Mom brought home some good bread from a nice bakery, homemade is still better but this bread is still good compared to what we can find here. All dishes I cooked are best with rice but they're great with bread too! We had them with rice for main meals and bread for in-between snacks!

Oriental Fried Chicken


Katnga (Dried Taro leaves cooked in coconut milk and chilies)


Fried Fishcakes


Spicy Fishcakes


Fishcake Soup


*Maybe we can have a kitchen apprentice (just like Dabrownman with Lucy) screening now for some fun. :P

Fedra is my yellow lab. She is the most hyper of all our canine companions. I can say she has the same personality (super fun loving but knows when to take matters seriously) as me that's why we became each other's partner in this household. She may become a good kitchen apprentice for me, don't you think? I have yet to train her not to eat when no one's looking. :P


This is Pochi, my dad's dog. I know he will not be a good apprentice for me because he obeys a strict chain of command with dad as the supreme commander. He will never do what I say when dad is around instead he will go behind dad as if asking for protection or confirmation.


From those photos about a year ago, Fedra has given birth and is now living with her son Bimbo; he is most likely to choose dad as his master. Her delivery has put her life in jeopardy and we almost lost her because the third pup was lodged in her birth canal for almost 18 hours, I can't imagine her pain! We brought her to the vet as soon as the clinic opened, they tried an assisted normal delivery to no avail so they had no choice but to perform a C-section or she'll die from infection. After 6 hours of waiting, 6 more alive and healthy pups were born and Bimbo was one of them. After two more days in the vet, Fedra and her pups were ready to go home. We took good care of them and they all grew big, strong and healthy!


We're really happy to see them playing together!


Sadly, I have no chicken livers for her now, it is her absolute favorite but in the coming days for sure she can have some since it's only once a year! We really had fun this week! I hope it's the same for all of you too!

HAPPY BIRTHDAY FEDRA!!!


Thank you very much!

PalwithnoovenP's picture
PalwithnoovenP

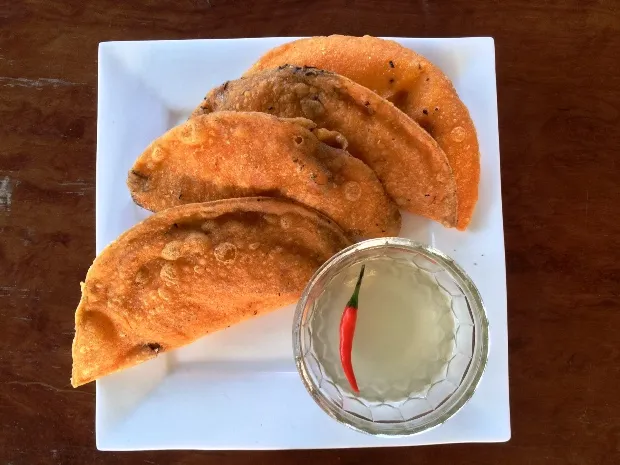
This is the style of empanada in the Ilocos region of northern Philippines. Living in a former Spanish colony; I've seen and tasted empanadas here close to the ones in Latin America, those with flaky crust filled with minced meat and potatoes and either baked or fried, just tweaked to the local palate but the people of Ilocos adapted the empanada like no other. The dough is made with rice flour filled with green unripe papaya, mung bean sprouts, longganisa (local garlic sausage), and a fresh egg then deep fried which makes it closer to a taco or spring roll. Fillings can be customized and can be vegan or a meat lovers delight; vendors are very creative with the names of the various combinations of the fillings like regular, special, seedless, jumbo, double double; refer to this blog for more information, it also tackles the difference between the two styles of Ilocos empanada namely Batac and Vigan style empanadas; more here.

I've never been to Ilocos and from the first time I saw it, it really got my interest and I really want to taste it. Luckily a friend recently had a trip and brought me some. It wasn't freshly fried but oh my! It was really awesome, what more if I had it fresh in Ilocos! I know it will still be a long long time from now before I can go there so to taste it again, I made my own! My Ilocos empanada is closer to the Batac style.


Finding a recipe for this is even more difficult than my previous posts. Most that I read used mochiko but I never heard of a glutinous rice making its way to an Ilocos empanada; it's the ONLY fact that I know, it is made with ordinary non-glutinous rice. Without finding a clue I just designed my own process, this is just my adaptation and does not necessarily mean it is the way they make it in Ilocos.  The dough has only two main ingredients, rice flour and water. You can also add annatto for color which is what I did here, I will certainly add more next time for a lovelier colour. Rice flour behaves very differently from wheat flour and being gluten free is very tricky to roll out thinly without tearing. It is only possible to roll them between sheets of wax paper which I don't have so I rolled them between banana leaves which is also traditionally used in Ilocos. They make it really look effortless making you think it will be the same at home but it's not! For my first attempt I ended up with fillings and torn dough pieces swimming in a pan full of boiling hot oil! It was a disaster! It's quite an ambitious project after all! This post is already my second attempt and I was quite surprised because I managed to slip them in the oil whole without cracks! Another proud moment for me! Still not as pretty but tastes the same. 

When you watch real empanada making, you'll be really amazed with their speed, coordination and efficiency. Watch here, here, here, here and here.

*When I cut my banana leaf from the tree, I noticed a banana heart! Looks like we'll have a bunch of bananas in a week!


Also, the cold northeastern winds are blowing now so it means purple yams! Unlike other yams, our yam does not grow underground instead they grow on hanging vines. This is the first yam of the year.


Back to the empanadas, this is the process that I did for what is called special empanada in Ilocos: (It's difficult to take pictures with oily hands! :P)

1) I rolled the rice dough between banana leaves. I just used a glass bottle because I don't have a proper rolling pin. A crater is then made with the green papaya to contain the egg.


2) Crumble sausage meat is added on top.


3) It is folded with the aid of the banana leaf.


4) The excess dough is trimmed with a plate to form a neat empanada shape.


5)It is flipped onto the hand and then slipped into the hot oil.


Maybe the oil was too hot that's why it had a lot of blisters, still pretty for me!


The crust was crispy and flavorful that you can even eat it alone, the papaya provided crunch, then there's the meaty flavor punch from the sausage and the creaminess of the egg; very delicious! It's really one of the best empanadas! It's even great with rice as a viand. Next time, I will even try to make the egg runny! It is best paired with vinegar with chilies optional but highly recommended! Ilocanos swear by cane vinegar but I and the whole family prefer palm vinegar. If you will be in Ilocos someday, definitely do not miss this along with their other delicacies!
.


After enjoying the empanada, we had a nice sunset that day too!


Thank you very much!

PalwithnoovenP's picture
PalwithnoovenP

Hoptik is a portmanteau of hopia, a Chinese pastry (see here) and tikoy, the Chinese version of mochi. It is essentially a flaky pastry filled with bean paste with mochi in the center that's why they're sometimes called mochipia. I first had this in a Chinese restaurant and we all liked it so I made my own yesterday. The crust is different from my first hopia post because I opted for a more traditional one with a higher fat content. It is the Chinese puff pastry or more commonly known as spiral pastry made with alternating layers of water and oil dough like the ones used in Teochew mooncakes. Similarly, I used homemade bean paste in addition to my homemade mochi. Only a small amount of bean paste was used otherwise it will be too sweet. Since I made them larger than normal, I think they are closer to or another interpretation of a mooncake.


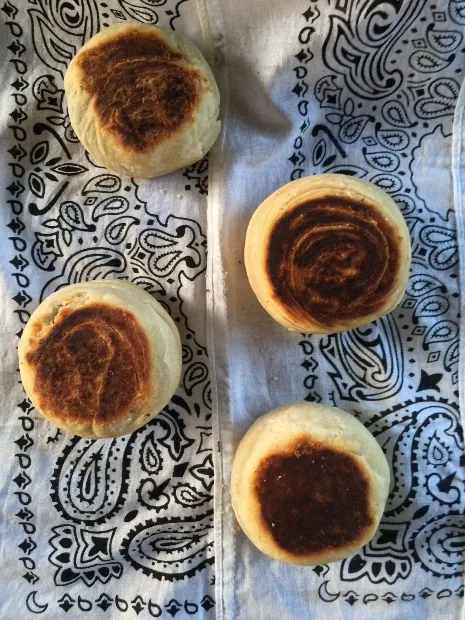
It was difficult to seal without destroying the spiral pattern so I messed up my first to but I made more decent pastries as I go along. Also, it looks burnt in the pictures but they're not. They are full-flavored with rich toasty notes. This is the prettiest one I made, you can clearly see the spiral pattern!


I made two variations on the wrapping.

With mochi in the center


With bean paste in the center


When properly made, they are extremely flaky!


Like the hopia, their flavor and texture improved after a day. Very delicious!


Thank you very much!

PalwithnoovenP's picture
PalwithnoovenP

I first saw this bread about a year ago in this video by chowhound  where Alex Van Buren had it at Rhong-Tiam, a Thai restaurant in New york. I made a lot of research and found out that it is a very popular street food in Thailand. It has very interesting ingredients and technique and looks very delicious, I knew I have to make it but I did not have the guts to try until last Saturday. I do not know why it took me a year to finally make this but I'm really glad and proud of myself for achieving this, not really bad for a first try.

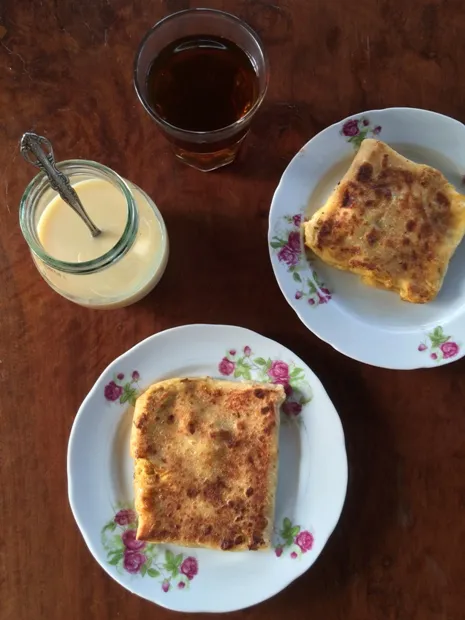
To make banana roti, an unleavened dough is stretched paper thin by flipping and slapping it against the work top then grilled on hot griddle; the center is then covered with a mixture of eggs and bananas and the sides are folded into a neat parcel before flipping it to cook both sides; when browned and crisp, it is cut into bite-sized pieces then drizzled with sweetened condensed milk and sprinkled with salt and sugar. Today there are different additions such as nutella, peanut butter, chocolate syrup, jam sprinkles; anything that goes well with banana is great with it but I think the classic is the best!
Here is a video of street vendor preparing it in Thailand.


The problem in replicating this bread at home as with most street food is the lack of resources on how it is exactly made. After watching countless videos, I only saw the cooking process as the dough making was never shown. I've tried to read on the web; some recipes I've read say it contains condensed milk, others say it has an egg but some even say that both or neither is needed. It's quite confusing! The choice of flour is also difficult because a strong but VERY extensible dough is needed. Though the recipes are confusing I noticed a common step which I think is the key to this type of bread; soaking the dough balls in oil. I thought of using oil instead of flour for the dough not to stick to the surface because I saw the dough is always oily when the vendor takes it out from his bucket  but not in this way. Armed  with that trick I went to make my own dough.

I used strong flour and kneaded less than usual for the balance of extensibility and strength. I added a little condensed milk but discarded the egg because I think the dough should be a little enriched but not too rich since it will be used for a dessert roti and I feel that it's really not necessary. No measurements too, just added water bit by bit until a nice smooth stiff but soft dough formed. After a short rest, it was divided into four balls and soaked in oil for two hours. A four hour soak is recommended and sometimes overnight but I don't have the time.


I proceeded to stretch the dough imitating the technique of  master roti makers in Thailand. The dough stretched really well with no resistance and with all the oil in the bowl my hands are non-greasy and smooth as soon as I finished stretching the dough like no oil touched it. Magic! I tried to stretch it as thin as I can but holes still formed in the dough, my technique needs refinement and practice; no matter what patchwork I do the dough just resists because of the oil. To add to that, I'm only using a large plate to stretch the dough and the masters are using a stainless steel surface because I don't know if it's okay to use oil on a wooden surface which is the only one I have. Here's one of those attempts.


I put it on a heated pan which is a challenge because it is difficult to maneuver the dough through its high sides. The thin sheet of dough is cooked instantly so you have to be lightning fast from this point on. I then put a banana and egg mixture and fold the sides. You'll immediately smell the banana the moment it hits the pan. When It was flipped I put some butter (vendors usually use margarine but I used butter since I don't stock margarine anymore) so it finishes frying in butter for extra delicious flavor. The whole house was filled with the lovely aroma of banana when I'm done cooking this.

Like anything, you'll really get better the more number of attempts you make:

1) This is my first one. The heat is too high so it was a little burnt. The filling also leaked out from a small hole making it look like a scrambled egg. I'm also "not yet into" the folding technique.


2) My second attempt. I overcompensated and left the dough too thick to avoid holes. It was more difficult to fold so it ended up looking funny, still delicious though.


3) My third roti. Getting better but the filling was not distributed well.


4) The last one. This the prettiest that I've managed. Cooked on gentler heat for a longer time, it was perfect. It was almost similar in looks to the real banana roti! I'm really happy!


The bread was crispy and soft with the slightest chew. The banana and egg became a smooth silky custard, very fragrant and delicious! Mom ate hers plain, dad with only condensed milk and I did it classic style, with additional sprinkling of salt and sugar. The sugar provided crunch and the salt cuts through the rich flavors but complements each well elevating this humble dessert to whole new levels. Very very good! I think they are really close to the ones you can get in Thailand


Until now, I still can't believe that I made it in my very own home. I just used to watch this in my laptop but now I have already made, eaten and shared it with my family and we all loved it! There's really nothing like this feeling of satisfaction, fulfillment and pride. I hope you've enjoyed this one as much as I do.


Thank you very much!

PalwithnoovenP's picture
PalwithnoovenP

Hopia (好餅- hao bing in Mandarin) in Fookien literally means good cake/pastry, it was introduced by Chinese immigrants mostly from fujian in the country. They are ubiquitous snacks and can be found almost anywhere; in the general merchandise store in cartons at the street corner to most bakeries to high end Chinese delis in gift boxes. The classic versions are mung bean or pork fat filling enclosed in flaky pastry made by alternating layers of water and oil dough. Today different types of crusts are used and more flavors are available like purple yam, jack fruit, cheese, milk candy, custard and a combination of those. Traditionally made with a lot of lard and sugar, there are a lot of "healthier" versions available like lite and sugar free hopia.

Since these are Chinese treats, it's natural to think that the best ones are from the Chinese delis in Chinatown but they are rivaled or even outmatched by a hole in the wall bakery about an hour away from there. Their hopia are small, non-uniform in size and have charred spots on its toasted crust.They are definitely made with lard and baked in a wood fired oven; this is maybe the artisan equivalent to hopia. A stone's throw away is a famous ham shop and as I've read from a blog, who knows if they use the ham drippings there for their delicious hopia?! Freshly baked hopia are stacked on large trays and just packed when you order. Still warm, it is one my indulgences; not too sweet, savory at the same time, silky, little crispy, soft and flaky.


Featured here is the classic hopiang monggo or mung bean hopia. Chinese delis use peeled split mung beans and have the smoothest filling thus commanding a higher price. I have used here whole mung beans because that's what I had on hand and is similar to how I remember these pastries are; though not as smooth, my homemade bean paste is delicious with the right amount of sweetness and I'm sure that it's made with 100% mung beans unlike other bakers that use different sorts of fillers like potato, sweet potato and even green peas!. It is one of dad's favorite snacks so I tried to make my own version with LESS fat than the traditional ones and in larger size, my own hopia is equivalent to two or three normal hopia sold in stores. Though commonly baked in a oven, I've seen some cooked on a flat grill and that's what I did here too.


The ideal hopia crust has a rich flavor, tender and flaky; "leaves of crust" with distinct layers should fall when you cut or bite into it. With the major tweak, it looked like I made a delicious but completely different pastry. The crust was crunchy and more crumbly than flaky. Dad was looking for the falling leaves and jokingly said that since it is a new style of hopia we should give it a name and  said "hopiang malutong" (crunchy hopia), he said it was still delicious especially the bean paste and I've mastered the technique he taught me for adding the right amount of sugar for the right sweetness without measuring.


We had one for each of us that day, I cut the last one into quarters and after eating one quarter I kept the remaining three so we can have one for each of us tomorrow. Here is where the magic happened; when we ate it on its second day the crust softened, had a richer taste and became flaky and yes, the falling leaves (no pics since we ate it really fast) were there! Perhaps the little amount of fat distributed itself well all over the cakes during its overnight rest, what difference a day makes! I'd dare say it was a 95% close match to the real deal with just a FRACTION of the fat!


Finally, the flood in the yard has dried up after two weeks and it sure created memories. Various beautiful birds visited the yard to look for food; egrets, zebra doves and a kingfisher that dove into the water five times to catch fish; a truly spectacular sight. From the beautiful there are also not so pretty and dangerous events; because of the water, snakes are finding dry land where they can stay and often found their way into our house. There were eight snake sightings this past fortnight; on the sink, in the bathroom, on the window and fortunately most were non-venomous I THINK excluding that FIVE FOOT ELAPID that almost made its way into the garage! The species is notorious for being on of the most common causes of death among snake bite incidents, we should be more careful when there is water around the house.

Anyhow, this one is truly delicious and I really liked how it turned out. 


Thank you very much!

PalwithnoovenP's picture
PalwithnoovenP

I was alone in the house this Sunday with nothing to do, my thoughts automatically turned to making bread. But what bread? There's not much stuff in the pantry and I want to enjoy the bread on the same day when my parents arive. I also want a bread like "that bread from that nice lady at the end of that narrow alley" you know what I mean. Days before I've been pondering about the wonderful world of street food; how quick, easy and convenient it is delivered to you and how delicious and varied they are; opening my own food cart someday or just going on a street food trip. Personally, I think a date night eating street food with just the two of you holding hands and savoring the whole experience is sometimes most of the time much much more romantic than a dinner by candle light with a glass of Merlot to go with your medium rare filet mignon. So I decided I will make a bread that will fit the street food culture like what i see from the world; quick, rustic, almost no need for utensils to eat, delicious. No muss, no fuss!

I saw a bunch of soggy green onions (which is one of my favorites in almost any food) in the fridge almost rotten so instead of throwing them out they found their way in these breads. After a lot of trimming and cleaning I gathered an amount enough for eight rolls, most of what was left over were the one closer to the white parts so the breads don't have that lovely greens in them. I was feeling lazy or daring that day too so in true street food fashion, I didn't measure a thing when I made these, I also made two breads of contrasting textures to offer variety to my "customers" family.

The first one is a flaky roll like the one I've posted here before but I used a lower protein flour here for ease of "lamination" and a less bready texture. Each roll was rolled flat and brushed with oil and sprinkled with toasted sesame seeds and chopped green onions, rolled like a spring roll and coiled into a snail and flattened a bit. After twenty minutes of rest, they hit the pan and are done when golden brown on both sides.


Shards fill the plate when I cut it. You can see the layers of dough studded with green onions and sesame.


I served this with fried chicken akin to the classic fried chicken and biscuits. When I'm searching the fridge earlier I saw theseforgotten pieces of chicken thighs that I deboned and marinated about a week ago so I could also name this post "Feast of Forgotten Foods" :P Super super flavorful from the extra long marination, no need for a sauce.


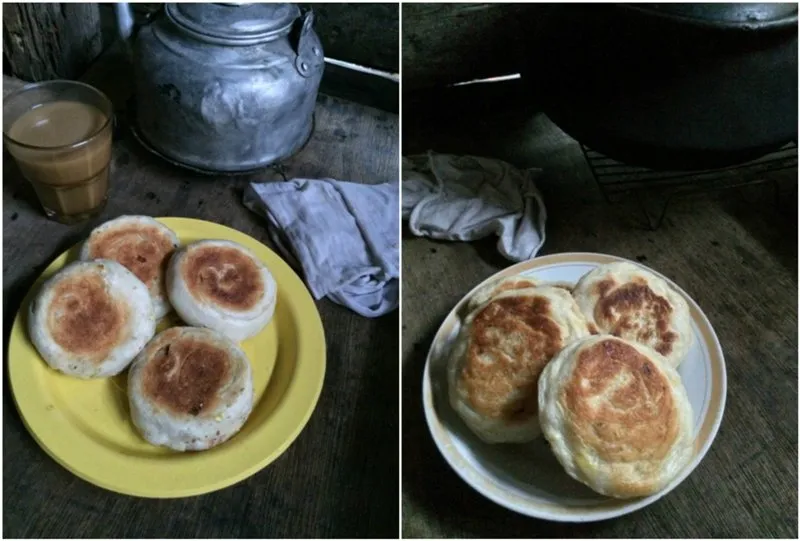
The second one is a soft and chewy lean roll. I used a strong flour and incorporated the green onions in the dough. I made a wetter dough to encourage a more open crumb to fit my intended purpose. I formed blobs of dough into rough circles and again after a twenty minute rest, cooked in a heated pan until golden brown on both sides.


The crumb has distributed holes of larger size than most and studded with green onions.


I served them with braised minced pork in oriental spices. The hearty rolls are perfect for mopping the saucy minced pork and the green onion flavor complements it well.


I served both breads/meals on our old table with old utensils for maximum effect! It's truly a wonderful experience, I was like the vendor and mom and dad are my patrons (well, they really are)! In the end we all truly had an awesome meal!


Thank you very much!

PalwithnoovenP's picture
PalwithnoovenP

For a long time, I've been trying to create breads (lean and enriched) that should look like society's ideals; dark crackly singing // delicate crust, blooming scores, holey // feathery soft crumb; those are some of the hallmarks of  great loaves achieved with the help of an oven. No matter how hard I tried, it won't be just the same and won't be enough to reach those standards for many. It's like that weeny teen spending hours in the gym to earn his six pack to be considered hot/in/cool/popular. Now, I realized that I can't do that, but I will continue to make bread because I love it.

From now on, I will create breads where my personality and character show through. I will not stereotype them anymore as Lean/Enriched; Asian/European because all of what I will make from now will be just be MY bread blending flours/grains/seeds/techniques and inspirations from all over the world to create a bread that cannot be found anywhere else.

Here's what I've thought so far:

1) Employ an appropriate (unique/quirky) method that will fit my situation.

2) Do not take others' paths and expect same results at this point in time. I have to make my own path because these breads are exclusive to me and are not recreations of "mainstream" breads with set standards so things like high hydration, high temperature are not really my friend here.

3) Aesthetics can be ignored because this is where I always try hard eventually ruining the whole bread; flavors should be the focus.

4) Simply make a bread that will be enjoyed by those who will eat it. 

These 4 things are key for less frustrations and a happier baking life for me. By not trying to be like others, I can make better bread. I hope you can appreciate their rustic beauty and charm too as much as I do. Maybe they will bore/shock/inspire you but as a famous song (it surely fits my breads :P) goes.. "They" are beautiful no matter what they say and words can't bring "them" (me) down...

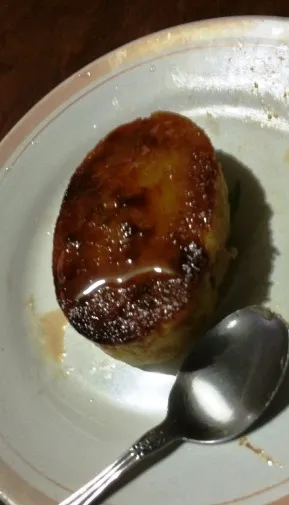
This bread pudding is a result of a failed loaf. Instead of munching on all of the sorrow and frustration all by myself, I remembered that I can make this failure great for everyone; by making bread pudding! This is the most basic since it was unplanned and it's my first time to make one, just eggs sugar and milk but the magic they've done is awesome that mom and dad asked for more when I served it warm as a late night snack. I just snapped a photo because they can't really wait to taste it. I will definitely make more elaborate puddings in the future. As a home "baker" I'm torn between bread and pastry so I may post some here too in the future. I will treat this from now on as my food diary to document my journey.


Anyhow, some photos from our yard....


The work space of the furniture maker in our yard with different wood species.


Santan flowers still blooming; yellow ones outnumber the red ones.

For me the true measure of success is contentment, if you're contented with what you have done the I can say you have truly succeeded. From the start of my baking adventure, it is only this time that I have learned to be contented with the results of my work not to mention those who eat it so I can say I am already successful in this craft that I'm passionate about.

I'm still a fan those crackly singing crusts and holey interiors with even distribution of irregular large and small holes and I won't fail to appreciate it especially in this excellent site but I have accepted that I can't achieve it at this point in time. In the future, when I already have the proper equipment and enough practice; I will surely achieve my dreams. Like the famous TV series here named Kalyeserye quote "SA TAMANG PANAHON" in the right time.

Thank you very much!

PalwithnoovenP's picture
PalwithnoovenP

I had fun with shaping my rolls today! They're supposed to look like dainty little roses, but they really "rose" and became too big! They are beautiful, Roses in full bloom!


They're soft, fluffy and bouncy on the inside but "soft crispy" on the outside with a nice flavor. They are like "pull-apart rolls" in roll form.


I would give this to my girl rather than real flowers for any occasion; Anniversary, Mother's day, Birthday or just any ordinary day. But perhaps, she'll be happier if I gave her both flowers, the plant and the bread! :P


Thank you very much!

PalwithnoovenP's picture
PalwithnoovenP

I think, I finally figured out the best method for baking lean breads in my clay pot so it's time to move to "flavor" aspect of the bread. I refrained from putting flavors in the bread because the cooking method is my focus so I want to change that only variable every experiment, that's why for so long we're only eating white lean loaves. For a start, I chose a common ingredient that I have that seems to be a classic flavor/addition to breads; sesame! It's amazing that a little amount of a single ingredient gives the bread an explosion of flavor. I've seen many folks here did it and here is my best so far. I've used black sesame to add color; toasting them is more difficult because you cannot judge them by color like white ones so I always do the "sniff" and "crush" tests.


The dough right after shaping.

I've used 50/50 AP/BF again because the last breads with only BF came out too chewy for me. Inspired by Bouabsa's baguettes and Reinhart's pain a l'ancienne, I mixed chilled flour, ice water, salt, instant yeast and sesame seeds; every fermentation stage is done in the fridge except for the final proof, 3 S&F's every 2 hours after 5 hours in the fridge and a pre-shape with overnight rest. In the morning, I shaped the dough into a batard and proofed it seam-side down in my oiled and lined "giant" llanera for 2.5 hours since it's pretty cool here today.


The dough fully proofed.

I let the dough dry a little bit in the fridge for 10 minutes before scoring because the air there is pretty dry. It is then baked for for 50 minutes in the pot; the first 10 minutes with steam, flipped after 30 minutes for the top crust to brown for the last 20 minutes.


Scoring is not so good and difficult when in a pan like this.

I totally forgot not to score the middle so the score marks won't be squished when I flip the bread so I just proceeded to bake it (next time I will surely remember it), as result the score is negligible in the final bread. I'm also not still used to scoring wet doughs so I have to practice more. Steaming is not a problem in the pot, the water it absorbs when washed before baking is enough to generate steam for the appropriate time. The bread rose well in the pot too.


I was greeted by this beauty when I released the steam.

When I flipped the bread (this is a combination of methods no. 2 and 5 as I've said before in my older post) onto a smaller llanera, I didn't noticed that it slipped and had direct contact with the pot itself. When I came back, it was browned but charred in some areas, if it did not happened this bread would be even more gorgeous.


It's the largest loaf my loaf (8 inches long) my pot can handle but it's only as big as my hand! 


Crumb is pretty tight for a wet dough, any thoughts why? Maybe because of poor shaping/too much handling; OR the dough failed to expand to its fullest because the pan is restraining it but I think it helps support the structure of the bread and I can clearly see that. It is identical to what happened in method no. 2 in the previous post.


The crust up-close, full of sesame seeds!


Crust is thin and very crispy when it came out of the pot but became soft and chewy when it cooled, crumb is moist, soft and chewy; full of sesame fragrance and flavor which is pronounced but not overpowering, just right. The black sesame contrasts nicely with the creamy crumb, very pretty!


Though there are still lots of improvements to be made, I'm very happy with how this loaf turned out; one of the most beautiful lean bakes I made. My mom and dad said that for a leavened bread baked without an oven using only a pot, this is very beautiful and can be called exceptional; they always encourage and support me.

I'm so excited to try more flavor combos (my own crazy ones and those tested/formulated by fellow bakers), grains and add- ins in the future! I think my next one will be even better!

-----------------------------------------------------------------------------------------------------------------------------------------------------

Remember my red bean paste in my last post? It's all gone now and I've used it in a number of treats. After this, it may take a while again for me to bake/cook something. If I'm not in the mood to cook, you can't force me; but when I'm on it almost nothing can't stop me be it an exotic ingredient, heat, storm, lack of sleep or anything!

I made this little crepes yesterday and filled them with the bean paste. I thought of making dorayaki but I settled on this crepes for something different. Too bad, they're almost gone when I snapped a photo.


I also made Bukkumi today while the bread was cooling, of course filled with my bean paste! It is a traditional Korean pan-fried rice cake filled with a sweet filling. I also garnished them the black sesame seeds, very pretty! I made it so I can have a sticky rice-bean combo, sticky rice and bean pastes always go well together, so delicious! Nice change from the usual fried sesame balls and steamed rice cakes. By the way, if I only had some nice strawberries I could have even made Ichigo Daifuku.


Another tiring but fun-filled day! Till my next cooking/baking adventure!


Thank you very much!

PalwithnoovenP's picture
PalwithnoovenP

Yesterday was a hectic day and this bread is one of the reasons. Last Sunday, I saw some beautiful red beans so I bought some; that same day while watching a late night movie minutes before midnight I decided to make red bean paste for tomorrow and I proceeded to wash and soak the beans so they will be ready for tomorrow.

I made the red bean paste yesterday, smooth but with some chunks left for character including the bean skins. It was a 2 hour process; boiling, mashing by hand and sweetening. I love the texture of homemade bean paste and its sophisticated sweetness. I also like to make a small amount so we can have it fresh; what was left will be used for various rolls, pastries and sweets in the coming days.

My homemade red bean paste.

With the bean paste made, I suddenly thought of making a bread that would go well with it. For me, there is no better bread but a mantou, its slight blandness will make the red bean paste shine while providing the perfect texture. Just thinking of kneading dough by hand is somewhat tiring so I made a convenient schedule, make the dough at night, retard it and cook it tomorrow.

I thought I can have a good rest until night time but suddenly, dad requested if I can make my sticky rice dish that he loved and said he had all of the ingredients needed bought. How can I refuse? It is only one of the few times dad requested something from me and it’s me requesting something from him often like his wonderful fruit preserves and sweets. To add more, I decided to make some rice dumplings/zongzi (粽子) from the sticky rice I have which will be treated differently.  So from the afternoon until midnight; I kneaded the dough, cut the meat and vegetable to their appropriate sizes, marinated and cooked them, prepared the rice and did all the things that need to be prepared in advance. If I haven’t done those, this day will be even more stressful. Thanks to the fridge!


Today is as hectic as if not more than yesterday, I cooked the sticky rice, made 2 rice dumplings, and made this bread! It was so exhausting but every effort I made was rewarded with very good food! We really had a feast today! Dad invited his friend and they really enjoyed what I made. They said now that I'm 21, I can really pull off some exceptional dishes without getting help. Seeing them enjoy the food I made is even more rewarding than enjoying the food itself, especially coming from my dad.

A well made mantou is already good but when deep fried like what is done in dim sum restaurants something magical happens and dipped in condensed milk, you cannot ask for more. It also goes great with savory dishes, in fact this was inspired by a bread in a Chinese restaurant served with red braised pork. The crust is thin and extremely crunchy. This can be described as a gigantic fried mantou.  It is also not overly airy, it's fluffy and substantial just how we like it.


The flour I used was unbleached so it has a yellowish tinge to it.


Honestly, it's so soft, it's difficult to cut.


It's better to pull shreds from the crumb.


It really goes well with black or lightly sweetened coffee!

You choose, classic style with condensed milk...


Or with red bean paste....


My favorite... Combine the two!


-----------------------------------------------------------------------------------------------------------------------------------------------------

My sticky rice dish that dad requested...


Kiampung, a sticky rice dish with meat and vegetables commonly found in Hokkien households and in Chinatown. There are many versions of this dish but mine is my dad's favorite.

Some rice dumplings made with almost the same ingredients as an experiment. I used banana leaves and nylon string to wrap because that's what I only have on hand. With a different leaf and string (a thick natural fiber one is ideal) wrapping the tetrahedral zongzi (locally called as machang) is a pain so wrapping is "just seal it" style. The bamboo leaves used are only available in Chinatown which is 2 hours away from us given there is no heavy traffic jam. For a misshaped zongzi with a different aroma because of the different leaf, it came out pretty good.


-----------------------------------------------------------------------------------------------------------------------------------------------------

Those flowers in the first picture have a special place in my heart and they are blooming right now. With those flowers, many friendships were formed back when I was a child. There are 3 varieties that I know; red, yellow, and white. The red variety has the most flowers now; the yellow variety still has many buds that haven't bloomed; the white one still doesn't have any sign of flowers. These are called Santan, very common here and most yards now are covered with red and yellow flowers.


As you can see, each cluster is composed of many tiny flowers. Each flower has a stalk that you can pull; pull them halfway and you can link each flower to another flower, this is what girls usually do forming garlands and bracelets; pull them all the way and a tiny drop of liquid (they say it's the nectar) oozes out that you can sip and the taste is lightly sweet and this is what I do back then (we sometimes even strip whole shrubs of their flowers) and we think that the yellow variety produces the best tasting one. Every afternoon, kids flock the shrubs to do what I mentioned above sharing what they made/picked with the other kids while playing outdoor/team games (Ah! Those were the days!) nurturing friendships that we still remember to this day. Ask any kid of this generation and they probably wouldn't know what I'm talking about! :P The games and fun that they know today are iPad and Apps.


I wish you could see that stalk with the precious nectar!

Yes, technology might have taken some "fun" from this generation but I'm thankful for it and happy that I lived in this time. Ingredients are easier to source, recipes and food from around the world are easier to find broadening my mind and palate, and I am able to share some good stuff and see those of others no matter where in the world we are.


It's a tiring but happy day! When you finish a day weary and smiling, you appreciate rest much better!

Thank you very much!

Pages

Subscribe to RSS - PalwithnoovenP's blog