The Fresh Loaf

A Community of Amateur Bakers and Artisan Bread Enthusiasts.

Mini Oven's blog

Mini Oven's picture
Mini Oven

I've been slowly brewing away with some thoughts over the years....  Starters and their differences.  Why is it that sometimes a weak rising sourdough starter culture will bounce back quickly (too quickly) and suddenly "stabilize" after chilling or a near death experience?
I have a timing theory thinking the yeasts might have syncronized their life cycles through temperature control and also the idea that perhaps getting the desired yeasts to spore (hibernate) and then wake up the correct yeast using the same selected bacteria group to do the job.  I have always (still do hopefully) kept my ears and eyes open for explanations. 

I was pointed to a podcast on research extending life spans recently and the mention that yeasts were also affected perked up my ears.  Why not?  I began to think about it more and more and it made sense.  Maybe this was one explanation for what I was observing.  Longevity of yeast perhaps.  That the yeast were living longer budding more and producing more gas in their life spans before dying letting the next generations take over.  The peaks that stay peaked for longer periods of time after feeding the neglected starter.   Hmmm.  Puts the expression "never starve a starter" into question.

There is also lots of other information in the interview like a quick mention that 2% sugar intake shortened life span by 20% which also could be applied to yeasts.  I wonder what the details are there?  The BBC Podcast features Prof. Cynthia Kenyon, director for the Hillblom Center for Aging, Univ of Calif. San Fran.   Topic: Latent capability to extend lifespan.

http://downloads.bbc.co.uk/podcasts/worldservice/discovery/discovery_20101027-1032a.mp3

Toward the end of the interview, I was struck by our own TFL member diversity and how contributions from so many have enriched the site.   Listen and enjoy!

"Lay back and bake at TFL!"

Mini Oven's picture
Mini Oven

I got to playing with pepper jelly. 

Ingredients:  gelatin, sugar, one orange habanero, assorted sweet garden peppers, one garlic clove, water, and one glass 250ml.   Method: slice everything colorful and thin and mix with sugar, gelatin and a little water to let all the vegetables shrink and curl up for about 6-10 hours.  Amazing how they do that!  Bring to a light boil until passing the gel test on a cold plate.  (about 10-15 minutes)  Pour into hot sterilized jar and cap, let cool. 

The color of the jelly is not as dark as this picture, it barely has color at all, a light clear hint of orange with red, green, yellow and orange squiggles.

Photo:


Mini Oven's picture
Mini Oven

They just didn't want to be baguettes!

I took the recipe under Metric and divided by 20 to use 500g total flour in the recipe.  I did make some changes... I added an egg white into the water to total 165g in the final dough.  I used 1/2 tsp of yeast in the final dough.  This gave me longer fermentation.  I also hand mixed the dough.

Poolish Baguettes, page 101, Hamelman's "BREAD" with barely a pinch of yeast and using 9% protein white unbleached wheat flour to sit 12 hours at 23°C (74°F).

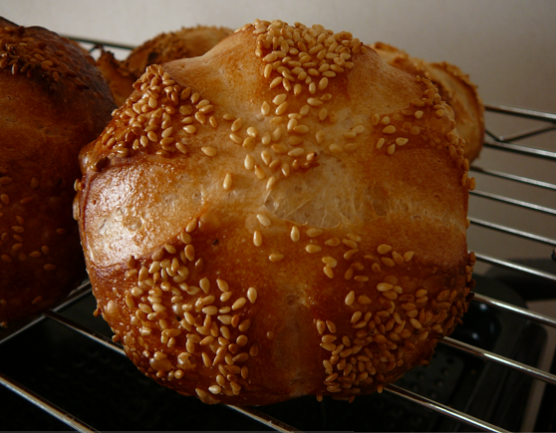
Mixed the dough with water (22g egg white "small egg" and 143g water) whipped with a fork  then added to the poolish along with salt 1/2 teaspoon instant yeast and 12% protein unbleached wheat bread flour.  Let stand one hour and folded the dough.  Did two more folds with 2 hours between for a 5 hour bulk rise.  Cut off 8 rolls at 100g each and one at 85g.  Let rise under cover and kept moist with water to rise about 45 min to an hour.  When somewhat risen, I sprinkled with sesame seeds and made 5 point star scissor cuts not connecting the cuts.

Then quickly into the hot steamy oven 240° rotated with steam release after 10 minutes.  Baked for another 10 minutes.  Then the second tray got sprinkled and scored hot on the trail of the first tray. 


They made it to the dinner table.  Crispy crusts and tender insides, still warm.

Mini Oven


Mini Oven's picture
Mini Oven

Monday:  My garden is bursting with Spring!  The wind is windy and the birds are joyful!  We have 18°C and the furnace has been turned off.  I've pulled a starter out of the fridge.   A firm rye that was not put into long hybernation (do not fear, my pretties, the prepared starter is the jar next to it also looking none the worse from wear.)  It's wonderful and exhausting to be back in Austria.  Lots of garden work and getting used to stairs again.  Back to the starter.

This overripe goo smells cheese strong and has ice crystals all over it.  (Must have been at the back of the fridge.)  I'm thawing it out and scraping it now to look at the bottom.  This stuff could send me under the table from just breathing it, that with jet lag could be lethal.  It would be wise of me to breathe ever so lightly.  My son thought I should pay a fine, keeping a starter that smelled so strong.  It's criminal!  I laughed and smiled to my inner-bread-self.  I'd be the last one to tell him he could have thrown it out months ago.  Must have been fed last in January. 

(4 pm) I managed to push a top layer aside to get at the most underlying glop.  Rather stiff really, broke some out and reminds me more of fresh yeast consistancy.  It is also brighter in tan color than the top gray layer.  I've mixed water with it and ... um... now some rye flour and we will see what decides to grow.  Oops, got to run out for some rye flour.  Needed milk anyway.  I love being able to read everything on the shelves!  Rye everywhere!  Picked up some spelt berries too.

Tuesday:  (4 am)  The starter sat 12 hours and no action other than it smells sour and no longer like wet flour.  Too much acid for the yeast!  Gotta build up yeasty beasties!  Took out a spoonful and did a 1:5:5 again for the next 12 hours > 20°C in the kitchen.

(8 am)  Cooked some spelt in my rice cooker and because I didn't do too much with water so it would go dry, got some nice browning on the cooked grain...  not a bad way to add color to a loaf...  I ate some for breakfast as a chewy hot cereal.  Spent the day trimming and chipping in the garden.

(6 pm)  Got bubbles! I can see them thru the glass but not on top.  Smells sour but mellow and when I attack it with a spoon the bubbles collapse and I see structure under that smooth exterior.  Very good!  Took out another spoonful and did a 1:5:5 feed plus scrounged around for some old rye bread.  Found sunflower light rye, will have to do and processed it into crumbs, mixed in.  Got that sitting out now until I wake up in the wee hours, but also good until morning if I sleep thru.  

Mini

Mini Oven's picture
Mini Oven

I've been playing with rye loaf ratios (starter/water/flour) and I came up with one using any amount of rye starter that when refreshed is a paste (100% hydration) and as it ferments loostens to a thick batter.  I was looking for basic numbers (like 1/2/3) and I found them they're  1/ 3.5/ 4.16.   It makes Rye so much easier!  The starter should be generously refreshed 8-12 hours before and mixed into the dough just before peaking and in a 22°c room (72°F) the dough ferments 7-8 hours before baking.   Dough should not be folded or shaped 4 hours before going into the oven.

Basic Ratio> 1 part starter: 3.5 parts cold water: 4.16 parts rye flour    

4 tablespoons bread spice for 500g flour    Salt 1.8 to 2% of flour weight

Hydration of dough aprox 84%.  Handle dough with wet hands and a wet spatula.  Combine starter and water then the flour, stir well and let rest covered.  Add salt about one hour after mixing and any other ingredients.  If room is warmer add salt earlier.  Three hours into the ferment lightly fold with wet hands and shape into a smooth ball.  Place into a well floured brotform or oiled baking pan.  Cover and let rise.  Don't let it quite Double for it will if conditions are right.  Before placing in the oven, use a wet toothpick and dock the loaf all over to release any large bubbles.  Bake in covered dark dish in cold oven Convection 200°C or 390°F (oven can reach 220°C easy with the fan on.)  Remove cover after 20 to 25 minutes and rotate loaf.  Reduce heat by simply turning off convection and use top & bottom heat at 200°C.   Remove when dough center reaches 93°C or 200° F.

All kinds of combinations are possible including addition of soaked & drained seeds and or cooked berries or moist altus and whole or cracked walnuts or a little spoon of honey.

How it works:  I have 150g rye starter at 100% hydration.  I figure for water: 150 x 3.5 gives the water amount or 525g.  I figure the flour: 150 x 4.16 gives 624 g Rye flour.  For salt:  2% of 700g (624g + aprox. 75g in the starter) makes salt 14g or one level tablespoon of table salt.

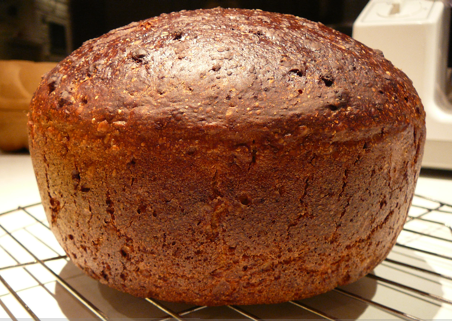
This amount of dough took 1 1/2 hours to bake and included moist rye altus.  It was baked in two non-stick cast aluminum sauce pans (20cm diameter) one inverted over the other .  The rounder of the two on the bottom.  No steam other than what was trapped inside.  Top removed after 25 minutes.  It has a beautiful dark crust with a light shine.  Aroma is heavenly.


Mini Oven's picture
Mini Oven

Ready in 3 1/2 hours?  (Make it longer if you wish, use 1/2 teaspoon of yeast, add salt & caraway and use cold water to make it rise slower.)

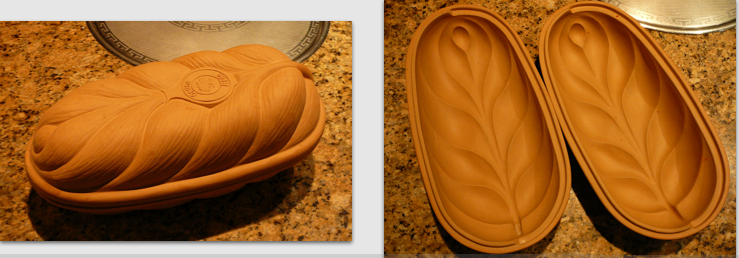
Wheat shaped form ... White Bread   crusty

  • 450g hot water (you can just manage to keep a finger in it)
  • 7g instant yeast
  • 650 g Wheat flour (250g AP, 400g Bread flour)
  • 1 1/2  to 2 teaspoons table salt
  • 1/2 teaspoon ground caraway
  • olive oil for bowl & form

Pour hot water into a large 2.5 ltr. mixer bowl and sprinkle with yeast.  Add the flours and stir until all the flour is moistened and a shaggy dough has formed.  Cover and let stand 2 hours or until the dough has risen up to the cover.  Remove cover and scrape out dough onto a lightly floured surface.  Sprinkle with the salt and caraway.  Fold or roll up the dough and knead to blend for about two minutes.  Shape into a tight ball and cover with the bowl.

Soak top and bottom of a Clay form (total volume 2 liters) 10 min in warm water.  Allow to drip dry and surface water to absorb, one minute.  Smear inside with olive oil.  Re-shape and tighten dough to form a loaf.  Rub with oil and place into bottom form.   Oil the inside of cover and place over dough.  Set in cold oven for 15 minutes.   Turn on oven to 225°c  (440°F) on Hot air (convection) and time for 45 minutes.   Remove form and brown loaf another 5 minutes in hot oven on rack.   Cool on rack for 15 minutes and serve warm with bread knife on cutting board. 


I was given this form for Christmas without any instructions.  As you can see the ingredients add up to just over a kilo of dough, about the right amount to fill this two liter volume form.  The loaf crust is very crunchy and thick.  The crumb slightly chewy and tender.  I removed the top for the last 5 minutes of baking but wished I had removed the whole form to let the bottom brown more as well.   Slices are almost round and crumb is fine.  The oil in the form adds to an almost buttery flaky crust.   This loaf was sliced warm.

Mini


Mini Oven's picture
Mini Oven

Inspired by Charles Luce gluten free millet starter (following instructions in The Bread Builders, by Daniel Wing and Alan Scott)   I startered a sourdough starter using amaranth...

http://www.thefreshloaf.com/node/14476/excellent-gluten-free-bread#comment-91244

I am repeating part of the thread below so that when I use the starter with gluten flours, it will not be confusing in Charles's gluten free thread.  The discussion can be carried on here about using amaranth sourdough starter in gluten breads.  I also want to try his recipe for millet bread but use amaranth starter.  He has much more experience than I with gluten free breads and this has interesting and fascinating overlaps I'm only beginning to discover.

Nov 16 //  ...to make a starter.  It smells much like corn.  For obvious reasons, I didn't rinse the grain first but put it directly into a blender to turn it to flour.  Then I mixed 60g with 60g water and it sat 57 hours (instead of 48) 16°c to 17°c 

Nov 18 //   I added 60g more amaranth flour and 60g water, blended well  16°c.

I'm hoping it will make the amaranth tastier, milder maybe.  This could be the "trick" I've been waiting for.

Nov 19 //   I got life!  I forgot it again, it is 24 hours since I fed it and it is bubbly and rounded and even a little bit risen!  Amazing!  Can't smell any "sour" still smells like wet amaranth (yuck) or wet corn but I know it is active.  I stirred it and forced it to collapse.  In stirring I can feel the bubbles or pockets of gas in the starter.  Now to dump half and feed again but in the warmer room to help develop the yeasts.  I will also start washing the amaranth and adding the water then blending before adding to the starter.   The photos are before and after stirring:


Nov 20 //    First thing was to smell my starter.   Na ya...   ... went for cooked rolled oats this chilly foggy morning.  When I discard today I plan to try a glutinous 10 grain flour and we will see if it lifts it.  I've not yet aquired xanthum gum and millet flour.  I would be interested in mixing the amaranth starter in a palatable mixture of GF flours.  Maybe the Montana Mix that Charles mentions and suggests on his blog.   Amaranth can be quite strong in flavor and smells of Autumn.   Wet leaves and mushrooms, truffle  come to mind along with dry red wine and soaked beans ...thyme.  Charles Luce seemed to also be in a similar lock of the senses and on the above mentioned thread writes: 

...walked through my neighborhood, which is quite Hispanic, smelling the smells and thinking of your question. Potato starch flour comes to mind, as does banana flour, yuca (tapioca)flour and corn masa (used for making corn tortillas in Mexico). Maybe coconut flour too. Then I read that porcini (Steinpilz) work w/ amaranth...

I had read that amaranth was often combined with banana and chocolate, also seems to be used more in cakes and sweet recipes...  I use a fine metal coffee filter for washing the grain.   Coconut milk.... interesting.

Okay, it's evening now and I'm looking into my starter and the smell is....getting sour and the amaranth is taking on a milder smell.  This looks promising!  This is good!  Ooo can't wait for the bread!  I mixed it 1-2-3  120g starter - 240g water - 345g 10 grain flour  autolyse  and work in 1 tsp salt.  Three hours in the kitchen then into a cool room for the night.  To bake tomorrow.  Better plain for the first loaf,  then come more taste experiments.

Now I'm working on the remaining 120g of starter.  I am rinsing 60g amaranth and will dry it before milling and adding.  It dries nicely in a smooth dish towel, the grain doesn't seem to stick at all.   This time I feed it 60g amaranth shortly blenderized (no water but the tiny seeds seem to slip avoiding the blades) mix well and after 3 hours tuck away into the fridge.  I'm liking the smell of the starter, I really do.

Mini Oven


Mini Oven's picture
Mini Oven

Peter Reinhart's  Thin Wheat Crackers on p.291  in  Whole Grain Breads

My interpretation used Spelt Flour type 700 glatt (fine) with additional 30g flour to the recipe.

Twentyfour hour rest on the counter top before cutting into small shapes and making windowpanes.  Place on parchment and continue to thin out the crackers...  Keep a towel handy to wipe off oil.  If I do this again I will use two tablespoons less oil in the recipe.  I like mine without the salt wash, which does give the crackers a little more strength but the crunch is better without it.

1000 words:

Mini Oven's picture
Mini Oven

Yes I did it.  I found rye flour in Seoul, South Korea, in the Bangsan Market between wall paper shops and packaging tucked into the alleyways kept cool in the winding shadows from the burning sun.  I found two different ryes, that with my third, and my unending curiosity can only lead to one thing.... a comparison.  I have already gathered that there might be some flavor differences evidenced by the interesting additives in North American recipes...

So I decided to use Daniel Leader's Soulful German Farmhouse Rye in Local Breads combining all the ingredients except for added yeast (don't want it) and final 70% rye flour.  That way the only difference in flavor will be the flours.  All three doughs will be handled alike. 

The Rye:

  • Bob's Red Mill Organic Dark Rye flour @ 4000 won a kilo

  • German, Demeter Organic Rye type 1150 flour @ 7900 won a kilo

  • Austrian, Haberfellner Rye type 960 which is quickly running out


I mixed up the recipe and divided the liquid into thirds, added 117g rye flour to each bowl moistening the flour and covering for one hour.  I had already started noticing differences...

Bob's is a slightly coarser flour, has more speckles, is darker (but not by much) and not as sticky as the other two

German 1150 has two mosts: lighter color, and stickiness

Austrian 950 has dough color between the two but in the picture they look all look alike.

All mixed well, all sticky (typical rye) so I use a wet silicone spatula to fold the doughs twice.   After 3 hours the loaves were gently shaped with wet hands patted with oatmeal flakes and set over cutout bread letters to mark the bottoms.  (4 o'clock is Bob's, 12 o'clock is German)  They were rising nicely (not a whole lot) when they went into the oven.  (tip, it is very hard to judge rising in a flat round bowl shape)

As you can see, I'm having a little trouble lining everything up here...(someone please send me a note on how to do this!)    The picture below of the top shows Bob's Red Mill at 10 o'clock, Austrian 950 at 2  o'clock, German 1150 at 6 o'clock.


The doughs seem to rise in relationship to fineness of the flour.  Bob's is the heavier and coarser so it rose slightly lower than than the other two.  1150 and 950 were pretty close in height but the 950 rose just a tad more.  The darker color of Bob's is even darker after baking.  Now to squeeze in another picture, the crumbs.  Austrian is on left, German right, Bob's is the darker of the three, first on the bottom then on the top.

All have a moist heavy crumb (We like it that way) but the differences are slight but mostly in color and texture of crumb in the mouth. 

1150 feels smoother in chewing, 950 is more stick to your teeth smooth, Bob's tend to be more stick in between the teeth which gives it a longer taste in your mouth. 

After two days the sour is growing but I still can't tell one from the other as far as taste goes.  The Austrians at the office yesterday could also not tell any flavour differences.  They just wanted more.  So I've been baking and playing.  I keep in mind that Bob's won't rise as high as the 950 (or peaks sooner having more whole grain).  I made a loaf yesterday with Bob's and gave it a longer steam in the oven, 10 min instead of the 6 minutes in the above bread.  It came out lovely rose higher and being consumed as I write.   It also went into a banneton, tall and narrow.  I also use more spices than the recipe but far from overpowering the rye.

So.  I Guess I blew the top off that urban legend if there ever was one.  They all taste pretty much the same.  Thanks for waiting patiently for the results.

Mini Oven


Mini Oven's picture
Mini Oven

Did anyone find the latest issue of National Geographic interesting?  How about Dan Fisher a paleontologist who plays with his food by preserving it with Lactobacteria? 

http://ngm.nationalgeographic.com/2009/05/mammoths/latreille-photography

Mini

Pages

Subscribe to RSS - Mini Oven's blog