The Fresh Loaf

A Community of Amateur Bakers and Artisan Bread Enthusiasts.

GSnyde's blog

GSnyde's picture
GSnyde

A lovely weekend on the North Coast of California. 

First, the Fauna.  Our yard seems to be the pasture of choice for our neighborhood herd of Mule Deer.  And the herd has grown in the last few weeks.  We’ve seen at least three new babies (we refer to them, collectively, as “The Fonz”).  And the young buckeroos were particularly rowdy this weekend.  After the pictures below were taken, a large group assembled not 20 yards from our porch (perhaps drawn by the smell of Focaccia buns baking; more likely by the dandelions in bloom).
Next, the Flora.  Cat and I pretend that our courtyard garden is a big pain to keep up, but the truth is we love working on it.  It’s been a while since I looked at it without making a mental list of the chores that need to be done.  But today, I was looking it over from the upstairs deck, and realized that it looks pretty great.  So I snapped a few photos.

And finally the Pane.  I saw an article in the food section of the SF Chronicle a week or two ago about the wonderful hamburgers at Bistro Don Giovanni in Napa (http://www.sfgate.com/food/chefssecrets/article/Secrets-of-Bistro-Don-Giovanni-s-burger-3674609.php#page-3).  The story included their recipe for Focaccia Buns.  So, with lots of good stuff around for sandwiches (leftover Salmon and Tartar Sauce; leftover chicken and barbecue sauce), I tried it out.  This is about the quickest bread I’ve made (LOTS of yeast).  It takes about two hours from mis en place to baked.  The buns are good—they are tender and tasty and hold up to saucy fillings.  I’m sure they would be great grilled for burgers.

Here’s the recipe (with my added weight measurements):

Bistro Don Giovanni’s Focaccia Hamburger Buns

Makes 12

These buns are adapted from the ones made at Bistro Don Giovanni.  The buns can be made ahead, wrapped well and frozen for a couple of weeks.

         2 1/4 cups (540 g) whole milk

         1/2 ounce (14 g) instant dry yeast, about 1 1/2 tablespoons

         1/4 cup (55 g) olive oil + more as needed

         5 1/3 cups (730 g) all-purpose flour

         4 teaspoons (25 g) salt

Instructions: Line two rimmed baking pans with parchment; set aside.

Warm milk to about 100°-110° and pour into the bowl of a stand mixer fitted with a dough hook.  Add the yeast and the 1/4 cup olive oil. Whisk to dissolve the yeast, then add the flour and salt. Mix on low speed until all the flour is incorporated. Increase the speed to medium, and continue to mix for about 2 more minutes.

Put the dough in an oiled bowl; turn to coat all sides with oil. Cover the bowl with plastic wrap and place in a warm place to rise until almost doubled, about 30-40 minutes. The dough should barely spring back pressed gently with your fingers.

Move oven racks to the middle and bottom third of the oven. Preheat the oven to 425° (400° if using a convection oven).

Divide the dough into 12 equal portions (about 4 ounces each). Shape each portion into a ball. Arrange balls on the prepared baking sheets, spaced well apart (about 6 per sheet). Brush each ball generously with olive oil and let rest 20 minutes.

After 20 minutes, oil the palm of your hand, then use your palm to gently flatten each ball until the top is somewhat flat and the balls are shaped like buns.

Bake for about 15 minutes, or until the buns are light golden brown. If needed, switch pans from top to bottom and back to front for during the last couple of minutes for more even browning.

Place the pans on a rack, brush each bun lightly with olive oil, and let cool completely before slicing. Wrap individually and freeze if not using the same day.

*********************

And may each of you have an enjoyable third fiscal quarter.

Glenn

GSnyde's picture
GSnyde

Why not?  I know rye bread is traditional.  But when one’s spouse doesn’t care much for rye bread, and suggests Challah, what is one to do?  Easy answer:  make Challah.

As I noted in my last blog post, I prepared more Pastrami last weekend than would fit on my Weber, so I froze one whole brisket flat after the spice crust was applied.  A week later, I thawed it for two days in the fridge and I smoked and braised it today.  Because of time constraints, I cut the flat into two pieces, smoked them for about four hours and braised them for about two hours.  They turned out just as good as the fresh batch last week

The Challah was made using the tried-and-true Maggie Glezer’s “My Challah” recipe.

The sandwiches were excellent (though I prefer rye around my pastrami).  My wife adored it.  So it was a success.  I turned away when she put Mayo and iceberg lettuce on her pastrami sandwich.

Glenn

GSnyde's picture
GSnyde

Seventeen Snyders is quite a bunch if you’re not well prepared.  Our more-or-less annual family reunion was held on the North Coast this week.  All four of my siblings and many of their issue (including Brother David’s three charming grandchildren) came to visit.   While each of these Snyders is unique, we do have some things in common, one of which—surprise!—is a love of good food.  And we were prepared!

The meals included pan fried local Petrale sole with Panzanella; homemade pastrami (thanks again for the recipe, Eric) on excellent sour rye (thanks, David) with a variation on Momma Snyder’s potato salad; Momma Snyder’s braised lamb chops with Papa Snyder’s garlic roasted potatoes; excellent take-out barbecue from a new local joint.

We made bagels together (and David’s six-year-old granddaughter showed her potential as a baker, artfully shaping a Krakowski bagel).  And, of course, David and I each provided some other pretty good breads for the whole multi-day festival.

Don’t think that all we did was cook and eat.  We also drank.  And, with the weather unusually clear and warm, we spent many happy hours exploring the local beaches.

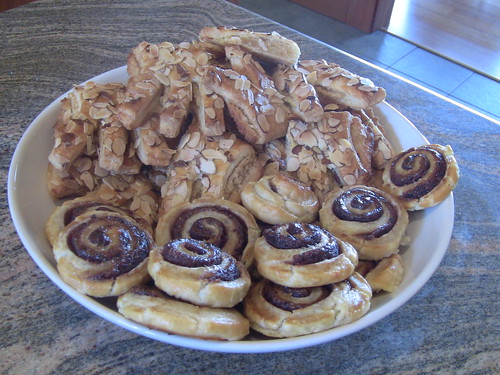
I didn’t get bread or bagel pictures (I think David got some), but I had my camera handy when the breakfast pastries came out Monday morning.  I made a double recipe of the cream cheese short dough from ITJB and used it for bear claws and berry wheels (with local Ollalieberry jam).

They were good!  Thanks Stan and Norm!

A very sweet time for the Snyder clan.

Glenn

GSnyde's picture
GSnyde

It has been several months since I made baguettes.   I had promised myself I would do a multi-week baguette experiment and compare different formulas and build my technique. But life intervened.  I’ve been very busy at work, and there never seems to be time for baking all the breads I want to bake.

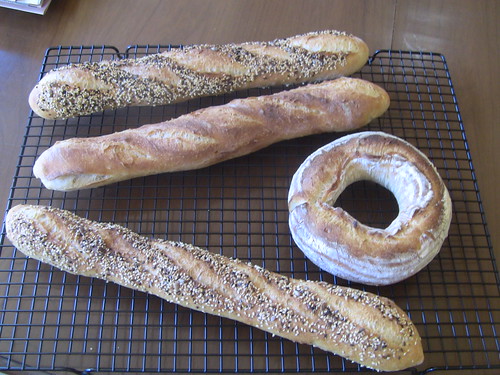
Today I spent most of the day working at home, and I decided to work in a baguette bake.   My usual baguette drill is to make a full recipe of proth5’s “Starting to Get the Bear” Baguettes, aka “Bear-guettes”, first posted by Pat here (http://www.thefreshloaf.com/node/20831/starting-get-bear) and then again by Brother David here (http://www.thefreshloaf.com/keyword/getting-bear).  This is a superb formula.  With some sourdough and a Poolish.  The dough is a delight to work with, and the baguettes are delicious and crispy-crusted.

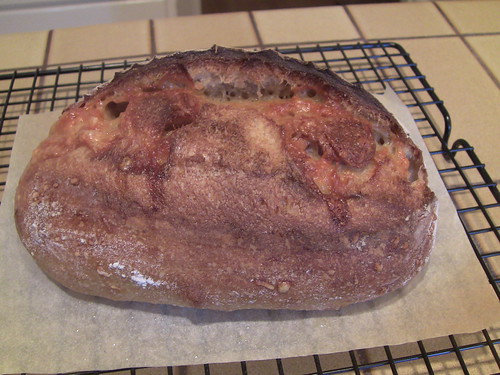
Because I can’t do a whole dough batch in one bake, I always have to retard some of the dough.  There wasn’t really room in the fridge for baguettes, so I made a Giant French Bagel and retarded and proofed it in a banneton.  It’s kinda purdy.

As the morning wore on, I started to think about what to make for dinner.  I remembered that I had some homemade Chicken Italian Sausage and some homemade pesto in the freezer.  Pizza!!!  So, I wondered how Bear-guette dough would be as pizza dough…. And then decided to find out.

Answer: Really good!! After the primary ferment, I carved off about 1/3 of the dough, balled it up, put it in an oiled, covered bowl in the fridge for about 4 hours, then pulled it out to warm up about 90 minutes before baking it.  It took several stretches and several rests to get it to extend into a 12" pizza.  But it was worth the effort.

It’s breadier than my usual pizza dough, but it’s delicious and tender.  I will use this dough for pizza again.

While I was baking, Tasha spent most of the day looking out the window and talking with her friends on the paw phone.

Glenn

GSnyde's picture
GSnyde

This weekend, I departed from my cheese bread experiments to try again a wonderful tasting bread from Hamelman.  The Whole Wheat Multi-grain is a sourdough with about 50% whole wheat, a taste of honey and the baker’s choice of other grains and seeds.  Some day I want to try it with cracked wheat, but I couldn’t find any.

So, like my last attempt at this bread, I used oats, sunflower seeds and pumpkin seeds.  And, as before, the result is a very hardy tasting bread with a nice moist crumb and thick crust.

It made awesome grilled ham and cheese sandwiches.

In the not-bread category, I figured I’d share a photo of one of my favorite foods: turkey wings etoufee.  A tangy New Orleans-style braise with fresh corn.  It’s really yummy and is always better the second day.

Glenn

GSnyde's picture
GSnyde

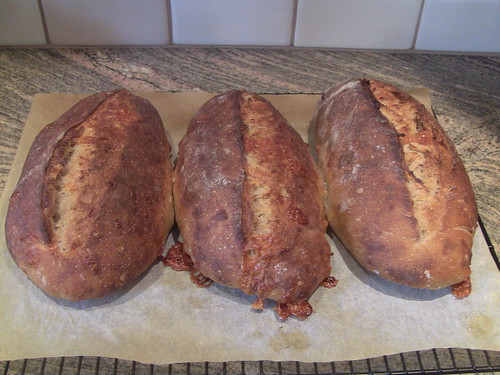
After last week’s delicious experiment, today I tried another version of Asiago Bread.  This time I used my San Francisco Country-er Sourdough (15% whole wheat and 15% dark rye).

The dough was very forgiving today.  After the first couple stretch and folds, we needed to go to the beach to see the Harbor Seal pups at low tide.   So I put the dough in the fridge for a couple hours.  While we were at the beach, I realized I’d forgotten to mix the cheese into the dough.  D’oh!  When we returned, I mixed in the cheese and gave it an extra hour of room temperature fermenting, then 90 minutes of proofing time.  Three 620 gram loaves fit too snugly on my stone, so they converged.

But for all the screw-ups, the loaves turned out very nicely.  Moist open crumb, crispy crust, and a wonderful sharp cheesy flavor.  I may use a higher percentage of cheese next time, or cut the pieces bigger.  I like gooey!

Once I have a formula I’m happy with, I’ll post the detailed formula.

And the seal pups came out nicely, too.

Glenn

GSnyde's picture
GSnyde

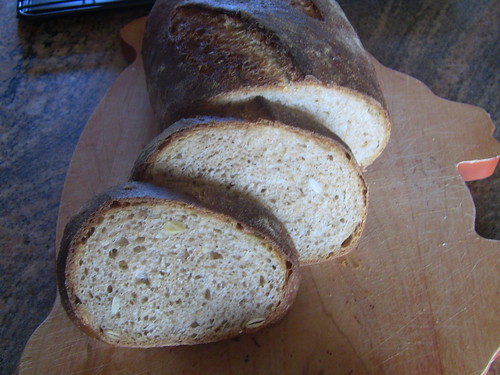
I hadn’t made Hamelman’s Pain au Levain with Whole Wheat for a while.  I remember that bread as one of the best I’ve ever made.  I made up the levain last night, and mixed the dough this morning, and then went to the grocery.  There, I began to crave cheese bread.  So I bought some nice dry, sharp Asiago.

I know Hamelman’s Sourdough Cheese Bread formula (like most cheese breads) calls for combining the cheese into the dough at the mixing stage.  It was too late for that.  So, at the shaping stage, I flattened one of the dough balls and spread a thick layer of grated cheese over it, and rolled it up, flattened it a bit again, added more cheese, and shaped it into a batard.

The aroma while it baked was incredible.   It was hard to wait for it to cool.  When the loaf was sliced, I saw that the crumb was nicely aerated…and cheesated, too.  The flavor is amazing!  Cat and I almost finished a 12 oz loaf as an afternoon snack.

Is this what they mean by “loaves singing”?

The other loaves also look like they’ll be good, but they’ll have to wait for tomorrow.

Glenn

GSnyde's picture
GSnyde

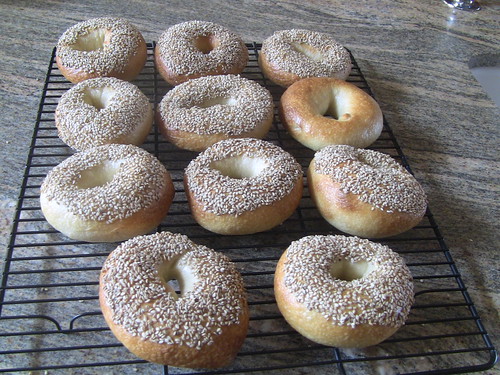
Today I baked some bagels.  Again, I used a variation on Stan's Krakowski formula made famous in the Wall Street Journal, except I used 25% Bread Flour and 75% Sir Lancelot, and shaped them without the twist.  They were great.  My sister loved them.  And my wife (who shaped most of them) paid them the ultimate compliment: "Just like the bagels at Russ & Daughters".

Glenn

GSnyde's picture
GSnyde


As mentioned in my blog last week introducing the 70/20/10 Sourdough with a two-stage retarded levain, my next tweak would be to increase the proportion of whole grains in the levain.  That’s what I did this week.  Instead of using the same blend (70% AP, 20% Whole Wheat and 10% Whole Rye) for each of the two levain builds and the final dough, I put 50 grams more whole grain (and 50 grams less AP) in each of the levain builds, and made up the difference with more AP and less whole grain flour in the final dough.  This was to test the frequent assertion that more whole grain in the levain makes the thingamajigs interact with the deeliebobs, resulting in a sourer, more flavorful and altogether more fabulous sourdough (and some people say I don’t try hard enough to understand the science ….hmphh!!).

The revised formula appears below.

The resulting bread was noticeably sourer, though not the sourest tasting sourdough I’ve had. It was an excellent vehicle for Dungeness crab (the truest test of sourdough in my homeland).  I would rate it a bit superior to last week’s try.  That is, the Saturday bake.  The loaf that retarded Saturday night for baking this morning overproofed before the oven was hot and looks like a worthy doorstop.

Cracks

Crumb

Crab Feed

Doorstop

In spare moments yesterday, I used up several cups of pecans in some nut bars.  Kind of like Pecan Pie, but the topping is less gelatinous and more sticky, and the base is cakier than a pie crust. These are sinfully good.  They come from a recipe found on the interwebs (http://sweetpeaskitchen.com/2010/11/23/pecan-bars/).

SF Country Sourdough With Retarded Whole Grain Levain (Sourer) 4-14-12

Formula (in grams) Yields  approximately 1600 grams of dough

Ingredient

1st Levain Build

2nd Levain Build

Final Dough

Total

Bakers %

Culture/Levain

40 (50% hydr)

330

764


Water

145

217

278

640

70%

AP Flour

50

100

480

630

69.5%

WW Flour

60

75

49

184

20.3%

Rye Flour

35

42

15

92

10.2%

Sea Salt


17

17

1.8%


Step 1: One evening (two days before baking, so this should be a Thursday or Friday evening if you need a weekend day for the main labor), take 40 grams of your seed starter and dissolve it in 145 grams of cold water (mine was 44 F).  Then mix in the flours. (My seed starter is at 50% hydration, but if yours is different, you can adjust the water to approximate the same hydration in the first build).  Cover and leave at room temperature over night.

Step 2: Next morning (12 hours for me), dissolve the nice bubbly levain in 217 grams of cool water (mine was 78 F).  Then mix in the flours.  Cover and leave at room temperature for 8 to 10 hours until nice and bubbly.  Refrigerate the levain over night.

Step 3:  Next morning, pull the levain out of the fridge and let it warm up for 30 to 60 minutes.  Dissolve the levain in 278 grams of warm water (mine was 85 F) .  Then mix in the flours to a shaggy mass.  Let it autolyse for 45 to 60 minutes.  Mix in 17 grams of sea salt.  I massaged the salt in by hand for about 3 or 4 minutes.  I’d call it moderately short of moderate development.

Step 4:  Primary ferment for 3 or so hours.  Stretch and fold the dough, just 4 or 5 turns each time, at approximately one hour intervals.  I did the two S&Fs in the bowl.   After 3 hours, my dough had increased in size maybe 25 % or so and looked and felt pretty airy. 

Step 5: Divide the dough into two and pre-shape as boules.  Let the dough balls rest 30 to 45 minutes.

Step 6: Shape the loaves as boules or batards and place in floured bannetons.  Cover the bannetons with a damp towel or place them in sealed plastic bags. Proof at room temperature for 1 to 1 ½  hours.  [ALTERNATIVE: After proofing, place covered bannetons in fridge over night.]  I baked one without overnight retardation and one with.  The “same-day” loaf proofed for about 75 minutes.  It passed the poke test.  The second (retarded) loaf was put in the fridge after 60 minutes of proofing, then the next morning warmed at room temperature for about 1 ¾ hours hours before going in the oven.  It was overproofed and ended up being a dark brown hockey puck.

Step 7:  Preheat oven with baking stone and steaming apparatus to 500 F enough in advance so your stone is very well heated.  I use a combination of a 10 inch cast iron pan with lava rocks and Sylvia’s magic steam towels.

Step 8:  When loaves are fully proofed, slash and put in oven.  As soon as the oven returns to 500 F, turn it down to 450 F.  Bake 15 minutes with steam, then an additional 20-25 minutes without steam.  Rotate the loaves if necessary for even browning.  For the retarded loaf, I also sprayed the oven walls with water after about 8 minutes.  I baked the retarded loaf a little hotter, leaving the oven at 475 F for the steamy 15 minutes.

Step 9:  When the loaves are fully baked (205+ F internal temperature and dark crust), turn off the oven and leave the loaves on the stone with the oven door ajar for 10 minutes.

Step 10:  Cool the loaves on a rack for at least an hour.

Enjoy!

Glenn

GSnyde's picture
GSnyde


One of the first tips in on which my brother David clued me when I started baking bread was to keep a store of sourdough starter food on hand.  He recommended a blend of 70% AP flour, 20% whole wheat flour and 10% whole rye flour.  I adopted that blend and that’s what my starter has thrived on for these 18 months.  I also like the convenience of mixing up 300 or 400 grams of the blend at a time and keeping it in a jar, so starter feeding takes just a couple minutes.

As I’ve been playing with flour combinations for my pain de campagne, I’ve come to enjoy the flavor of blends with about 70% to 80% white flour and the rest a combination of rye and whole wheat.  This week, it struck me that I’d never made a bread with the same blend as I use for starter food.  So I made a batch of 70/20/10 sourdough pain de campagne.

I basically used the same technique as for my “San Francisco Country Sourdough”, except, seeking sourness, I used a higher percentage of pre-fermented flour and a longer fermentation for the levain.  This formula uses a two-stage levain build, with the second stage levain retarded in the fridge, and has 40% pre-fermented flour.

So here’s how I figgered it:

Formula (in grams) Yields  approximately 1600 grams of dough

Ingredient

1st Levain Build

2nd Levain Build

Final Dough

Total

Bakers %

Culture/Levain

40 (50% hydr)

330

764


Water

145

217

278

640

70%

AP Flour

100

150

380

630

69.5%

WW Flour

30

45

109

184

20.3%

Rye Flour

15

22

55

92

10.2%

Sea Salt


17

17

1.8%


Step 1: Mix up 1000 grams of flour blend: 700 grams of AP, 200 grams of whole wheat and 100 grams of whole rye.

Step 2: One evening (two days before baking, so this should be a Thursday or Friday evening if you need a weekend day for the main labor), take 40 grams of your seed starter and dissolve it in 145 grams of cold water (mine was 44 F).  Then mix in 145 grams of the flour blend. (My seed starter is at 50% hydration, but if yours is different, you can adjust the water to approximate the same hydration in the first build).  Cover and leave at room temperature over night.

Step 3: Next morning (12 hours for me), dissolve the nice bubbly levain in 217 grams of cool water (mine was 74 F).  Then mix in 217 grams of the flour blend.  Cover and leave at room temperature for 8 to 10 hours until nice and bubbly.  Refrigerate the levain over night.

Step 4:  Next morning, pull the levain out of the fridge and let it warm up for 30 to 60 minutes.  Dissolve the levain in 278 grams of warm water (mine was 85 F) .  Then mix in 544 grams of the flour blend to a shaggy mass.  Let it autolyse for 45 to 60 minutes.  Mix in 17 grams of sea salt.  I massaged the salt in by hand for about 3 or 4 minutes.  I’d call it moderately short of moderate development.

Step 5:  Primary ferment for 4 or so hours.  Stretch and fold the dough, just 4 or 5 turns each time, at approximately one hour intervals.  I did the first two S&Fs in the bowl and the third on a lightly floured board.   After 4 hours, my dough had increased in size maybe 30 % or so and seemed pretty airy.  In retrospect, it could have gone another hour.

Step 6: Divide the dough into two and pre-shape as boules.  Let the dough balls rest 30 to 45 minutes.

Step 7: Shape the loaves as boules or batards and place in floured bannetons.  Cover the bannetons with a damp towel or place them in sealed plastic bags. Proof at room temperature for 1 ½ to 2 ½ hours.  [ALTERNATIVE: After proofing, place covered bannetons in fridge over night.]  I baked one without overnight retardation and one with.  The “same-day” loaf proofed for just under 2 hours.  It passed the poke test, but another 30 minutes would have improved the openness of the crumb.  The second (retarded) loaf warmed at room temperature for about 2 1/2 hours before going in the oven.

Step 7 ½:  Preheat oven with baking stone and steaming apparatus to 500 F enough in advance so your stone is very well heated.  I use a combination of a 10 inch cast iron pan with lava rocks and Sylvia’s magic steam towels.

Step 8:  When loaves are fully proofed, slash and put in oven.  As soon as the oven returns to 500 F, turn it down to 450 F.  Bake 15 minutes with steam, then an additional 20-25 minutes without steam.  Rotate the loaves if necessary for even browning.  For the retarded loaf, I also sprayed the oven walls with water after about 8 minutes.  I baked the retarded loaf a little hotter, leaving the oven at 500 for about 8 minutes.

Step 9:  When the loaves are fully baked (205+ F internal temperature and dark crust), turn off the oven and leave the loaves on the stone with the oven door ajar for 10 minutes.

Step 10:  Cool the loaves on a rack for at least an hour.

First Loaf

First Loaf

Second Loaf

Second Loaf

Both of the loaves have a very crispy dark crust and a moist, medium-chewy crumb.  Neither loaf got great oven spring, but the crumb was airy, if not real open with big irregular holes.  The retarded loaf has a more open crumb and a darker crust.  Both have a nice sour tang.  The retarded loaf is distinctly sourer, very much what I was going for. 

One of you baking chemists could probably tell me what the heck I did right.

I think one of the next experiments will be to put more (or all) of the rye flour in the levain, per David’s suggestion.

This was a successful experiment and will lead to further refinements.  It could be favorite if it didn’t involve a four-day process.

Submitted to YeastSpotting 

Glenn

Pages

Subscribe to RSS - GSnyde's blog