The Fresh Loaf

A Community of Amateur Bakers and Artisan Bread Enthusiasts.

GSnyde's blog

GSnyde's picture
GSnyde

We had guests this weekend, and they’re bread lovers.  So the bread sort of became the centerpiece of the weekend.

Friday night I made the two very different levains, one for Tartine Basic Country Bread (50% whole wheat and 50% white at 100% hydration) and one for the SFBI Walnut-Currant Bread (95% white and 5% rye at about 55% hydration).  The Walnut-Currant bread is my variation on the Walnut-Raisin Bread Brother David posted about last December (http://www.thefreshloaf.com/node/21289/walnut-raisin-sourdough-bread-sfbi-artisan-ii).

Saturday morning I mixed both doughs fairly early.  The timing worked well, since the Walnut-Currant bread has shorter primary ferment time and shorter proofing time.  Because I knew we’d eat a lot of it, and because I wanted to continue my experiments with loaf size, I made two full size (975 gram) loaves of the BCB and retarded one in the 50 F garage to bake the two sequentially (previous experience having shown that two slack loaves of that size don’t really fit on my stone).

I made the Walnut-Cranberry breads—two 550 gram boules—with about 10% pumpernickel flour, which gave it a slightly deeper, richer flavor.  This bread made a very nice appetizer before dinner Saturday and was wonderful toasted for breakfast with cream cheese.

Walnut-Cranberry Bread


Walnut-Cranberry Crumb


The two Tartine loaves ended up looking quite different from each other.  The first one was browning too fast, and I covered the top with aluminum foil and reduced the temperature to around 450 F (with convection) for the second half of the bake.  Attempting to reduce the char, I baked the second one—the one proofed more slowly at lower temperature—at 475 F with steam for 20 minutes and at 450F (with convection) without steam for about 17 minutes more.  The second one had a nicer crust color and better grigne, and slightly more upward expansion.  The two loaves' crumb texture and taste are almost identical.  That is to say, delicious!

BCB Hotter Bake


BCB Cooler Bake

 BCB Crumb


For dinner Saturday, I wanted to serve something that would compliment the Basic Country Bread.  I settled on a Daube a l'Agneau (lamb stew in a Provencal style), marinated 15 hours in wine, cognac, herbs, spices and vegetables and then braised slowly for four hours.  Nothing could have made better gravy to sponge up with this wonderful bread.  Delicious with a well-aged Oregon Pinot Noir.

I continue to be very happy with the crumb texture of this Tartine bread, but I think next time I bake it I’ll go back to the Dutch Oven method.  In my four or five bakes of this bread, that method resulted in the best crust color and grigne.

Glenn

GSnyde's picture
GSnyde

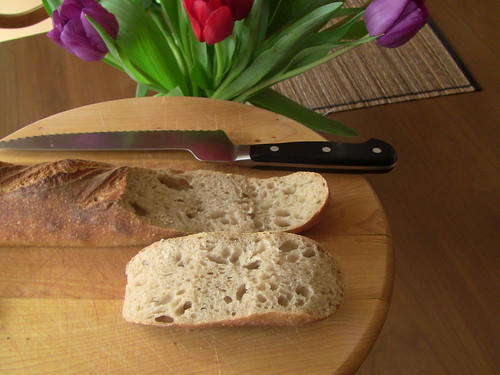
Back from vacation, I needed to bake some sourdough.  Tartine’s Basic Country Bread has become my favorite.   Its crumb is my ideal texture for a hearth bread--just the right amount of chew, and airy and moist.  But, as I’ve noted before, large loaves just aren’t practical for our everyday use.   Last time I baked a batch, it was one large loaf and two small ones.  This time I made four half-kilo loaves, two batards and two boules.

IMG_2378

I mostly followed the Tartine BCB formula, using Central Milling white and whole wheat flours.  But I departed from gospel in the following ways:

·      I only made as much levain as one recipe requires

·      I did the stretch-and-folds when convenient, five of them at intervals of between 30 and 45 minutes over a 3 ½ hour bulk ferment

·      I divided the dough into four loaves of about 490 grams each

·      I baked the loaves with steam on a baking stone, in two batches an hour apart, having proofed the second two loaves in the cool basement.

My hope was that these departures would not affect the result, and I was very pleased.  The crackly crust, the tender crumb and the subtly-sour complex flavor are as good as the one kilo loaves baked in a Dutch Oven, and we can have loaves of a usable size in the freezer.

IMG_2381

IMG_2383

To prove the point, we ate most of one not-quite-fully-cooled loaf for dinner, with a medley of melted cheese for the main course, and with a mix of peanut butter and passion fruit-jalapeno jam for dessert.

It’s great to be back and baking in my own kitchen!

Glenn

GSnyde's picture
GSnyde

We’re back from our trip to the Kona Coast on the Big Island of Hawai’i.   Since we spent a lot of time in the ocean, and another large part out enjoying the sights and flavors of the islands, there were not a lot of occasions for baking.   Plus, though our friends’ house where we stayed has a well-equipped kitchen, it isn’t well equipped for baking.

The good news is that I had a chance to try baking some typical Hawaiian breads, which don’t require much specialized equipment.  I took along a thermometer, some parchment and my favorite rubber spatula, and I bought our friends a nice big glass mixing bowl and a large rolling mat.  It all worked out.

Lavosh

I’m not sure why a Middle Eastern flat bread is so ubiquitous in Hawai’I, but it is very common to see Lavosh included in bread baskets there.  And we have enjoyed it.  So I found a simple formula in Reinhart’s Bread Baker’s Apprentice, and tried it out.  The dough is somewhat like a pizza dough.  After kneading, it had a nice silky feel.

IMG_2332

The containers by the bowl are not ingredients, just indicators of the proper means  of fueling an Island baker.

To attain the proper crispiness of the Lavosh, it must be rolled very thin.  This may require letting the dough rest for periods during the rolling.  I found that a millimeter can make the difference between a cracker and a bready texture.

The results were satisfactory.  Next time I’ll use at least half whole wheat flour and maybe some wheat germ.

IMG_2333


Portuguese Sweet Bread Rolls

IMG_2371

I do know why Portuguese Sweet Bread is so common in Hawai’i.  In fact many refer to it as “Hawaiian Sweet Bread”.   The Portuguese influence in Hawaiian life is everywhere.  I found a promising formula here on The Fresh Loaf (http://www.thefreshloaf.com/node/21175/hawaiian-portugese-sweet-bread).  This is a highly enriched, buttery, yeast bread.  I have had this kind of bread many times, and had a definite idea of what I was going for.  It is soft, tender, semi-sweet, best for breakfast.  I had Txfarmer’s “shreddable” crumb texture in mind, and with extensive kneading I achieved it. 

IMG_2372

IMG_2373

I should mention that the bread had to bake almost twice as long as the recipe calls for (and the oven did have a thermometer showing the temperature was accurate).

The rolls made good sandwiches with spicy island chicken and Passion Fruit-Jalapeno jam, and the loaf was excellent toasted with jelly.  Here’s the chicken cooking (with soy, sherry, scallion, ginger, star anise, hot peppers and sesame oil).

IMG_2375

After a thoroughly relaxing trip, it’s good to be home with my baking supplies and equipment and my kitty cat.  Sea turtles may be more unusual, but they’re nowhere near as fuzzy.

IMG_2359


Aloha!

Glenn

GSnyde's picture
GSnyde

I posted a funny blog (would that be a “flog”?) earlier today about the …um, difficult texture of rye dough.  But, seriously, the bread turned out very well.  I took a first try at Greenstein’s Sour Rye, which Brother David had blogged about some years back (http://www.thefreshloaf.com/node/9316/sour-rye-bread-george-greenstein039s-“secrets-jewish-baker”).  He had recommended it as a good sandwich rye.   The flavor is, to my taste, much superior to Reinhart’s New York Deli Rye, which I made recently.  As David promised, it is quite similar to the rye bread up with which we grew.   There’s no way to take pictures of the process without either washing your hands for several minutes to get the paste off or getting your camera irreparably gummed up, but here are some pictures of the finished product.

IMG_2312

IMG_2328

I also made a batch of proth5’s incredible “Starting to Get the Bear” baguettes, aka “bear-guettes” (http://www.thefreshloaf.com/node/20831/starting-get-bear).  This has become my favorite baguette formula.  The crispy crust and creamy open crumb are just about perfect.  No pronounced ears this time, but yummy as ever.

IMG_2317

IMG_2319

We had company for dinner (roasted King Salmon marinated in teriyaki, greenbeans with garlic and slivered almonds, and cucumber salad).  And they raved about both breads.  It’s nice to get positive feedback from people besides the loyal spouse.

A productive day in the home bakery.

IMG_2325

Glenn

GSnyde's picture
GSnyde

Having just begun what could be a long adventure with rye breads, I may not be an expert yet.  But I've developed a formula that replicates the texture of 40% rye dough.

800 g warm water

750 g rye sour

150 g quick set cement

50 g Epoxy

1/2 cup Altus (optional)

1 Tbsp Caraway seeds (optional)

Once you mix the ingredients (I recommend a mason's trowel) and scrape as much as you can off the spatulas, your hands, the bowl and the work surface, you have enough for a small dinner roll.


Glenn

GSnyde's picture
GSnyde


More experiments today.  I baked a Jewish-style rye bread for the first time and I riffed on Tartine’s Basic Country Bread.

The Rye and Wherefore

IMG_2291

I have been meaning to bake a Jewish-style rye bread for quite a while.  It hadn’t made it to the top of the list largely because my wife, though a devout Carbotarian, is not a fan of rye breads.  I have very fond memories of the “corn rye” from Karsh’s Bakery in the old country (Fresno).  And, though I don’t like the dense high-percentage rye breads that some TFLers do, I do consider rye sandwich bread to be among the most important breads.

So, with promises not to include caraway seeds and—more important—promises to also bake Tartine Basic Country Bread, I managed to get the (completely unnecessary) spousal consent to bake a rye bread.

I chose the New York Deli Rye from Reinhart’s The Bread Baker’s Apprentice.  The formula includes about 35% white rye flour (I used Central Milling Organic Light Rye), half of it pre-fermented.  The formula calls for first clear, high gluten or bread flour.  I would have gone for the first clear or KAF Sir Lancelot, but I don’t have any, so I used BRM bread flour. 

The dough was nice to work with once I got it hydrated enough.  It was easy to shape into nice cylinders.  Both the primary ferment and the proofing took less time than the book specifies (I guess my kitchen is warm today).  The loaves came out looking pretty good.  I like the medium dense, medium moist texture. 

IMG_2286

IMG_2288

The flavor is good, but a bit too sweet from the brown sugar.  It made for an excellent corned beef sandwich (the real purpose of Deli Rye). 

IMG_2310

Nothing wrong with this bread, but I think I’ll try another recipe next time, maybe a Hamelman.

Tartine Demi-Loaves

IMG_2305

A couple weeks ago, I baked the Tartine Basic Country Bread for the first time, and I was delighted with it in every way, except (1) the formula calls for a levain that is twice the amount needed for the dough, and (2) the formula makes two one-kilo loaves, and that is just too big for our normal use.

I have said before, in discussions about humungous miches, that I just don’t think the texture and flavor differences of a huge loaf are as big as the inconvenience of trying to consume one.  I needed to find out if Mr. Robertson’s much ballyhooed BCB formula could be tweaked to work better for me.

So, I mostly followed the formula, but I made half the amount of levain called for (just enough for one recipe), and I divided the dough into one one-kilo boule and two small batards of about 500 grams each.

 IMG_2296

I used all Central Milling flours: Organic Artisan Baker’s Craft white flour and Organic High-Protein Fine whole wheat flour.  The fermentation time and proofing time were shorter than last time (again the warm kitchen).  I baked the small batards on the stone, and the boule in a Dutch oven. [edit: here's a photo of the boule in the DO].

IMG_2302

Because of the smaller loaf size, the batards baked 18 minutes on stone with steam at 450 F regular bake, then 18 minutes dry at 425 F convection.  The internal loaf temperature was 209 F.  The full-size boule baked in a cast iron Dutch oven at 425 F convection covered for 20 minutes, then uncovered for 17 minutes.  Internal temperature was 210 F.

The batard was just as delicious, and the crumb just as holey and moist as the previous bake of this (full-size) bread.  

IMG_2308

I have rarely achieved such a big grigne…from ear to ear (yes, I had a bit of fun with the scoring).

IMG_2299

I failed to capture a photo of the equally broad grin of my Number One Bread Taster.  I think I’ll be baking this bread a lot more often now that I know that size doesn’t matter.

Glenn


GSnyde's picture
GSnyde

Brother David and his wife Susan are traveling back to Fresno after a weekend in the Bay Area to see our visiting brother Aaron from Colorado.  So with the two locals, we had 80% of the Snyder siblings in one place.  That place, of course, was well-provisioned with baked goods, and we had a very nice brunch at Sister Norma’s apartment in Oakland. 
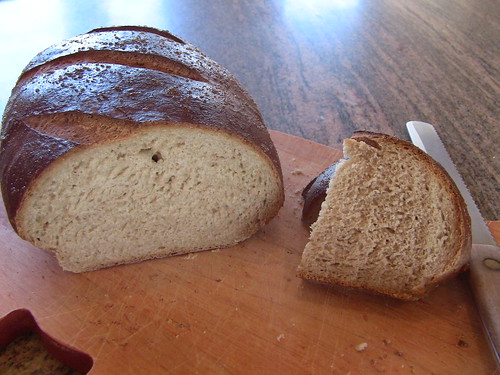
In the spirit of culinary science and the anthropology of family ritual among the California natives, we studied the question: “How many Snyders does it take to make a table full of baked goods disappear? “  The answer is “more than four”.  Now, this was not a proper scientific experiment, as we did not have a control group.  Just our out-of-control group.  Still, the procedures would be worth repeating to gather further data.

We did not photograph the experiment, as we did not want the recording of the event to affect the behavior of the subjects.  I can provide links to previous descriptions of the treats that lured the rats through the maze.

David brought his famous banana bread (http://www.thefreshloaf.com/node/22727/praise-crust-amp-crumb), a Hamelmanian rye bread  (http://www.thefreshloaf.com/node/22773/rye-bread-tips-and-tricks-applied), and the somewhat bizarre, but not really objectionable, Greek Saints’ Bread (http://www.thefreshloaf.com/node/22790/artos-greek-saints039-day-bread-kassos). 

I brought my latest attempt at “Mai Tai Scones”, somewhat like the ones described here (http://www.thefreshloaf.com/node/21496/people-who-live-glass-houses-shouldn039t-stow-scones) and some pistachio-golden raisin scones, using the same basic recipe but without alcoholic flavors.

As with most ritual gatherings of this particular tribe, there was more food than could possibly be consumed at one meal.  I have to say, that was among the best-smelling laboratories I’ve ever been in, and all the rats were quite pleased.

It is for smiles on family faces that we bake.

I will be performing further experiments with that banana bread.

Glenn
GSnyde's picture
GSnyde

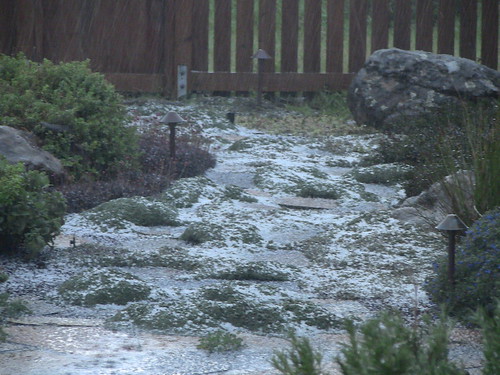
But, first, the weather.  Thunder, lightening and hail may not be a big deal to people in  some localities.  But in Northern California, they are rare as reliable weather-forecasting.  Saturday, our morning coffee was interrupted by a crashing downpour of (admittedly small) hail.  It went on for many minutes and accented our garden with glistening ice.

IMG_2262

Now, back to bread.

I posted a question here a few days ago, asking how to achieve an airy, tender crumb in a sourdough bread, like the ones I’ve had from some local artisan bakeries.  Several wise advisors suggested higher hydration, and mentioned Tartine’s Basic Country Bread in particular.  I am among the diminishing group at TFL who had not previously baked that bread.  This weekend I ended my holdout.  And the result was just the crumb I’d been hoping for.

IMG_2272

I found the formula at the breadexperience blog (http://breadmakingblog.breadexperience.com/2011/02/tartine-country-bread.html).  I refreshed my basic sourdough starter (70%AP/20%WW/10%Rye at 75% hydration) on Friday morning.  On Friday evening I made up the Tartine Leaven (50% white flour and 50% whole wheat at 100% hydration), using Central Milling Organic Artisan Baker’s Craft (malted) white flour and KAF whole wheat flour.  By Saturday at 9 a.m., the leaven was bubbly, and passed the float test noted in the formula.

The final dough was very fluid, but after a 30 minute autolyse and four hours of fermentation, with a four or five stretch and folds every 45 minutes or so, it became somewhat firmer and silky, though still quite sticky.  The sticky dough did not cooperate in the pull-stretch-rotate boule-forming technique, but I tightened the sheath as best I could, and plopped two blobs into well-floured 8-inch wicker brotforms.  They proofed for about four hours at room temperature, and grew about 25%, passing the poke test.

Then the real mess ensued.  Those blobs did not want to come out of their brotforms.  The edges of the blobs stuck to the rims of the brotforms and the “loaves” (if you can call them that) spread out on the parchment, defiantly declaring themselves to be pains rustiques.  I had decided to bake the loaves on stone with lots of steam, instead of in Dutch Ovens.  And the spreading blobs didn’t quite fit on my stone.  They melded together in the middle and almost oozed over the edges of the stone.

Thank goodness for a fully-preheated stone and the steam power of Sylvia’s Magic Towels plus a cast iron skillet with lava rocks.  The steam heat quickly gelled the oozing masses into something like loaves before they totally lost all form.  And they rose up like they were full of gas.

After 20 minutes of steam, I turned the oven from 450F to 420F with convection, and let the loaves bake for a total of 38 minutes, then left them on the stone with the oven door ajar to dry the crust for another 10 minutes.

Though these are not the best formed loaves I’ve baked, I could tell from their weight the moment I moved them from the oven to the cooling rack that they were going to be light-crumbed and open-celled.

IMG_2269

IMG_2273

This is pretty close to immediate gratification.  I go to TFL with a question.  I get some answers.  I follow the advice.  And it works!!  The crust was fairly thin and crispy when just cooled yesterday (or toasted today), and only slightly chewy today.  The crumb is deliciously tender and moist, even the day after.  The flavor is subtle, compared—say—to San Francisco Sourdough or the Hamelman Vermont, but very nicely complex in a delicate way.

We made a “bread dinner” of things that go great on sourdough—tuna salad, proscuitto, gorgonzola and a spread of chopped pear, chopped pecans and gorgonzola.  Washed down with a nice Pinot Noir Rose'.  And it was gooood!

IMG_2276

Thanks to all for the very good guidance.  I got a happy result, but my crumb quest continues--can I achieve this crumb texture consistently? 

Glenn


GSnyde's picture
GSnyde

Mixed Flowers and Mixed Flours

IMG_2250

Our plum tree blossoms  are gone and it’s leafing out (background of challah pic below).  And Daylight Savings Time stole an hour today.  So it must be Spring (despite the drizzle outdoors).   The baking this weekend followed the dinners.  Roast Chicken calls for Challah.  Fresh Pasta and Lamb Ragu calls for Sourdough.

The Challah bake was just the usual. No experiments.  Maggie Glezer’s recipe is perfect enough.  Always reliable and always delicious.

IMG_2234

IMG_2238

The Sourdough bake involved some tinkering with my “San Francisco Country Sourdough” formula.  It had been a couple months since I’d last played with this part-whole-grain pain au levain.   I upped the percentage of whole wheat to 11%.   I used Central Milling Organic Artisan Baker’s Craft (enriched) white flour.  I baked it into a large batard (one kilo) and two mini-baguettes.

IMG_2244]

IMG_2239

I think the evenness of the crust color on the baguettes may be due, in part to the malted barley flour in the Central Milling Organic Artisan Baker’s Craft flour, and in part to the thorough pre-heating of my oven and stone.   The darker edge of the grigne on the batard shows I forgot to turn the oven down after the loaf went in until I removed Sylvia’s Magic Towel set-up (d’Oh!).

The crumb texture is very nice, moist and medium airy, just as I like it.  It has a good sour flavor.  I let the liquid levain ripen for 16 hours and the dough retarded for about 16 hours.  My sourdough-lovin’ spouse describes her ideal sourdough simply as “fairly- but not super-sour, moist and chewy inside, crispy outside”.  She says this one hit the mark.  One baguette gone already.

IMG_2246

IMG_2251

Here’s the tweaked formula:

San Francisco Country Sourdough (Sourdough Pain de Campagne) version 3-13-11

Yield: Two 750g  Loaves; or Three Mini-Baguettes (235g each) and one 800g Loaf; or One 1000g loaf and two 250g baguettes; or…   

Ingredients

LIQUID-LEVAIN BUILD

100 grams   AP flour

24 grams  Whole Wheat flour

12 grams  Whole rye flour

170 grams   Water, luke warm

28     Mature culture (75% hydration)

FINAL DOUGH (67% hydration, including levain)

640 grams   All-Purpose flour (83%)*

85 grams  Whole wheat flour (11%)**

45 grams   Whole rye flour (6%)

435 grams   Water at room temperature (56%)

17 grams   Salt (2%)

306     Liquid levain  (48%)   

* 3-13 used CM Artisan Baker’s Craft (malted)

** 3-13 used CM Organic Hi-protein fine whole wheat

Directions

1. LIQUID LEVAIN:  Make the final build 12 to 16 hours before the final mix, and let stand in a covered container at about 70°F

2. MIXING: Add all the ingredients to the mixing bowl, including the levain, but not the salt. Mix just until the ingredients are incorporated into a shaggy mass. Correct the hydration as necessary.  Cover the bowl with plastic and let stand for an autolyse phase of 30 to 60 minutes. At the end of the autolyse, sprinkle the salt over the surface of the dough, and finish mixing 5 minutes. The dough should have a medium consistency. 

3. BULK FERMENTATION WITH S&F:  3 hours. Stretch and fold the dough in the bowl twice 30-strokes at 45-minute intervals.  Place dough ball in lightly oiled bowl, and stretch and fold on lightly floured board at 45 minutes.  If the dough has not increased in size by 75% or so, let it go a bit longer.

4. RETARDED BULK FERMENTATION (optional):  After second S&F on board, form dough into ball and then place again in lightly oiled bowl.  Refrigerate 8-20 hours, depending on sourness desired and scheduling convenience.

5. DIVIDING AND SHAPING: [Note: if bulk retarded, let dough come to room temperature for 30-90 minutes before pre-shaping.]  Divide the dough into pieces and pre-shape.  Let sit on board for 30-45 minutes, and then shape into boules or batards or baguettes.

6. PROOFING: Approximately 1.5 to 2.5 hours at 72° F. Ready when poke test dictates.  Pre-heat oven to 500 with steam apparatus in place.

7. BAKING: Slash loaves.  Bake with steam, on stone.  Turn oven to 460 °F after it hits 500F after loading loaves.  Remove steaming apparatus after 12 minutes (10 for baguettes). Bake for 35 to 40 minutes total (for 750g loaves; less for smaller loaves).   Rotate loaves for evenness as necessary.  When done (205 F internal temp), leave loaves on stone with oven door ajar 10 minutes.

Happy Spring!

Glenn


GSnyde's picture
GSnyde

A drizzly weekend seemed like a good time to fill the house with the aroma of spices.   It started out with the need to replenish our supply of Cinnamon-Raisin-Walnut Bread, my Number One Bread Fan’s favorite.  Then, I wanted to bake something really special to take to our friends’ new house for a pre-dinner snack and cocktail.   I settled on making a second attempt at the Cheese-Curry-Onion Bread from The Cheese Board Collective’s cookbook.

Cinnamon

IMG_2222

Peter Reinhart’s Cinnamon-Raisin-Walnut Bread may be the bread I’ve baked more times than any other.  It’s a real treat every time.  I usually use a mix of walnuts and pecans, and use butter in place of shortening.  And this time I decided to try it with 25% whole wheat flour, since we’ve been enjoying the flavor of whole grains lately.  Besides, we have declared that whole wheat makes this a health food, so we can eat it even more often without sugar-guilt.

IMG_2223

A well-balanced breakfast.

IMG_2232


Curry

IMG_2230

At the beginning of my baking education, I started on sourdough.  The first straight dough bread I made was the Cheese-Onion-Curry Bread from Berkeley’s Cheese Board Collective.  As I reported back in September, it is a bread with very special memories of my gradual school days in the ‘70s.  So when my wife--as if reading my mind-- gave me The Cheese Board Collective Works as a birthday present, I immediately tried to bake a batch of taste memory.  We loved it, and now six months later, I can’t believe I haven’t baked it since.  It was time.

In the interim, I’ve read a lot of recipes here at TFL and elsewhere that use cheese, onions and bacon in various combinations.  They usually make me drool.  I decided to vary the Cheese Board’s recipe a bit.  I used a combination of yellow onions and scallions, and I added some fried bacon (in our house, we call it Vitamin B), since almost everything with cheese and onions is better with bacon.

This bread is a complete meal.   You start with a simple yeast bread dough with curry powder and pepper.  Then add onions/scallions, chopped bacon and a full pound of cubed cheese.  I used a combination of Sharp Cheddar, Jarslberg and Gruyere. 

IMG_2214

IMG_2215

The amount of chunky stuff in the dough makes it impossible to form a smooth-skinned boule, so the loaf flattens out some in baking, but holds together with some luck.  It's not a real pretty bread, but my, my, what flavor!

IMG_2231

The best part is the pockets of molten cheese interspersed with the strongly cheese and curry flavored moist and tender crumb.  I think the bacon flavor is barely noticeable, but my wife tells me it's there and it's good.  She suggests dialing back the curry a bit so the bacon flavor comes through more.  I may try that.

This is a recipe worth trying if you’re looking for a hearty meal in a loaf.  I highly recommend The Cheese Board Collective Works (http://www.amazon.com/gp/search?index=books&linkCode=qs&keywords=1580084192). It's got lots of recipes for breads and morning baked goods, too.

Here’s my variation on the recipe:

Cheese Scallion Bacon Curry Bread

(adapted from Cheese Onion Curry Bread in The Cheese Board Collective Works)

Ingredients

4 cups  Bread Flour  570g

1 ½ tsp Instant Yeast 5g

1 ½ tsp Black Pepper 3g

1 ½ Tbsp Curry Powder 4g

2 tsp Kosher Salt 12g

1 ¾ cups Lukewarm Water 400 g

6-8 slices Bacon, cooked and chopped

½ yellow onion plus  6 Scallions, chopped

1 pound Mixed Cheeses*, cut into ½ inch cubes 

Medium yellow cornmeal (for sprinkling)

1 Egg, beaten (for glaze)

-------------------

* Any firm flavorful cheeses will do.  I used a combination of sharp cheddar, Jarslberg and Gruyere.  If you don’t want molten pockets of cheese in the bread, you could grate the cheese.


Procedure

In a mixing bowl, combine flour, yeast, pepper, curry powder and salt.  Add water and mix until ingredients well combined.

Transfer to lightly floured board and knead until smooth and silky (10-12 minutes)

In a small bowl, toss onions and scallions with 1/2 Tbsp of flour and mix.

Flatten the dough to a one-inch thick disk and add scallions and bacon to the center.  Gather the dough around the scallions and bacon and knead to incorporate (2-3 minutes).

Again flatten the dough and add cheese in center.  Gather up the dough around the cheese and knead to incorporate.

Form the dough into a ball and place in an oiled bowl large enough for dough to double.  Turn the dough to coat with oil.  Cover the bowl with plastic wrap or a damp cloth.  Let the dough rise until doubled (about 60-90 minutes at room temperature).

Sprinkle cornmeal on two baking pans.

When dough has doubled, place it on a lightly floured board and divide into three equal pieces.  Shape each as a loose boule, cover with a floured dish towel and let rest for 10 minutes. (Note: with the chunks of cheese, there’s no way to get a smooth taut sheath on the loaf.  Don’t sweat it).

Shape each ball into a boule and place on baking pans dusted with corn meal (I used parchment between the pan and the cornmeal).  Cover the loaves with a floured dish towel and let rise until increased in size about 50% (or use poke test).  This takes about 60-75 minutes at room temperature.

Pre-heat oven to 450F.

When loaves are proofed, brush with beaten egg and bake (Note: no need to slash and no need for steam).

After 10 minutes at 450F, lower temperature to 400F.  Rotate baking pans as necessary to achieve even browning.

Bake a total of 35 – 40 minutes or until crust is golden brown and loaf sounds hollow when tapped on the bottom.

Remove loaves to cooling rack.  Eat when not quite cool (45 minutes).

Enjoy!

Glenn


Submitting to Yeastspotting.

Pages

Subscribe to RSS - GSnyde's blog