The Fresh Loaf

A Community of Amateur Bakers and Artisan Bread Enthusiasts.

breadforfun's blog

breadforfun's picture
breadforfun

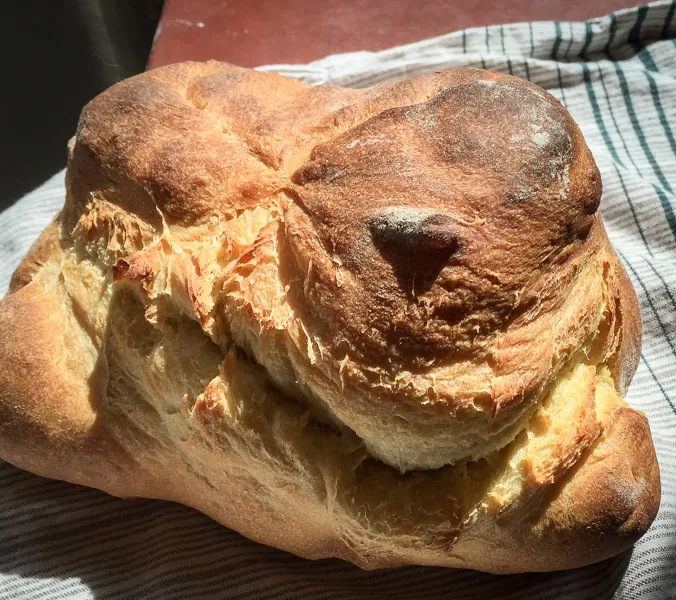
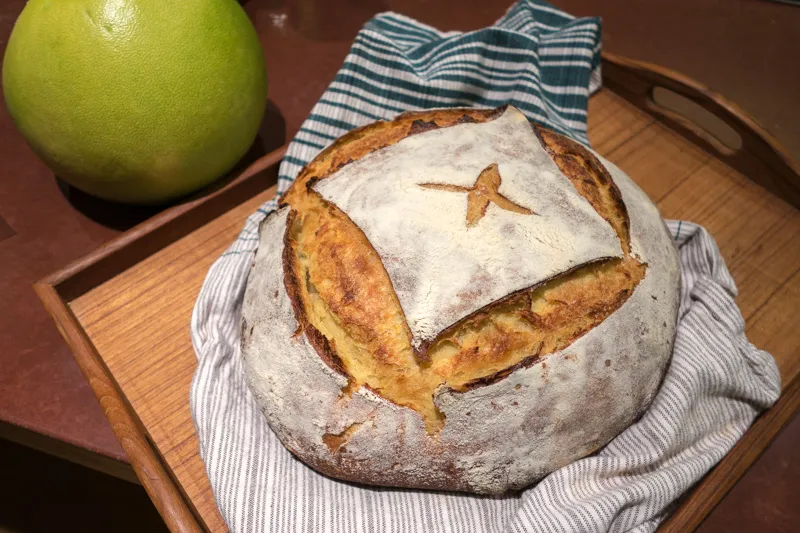
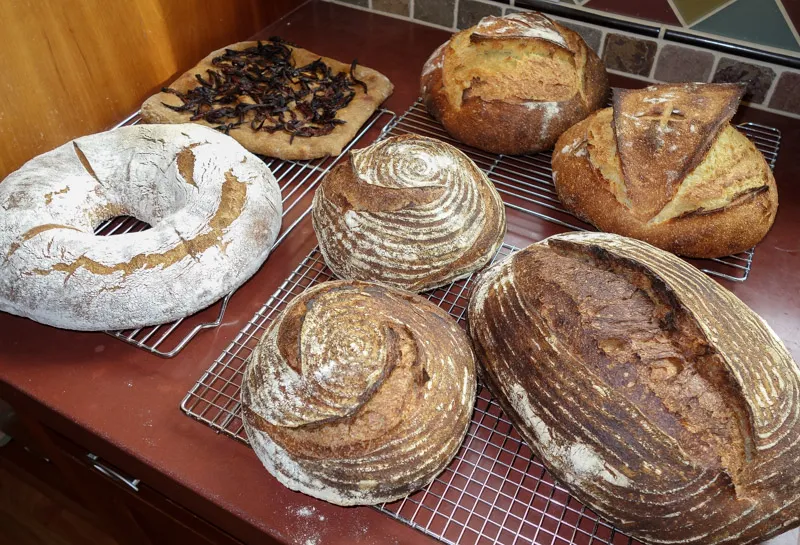
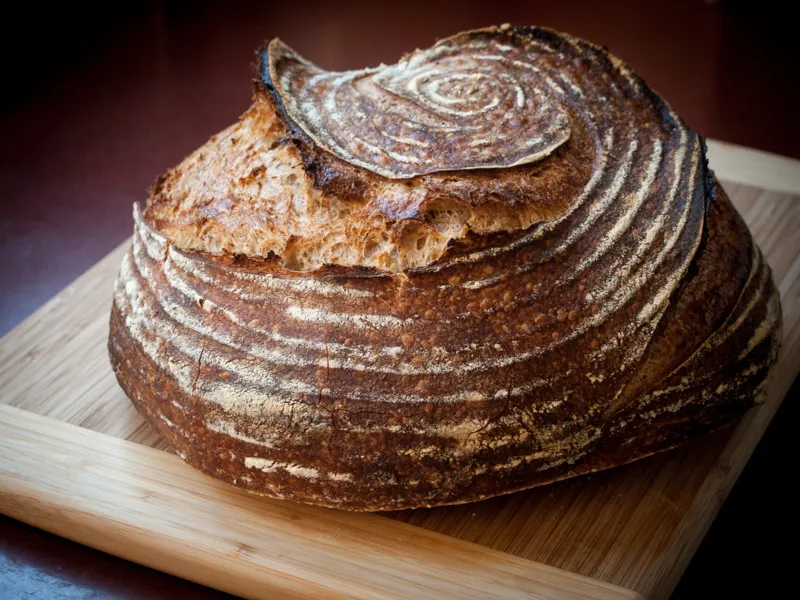
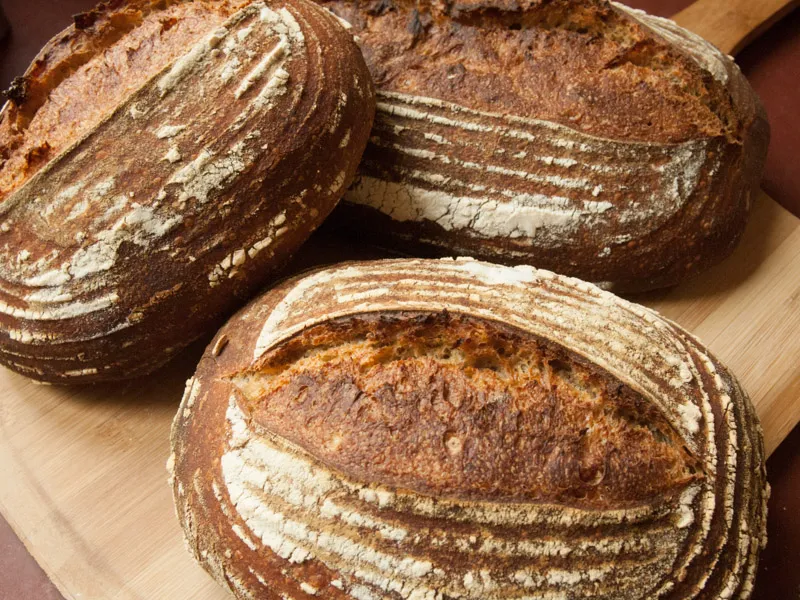
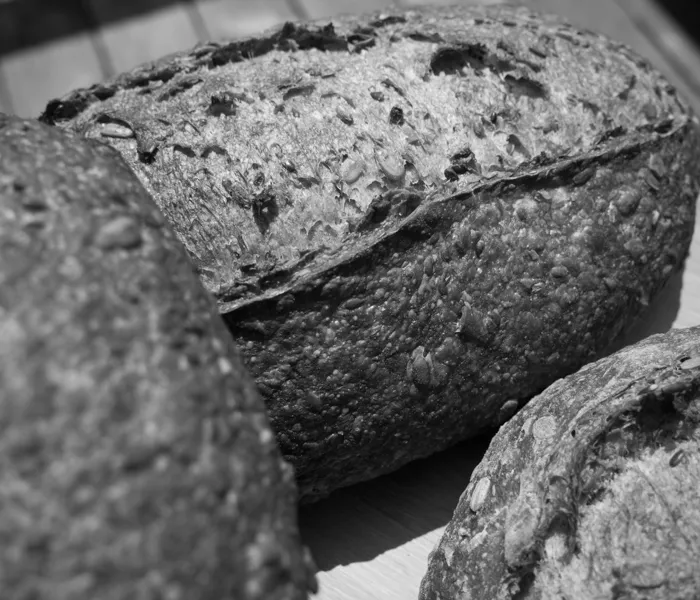
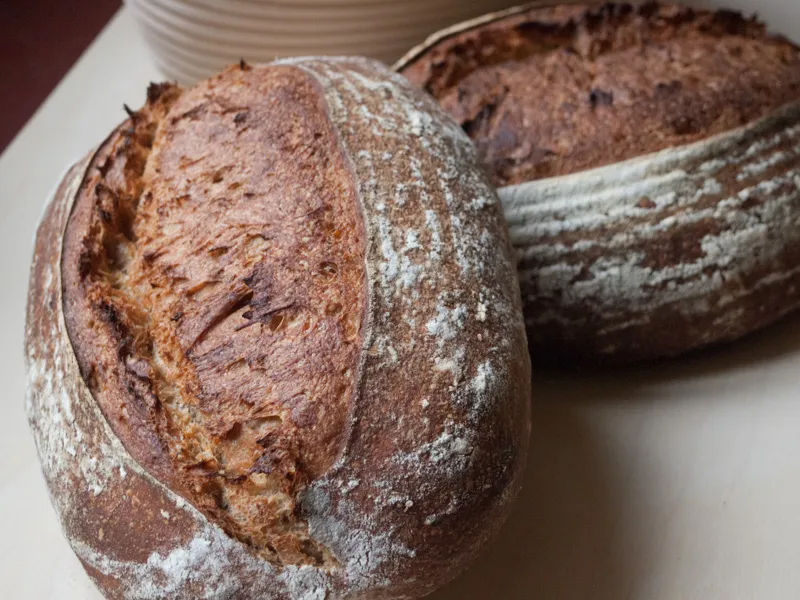
About a month ago I wrote about my attempts to reproduce a Pane di Altamura that I tasted on a visit to Italy.  For the past few weeks I have been working on the formula and on my technique, and I’m happy to post my most recent results, which are much closer to the original look I was after.  I researched the techniques a bit more and found some information I had missed the first time around.  The key one was that I had not achieved sufficient gluten development.  A post on TFL (with much thanks to nicodvb) described a 30+ minute knead to fully develop the dough, which was contrary to much of what I had read about gentle kneading requirements of durum.  I had been doing S&Fs every 30 minutes previously and although the strength felt right, it was apparently insufficient.  A couple of other important changes came from the D.O.P. document which said that the preferment should be 20% PFF (I was using 17.5% based on other recipes), and mixing the dough with cold (~55-60˚F) water.  (While I perform these experiments I am keeping a 100% durum starter as well as my normal wheat starter.)

My two last bakes shown in the photos below differed primarily in the overall hydration.  Most of the formulas available indicate hydration around 65% for Pane di Altamura, which I stuck with at first.  The dough was easy to work with, but it was quite stiff, and the resulting crumb was very closed and tight.  The aroma was lovely and taste was mild and somewhat sweet.  The sourdough flavors were mostly undetectable.  My shaping technique is still not perfect, although it is improving. The finished loaf is pictured at the top of the post and the crumb is shown here.


On the most recent bake I increased the hydration to 72%, more like the minimum I would use for a wheat-based sourdough.  Keeping with 20% preferment, I split the batch into 2 loaves and shaped them into boules.  One loaf was proofed for 2½ hours and baked as a boule.  The second was retarded overnight, then shaped in the traditional folded loaf and baked the next morning.  No steam was used during the bake and the oven was propped slightly open during the first 15 minutes of bake.

     Active starter after 12 hour fermentation


     Boule and crumb with 72% hydration dough.

     Folded loaf and crumb


I plan to work with this general formula a bit more, making adjustments as the mood strikes:

17% prefermented flour using 110% hydration durum levain. This was based on a misreading of the regulations that the levain is 20% of the overall dough; it should actually be 20% prefermented flour. The levain was fermented for 12 hours at 75˚F with the ratio of seed:water:flour of 1:3.5:3
72% overall hydration (the calculation includes the levain)
100% patent durum extra fancy flour (fine grind, or Italian rimacinata)
1.9% salt
Final dough weight ~1300 grams (this large because it makes it easier for me to accomplish all the folding needed to shape the loaves) kneaded for at least 20 minutes, plus 4x S&F for the first 2 hours.
Bulk ferment 3 hrs @ RT, final proof 2½ hrs or retarded overnight.
Baked in a falling oven for 1 hour, starting at 460˚F and finishing at 400˚F, dropping the temperature in 2 steps, without steam.

They both had chewy crusts and the crumb less so, but had a bit of resistance.  The folded loaf had noticeably more flavor and a more pronounced but not overpowering sour tang and came out really tasty. Another major difference was that the crumb of the boule that was scored was drier than the boule shaped in the folded loaf form, which was quite moist.  They were baked with roughly the same temperatures and times but clearly the scores allowed more water to evaporate.  They both had thick crusts reminiscent of the authentic loaf.  I plan to extend the baking time and lower the temperature more quickly for the next folded loaf to dry it out a bit more.

-Brad

breadforfun's picture
breadforfun

Hamelman's 5-grain Levain is one of our favorite breads.  My wife and I always have some on hand in the freezer (it freezes quite well), ready to toast a slice for breakfast or for a sandwich.  It also lends itself to all kinds of variations since it is easy to modify the ingredients and relative amounts of the soaker.  I have used cracked rye (as called for in the original recipe) and have also had success with bulghur wheat.  This time, inspired by this post earlier this year, I tried it with freekeh, something I just recently discovered.  Freekeh is green durum wheat that is lightly smoked, so I was hoping to impart that smokey flavor to the bread.  Another variation this time was when making the levain, I doubled the amount of the seed starter, shortening the fermentation time to reduce the acid formation and yield an overall sweeter bread.  The two loaves were retarded in the refrigerator overnight and baked after resting at room temperature for an hour or so.

The bread is really delicious, although the smokiness is not as pronounced as I had hoped.  The sweetness nicely complements the dark caramel of the crust.  I will make this again and probably increase the amount of freekeh in the soaker for a more smokey character.

-Brad


breadforfun's picture
breadforfun

It began innocently enough, as these things often do.  Ever since I started baking in earnest several years ago I have been intrigued with Pane di Altamura.  Not that I knew exactly what it was, mind you, but the name appeared in many breads that had the golden glow of rich butter in the crumb from the durum wheat.  I was able to buy loaves from several local bakers, most notably Acme Bread, to sample.  These are good breads!  I started experimenting with various formulae and making my own.  Il Fornaio, Peter Reinhart’s Bread Baker’s Apprentice, Amy’s Breads, Dan Leader’s Local Bread, Maggie Glezer’s Artisan Bread all had versions and I made and enjoyed each of them. I even shared them with friends, who all left with smiles after eating them. Some of them may have been smiling after drinking that 20 year old Barolo, but they liked the bread, too.  

My wife and I spent the last two weeks of October in Southern Italy.  Needless to say, we had to make the pilgrimage to the town of Altamura - after all, it was only 15 minutes away from where we stayed in Matera, a city continuously occupied since prehistoric times that’s worthy of a post of its own.

Before we left on the trip I learned about twice milling the durum flour to achieve a flour texture suitable for making breads.  Semolina, the coarser grind of durum wheat has sharp edges that tended to cut the gluten network and therefore reduce the ultimate height of the loaf.  The double milling is supposed to reduce these spikes.  In the U.S. it’s called Extra Fancy or Extra Fine Durum, and in Italy it’s called Rimacinata (re-milled). I've used the Extra Fancy Durum before but I never knew exactly what it meant.

Pane di Altamura is, I believe, the only bread that has a Denominazione d'Origine Protetta, or D.O.P., an E.U. designation that specifies a product and protects the name from being co-opted and used to promote an inferior product. We bought a loaf from a local Paneficio in the city center, and another loaf from a D.O.P. certified bakery on the way out of town. This last loaf was a complete eye (and mouth) opener!  It was nothing like any bread I had ever tasted. The loaf had a honey-colored crispy crust that begged to be torn into.  The crumb was very yellow, slightly moist and chewy and, at the same time, fluffy and very aerated.  There was an ever-so-slight sourness with a rich, a little nutty, earthy flavor.   The DOP regulations say (among other things) that the crust must be at least 3 mm thick.

If you are interested in the regs you can download them here (the link doesn’t always work - not sure why)


When we returned home I set out to reproduce the bread as best I could.  The quest started by my dragging home a 5 kg bag of the local flour, Semola Rimacinata Grano Duro, in my checked luggage. 

Although it wasn’t that expensive there (€8 or roughly $10.50 at the time, less than $8.50 at this weeks exchange rate) for 11 pounds of flour, my supply was obviously very limited, so I wanted to practice on something more available in case the imported version was truly different.  I had some Extra Fancy Durum flour from Central Milling (in California) that seemed to be as fine as the Italian version so I decided to use this to develop a bread formula before trying my import.  

But where to start?  At first I was unsuccessful tracking down any authentic Italian recipes (more about this later), so I took parts from Il Fornaio’s Altamura and Amy’s Breads Golden Italian Semolina for a couple of bakes.  These loaves were not worth spending much time on - flat, dense, nearly tasteless, certainly nowhere near the loaf in my minds eye.

On my third attempt working with the Extra Fancy Durum I opted for Leader’s version, which is 72% hydration and 18% pre-fermented flour from an 81%H all durum starter. I several some changes to the formula mostly because the flour seemed unusually thirsty, and ended up with about 77%H dough made with an 86%H starter.  Instead of following Leader’s shaping technique, I tried simply to fold the loaf in half trying to achieve that authentic look.  This resulting loaf looked OK, but the crumb was very tight.  Also, in the photo you can see some unincorporated flour due to the simplistic shaping. And it certainly wasn’t the same color as we had in Italy.


At this point I felt I had to try the flour I brought back to see how it behaved.  The first thing I noticed as I prepared the starter was the ease with which the flour hydrated.  The flour from Central Milling was very thirsty - building an 80%H starter felt as thick and dry as a 65-70%H whole wheat starter. Using the Grano Duro, the same 80%H more closely resembled an 85-90% WW starter and the flour hydrated as readily as sugar into water. The second major difference is the color.  The Grano Duro is a bright yellow compared to the creamy yellow of the CM. Clearly I would have to lower the hydration for this flour.  The initial results were unspectacular and disappointing, and it was back to the drawing board.

Since the first attempt with Leader’s formula have baked versions of Pane di Altamura a dozen more times.  I found another domestic flour from Giusto’s Vita Grain (sourced from North Dakota Mill) that behaved and appeared more like the Grano Duro. Rather than bore you with the details of each and every one, here are some representative photos of the results.


I also found this blog (translated by Google) that gives a pretty detailed formula, although she, too, uses the boule shape.  My results are not quite as open a crumb as hers, but pretty close.


My most recent bake was done at a slightly lower hydration.  It was a direct comparison between the Italian Grano Duro and the Giusto (North Dakota Mill) Patent durum flour.  I was also playing around with long refrigerated overnight bulk ferment rather than retard after shaping, as was the case with loaf shown above. 

Comparison between Giusto Flour on the left and Grano Duro from Italy on the right.  The respective crumb shots are below.


In the interim and after some intensive web searches I found a few Italian videos that describe the shaping process. Unfortunately I don’t speak Italian, and there is a lot more dialog than action in these clips, but I began to get a sense of how the loaves are shaped.

In this video the various finished shapes are shown in the beginning.  You have to wait until around halfway through the video until you see the shaping techniques.

In another video you can advance to around the 10:00 mark to see about 10 seconds of shaping.


At this point, I am fairly happy with the breads when I make basic boules.  I think the results are not as good as they could be, and for whatever reason my gluten structure isn’t strong enough to hold up to shaping after long fermentation.  Presumably this is why I can’t shape as in the videos.  If there are any Italian speakers out there who can translate from the videos I’d be happy for any tidbits that may shed some light on what I am missing.  My goal is to be able to shape a loaf like the one at the top of this page.

If you have read this far, thanks for sticking with this long-winded post.  My version of Pane di Altamura is still a work in progress.  The lack of a wood-fired oven, though, will insure that I never can match the flavor of the original. That’s fine with me - it makes a perfect excuse to go back for more.

-Brad

breadforfun's picture
breadforfun

It's been a while since I last posted, so I wanted to share some photos from this weekend's bakes.  A small get together with some friends always inspires me to bake a mix of some new breads and some standards. Clockwise from the left are: Royal Crown's Tortano (from Glezer's Artisan Baking in America), a caramelized onion focaccia (made with flour I brought back from Italy last fall), two boules of Pane di Altamura (more on this later) and three loaves of my go-to spelt sourdough.


Here is a crumb shot of the SD batard and a close up of one of the boules. The batard finished at around 1200g and each boule was around 700g.


The Pane di Altaumra is a formula that I have been working on for a few months with mixed success.  It is worthy of a post all its own that I hope to finish soon.  Meanwhile, these two boules are a comparison between a loaf made with domestic patent durum flour (on the left) and one made with Italian Semola Rimacinata Grano Duro that I carried back from my trip.

And their respective crumb...


The tortano didn't fully rise in one section, probably due to overhandling the dough, but it had a very complex flavor for a yeasted dough (it used a long-fermented poolish as leaven).


There was enough for all the guests to take some home for breakfast.

-Brad

breadforfun's picture
breadforfun

I haven't posted in a while due to a busy travel schedule and family obligations. When I finally returned a few weeks ago I wanted to try out a few formulas from Robertson's latest book, Tartine 3. His combinations of ingredients and use of porridge (think cooked soaker) are very intriguing. 

I made a double batch of the wheat-rye-caraway-bread.  This has only 10% rye, the rest being a blend of white, high extraction and whole wheat. I was out of high extraction at the time, so I substituted a 50/50 blend of white/WW instead.  This is an 85% hydration bread with only 7.5% prefermented flour, so the bulk ferment was long (4-5 hrs at 75˚F).  I divided the dough into 6 loaves, roughly 500-600 gm each, and proofed them in brotforms overnight in the refrigerator.  The flavor of the ground spices, each 2%, were in the background of the finished loaf, less intense than I expected considering the volume as I was adding it. The crumb was open, although less so compared to his basic country sourdough. It makes a great tasting sandwich bread, and goes surprisingly well with sharp cheddars.


When I first approached the porridge breads I noticed an inconsistency in the book (see post).  I made the Rye Porridge bread using a hybrid technique.  It was too late to add the porridge to the levain and water mixture, so I added it to the dough directly after the autolyse, but well before the second fold as stated in every porridge recipe in the book. Still, it was difficult to distribute the porridge evenly, and I believe it affected the openness of the crumb somewhat.  The flavor was very nutty and had a lot of depth due to the porridge.  The crumb was very moist and the crust had a good chewiness.

In the future when I make these porridge breads, and I definitely will, I will add the porridge to the levain prior to the autolyse, as he describes in the Master Formula section of the book. There are so many combination that sound so good, they will keep me busy for a long while.


-Brad


P.S. Here are a few of views of my trip to China and Tibet:


breadforfun's picture
breadforfun

It has been a while since I posted, although I have been baking regularly.  For New Years I made a few breads and thought I would add my voice to those who have had wonderful success with David's posting of the SFBI Miche on TFL.  When I first started baking sourdough breads I was totally intrigued by the photo of a large miche on the cover of Reinhart's Bread Bakers Apprentice.  I spent months trying to master it, with only moderate success.  But an attraction to the miche loaf has stayed with me, and I really enjoy making these large loaves.

Since David posted the SFBI recipe, I have made it half a dozen times.  The picture of a miche that I have in my head, though, is something a bit flatter and more spread out.  I thought I might be able to attain this look by increasing the hydration above the 73.4% in the recipe.  Over my last three bakes, I have worked the hydration up to 78%, and I'm pretty sure it can take even more water.  Still, the 78% results are worth sharing, so here are some photos.  I will continue to try for the flatter loaf, but in the meantime I'm happy to enjoy these.

Like David, I keep Central Milling's Type-85 high extraction flour in my pantry just for the miche.  I made a batch of 3.6 kg of dough that required a 4 hour bulk ferment, keeping the temperature at 75˚F.  I did a total of 4 stretch & folds at 30, 60, 90 and 150 min.  It was divided and shaped into two ~1000 gm batards (see below for a variation) and one 1550 gm boule and proofed at RT for one hour.  One batard and the miche were refrigerated overnight (about 18 hours) and baked on a stone directly from the refrigerator the next day.

The crumb on the loaf is light, airy and transparent.

The flavor is tangy, wheaty, even a little earthy.  The crust had a good chew and the crumb was somewhat soft but with a good mouth feel.

There was one other variation that I made.  Varda's post describing fig and anise bread, with links to several other posts, made me want to try another attempt at a fig bread.  My earlier attempts were not that successful, and I also wanted to add nuts to the bread in place of the anise.  I felt that this dough would lend itself to this so after the first 30 min. of the BF I divided off 1000 gm of dough and folded in 20% each of soaked dry figs and toasted pecans.  Phil made a similar loaf, so I borrowed his technique of final proof in the refrigerator for 3 hours rather than an overnight retard.  The results were quite respectable.  The crumb is not as open, unsurprisingly, which gave the bread a nice chew.  Perfect as a base for a bit of soft cheese.


Happy New Year everyone!

-Brad

breadforfun's picture
breadforfun

A few weeks ago I wrote about this formula, and after many suggestions from readers out there, I followed up with two bakes.  This post shows the outcome when including all the flours in the long autolyse, based on suggestions from Khalid and David.  Essentially the method was the same as previous with these two exceptions: for bake 2, the autolyse included all the water and all the flours as listed plus 3 gm salt, and for bake 3 the salt was eliminated in the autolyse and the overall hydration was increased to 75%. 

Bake 2, I included the small amount of salt as a hedge against overactive enzymatic activity of the rye (and possibly the spelt) flour.  The autolysed dough was maintained at 74˚F for a little more than 11 hours, the same time to allow for the final levain build to mature. It was more hydrated than the original version, and the autolysed flours already had a nutty aroma.  Here are the final bakes:


The loaves seemed more flavorful than the last time (but it may be wishful thinking), and the crumb was definitely moister.  Sorry, no crumb shot, but it was very similar to the one below.

For Bake 3, I eliminated the salt altogether from the autolyse, and increased the overall dough hydration to 75% from about 72.5%.  I also made a double batch, which turned out to be a bit problematic as I am not really equipped to handle over 4 kg of dough.  It also turned out to be an unusually hot week in San Francisco, so the bulk fermentation got a bit out of hand and I probably went too long.  This made the dough a bit sticky and more difficult to shape.  Still, the breads turned out fine, although the bloom was not as large as usual for this bread.  The crumb, again, ws quite moist, even moreso than the previous bake due to the added hydration.


As mentioned, the crumb was moist and airy.

A few of folks have mentioned the boule scoring, so here are some photos. This boule was 1500 gm of dough, which is the largest I've done with this score.

The flavors of both bakes were quite close, with good nuttiness and noticible tang that increased over the next few days.  Bake 3 was a bit bolder, in part to compensate for the added hydration, and had nice singing and cracks are seen throughout the loaves.  It was also more sour, presumably due to the increased fermentation from the higher ambient temperature.

I don't really have a conclusion on whether the salt was necessary for the autolyse, but I think it is not.  The autolysed flours for bake 3 were softer, but that was more likely due to the increased hydration rather than omission of salt. 

Another thing I learned: the wheat germ absorbs a lot of water, much more than I expected.  Since it was the only ingredient other than the salt added when mixing the final dough, and I held back a small amount of water for the add, it was easy to see that all the water went straight to the wheat germ.  Next time, maybe include the wheat germ in the autolyse - has anyone ever done that?

Have fun baking!

-Brad

breadforfun's picture
breadforfun

Just a short note to share some recent bakes.  We love Hamelman's 5-grain levain - it's flavorful, moist, healthy, and it freezes well.  We always keep a loaf in the freezer, sliced and ready to toast for spreading with (choose your topping: cream cheese, yogurt cheese, jams) for breakfast.  It also makes a great sandwich bread.  I follow the basic recipe from Bread (1st edition - I don't know how it compares to the recent release), with just a few small additions.  First, I add 100 gm of toasted pumpkin seeds, and second, I substutute yogurt whey for the water in the final dough.


Another recent bake is Horiatiko Psomi, which is based on this recipe.  David (dmsnyder) also made a version of it here.  I tried the batard version that is coated with sesame seeds.  It had a fairly closed crumb with a few larger holes.  But the crumb was creamy and it had a soft, chewy crust, it is also quite tasty with a hint of tang.  Unfortunately, I have no crumb shot because it was brought to a friend for dinner.


Have fun baking!

-Brad

breadforfun's picture
breadforfun

There has been lots of discussion here and elsewhere (notably Ken Forkish in FWSY and Ian in his Ars Pistorica blog) on the benefits of long autolyse.  I thought I would do a side by side comparison to see what the difference in taste is, since, after all, that's the main reason we all bake so much.  Just for fun, I also wanted to try a more complex levain.  I have been using a simple straight wheat levain that I maintain at around 100% hydration.  After reading posts by Tom (Toad.de.b) and MC (Farine) on the mixed flour blend used by Gérard Rubaud, it seemed this would be a place to start in order to get a better flavor.  I adjusted the levain flour blend to the same as in the final dough. For the autolyse, I used only the wheat flours (AP, bread and whole wheat), mixing in the rye and spelt together with the levain because I am not sure if the additional enzymatic activity would make the dough too slack (aha, another experiment!).

The loaves baked very much like other levain loaves that i have made with similar hydrations (about 72-73%) with nice blooms and singing crusts. 

The comparison loaves were made with the same formula except for using a 30 min. autolyse instead of the overnight refrigerated autolyse, and I did deviate slightly by shaping them into 500g loaves instead of the 1000g ones above.

The flavor was definitely more intense on the loaves that were autolysed for around 16 hours.  Compared to breads I made in the past using a straight wheat levain with the same flour blend, the flavors were  more nutty and wheaty.  Also, the texture was much more creamy on the longer autolysed loaves and the crumb highly gelatinized (the photo doesn't do it justice). 

This is all consistent with what others have been saying.  I've been just a little slow on the uptake here.

The formula, which is scaled to two 1000g loaves after baking, is below:

I'm very happy with these loaves, and I plan to try them again upping the hydration to around 78%.  The other questions that still need to be answered are whether long autolyse with rye and spelt negatively affect the dough, and what is the difference between the refrigerated and room temperature autolyse used as an enzymatic preferment.

-Brad

 [Edit: Replace formula panel because some lines in Method were incomplete.]

breadforfun's picture
breadforfun

What can I say, I like big loaves.  I have made the Tartine Country bread a number of times in all sizes, from 500 gm to 2 kg, and am always happy with the results.  I refreshed my starter when I returned from a week away with the intention of trying the whole wheat loaf as well.  On my last visit to Central Milling I picked up a 5# bag of Acme Organic Whole Wheat flour, so what better bread to test it on.  I pretty much followed the method in the book, with a small deviation because I forgot to hold back the required 50 gm of water to add with the salt after the autolyse, so I had to add some extra water.  The formula was supposed to be 80% hydration, and the extra water took it up to 83%.  The formula is quite basic:

Levain          200 gm    20%

Water           830 gm    83%

WW flour    700 gm     70%

AP flour       300 gm     30%

Salt                  20 gm      2%

I made a double batch and shaped them into 1 miche at 1950 gm and three smaller boules at around 700 gm each.  The bulk ferment was about 4 hours at a controlled 74˚F with S&F at 30, 60, 90, 120 and 180 min.  After shaping, I retarded the miche and one smaller loaf overnight (about 16 hours), and continued proofing two of the smaller loaves for 3 hours.  Baking was on a stone heated to 500˚F which was reduced to 460˚ when the boules were peeled into the oven.  Steam for 15 min. then turn on the convection to 425˚ for 20 min. more, rotating as necessary.  For the miche, the convection temperature was 415˚ and the convection bake time was 35 min. 

The loaves showed lovely bloom and grigne.  I have been playing with different scoring lately, and I like the effect using two interlocking half-circles.  A bit cumbersome to do on the large loaf, but it's a nice look.  I think the bake times could have been a bit longer.  Though the loaves registered over 205˚ and were left in a cooling oven with the door cracked open for 10 min., I didn't get the nice singing and crackling crust like I do on the Country Loaf, which I suppose is due to the higher hydration dough and not being baked out completely. 

The crumb on this bread is sublime - airy and with a fairly soft chew.  The flavor is nutty and wheaty with a distinct tang on the retarded loaves (I didn't get to try the others).  Curiously, the 2% salt seemed a little on the light side.  This photo is the crumb of the smaller loaf - I'll post the miche once I cut it.  The final size of the miche was about 10 inch diameter and 4 inch tall at the dome.

-Brad

Pages

Subscribe to RSS - breadforfun's blog