
This is a formula originally posted on usenet in the great alt.bread.recipes group by Jason Molina all credit to him and the 'King of Gloop', I'm reposting it here for those that missed it there. I've made this quite a few times and it's always a huge hit. Giant bubbles and a golden crust. Best part is you can do the whole thing in about 4-5 hours. It does not use the traditional stretch/fold method for a ciabatta because it's so damn wet, the only stretch is the final shaping.
THIS WILL NOT HURT YOUR PRECIOUS KITCHEN AIDS
Ciabatta BreadVariaton 1
500g bread flour
475g (~2 cups) water
2 tsp. yeast
15g salt
Varation 2 (Semolina)
350g bread flour
150g semolina flour
475-485g (~2cups) water
2tsp. yeast
15g salt
- In Kitchen Aid style mixer: Mix all ingredients roughly till combined with paddle, let it rest for 10 minutes.
- With the paddle (I prefer the hook to prevent the dough from crawling into the guts of the mixer), beat the living hell out of the batter, it will start out like pancake batter but in anywhere from 10 to 30 minutes it will set up and work like a very sticky dough. if it starts climbing too soon, then switch to the hook. You'll know it's done when it separates from the side of the bowl and starts to climb up your hook/paddle and just coming off the bottom of the bowl. I mean this literally about the climbing, i once didn't pay attention and it climbed up my paddle into the greasy inner workings of the mixer. It was not pretty! Anyway, it will definately pass the windowpane test.
- Place into a well oiled container and let it triple! it must triple! For me this takes about 2.5 hours
- Empty on to a floured counter (scrape if you must, however you gotta get the gloop out), cut into 3 or 4 peices. Spray with oil and dust with lots o' flour. Let them proof for about 45 minutes, which gives you enough time to crank that oven up to 500F.
- After 45 minutes or so the loaves should be puffy and wobbly, now it's iron fist, velvet glove time. Pick up and stretch into your final ciabatta shape (~10" oblong rectangle) and flip them upside down (this redistributes the bubbles, so you get even bubbles throughout), and onto parchment or a heavily floured peel. Try to do it in one motion and be gentle, it might look like you've ruined them completely, but the oven spring is immense on these things.
- Bake at 500F until they are 205F in the cnter (about 15-20 minutes), rotating 180 degrees half way through. Some people like to turn the oven down to 450F after 10 minutes, but whatever floats your boat. I usually bake in 2 batches.
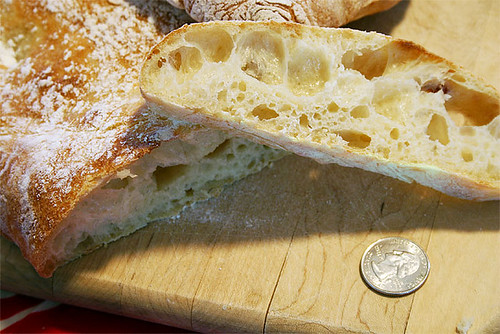
Here's my crumb:
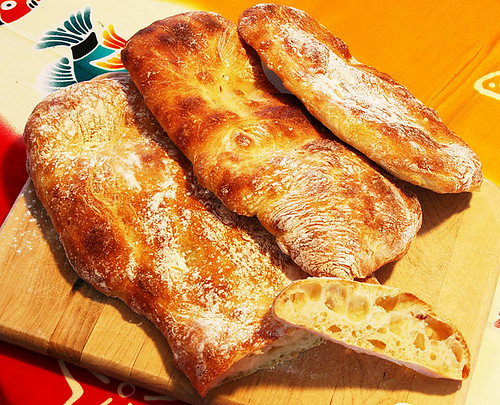
And my loaves:
Original usenet thread with extensive discussion and Q&A - http://groups.google.com/group/alt.bread.recipes/browse_thread/thread/ad0e477790ef4f03/a644f520f4b3cd48?rnum=2#
Made this yesterday with 50% semolina and it came out beautifully, many thanks. Elastic, yet light and full of flavour. eerr how does one attach a photo here?
Hi James -
To attach a photo, you can go two different ways to end up with the same thing...
Those are the two ways to upload your pics here to TFL, then use them in a post. If you have them hosted off-site somewhere, just hit the green tree and provide the URL.
- Keith
Images of my bread adventures pending. Time permitting of course!
I did 50% semolina also. The flavor and crust were excellent. I typically use bulk organic flours. I used a Globe 8 qt mixer switching between the paddle and hook. When using the hook the double batch causes the the mixer to jumb around a bit so I have to hold it down eventhough it weighs 55 pounds.
Thanks to all on TFL.
I followed this recipe to the T and it turned out perfectly. I did have to change from the paddle to the hook after 3 minutes because the dough was quickly rising to the top of the paddle, but changing to the hook really made a difference. I continued to mix for a total of 10 minutes on 6 and all was well. The dough did indeed triple in 2 1/2 hours! I was a little concerned that there was virtually no rise once cutting the dough into 3 disproportionate pieces, but once in the oven the rise was incredible. Will post pictures shortly. This is a great, simple ciabatta recipe. Thanks so much!
Looks like this dough would make great pizza. When you have the dough up in the air to stretch and fold it prior to baking, stretch it into a rough pizza shape, put it onto parchment, slap on the toppings and go. I use my ciabatta recipe for pizza all the time and it is terrific. You might want to crank up the oven as high as it will go for pizza though.
Paul Kobulnicky
Baking in Ohio
The crumb was Magnificent! Mine didn't get nearly as brown as yours. Any ideas regarding that? I must admit I've never worked with such gloppy wet dough but now I "get it" and it really does make the crumb we're all looking for in this type of bread. Have you tried adapting this recipe to sour dough?
Trish in Omaha
Really depends, sometimes I get a light crust sometimes a darker one. If I had to guess why, I'd say it's in how long you do the 2nd proof. There needs to be sugar left in there for it to turn brown. So maybe it's an under/over proof thing.
Oh and no on the sour dough, I'm a sour dough virgin, hopefully not for much longer though.
Hi there--from a new member of the Fresh Loaf! I'll post an introduction on the appropriate board, but I had to first post my reaction to this formula. It's amazing! I just took my first batch out of the oven this afternoon. Beautiful browned loaves, my first try at ciabatta. I used KAF bread flour, kosher salt and SAF instant yeast. I mixed it with my Kitchen Aid for 20 minutes after the 10-minute rest, which was enough to achieve the climbing dough as described. I placed the dough in a Rubbermaid canister and measured it along the side so I could be sure it tripled, which was going to be a final rise height of 6" in my container. I set a timer for 2.5 hours and was shocked to see it had gotten to 7 " in an hour and a half! That was just at normal room temp in my kitchen (this is the South, but still, we have the AC on).
I baked the loaves, on parchment and on my stone, in two batches at 500 in my regular old electric oven. I did use a steam pan and three consecutive sprays from a mister as PR advocates in the BBA. It took 20 minutes to get the nice, reddish-brown color that I was looking for. And, wow, is all I can say. For a pretty short fermentation, this bread delivers fantastic flavor. And the crumb is so moist!
This was my first time working with such a slack dough (with the exception of Pain a l'Ancienne). I'm no whiz at math, but am I correct in figuring that this formula is at 95% hydration? The huge holes in the crumb are unbelievable. And LilDice is right--the oven spring is nothing short of an athletic feat.
I'm glad I found this board, and hope to meet new friends AND find new bread-baking frontiers. =)
Glad you liked it, yeah the percentage is nearly 100%. Glad to see you got such great results, I have to say baking this bread sort of feels like cheatin.
It's a strange feeling doing it the first time, you swear that there's no way it's going to come together, but before long that thing's tryin to escape the bowl!
Once again I have to say I love this bread. Now I've made it twice--the first three loaves got eaten so fast (one went to a neighbor) and I still wanted more! But now I have two loaves in the freezer for future enjoyment.
Here's the first loaf I cut into:
And here's my second batch, first loaf:
The second batch had way more oven spring, though I did nothing differently (except realize I didn't have to flour the dough as heavily as I did on the second rise the first time). Bread is so funny that way--consistency is hard to achieve. Or it is for me, at least.
Here's one more shot of these pretty (albeit oddly shaped) loaves.
This will be a new staple bread in my house!
It's taller.
What does stretching it more lengthwise do?
without an electric mixer?
I don't have one that can handle dough and since finding the stretch and fold method, I actually put the need for one on the low priority list.
Can I just stir briskly for about 3 minutes, then rest it for about 15-30 minutes then come back and stir again for about 3 minutes? Doing this for about 4 stirs and get the same type of gluten development, do you think?
Have you ever tried making this by hand? I have an awesome spatula that is my favorite over the years that is a one piece huge job that's extra sturdy and can withstand the elasticity of wet dough.
Thanks!
I'm going to try this dough by hand! I will post in my blog about the results this weekend and will also take photos (good or bad) with it.
I think I've had a breakthrough about gluten formation with uber wet doughs and want to try it out with this one to see if I'm right about it. If so, it may help all of us. Boy wouldn't that be incredible? But lol, I'm also a realist and know that just because "groovy is the coolest new word in my school" (my nephew came home from first grade telling me this one day! lol) that you pros may have already cracked this code!
Anyways...just wanted to let you know!
Cheers!
I do have a fairly large capacity robot coupe we found last year on ebay that is a dynamo for strength. I could try mixing in that but like Weaver, look forward to hearing if agitating the dough by hand would produce enough "oomph" to activate the gluten!
:) I'm trying to use my hands on all my baking until I really get a firm grasp (all puns intended) on what dough is supposed to feel like at the beginning, middle, and end of a process!
Happy baking Katie!
What flour are you using, I've found Semolina + King Arthur Bread flour takes only about 10 minutes to come together, and I've had just straight up King Arhur come together in as little as 5 minutes
I think the Latin for "Behold the Bread" is
Ecce panis! (panis being the nominative case) Latin has different words for the same item - grammar dependent. Look at this site:
http://www.everything2.com/index.pl?node_id=636267
Hope this helps!
My understanding is the name "Coccodrillo (Crocodile Bread)" came from an Italian bakery via Carol Fields (read the reference in the posting above for details). And "Ciabatta" is a generally used term for a very light and fluffy style of bread that originally derived from its typical shape ("Slipper Bread").
So the combination "Coccodrillo Ciabatta" is a clever name for a particular Ciabatta that's even wetter than most (100% hydration?).
Well I did it! I made this bread by hand and it was very easy! Here's the link to my blog with pictures. Feel free to make comments there. I just didn't want to take over lildice's thread with it!
http://www.thefreshloaf.com/node/3088/bluezebras-baking-banter#comment-14086
When I do the stretch and fold on the counter, which is really when it comes down to it most of what I've done in the baking department, I've worked with preferments mostly. The bread continues to rise and bubble the whole time I do the French folds. Even when I use Mike Avery's technique (which is all I ever use cuz it rocks) which has you use 1 wet hand on top and pulling/stretching gently but firmly from the bottom wiht a scraper. I don't ever fully deflate the bread. It usually grows by about 2/3 during my 90 minute fold timeframe. And more when I do folds at 1 hour intervals. I recently switched to 30 minute folds. I think the crumb and flavor develop better at 1 hour intervals. The dough is also easier to stretch at that point. There is more resistance to the stretch at 30 minutes.
Soooo....yeah, as I suspected with a dough this wet and judging from all the other more knowledgeable posters on this board as well as Mike, it's actually the pure stretching more than the muscle that develops the gluten. So doing the very exagerated fold in the bowl with the wet wet dough did the same thing along with the resting cycles as a KA mixer for 30 minutes lol. Cool huh? I did it in the bowl in order to keep from adding a variable of the extra flour that would have taken the hydration down from 95% to something more in line with an 80% hydration dough maybe?
Anyway, would love for the experts to step in and give their thoughts?! I would love for others to try this recipe making it by hand to see the results?
Happy baking!
p.s. We just had this tonight with wine and olive oil and avocado. I liked it quite alot as a ciabatta. But I do think it lacked flavor a bit compared to breads with a longer rise and a preferment or even a sourdough starter. I think this would be a good recipe to incorporate with one of those flavor busters. You know?
And the crumb while not as creamy as SD-G and bwraith's pagnotta was not dry. It was still creamy with a very thick and crunchy crust. I rewarmed the bread at 400 till crisp.
By the way, I made a proper pizza recipe out of this dough (half batch). I posted it in the pizza forum and here:
http://hollosyt.googlepages.com/quickrusticciabattapizza
I made a pretty incredible ultra thin crust dough that was adapted from the Cook's Illustrated Pizza Dough for Grilling recipe. It was absolutely the best for a "cracker type" thin crust.
But I'm still searching for the pinnacle of doughs for both the Neopolitan style and also the pan style pizza.
Part of the fam is a cracker thin crust eater.
I love Neopolitan and DH loves pan pizza.
Yeah life is tough ;)
Thanks LilDice!
Ok, it's obvious why it didn't rise. You didn't develop enough gluten for air to be trapped in the dough.
If I had to guess why your's never came together it's probably because you didn't mix it fast enough. I start out on my KA with the PADDLE at 6 -- this is pretty fast, once it starts to crawl up the paddle I switch to the hook until it lifts up off the bottom of the bowl. It takes about 15 minutes typically. You were probably mixing waaay too slow.
The first time I made this, I used my DLX and never did switch to the dough hook. The Roller was used throughout the entire process. I gave it a full cycle on high speed - about 12 minutes. It came out perfectly every time I've used the DLX. The other day I switched it up and made it in my KitchenAid Pro. Took a lot longer for the dough to set up properly and overall, I didn't get as much holiness as I have before, but the bread was still nice and textured, with alot of smaller holes - great crust and flavor.
I thought ciabatta meant slipper , because of its shape...
I agree with slipper for the meaning of ciabatta, as does my Italian dictionary.
Anyway has anyone come up with a flour/ water ratio that isn't so wet? If so did it effect the crumb?
After twenty-five years of baking with traditional style artisan loaves, rolls, pizzas, etc., I decided that this post gave me the courage to try a really slack dough. The resultant bread was delicious, but didn't look anything like the internal crumb structure everyone else is achieving.
I tried making a ciabatta type bread (although not in shape) according to the instructions above, although I did change the formula slightly. Was the following result because of the formula changes or something else.I used one cup of cold butter milk and one cup of room temp water, one half cup of wheat sourdough poolish, two and a half cups of bread flour, two teaspoons of Kosher salt and two and a quarter teaspoons of proofed yeast. I kneaded with a Kitchen Aid on speed five and six for thirty minutes using both the paddle and then the hook. It never really came together away from the sides of the bowl like a traditional dough does so I dumped it on the bench and continued folding and stretching until it would hold together, which only took about six folds. The initial rise was for approximately one and a half hours which tripled the volume, the second was for one hour which doubled the size. The dough was very slack and I needed a bench scraper to help in the folding and shaping but it did hold together enough to hold its shape. The dough was stretched and folded after each rise prior to the final shaping. I made one boule and one banneton.
The loaves were baked in a 450F oven, misted every thirty seconds for a total of four times during the first two minutes and a pan of boiling water was placed in the oven on the stone for the first five minutes. The loaves were pulled from the oven after the internal temp reached 205F which took ten minutes for the banneton and fifteen for the boule.
The loaves rose in the oven beautifully as expected, the loaves looked beautiful when removed from the oven as expected, taste was an absolutely delicious soft buttery creamy mouth feel as expected, the crust was softer than a regular ciabatta as expected due to the milk, but there was not a single large hole in the crumb which was not expected. From the external appeareances both prior and post baking and the slackness of the dough, I was expecting large holes, however, upon cutting open it looked like a sandwich loaf. It was delicious but not what I was expecting.
Could the buttermilk be responsible for the change in crumb?
Thank you for your reply harrygermany, and I totally agree with you. In fact I read and re-read the formula prior to baking when I read that the recommended speed and time were so high. I normally mix at speed two for three minutes and then speed three for three minutes which allows me the approximately 900 total revolutions suggested by Hamelman in “Bread” with wonderful results. Today’s bread, although not holey, came out absolutely delicious and was completely devoured before and during dinner tonight by some friends that come over.
Maybe I misunderstood LilDice’s formula to “Beat the Hell out of it” and “in ten to thirty minutes it will set up”. Perhaps LilDice meant to rest it for 10 to 30 minutes after the initial mix, although I read that kjknits also kneaded it “for twenty minutes on speed 6”, JIP kneaded in a Kitchen Aid “for almost twenty five” and fearlessemily had the same understanding and results that I did? In fact on September 17 post, LilDice tells fearlessemily that the reason was that she didn’t mix fast enough. LilDice? Are you out there?
I get silicone-free parchment via amazon. I hear it's also available at Whole Foods but we don't have one here. The brand name is "Beyond Gourmet" and it comes in long rolls that have far more square feet on a roll than the Reynolds. Since it is non-coated, un-bleached, etc., it doesn't throw off any fumes.
Nice looking loaves! Yes, it is a great and fast recipe. I like it because you can make it in a day. Sort of a "quckie" bread. I've also added my sourdough discard to the mix and have had nice results.
I'm a long time lurker, first time poster. This is such a great recipe that I had to comment. I've made this 2 weekends in a row and my family and friends devour it. I'm making it at 90% hydration. I'm also holding the salt out until after the 10 minute rest to give the yeast a head start. Fantastic, predictable results.
Welcome to TFL, glad you joined us. Looking forward to seeing some more of your breads.
Betty
Can you please give the amounts of the ingredients? (I have no idea what 90% hydration means and how I would change the original recipe to do that).
Also, my crust is not as brown as yours. How can I get it browner? Internal temp is 208 when I take my bread out of the 500 oven.
The 90% hydration refers to what is called "Baker's percentage." The weight of each ingredient is expressed as a percent of the weight of the flour (total) used in the recipe. For example, if you made a loaf of bread using 500 Gm of flour and to that you added 450 Gm of water (same as 450 cc), then the hydration would be 450/500 x 100 = 90%
Glad it turned out, Tommy. Your measurements might have been off since you didn't scale the ingredients. It makes a difference:
I measured out two cups of water using a liquid measuring container and placed the water in a container on my scale. Came to 467g.
I then used a cup intended for dry ingredients, filled it with water twice, and measured the weight: 417g.
A cup of unbleached bread flour weighs 4.5 ounces, or 127.58 grams (per the [url=http://www.baking911.com/howto/measure_metric.htm][u]calculator[/u][/url])
You noted you used 4.5 cups of flour. 127.58 times 4.5 equals 574.11g.
Flour is especially problematic when using a measuring cup because your cup of flour could weigh much more than mine, depending on how each of us fills that cup with flour.
Perhaps you have a birthday coming soon? A scale would be a wonderful gift!Not knowing what type of measuring cups you used, or how you loaded your flour into the cup, Tommy, it's hard to say whether you had too much flour or too little water. Am guessing the answer is both, since you said the dough was not wet. I've made this ciabatta many times and it is like pancake batter at the start of the mix.
The gram measurement was listed because using weight instead of volume is accurate. The only way you can be certain you have 500 grams of flour and 475 grams of water is to weigh it.
The first bread book I purchased didn't use volume measurements, so I had to buy a scale if I wanted to bake any of the breads. I discovered that aside from the accuracy, weighing the ingredients is faster and I never wind up with spilled flour on the counter.
You can get a good scale with a tare function that measures in ounces, grams, or pounds for less than $30.
I made this bread today. It was easier, faster and MUCH better than than the other ciabatta recipe I've tried (Shirley Corriher's).
I'd give the crust, appearance and flavor 5 out of 5.
The crumb was only 3 out of 5 for me, I'm not sure why I didn't get as many beautiful bubbles as everyone else. I mixed for 30 min on highest speed on my DLX with the roller. It never crawled, it just started to pull away from the the center of the bowl after 25 minutes. I figured the gluten was developed since I could stretch an 18" long strand from the bowl. Did I overdo it? It tripled in about 2 hours. My kitchen is on the chilly side and I noticed the final proof on the counter really didn't do much.
This recipe is incredibly gratifying for a novice baker.
eta - I weighed my ingredients
They're in the oven now and are looking good. I was a bit unclear on one thing:
When you say to cut the dough into pieces and let it rise, I now realize that I should be cutting it into a long rectangular shape, correct? Otherwise, after I let it rise for 45 minutes, shaping will knock out a lot of the rise that I've achieved...
chrisinweare - I don't think you need to cut it into long rectangles because you will stretch the dough into the oblong when you shape it.
norsearcher - I think roasted garlic might work really well - the bread doesn't bake for so long that it would burn the garlic. Other than that, I'm not sure, it seems like whole cloves of garlic might just sink down since the dough is so slack??? Just try it! :-)
I don't know how you would manage to get the roasted garlic to stay in this bread. This is the crumb from some I made tonight. I love this ciabatta, it comes out fantastic everytime I try it. mattie
I didn't quite get the air bubbles I was looking for.. I think I put in too much flower. However, the taste of the bread was delish. My husband ate almost the whole batch and made me promise to make it again. Thank you!
I make this bread a lot at home. Last night we tried it at my daughter's house, where there's no mixer and no scale. We mixed it up until the dough looked right then beat it in the bowl for while. Then we put it out on a clean counter and used the French slap and fold kneading method for a long time. The dough really came together! We then put it in an oiled bowl and turned it over and followed the directions for kneading.
It came out great, and we all had a great time doing the slap and fold kneading. We scraped the dough off the low cabinets when we were finished...
I do have one question. I used Giusto's flour, which I had read about on this site, and we were at sea level. I usually bake with KAF and at 7000 ft. I think I didn't let it rise quite enough because I didn't get the huge holes I usually do. But wonder about the lack of crispness in the crust. I steamed (something I normally don't do), but I was baking on a cookie sheet, so I thought I was compensating. Anyone have any ideas?
Thanks!
A decent looking ciabatta that can be made in several hours? I will be trying this tomorrow. I love gloopy doughs!LOL
Thanks for the formula and fantastic pics.
Darren
I've finally learned how to post a picture to this site...........a really big accomplishment for me! Here is my typical result with this recipe. I mix it in a DLX, it takes longer than it would in a KitchenAid but comes out fine. We love this bread for grilled sandwiches, some Rosemary Ham, cheese, roasted tomatoes, a little olive oil then on the grill a few minutes.........mmmmmmm
mattie, your bread looks great and your holes look bigger than what I've been getting.
How long do you mix in the DLX? I've tried anywhere from 16 to 25 minutes with the roller. . . . . . do you use the roller or the dough hook?
I made some in my mom's ancient kitchen aid last weekend and it was mixed in about 10 minutes. I didn't dare turn her mixer to max speed because it makes peculiar noises . . . and I had to switch from paddle to dough hook because of the creeping problem.
Normally I turn the timer to maximum time (12 minutes) twice to get this to come together, I also put the machine at the fastest speed. I haven't tried it with the hook yet, I use the roller and scraper. There have been a few times when it has come together in only 12 minutes but that is rare and it hasn't happened often, there seems to be no ryhme or reason to it either.......same flour, same water etc. Sometimes the crust comes out very thin and others it comes out thicker as in my picture but it always tastes good so I am happy with it.
I looked back at the recipe and the reason it didn't turn out is I tried the semolina and he has a range for the water. I used the upper amount. Even after 30 min it was still like watery paste. So for the 1st try of the formula I would not try the 2nd version and would not use the higher water amount.
Mattie yours looks wonderful !! c
Caroline,
I can make semolina bread and semolina pasta but everytime I try adding semolina to this recipe it has been a disaster for me. Don't know what I am doing wrong but it nevers comes out as good as it does with just regular flour, I even had problems adding herbs to this.......so now I just stick to the basic recipe because we love it as it is. mattie
I wondered...glad to hear it probably waasn't me !! I think it is the absorption rate of the semolina vs flour. THANK YOU c
Caroline,
I have some of this going into the oven in a few minutes, will let you know how it comes out later. I added a little rye to it and it seemed to not make a difference in the dough, seems the same as the original. I also picked up some more semolina tonight and will give the semolina one a try again maybe tomorrow after work. mattie
Bigjoe13,this is a deliberately high hydration dough that is almost like handling a blob of sticky bubbles. It is mixed so long that every particle of flour is coated with water and gives off its wonderful sticky starch. As it rises, it becomes a moist,marshmallowy blob that is best handled as little as possible and with the assist of a dough knife.It is not like the usual dough that is kneaded and folded by hand and has a velvety,smooth feel.
So,try again and resist the temptation to add more flour than is called for. It should be a glossy,sticky dough that needs to be handled like a mass of soap bubbles-very lightly,with wet hands and as little as possible.
Have fun!
I tried the Cocodrillo Ciabatta today. I made half of the batch with some whole wheat flour, the other part I made with semolina.
What to say - a sticky thing! Incredible soft . . . There's a lot left to improve. I couldn't withstand to try some of the bread freshly out of the oven, that's why there's only one semolina loaf. (to the left.)
It was very tasty while still warm, but I can't say anything about the ciabatta when cooled down. I don't expect huge surprises because it's a straight dough.
I've written more about it on my blog:oventv.wordpress.com (And I posted some more pictures there, too. No crumb shots yet though, the first loaf got eaten by my family and me to fast)
Salome
Here they are, two shots of the Coccodrillo Ciabatta with whole-wheat instead of Semolina:
I made a delicious lunch-sandwich with it, I stuffed it with smoked salmon, some cream cheese which I mixed with horseraddish, and some crunchy lettuce leaves. So soft and light. I'm very satisfied with the crumb. YUM!
Salome
If it tastes as good as it looks, it must be a fabulous bread. Congratulations on your results!
Paul
Ive had success so far with the first half of the recipe, but my 90 degree summer kitchen is causing the bread to rise ultra fast, hopefully this does not diminish the flavor of the bread!
I mixed it for about 25 minutes on a speed of 6 as well. My only modification of the original recipe was using a little bit of extra water and adding maybe 30grams of wheat germ.
I've made this twice now and just love it! So much easier than using a biga---just a tad less flavorful...most people would never notice. The flavor and texture always comes out just right. I've found I can almost "pour" the dough out for proofing right into the desired shapes. I let it proof right on my dusted silestone island and carefully scoop it up with my dough scraper when it's time to put it on parchment. It's a tricky thing to do, but practice makes perfect!
This recipe is very easy to make, had family over for the weekend the kids 'LOVED' checking on it while rising in a food grade bucket. Unfortunatelly, it was too wet for me to flip over. Gorgeous color but bottoms were a bit pale. Not giving up on it though, will try again, thanks so much for posting Amori.
What a great recipe. I've been wanting to try ciabatta, and this was a great success. I'd print a picture, but it looks like everyone else's.
On a side note, I sliced it about 4 inches wide, then down the center (top separated from bottom) and made grilled cheese sandwiches for our tomato soup. The kids were a little skeptical until I mentioned that it was Crocodile Bread. They pouted that we had eaten it all up.
My own recent adventure with this bread,
http://www.thefreshloaf.com/node/13519/mission-ciabatta
There are some tips on handling this extremely wet dough as well.
I'was able to successfully make this recipe a few weeks ago, but this time - I was waiting for it "to triple" as emphasized in the directions. It was getting close but was still about 25% away from triple when it collapsed in the container.
I"m not sure what to do with it now. I stirred it down and thought about putting some refreshed starter in it tomorrow because it's getting late today.
any suggestions on what went wrong? It must have taken all of the 30 minutes in the kitchenaid to develop and start to climb the paddle. actually it was almost 45 minutes. There were lots of gluten strands when I put it in the oiled container even though it had not 'cleaned' the sides and bottom of the KA. It had, for the most part, but not like it had on my last batch.
I used high gluten bread flour and followed the directions to the letter. It's not overly warm in the house. I did turn on the oven when the dough got close to the 'tripled' size, but that shouldn't have affected it.
Help?
-susie
I attempted this recipe again after watching the how-to video mentioned in this thread
http://www.thefreshloaf.com/node/14554/deep-brown-golden-color#comment-91200
I don't have a kitchenaid, but do have a 20 year old siemens kitchen machine that looks exactly like the bosch compact. I added 70grams of my sourdough discard for flavour and it looks wonderful. It's really quite fun to make :)
Thanks!
Hi
Here is my loaf. I messed up on the flour as I did a wrong computation but when I added the extra I think it screwed up my crumb. The taste was good. Nice Spring. I did the 450 on temp after 10 minutes. Transfered with a peel to Stone.
Nice flavor and will try to do a better loaf in few days.
I agree outstanding bread my second try with right amount of flour was sooooooo tasty. Outstanding crust and the crumb was full of nice holes with a sweet taste.
Have to try to get a little larger loaf and not ruin the crumb in doing it. This dough like jelly what a challenge and so scary when you try to pick it up.
Mt. Bob
[quote]perhaps someone can help me uoloading a pic[/quote]
Perhaps this thread will help:
http://www.thefreshloaf.com/node/11826/apology
Today I decided to try the semolina version which is now rising getting ready for the final bake in about an hour.
Here is my question: I mixed together the flour, yeast and water and as usual - I allow to hydrolyse for at least 10 minutes before adding the salt. I got side-tracked today and it was almost 30 minutes before I added the salt. When I began mixing in the mixer it almost immediately cleaned the sides of the bowl and the bottom. Less than 5 minutes to be exact. I did mix it a little longer just in case, but would suppose it did that because of the long hydrolyse prior to the salt addition or because of the semolina version? I have noticed that holding off on the salt in the beginning does shorten the mixing time in the regular version, but this was amazing!
Does it achieve the same goal as prolonged mixing by allowing it to sit for a longer period of time before adding the salt?
just curious. Even more curious to see how it turns out.
-susie
I would like to make a loaf (many loaves) with only a 2 inch diameter.What's the easiest way to handle the dough? I want to be able to slice these loaves into 1/4 in slices for appetizers.
Hmmmmmmm I wonder now if that was not the problem I had last 2 times I tried this bread. First time was not that bad.
I bought a scale and now started to measure in Grams instead of just a cup or what ever. i beat the H out of it and it still was so soupy that I could not even begin to work with it. For sure it was like pancake batter . First time was not to bad and i had a good looking loaf considering. Taste was also very good and the crumb was excellent.
I am now also thinking water might have been the culprit. Have to try again and add little flour. But again not wsure if that will help as I assume it does not need any more ??? just less water..
Glad I am not the only one that had a problem.
Have a nice day and good luck
Mr.Bob
Yeah... doing less water would be better than adding more flour...but I think this is a very forgiving dough. Once you get it down, you'll love it. I use a scale and weigh in grams for everything. Pouring water by the gram though cracks me up...I always over shoot it. :)
You can add and remove water with a teaspoon or any other spoon. I find my teaspoons are around 5 grams!! Just a thought.
Hi
Well my post on Nov 28 was what I call not bad. Since then 2-3 batches all seem ok. Last 2 as I mentioned earlier yesterday not good at all. I beat the h out of it with a hook for at least 30+ minutes .
It just would not get more than real bad soup. It poured out of the bowl like water.
It did a triple rise . Impossible to handle with a little expertise even. Then no spring in the oven. Like a pancake after it was baked. Taste was fair looked almost like a flat bread.
Next time well this be 3rd bad batch I will hope for better as I know it is supposed to be ok. Nothing changed in my procedure either way.
Have a nice weekend
Mr. Bob
www.siemann.us
I am surprised people are having to beat this this so long. Here is my one loaf method, I've made it a dozen times and it always comes out the same. Huge holes and very tasty.
250g bread flour
238g water
1 tsp yeast
6g salt
70g discarded starter (65%)
Using speed 6 on Cuisinart, beat for 5 minutes with paddle, switch to hook and beat for 5 minutes
Let triple, shape, flip onto stone and bake 500 16 minutes.
I follow the method in the youtube video I linked to above and this ciabatta is a household favorite!
jacki9999
I just made the ciabatta yesterday using your ingredients and it came out great! I was impressed.
I had saved it in a text file and for some reason didn't have a link to your post at the time or I would have watched the youtube video you referred to. I still haven't looked that up yet.
Have you ever tried doubling this recipe? I used my starter which was more like an 80%, but it worked out great. I'm thinking of trying it again today and subbing some olive oil for the water and making pizza crust. hmmmmmmmmmmm
I'm thrilled that I now have a place for my starter discard. I did bake it a tad longer than 16 minutes. more like 19 or 20, but I got a nice rise and great holes. I also let it autolyse for about 5 minutes before adding the salt, then continued per your recipe. It cleaned the sides and bottom of the bowl using the paddle, but I did switch to the hook as you suggested.
great recipe. I can't wait to try it again.
Now to watch the youtube video.
-susie
Ciabatta, like all bread, freezes well for short periods. Wrap it well or put in a plastic bag when it is completely cool and freeze. When ready to use, unwrap and put directly in a 350 degree oven until hot and crusty, about 15-20 minutes.
OR, rinse with water all over, pop in a hot oven until crusty, and serve.
You can cut loaves in half first if you are planning on using them for toast, defrost partially in the microwave, then slice and toast. I've done all of the above, and they all work. I bake a lot, and my freezer is always full of bread.
Patricia
Well, Christmas has come and gone. All that bread baking for the season has left me with a Kitchen Aid in pieces on my dining table, after stripping the gears with WAY too much chocolate sourdough! Despite my current bread 'handicap', I decided to try this recipe. I've never made ciabatta, and didn't have high hopes, considering the long beating times needed to make this recipe. But, low and behold, it can be done! I used Bertinet's slap and fold method (sort of) mixed with a traditional fold, aided by some oil and a good dough scraper. I used three folds at 20 minute intervals. I wish now that I had oiled with olive oil for better flavor, but otherwise, I'm so happy with the results! So, it's entirely possible to achieve a good ciabatta without your mixer! Yay! This will be my bread of choice for the week while I wait for my new gears to arrive in the mail :)
That looks pretty darn good to me. I'm in the process of making the Ciabatta at the moment. Considering I had it beating at 3 on my KA for 35 min. yours looks real good concidering you did it by hand. Hope mine looks as good!!!
Wow, it looks so nice! I love those little holes!
Glad you had success susie!
I've never doubled the recipe, in fact I think my recipe is 1/2 of the original..it makes one loaf that the two of us can finish in a day.
I always autolyse without the salt. I read some posts here on the effect of the salt on the yeast..it isn't pretty. I measure out the salt and sit it on top of the covered dough so that I don't forget to add it right before mixing.
As for the making pizza with it, I did try it once, but, as much as I like a thick crust, it was TOO much crust, even for me... so I always make [url=http://www.thefreshloaf.com/handbook/overnight-sourdough-pizza-crust-60-whole-wheat]jmonkeys sourdough pizza[/url] but I use bread flour and all my discard and it turns out perfect...1/2 his recipe makes a nice size 14"x16" pizza.
Funny that you mentioned you measure out your salt and set it on your dough. I do the same thing. I forgot to add it once to a recipe and it was awful. My dogs liked it, but I didn't even think it was good enough for breadcrumbs.
I just mixed up another batch of your recipe and added some olive oil. at first I just measured in a little olive oil and filled the remaining amount with water, but the dough seemed to stiff. so - I added back in enough water to get it the right consistency.
ON the pizza dough recipe. You said you use all of your discard? Approx how much is that? sometimes I seem to have alot. I'm not quite sure how to interpret his recipe. It gives you the 'formula" in percentages, but then gives you actual amounts in the ingredients. I guess I'm not experienced enough to read the percentage recipes correctly. My logical side wants to add up the % to achieve 100% which the formula doesn't do. maybe I don't understand what his 'formula' is supposed to be?
-susie
Ignore the formula and just use the ingredients in the amounts listed. (I'm talking about the jmonkey sourdough pizza). You will end up with about 3 lbs of pizza dough.
The formula is for those who want or need to make a precise quantity of dough; more or less, than the listed recipe makes.
I never tried adding Olive Oil ...but then I do use quite a bit in the container I let it rise in.
I added the pizza recipe I use here
http://www.thefreshloaf.com/node/15805/my-take-jmonkeys-sourdough-pizza
I made this ciabatta this weekend and it turned out wonderfully -- huge holes, very moist, great thin crust...but I thought the flavor was a little lacking compared to other ciabatta I've made (Hamelman's Bread) that use a pre-ferment. Has anyone tried using a pre-ferment with this recipe that they'd like to share? Thanks.
I used 150g each of the flour and water, plus 1/8 tsp instant yeast to make a poolish the night before, and just reduced by similar amounts from the finished dough. It was very good. I guess the whole point of this particular recipe is that it is made in one day with pretty good results, hence the "Quick...Ciabatta Bread" title. There are plenty of other recipes out there with pre-ferments.
Just look back a few spaces... this is getting to be a marathon type thread.
I added a big glob of high hydration sourdough starter to this recipe and added a little more flour and followed the recipe as is otherwise. It came out great. (You could always make the starter in the proportions of the flour/water in the recipe if you wanted to be precise.)
Patricia
I really don't want to wade through all these posts looking, but has anyone tried a large batch... say, with a floor mixer, maybe 10-20X as much?
I had heard that that a bakery in California does a large order like that. I just wonder why you cannot iterpolate. Let up know how many loaves you want and ??? some one will give you the figures I am sure. Wow thats a lot of slop to handle. Have to say good luck.
Mr. Bob
Ragreen
I regularly make a batch of 20 loaves at a time and I use the bakers % method for measurement. Yes it is a lot of slop - be careful it will run off your work bench- but it sure is good! It is my customers favorite!
Rick
lol... I've already had the experience of it seeking lower ground, it's like working with The Blob.
I'm sure glad to hear that!!!
Hi
I read all the psots here and decided to use Variation 1 recipe. Since I did not have a Kitchen Aid I experimented using bread machine. My machine has a dough cycle which lasts 90 minutes of which 30 minutes are when the dough is built and 60 is the rest period. What I did was to remove the dough after 30 minutes and let is triple in size in a plastic container for abot 3 hours. Following that it was all easy and it turned out very nice. Evenly distributed large air pockets. Good crust.
Thanks for the quick recipe.
After a long search on many sites, and some failed attempts, I happened on this site and decided to try again. Bottom line was 2 beautiful loaves with wonderful HOLES all through; truly a first.
I'll skip all the details except for ones that may help another seeker.
- Weighing the ingredients is the way to go. Used generic bread flour
- Never heard of "instant yeast" so used regular dry. Followed someone's suggestion of dissolving yeast in lukewarm water with a small pinch of sugar for 1/2 hour.
- Started with half batch of Jason's recipe (tired of eating failed experiments!)
- Only have an older bread machine so used manual setting for 15 minutes. One key point needs to be stressed. When you have the lump right, you know it. it's really sticky and glue-y.
- I was expecting to wait the 2 1/2 hours for it to triple, but in 1 hour it was at the top of the container - nearly 4x the original, so I decided to go ahead.
- Don't know what either peel or stones or parchment are yet, so used a cookie sheet with flour; worked fine.
Awesome bread........
Thanks to all who posted; especially the detail people. I obviously have a lot to learn including scoring the bread. In time......
I've made this recipe numerous times but I've tweaked it a little to save wear and tear on my KA.
I've started using the already varied form of this by adding some sourdough starter. Here is the basic recipe:
250g bread flour
1 tsp yeast
238g water
70g discard starter (works more for flavor than effect)
6g salt
Now for the 'tweaks":
sub 30g of good olive oil for some of the water.
Add 2-3 T of chopped fresh rosemary.
DON'T ADD THE SALT INITIALLY
I've found - in my experience ' that if you mix all of the ingredients EXCEPT THE SALT -with the paddle for a minute or so - let it autolyse for approx 10-15 minutes, then add the salt and mix some more - the time spent using the mixer is cut WAY down. Usually under 5-7 minutes.
I'm not sure why this works, but I've made it at least 10 times and it works every time. The Rosemary gives it a Wonderful flavor!
The other thing I do that helps is to put the dough on parchment paper and before putting in the oven - mist the parchment paper all around the dough. Then put parchment and all on hot baking stone. This seems to create the needed steam which helps the oven spring.
YUM! hope this works for you.
-susie
Original recipe but I added about a 1/2 teaspoon of caraway seeds. What a flavor. I beat the heck out of it with my KA a new pro. It wanted to jump off the counter at the end. Nice crust and crumb. It was baked in a LaCloche clay baker.
I slid the loaf onto a piece of parchment then transfered to a peel.
I then dropped it in the already hot Lacloche at 500 degrees. Be careful thats the tricky part not to get burned. Baked for 10 minutes took the lid off and baked for another 10 minutes. Cooled for about 35 minutes and below is one loaf and the balance of the other I ate. Soooooooooooooo tasty.
Mr Bob
I halved the master recipe but otherwise followed it completely.
Notice I did not get a nice color and the bread was quite soft and no hard crust.
Any ideas of what I did wrong? Comments?
Here are pics of my attempt.. I didn't quite get the "spring" that I was hoping for.
scottv,
Explain the steps you used in your preparation and baking in order for someone to give advice.
Rick
Yeah, I'd surely agree with that... looks to me, to begin with, the dough may not have been allowed to triple or the yeast was dead... the misshapen loaf is either uneven cooking or bad shaping. More input needed!
OK, first let me say I love this stuff. That being said, I'm trying to tweak it to what I want. I must say that I pretty much follow this recipe to the last detail, the only subjective thing is the perception of when kneading is "finished." I knead until the dough cleans from the bottom except for a spot about the size of a half dollar (remember those?). I put it on a stone, and bake it at 500F. At seven minutes, I give it a spin and turn the temp down to 400. It also has steam introduced at the very start.
Now, the differences... directly on the stone, it reaches an internal temp of 205 about eight minutes in, shortly after I turn it. The crust is way too pale, so I cook it a couple more minutes until it's the right color. This results in an internal temp of 212. The problem is, the crust is still soft, but so is the structure. It's one of those "start to cut the crust and crush the bread" kind of things. Would just overall longer cooking at a lower temp fix this with maybe more structural strength?
"...Bake at 500F until they are 205F in the center (about 15-20 minutes), rotating 180 degrees half way through..."
http://www.youtube.com/watch?v=v24OBsYsR-A
Not sure what your point is there, like I said, unless it's my turning down the oven to 400F' they reach 205 in about 7 minutes... nice video, no answer.
All was going well - my bread machine lets you do an entire manual program so I went with a 5 minute initial mix followed by a 20 minute knead cycle, then poured the whole lot into a bowl. I was dragged out to 'assist' mum with the grocery shopping, and eventually dragged her home again 3 1/2 hours later half expecting to find disaster waiting for me. Instead - a nice looking dough (if one can call it that - it still looked like batter to me!)
Cut, floured and put onto a board, then an hour later shaped and threw into the (electric) oven. And five minutes into my baking, a bloody possum zapped himself on the power lines and blacked out the entire area. I'm devastated... I've never had success with ciabatta (mine have always resembled scottv's) and these looked like they were going to be just beautiful. I had a fantastic homemade vegie stew ready to go with them and now I just have to have my regular bread with it. Wish me better luck with my next attempt!
It was none of your fault. I am sure next time you make the same recipe it will turn out excellent. Good luck!
Delicious with chilli! This is so addictive!
I made this bread today, and it turned out great! I was wondering if it would also work with a longer rise in the refrigerator while I'm at work (8-10 hours). Would I need to decrease the yeast?
Thanks for any ideas!
Hello Irene
Well I said I would try the refrigeration for you. I Mixed the dough yeaterday and let it rise in the refrigerator for about 20 hours. After about 6 hours I noticed it had rose about 1/3 and was slow the rest of the rise and stopped some time in the early am. This am about 6 or so I took it out of the refrigerator and noticed it had trippled about . It had some yeast bubbles.
I dumped it out on a mat with a little flour and cut it into 3 pieces. Water keeps the plastic cutter from sticking. Cranked the oven up to 525 most this one will go. I also started the microwave convection oven and stuck a Clay LaCloche in to pre heat. Most it will pre heat to is 450.
The bread I rolled very easily in about 45 minutes to a hour onto parchment paper and then slid onto a Pizza Peel parchment paper and all. Then slid on lowest rack of the oven onto a stone at 500 degrees. I turned both loaves in 10 minutes but maintained 500 degrees. . They were nice and brown looking in 20 minutes so I never checked the temp.
I misted both with water 3 minutes apart. They came out very good. Nice crust and a delicious crumb. Not sure if the taste is much better but I did the refrigeration thing to see if it would work for you and I can say that I see no problem.
Now the one in the convection/microwave has a lot to be desired. I do not think 450 was hot enough. The internal temp was 205 in 20 miinutes. I took the cover off in 15 minutes but dough not so hot. Toasted ok but not a good crumb doughy tasting like not baked enough. . I will try it again but will bake another 5-10 minutes longer and see if my loaf will be any better. I have never made a good loaf of bread in this convection micrwave oven. Couple pix below I hope I helped a little .
I cut in 4 pieces each loaf and freeze. They make such a good sandwich. Cut smaller right away and delicious to dip in good olive oil, with or with out red vinigar and a crushed pepper.
Have a nice day
Mr.Bob
.
Thank you bobkay1022 ...nice description. I'm tempted to go this route myself next time. It's interesting about the 450 degree not being enough though..my last try at this bread was pretty dismal, didn't rise much, but my oven is giving me problems and I think the temperature is off...your post pretty much confirms what I was thinking - 500 is the lowest you can go, I suspect my oven is off by 50, so the 450 I was using resulted in a flat loaf.
Thanks again!
Hmmmmmm Very good question. I have done this bread now many times but have not tried the refrigerator to slow down the first rise. I also wonder if that would work and if it will improve the taste considerable.
I think I will try it if you do not get any posts and see if it will work. its a bear to work with but I have now managed with the help of parchment paper and a pizza peel to get a pretty good loaf. Also in a french bread pan it does a nice spring.
Have a nice day
Bob
www.siemann.us
Hi
Well I am not sure if your temp is the reason for the flat loaf. I am sure some one will pop in and give you a idea also. I am a complete novice compared to lot of the folks on here. I do not trust my oven even though it is new so I have a external temp guage I put in the oven. Cheap investment.
I noticed that the post said 500 for ten minutes and 450 for 10 min. I have never lowered it to 450 not that it would not be ok.
If you look at a few of the photos you will see that others have a flat loaf also. They also make a nice sandwich. I have had that also some time ago and not sure what I did wrong. I think it might have been how i handled it not sure. It is awful to work with until you get the hang of it. I never have been able to pick it up and move it.
In my coach i have the micr/conv. oven and it is useless for bread. I have to find a recipe that is under 450 and try it. I threw out so many loaves. Birds love it.
Well good luck and I am sure if you ask you will get a real pro. that will give you some info on the temp. You might do as i do crank the oven wide open and then set it back to the temp you want. i loose quickly when i open the door.
Mr. Bob
www.siemann.us
Wow that looks awesome!
Do you think it would work out using wheat flour?
newfieguy
Hi
Strange I bought a bag of wheat flour yesterday and was thinking of trying it . Since I have talked to you 2 more batches of the bread.
I have both times put it in the refrigerator and let it do its thing. 18 plus hours. It looks like it will never make a good loaf.
I scrape it out on a mat. I devide into 3 sections that resemble a loaf. Smile
I spray with oil and use a large salt shaker to flour with.
I start the oven at 525 most mine will go. 45 minutes to 1 hour, I now cut 3 pieces of parchment paper and roll the logs/loaves onto each piece. They will be so sloppy so be careful. Just flour your hands and move the paper up to the loaf and roll it over 1/2 roll only to get the nice holes. Then slide onto the peel.
I use the pizza peel for two loaves to slide them onto the stone on lower shelf. One loaf I put on the second shelf same way I have a second pizza stone.
I close the door wait 3 min spray sides with water 3 more min spray again and lower temp to 500. I turn end for end 8-10 minutes. They will burn a little on lower shelf on the bottom but so tasty.
Oh such a delicious taste and the crust is soooooo chewey. I feel the taste is from letting it sit over night in the refrigerator covered with plastic in a oiled bowl.
So hope that helps will try a little wheat flour next and let you know. But I have to get this out of my system first. lol
Have a nice day I think I repeated my self a little on this post but I was so excited to get such a tasty loaves could not help my self.
Mr. Bob
www.siemann.us
I have aways read you have to let the dough rise in a warmer place to make it the biggest possible. How does putting it in a fridge help make it rise? I would figure that would kill the rise no?
Just curious why you put it in the fridge for 18 hours.
Also why did you spray the sides with water? Make the outside soft?
Thanks!
Many times done to lengthen the rise time and to make handling easier. A dough will stiffen up when cooled (unless it is an expired poolish.) The higher the protein in the flour though, the more punishment it takes.
I would be tempted to do the same, I like longer wet dough times.
I love this recipe and I make it once a week at least. The bread has ALWAYS turned out perfect.
WEll this week I ran out of bread flour! I grind my own WW so I dumped in what little left I had in the bag as I still have no idea how to make bread flour - any suggestions I am all ears so I wound up with about only 100g of bread flour and the rest WW freshly ground.
FIrst thing I noticed was that the gloop would not pull from the sides at all. I beat the heck out of it for a good 30 minutes and eventually just said to heck with it. I let it rise for a few hours but the nice songy wobbly goop that normally is left when I pour it out all came out in a chunk and it was almost a loaf right there.
I am about to bung it in the oven once I hit temperature but I did not get the right rise for sure and it is much more solid and regular loaf like rather than ciabatta! Oh well! A science experiment if nothing else.
Technically if you took the recipe above and switched over WW for the Bread flour, in the dough's brain what are we doing to it to make it more loaf like?
Can not wait to see what it turns out like!
Newfieguy
This turned out to be one of the best loaves I have ever made! Did not have the spread out bubbles but still had a great crust, whole wheat taste to it, more dense of a loaf but it turned out great!
Alll the flexability of grain to those who do not know what they are doing with it!
hehe
Made Ciabatta recipe #1 today.. it blew us all away. I'm trying so hard not to devour the entire batch! Tons of holes and a gorgeous, moist crumb with a beautiful chew. This is a most excellent recipe.
I used my new mixer the Electrolux Assistent and mixed it the entire way with the roller and scraper. I used the entire timer just once - about 12 minutes and I used the highest speed throughout. Its interesting to watch this dough transform from a doughy wet mess to a silky smooth and gorgeous dough at the end. It was very impressive. I didn't see the point in mixing any further. It was trying to climb up the roller, but at the end of 12 minutes, I figured it was enough.
I did not add my salt until after the first 10 minute rest. I used instant yeast and bread flour. Everything was excellent.. and a great way to break in my new mixer. Thanks for sharing. My husband wants to do grilled burgers tomorrow with avocado.. so it looks like I'll be making more ciabatta for the buns. Yum!
I have yet to try making these in my KitchenAid, just because they come out so well in the DLX. I keep telling myself to get the KitchenAid down off the shelf and give it a try but then my sensible side says why bother when they come out so good with the DLX. I originally thought it wouldn't work in the DLX but then again why wouldn't it. Mattie
That was the only question I had, how long to mix it up in the DLX. It was really the first time I had used it for bread. Loved that I could just use the roller and scraper on it. I gave it 12 minutes, or one full turn on the timer and it looked good enough to bake just as it was. It turned out perfectly with gorgeous holes and substance, so I was quite happy with it.
It is a lot of fun making this bread. I make it occassionally as we primarily eat whole grain breads, but when guests come over, I pull out this recipe. On two occassions I have included bacon in this recipe.
Yesterday I experimented with reducing the hydration a little (from 95% to 90%). It may have been my imagination, but it seemed to handle a little better.
Hmmm.. that would have been the last thing I would have thought of adding!
If your pictures are any indication of the result of lesser hydration, I like it. Looks beautiful. How much water then did you use?
I added 90% of the 500 g of flour. I really doubt that small a change was that noticeable, however, I didn't want to go less at this time.
The loaf above was sliced on a bias, giving the impression that it's a thicker loaf than it really is, although it is thicker than previous attempts at this bread.
It's likely the dough was easier to handle because I did not shape the loaves right after dividing the dough as I usually do. After re-reading Jason's directions, i just folded the dough into 3 lumps and let them spread a little and rise. The shaping came after doing the "stretch and flop" onto the parchment.
A friend of mine cures his own bacon and had given me a block of it unsliced. I cubed it, fried it a little and mixed it in at the end of the mixing cycle. It was very good.
What an overnight fermentation would do for this? One day I'll have to try it!
Curious if your bacon would sink during the final rest period? My dough is so wet that if I added a pea, I feel it would sink to the bottom.
Thanks for replying. Fun to hear what others are doing with their loaves.
I know what you mean. The proofed dough is like heavy water. I was surprised at how well the bacon was distributed. Perhaps flipping the loaves helped suspend the bacon.
oops
Forgot to do the rest after combining ingredients. I then kneaded it too slowly with a dough hook for 40 minutes. It didn't do anything. Then I let it rest for 15 minutes and then beat at high speed until it pulled away from the bowl. There 3 speeds on a Globe mixer. With all the mistakes it still came out nicely.
It is rare that I can make this many mistakes and still be forgiven.
Alfie, I laughed out loud at your description - sounds like something I've done in the past. Glad it came out just fine.
first try was pretty good. It was a bit too chewy and moist inside. looking for a dryer interior. please help.
Formula was followed to a T using KA BF.
The interior and tooth shattering crips exterior with the moist and chewy crumb are what is so appealing to me! Try a different flour, more flour, longer bake at lower temp.. Personally, I would find something else that would better suit what you like. Maybe a focaccia?
thanks for the input
I can only suggest you check your measurements - are you going by weight? This concoction is so wet you can't even touch it :)
I love my Fibrament stone. I've had it for more than five years now.
This ciabatta recipe is really good and easy! I made some very slight changes - I used the Semolina version, but don't have semolina, so substituted white whole wheat and a litte ground flax meal.
I used:
350 grams King Arthur bread flour
145 grams white whole wheat
5 grams flax meal
480 grams filtered water
15 grams salt
2 tsp instant yeast
And followed the instructions. Just make sure the flax meal doesn't sink to the bottom while it's kneading. I've taken this bread to a supper with friends and to my knit along night and it's gotten rave reviews. And it keeps well to the next day too.
After reading all the positive comments and seeing the yummy pics of these ciabattas, I decided to invest in a KA stand mixer so I can make this bread (I saw that some of you were able to do it by hand but I am not there yet...). After I unpacked my KA and started to flip through the manufacturer's manual, I noticed that there was a warning that said to knead the dough at speed 2 as any other speed may cause the KA's failure. Huhhhh, what was that all about? This is a Professional 5, 475 w machine (which is a bit stronger than the Artisan series). Most of the postings relating to KA did mention a kneading at speed 6 for appx 10 to 30 min. Am I missing something here? I bought this machine just so I can do this particular bread...sigh.
I'd like to get some feedback please before I start doing anything with my KA-Jason's ciabatta recipe. Merci
Problem solved. Will do this ciabatta this weekend and report back. I have so many shaped loaves in my fridge ready to be baked that I don't know where to put all my other refrigerated foods. Once I am done baking these babes, will move on to this recipe. Cheers
I have the Pro 600 KitchenAid.. my machine gets pretty hot making this dough. I can smell the machine oil when it gets to be that warm. Recently, I've started using my DLX Assistent machine to mix this dough.. it just performs better without getting so hot. Don't have to mix quite as long either.
kisgabi,
I no longer live in Australia, but I used to (Melbourne). Laucke Wallaby is good flour to use. I've used Manildra's, but preferred LW's because of the natural aroma when baking. You can also see if your local baker can sell you some of their flour. It's hard to find LW or any bread flour in local stores sometimes.
Good luck.
Ok, let me start by saying that I was ready to throw this gluey dough halfway through.
I decided to try out this recipe but cut all the ingredients in half. I added the salt only after the 10 min rest. I sprayed the paddle and spiral hook to avoid having the dough pull up too much. And that is where I thought I made the first mistake. After 20 min beating the dough at speed 6 on my KA, it did not look like the dough was ever going to pull away from the bowl. Getting a bit impatient, I raised the speed to no 8 a few times after 25 min. The dough was still not climbing up the hook and I was afraid that the Pam was causing it. The dough did come close to pulling completely away from the bowl but at the very last second, the dough would fall right back into the bowl. After 30 min of the beating, I just decided to pour it out and let it triple anyways.
Two hours passed and the dough must have risen appx half its size and here I'm thinking I needed the dough to triple. Not happening...so I was gonna throw it out. But since I did not have anything to do and no where to go, I figured I'd just let it sit there for as long as it needed til it'd triple as an experiment. Hold and behold, after 3h30, the dough almost tripled.
Baked it and .....the ciabattas were superbe! Big holes, airy, light, moist, crust is wonderful. The only complaint is, as some of you may have noticed, the lack of depth with taste and flavors. Not a bad bread but definitely one that needs to be eaten as a "panini" type, or dipped in oil, etc...to enhance its flavor.
But still, I'd encourage you to test it for yourself.
Thanks for stopping by. Like I said, the crumb and crust turned out perfectly. Love my ciabattas. It's just that I also baked P.R. ABED French bread this am and when I compare the two flavors, I can definitely see a difference in taste and flavor complexity. I am not disappointed with this ciabatta; it's just another kind of bread that requires a bit more flavor enhancement IMHO. I may also try out adding a poolish just to see the difference.
I did use KAF and SAF yeast. I thought about making the original recipe the next time I did this again (when I was about to throw the dough away) but since the ciabattas turned out great, I wouldn't mind keeping it at half the portion (I live alone during the weekdays and there is no way I can go through all this bread by myself).
And for sure, I will buy an air tight container; have been meaning to do this for some time. My hubby cannot believe how I have besieged our kitchen with tons of kitchen tools and gadgets in just the las month.
Hi Gabi,
The actual recipe itself is quite simple: flour, water, salt and yeast. The reason why I am reluctant to post it is bcuz the instructions are a bit long. In addition, I have also used a variation (please read my posting in General Discussion and Recipe Exchange: Peter Reinharts artisan breads. I could try to summarize it but I am afraid I would leave out some important info. Furthermore, is there any rule regarding copying someone else's recipe? If I am allowed to do so, I will try to cook you up something and post it on a different forum (so I do not take up any space at this forum).
But in the end, the best thing to do is to buy his book; it is worth every penny of it (and this is coming from a newbie baker). The book is very user-friendly, the pictures delicious....all in all, a beautiful book that I highly recommend. What I baked yesterday morning was absolute PERFECTION (crust, crumb, appearance) and Peter knows how to take you there. My hairdresser couldn't believe how amazing the bread tasted.
After the rest, I put the dough into one of those 6 quart containers with a lid. It was a double amount so the 2 qts would have to triple before reaching the lid. When I came back 2 1/2 hours later the dough had expanded to the point the lid was crowned up from pressure of the rising dough. I opened the lid which produced a loud pop and the dough fell to slightly more than the original amount that I put in the plastic container. Am I a goner? Should I let it rise again in the plastic container or divide the dough into 4 loafs and go for it?
I know now that the 2 1/2 hours time should have been lessened and that I should have opened the lid more gradually.
We are all in this together,
Al
Knead it a few strokes by hand to put new food in reach of the yeast, and then shape it right away. Watch the proofing carefully and aim to bake it somewhat under proofed. Don't let it over proof or there may not be enough food to sustain it. Even so, you may not get great oven spring, and you might get a paler crust than otherwise, but it will still taste good.
OldWoodenSpoon
Not knowing that a reply would be so timely I did pretty much what you suggested by SOP. The oven spring was not quite springy but it seems to be tasty. Many thanks for your help. /al
This page gets a lot of attention. The bread is out standing. I did two batches yesterday. Oven already up to temp so just time the proofing.
I have added 2 tablesppons of wheat flour to both batches of bread, Normail proofing 1 1/2 to 2 hours.
Taste is very good. Nice Crispy crust and lot of holes in the crumb.
Have a nice Holiday,
Mr Bob
www.siemann.us/motosat.html
Nice job
So i made this today but since i dont understand metric, i converted to cups. So 500g of flour is equal to 4 cups flour. so when i added all the ingredients into my kitchenaid, and then added the water, it mixed up FAST. it didnt look like pancake batter at any stage. more like pie crust. haha. Any way, the dough was really really thick and clung to the hook. after it rose 3 times, it still was thick, not gloopy at all. just curious if i converted everything correctly.
thanks
Your experience is a perfect example of why anyone who bakes bread needs a scale.. buy one that weighs both metric and US. They aren't that expensive and they worth every single penny.
You either converted your dough wrong or you added way too much. This dough truly is a wet, gloppy blob... I'm sorry it didn't work for you. It's super nice bread.
Thanks for the reply. Thats nice to know though!. It trippled just fine and hten i put it into the cibatta shape and put it in the oven and low and behold... flatbread. so we had naan for dinner rather than ciabatta, haha
its googles fault for the conversions then. according to google and answers.com, 125grams = 1 cup flour... So the internet doesnt know everything. haha
i think my sister has a scale, i will try that next time. Oh and it could have been that i do the scope and sweep method of measureing. i dont use a sifter at all. i just scope it in the cup and use a knife to levle it out.
thanx guys
You can have your guesswork correct or google the conversion correctly, but everyone scoops and measures differently. It's shocking how "off" on your ingredients you can be when you measure, vs weigh. In addition, different flours can weigh differently... and there are as many guesses as to the weight of a cup of all purpose flour as there are opinions. No one seems to agree.
I hope you don't give up on the recipe.. it's a really good one. You can buy a great digital food scale that measures every which way to sunday and has a tare function so you can just use one bowl to accurately measure everything. I've seen them for less than $20 and includes free shipping. Just buy a digital one..
Good luck!
... So the internet doesnt know everything. ...
Yep, weight-to-volume "conversions" aren't anywhere near as accurate as they initially appear. At the same time, in the web's defense, I'll point out that this is just one more manifestation of the hoary old problem with calculators and computers: confusing "precision" with "accuracy" (dictionary time?-). That confusion is something we computer professionals have been decrying (largely fruitlessly) for many many decades already.
The Google answer isn't exactly "wrong" ...it's just incomplete. It really should have a footnote of a least a couple paragraphs to explain it. So long as we shoehorn answers into nothing more than a single "number", we get this sort of over-simplified under-explained pablum.
It is amazing what you can do when you are ignorant. I mix a half pound of flour with six ounces of water, a teaspoon of table salt and a teaspoon of yeast stir the whole mess up with a strong spoon, let rest for a half hour, stir it again and leave it alone for a couple of hours. Dump it out on to a pile of flour and organize it into a loaf shape and put it on a greased baking sheet, let it rise for a while and get a loaf that looks just like that. I never knew that it had a name I just called it bread.
As BellesAZ pointed out..you need a scale. You can scoop, scrape, sift and google BUT until you use a scale it's all guesswork.
I used to always measure flour until I started coming here and reading more books on artisan bread baking.. the scale has been my most valuable kitchen tool... that and dough scrapers, particularly for this recipe!
I just bought the Artisan bread in 5 Minutes a Day book and it's a bit frustrating as they only give measures, not weights.. :)
Sweet action, thanx guys.yeah my sister has a scale, i just weighed some 500 grams of flour and it ended up 3 cups. i used medal gold AP bleached flour. i wanted unbleached but mis read the dang bag. haha
here is my problem, i dont know if i will bake it at 500. 450 make a to crispy of a crust for me. i prefer a softer crust, still crispy but not extremely crsipy.
what if i were to bake at 430?
thanx. oh and is there a forum here so i can post questions in there rather than all on a single blog? how do the moderators of this place prefere things to be done?
It's his website. But if you have specific questions, there are all sorts of categories and some existing blog somewhere probably answers your questions. Use the Search function, it works pretty well.
I heat my oven to 500 then turn it down to 450 to bake. Ciabatta is supposed to be rustic and have a good flavor in the crust, with a creamy and airy center. Even though you live at high altitude, you will probably get good results. However, you can do whatever you want, but I would not want to experiment, spend all that time baking it and then have it turn out inferior, but that's up to you. The crust does soften as it cools and is absolutely delicious. To me, it's the combination of the crust and creamy crumb that gives this bread it's personality. The only negative thing I can say about it is that it tastes salty to me at times... and I've cut back on the salt in the past and it hasn't hurt it too much.
also i live 4600 feet elevation so my crumb is always dense and not airy at all.
ok cool. if the crust softens then i will just bake it as is. i will at least do the recipe exactly once before i do anything to it or change anything.
the pics above look awesome and im hoping mine will turn out somewhat like that, but my crumb is always dense due to elevation, oh well. at least flavor should still be there.
im gonna try another batch soon. this time, now that i have a scale, im gonna wiegh it all.
Elevation may have nothing to do with it. Your crumb can be dense because you have been mis-measuring flour all this time - something to think about. It really does make a difference.
Three elements just off the top of my head (although I'm sure there are many more) can effect your bread - the type of flour (brand does matter as does bleached and unbleached in my opinion), the knead (do you knead your dough enough.. or even too much? And finally, weighing vs. measuring flour. This can make a major difference in how your breads turn out.
At high altitude you have hydration issues naturally - so if you're measuring flour, you're most likely using too much, which - when added to the hydration issues of high altitude, leaves you struggling with a dense crumb or heavy loaf. Also, your bread will rise a bit faster at high altitude, so I'd use an instant yeast, not rapid rise.
Hope that helps.. I lived in Montana at high altitude for many years and never had bread baking issues, but I always could feel when my hydration was just right.. and knew when I had kneaded just enough.
Good luck
I only use gold medal AP un bleached because i follow the ABin5 book. I have never ever baked before until i bought that book. That book has taught me so much about bread and how to make it. Im glad i bought it. I dont spend alot of time baking since im a 20 credit hour mechanical engineering student! BUT when i get the time to bake, i like it. i have only made the master recipe 4 or 5 times so its all new to me. haha. I bought that book cuz she wrote it just for me and my little time to bake. haha
I dont knead my dough since im following the ABin5 technique. However, for the cibatta recipe, im assuming, the long mix times of up to 30 minutes are my kneading times. I have no idea what i "knead" to look for for a good knead and hydration.
I also use Gold medal AP because its not to expensive. King arthur is bout 9$ here for 5 pounds. Plus i have heard that the protien content of KA flour is more than GM so it requires more water. My only issue with ABin5 is they say to make the dough sticky. Well, there are many forms and degrees of sticky dough so i just make it till the douhg clings to the hook and not the bowl. maybe thats wrong. Maybe the master recipe from ABin5 is supposed to stick to the bowl. i have no idea. haha.
thanx guys
You know those instructions that say, "and flip them upside down (this redistributes the bubbles, so you get even bubbles throughout), and onto parchment or a heavily floured peel." I have never been a master flipper so here is an alternative using 1/2 gallon plastic milk jugs. I cut them length wise in a "V". The point goes down and they are held up with wood blocks on the sides. They are sprayed with olive oil and each of the six loaves did the final rise in one of milk jug halves. It was a very simple step to turn each one upside down on parchment paper when ready.
It might be considered the coward's way out but it worked for me.
I don't have the spreading issue for whatever reason. I use two dough scrapers and scrape up each end at the same time, flipping it over onto my parchment for the final resting before baking. I get a nice spring on my loaves and I actually never touch the dough.. I use my dough scrapers to cut, flip and final shape the loaves. Actually, I learned this method from Jen Menke's video where she goes through the entire process from beginning to end - here is the link:
http://www.youtube.com/watch?v=v24OBsYsR-A
Enjoy her ciabatta video, too. I just find myself less than graceful when the final flip is called for.
Keep them wet when flipping or shaping.. makes it so much easier!
so i just bought me some because it was uber cheap and i have heard dang good things bout it!
I agree . I use parchment paper for every loaf. After it has sat for about 45 minutes and starting to proof. I Wet my hands turn roll it onto the parchment parpr and shape. I have a few photos on this page unless I deleted them. I get a nice rise and lots of holes for dipping and holding the oil and pepper.
I do 2 mixes at a time and when the first one is ready in about 45 minutes the second 3 loaves are ready also for the oven. Delicious sandwich bread and with flour at $1.50-1.75 for 5 lbs at Wallmart most expensive thing is tha ac for baking. Happy Holidays .
Mr.Bob
We were invited to friends last night for Christmas Eve dinner and I brought 4 large ciabatta loaves. Everyone went slightly nuts for it.. and I was laughing to myself how darned easy it is.
BTW, I order my Parchment from Gygi out of Utah. $9.00 for 100 half sheets of parchment. Big enough for my biggest sheet pans. It's high quality paper as well... love it.
http://www.gygi.com/scripts/silverware.exe/moreinfo@D:/ELEVCLIENTS/ORSON/ELEVATOR.FXP?ITEM=PAT-2705165
Thats like 10 min from my house. ill just run over there and buy me some. The only thing bout orsan gygi is how expensive there lump charcoal is.. i pay 6.50$ for 11lbs at walmart and its royal oak american made lump. haha
Hey, Tried this today. Only have a food mixer but since others have used them I figured I'f be okay.
The mixer switched off burnt out after about 15 mins.
Left to rise, didn't but got really hot for some reason.
Baked it anyway and tastes fine just very heavy and flat.
I did use warm water as the yeast instructions said.
Can any one help?
Thanks
@dragoninink,
The secret to this bread is beating it fairly fast - super high speed in a stand mixer like a kitchen aid. A small hand mixer won't work well and I can see why it would burn out.. it's alot of mixing. You have to really work it for about 20-25 mins and I too have a Kitchen Aid Pro machine. I've tried to make it in my Magic Mill, but it never seems to work out as nicely, although it does pretty well.
There is a video on You Tube that is really wonderful to watch for the next time you make it. She does an excellent job of explaining all the steps... each of which is vital and important to the success of your bread.
http://www.youtube.com/watch?v=v24OBsYsR-A
Hey,
Thanks for the info. I should say that it was actually a Braun Food Processor, turns out that it was a heat overload.
I was using around half speed I'll try it at a higher speed next time.
I suspect you'll have the same problem if you use it again on higher speed. Their motors just aren't meant for this unusual type of mix. Also, you need to have at least a dough blade for those.
Hi dragoninink
Sorry about your mixer. I have to beat mine 20-30 minutes on high speed. I have KA Pro. Have had flat bread but not sure . I think inexperience was my problem.
This was last bread. about 2 weeks ago
Have a Happy Holiday. I find that my success has been going exactly by the recipe . I do as mentioned in previous post add 2 table spoons of either wheat or rye flour to the mix. Just seems to taste a little nicer. But that is from my taste buds.
Mr.Bob
I put these on for our New Years Day dinner, which was Marinara and Meatballs... the recipe from Jason is followed exactly.. only I add a bit more water (490 grams) since I live in Arizona. Perfect every time and the oven spring is great!
This dough is supposed to be extremely hydrated and have tons of bubbles.. so the answer is yes. It is definitely supposed to be "gloppy" and sloppy if you are using this formula. I never touch it with my hands, I just use wet dough scrapers. i think every formula is going to be slightly different. I haven't seen or tried Gisslen's formula or percentages, methods, etc. I've made many ciabatta's and by far, this one has really given me a great bread. Others are slightly more flavorful, but not nearly as convenient and fast. Are other methods more traditional? Probably, but the outcome is fantastic and that's all I care about. Give this a go and do your own comparison. Nice, holey and moist ciabatta with a crackly crust is hard to achieve, but it is very easy using Jason's methods.
I modified the recipe using my wild sourdough starter and it came out great!
443 g KA bread flour
272 g water
453 g 100% wild starter
10g salt
Mixing took a full 30 min to thicken as called for.
At 100% my starter will rise for 5.5 to 6 hours. As it turne out, for the dough to tripple it took six hours. The rest of the process went as called for in the recipe.
The results were great. The bread has a great sourdough flavor.
I also thickened the dough a bit and made english muffins that were great too!
I forgot to mention that the muffins I made only had to rise for 4 hrs. I did not wait for them to tripple.
I made this recipe (variation 1) and it was good - nice and chewy. I'm a real neophyte trying to understand hydration, feel of what I'm looking for to get what I want (like I can do with cookies!) and trying to understand all this. Mine was a little dense but I could see SOME big holes, so I am on the right track. I will keep doing this recipe to be my guinea pig for learning about bread.
One thing I have determined is I do need to get a scale - approximates for me now just don't work!
A scale transforms your baking experiences beyond belief! Luckily, I know most doughs and how they should "feel", so i can tell when they are right, but a scale has helped me better achieve this. Your baking will take the next step. I just bought a new scale at Bed, Bath & Beyond. It's made by OXO and it's fantastic.. love it more than my other scale. It has a larger flat surface so my biggest mixing bowls sit right on top, never a problem. It also has a zero button.. so everytime I add the next ingredient, I just zero it out.. and add it in the right scale. I think i was less than $50 and it is the nicest scale I've ever owned. It has a pull out front too so I can see the measures better.. it lights up too!
http://www.oxo.com/p-501-food-scale-with-pull-out-display.aspx
I was really surprised how similar this recipe is to my regular loaf/roll recipe.
I'll definitely aim more for ciabatta and less for white bread for my next bake.
Tip:
I tried this thing once, turned out quite fun:
Add some rosemary and swap half the water with red wine. Red, tasty bread, weird, right?
Did a double batch about two hors ago. Still to warm to eat.Mr Bob

Would love to see one sliced to check the inside crumb.
Any advice on doing a double batch? Did you do anything differently?
This bread looked so good I had to give it a try. This is the results of following the Semolina version of the recipe. I did make a "no knead" Ciabatta that I thought had more flavor but as you can see this is a very pretty looking loaf.
I LOVED this recipe! I made it Friday and then made it again Saturday. This is the first ciabatta recipe I have ever tried. Thanks for making it so easy and accessible! :D I used a kitchen aide artisan mixer.
The first time I made it, I mixed the dough with a paddle, let it rest for 10 minutes and then changed to a bread hook and beat it on 4 for 25 minutes. Nothiing happened until I moved the speed up. The bread was super tastey but not a ton of rise.
The second time I made it, I, again, mixed the dough with a paddle, let it rise for 10 minutes BUT I left the paddle on and mixed it on crazy high speed. In about 4 minutes the dough was pulling away from the sides and climbing up the paddle. I switched to the bread hook and the dough formed a ball in on super high speed in about 2 minutes. This bread had a taller rise.
Both times the bread tasted soooo good. I used the half bread / half semolina flour recipe. YUM!!!
It looks absolutely beautiful.
Well done!
If you don't have a stand mixer, you can use a food processor. I used a Cuisinart Power Prep 14 cup model ( DLC 2014N), mixed the bread flour for a few seconds till everything was moist, waited 20 minutes to autolyse, then added the salt and processed for about another 20 to 30 seconds. Unfortunately, as it comes together instead of rising up the hook as she shows in the video, the dough works its way down the tube for the motor, so it is helpful if you catch it before that happens.
This recipe seems to have a lot of salt - about twice the amount I use in other breads. Is it necessary to have so much for this style of bread or can I safely reduce it?
Richard.
You may have hit on something there. Maybe that is one of the keys to why this recipe gets rave reviews.
The salt amount is quite high. Not double typical levels though, but maybe if you keep your salt to low levels, it may be,
Sure reduce it to 10 grams or so, or even lower if you like. Maybe not expect as much from the recipe then.
Another question!
Is it necessary to have a baking stone for this to work well? The recipe mentions that the oven spring is immense but is this reliant on a hot stone?
Richard.
All things being equal, you get the best oven spring and bottom crust texture on a hot stone.
That is not to say that you cannot achieve a "perfectly satisfactory" loaf without a stone. You certainly can. Even with a stone, if things aren't right, one might not get much oven spring. So just because you may not get oven much spring, does not necessarily mean a stone, or lack thereof, is the problem.
Good gluten developement, proper timimg(proofing), and shaping, are all probably more important to a good rise and good oven spring, than a stone.
Richard You will see the next message down where I baked on a pizza pan. I am in a motor home so no room and the stone in a conv. small one does not get hot enough. I have baked on stone ,cookie sheet and also the pizza pan you will see in next post below.
Only difference I got was a small convection oven does not get hot enough but will work. At my winter residense I have a oven. I bake CB at 550 . Good crust and crumb. So hope that helps . I have a few other post with photos here also.
In CT and the weather is perfect.
Have a nice day
Mr. Bob
www.siemann.us
I make my Ciabatta form Lahey's no knead recipe, which is a wet dough. I bake it on parchment paper on a cookie sheet and it comes out very good. I can't see myself sliding a wet dough on a stone, might be to messy. Take a look!
http://youtu.be/YX_6l2bmvQI
Moved into the motor home for the summer. Only have a micro/convection small oven In the past not good luck with bread.
I only made 3 loaves from the whole recipe. I put them on a pizza pan and baked. 15 minutes . 3 minutes on convection at 425 all the oven will go. After 3 minutes I would turn the turntable on to rotate 50% to get even crust color. The crumb was full of holes . The crust was chewey not hard but with the low heat about all I can expect. The crumb was nice and moist. Not sure how dense it could be but had a nice flavor.
Thanks for posting this recipe! I just made it for the first time tonight. Just got a Bosch Compact mixer and I wanted to experiment. I used KASL flour and semolina. I used the dough hook throughout, both for the initial mixing and for the "beating the hell out of it part". Put the mixer on high and it took just under 10 minutes for it to start bouncing around. It didn't really climb the hook, but it cleared the bowl and was as close to window-paning as you can get with something so sticky. I did need to hold the mixer a bit towards the end, to keep it from walking, even with the little suction cups. Rise took only 1 1/2 hours to triple. The crumb came out beautiful, similar to the initial poster's pictures, and the flavor was great. This one is a keeper!!!
Hello I have a quick question.
I have made this recipe many times and have posted here many loaves and there condition on this site. My loaves are always well proofed baked and full of nice holes. If not a crispy crust that I get in my home oven it will be a chewy crust from baking in a micro/convection oven in my Motor Coach.
My bread regardless of looks or good crumb it does not have a nice flavor. I use King Arthur or Gold Medal unbleached and un bromated flour
I have tried also letting it do a proof in my refrigerator to ??? get more flavor but it still is a bland taste. Wonder if there is any thing I might add to increase the flavor or taste.
I might mention my crumb is sort of a moist content. My bread temp is about 205 + 1-2 degrees in temp when pulled from the oven. Most folks enjoy it but I think it should be better and a little more on the drier side for the crumb for a nicer flavor and taste.
Thanks for reading my post. it is a wonderful recipe after you master handling it. Mr. Bob
This bread was a pleasure to make and really turned out nice. Thank you for originally posting this recipe and staying with it!!! Lots of support you have given to all the posts, I have enjoyed reading and learned a great deal...
Many thanks
Anyone try adding olives to this recipe?
If so, which stage would you add?
after the mixer is used and before it starts to rise. Just put them in with the folding.
I made olive and rosemary bread last week using a no knead wet dough. I added the olives and rosemary when I did the final stretch and fold, before the final rise.
Rob
Thanks !
this bread is AMAZING.... I learned so much just with working with the semolina recipe. Always wanted to make ciabatta, and silly me I thought the big bubbles were because of the x amount of yeast. I should have known that water plays THE roll of succes (together with the right strength of gluten)
my loafs came out like little wonders... small contribution: I use an unglazed ceramic floor tile as my "floor" in my oven. True stone baked bread now!!
next time I'm going to replace 10% of the bread flour with buckwheat or whole grain rye, see how that will work out..
Have not posted for a few months. My convextion Oven in the Motor Coach
ok but to get a nice loaf I needed my standard oven.
Did 3 loaves this am Nice Crust and delightfull tasting moist crumb.
I finally tried these instructions for ciabatta and ended up with four wonderful long flat loaves -- not the most beautiful or shapely ones in the world but very toothsomely chewy and tasty with lots of holes. Split, filled with garlic-sauteed spinach, grilled red pepper slices, bacon, sharp cheddar and pesto mayonnaise, and then grilled. Yummy supper!
Thanks for sharing this recipe!
I'm seeing credits to Jason Molinari on YouTube and elsewhere for this recipe/method, but I went back to the original posting and see that Jason got the original from John "king of glop". I don't see how something working out this good is being passed on as "Jason's". Here is a link:
http://www.kitchencookingrecipes.com/forum/bread-recipe-forum/270789-buns-jasons-coccodrillo-ciabatta-bread.html
http://groups.google.com/group/alt.bread.recipes/browse_thread/thread/ad0e477790ef4f03/a644f520f4b3cd48?rnum=2#
Does it matter? This was posted so long ago and we've all had fun making it... I'd give credit to the Princess of Glop if it meant having tons of fun baking it. Now, go bake up a loaf or two and have some fun!
I love this recipe!!! I have made this three days in a row now. My boys won't stop eating it. It is amazingly simple and produces a great bread, made great turkey sandwiches!!!
tried this recipe and really like it, but I am not sure how to fold the dough. Is there any special technique. First try I did not fold it at all. It came out bubbly and wonderful, yet there was a separation in the dough. The second time I folded it like a baguette. It was denser and the loaves came out a bit heavy.
//Bradley
You were right the first time(re-read the original post). There is no folding. For this recipe, you just dump it out on a well floured surface and shape into loaves with a bench scraper(see video linked below).
Probably the best way to prevent/minimize the "separation" is the dimpling in the initial shaping, and the flipping of the loaves just before baking. Good luck!
Video, representative of the recipe and method:
http://www.youtube.com/watch?v=v24OBsYsR-A&feature=plcp
I want to express a huge amount of thanks to lilDice who posted the recipe here, as well as to the king of gloop who came up with the idea of using close to 100% hydration.
For me this was just an experiment, being intrigued by what I'd read in the thread and having a couple of hours to spend. I honestly didn't think it would work, certainly not after seeing that the 'dough' had the consistency of batter after initial mixing.
The only thing I modified was adding 100 gr of 100% hydration sourdough starter (that I intende to discard anyway after having refreshed my starter culture). For the rest I followed the described procedure to the dot. Started mixing with the dough hook but got nowhere after 10 minutes at speed 8 and switched to the paddle attachment. Sure enough, the dough started coming together and creeping up the paddle after a couple of minutes. Switched back to the hook and gave it another 4 minutes, then gave it a 10 minute rest (33 centigrade in my kitchen). This is what it looked like at this point:
Saying things didn't look too promising at this point is a bit of an understatement.
Anyway, I left it in my kitchen to rise. Perhaps it was the temperature, perhaps the boosting effect due to the injection of extra yeast with my starter but anyway, it tripled within 1.5 hours. I divided the gloop (manageable but obviously very slack) and gave it a 35 minute rest, at which point we were here (apologies for picture quality):
Meanwhile I had stoke my oven very hot (250 centigrade), placed some cast iron pans at the bottom for extra thermal inertia (don't have a baking stone, yet) and manhandled the liberally floured dough onto a silpad placed on a baking tray. It lost a lot of oomph while I was manipulating/stretching/flipping it but I wasn't overly concerned, still thinking it wouldn't yield a good result.
Put on the fan in my oven, didn't bother with steam. Oven spring was truly good, considering the deflation that had taken place while manipulating the dough.
After 20 minutes, things were ready and I took it out of the oven to let it cool.
The result:
The crust was crisp, the interior airy and creamy. I went wrong with shaping, while transferring the dough to the silpad I stretched it too much. The taste was very good!
The are lots of ciabatta recipes floating around (Hamelman mentions two I believe, one with poolish, the other with biga, then there's Wayne Gisslen in 'Professional Baking' who gives a recipe with a preferment and a rather huge quantity of olive oil, just to mention these) but you'll be hard pressed to find anytng as easy/quick and lean as this one. The only thing I'l try to modify is the quantity of salt: you don't really taste it after baking but it is rather much, even when using lo-salt. I'll reduce it by 1/3 rd next time and see what it does. Shouldn't be a problem as it normally slows down fermentation and that certainly wasn't a problem here.
Finally made the bread - only cut into 6 pieces, one of which is below.
Crumb is softer than it looked with chewy crust. Haven't managed the velvet glove part yet, so it's less holey than it should be, but will definitely be making this again.
Been a few weeks . Made these for my self and a neighbor. More you make these better you get????
Delicious crumb and nice chewy crust. Make a great sandwich roll cut in 4" length.
Made these today for my self and a neighbor. They make a delicious sandwich cut in 3-4 inch lengths. More you make these better we get. Have a Happy Holliday Season and a great New Year..
At 12:00pm i put everything in my kitchen aid mixer bowl except the salt. I mixed it to the shaggy state and the autolyse it for 20 minutes then I added the salt and put my mixer on a real high mixing speed and let the machine do it's thing. After about 10 minutes at that real high speed the dough was slapping the side of the mixing bowl and was all in a ball on the dough hook. It was then about 12:42pm.
I put the dough in my proofing container and put a rubber band around the container so I could see how much it was raising. It tripled in mass in 45 minutes. Wow... I'd never seen dough raise like that. It is now about 1:30pm.
At this point I fired up my large Big Green Egg so I could preheat my pizza stone to 500 degrees. I like to preheat for bread baking for at least 1 hour.
I took the dough out of the proofing container and put it on a well floured work surface and punched it down some and preshaped it into 2 loaves and let it raise again. 30 minutes later I did the same thing and final shaped it. It is now 2:05pm.
A half hour later at 2:35pm I put it on the preheated pizza stone under my preheated mixing bowl after I sprayed it with water for the steam I needed and left it covered under the mixing bowl for the first 10 minutes of the cook. Then I took the mixing bowl off and turned the heat down to about 465 degrees. My intent from there was to watch it brown to the color I wanted it to be through the top vent of the BGE... But, browning was not to be on these lovely loaves... They were over proofed in that short time. it is now 3:00pm. Warp speed from start of mixing to out of the oven in 3 hours, wow!
The Ciabotta bread looked great with great oven spring and it tasted wonderful. But I think my mistake was using 85 degrees water. The water should have been much cooler so the dough didn't rise at warp speed. If I had done that it would have risen slower and not used up the chemicals needed for the browning of the dough.
It was a fun attempt at Ciabotta I was amazed at how fast everything was happening. That just shows how the weather effects how the dough works at higher temps. If I had done the same thing and my room temperature was in the mid 60's it would have taken 2 or 3 hours for the first rise. That's what I was expecting on this dough really.
Here are some picture's of this cook...
http://www.flickr.com/photos/food_pictures/9180176476/
You must have a mixer to make Ciabotta this way...
http://www.flickr.com/photos/food_pictures/9178138985/
Good oven spring...
http://www.flickr.com/photos/food_pictures/9178041081/
The view from the top vent...
http://www.flickr.com/photos/food_pictures/9180242636/
_________________
Whether you think you can or, whether you think you can't, you're right!
This time my kitchen was still 78 degrees and my flour, in it's storage container was 77 degrees. So I mixed the dough with 58 degree water. I used bottled mineral water at room temp so I had to put some ice in it to get it down to 58 degrees. Then with the mixer speed the recipe suggests you are going to have an increase of at least 26 degrees dough temperature because of the mixer friction. My dough at the end of the mixing process was 80 degrees, which is perfect.
The dough tripled in mass in hour and 45 minutes instead of 43 minutes on my first try. The cold water worked. After final shaping and final proofing which only took 45 minutes I put my loaves in the oven. I still got good ovenspring but this time I got a much better final color. I think my first try my dough was over proofed.
Here are some pictures...
http://www.flickr.com/photos/food_pictures/9193052175/
http://www.flickr.com/photos/food_pictures/9195867172/
http://www.flickr.com/photos/food_pictures/9195884898/
http://www.flickr.com/photos/food_pictures/9196044808/
http://www.flickr.com/photos/food_pictures/9193566707/
http://www.flickr.com/photos/food_pictures/9194092197/
I agree that recipe makes a beatiful loaf, is easy to make, and has a great crumb. The problem with the bread is its flavor. It does not have enough time to develop great depth and complexity. For a recipe that exudes depth of flavor, may I suggest the recipe for Craig Ponsford's Ciabatta from "Artisan Baking by Maggie Glezer. Side by side there is no comparison. This recipe takes two days to make but is worth the extra effort. The parchment paper makes the shaping and handling easier. Here is a link to the recipe http://breadbasketcase.blogspot.com/2011/01/craig-ponsfords-ciabatta.html, although the ingredients have been halved for 1 loaf instead of two. Since ciabatta is only great the first day, I think halving the recipe is the right way to go. If some ciabatta is going to be left over, I get the best results by freezing it immediately after being fully cooled.
I don't have a bread mixer and stupidly decided to tackle this bread anyway.
It took me 30 minutes to hand mix - I must have sweated about a gallon of water (I promise none of it was used in the bread)! Suffice to say I probably didn't quite mix it for long enough, as it was still a very elastic dough, but I physically couldn't do it any more.
It got decent oven spring and was nice and bubbly as Ciabatta should be, but the runniness of the dough meant that I had no chance of being able to shape it. As delicious as it was, unless I get a bread mixer I'll probably try to search for less labour intensive Ciabatta recipes in the future!!
Hi! I made some ciabatta, roughly followin' these instructions and it was AWESOME. I took it to another step though, and separated the dough into several blobs. I used them as bowls for my pizza soup and it was a rousin' success!! Thank you so much for puttin' it here! :>
Thanks Jason for an outstanding and unique recipe. I found that I could make a few slight modifications and turn out a couple of great tasting sandwich (type) loaves using a pan. I did incorporate a sponge. And like the original recipe, the bread is feather light and great tasting. I'll post my changes below, but the claim to fame for this recipe will forever remain yours. Thanks for sharing...
Jason's Quick Coccodrillo Ciabatta Bread
Saturday, July 06, 2013
5:13 AM
THIS WILL NOT HURT YOUR PRECIOUS KITCHEN AIDS
Sponge - - - - - - - - - - - - - - - - - - - - - - - - - - - - - - - - - - - - -
200g bread flour (may substitute AP flour for softer texture)
175g water
1/2 tsp. yeast
Let this sit over night to ferment
Dough - - - - - - - - - - - - - - - - - - - - - - - - - - - - - - - - - - - - -
300g bread flour (may substitute AP flour for softer texture)
300g water
1 tsp. yeast
10g (2 tsp.) salt
Pasted from <http://www.thefreshloaf.com/node/2984/jasons-quick-coccodrillo-ciabatta-bread>
Other links
http://www.youtube.com/watch?v=v24OBsYsR-A
I made Jason's Quick Coccodrillo Ciabatta Bread (the first recipe from the top of the first page). It turned out perfect and delicious.
I made just a couple of changes to the original recipe.
Ingredients:
500g bread flour (used generic supermarket bread flour)
475g water (used tap water)
2 tsp instant yeast
2 tsp table salt (reduced from the original 15g - I added 12g = 2.4%)
I mixed only the flour and water until all the flour was moistened and let them autolyse for 10 minutes. I added the instant yeast and table salt after the 10-minute rest.
Using my Kitchenaid 5-qt mixer (KSM500PS), with the mixing Paddle, I beat the batter on Speed 4, adding in the Instant Yeast and when it was mixed in, adding the table salt.
I beat the batter on Speed 4 with the mixing Paddle for 4-minutes, until the dough started climbing to the top of the mixing Paddle. I stopped the mixer and scraped the dough all back into the bowl and removed the mixing Paddle.
I switched to the "J" Dough Hook and beat the dough for an additional 11-minutes, until it had pulled away from the sides of the bowl and was pulling from the bottom of the bowl (the dough would pull away and fall back to the bottom of the bowl). Total mixing time 15-minutes on Speed 4. (4-minutes with the mixing Paddle & 11-minutes with the "J" Dough Hook).
From this point on, I followed the recipe exactly as it is printed above and it turned out perfect.
I baked the ciabatta for 15-minutes at 500-F, when it read 205-F internal temperature, I removed it from the oven.
This will be my go to recipe for Ciabatta.
this time using a Kitchenaid Spiral Dough Hook (that I recently purchased) in my Kitchenaid 5-qt mixer (KSM500PS). I beat the batter on Speed 4 for 18 minutes with the Spiral Dough Hook until the batter came away from the bottom of the bowl. The dough does not climb up this Spiral dough hook, because of its design, it pushes the dough down into the bottom of the bowl. I didn't have to stop the mixer once to push down the batter, as I did when I made the recipe the first time. The recipe came out great as usual.
as you except I added one half cup more bread flour to the 500g and I use the dough hook all the way on the KA mixer. That's just me wanting a little more structure to the crumb. I reduced the salt as well, felt that 15g was a tad salty. And I'm following your procedure with baking at 500 F for 15 min. I use a pizza stone for good oven spring. Yeah, I agree with you, this is THE ciabatta I bake from now on. So far I've baked 4 batches. See pic's below.
So on Saturday we were invited to dinner, I volunteered to make bread as our contribution to the meal. A couple of days earlier I watched the [url=http://www.youtube.com/watch?v=v24OBsYsR-A]"That's a lot of Ciabatta"[/url] and it looked pretty straightforward. Maybe someday when I watch a video and think "I can do that" I'll practice it a few times.
Short story is that my Ciabatta was a partial success. Tasted great (our friends' kids said it was the best bread they've ever had), crumb was light and airy ... on the bad side was virtually no oven spring. Here we go again ... I've been having the same problems with sourdough ... sigh. Especially frustrating was watching the video and the loaf nearly doubles in volume from oven spring alone.
A couple of things:
1. I used "active yeast" but Jennifer Menke used instant. I assumed - I think incorrectly - that there wouldn't be a difference. The 2nd rise was weak, so either my kitchen was too cold (I proofed the loaves in a warm (80F) oven) or the gluten was not developed sufficiently. Jennifer's dough seemed to maintain its shape and had a nice 2nd rise, my dough merely oozed everywhere.
2. While using my Kitchen Aid with dough hook, the dough came off the bowl after maybe 5 minutes (tops) of mixing. Should I have continued mixing it for 3 to 4 minutes after it came off the bowl? I'm a bit worried that if I overdo it that I'll lose the airy crumb.
I'll try again but this is getting ridiculous. These sorts of continuous failures are why I gave up making bread 15+ years ago.
-Dave
Hey Dave,
I've made this bread 3x over the past week for the first time and had great success, so I'm not expert but will try to lend some advice based on my experience.
Active dry yeast definitely does not equate to instant yeast and may be the crux of your issue. Active dry yeast should be activated prior to making the bread while instant yeast is sufficient to just throw in with the dough. You should activate your active dry yeast with some warm water and a pinch of sugar at least 10 minutes prior to making the dough (use a portion of the water called for in the recipe). Without activating your yeast beforehand it likely wasn't active enough after making the dough hence the weak second rise and lack of oven spring.
A few other tips I've gleaned from the comments which I'd suggest:
1. Mix the flour, water, and activated active dry yeast (or instant yeast) for a few minutes until incorporated then let rest for 10 minutes for the flour to fully absorb the water (aka autolyze). Important: don't add the salt until AFTER the 10 minute autolyze. This will give the yeast a nice jump start and reduce your mixing time.
2. It should take at least 8-10 minutes of mixing to get the dough kneaded to the right stage. It may look like it's fully pulling off from the bowl but until the dough is STAYING pulled off the bowl it isn't ready. The sound of the kneading dough goes through 3 stages for me from 1) sticky slopping to 2) sticking slapping (almost or partially pulling away from the bowl) to finally 3) slapping (when the dough is fully on the hook, pulled away from the bottom of the bowl and just slapping against the sides). I let it go for a couple minutes after fully pulling away just for good measure.
3. I stopped the kneading a few times in the early stages to scrape everything off the sides and bottom of the bowl, probably not necessary but can't hurt.
4. I used a floured parchment paper to pour the risen dough out onto and shape. After the second rise I cut the paper leaving significant extra paper so when I need to flip I can just roll the paper over, almost like folding in half. That way I don't even have to pick up the dough to flip it and I can simply slide that paper with the dough into the over when ready.
5. Add a pan to the over when it's pre-heating (under your stone or shelf where you'll cook the bread) and 5 minutes before you put your bread in add a cup and a 1/2 of warm water. The steam has given my bread a nice rise and a tasty brown crust.
Hope that helps!
for the most part and I'm very pleased with results. In the past I was hit and miss trying to get a good crumb until now. Everyone that samples this ciabatta say it has great flavor, make more! ha ha ha I got it memorized as I bake bread two times a week, sometimes more. Ciabatta is very good toasted with soup in winter and it will be a long time before I get tired of making this impressive crazy bread.
Thanks for the recipe,
Breadboard
[URL=http://s2.photobucket.com/user/ClayQ/media/IMG_0172_zpsd4fa357c.jpg.html] [/URL]
[URL=http://s2.photobucket.com/user/ClayQ/media/IMG_0217_zpsf3b05f7d.jpg.html] [/URL]
[URL=http://s2.photobucket.com/user/ClayQ/media/IMG_0205_zpsf223a8fe.jpg.html] [/URL]
I have made this recipe a few times with great success.
But for some reason today I cannot get the final dough ball to rise. I revived my starter with several feedings until it doubled. I then mixed it with all other ingredients except the sale for 2 minutes with a paddle. Let that stand for 10 minutes. Then beat the heck outta it till the dough just started coming off the bottm (it was already coming off the sides). I turned that out into a 3L measuring cup and let sit at 76-78F for, well, now 3 hours. My rise was negligible (it went from .8L to .9L in the measuring cup.
FWIW, after the 10 minute pause, I whipped it up forgetting to put the salt in. After it just started to clear the bottom, I took it outta the KA. Then I realized I hadn't put the salt in, so I added it and whipped it up again for another 1-2 minutes. I don't think I over-beat it.
I have put it into the fridge to retard overnight and will try to deal with it in the morning. Any ideas?
When I was trying to achieve great, large holes in my ciabatta, I found this recipe and loved the appearance of the bread. It is really beautiful and impressive. But, and you knew it was coming, the flavor is rather shallow and weakly developed. That should have been obvious to me by the title word "Quick." Quick does not have time to develop the necessary enzymes and acids to lead to a depth of nutty, wheaty richness. Try the ciabatta in "Artisan Baking" by Maggie Glezer called Craig Ponsford's Ciabatta. It takes more time (not work) and has a similar crumb and overall appearance. The difference is in the eating. Here is a rendition (that I have not checked for accuracy compared to the book) of the recipe: http://breadbasketcase.blogspot.com/2011/01/craig-ponsfords-ciabatta.html And yes, it is not a typo that you place 1/8 tsp of instant yeast into 1/2 cup water, and then measure only a 1/4 tsp yeasted water into the biga. Then you throw away the rest of the yeasted water! Try it, be patient with the biga, and enjoy! Incidentally I highly recommend Maggie's book. i have several very requested breads that I have copied or adapted from the book. It is beautifully illustrated, a pleasure to look at, and a good read to boot.
tried this with AP flour but I guess that doesn't make it.
After 45 mins, still a wad of goo in the bottom of my Concept 7
What brand did you use? I made it yesterday for the first time with KAF AP and it came out great, but KAF AP is closer to most other brands bread flour in terms of protein content. In fact when Hamelman talks about "Bread Flour" in his book, he is apparently pretty much meaning KAF AP.
Pictures of Ciabatta bread... 1-17-2015 and 1-18-2015 bakes... 95% and 90% hydration recipes. 480 and 465 degrees baking temps. I also experimented with spraying the dough with canola oil before putting it on the baking stone. I prefer it with a lower hydration and the lower temp gave me a better color. All the loaves came out with an internal crumb temp of between 203 to 207 degrees. I use a thermapen to check if the bread is done. I'm going to try a 85% hydration batch of dough next time. The lower hydration makes the crumb less mushy. This dough has a 3% salt... 15 grams of salt for 500grams of flour. That's higher than most bread but it adds flavor.https://www.flickr.com/photos/food_pictures/16129580097/
https://www.flickr.com/photos/food_pictures/16127887538/
https://www.flickr.com/photos/food_pictures/16129576207/
I was looking for something different from my usual FWSY boules (and recent baguette obsession), and this looked like just the ticket. Amazing that you can get good bread so quickly, love it! Blog entry here:
http://www.thefreshloaf.com/node/41630/jasons-quick-ciabatta
Thanks for posting LilDice!