(warning: newbie question!)
Yesterday I made the Basic Soft White Sandwich Loaf from RLB's Bread Bible for the first time. It tastes great and my husband is especially grateful he doesn't have to eat the dense loaf I made last time!
However, one of the two loaves I made had a big hole near the top of the loaf. To another poster someone suggested it could be related to letting the bread ferment for too long. I was wondering if it could have anything to do with using too much oil? I tried to use as little oil as possible when preparing the bowl I use for rising, and I don't like to use sprays. Also, the recipe says to let it rise in the bowl, shape it after 1 - 2 hours, then put it back in the bowl to rise for another 1.5 - 2 hrs, then shape into loaves. Could that cause too much contact with the oil in the bowl, so that when I'm shaping the loaf and trying to roll it tightly, the oil prevents the structure from 'reconnecting' properly? Sorry if I'm not making any sense. Here's a picture if it helps. 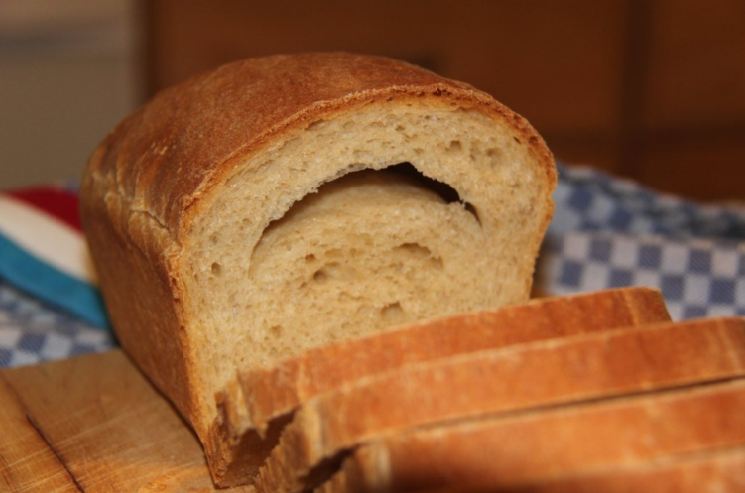
Only changes I made to the recipe were:
- substituted dry milk and 1 cup of water with scalded liquid milk
- substituted 40 grams of AP flour with 40 g of KA whole wheat
- did not use a baking stone (don't have one)
- I did not go up to speed #4 as instructed as I have a Kitchenaid artisan 5qt (motor not as strong as the pro))
Other things I noticed:
- 2nd loaf looked fine
- I hoped/thought the shaped loaves would rise more, but they never do (another reason I don't think I have let them ferment too long). I don't know how I'll ever have confidence to use a pullman for example, the slices would come out as noncongruent hexagons!
- Crumb is not very fine, which I like but may not be the right result for this recipe (and for my American husband--I think he'd probably prefer Wonderbread!)
Any thoughts appreciated!
Try being more vigorous when rolling and tucking the dough when shaping it for the bread pan.
Roll and tuck firmly.
Also, make sure that the surfaces of the dough are not too dry (too much flour, for example, or exposed to the open air too long) before you roll it. The dough should be tacky. If it's too dry, try spraying or brushing the dough lightly with water.
-=-
tack·y [tak-ee] adj. sticky to the touch; adhesive.
-=-
If you were making rye bread, it would be called "losing the roof", which is caused by trapped gas. That's why (some) rye breads are docked (holes poked into them with a dowel or finger) before baking.
Which is most desired in rolling up a strudel. :)
Thanks!
I'll try to roll the loaves tighter next time. Maybe I'm afraid to deflate the dough too much while rolling.
If the dough is properly developed you can be amazingly vigorous in deflating and shaping loaves. And make GREAT loaves. It seems that home bakers routinely underdevelop and overproof their doughs which creates a delicate dough that won't take abuse and must be handled carefully. At SFBI we pounded the pooh out of the dough to degas it in the forming process and we made spectacularly open crumb baguettes and boules. My suggestion would be to degas aggressively. If it doesn't rise, you have other issues.
The "hole" appears to clearly be a failure to get the dough to stick when you rolled and formed the loaf. The pointed ends of the bubble highlight that it is a forming issue and failure to adhere the dough. A bubble will not have a classic "moon" profile. I doubt there was much trapped air. I kind of feel like you might have had some oil on the dough??? Gas (CO2 and alcohols) move to the holes/bubbles in the bread during the proofing and oven spring portion of baking. The unlaminated area created a big "hole" for the gases to collect in.
As others have said, the dough needs to have some "stickiness" so it will adhere to itself. Hang in there. It is an easy fix!
Jay
Try mixing up the milk first with the water and scalding it to kill certain enzymes and see if that doesn't help the crumb. Also slowly add dry ingredients to wet, whisking the smooth batter for a few minutes before adding the rest of the flour to make a dough. Let the dough sit for 30 minutes before kneading will save you a lot of time kneading and get a jump on gluten development.
Site search: fluffy white bread
Link to scalded milk:
http://www.thefreshloaf.com/node/12076/why-milk-powder-milk-bread-and-not-just-milk
Mini Oven your name is so cute :) do you have a very small oven?
I did scald the milk, like I explained, and I added it together with (one cup less of) the water all at the beginning in the dough starter or sponge. RLB prescribes whisking this sponge with about half of the flour, all of the liquid, and half of the yeast. On top of this is sprinkled the rest of the flour and yeast as a 'blanket'. I let this ferment for about an hour and then had it in the fridge for almost 24 hours.
I did look up fluffy and will be trying in that direction, but first I will try to make this recipe again and also Peter Reinhard's white bread variation #1 just to get the basics down.
you substituted dry milk for scalded milk. sorry.
My name comes from my first step into TFL. I was in China and had a small, yes, tiny mini oven to bake with and needed some help and found TFL! Over the years I've had many ovens and different mini ovens. Still have a mini oven around to bake and do small roasts outside in summer. Wish I had grabbed it (and other handy stuff) before we started our trip here to Spain a month ago. Oh well, I like a challenged environment. Keeps the brain cells working.
I'm doing flat loaves baking first in a covered frying pan on 4 low medium heat (1 to 9, 9 being high heat) flipping to brown both sides, and then sliding the loaf onto a plate and popping into the microwave for 30 seconds to sure bake the inside. So far works great! Makes a loaf about 1 1/2 inch high as big as the pan. Kind of an ugly loaf. I skip the rolling up part of shaping and leave the loaf flat. Cover with a wet towel to proof. :)