The Fresh Loaf

A Community of Amateur Bakers and Artisan Bread Enthusiasts.

Most bookmarked

aptk's picture
aptk

Pull Apart Buttery Herb Bread

I grew up in a household where bread and butter was served with every meal. Now granted, it rarely was a nice, warm home baked bread. More likely than not it was either Rainbo or Wonder brand sliced white bread from the corner store. Today I still like bread with almost every meal, but I've made great strides in seeing to it that it's a home baked bread.

I currently live in Interior Alaska and the corner store is a 20 mile trip to town, so I've come up with a recipe that works well for me that's quick and easy enough for a good quality daily type generic bread. One cup of warm water with one tablespoon of white sugar dissolved in it. Sprinkle with two teaspoons of yeast, let it sit until the yeast blooms, then stir in one teaspoon salt and one cup of flour and really beat it good with a fork until it's smooth. Now add two more cups of flour and work it into a dough. If it's too sticky add more flour a handful at a time and work it (knead) until you have a smooth elastic dough.

Next step, I place my dough on the counter, wash and dry the bowl I mixed it in, spray the bowl with a non stick cooking spray, plop the dough ball back in it and spray it too. I cover it loosely (usually with a piece of wax paper, but sometimes a kitchen towel) and let it raise until doubled in size. You should end up with enough dough for two loaves.

Divide your dough in half. Knead one lightly, shape, and place in an oiled loaf pan. There you go, one loaf of plain bf bread.

The other half we will turn into a wonderful pull apart loaf of buttery herb bread.

Step 1: Shape dough into a flat 10 x 16 inch square. You can shape it by hand or roll it out. Spread it well with softened or melted butter.

Step 2: Sprinkle it liberally with chopped, fresh herbs of your choice. I like to use primarily parsley, with small amounts of oregano, cilantro and chives (but that's because I grow those herbs in my kitchen window garden, you should use what you like and have on hand, and dry herbs will also work).

Step 3: Now cut your dough, length wise into two inch strips and stack them up. Now cut the stack into 8 two inch pieces. Now we're going to place them in an oiled loaf pan, sideways and alternating the way you put them in so that they face opposite directions, but always so that you can see all five of the layers.

Step 4: Cover loosely and let both loaves rise until again double in size. When they are ready, bake in a 350F oven for about 45 minutes or until done.

Enjoy!


varda's picture
varda

The Oven Question (aka Problem)

Lately I have been pondering the impossible question.   How to up production in my tiny home bakery while still keeping it in the home.   Here are my wishes/constraints.

1.  I would like to be able to bake around 50 loaves for each sale in a two day period without freezing.   That is whole grain loaves the day before the sale, and everything else baked off in the morning of the sale.   That is around twice my current output.  

2. I would like to continue baking out of my house.   I have checked into renting kitchen space and the story isn't pretty.    Also, I tend to bake in the midst of things like making sure my son does his homework so I really don't want to be off somewhere else.  

3.  I'm not going to pay a lot of money for that muffler.  

4.  Small kitchen with very little potential for expansion. 

Right now, the oven is decidedly the bottle neck since I upgraded my mixer to an Assistent.   My current oven is GE gas, nothing special, which if I'm very careful can bake 6 hearth loaves at once using half sheets.  If I switch shelves and rotate in the middle of the bake, I run the risk of losing too much heat.   If I don't then I run the risk of scorching.   I don't intend to get rid of this oven (around 5 years old.) but think I might be able to add another one in the eating area which I would like to be as small as possible (as it will cut into our eating space) while still baking 12 loaves at a time. 

My investigations show that there are three types of ovens that might work:

1.   A double wall oven - like the Electrolux EI30EW45J S.   These need an enclosure, which given that I just want to plop the oven down in an eating area seems iffy.   Costs around $3K+.

2.  A single deck convection oven like the Vulcan VC4ED or Southbend EH/10SC.   The first is fairly massive.   The second looks amazingly small.   Can it really handle 5 half sheet pans with loaves on them, or even 4?    These are also in $3K+ range

3.  A large counter top model like the Cadco - XAF-193 - Line Chef Full Size Countertop.   This has four rack positions but at 13 inches tall could it handle even two fully loaded sheet pans?   This is a bit cheaper - around $2.5K.

All of the models above are convection ovens.   I know a lot of people use convection ovens happily, but isn't there an issue with loaves drying out too quickly and so losing full spring?    The Cadco has some sort of steam option - not sure what it is.  

Anyhow, that's as far as I've gotten.   Any suggestions, ideas, information?

Thanks so much!

-Varda

Wingnut's picture
Wingnut

Lemon-Lavender Madeleines

My Wife's workmates wanted something a little more sweet than savory so Madeleinse it is. 

Cheers,

Wingnut

aptk's picture
aptk

Orange Cranberry Walnut Sourdough Cinnamon Rolls

Yesterday I had a big bunch of starter and two baking plans. One was an artisan loaf, which totally failed, it didn't hold its shape at all, I ended up with a 10 in round disk that had such a crust you could hardly cut it. Today it is bird food out in the back yard.

The second project was the cinnamon rolls, flavored with orange zest, sprinkled with cranberries and walnuts in addition to my regular cinnamon roll fare, frosted with a cream cheese orange glaze, and it's delicious.

Floydm's picture
Floydm

Brioche

Some Lazy Man's Brioche I made this week.  Quite tasty.

My biggest takeaway, baking-wise, from the Kneading Conference West this year is that I've been baking with too strong flour.  I almost always use bread flour, and generally try to bake with the highest protein flour I can find.  It works, in the sense that I usually have strong loaves that can hold their shape well, but they are tougher and less tasty than they need to be.  So I'm trying to ease up and get used to mixing in more AP flour.  I did this with a batch of pizza dough last week and it turned out really nice, much more extensible than what I typically make.  

Still much more to learn about and explore.

Sopapillas

aptk's picture
aptk

Description

Popular in the American Southwest and a staple in many Mexican households, the sopapilla (sew-paw-PEE-yaw) is a light fried bread, which puffs up and is hollow. They are served in numerous ways: sprinkled with sugar(s), drizzled with honey, opened up and stuffed, or for sopping up broth, soups, stews, sauces, gravy...

Summary

Yield
Servings
SourceTraditional
Prep time
Cooking time
Total time

Ingredients

1 t
salt
4 T
shortening
1 c
warm milk
1 q
vegetable oil (for deep frying (375F-400F))

Instructions

Mix the flour, salt and baking powder in a large bowl. Cut in the shortening with a pastry cutter (I use my hands), and then add the warm milk all at once, stir with a fork (or once again, your hands) to make a sticky mass. Turn out onto a floured surface and knead until you have a soft ball. Wrap in plastic wrap, and let it rest for 15 minutes to an hour. (At this point it's a pretty forgiving dough, I've let mine sit for most of an afternoon, but I don't recommend letting it go that long. I find 15-30 minutes to be optimal).

Now is a good time to start heating your oil for the deep frying, somewhere between 375F to 400F is what you are looking for.

Divide dough in half. Wrap the half you're not using back in the plastic wrap to keep it from drying out. Now we're going to roll the dough thin and flat. It's about 18 inches by 12 inches, you want it to be about 1/8 of an inch thick, so your dough may vary in size, the important part in the thickness. If it keeps springing back, roll it as thin as you can, let it rest 5-10 minutes more, then come back and roll it again.

Next cut the dough into 3-4 inch squares. It doesn't have to be perfect, They can even be triangles. If your oil is long in heating up, cover the dough with plastic wrap or a towel to keep it from drying out. And don't worry about the dough springing back or starting to raise, if that happens simply give them a light roll and stretch them back to the 1/8 inch thin.

About the hot oil, you can use a deep fryer, but really, all you need is at least two inches of oil in a heavy pan or skillet. I used my dutch oven because it's big enough to allow my to fry four at a time.

When your oil has reached temperature, drop one square into the oil. It should sink to the bottom and immediately begin to puff up and will rise back to the surface. Using tongs or a slotted spoon, flip the sopapilla over to cook the other side. This can be kind of tricky, they like to stay puffiest side up. Use the tongs, or spoon, to hold them in place if you have to. Cook each side until light golden brown, one to two minutes per side. Remove from oil and drain on paper towels. You can keep them warm in a 200F degree oven until ready to serve. (They will hold for about half an hour). Once you've finished the first batch, start again with the other half of the dough.

You can dust these with sugar, sugar and cinnamon, powdered sugar, drizzle them with honey, spread them with butter, serve them with soup, it's up to you!

Notes

What if they don't puff??? Don't worry, they are still good to eat, like a miniature fry bread! Nine times out of ten, when it happens to me it's because my oil is not hot enough, check your oil temp. If they brown before they puff, your oil may be too hot, again, check the temp.

What if they start to bubble but don't make the big bubble? Again oil may be to hot, dough is cooking before the air can expand, or you dough may be a little too thick, try rolling it lightly to thin it down and try again!

The biggest reason an entire batch will fail is old, tired baking powder. This works best with fresh baking powder.

At first, try one at a time, until you see how they are doing, then work your way up to as many as your fryer or pan will hold. I've been making these for 40 years, and still only do 3-4 at a time. And some of them are just a trial to turn over!

This is the first recipe I've posted here, so if I'm not clear or you need further instructions, please let me know. Try it and enjoy!

Vicious Babushka's picture
Vicious Babushka

Butternut Sourdough

Pre-ferment

50 gr. bread flour
50 gr. whole wheat flour
100 gr. water
20 gr. sourdough starter

Mix together and ferment for 12-16 hours.

Final Dough

500 gr. bread flour
100 gr. whole wheat flour
Pre-ferment
260 gr. water
16 gr. salt
6 gr. yeast
250 gr. cooked, mashed butternut squash
10 gr. pumpkin seeds or sunflower seeds

Mix together bread & whole wheat flour, pre-ferment & water, autolyze for 15 minutes.

Mix in yeast, salt & butternut squash & knead on medium for 10 minutes. Mix in seeds.

Cover and proof for 1 1/2 hours.

Stretch & fold & proof and 1 hour.

Preheat oven to 480 (220C)

Divide dough into 2 balls, let rest for 10 minutes. Fold and proof for 1/2 hr. in brotforms. When oven is preheated, turn out of the brotforms and slash. Bake with steam for 25 minutes.

The dough was very wet and the loaves turned out kind of flat, should I have used more flour or less water? When I have a dough this wet and sticks I flour the board and brotform with semolina.

They have nice crumb.

dabrownman's picture
dabrownman

The 100% Whole Grain, Multigrain - Mashed by Melon Test - 3 Ways

I started out to see what the keeping qualities and crumb structure of a YW /SD combo levain and a straight YW levain would be compared to a SD levain bread.  I figured that if YW alone couldn’t supply a decent keeping quality and was better in combination with SD for this while still mellowing the sour and providing YW’s unique crumb structure - there was no sense making a straight YW bread if you could get the benefits of it and still get the SD keeping quality with a combo levain.


Sounds great except my apprentice wanted to do an even more important retarded proofing test too, a test she sort of snuck in there while I was asleep.  At first I was a little miffed but heck, life is too short and after contemplating it, I thought the YW overYW / SD melon recovery test was a great idea. Why not kill 3 breads with two melons!


We took one of favorite 100% whole grain, home milled multigrain SD breads with whole berry 24 hour soak and 4 seeds, and made it 3 ways: SD, SD /YW Combo and YW levains.  To mix things up a little bit, 1 hour after the 3rd feeding, we retarded all 3 for 72 hours to bring out the sour in the SD portions.


As per our usual when home milling we took the 25% sifted out portion of bran germ and what nots and feed that to the levains.  They don’t seem to care and nit is a great way to get the hard bits of the wholegrain wet for as long as possible.  The grains used were 20% each whole berry: barley, Kamut, spelt, rye and wheat.  The AP in the formula was brought up to whole grains with the inclusion of the appropriate amount of Toadies.


We let the levains finish doubling after removing them from the fridge which took 3 hours.  We started the autolyse for everything else less the soaked whole berry, pumpkin and sunflower seeds 1 hour before the levains came out of the fridge to warm up.  We used exactly 2 bottles (11 oz each at 5.4% alcohol – no tasting) of Full Sail’s Session Black Lager for the autolyse liquid resulting in a 4 hour autolyse  for the 75% extraction flours, malts, VWG, sesame and flax seeds.


We divided the autolyse in half.  One half we mated with the SD levain to make a straight SD bread.  The other half we divided in half again and made one into a straight YW bread and the other half go the SD/YW combo levain.  All of these whole grain breads came in at over 90% hydration but less than 92%


Each got our new 3 sessions of slap and folds that Lucy shamelessly stole from Josh – this time 10 minutes, 5minutes and 3 minutes and 3 sets of S&Fs where the left out soaker and seeds were incorporated on the 1st one and fully distributed by the end of the 2nd set.


We were starting to like this method but doing 3 breads at a time was 46 minutes of slap and folds – whey.  But, at least I know that with the holidays looming, I’m ready for Michael Wilson’s required 30 minute minimum of panettone slap and folds. 


After a very short 30 minute rest the 3 separate dough balls were shaped.  The two smaller ones were going into cocktail loaf pans, due the high hydration and sized to have a 1 pound finished weight.  The larger lump was shaped into an oval and placed into a rice floured basket.  Once shaping was complete all 3 went into a used trash can liner and into the fridge for a 20 hour retard.


When I checked them at the 12 hour mark; midnight and all was well.  All three had already doubled and the cocktail loaves had risen above the rim in the middle.  I was worried that they would over proof in another 8 hours but figured they were good and cold after 12 hours and that the yeast would shut down while the dough got a little more sour.


About here is when I think things started going strange.  Lucy got out of bed and went out the doggie door next to the kitchen to do her business.  Right after she came back in I heard a thump coming from the family room or kitchen.


Lucy says everyone should start their day enjoying a good breakfast featuring Hanseata's Challenge Bread and have a fine lunch in the middle of the day of seafood pho, feta salad and Tzitzel pastrami sandwich.

When I investigated I couldn’t find anything wrong other than Lucy had a satisfied look on her mug.  Normally she would bark if a thump happened in the darkened house but not a peep came out of her this time.  So I figured it wasn’t an evil intruder and it was probably just the ghost of my previous baking apprentice; Gretchen, who sometimes comes out to play with Lucy late at night.

 This weeks smoked meat is maple and brown sugar cured, apple wood smoked bacon.  If you don't make your own bacon, you are missing out on what real bacon should taste like when made properly without nitrates and used to make a BLT.

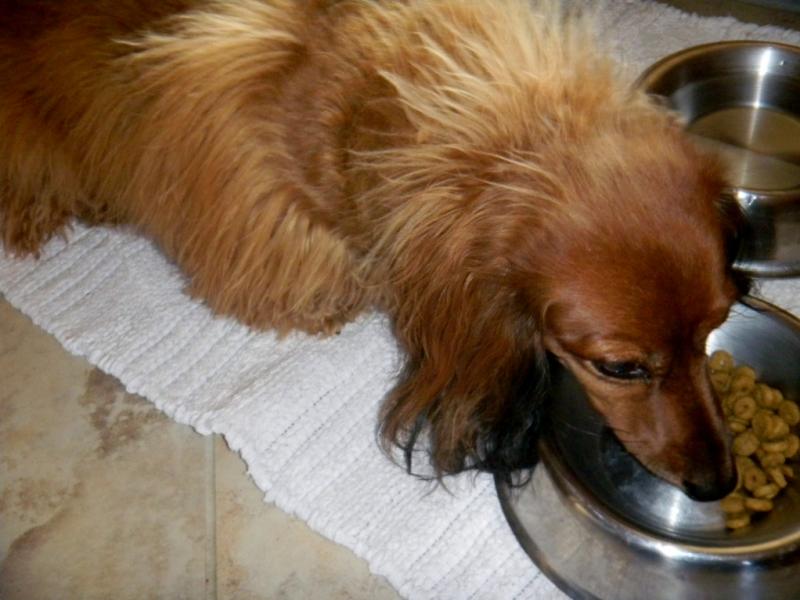
At the 20 hour mark I went to get the trash can liner and bread out of the fridge and I noticed that the cantaloupe and Honey Dew melons I had purchased at the Sprouts were sitting right one top each of the two tinned loaves.  Both had been smashed down from their midnight high marks!

A mixed apple and stone fruit crisp is a fine desert for any dinner and no dinner is complete without a salad.


I though it was an accident since I had piled them up above and behind the bread in the fridge and perhaps they were unsteady and just rolled onto the bread, but nnnoooo!  Lucy had decided to do a Mashed by Melon Test on the YW and YW / SD tinned loaves to see if one could recover better than the other in the heat of the mini oven when baked.


YW left SD right and the combo in the middle.

We decided to bake the two tinned melon mashed loaves first so they couldn’t recover at room temperature.  They were placed in the tins seam side up hoping they would crack naturally on the seam anyway - if they cracked at all.  We chucked them onto the 500 F mini oven with 1 of Sylvia’s steaming cups and 1/3 C of water thrown into the bottom of the oven’s the door was shut to supply an instant burst of steam. 


Sourdough

After 2minutes the temperature was turned down to475 F and then down to 450 F 2 minutes after that.  After a total of 15 minutes, the steaming cup was removed and the oven turned down to 425 F, convection this time.

YW / SD combo 

5 minutes later, we removed the bread from the tins and turned them upside down in the mini oven to make sure the bottom got as well done as the top. After 5 minutes upside down the bread was rotated 180 degrees and flipped back over.


Yeast Water

In 5 more minutes the bread was 203 F and the mini oven was turned off.  When the bread hit 205 F on the inside it was removed to the cooling rack.  32 minutes total time in oven was all it took.


They both recovered somewhat from the Melon Mashing but the straight YW one recovered fully and not a hint of the MM was observable.  Plus one - for the YW over the YW / SD for the full Melon Mash recovery.


Combo YW / SD

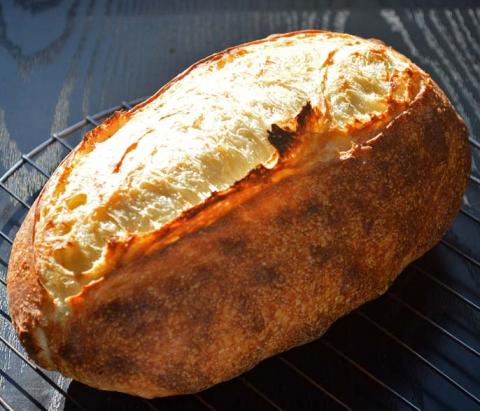
We redid the entire process again with the oval in the basket.  This time the bread stuck in the basket and was deformed in one place so we immediately had a Basket Deformation test going for this loaf.   Lucy wanted to drop a melon on it too but we caught her just in time.


Soudough

The SD oval was out of the fridge for 45 minutes to warm up but was still cool when it was un-molded and slashed. Before going into the mini with 2 of Sylvia’s steaming cups this time.  We used the same schedule as before including the flipping over and rotating; 15 minutes of steam and 17 minutes with out steam - with a falling temperature and convection with the no steam portion.


YW / SD

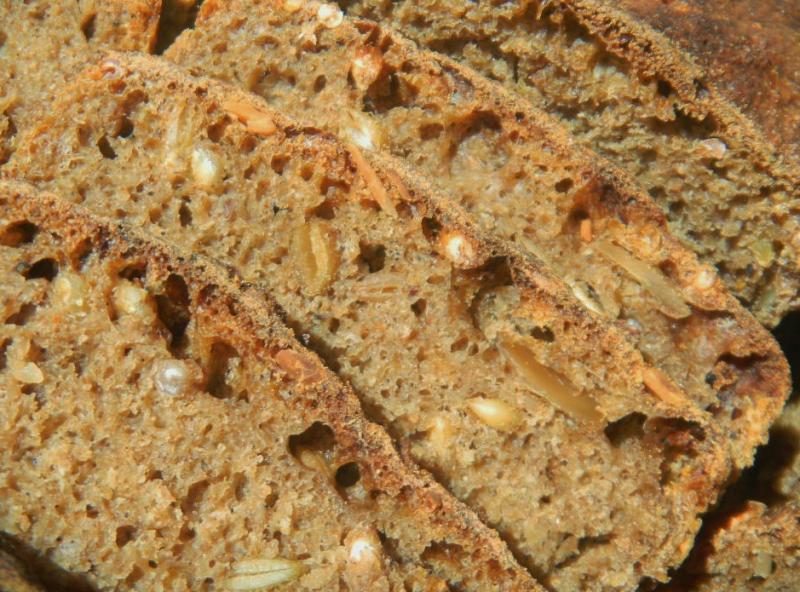
The oval spread mostly, but did spring and bloom a little.  All the bread browned well on top but the big blisters were hiding somewhere else this time for some reason - Tiny ones were there agin though.   The crust was crisp as usual though.  Can’t wait to see the crumb of these 3 different but similar breads and how much different the taste is and how the keeping qualities compare.  As you can see the crumb is fairly open for these 100% whole grain breads.  All are soft, moist and tender. with the YW more so.  The YW has no sour and the SD / YW has a light tang and the SD is tangy as one could want.

Lucy voted this the best bread for a sandwich ever - especially when it is paired as a brie, homemade pate & bacon lettuce and tomato sandwich.

We love SD so it is no surprise we like SG bread the best - by far -  with the SD /YW second but those who don't like sour would likely prefer the YW.  They are excellent breads and would likely be nearly as good without the Session Black Lager and,  without the beer, the bread would have a lower GI and perfect for those with diabetes.   The crust stayed a little crisp but cooled much softer but it was very tasty on all 3 versions.  Now to see if the YW versions can withstand a week of counter and still be edible.

The last monsoon dust storm was yesterday for the year it seems and today feels like the first day of fall with a high of 90 F 

Formula


Build 1

Build 2

 Build 3

Total

%

Multigrain SD Starter

10

0

0

10

2.44%

Whole Rye

3

6

11

20

4.88%

Whole Kamut

3

6

11

20

4.88%

Whole Barley

3

6

11

20

4.88%

Whole Wheat

3

6

11

20

4.88%

Whole Spelt

3

6

11

20

4.88%

Yeast Water

15

30

55

100

24.39%

Total

40

60

110

210

26.83%


Multigrain SD Levain


%


Flour

105

25.61%


Water

105

25.61%


Hydration

100.00%


Levain % of Total

22.29%


Dough Flour


%


Whole Spelt

50

12.20%


Whole Kamut

50

12.20%


Whole Barley

25

6.10%


Dark Rye

50

12.20%


Whole Wheat

50

12.20%


AP

80

19.51%


Dough Flour

305

74.39%


Salt

7

1.71%


Black Lager 283, Water 29

312

76.10%


Dough Hydration

102.30%


Total Flour

410

100.00%


Black Lager 283, Water 29

417

101.71%


T. Dough Hydration

101.71%


% Whole Grain Flour

48.63%


Hydration w/ Adds

91.05%


Total Weight

942


Add - Ins


%


Red Malt

4

0.98%


White Malt

4

0.98%


Toadies

20

4.88%


Ground Flax, Sesame Seed

20

4.88%


Pumpkin, Sunflower Seed

40

9.76%


VW Gluten

20

4.88%


Total

108

26.34%


Multigrain Black LagerSD and YW with Soaker & Seeds


Build 1

Build 2

 Build 3

Total

%

Multigrain SD Starter

10

0

0

10

2.44%

Whole Rye

3

6

11

20

4.88%

Whole Kamut

3

6

11

20

4.88%

Whole Barley

3

6

11

20

4.88%

Whole Wheat

3

6

11

20

4.88%

Whole Spelt

3

6

11

20

4.88%

Yeast Water

15

30

55

100

24.39%

Total

40

60

110

210

26.83%


This is the total weight for bothe levains.  Each levain was 105g total one

had 10 g of SD stater and the other didn't.  All the liquid for both was YW.

 The Melon Mashing Mama

Skibum's picture
Skibum

Today's batard with an added twist.

The only twist was to add a scant 1/4 tsp of instant yeast after I added the salt to the top of the dough.  Ken Forkish recommends using a little commercial yeast for increased volume and a more open crumb.  Check on both points!

This bake used 300 grams total bread flour @ 75% hydration, about 20% 100% levain, 11/4 tsp coarse salt and 1/4 IY. This made some very tasty bread and is part of my loaf a day plan. I have good friends who were flooded out of their home in Exshaw last June.  After 3 weeks living in the local school, sleeping on cots, they were loaned a large travel trailer and are now in a local hotel -- not the best summer. . . Anyhow Marg said her son devoured the French style loaves and loved them. I always bake more than I can eat and frequently give bread to my neighbours, but for the next while, I will make sure Marg and her family have fresh bread every day, if I can manage it. Here is today's crumb:

I had a real skibum moment he other day. One could also call it a 'senior' moment . . . My plan was to bake 2 batards side by side, one using a levain fed 1:1:1 and the other with a 1:4:4 feed.  My object was to see if there was any difference in the flavour profile of the 2 breads.  So immediately the 1:4:4 mix felt different -- very slack with  little structure. Well it finally dawned on me that I had used all of the water in the second mix, forgetting to back out the h2o in the levain, so my slack dough was 85% instead of 75%.  Good practice folding in bowl with wet hand aka KF. I had a good laugh at myself when I finally realized.  For a bit I was thinking, wow it is incredible that a starter can make such a profound difference -- DOUGH!  There was no difference in  the flavour profile of either bread.

Here are yesterday's batard and boule:

Batard crumb

Boule Crumb -- should have done it as a ciabatta, next oops mistake!


Today's experiment involved mixing the same batch as above @ 77% hydration, bulk on the counter, which after 21/2 hours was at least 21/2 x in volume, the most volume I have ever seen from 300 grams total flour.  This has been shaped and will proof until morning in the fridge.  It is my first time trying this and it will be interesting to see the result.

Happy baking folks!

Brian

aptk's picture
aptk

Italian Peasant Bread

Found this recipe lurking around on this site and just had to try it. IT'S PERFECT!!! Quick, easy and a delightful companion for my home made chicken soup.

My picture shows four subjects, the bread ready to go in the oven, the bread just out of the oven, the bread torn by hand into pieces and the soup it went so well with.

I will have to stock up on flour as I envision myself finding many more recipes to try!

Pages