I've been real busy the past few weeks so have not been online much, but did make time to bake each weekend.
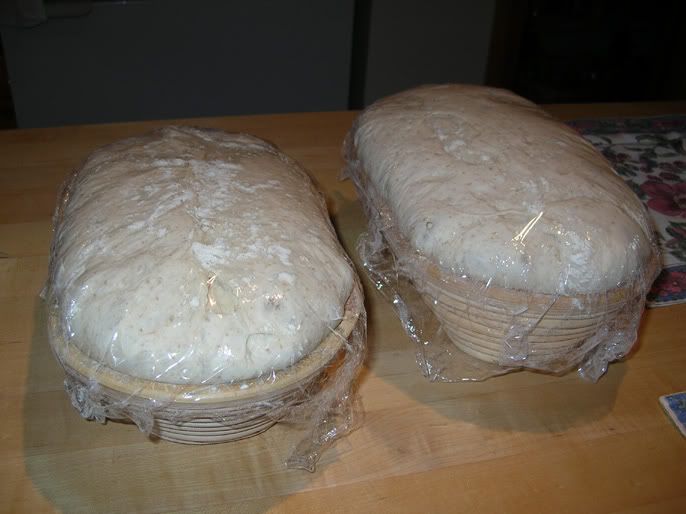
Back in Feb., I was lamenting that my Thom Leonard boules, which I had been making successfully for weeks, were suddenly getting overproofed and collapsing when hitting the hot stone (thread here). I was wondering if it was my switch to 100% organic King Arthur Artisan flour, or if my starter is getting too strong and acidic. I took the advice people here gave me about folding the dough more and paying attention to shaping better. So I did a test to see if the flour played a role or not, but also incorporated the advice given on folding, and I was careful to ferment them at about 70-75F rather then 80-85F as done earlier. To see if my flour switch played a role, I bought some regular King Arthur AP flour and made two batches of the Leonard loaf side by side, one batch with KA organic artisan flour and the other with the KA AP. I folded each batch 4 times, 30 minutes apart during the first bulk fermentation. I also carefully shaped each loaf into a tight boule, rested for 10 min., then placed in the bannetons, and I could not believe how high the loaves rose during the final proof, after only 3 hours:
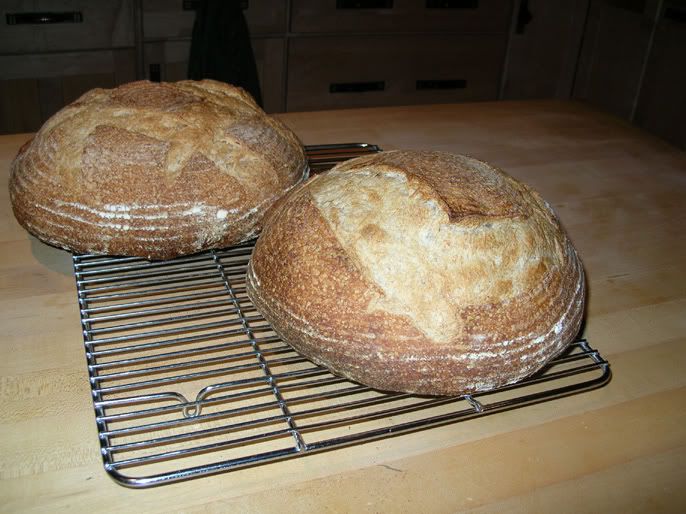
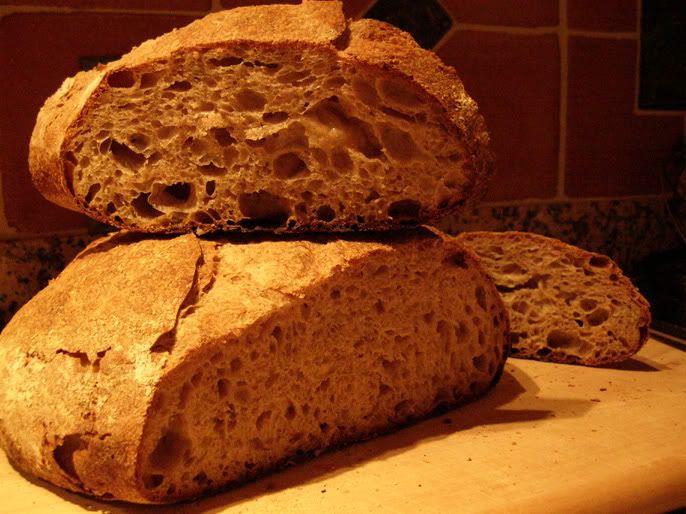
I was in for even more surprise when I baked them - the oven spring was HUGE. Here are the loaves made with the King Arthur 100% organic artisan flour on the left (oval shape), and to the right are the ones made with the King Arthur AP flour (round shape). No discernable difference in the quality of the rise, oven spring, or crumb structure, they all came out excellent, and all because I paid a lot more attention to proper folding and shaping, and note that these were wet doughs:
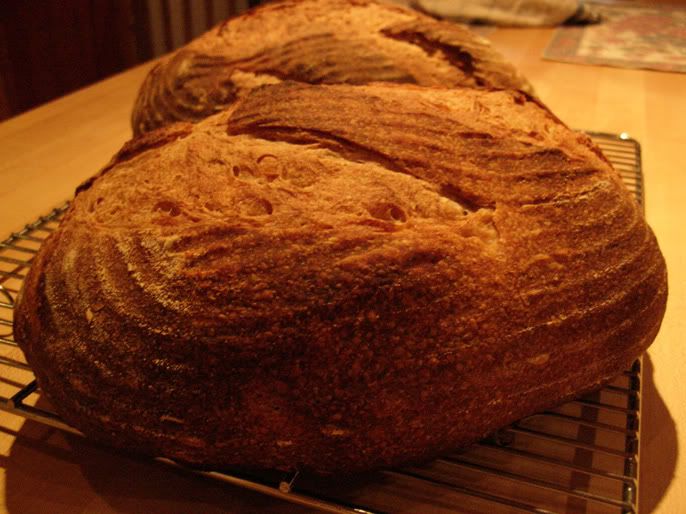
I also retarded 2 of the loaves in the frig for about 6 hours before baking right out of the cold frig and into the hot oven, and got equally huge oven spring as for the ones I did not retard.
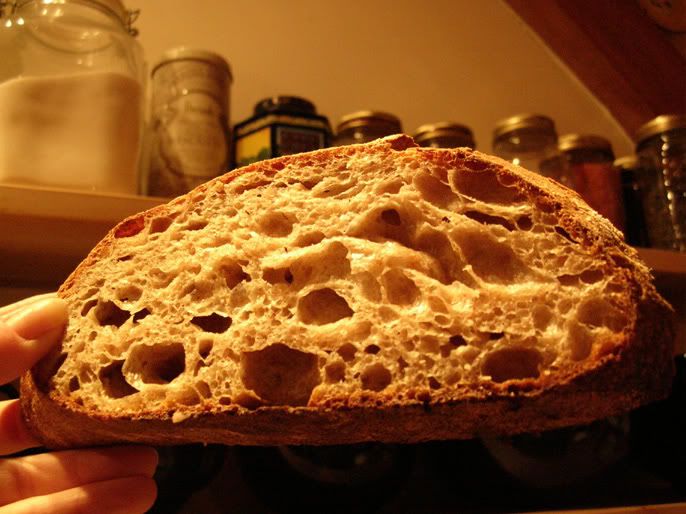
Here is the crumb shot of yet another batch a week later done by the same folding/shaping method, but using King Arthur organic whole wheat flour for 30% of the flour in the recipe (I have not been able to get that yin/yang symbol again in my bread that JMonkey likes though, ha!):
Conclusion of the experiment: My earlier overproofing problems were not due to the KA organic flour. It performed equally as well as the KA AP flour. The extra folding of the wet dough, and tighter shaping of the boules seemed to make all the difference, plus probably cooling the fermenting temps down to 70-75F I think helped. Thanks especially to gt and Bill Wraith for pointing out my lack of folding as being the main culprit. I've been having consistently great outcome with this recipe ever since.
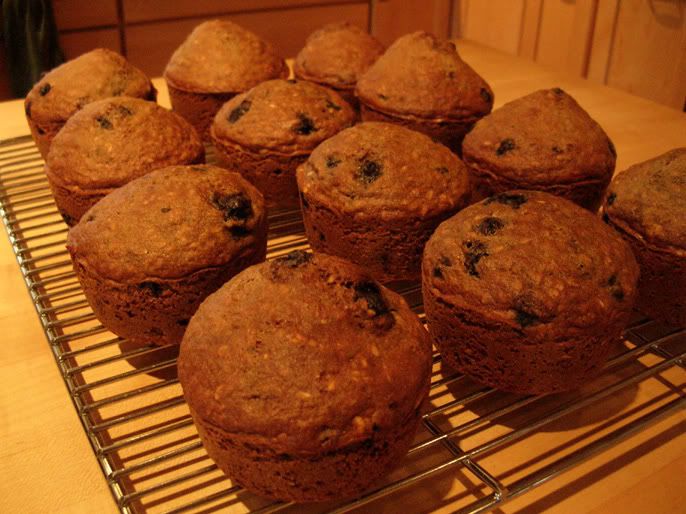
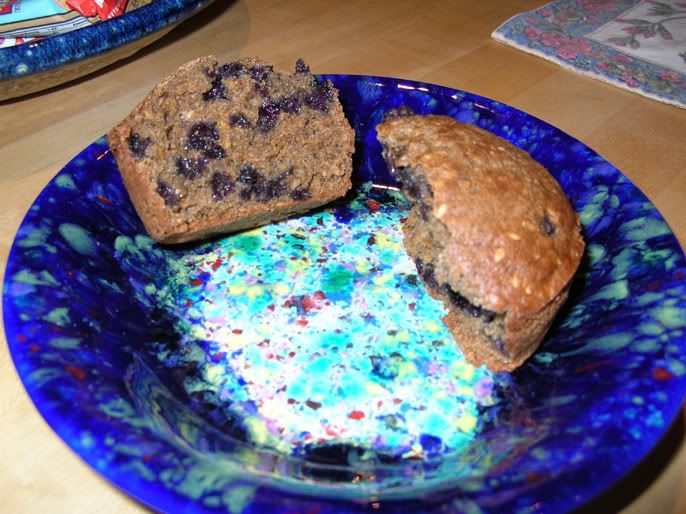
I also made some sourdough spelt blueberry flaxseed muffins. These rose nice and high, but needed a little more sweetening and perhaps a bit more salt than my usual recipe calls for, probably because of the extra liquid and flour brought in by the sourdogh levain, otherwise they were quite nice. Somehwhat dense due to 100% spelt flour, including in the levain. The regular recipe for my muffins is here, but I modified it by expanding my regular batter white SD starter with 1 c. spelt flour and 1 c water (similar to how the King Arthur baking book makes a levain for sourdough waffles), which replaces the same amount of flour and liquid (oil) in the original recipe. Then followed the orginal recipe using baking soda rather then powder to get even more rise. Next time I will add a bit more oil, brown sugar, and salt:
- mountaindog's Blog
- Log in or register to post comments
Congratulations on your renewed success! They're beautiful. And thanks for doing the research.
Susan
Moutaindog,
It's so helpful to see real comparisons like this. I'll be paying close attention to the folding again soon. One of the things I'm trying to zero in on now is getting the feel for the right tension. I think I may be folding one too many times, and the result may be that I'm putting too much tension.
By the way, I notice you said you let the dough relax after forming the boule before you put it in the banetton. I don't think I've been doing that. I just drop it right in after shaping. Do you think that helps? I'll have to remember to do that.
One other question. I've had some trouble forming a boule with those big miche round doughs. I've usually formed them upside down by gathering in the sides and pinching them together. Any good tips for forming the boules?
Thanks for all the pictures and explanations. That's a lot of work.
Bill
I used to not bother with the 10 minute relaxing of the boule before the "placing in the basket" step, but this time I tried to follow the techniques in the book exactly - I figured bakers must do this for a reason even if you do not need to go into another shape (obviously relaxing helps with additional stretching and shaping). What I found was that even as I was keeping the shape as a boule and not going into an additional shape like a batard, I only shaped the boule tightly once and left it to relax for 10 minutes, and this served to seal the bottom seam without me having to do that again after flipping the boule into the basket. I think this helped in handling the dough less and squeezing out any air bubbles. It seemed to help with the oven spring and openess of the crumb to do that.
To shape the boule, I flip the dough out of the vessel it rose in and onto my lightly floured counter, divide it in half with bench knife, then very genlty fold each half onto itself like a letter, flip over so smooth side is up, and rotate the dough with hands underneath to tuck the edges in underneath tightly, then let the boule rest on the counter 10 min. as the bottom seams seal themselves. Then I just carefully flip the rested boule into the basket to proof, no further seam sealing is usually needed. Next time you make a batch of dough, try dividing in half and shaping one boule this way, and one without the relaxing and see if you see any difference in how high they rise while proofing.
For the large boules, I use the same method described above just without dividing dough in half. It is a little more awkward to handle but I use the bench knife to help flip it into the larger bannetons I use for those big 4 lb boules. I seem to get better rise, oven spring, and open crumb by making the smaller 2 lb boules, though, probably due to the greater surface area of the dough.
Mountaindog,
Thanks, again it really helps to see pictures and hear the detailed explanations. There is something less than perfect about trying to form the boule upside down, as I had been. The seams are very hard to seal, and I end up degassing the dough more and having to let it rise a lot longer, probably too long, in the final proof.
I'll give your approach a try.
Bill
Thanks for the update, your loaves look great.
What weight of dough do you put into those bannetons? Just curious :)
Hi Breadnerd,
I divided one Thom Leonard recipe from Glezer by half for each banneton, so total dough recipe is 2118 grams, then each basket received 1059 grams of dough, or about 2.35 lbs of dough each.
Previous to this attempt I had never had the dough rise over the top like that for this same recipe/amount, even after some very long proofs.
Those are nice big loaves! I think your proofing pics were very impressive, indeed.
I'm finally running out of bread from my last big bake (I froze a lot) so am getting in the mood to do some baking. Started refreshing my starter this morning :)
Mountaindog,
Good to see you back. Once again you have methodically tracked the source of your troubles and documented it with remarkable skill. The loaves look wonderful.
When you say you folded them 4 times, do you mean you folded them in the bowl like you have mentioned in previous posts? If I recall you fold an edge in and rotate the bowl 90 degrees and fold and rotate. Then flip the dough over. Is that the procedure you are using or are you pulling the dough onto the counter and doing a stretch and fold, 4 times? Maybe you already stated this and I missed it, if so I apologize.
Your version of the Thom Leonard has become my family favorite. My 14 year old who has developed an ability to judge the crumb and crust told me today she likes the flavor of the crumb and the fact the crust has a totally different taste :)
Eric
I also would like to know if you have folded the dough in the buckets. I would like to double a couple Glezer recipes, this one included. I also prefer making this into 2 pound loaves but would like to double the recipe to get at least 4 smaller loaves to share with neighbors. I see the photo in Artisan Baking where a huge bucket of dough is being folded so I know it can be done but not quite sure how. Please explain! And thanks in advance.
Thanks everyone for the comments, I'm glad you find this helpful.
Bill, Eric, ZolaBlue - regarding folding, I've changed my methods on that since I first made this recipe back in November/December. I used to use a big huge shallow wooden bowl to rise all my doughs in, so it was easy to do a gentle fold right in the bowl. Nowadays, I've switched to 6 QT dough rising buckets you can get at restaurant supply stores, or the King Arthur store, and they seem to work better for me 1) because I am usually fermenting a couple of different doughs at the same time, so needed more vessels, 2) it is really easy to see when the dough has doubled by the marks on the containers, and 3) the tight lids keep the dough from drying out, and make it easy to stack them with dough in them if I need more counter space.
To fold the dough, I just dump the dough out of the bucket onto my stone counter, which has been lightly sprayed with oil, and stretch and fold each side onto itself, rotating 90 deg. after each side is folded, flip over so smooth side is up,tuck edges underneath like forming a boule, and place back in the bucket. I do that every half hour for the first 4 half-hours (i.e. 2 hours of the bulk ferment, then leave it for the rest of the time, usually another 1.5 to 2 hours at 70-75F). The slack dough pours out of the bucket easily because I also lightly spray-oil the bucket so nothing sticks.
Merrybaker - I actually could not notice any discernable difference in the taste between the King Arthur AP flour vs. the loaves with the King Arthur Organic Artisan flour. They both really tasted the same to me, which says a lot about the artisan quality of regular KA AP flour - it is very tasty. I would expect them to be very similar because the protein level and ash/mineral content are nearly the same. The only difference I notice (other than one being organic and one not of course) is that the King Arthur AP absorbs slightly less water than the organic, so I needed to add a little more water to the organic dough to get it as wet as I like it to be. If using organic flour is important to you, the KA organic artisan is great, but if you cannot get the organic easily, or cannot afford the extra cost, or organic is not as important to you, the KA AP flour is really a great flour in my opinion, and is often sold in large 25 lb bags in most supermarkets in the Northeast which lowers the price per lb even more.
I also plan to try other organic AP flours as I can find them to see how they taste. The BRead Alone bakery which is nearby to me sells 50lb bags of organic Milanaise flour from Quebec, I'd like to try that next.
Mountaindog,
I use almost the exact same method for the folding and rising with those same buckets, the spray, though I ever so slightly (tiny amount) dust the sides of my dough and the sides of the container above the dough level with flour to make it easier to slide it out. Other than that, the one thing I've realized is that I am missing the benefit of getting my seams sealed up with the weight of the dough. I've been putting mine in the bowl seams up, and as I mentioned once before, I also was forming the boules upside down and not letting it relax seams down before putting in the banetton. The reason I was on the upside down kick had to do just with the size of the dough being cumbersome to work with. Thanks again, as I can see exactly what to do differently from your explanations.
Bill
I'm using the same folding method using a bowl and once began it with the bucket but I remember switching to a bowl half way through because I was worried I'd disturb the dough too much getting it out of the bucket at the end. Next time I'm also going to use the buckets. When I fold using the bowls I never use spray oil but just floured the top of the dough and the counter, like Bill said he does.
If you look on page 26 of Artisan Baking there is a photo of a baker turning huge buckets of fermenting dough. I would like to double a couple different recipes in that book so it would make more sense to use a bigger bucket. But I don't quite understand how they accomplish turning it inside that bucket and I'm doubting he is using any flour. Have you done this before?
One more question. Is it generally ok to double a dough recipe? Or even triple?
Sure, I double all the time, or triple...that's what baker's math is all about, and where using weights helps...just keep your ratios the same and you are good. Your only limiting factor may be your mixer's capacity - if using a mixer at all. My mixer can only mix about 4 lbs of dough at a time, so I do batches in sequence, but am often fermenting them at the same time since the mixing of each batch does not take that long.
No, I have never used the big buckets like you mention in Glezer (is that the big square tubs you mean? I don't have the book handy) I have only used the 6 qt round buckets and never fold in the bucket - too awkward and can't do a good enough stretch. I think pouring out onto the counter helps it to stretch, and I'm not afraid of stretching it at this stage, I think that's the best thing for it.
I have both 4 qt and 6 qt buckets, the same ones you have, Those are the ones I want to use but was wondering if it works to fold inside the bucket. Just curious what their method is to do it that way. I suppose it is silly to think of my trying it because it is so easy to dump the dough out in those quantities.
You're right, I have to consider my mixer in doubling doughs. I also need to learn to use baker's percentages. I have resisted. :o)
The one in my blog is a little over 5 pounds total dough weight after mixing. I do it by hand, as my mixer just is not up to it, and between the cleaning and time trying to do it serially it seems like more hassle than doing it by hand. Actually, between the autolyse and folding techniques, the mixing part is just to get all the ingredients uniformly distributed, plus a little kneading. It's not all that much work. I pick up the dough and holding one end, I toss it on the table, which stretches it out. Then I roll it up, which elongated it in the other direction. Then I do the same thing holding one end of that rolled up result. It takes maybe 5 minutes or less to get it all mixed and starting to have some gluten texture. The folding takes care of the rest. I think the other thing different in Mountaindog's form what I've been doing recently is to fold more frequently and earlier, and maybe avoiding getting it way too stiff by folding one too many times, which is on my list for the next one I do.
I also started using the Artisan flour and can't tell any difference between the regular KA AP and the Artisan. However, I do have another question after getting a very strange loaf of Columbia bread. Have you noticed a slightly greenish cast to any of your loaves?
I had this happen twice and i can't figure it out except that I'd switched to that flour. One loaf was baked in my gas oven and one in my electric oven and they looked totally different. The one in the gas oven was much lighter and had this very odd greenish/teal quality to it. Could that possibly have been from the barley malt syrup?
But the other day I baked another sourdough loaf and I brushed a tiny bit of flour from it after baking and I swear I could detect the slightest of greenish/yellowish cast. It is crazy!
Bill, I would love to mix dough by hand but I really am chicken to start it. I even bought one of those big dough whisks from King Arthur but when a recipe calls for mixing in a stand mixer for 10 - 15 minutes I fear mixing by hand, for me, just would not be adequate. Maybe I need to experiment.
Zolabaue,
I too was reluctant to hand mix. When I finally did it for the first time it was so I could get a better feel for the dough to understand the gluten better. Once I found how easy it is to manage and how easy the clean up is on the counter I never looked back. Now days I think the last time I used the mixer was for a batch of bagels because of the long knead time. That was my first attempt at that formula and I stuck with the directions. That dough whisk is a big help once I learned how to use it. The other thing I have learned is how to do a Frisage (sp) where you push the heel of your hand down on the edge of the freshly mixed dough and squish it forward, taking more with each push. It breaks up the clumps of dry flour very efficiently and makes for a smooth homogenous mass. I had heard of this but didn't understand how it was supposed to be done. I found a video clip on Julia Childs web site featuring Danielle Forester demonstrating how to make baguettes. There are several things to be learned in this video including the mixing and kneading. I would recommend the video, there are 2 parts to it. I don't go to the extent that she does in kneading but it is a good technique. http://www.pbs.org/juliachild/free/baguette.html For me, learning the hand methods make me appreciate the subtle differences in the dough that end up having a big impact on the finished loaf. From what I have seen of your work here, you will enjoy this aspect of baking.
ehanner, I don't really want to hijack Mountaindog's thread but I did want to thank you so much for inspiring me to try hand mixing. This was the perfect instruction because I am such a visual person and by seeing the videos it all made sense and looked so easy. And, ya know what? It was easy! Surprisingly easy and it seemed magical - I swear - I'm still obsessing over it.
I made the bread the very next day after you posted the link. Here it is.
http://zolablue.smugmug.com/gallery/2619693#138236657
The only thing I changed in the recipe was to add 75 grams of my stiff sourdough starter (for flavor) and more salt to compensate for the extra flour. I should have splashed in a bit more water but I'll know next time. I set my timer to 15 minutes for the knead so I'm sure I didn't come close to the 850 "slaps."
Do you think it would work just as well to mix the dough and instead of kneading so heavily it could be folded several times? Would like to try that method for this bread.
Thanks, again, so much for the inspiration. I learned a great deal about bread baking doing that exercise and I would urge other new bakers to try as well.
Zolablue,
When I say Julia Child slap that dough on the counter I thought I would try it myself. There is no way I would do that 850 times nor do I think it's necessary. What I did is I counted how long it takes on my mixer at 2 to crank around 85 times and I multiply by 10 and let the kitchen aid knead this dough. Then I did one by hand, stretching and folding, resting, stretching and they were about the same. The key is to avoid adding additional flour so the dough stays nice and soft and workable.
I'm with you Zolablue, the whole hand mixing thing has been a big inspiration for me also. In the last couple months I feel like I have really started to understand the nature of flour. I should say white flour because for the life of me I can't get a 50% whole wheat bread to rise and act like it's supposed to.
I made Floyds Honey whole wheat again last night. It tastes great but it's a little dense.
I checked out your photo's on your site, very nice! It does feel good to be able to produce delicious and beautiful bread.
Eric
As a result of watching these video clips I do the Frishage (sp) on every dough I make and it helps. I now do some kind of stretch and fold on everything. Sometimes it's the french fold on medium hydration and usually the letter fold on more slack dough. I have gone back to look at the videos to see how the character of the dough changes as it is worked and stretched so I can recognise the changes in my own hands. For me it feels like there is a definite personality in the flour that can be brought out with just the right amount of stretch/fold/resting. I don't want to get all mushy over this but it is an awakening and I think maybe a quality that professional bakers must get to understand.
Eric
I have just reproduced my grandmother's "brown bread" recipe and it is to die for. It is very flour specific though and must use a special type of graham. I am tweaking the instructions to read better as she baked this for many years and it was cryptically written on a note card. If you are interested I will post it later in a new thread - it is one of the best loaf breads, partly whole wheat, I've ever eaten. Of course, it is sentimental to me as well.
I'm going to do the French bread again this week using more water and doing the folds. When I was finished with that bread it was almost like I'd forgotten something because I had no mixer or even a wooden spoon or spatula to wash. I want to do it again!
Thank you Zolablue, I will wait with held breath. I also am going to make Baguettes this week. Did you find it interesting how that dough came together in the JC video? It was the first time I had used cake yeast and I thought it was easy to work with. As it happens I live in the City where most of the yeast is made in North America. Milwaukee was a huge brewing city and the industry migrated here. I don't know how available fresh yeast is in other parts but it is abundant here.
What part of the earth do you live on?
I did not use fresh yeast in that recipe. I have no idea where to find it. (I'm in Omaha-ha-ha, btw. :o) It was SUPER interesting to watch that dough come together like magic and provided a lot of adult fun! (chuckle) (That's why I call it silly putty for adults.) Anyway, I measured the flour on the counter, added my salt and instant yeast and had stirred some of my discarded stiff starter into the water for extra flavor. I think because of that I should have added more water and will next time. Cannot wait to make it again.
Btw, are you only interested in a 100% WW recipe? Mine is not 100% but it is really good. I'm working on it now.
Not particularly 100 % . I just want to find a tasty bread that is nutritious that I can make. For some reason I haven't been able to get Floyd's honey WW to rise. It's probably got something to do with the way I am kneading or some other physical thing I haven't figured out yet.
I would think Omaha would be big enough that a large supermarket would carry fresh yeast or cake. It's in the refrigerated section usually around yogurt or cream cheese. Look for a 1"x1"x1-1/2" silver foil cube. It was enough for 3 recipes from the JC video. It worked so well for me I would suggest trying it if only just one time. I'll send you some if there isn't any in your supermarket.
Eric
Are so beautiful! You really have a way with bread and should be very proud of yourself.
Susan
Wow, I'm so happy you pointed me towards this video. How wonderful to see the process rather than just read it. I think that is one of the recipes I've been wanting to try anyway, I believe from my Baking With Julia book. That woman sure made everything look easy including slashing which I'm terrible at doing.
What is the trick to learning to use that dough whisk? I just bought it, tried it once, got dough all balled up in it and put it aside for "later"...hehe.
I had never heard of the frisage but wow what a great demonstration. I know someone I really need to recommend this video to now so I'll pass it on. Thanks so much!
PS...I bought the book Dough but have yet to watch the video - don't know why. Now I have to and I only hope it is as good as watching those JC videos.
Hi Zolablue,
I'm with Ehanner. I rarely use the mixer for ordinary breads, although I've used it to mix focaccia or ciabatta doughs recently, where it's all sticky and messy and very wet at first. For the 5 lb miche dough, though, it's just easier to go without the mixer. I saw that very same video, thanks to someone's post here, and do the frisage first, then something that looks a lot like her kneading technique, but big and heavy. The difference is that with 5 lbs of dough, it feels more like you're swinging an axe and then rolling up a carpet. It seems to work very quickly, though. However, I'm not sure how to use the dough whisk effectively, so maybe there's another video or a lesson from ehanner?
Bill
I knew these things would come in handy. The thing about the whisk is that it is handy for about 1 minute then you are past the point where it matters. (Remember I'm the guy who bought the steamer.) I really want this thing to be necessary and help in the mixing and it does help get the dry dough mixed in and workable, then it's done and you are wondering if it was worth it. I became a convert after watching the guy on Breadtopia who uses it with the slack no knead doughs he makes. I think it does work better with high hydration levels. Check it out and decide for yourself. The first part of all his videos contains him using the whisk. I end up with my hands in the mix doing the frisage.
http://www.breadtopia.com/
Glad you found it interesting zolablue, I posted a link above for another video on the whisk. I use it most every time for just a minute or two and it gets you past the awkward stage where a spoon wouldn't work well and a wire seems to break up the big clumps so the moist dough is exposed to the dry flour. I think it helps me to avoid chasing the "is it to dry or do I need just a little more water, then woops it's to wet".
Here is another one that I liked. It has a few nuggets that I found interesting. I have learned a lot about handling from watching these things. You just can't get it by reading it. http://lepetitboulanger.com/
Here is another one in Europe that's interesting. http://www.fornobravo.com/video/hearth_bread.html
Browndog5,
For me, I fold when I think of it and I do look for some activity but the clock is what drives me. Every time I fold and flip the dough in the bowl it gets better. You can feel the gluten forming and strengthening. I see mountaindog has gone to dumping her dough bucket on the counter and stretching and folding out of the bucket. With larger recipes that is probably easier but if you have a low-wide profile bowl for me it's easier to leave it in the bowl. I try to stretch the piece I lift a little before laying it down on top then rotate the bowl and do the other sides. When done folding, flip the mass to put the seams on the bottom.
I learned this method first in Glezer's book, Artisan Baking. In her recipes she will explain exactly when to start the folding and how many times it should be done for each particular recipe. Most of them let the mixed dough rest for 20 or 30 minutes and then start folding every 20 to 30 minutes after that for 3 - 5 times and then allow the dough to continue to ferment the remaining time on its own.
As for using the method in other recipes, I've done it successfully and I just experiment. I base the number of times on the consistency of the dough - if it is wetter it gets more folds. But you also have to take into consideration the entire bulk fermentation time.
mountaindog,
I've been meaning to write to thank you for this thread; it really made me pay attention to my folding and shaping. Big change in the bread!
Did you post your version of the Thom Leonard boule here at some point? I'd love to try it.
Thanks,
edh
ps Is the snow gone yet?
Hi edh - yes, the snow melted pretty fast this past week and is nearly all gone, spring is here!
Here is the link to where I previously posted the Thom Leonard boule recipe. Good Luck!
thanks mountaindog,
I can't wait to try this; I'll wake up my starter tonight.
Spring is springing here, too. Might even get the peas planted this week...
edh