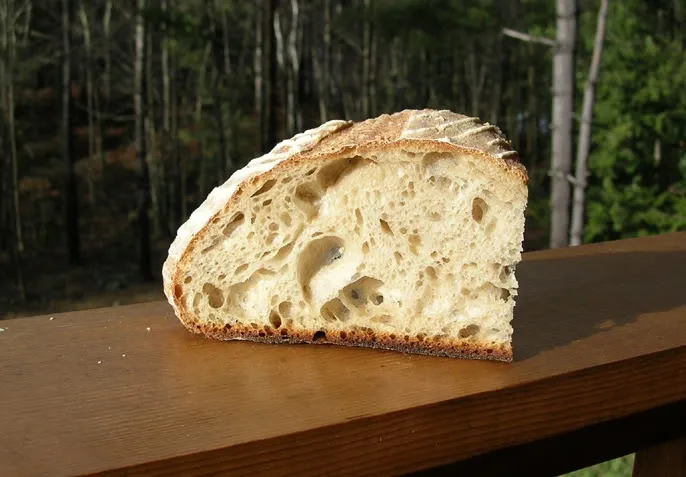
Hole-y-ness:
I've been asked how I get the big holes, and how I fold. Whether you are working with a bread dough that uses commercial yeast, or with sourdough, the same principles seem to apply from what I've experienced. Obviously, there are others here more experienced in sourdough who may have different techniques. It depends on what works for you.
What gives me the big holes is to use a very wet, soft dough, fold it 2-3 times for the first 60-90 minutes of fermenting to strengthen the gluten, and when you're ready to shape, VERY GENTLY pour it out onto your counter, VERY GENTLY fold the sides into the center to gather it up into a boule without degassing it in the least, flip upside down in your hand and tighten it into a boule by pinching the seam underneath closed. Then place it smooth-side down (seam-side up) into a floured banneton or proofing basket. Do not skimp on the rising time - if it needs 5 or 6 hours rather than the 3 stated in the recipe, let it rise all the way, and make sure your starter is very active.
I really like this bread, I just made it again this past weekend and it came out equally well as it did in the photo at top. It had more of a sour bite to it this time from the wet rye starter.
Thom Leonard’s Country French Bread (from "Artisan Baking" by Maggie Glezer)
Makes one 4 lb. (1.8 kilo) loaf
Time: about 18 hrs. with 30 minutes of active work
The evening before baking make the Levain as follows:
45 g ( 1 oz) fermented rye sourdough starter refreshed 8-12 hrs before (I use a batter-like starter made with equal weights water to rye flour, not a firm starter. If you only have a white flour starter, use that and just substitute 30 g of the white flour in the final dough with rye flour)
120 g (3.3 oz) lukewarm water
140 g (5.3 oz) unbleached all-purpose or bread flour (see my note below on flour)
Dissolve starter in the water in a small bowl, then add flour and beat this batter-like dough until very smooth. Place in covered container and ferment at room temp (@70F) until doubled, 8-12 hrs.
NOTE: I use only King Arthur All-Purpose flour rather than bread flour as it has a high enough protein content and a high ash content compared to other all-purpose flour. The high amount of protein found in most “bread flours” makes the crumb too tough for my taste.
Next day make the final dough as follows:
100 g (3.5 oz) Whole Wheat Flour (if you like your bread a little darker add up to 350 g whole wheat here and use 250 g less white flour below)
1030 g (36 oz) unbleached all-purpose flour (King Arthur has best protein and ash content. If using a white flour starter in the levain rather than rye, substitute 30 g of the white flour here with 30 g rye flour)
660 g (24 oz) warm water
all the fermented levain you made the night before (305 g or 10.6 oz)
23 g (0.8 oz) sea salt (preferably grey Celtic sea salt if you can find it, often sold in health food stores)
Mix By hand: combine all flours in large bowl. Add the warm water to the fermented levain to loosen it from container. Pour the watered levain into the flours and mix with spoon, dough whisk, or hands until just combined. Cover with plastic wrap and let rest (autolyse) for 20-30 minutes. Turn dough out onto work surface, knead for 10 minutes, then add salt, and knead for another 5 minutes until salt has dissolved and dough is very smooth and shiny.
Mix By stand mixer: same as by hand except leave in mixer bowl after autolyse, then mix with dough hook on lowest speed for 5 minutes. Add salt and knead in mixer at low speed for another 4-5 minutes until very smooth and almost cleans the bottom of the mixing bowl.
The dough should feel soft, sticky, and extensible at end of kneading. If it is too stiff and dry, add a few more drops of water until dough just barely clears bottom of mixing bowl at end of kneading if using a stand mixer, or until dough feels soft and stretchy, and slightly sticky, if hand kneading. Softer, wetter doughs give you larger air holes in the baked loaf, which also gives the bread more flavor.
Fermenting: Place dough in lightly-oiled bowl at least 3 times its size and cover with plastic wrap. Let ferment for 3 hours at room temp (@70F) until well-expanded but not yet doubled in bulk. Turn dough 3 times at 30 minute intervals by gently folding like a business letter and flipping upside-down, (that is, turn once at 30, 60, and 90 minutes into fermenting time), then leave the dough undisturbed for remainder of time. OR: for even more flavor, ferment at room temperature for one hour (turning 2 times, once at after 30 and once after 60 minutes), then retard overnight in fridge, warming up again next day at room temp. for 2-3 hours before shaping.
Rounding and resting: Turn dough out onto floured work surface, and very gently round it into a tight boule. Cover with plastic and let rest for 10-15 min. to relax the gluten. While resting, prepare your basket or banneton by dusting with flour. If you’d rather make 2 smaller boules than one large one, divide the dough in half with a dough cutter, and gently form each piece into a tight boule.
Shaping and proofing: Shape the dough into an even and tight round loaf (or leaves if making 2 smaller boules) without deflating it. Place dough topside down into the floured basket or banneton. Lightly sprinkle the top of the dough with flour, cover with plastic wrap and proof for 4 to 4.5 hours at room temperature (@70F) until at least doubled in volume and a slight dent remains when pressed with finger.
Preheating oven: At least 45 minutes before dough is fully-proofed, preheat oven with baking stone on middle rack to 500F.
Bake: Gently flip the dough upside down to release it from the banneton/basket onto semolina-dusted parchment on an over-turned baking sheet or wooden peel, or directly onto a semolina-dusted peel if not using parchment. Slash the boule with a razor in a pound sign (#) design, or in a spiral, cross, or any other desired pattern, as long as the slashes go completely across the top to allow for even expansion during baking. Slide parchment onto hot baking stone in oven, or onto semolina dusted baking stone if not using parchment, and quickly mist side walls of oven with water in a mister (do not spray near the oven light!) and quickly shut the oven door to prevent heat and steam from escaping. The steam helps the dough rise very quickly in the hot oven (called “oven spring”) and also makes the crust more brown and crisp. Turn oven down from 500F to 400F and set oven timer for 30 minutes (20 minutes if making 2 smaller boules). Continue misting every 30 seconds just 3 or 4 times for first 2 or 3 minutes of baking, then leave to bake. When first 30 minutes are up, open oven and rotate loaves around to even out browning. Set timer for another 30 minutes (20 minutes for 2 smaller boules) and check the loaf when that time is up. If it is still a light color brown, leave in for another 5-10 minutes until it is a deeper brown but not burnt, then probe center of loaf with instant-read thermometer, loaves are done when thermometer reads at least 205F in center. If they are getting burnt but center is not done, your oven is too hot, turn it down another 25 degrees or so next time. Let cool thoroughly on rack before cutting as the centers are still cooking, at least 2 hours.
- mountaindog's Blog
- Log in or register to post comments
I made a loaf yesterday evening of plain white sourdough, using what I've learned from the Sullivan St. method and Jim's encouragement. It's the best bread I've made, period. Nice open crumb, very crunchy crust, big flying ears, delightful sourdough tang.
Funny. I really thought I knew how to bake sourdough bread over the summer. I even wrote up a big lesson for this site on how to make a more flavorful and sour sourdough bread. Now, I'm realizing, most of it is ... well ... if not wrong, at least not really right. I need to revisit that lesson.
I thought your lesson was very helpful to me when I needed to see what an active starter looked like, and the folding of wet dough, and I'm sure others have found it very helpful. Until something else comes along, sometimes we're all feeling our way in the dark and helping each other as best we can with good intentions. This should be a free forum for people who love baking bread in all forms to discuss their experiences, ask questions, compare notes, etc. People shouldn't be discouraged from sharing what they learned because they may be newer to to some aspect of breadmaking. In fact, someone who has just had success learning a new technique may be very encouraging to the next new person coming along in the struggle. I've always enjoyed all of your posts, so keep it up!
Because it is an art form, there are many ways of accomplishing what you want to get in the end...variety is the spice of life and all that. Anyhow, it's not rocket science - if my peasant ancestors from Germany, along with gold miners in Alaska, could make good sourdough bread, it's not that unattainable.
For instance, I'm not at all sure anymore that keeping a stiff starter makes much of a difference. I think the biggest factor is time -- the longer you can ferment the dough without destroying its ability to rise, the stronger the flavor.
I'm also beginning to realize the full importance of temperature and the virtue of a relatively warm rise ... say, about 82 degrees F. I've seen a lot written recently on how the lactobacilli truly thrive around that temperature, so I've been experimenting with doing my final proof at about that temperature, with really great results. As for the bulk fermentation, I've been putting about 15% of the total flour in the starter, and then just mixing up the dough with a spoon to let it stand for 12 hours at room temperature (which in the winter in New England is supposed to be about 64 to 68 degrees F). Fold, rest for 15 minutes, gently shape and then do a final proof of 3-4 hours at about 82. I still haven't gotten it to work to my satisfaction with whole wheat, but I'm hopeful that I'll break through that barrier this weekend. It'd be nice to do so. Right now, I make whole wheat sourdough bread on the weekends and freeze it for use later in the week. It's better than what I can get at the store, but nothing beats fresh bread. I'd love to bake during the week and have (relatively) fresh bread for the next day's sandwiches and dinner.
I'm glad to hear that the old lesson was helpful! Folding is a really amazing technique, isn't it? That something so simple could have such a tremendous impact on the dough.
My thermometer is to the left, so it's really easy for me to put the probe inside to monitor the temperature. If it's too high, I open the lid until it's about right. Too low, and I throw another cup of hot water in. It'll keep to within 5 degrees for a couple of hours. Plenty of time, and a lot less trouble than building something.
But if you want to build something, here's a slideshow.
In the French Chef dvd Julia Child mentions the heating pad--and gave me a brainstorm as I was planning on getting a seed germination warming pad (whatever those are called) this year and happily told myself that I could use it to make a proof box too!
Hmmm, I used a rubbermaid tub and a lamp for a chicken brooder--but it wasn't very humid in there. Plus I have a rule not to use any chicken husbandry items anywhere near my kitchen! Except eggs of course Ha ha!
Great write up again as usual, by the way!
Really appreciate the advice in this thread. Mountaindog, you've really helped me be much more gentle in handling my wet doughs during shaping.
Becausee I live in northern Wisconsin, and my kitchen is usually between 62-65 degrees, I've used both portable coolers and a warmed microwave to create the warm, draft-free box I need to get my breads to rise. In both instances, I heat small mason jars (or stoneware cups) of water to boiling and use them to provide the heat and humidity desired. One cup usually works OK for the microwave, and a couple do the job for the cooler. Depending on the activity of the dough, I often reheat the water partway through the process.
But I didn't think to use my remote thermometer with this approach. Thanks for the tip, JMonkey.
Sylviambt
In search of the perfect crust & crumb
That bread looks really, really nice.
Folding really does make a difference when working soft dough, and I am truly a convert.
I do not have nearly the open crumb you have, but I am going to try again this weekend and see if I can replicate your bread! What an inspiration!
Thanks for the post, and for all the advice!!
Just read an article by Ed Wood where he gives details on buliding a proofing box out of a styrofoam cooler (cheap). He simply puts in a 25 watt light bulb connected to a dimmer switch so you can regulate the heat, insert a temperature probe through the styrofoam and you are done. Have not tried this myself yet, but sounds like a simple way to proof doughs, starters, etc. at around 75 - 80 degrees.
Mountaindog:
My memory just kicked in......this article or blub was in a instruction book that came with a San Francisco sourdough starter I purchase from Sourdoughs International.... The following is a quote from the booklet (hope this is legal):
"A proofing box is made from an inexpensive Styrofoam cooler. It will accurately regulate the temperature of proofing without the necessity of heating an entire room. Select a cooler large enoughto fit upside down over your large mixing bowls (20.5 x 13 and 11 inches deep) The lid is not used. Usa a 25 watt light bulb connected to an ordinary dimmer switch. Install a standard porcelain light bulb socket in the inside bottom of the cooler. Use an accurate thermometer to measure the temperature."
He recommended this device because proofing the San Franciso culture is very temperature critical. But, this method would probably work great on anything you need to proof, especially in those cold New England winters. I am planning on making one of these very soon. Will post pictures when I do.
Thank you for the perfect photo of a slab of bread that Floydm has sagely highlighted on the home page. It makes me smile every time I see it and inspires me to bake.
And it makes me quite hungry.
...That is, unless your bannetton willow is the thickness of garden hose! I nearly fell off my chair when I looked at the glorious height of the loaf pictured and then read that the recipe makes one 4# loaf-- I imagined the loaf being something like a foot tall, judging by the curvature and angle of the cuts.
Presumptuous, I know, but I was getting ready to renounce everything and sit half-lotus outside your house, waiting to be taken on as a student.
I have this dough fermenting in my fridge!
I shall let you know how it come out.
I appreciated this thread since I am in the middle of making a proof box as I write. I am actually building one from scrap lumber and styrofoam. My only costs are a dimmer and an indoor/outdoor thermometer (cheap now at about $7). Mine is about 2' X 2' X2' . The dimmer will regulate a light bulb and I will calibrate the dimmer to approximate temps.
I have been pleased with the move of baking recipes to include weights of ingredients but now we have to get them to include optimal temps for proofing.
Paul Kobulnicky
Baking in Ohio
I made a 4# Boule last night from your formula and took the suggestion to add the rye and Whole Wheat. It was/is wonderful! I am learning to control the oven temp based on internal temp and crust appearance. These big loaves need that kind of attention. Thank you mountaindog for your effort and inspiration. I am learning to be a better baker and am beginning to understand how things work together. Below is an image of my daughter holding last night's bake. It's not a very good pictute of the bread but I couldn't resist the re-creation.
That's a truly beautiful loaf.
I don't always want my bread sour and find a short proof makes less sour flavoured bread . But if I do want a tangier flavour, I fins that a longer proof - somehwere colder, even the fridge for 12 hours or so, makes for a sourer flavour. I also think different sourdough cultures must make a difference - I wouldn't know, as I've got the same starter which has been going for a couple of years now. But I do have a dried sourdough starter from Ed Wood which I haven't activated yet - I must do and see how it compares!
Happy baking,
Andrew
I made this bread yesterday and formed 4 1-pound boules that retarded overnight. The recipe calls for baking the 4-pound boule at 450 for 70 - 80 minutes. How long should I bake these 1-pound boules? Hope someone is around since I just shoved 2 in the oven. Thanks! :o)
......EDIT - minutes later. I baked them for 30 minutes and they turned out super well. Oddly, the first two got much darker and interior temp was around 207 so the next two I turned the oven down, baked the same amount of time and they nicely browned but not quite so dark or hot an oven. They were registering in the 300's internal temp! What was that about! Anyway, they all look pretty nice although my slashing skills are very lacking.
....SECOND EDIT (hehe) - Just saw this again because I need to ask MD a question. My thermometer was broken just in case someone thinks I could actually get my internal bread temp to 300+. Not. :o)
Thank you for the recipe. It's perfect. Until now I never got such big holes in my breads.
Pics you'll find here: http://kochtopf.twoday.net/stories/3663097/
1 x umrühren bitte - http://kochtopf.twoday.net
If you see this, MD, by looking at your ingredient list it looks like you must be using a more traditional type of whole wheat flour and not sifting it, right?
The first couple times I made this I used traditional, because I didn't know where to find a coarsely ground WW, but still sifted it. I was wondering all the time why. Then I found the coarsely ground flour which actually was the WW graham and it made a world of difference sifting it or at least it made sense. But now I feel like I'm wasting a whole lotta big WW flakes so would like to try it without sifting. I know there are no unbreakable rules in bread baking but I'm curious about how you handle the WW flour you use in this recipe and what type you like best for it. I think this is great bread!
Zolablue, Mountaindog,
Sorry if this is just unnecessary repetition of stuff you already read in my various blog entries, but this may be a good summary of things that appeared here and there in separate entries.
I've tried two approaches to filling the call for high extraction flour in various recipes. One is that I found sifted wheat flours at Heartland Mills (Golden Buffalo), which says it has about 10% of the bran and all the germ still in it. Another I found is Homestead Grist Mill, which has sifted flour, both red wheat and white wheat varieties, that might be about 90% extraction, based on what they said. At 90%, it should have about 30% of the bran still in it. One other one was Littleton Grist Mill in NH. They have a sifted flour that also sounds to be about 90% extraction based on a coment from the miller. All took orders over the internet.
The other approach is to try to make the percentages of endosperm, germ, and bran similar to a sifted product. What I've done there is mix the right proportion of WW with white flour to get the percentage of bran desired, then add some wheat germ in to compensate for the missing germ in the white flour. For example, if you want 30% bran, then mix 30% WW with 70% white flour, then add about 3 % of the total weight in wheat germ to it, since that's the part that's missing in the white flour that would be in flour that is only sifted to remove part of the bran. You could probably get it even closer by adding in some "first clear flour" (now that you sent me off reading about that, ZB), since that is also missing from the white flour.
It's somewhat easier to buy the sifted flour, but between the shipping expense and the fact that the sifted flour is somewhat limited in usefulness compared to regular white and WW flour, I'm not sure it's worth it. However, I've enjoyed tossing in that Golden Buffalo flour into a number of my recipes. Even where I just use a small amount in white doughs, it gives them some nutty flavor and gives it a slightly darker, more rustic look and texture. The ciabatta I made with it was also good, although "very rustic", as the pictures show. Some might say with fairness it was a little too rustic, but I'm just going to claim victory and enjoy how it came out.
Bill
I just bought some of the KA in the green package and wanted to try it so I won't sift this time either. It is worth a try to see how it comes out even though last time I baked this bread it was superb. I think that is because I had discovered the Hodgson Mill WW graham which is much more coarsely ground thus it was easier to sift, and quite a bit sweeter. I thought that was my best bet at getting close to the flavor intended but who knows.
I'm sure you remember that Thom Leonard used Rocky Mountain Flour Milling's Alpine flour (no longer made) and it basically looks like white flour in the photo. Glezer describes that Alpine flour (at 72% extraction) as a WW flour much lighter in color and sweeter in flavor than a WW flour at 100% extraction. (I don't really understand all the nuances regarding flour, btw.) I sifted the HM with a very fine seive and it worked so well but then I start getting these bags of bran flakes and, well, maybe I need to start baking bran muffins!
Anyway, yes you have helped and basically I wanted permission to use a darker more traditional WW and not sift it. :o) I don't know how I could improve upon the taste of the ones I made last time and they were gorgeous but I have several pounds of other WW flour and I must use it up. I know that if you're doing it a certain way I can follow your lead so thanks a bunch.
Here is what my crumb color was in the boules last time. I really need to bake this bread more often as you do because it is one of the best I've made.
mountaindog, a question please.
I have the levain in the fridge, and am planning on making the dough tomorrow. Just wondering about your instruction to knead the dough for 10 minutes after autolysing. It seems to me from reading over the process as you describe it, and others' comments in this thread, that the dough is fairly wet.
This being the case, isn't hand-kneading for 10 minutes likely to be a messy business, with the dough sticking to hands, fingers and benchtop?
Just thought I'd ask you how you cope with hand-kneading a wet dough like this before I attempt it myself. (No machine by the way - I prefer to work by hand anyway).
Note: I've made quite a few successful sourdough loaves of various types using the folding method, but none of the recipes have called for hand-kneading, so this one will be my first sourdough to require that...hence this question.
Looking forward to trying this one - your crumb pic looks great (as does zolablue's).
Cheers!
Ross
mountaindog and zolablue haven't been around in a while, unfortunately!!!!They both offered great advice and wonderful bakes.
If they should suddenly rejoin us, pardon me for stepping in!!
I would use the folding technique. When this was first posted, I don't think we had really grabbed on to just folding.
This was my favorite sourdough for ages..really good.
Betty
Thanks so much, Betty. That makes things easier!
A point of clarification, please: when would you fold with the Thom Leonard dough (ie: at what stage of the process and with intervals of how long between folds)?
Just to give an idea of the folding I'm accustomed to, the bread I have baked most frequently is the Norwich Sourdough adapted from 'Vermont Sourdough in Bread: A Baker’s Book of Techniques and Recipes' by Jeffrey Hamelman: see http://www.wildyeastblog.com/2007/07/08/my-new-favorite-sourdough/
Cheers!
Ross
Just in case anyone is following along, or chances upon this thread in the future and wants to try the Thom Leonard Boule, I've just taken my first effort out of the oven and it looks pretty good. Aroma is divine. Those 2 hours before the first slice can't pass soon enough.
I ended up kneading the dough as per mountaindog's recipe instructions, because the dough was dryish and easily kneadable at that stage. Actually, I quite like kneading sometimes...didn't mind it at all. After kneading, during the proving period, the dough gets more moist.
I found it quite difficult to handle at the end of the proving, as it was so soft that attempting to lift it on to the cookie sheet I use for a peel could have ended up disastrously. It drooped and stuck to my hands monentarily, but I managed to get it on to the tray and re-shaped it quickly without de-gassing it (I think). Has come out evenly risen, if a bit "rustic" in shape, with some evidence of my finger indentations on the side where I manhandled it on to the cookie tray. Let's call it "character", shall we? Sounds better than "misshapen" or "flawed"!
Anyway, it is now 1 hour 10 minutes to the Big Moment. Will be interesting to see if the crumb is as open as the pics above. Fingers crossed...
Cheers
Ross
I haven't been here for a few days..without knowing how things went for you..I will guess that your stretch and folds went well, slightly difficult dough to handle and that you are very happy with the end result. Good oven spring..crumb..not bad???
Betty
PS : There is no hard and fast rule for folding, every 20-20-40 minute intervals, until you get the feel of the dough you like.
Appreciate your interest. The bread worked out pretty well. The crumb wasn't as open as in the other pics on this thread, but the bread was a lovely flavour, the crust the dark brown it should have been - and also had a nice, caramelised flavour. (I would post a pic, but can't work out how to do it).
I agree that the dough was a bit difficult to handle. I ended up making a loaf that was stretched out to a choral singer's "O", rather than a true boule, partly because the dough was floppy and sticky - my fingers stuck to it and it drooped over the outside of my hand as I tried to get it on to my cookie sheet peel. The finished loaf had evidence of my paw marks along its edge, but the rise was quite even, and I rationalised away the shape imperfections as "rustic"!
Next time, I'll adjust the way I ease it on to the peel, as I do think the intended boule shape is best for this bread, so that when you slice it you don't always end up chewing crust as well as crumb - a higher rise would take care of that little issue.
But it is a little issue. All in all, I found this to be a VERY nice bread, worth the extra time and trouble.
Cheers
Ross
Big beautiful tasty bread. I just could not get the crumb to open up like I was hoping. I may have over proofed a bit.
Bread looks lovely. You mentioned you get the holes with a very wet dough. If so and you place it in a banneton to proof before it goes into the oven, how do you ensure it keeps its shape when you turn it out of the banneton? How do you maintain its structure/form before or as it goes into the oven?
Your recipe does not accurately represent the Leonard recipe as presented by Glezer. I won't go into the details, but they are significantly different. Most important, Glezer's version is 68.7% hydration. Yours is 62%. How does this square with your statement that you attribute your open crumb (big holes) to a very wet, soft dough. A dough of 62% is anything but wet and soft, even if you are using a relatively low protein flour.
The recipe says to place the Levain in a covered container at 70 F for 8-12 hrs. Won't the peak have passed at this stage? My starter usually reaches peak in 4-5 hours
I agree with Pagnotta. This, at 62% is not a wet dough. The formula must be off in the water department.