Back from two weeks off without any baking. My starter was refreshed two weeks ago at 50% hydration, given 1 hour at room temperature then refrigerated. The pH had only dropped to 4.4 or so when I returned so there was plenty of food left. I discarded some, then brought the hydration up to 100% and did a small feed. He tripled in 3 hours but had not yet peaked, so I discarded and fed him again. 5 hours later he had peaked at 3.5-4x with the dome just starting to flatten. He was ready to build a levain for this bake.
You may have noticed my gradually increasing the whole wheat in my Hokkaido sourdough milk breads lately. I finally decided it was time to do 100% whole wheat and this didn’t disappoint.
For a 9” x 4” x 4” pullman pan
Sweet Stiff Starter
• 53g stoneground unsifted organic whole wheat flour
• 24g water
• 18g light brown sugar
• 18g sourdough starter ~100% hydration
1:1.33:2.9:1 starter:water:flour:sugar
Tangzhong classic 1:5 ratio
• 89g milk (adjusted down to 1:5 ratio from original)
• 18g stoneground unsifted organic whole wheat flour
Dough Dry Ingredients
• 9 g vital wheat gluten
· 424 g stoneground unsifted organic whole wheat flour
• 54g sugar 12.5%
• 7g salt 1.6%
Dough Wet Ingredients
• 180g milk (consider adding more milk 5 g next time, dough was stiff)
• 50g egg beaten (about 1 lg egg)
• 60g butter 13.9% softened but do not melt, unless you are mixing with the mixer then melt. Combine with 30 g of flour to make easier to add to dough if hand mixing.
Total flour = 513 g
Total weight 1004 g
Pre-bake Wash
• 1 egg beaten
• 1 Tbsp milk
Post-bake Wash
• 1 Tbsp butter
Instructions
Starter
Mix the starter ingredients in a jar or pyrex container with space for at least 50% growth. In fact I usually get 2.5-3.5x growth.
Press down with your knuckles to create a uniform surface and to push out air.
At room temperature, it typically takes up to 10 hours for this sweet stiff levain to be at peak.
Tangzhong
In a sauce pan set on med-low heat, whisk the milk and flour until blended. Then cook for several minutes until thickened, stirring regularly with a spoon or heat-resistant spatula. Let cool in the pan or, for faster results, in a new bowl.
Dough
In the bowl of a stand mixer, briefly whisk the dry dough ingredients, and then add the sweet stiff starter, separating it into 5-6 portions as you add it to the bowl.
Now pour/scrape in all the wet ingredients (including the tangzhong), with the melted butter last. With the dough hook attachment, mix on low speed for a minute, scrape down the sides, and then mix on medium speed for 15-20 minutes. The dough will seem very soft, but as you approach the 15-20 minute mark, it should not stick to your hands and should pass the windowpane test.
Transfer the dough to a lightly oiled bowl, form it into a ball, flip it smooth side up, cover and let rise for 6-12 hours depending on room temperature. You can place the dough into the fridge to chill the dough for about 1.5 hours, this makes rolling the dough easier.
Prepare your pans by greasing them or line with parchment paper.
Scrape the dough out onto a clean counter top. Lightly flour the bench. Press the dough into a rectangle and divide it into four. Shape each tightly into a boule, allow to rest 5 mins. Using a rolling pin roll each ball out and then letterfold. Turn 90* and using a rolling pin roll each out to at least 8”. Roll each into a tight roll with some tension. Arrange the rolls of dough inside your lined pan alternating the direction of the swirls. This should allow a greater rise during proof and in the oven.
Cover and let proof for 2-4 hours (more if you put the dough in the refrigerator). I proof until the top of the dough comes to within 1 cm of the top edge of the pan.
Preheat the oven to 350F and brush the dough with the egg-milk wash. Just prior to baking brush with the egg-milk wash again.
Bake the loaves for 50 minutes or until the internal temperature is at least 190F. Shield your loaf if it gets brown early in the baking process. After 50 mins remove the bread from the pan and bake a further 10 mins by placing the loaf directly in the oven on the rack with the oven turned down to 325ºF. You can brush the top of the loaf with butter if you wish at this point while the bread is still hot.
Wonderful flavour, there isn’t any real sour tang and certainly no bitterness that I had always thought was characteristic of 100% whole wheat breads like this that I ate as a child. I’m not sure that the Vital Wheat Gluten was necessary, but I wanted to ensure that I was able to get the shreddable crumb that this type of bread should have.
Benny


- Benito's Blog
- Log in or register to post comments
Here is a quick video showing the shreddable crumb.
Looks like you reached bread perfection here Benny! The crumb looks incredibly uniform, the crust shiny and not too thick and the domed tops like inflated balloons. I love that you can still see the little swirls at the outside bottom of each section. I think you have this method down to a science! I've got to give this a try soon...haven't delved into this just yet but definitely will give it a try, thanks to your excellent instructions. Yum!
Thank you Leigh, I hope you do give this a try. I am pleasantly surprised at the height I was able to get with this dough. I’m not sure if it was the addition of the vital wheat gluten or if I could have achieved the same without it. Either way, I wasn’t disappointed with this bake.
Benny
Spectacular colour, rise and shine. The top looks stunning.
I found fresh milled wheat kernels had a wonderful kind of creaminess plus back of the mouth wheaty aroma during eating that I'd never experienced before. How is the flavour and texture of your flour coming through? Do you get chewiness of bran? Would be interesting to see how relying on the tangzhong vs adding gluten affects texture.
Amazing 100% whole wheat accomplishment!
I'm certainly aiming for a similar shift towards whole grains... difficult to give up the security blanket of using a % of AP flour!
Thanks so much David, very kind of you to say.
I have to say that I quite enjoy this bread. It does have that wheaty flavour but without any bitterness. I don’t really find it particularly chewy but I suppose it might be a bit more so than the 100% white flour version of this bread that I have made in the past. I have to admit that I was a bit scared of leaving out the bread flour for this bake, but thought I’d better give it a try and find out if I could bake it, but I didn’t want to take a chance and not have decent bread on the table so went ahead and added the vital wheat gluten for the first time.
Benny
Wow, Benny, that is such a lovely loaf!! Especially given all the difficulties you have had in the past using whole wheat! The amount of rise and that soft, shredable crumb are really amazing.
Well done! (And welcome back from vacation!)
Mary
Thank you very much Mary. I was really pleasantly surprised at how well this bread turned out. I was definitely apprehensive about this bake, as you know I have had many challenges doing 100% red fife sourdough in the past. I know that baking a panned loaf is easier than a hearth one so the big challenge will be to bake a 100% whole wheat sourdough hearth loaf in the near future.
Benny
Congrats Benny! Looks like a wonderful loaf and a great way to get back in the swing of baking after the time off. I think it’s safe to say that you didn’t miss a beat!
Thanks Troy, it was nice to have a successful bake as my first bake after vacation and even nicer that it was with a 100% whole wheat loaf.
Benny
Beautiful! Just beautiful!
How do you think this would work if you used less sugar?
Thank you YM! I think it would work quite well with much less sugar, that is one of the changes I was planning to do the next time I bake this as well as adding a bit more milk to balance the bran of the whole wheat.
Benny
Consider the option of using some malted grains in place of sweetener. I mashed some rye and buckwheat last week and the resulting bread is quite sweet from it along with other interesting flavours from the process. Adds an interesting dimension.
Very interesting idea David!
Wow! I can hardly wait to try this! Two people and not enough time! I am stunned at the perfection crust to crumb.
Thank you Caroline, I hope you find some time to try this as well and I hope you like it when you do.
Benny
Hey Benny, what an outstanding loaf. Thanks for the detailed process - well done, sir.
I am curious, what is the flour that you're using? You mention unsifted SG whole wheat flour in the sweet starter and whole wheat in the main dough. Are you using the same flour? I'm planning to try your formula/method for my next bake with the last of my Red fife grains stash.
Cheers,
Tortoise
Thank you Tortoise, sorry if I wasn't specific enough. All the whole wheat flour I used was organic stoneground unsifted, so all the same flour.
Benny
Benny!
But wait…no, you can’t fool us any longer. Only Txfarmer is capable of such consistent perfection across such a range of objectives.
Welcome back Tx. You can take off the mask now.
😉
Tom
LOL thank you Tom, I got a great laugh out of that. Txfarmer is a hero baker in my books and I am no where near her level of perfection. I still have bad bakes, now I've jinxed myself and the next one will be a floppy pancake 😂
Benny
look to your bakes. So happy to see your perfect loaf in the "pin ups." I knew it was yours the second I saw it.
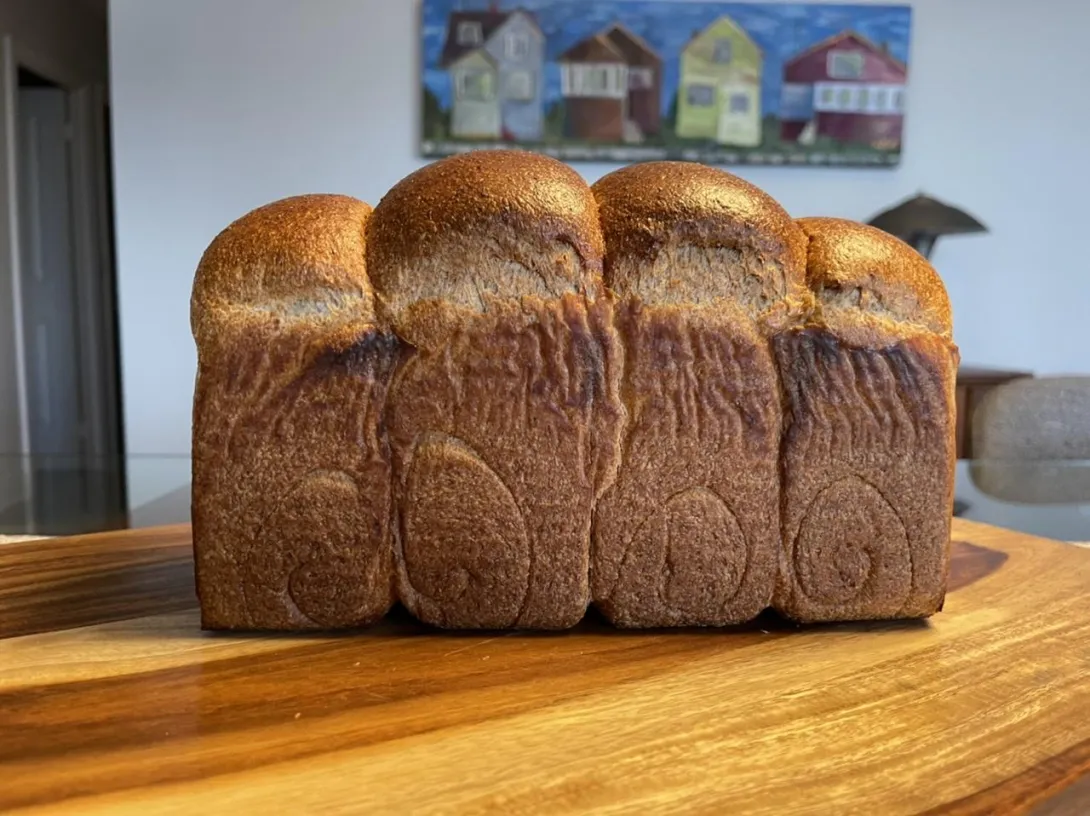
The background pairs up nicely too; 4 houses, 4 rolled up sections, gosh what crust colour! The loaf glows!
Thank you Mini, people are probably starting to recognize that painting in the background in many of my photos. You’re the first one to comment on the four lobes of the bread and the four houses in that painting in the background, good eye for detail.
Benny
this looks wonderful. How crusty is the crust?
Hi Lee, thank you for your compliment. The crust isn’t super crusty like a lean hearth loaf at all. It has a thin crispness to it that we enjoy. Now if you wanted a soft crust you could brush butter on the crust and that will help keep the crust soft. Alternatively, you could put the loaf into a breathable bag while it is still a bit warm and that would also soften the crust. Having said that I haven’t tried the bag trick but it would make sense to me that it would work.
Benny
Well deserved on the cover page! I don’t think you can get any better with a whole-wheat bread than this. You should be able to eliminate the vital wheat gluten I would think.
Happy baking Benny!
Ian
Thank you very much Ian. I really wasn’t sure if I needed the VWG or not but didn’t think it would hurt. At some point in the future I might try without to find out.
Benny
Great job Benny. The 100% whole-wheat make a fabulously soft sandwich bread when treated well. Did you use the Pearson's Square to calculate the amount of VWG?
Cheers,
Gavin.
Thank you Gavin, I thought of your posts baking 100% whole wheat sandwich bread when I made this. I remembered your comment on adding VWG and thought to use it for the first time. I used an online calculator which must be based on Pearson’s square. However, not really knowing the protein content of my flour, our labeling is extremely inaccurate here, I just decided that I’d increase the protein by 1% and hope for the best. Fortunately it worked out well.
Benny
and you seem to up the ante every time. The top down and ant's-eye view of the crumb are something to behold. I think I could devour a few slices from the pull apart chiffon pieces.
Haven't lost a beat, like riding a bicycle. But tastier!
Thank you Alan, I appreciate your comments as always. You can be assured that I ate those pulled off bits after I stopped the video. The crumb doesn't quite have the softness of a fully white flour version of this bread but it more than makes up for that in the added flavour. I don't think I'll be making the white version again any time soon.
Benny
Instagram postings. He goes by the moniker "breadwright". And although we can't hold a candle to him, his experience nor his skill I think am convinced that a lot of what you post on TFL could give him a darned fair run for the money. At least looks-wise.
https://www.instagram.com/breadwright/
I follow Martin on IG and yes there is no way that we can match what he does given his years of baking experience. But it is nice to think that some of what we bake around here at can least look as good at what professionals do. I can say though, having seen and tasted your baking that what comes out of your oven does look and taste as good if not better than what I’ve had from artisan bakeries.
Benny could be our entrant for team Canada on the Coupe du monde de boulangerie...
LOL thank you Jon for your vote of confidence, but I’ll stick to baking in my home kitchen thank you very much. There are other much more worthy bakers on TFL!
Benny
And straight from vacation to the starter! As it should be, I guess
Lovely bread and such pretty uniform crumb. Did end up watching your video more than once.
Looks like a neat way to get healthy bread. I did wonder if you were going to put some red fife in next.
-Jon
Thank you, and you’re right Jon, one of the first things I did when I got home and open the fridge ad smelled my starter. LOL.
I don’t currently have any red fife in the house, I want to see how this whole wheat flour is at 100% for a hearth loaf. With some VWG I’m hoping that I’ll be able to bake a good loaf with it, stay tuned.
Benny
This is a useful online VWG calculator https://foodgeek.dk/en/vital-wheat-gluten-calculator/
Yes that is the one I used again not really knowing what my flour’s protein was I just chose 12% and said I wanted the final protein to be 13%.
Looks great.
I am waiting for the food pickup I do to get bulk organic gluten flour. I think if I were to start a micro-bakery I would specialize in freshly milled flours supplemented with the gluten flour. I have yet to try it since I ran out, but I think it's the combination I was looking for, alongside tangzhong. Freshly milled is too finicky. Great for muffins, or non-yeasted breads, but those bran bits are a real pain for holding CO2 and also having to cut yeast so it doesn't overproof in 30 minutes.
Today was the first majority-store bought flour bread I've made in a while. It is extremely easy after dabbling in 100% freshly milled breads for a few months.
I haven’t dabbled in freshly milled flour as I do not have a mill and wasn’t planning on getting one yet. But from everything that I’ve read it is much more challenging to work with than store bought whole grain.
Benny
Thanks, I guess I jumped to conclusions and got giddy when I saw stone ground. I was in shock generally but very motivated. Now I have to temper my expectations for when I get my gluten flour...
Sorry to get your hopes up but this flour is from a local small mill that does stoneground flours.
Benny
sift out and soak that bran... and/or scald it. problem solved ;)
If you malt or mash your scalded bran... so much deliciousness on top of the softening
Speaking of sifting David, what sifters do you own? 40, 50, 60? One, two or all three of them? I’m thinking I need to get a sifter at some point.
Benny
I use the 30 first and if I want a higher extraction I’ll then use the 40.
Thank you Ian. I’m only thinking about trying to sift out the bran possibly to soak separately from the autolysed flour and then adding it later on. So you think that a 30 or 40 would work for that purpose?
Benny
That should work just fine
Thanks again Ian.
I just have a big sized one from the dollar store. It's more coarse than the smaller one I have. Not helpful, I know :p but it works well for bran.
I pulled the plug and ordered a #40 mesh 24 cm sieve that should arrive today. Thanks for everyone’s help on the sieve!
I do most of the tips and tricks I've learned from here.
Today I used a relatively coarse sieve to bolt the flour, roughly 1/3 of it was freshly milled as I wanted a successful, huge, risen loaf of cinnamon swirl bread. It was one of my best yet given all I've learned from failing over and over with 100% freshly milled and pestering people here with similar threads :) I used tangzhong method as well. The crust was crunchy, but it's almost microscopically thin. It's like a glaze of crispy crust surrounding a nice soft yet dense cinnamon swirl. Just what I was in the mood for. have since, when I had much more trouble, also switched to exclusively using volume marked rise containers. Eyeballing true doubled size in 3D is much more difficult than one might imagine.
I have a very fine sieve as well, it could make pastry flour, but freshly milled flour has weaker gluten structure, so I am waiting on a bulk shipment of organic gluten flour to help. That should give me very successful fresh loaves.
It was definitely a breath of fresh air to not have a flat topped loaf, but this post gave me the desire to tackle vegan Hokkaido bread, maybe not sourdough yet. It truly looks miraculous, a bread I could sleep on.
Your cinnamon swirl bread sounds wonderful Kooky. What sieve do you use to bolt the flour to remove the coarser bits?
Benny
It's good but not as good as that Hakkaido! It's like pulling a cloud apart and it's whole grain...
So far I have imported all my gear from Salzburger. I know I can buy metal sieves from Breadtopia and the like, but I just like to support certain people sometimes if they're the company I got my first product from, in this case the grain mill. I ended up with their mill, flaker, hand mill, and sieves. Hand mill is on the way in case of hurricane power outages and such. I can make bread in an earthen oven.
I don't mean to hijack the thread but since it's onto sieves. I've never made cinnamon swirl before but I really wanted it for Nation Bread Day, it used 1/3 freshly milled flour. I used the coarse sieve, I must guess it's a #20 or #30. I cannot figure out whether the fine sieve is a #40 or #50. In Austria, they just say coarse and fine!
Today I woke up and made French toast out of it with cinnamon-cayenne candied pecans and powdered sugar... It's not the softest, but it is hearty.
Hijack away Kooky, I don't mind. I've placed an order for a #40 sieve since that seems to be sufficient for just removing the larger bran. I'm hoping that this might prove to be useful when I attempt 100% whole wheat sourdough hearth loaves in the near future.
Benny
From what I can tell #40 will do everything you need unless you want superfine pastry flour...
I occasionally have excess bran. I put it in compost if I don't top bread with it, but I might try making Japanese nukadoko. This would help eliminate kitchen waste as I can ferment inedible vegetable scraps, like the outside of carrots, as well as not waste bran. It's traditionally made with rice bran but I can't find any organic, whereas I have so much organic wheat bran...
Btw, does the flour you buy from your small local mill expire quickly? I'm looking into the closest "larger" mill and it's in Georgia. If it's flour just like I grind at home it'd go rancid somewhat quickly. Says they ship at -10F and to freeze upon receipt. Must still have all the germ in it? If your flour expires quickly you're pretty much dabbling in freshly milled!
That's a good question about expiry. I only buy 2-2.5 kg of flour that I will use regularly and only 1 kg if it is something I use less often. So I don't think that is expires.
A very elegant and shapely loaf, Benny! The shape reminds me of the classic English four-piece moulding technique for a 2lb tin loaf.
Regarding your Tangzhong, did you keep the temperature down in the 150-160F, as some advise, or did you go up to simmering point?
Lance
Thanks you Lance. I brought it up to a simmer then let it fall and thicken.
Lovely loaf Benny!
Thank you for your kind words. I have to admit that I was really surprised at how well this turned out. I hope I can easily replicate this bake.
Benny
all the best.
I'm going to make this with my stiff starter who's just out from his hibernation. :D
- Christi
Thank you for reading Christi, I’ll look forward to your bake of this!
Benny
Hey Benny, what does a sweet stiff starter do versus a stiff starter? Is it responsible for giving less tang than usual whole wheat sourdough?
Sugar absorbs water from the doughy mixture (it is hygroscopic) and therefore reduces water availability to the microbes in the sourdough culture (which puts selective stress on the acid-producing bacteria but not as much stress on the hardier yeast populations).
Thanks. I'm not very knowledgeable on how bacteria is selected but that makes some sense to me. If I want to maintain a stiff starter with low acidity, would it make sense to feed it sugar as a part of my routine? Previously I have tried <50% hydration starters but mixing was a chore. Adding sugar sounds like a good way to up the hydration while still reducing the acidity.
I've thought of adding sugar to the starter, but for the starter I wouldn't want to do anything to reduce the LAB component as that might allow other microbes we don't want into the starter.
Benny, what pH are you reaching with the sweet stiff levain?
I tried it, but the pH only came down down to 4.50. I'm not sure if this is how it should be.
Lance
Hi Lance, I have to admit that for these enriched doughs I've never checked pH nor have I done so for the sweet stiff levains. Perhaps I should also do that the next time I make this. When I do I'll be sure to include that information in my post.
Given the supposed effects of lower hydration and sugar on the microbes, a higher than usual pH would fit with that.
Benny
Thanks Benny - it will be interesting to see what you get. I've edited my original post because of course I meant levain, not starter.
Lance
This looks absolutely amazing. Look forward to trying this recipe!
Oh thank you, you’re very kind to say that. I hope you do give it a try!
Benny
Benny, I noticed something in your image above and got curious. Notice the well defined spirals at the bottom of each roll. Any idea why the spiral rolls are not detectable as the height increases? Looking at the crumb shot, the cell structure looks nice and even. Have you any thoughts?
It seems that putting multiple rolled doughs in a pan is a fantastic way to get a phenomenal rise.
Well Done!
Thank you Dan, you can get awesome rise especially if you alternate the direction of the swirls.
To answer your question I know exactly why the swirls are stuck at the bottom. If I roll the dough such that the width of the roll is narrower than the width of the pan so that the ends of the rolls do not touch the sides of the pan, they would rise instead of being stuck at the bottom of the loaf. I’ll have to try to remember to do a letterfold of the dough before rolling it up next time. Anyhow, that is the reason.
Benny
Hi Benny- First I want to say that your bread looks fabulous! I will try to make it some time soon. I just have a couple of questions. In your formula, you show your starter ingredients and below it you show the ratios by: 1:1.33:2.9:1 starter:water:flour:sugar. I don’t see how this relates to the starter components. Maybe it is just my view, but I don’t see how those numbers mesh with your formula. Also there are 6 numbers and only 4 components listed. Also, you state your flour and total dough amounts as 431g and 920g and I don’t see where you get those amounts. When I added up the numbers from you formula, I got higher numbers.
I hope you can clarify this. Thank you. I am excited to try a type of bread that I have not tried before.
Hi Caryn, thanks for your comments on my bread. The levain is 1 : 1.33 : 2.9 : 1 Perhaps adding the spaces might make it more obvious that there are four numbers and not six. The middle two numbers are fractions and not whole numbers.
The flour and dough totals may not be correct as I’ve kept adjusting the ingredients and may not have updated the totals as I’ve gone along, sorry about that. I’ll go back and fix it now.
I hope that helps.
Benny
Benny- Thank you for your explanation. Now it makes sense- I didn’t see the decimals!
Now two more questions- Have you ever made this dough or similar using an overnight proof? Many of the sourdough breads that I make proof in the refrigerator or wine cooler for 12 to 14 hours. I am wondering if you have tried that.
Also, I only have a larger Pullman pan- 13” X 4” X 4”. I am guessing that that size will work if I scale the recipe up about 50%. Does that make sense to you?
Than you,
Caryn
I have done a cold retard after bulk and prior to shaping. I haven’t tried doing a cold final proof after shaping.
Yes increasing the dough by 4/9 which is just under 50% should do the trick for your 13” x 4” x 4” pullman pan. How many lobes would you shape for that pan, perhaps 5 or 6?
Benny
Thank you!
Benny- I am in the process of trying your formula at this moment. I made the dough and put it in a warming box to rise (@76°F). You say to let it rise 6 to 9 hours or do an overnight retard. I have two questions: 1. What are the indications that the dough is ready to shape and put into the bread pan? 2. Since I don’t want to bake this in the evening. I probably will put it in the refrigerator overnight anyway. So if I do, do you suggest leaving the dough in its warming place for an hour or two and then putting it in the refrigerator? This type of bread is completely new to me, so I am unsure that the usual tests apply.
Thank you!
Caryn
Hi Caryn, glad to see you trying this recipe. I’ve actually modified this formula since this post, the newer one with higher hydration IS HERE.
After mixing you can bulk for a variable amount of time, I usually bulk for about 2.5 to 3.5 hours at a warm 82°F and then either shape or do a cold retard. At 2.5-3.5 there may be a small rise at most. It sounds like you want to do a cold retard, so in the morning shape the dough cold and then do the long warm final proof.
You’ll know that the dough is ready for baking by it reaching 1 cm from the top of the pan, assuming you adjusted for the volume of your pan or when the finger poke test bounces back only halfway.
I look forward to your bake!
Benny
Benny- Thanks so much for your very quick response. I just put my dough in the refrigerator for an overnight retard so that the process will hopefully work in the morning. I also appreciate your giving me a link to your update. I was a bit tempted to add more liquid to this formula because the dough is so dense, but I like to follow a recipe as designed the first time around.
I actually made the same amount of dough as your recipe and have rigged my 13.5 Pullman pan to be only 9” like yours by adding an aluminum tin barrier to the pan! I didn’t want to make a larger amount in case I don’t have as good luck as you have had with this formula. If all works well and maybe even if it doesn’t, I will submit pictures tomorrow.
Thanks again,
Caryn
Good work on modifying your pullman for the smaller size Caryn. Interesting thing about doughs with scalds, tangzhong and yudane, but the hydration that comes from these do not alter the feel of the dough significantly. It was something that Dan asked me about that he read on the King Arthur website but I had noticed. So eventhough the hydration of this bread is relatively high, at over 80% it doesn’t feel like an 80% hydration dough. However, the moisture is all in there so the baked bread is moist. I may adjust the hydration a bit further again, I’m still working on perfecting this recipe but I am pretty happy with the 2.0 version.
Benny
Benny- I shaped and placed the dough in the pan this morning. I am worried that it will not rise 🙁, but I hope I am wrong. The dough just seems so dense. I put it in my proofed at 80°F and will let it proof for as long as it takes!
Here’s a pic:
Don't forget, what does butter do at fridge temperatures? It hardens so your cold dough will feel very stiff and firm, nothing to worry about. Give it as much time as it needs to rise, it will take some time given the starting dough temperature, it will take hours to reach 80ºF of your proofing box. Be patient, this is an enriched dough so will rise more slowly than you're used to.
Edited to add: Interesting way to place the rolls of dough!
Benny
So was my placement of the dough in the pan different from yours? I thought I was following your instructions. Maybe you could clarify.
I fixed the dough in the pan 🙃😀
Benny- I just want to mention that the main reason I am worried about the rise of this bread is that my sweet starter did not triple like yours. It really just increased by about 50%. The starter from which I made this from is one that i maintain and has consistently worked for me for the more standard sourdough breads. If this “experiment “ fails, I will work on getting the starter to be more robust, perhaps by giving it some extra feedings before developing the sweet starter.
You may already know this but enriched breads can take soooooo much longer than regular sourdough to do anything. And it all depends, too on the temperature of your kitchen, your ingredients, dough, etc.
Benny-I obviously was confused about how to shape the dough as you did, and I know that it is not necessary, but I am wondering if you could add to your instructions exactly how wide and long the dough section should be before rolling the spirals, so that it would yield the same results that you got. I don’t know if the dough balls should touch the sides of the pan or not when you place them into the pan. If you noticed, my dough after moving it around did not touch the sides.
Caryn, I didn’t post all the photos of the steps involved because I had done so in previous blog posts, sorry I didn’t have the time to do that with this post. However, you arranged them “correctly” in the second arrangement. I put that in quotes because the other arrangement can be used as well and can give very interesting slices if it is done with coloured and laminated dough. I’ve done other milk breads in the past with layering of different flavours and the crumb can be quite nice.
In terms of width of the rolls filling the pan, you can have them narrower than the pan or as wide as the pan. If they are touching, then when you see the loaf from the side the swirls will be in the bottom ⅓ of the loaf. If you make the rolls narrower than the pan, then the swirled sides will have time to rise before they touch the sides of the pan and then the baked swirls will be higher on the sides of the loaf. Neither is better than the other or more correct in my mind. It is just an aesthetic consideration only and doesn’t affect any other aspect of the baked bread that I have been able to discern.
So after about 10 hours of proofing in my proofer, my dough still did not reach 1 cm from the top. It was probably more like an inch, so I decided after poking it that I just needed to bake it. I think I may need some tips for how to get my original starter or the sweet stiff starter stronger. It does smell wonderful, but I know better than to cut into it now. Unfortunately at this point the taste test will have to be tomorrow.
Here it is:
Beautiful crust you bake there Caryn. I hope the flavour is something you like. You’ll want to ensure that your starter is active enough before making the stiff sweet levain. If possible, feed it before you need to make your levain, and again if possible, use the starter when it is at peak. So it should have risen to the maximum height and the dome just starting to fall. Then take the portion out to make your levain with it. That should improve the chances that your levain will be strong if you use your starter at its peak.
—Caryn
Caryn, I'm so glad that you enjoy the flavour of this bread. When you have your starter optimized and thus your levain as well, you'll find that fermentation moves along faster than it did for you. As a result there should be a bit less of the sourness that you currently have.
Benny
I may try the method described by Nathan Myhrvold in his “Modernist Bread” after feeding my regular starter to make it robust too. This is from the book:
That’s very interesting Caryn, I’ve never read that book so that is great to see. I guess I was pretty lucky in that my yeast in my starter were relatively fine in the difficult setting of an enriched dough. I look forward to seeing what you come up with following their protocol.
Benny
Hi Benito, thank you so much for sharing this recipe. I am new to the community and this is the first bake I try. I really like this process and it was great incorporating the tangzhong.
One I thing I did differently. I did not have regular milk at home so I used water instead. (I did not want to risk using milk alternatives (almond, oat, etc), because I am still not sure which ones to use and what the effect is.)
The result was good in terms of texture (maybe I slightly underproofed it) but the taste was a bit too tangy for me. Do you think the water for milk substitution had smth to do with it? Or do you think it might have been the levain (over ripe, for example)? Do you think an all-white warm level could bring the sourness down a bit?
Also, I am curious about what you do if you have to subtitute milk in general. (And this might be a good question for all the vegans out there)
I am on a whole-grain adventure as well so keep them coming!
Thanks again, Juan.
Hi Juan, let me first welcome you to TFL, all bakers are welcome and I’m honored that you chose my formula, which I’m still working on improving, as your first bake here.
I haven’t tried my recipe with anything but dairy milk, however, what I have noticed since I like to measure pH is that this dough with the enrichments of milk, butter and sugar ends up being much higher pH (less sour) at the beginning of bulk fermentation than other whole grain doughs without those enrichments. So when I used spelt, since I have those numbers handy, the pH at the start of bulk was 5.82 whereas another non enriched 100% spelt dough started bulk with a pH of 5.62. So that leads me to think that your starting pH is more sour when using water than when using milk. Now another thing is that having used a stiff sweet levain to ferment this dough causes the LAB to be much less active in this dough so if you use the levain at peak then your resulting dough won’t have a great drop in pH to the end of bulk. So using my enriched spelt loaf that started bulk at 5.82 at the end of proofing at bake the pH had fallen only to 5.71. That is a minuscule drop in pH contrast that with my typical sourdough bread where the drop in pH from the start of bulk to the end of final proofing is typically 1.3. So when successfully made, these Sourdough Hokkaido Milk Breads have very little sour tang to them.
You asked about an all white warm level, sorry I’m not sure what you’re asking there, it might be a spell correct issue.
In terms of a non dairy milk, I suspect you could use a non dairy milk and probably get quite a good result. I typically use skim milk when I make these loaves, you can make them even more delicious by using higher fat milk but I seldom have anything more than 1% in the house.
Benny
Thank you Benny! All of this makes a lot of sense. My guess is that my levain was too ripe and that is probably bc I am not used to using 50%-hydration cultures with WW. I am looking forward to trying again with some milk. And I will keep a close eye on the levain this time around. ;)
In my previous comment I mentioned a white warm levain because I have been experimenting with that lately. I use a 80% hydration white levain that I keep at 85 degrees (you need a minuscule inoculation for a 12 hs cycle, like 1-2%). This helps me keep the acetic acid under control and it delivers a really nice milky taste. I was wondering if I could use that for this recipe. Would it matter that the rest of the dough is all WW?
I still want to try the sweet levain technique you brought up. Specially because you mention that it may have an advantage for low-gluten flours, like spelt.
I appreciate your thoughts on this and I look forward to trying more of your recipes.
Best, Juan.