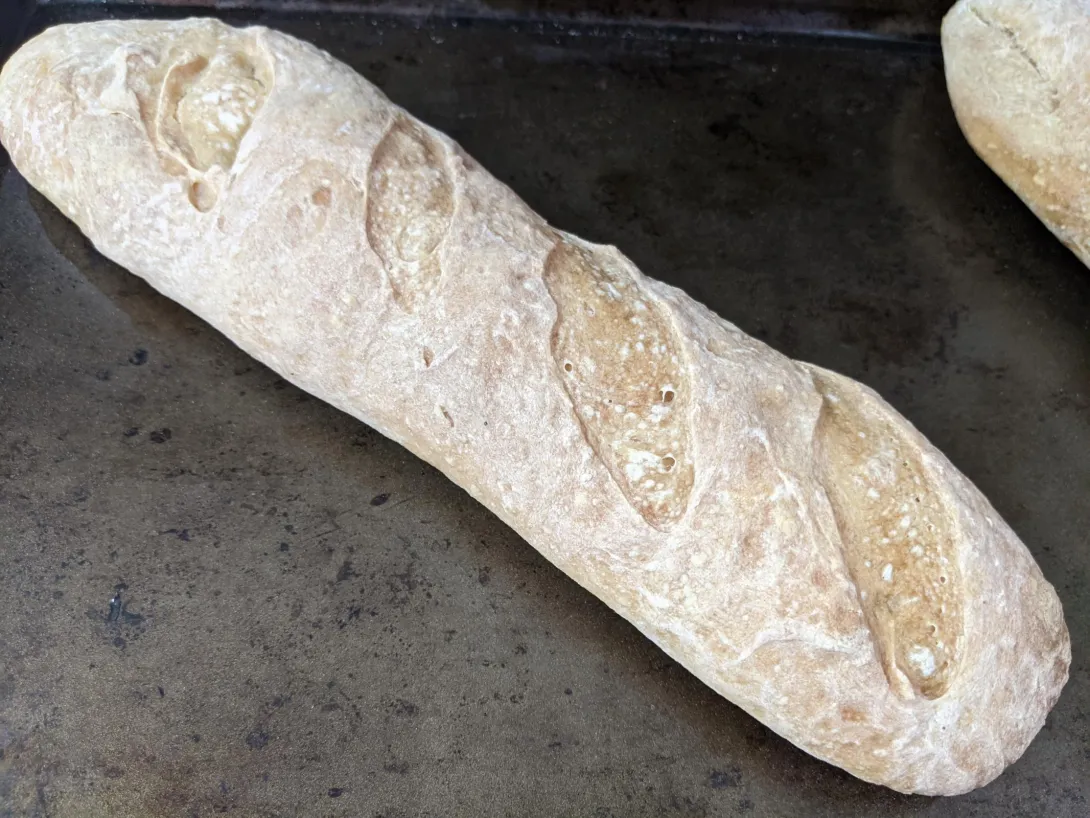
I just made a batch of baguettes, and they seem fine (crispy, fine shape/rise, etc), except for the color is really dull and there's almost a white-ish film (see picture), instead of them being golden brown. Any idea why this could be?
Some details:
- I used the King Arthur recipe with King Arthur AP Flour.
- As per the recipe, I steamed the baguettes with hot water at the beginning of the bake.
- I used a floured couche, but didn't use extra flour for any of the other steps. I covered them with plastic wrap on the couche so the flour should've only touched the bottom of the baguettes, maybe the sides a bit, but not really the top.
- I baked them at 450F for a full 29-30 minutes and they seem crusty and fully baked, so I don't think it's about them being underbaked.
Perhaps it's about steaming? However, reading similar posts, I've seen some comments about under-steaming, and some comments about over-steaming, which makes me a bit confused which direction might be right.
Thanks for any pointers!
Are you incorporating a pre-ferment? My baguettes with poolish are baked in a pre-steamed oven at 460F/238C for 25 minutes. Steam for the first 10 minutes. They come out golden.
Yeah I'm following the King Arthur recipe including the poolish. I'm trying to follow the instructions closely so I'm a bit puzzled why mine look like that.
Should yield very dark loaves maybe even burned. So, you should probably check your oven temp with an internal thermometer. How much water are you using ? you only need a splash of a few ounces which is enough to dump the temperature. Its incredible how much energy is needed to phase change water. Another factor is the amount of dough you are loading. If you are loading more than a kilo of dough (more than say 4 baguettes) then you now have competition to get limited heat energy. My guess os the oven showing 450F then the temps are going down meanwhile the display is showing you what its aiming for.
Thanks for the advice! I used 1 and a half cups of boiling water as per the recipe. I loaded 3 baguettes at a time so I don't believe it was an overly big amount of dough. I have an oven thermometer and I'm pretty sure I checked that it was at 450F before baking, but I'll pay closer attention next time. It also seems clear trying less water next time is a good idea.
You have received some very good information from both Gavin and kendalm but I’ll add another couple of points. Is it possible that your dough overproofed somewhat? If they overproof the yeast may have metabolized much of the sugars in the dough leaving little in the dough which is needed for browning. I cannot tell from your photo if they are overproofed since there is no profile or crumb photo, but overproofed dough won’t brown very well.
On the other end of the spectrum which is less likely would be amylase. I believe KA flours have amylase added to them. As you know amylase in the flour helps to break down the complex starches into sugars that the yeast can then use as fuel. Bakers often add diastatic malt which contains amylase to make sure there is enough food for the microbes to multiply and also to help the dough brown in the oven. Even with the amylase included in the flour I usually found that I would get better browning of my baguettes by adding 1% diastatic malt.
Benny
Thanks for all the advice! Here's a picture of the crumb, if it helps.
Based on the crumb I’d say it is a bit overproofed which would also contribute to the pale crust in addition to the problem with steam venting because you have a gas oven. You‘ll want to reduce bulk somewhat.
I see you got some great idea below about dealing with the steam issue in your oven.
Thanks! This time I just followed the recipe and did overnight (~14 hours) at room temperature for the poolish and ~45 minutes ~1:30hr (~45 mins + fold + turn over + ~45 mins) for the first rise. I'll try a bit less next time.
Welcome to TFL.
Your bread is reminiscent of other loaves that I've seen come out of a gas oven.
Sometimes a gas oven causes pale loaves in combination with improper (too much or too little, I'm not sure) steaming.
The dough surface dries out too much before the Maillard reaction (browning) takes place. Or, maybe it's the opposite, and too much "cool" steam prevents the Maillard reaction.
Remember, steam is 212 degrees F, and your air temp started at 450. So, too much steams cools down the oven, as the steam increases from 212, and the air drops from 450.
One possible way to compensate is to pre-heat to 30 or 40 degrees F higher than the desired temp, then lower the thermostat to the desired temp immediately after loading the dough into the oven. This prevents the flame from coming on immediately as it tries to compensate for the heat loss when you opened the door. Because when the gas flame is on, the oven is venting, and venting means drying out.
Also, please state how much water you are adding, and at what temp... cool right out of the faucet, room temp, boiling.
Kendalm has a good point. In a normal size home kitchen oven, 1/2 cup of boiling water is all you need. Anything less than boiling, or any quantity/amount over 1 cup is going to rob too much heat.
Thanks for all the advice! Mine is indeed a gas oven, so I'm very interested to read your gas oven info. I'll think about your recommendations for next time.
I followed the instructions in the recipe when steaming, so I used 1 and a half cups of boiling water. The only thing I did differently is I didn't have a cast iron pan, so it was a regular oven pan.
Seems like a good idea to try less water next time.
There are two distinct possibilities for what has left you with pale bread. As idaveindy pointed out, if you are using a gas oven, it will not hold steam but vent it almost immediately. Unless you have a constant source of steam for the first 10 minutes of the bake, the bread will not take on good color. It will also not rise fully because a crust will form on the top restricting further ‘oven spring.’
Second, if your poolish is overripe it will also result in a pale crust and usually under-risen loaf, having consumed too much of the sugar in the flour and having destroyed gluten bonds to too great an extent.
Thank you for the advice. It is indeed a gas oven. Is there any way to compensate for the loss of steam? I see idaveindy recommended compensating with a higher pre-heat temperature. Is that about all I can do or is there anything else to try?
You can place a container of boiling water (or a towel in a bread pan filled with boiling water) next to or on the baking stone before loading dough. Once you slide in the baguettes, you need to cover them and the boiling water with a large aluminum roasting pan turned upside down, big enough to cover both. Leave on for initial 10 - 12 min of the bake, then remove both the roasting pan and the container with boiling water to finish bake. It will work. It will also work for bâtards.
Good luck!
I second Wally's strategy. This would definitely work with a gas oven.
Thanks! I'll find a way to try that out.
Since I am now something of an expert on failed baguette attempts, I feel that I am qualified to offer an opinion. Looking at these baguettes, I get a gut feeling that more is going on here besides oven temperature and steaming. What you said about using warm water further supports my theory that these bad boys are over fermented to the point there is zero sugar left to caramelize. As for gas ovens and steam, this specimen was made today in a G.E. gas oven. Granted a gas oven will vent copious amounts of steam. However, this is easy to overcome. I use two steam source approach of using Sylvia's towel along with 6 oz of near-boiling water in a smoking hot pan, just as the bread is loaded. If you would mind your eye on the attached photo, you will notice how a well-proofed loaf caramelizes. I hope this leads you in the right direction. Please keep baking, take notes and you will sooner, if not later solve this puzzle.
http://www.thefreshloaf.com/node/20162/oven-steaming-my-new-favorite-way
Sylvia is the inventor of the method, not the brand of towel.
I googled "Sylvia's towel" thinking it was a special oven-safe towel, before I realized Sylvia was a TFL member.
--
Yes, The Roadside Pie King has been making great bread, including baguettes, out of a gas oven for years. So you can trust him on this.
--
Your next baguettes are going to be AWESOME!
Thanks for the link!!
This example seemed to fit in well with this discussion so I thought I'd share.
Here are four baguettes prepared from the same dough and baked last night in two different ovens. The two on the left were baked in an old GE gas oven using the common setup of baking stone on second lowest rack and cast iron pan full of lava rocks on second highest rack. Boiling water poured over rocks when dough loaded into oven. The two on the right were baked in a combi steam oven. It didn't start out as an experiment, it just turned into one, haha! But it is a very good example of the effects of steam. Hope it helps.
Wow yeah, that really does illustrate the difference steaming makes. It gives me further hope that better steaming could be the key to improving my results. Thanks for sharing!
I'm glad you posted because the replies will benefit others, including me. From now on, I'lll be using the lid of an old turkey roaster to capture steam in that oven, and I'll also be looking at other possible contributing factors mentioned in this thread.
Good luck. And happy New Year!
Thanks for posting this. I'm experiencing exactly the same thing in my home pizza attempts with an open oven stone in the cheap gas oven in our apartment. The pale crust is the biggest mark against these pizzas in my eyes, so I'm eager to follow any progress on this
I think you mentioned a hunk of some levain, would that be sourdough? You could try .5-1% diastatic malt and even some sugar in your dough too. Browning is especially problematic if you're using Italian flour meant for wood fire pizzas. I ultimately switched to commercial yeast due to browning issues. However, I make big batches of dough and use it from frozen. Stay tuned I will blog tonight's margarita pizza here at the fresh loaf.
Best regards,
RPK
Thanks for the input. The desem starter I mention is a cool stiff sourdough starter I've been experimenting with. I do have some diastatic malt in the back of my cabinet I purchased for my first starter project, which has since gone unused. I may give that a try. I guess the goal would be to find a way to add or free up more sugar in the crust to promote browning.
I agree with Gerhard, 7 minutes is not long enough. My old 1990's vintage gas oven always took 12+ minutes for a nice well-done pie. With the new gas oven, I can get the well-doneness we like in ten minutes flat. I am on a margarita pizza kick. One other note, diastatic malt. I hear tell has a short shelf life you may want to get a fresh batch.
Nice pie. Here are a few more pictures of the crust. (My phone gives everything a terrible yellow hue when I take pictures at night with overhead lighting, and "auto adjust" usually make it look artificial.) The toppings are done and the crust is cooked through adequately for a reasonable crumb given the whole grain flour. As mentioned in my other response, extending the time seems to contribute to a stiffer crust, but perhaps I need to think about making other changes needed to support the longer cook time. I'm thinking I can go heavier on the sauce, which might help the center hold up to the longer times.
The crust looks good except with no browning. If your home grinding berries that's another reason you need a diastatic malt. commercial flour 9 out of ten times has malt as an additive. That's why I mentioned the high temp Caputo it is not treated with malt, due to the high temperatures it is made to endure.
Yes, I'm using home ground soft white wheat for this. I appreciate the additional background on your earlier point. I bought a small bag of this soft white wheat specifically for this home pizza project and haven't actually used it for anything else, so it is an unknown in addition to the home pizza itself. Although not ideal for hearth loaves, it would be interesting to use it in place of my hard wheat berries for a hearth loaf bake to see how it browns up in the context of a covered-then-uncovered bake. That would be another interesting data point. Your comment about caputo is also interesting. In my wood fired pizza oven experiments this summer, I very briefly had a small bag of recommended caputo 00 flour (peak flour shortage period), and pizzas made from that flour handled the short high temperature (> 900 F) cooking much better than the large bag of Central Milling bread flour I was working through -- the latter required lowering the temperature significantly to prevent incinerating the dough. I wasn't sure of the reason, and suspected bran content might be a factor, but was unaware of the diastatic malt issue.
not enough, my home oven 500°F max temp it takes 12 to 14 minutes to get a crust I like.
I appreciate all the input. I should provide a few additional details to my hasty post. This oven gets pretty close to 550 F at full temperature. I called it an even 525 F in my post due to recovery times, but I have some probes to support more careful measurements next time. Likewise, these times are also based on estimates from a mechanical 60 minute kitchen timer, which is plenty accurate for 40 minute bread bakes, but leaves something to be desired for these hotter and shorter pizza sessions. I expect there may be about a 30 second delay by the time I load it on my improvised cutting board peel and remove it. I was in more of a holiday mode than a scientific baker model during the project. I'll keep more careful notes in a follow up experiment to help with feedback. It is also worth noting that I shaped these about as thin as I could make them while still holding the toppings, which will impact cook times. With that additional info out of the way...
The recipe makes 4 pizzas and calls for a baking time of 6-10 minutes. I actually checked the first one at right around the 6 minute mark, but expected more color in the crust, so I left it in for the full 10 minutes for that reason. The additional time didn't seem to add any color in the crust, but did make the inner crust drier and stiffer (the slices were essentially rigid when held by the crust). I preferred the more pliable pizza crust at closer to the 7 minute mark (possibly 7:30 by time of removal) and the toppings were cooked adequately at that point. Perhaps I need to improve initial extensibility of the dough in such a way to accommodate longer baking times, although I don't think the longer bakes will be sufficient for this. I guess I can expect any dough to brown and then blacken if I leave it in long enough, but I need to find a way to promote the color earlier in the process before compromising the other goals. I can bakes a few mini samples at 1 minute intervals from 6-15 minutes to see how they react. The initial recipe also calls for a 36 hour cold fermentation with ADY, whereas I did a 2 day saltolyse followed by a < 1 day sourdough fermentation.
I typically bake hearth loaves covered in a cloche for 20 minutes or so before removing the top, then bake uncovered for another 15-20 minutes to develop the crust, and have had no problem with color. A natural question is whether or not the initial steam is necessary to developing the crust. Another point just occurred to me. I have started baking a mini loaf from the dough in my aliquot jar uncovered directly on the oven stone, which helps me avoid the temptation to cut the loaf prematurely, and these also tend to be very pale (relative to initial dough in case of HRWW). I don't mean to hijack the post with pizza specific details, but the look of the pizza crusts (and to some extent the aliquot loaf) is almost exactly the same as the baguettes in this post, so I suspected there was a connection. Another data point is that I was baking with the oven stone placed very close to the bottom of the oven, which is where it needs to be to accommodate my large cloche. For pizzas my sense is that it is probably better to raise this near the top of the oven. I'll search through both of your blogs for additional pizza details and photos that might help.
Hi! I wanted to post an update with my next attempt from today after applying a bit of everyone's advice.
I made the following tweaks compared to the bake that started this thread:
They still don't look nearly as shiny as some of the photos in this thread, but it's obviously a big improvement over my last attempt. So thank you very much for the analysis and advice, everyone!
I'll keep thinking of ways to improve further. Some things I'm curious about next:
I also want to say congrats on forming such an engaged and helpful community on this site! It's my first post here, and it went ridiculously better than my very very lonely /r/breadit post, which I think exemplifies the level of interest here. So, thank you and kudos to everyone.