My message picks up from a challenge posed by a friend in another thread to the whole community here. I hope this message finds you and yours in fine health, peace, and prosperity.
The original challenge was on how to manipulate your recipe to achieve either a tangy or mellow flavor in your loaf.
My friend's recipe called for...
- 500g flour
- 350g water
- 10g salt
I was ultimately unsuccessful because I still struggle with the basics. Tangy or mellow is a secondary consideration to time and temperature.
Time is important because I only have a window of opportunity before work and another window after work.
These "windows of opportunity" are roughly 12 hours apart and last for 2-4 hours each. And then I have to go do something else: Like sleep. Or work.
Temperature is important because warmer speeds things up, colder slows them down.
Time and temperature are essential ingredients. They are just as important as the flour, water, salt, and yeast.
This thread documents my struggle with something as mundane as baking a decent first loaf.
One thing I did learn in joining a "challenge" is to avoid posting into a thread with the word "community" in it until you bake that first loaf. Experienced bakers tend to frown on that.
Baking that first loaf is just as valid a struggle as baking the perfect ciabatta. If you look, you can find threads that exceed 2,000 posts on a single bread! That's the caliber of baker you will find at The Fresh Loaf.
Me? I'm still struggling with baker's math and putting a photo in my post. I think I have the photo part down, at least.
Here's a shot of the levain I made for tonight's bake. Getting past the photo-posting, wrestling with arithmetic (and failing), and considering the comments from the creator of the Tangy/Mellow Challenge thread - while not losing my temper or causing him to lose his - made me too late for a bake tonight.
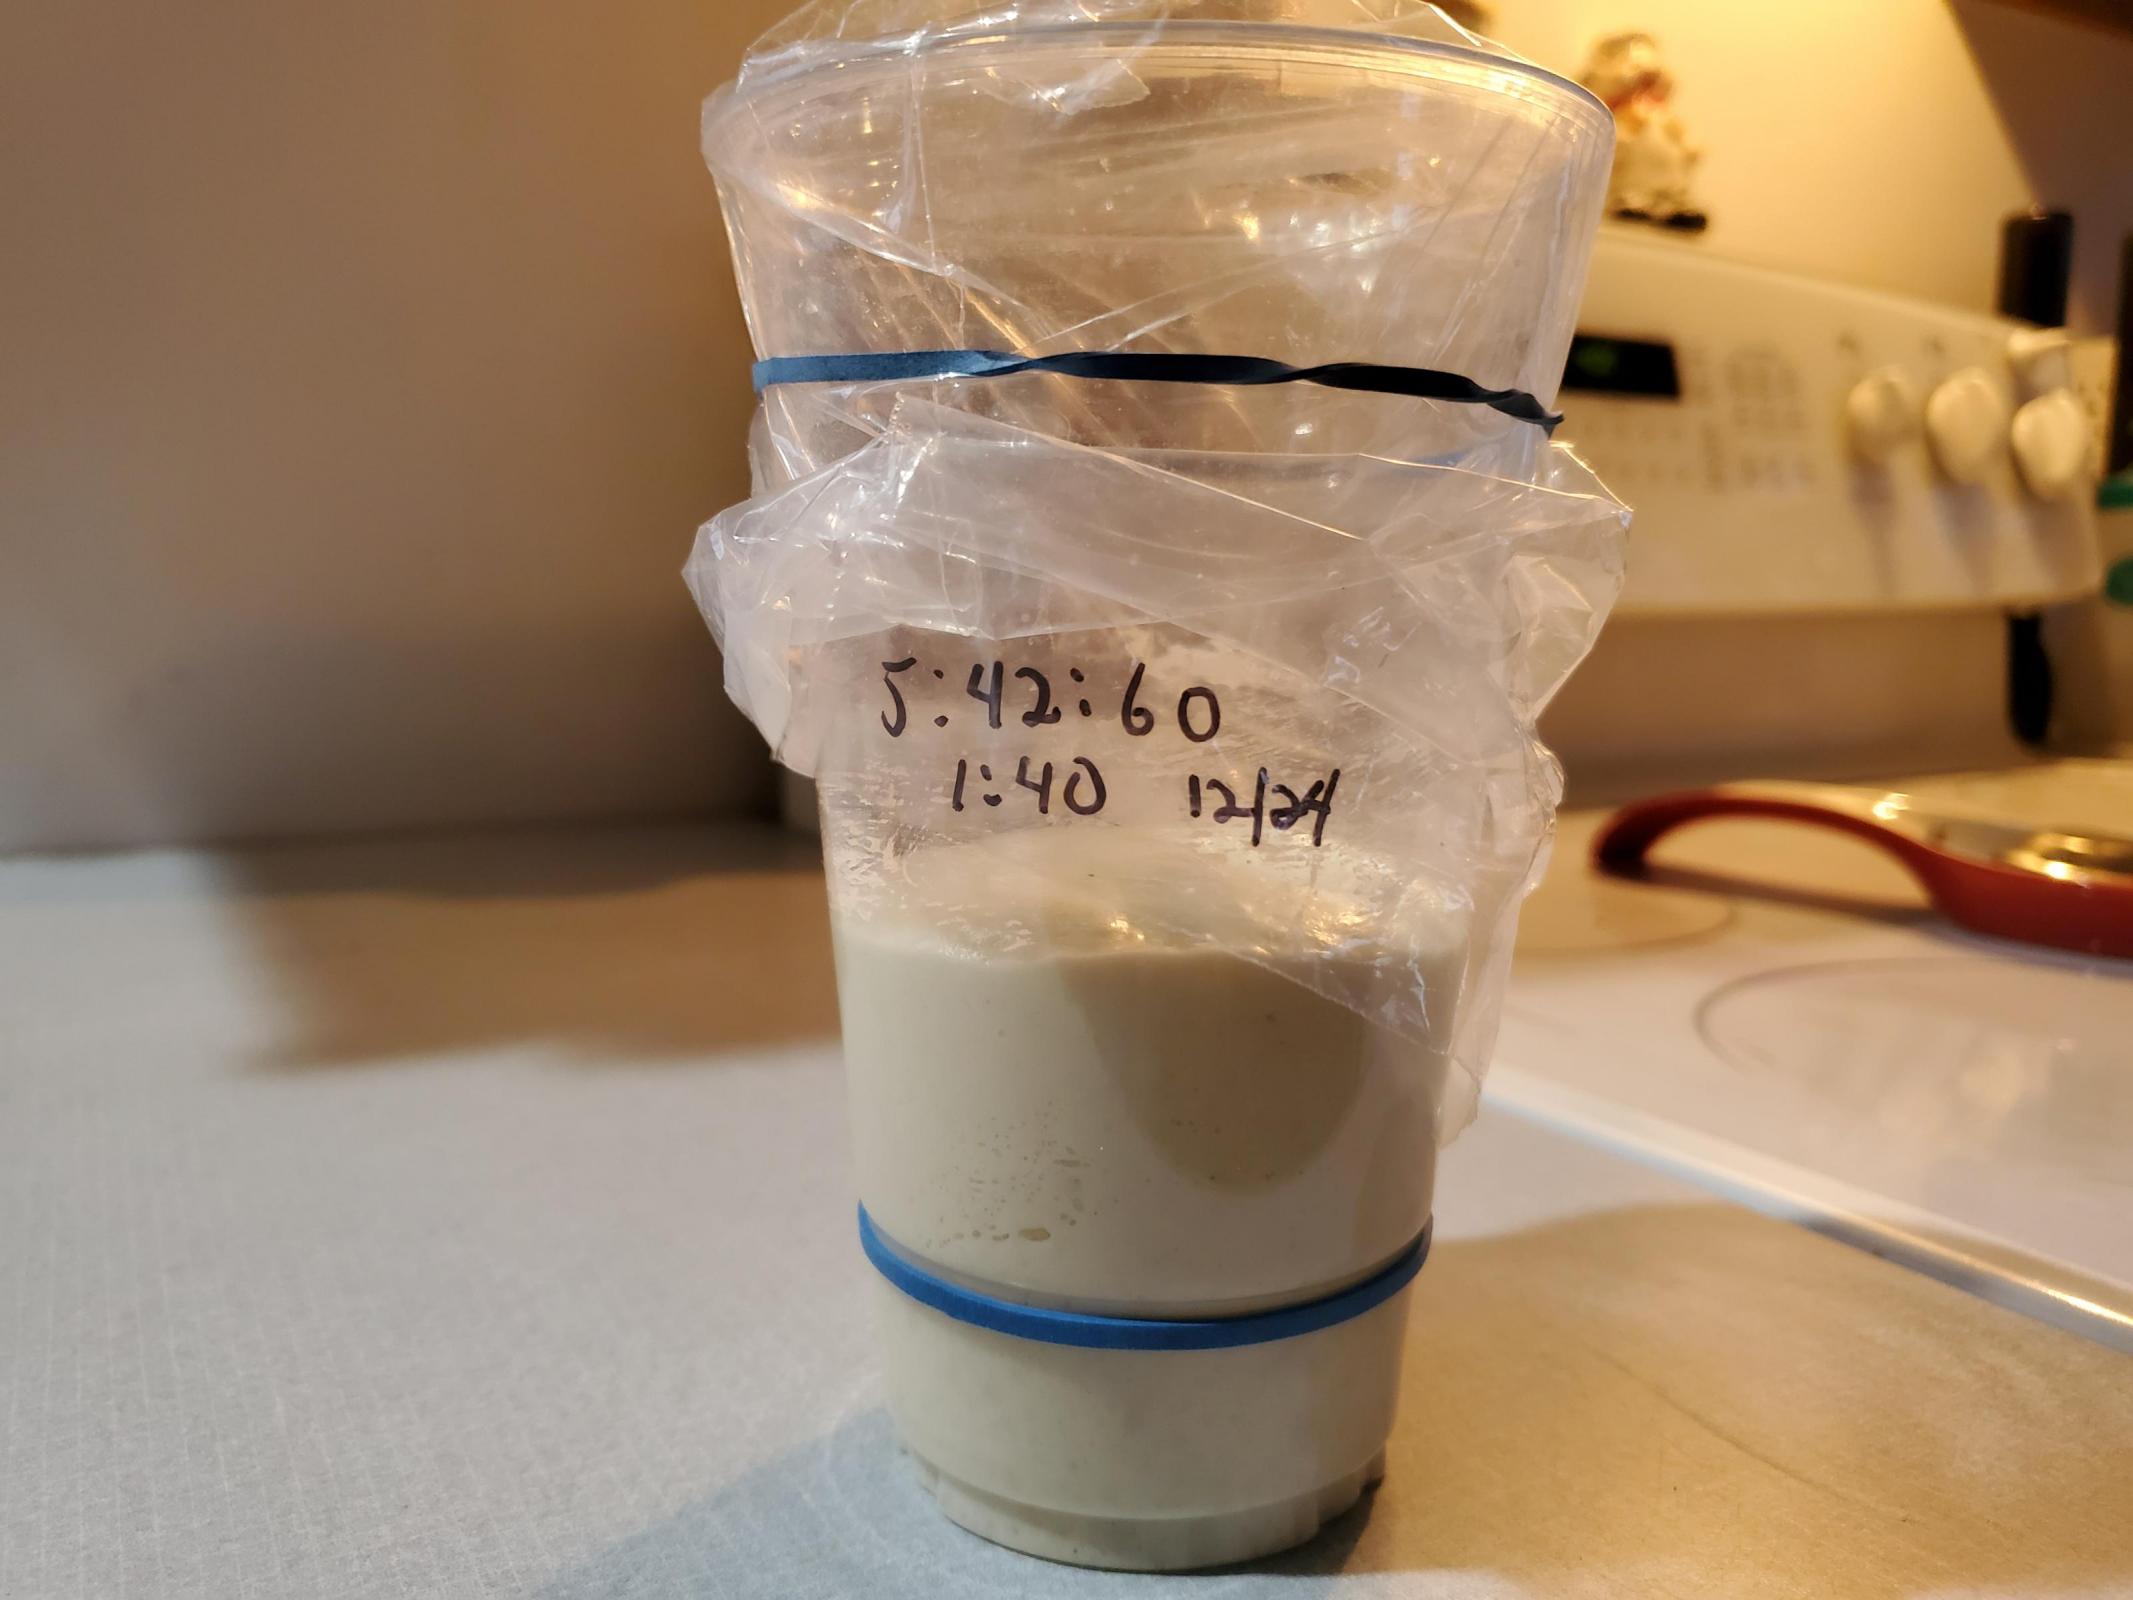
I spun this up at 1:40 this morning. It's 4:00 in the afternoon when I took the photo. It will triple if I let it. (It did. I got 3.5x before it started falling. It's in the refrigerator now.)
This levain is 5g starter, 42g bottled water, 60g Bob's Red Mill Bread Flour.
I'm going to use 90g of it to levain the Tangy/Mellow dough.
I tried to get as close as I could to accounting for the flour and water in the levain so I could perfectly match that Tangy/Mellow recipe hydration.
The starter that created this levain is 85% hydration with a total weight of 107g. It is 3g:42g:60g (seed:water:flour). I struggled to account for the flour in the 5g of starter that went into the levain.
Long story short, my (incorrect) recipe for the Tangy/Mellow recipe is...
- 90g levain
- 450g flour
- 315g water
- 10g salt
And then whatever happens next... I'll find out.
New bakers are encouraged to post their struggles here. I won't bite. Maybe I can help, maybe somebody else will jump in. This hobby is pretty interesting, though!
Don't think, bake!
Murph
I mixed a dough at 10:30 last night with...
Here it is...
The dough will have doubled at 10:30 this morning. I'll still be asleep because [my excuse here].
The point, though, is that my starters and levains are predictable. They do what I tell them. Like a well-trained puppy.
You have to do that, too.
It takes a while. And a fair bit of patience.
I created the starter on October 30. It finally became active by doubling on November 11. It seemed like forever but is a laughably short time when I write about it a month and a half later.
It took from November 11, my starter's birthday, to maybe just a week ago, to be able to brag about my well-trained puppy.
That's nice but it doesn't put bread on the table. I veered off-topic.
What I do know is that my starters, levains, and doughs are capable of tripling if I let them. I use containers that let me see when I hit doubles and triples.
That's something else you have to do if you want to be successful.
There are a bunch of posts on how to make starters and levains and doughs. Don't get confused if you are new.
Just remember that you can bake any one of them because they are all nothing more than fermenting flour in a more or less straight-sided container that you may or may not be be able to see through.
The real mystery is trying to mix this stuff. It gets sticky sometimes. I had to knead the stuff in the bowl up there. You know, like on the counter and by hand.
Another mystery is when you can't use straight-sided, see-through bowls. Like when you've shaped a ball of dough and you're trying to judge when it's time to bake it. When its finally done "proofing."
My focus these days is on the mixing and proofing part. Everybody gets hung up there.
2020 just keeps on giving. Or taking.
Murph
Merry Christmas Murph, I follow your thread with interest. I hope this loaf of bread turns out well for you.
Benny
Place a small dough sample in an aliquot jar.
My dough is done bulk fermenting. I thought it was amazingly fast. I put 90g of levain into 450g of flour, 315g water, and 10g of salt.
That's about 12% of levain (or preferment).
If I have this right, I have
90 ÷ (450 + 315 + 10) = .116
I mention this because "conventional wisdom" says anywhere from 10-30% preferment is about right. I'm on the low side and think I had strong results.
By the way, I mix the levain and water together until the levain is completely dissolved into the water. I then add the salt to the levain and water mixture.
I think it helps get the yeast and salt more evenly distributed into the flour as I incorporate slowly. Also, it saves me from forgetting the salt. Again.
In any case, I've never had a problem with that.
Here's the dough after rising for just six hours at a room temperature of 73°F (23°C).
That was really moving along! I didn't plan on seeing that dough for quite awhile so into the refrigerator it went.
I put it on the top shelf in the refrigerator where it is about 40-41°F (5°C).
Note my careful attention to time and temperature. Even in the refrigerator. Even on what shelf in the refrigerator (top shelf a little warmer, bottom of refrigerator a little colder).
I always have to remind myself that time and temperature are essential ingredients.
The next time I saw it was eight hours later at 1:30. Perfect!
Here comes the tricky part: Shape and bake.
I think letting it warm up before baking is a mistake because the outside gets warm while the inside is still cool. After a few hours, the dough temperature will finally be the same throughout (maybe). But at that point, the dough will have over-fermented and be ruined.
I think I'll warm up that oven and do a couple of stretch and folds on the dough while the oven is reaching baking temperature. For no particular reason.
Gaining experience means gaining experience. You just have to do it to see what happens until one day... you can post into a thread that says "Community" in the subject line!
Merry Christmas!!
Murph
Merry Christmas Murph!
This bulk looks nice! I just wanted to check, what do you mean by "shape&bake", and about warming the dough to room temperature? Are you going to Put the shaped dough in the fridge? Or do you want to shape cold dough and bake straight away? A little unclear.
My questions might be too late, looking at the time you posted this.
I want to record some comedy shots. These are photos of my early loaves. Complete failures. And that's OK because believe me... if you are "new to sourdough," you will see results just like this.
Embrace the mess!
Here's my first loaf. It was an attempt at the 123 Sourdough No Knead - Do Nothing Bread. The loaf was aptly named because my version did nothing.
Use your imagination.
It has "potential," as they say.
This loaf was so bad that I didn't even take a picture!
My second loaf was at least edible but, wow!, was it chewy!
Here, I stuggled to figure out how to upload pictures to The Fresh Loaf...
Hmph. Not bad. I set my Samsung Galaxy 10+ to HEIF mode this time because the file size was too large and I kept trying to insert the picture directly into the message without going through the TFL photo utility (or something). Anyway, the small and weird images seem to work this time.
My third loaf started out OK but it was the worst of all! Here, I tried the Tangy/Mellow Challenge recipe. It is complete birdfood! If the birds will have it.
I got a fair rise but the crumb was so dense. To look at the crumb was to look at a solid surface. Not a bubble to be found! I don't think I will even taste it.
Tonight's bake looks REAL nice! The dough held it's shape so well that it looks like a bowling ball coming out of the Dutch oven!
I will post some photos after it cools.
Murph
I am still baking the Tangy/Mellow Challenge loaf and delighted by early returns.
Shaping and proofing is always scary. I better write down what I did before I forget! You should always take notes, too. On a forum like this might not be the best place but it's better then nothing.
I pulled this dough straight out of the refrigerator as noted previously. I set up two small bowls. One for flour and another for water. Just enough to dip my fingers into if I need to.
I'm glad I set this up ahead of time because I can't image the mess I would make reaching for a bag of flour with that nice glob of dough all over my palms and fingers.
Here's the top of the dough just as it came out of the refrigerator. I hope you can see the domed surface and the nice, big bubble at the back...
As it turns out, I barely needed the extra water and flour! I was DELIGHTED beyond description to see how easily I could handle cold dough!
This dough is about 70% hydration. It is approaching "on the higher side." My baking process was roughly like this...
I set the the oven temperature to 450°F (232°C) to let it warm up for 45 minutes or so.
I pulled the cold dough out of the refrigerator and gave it a few stretch and folds. It looked like I was just folding in some air pockets so I stopped doing that. Mostly.
I rounded the dough into a ball and came back 30 minutes later. Then stretched and folded yet again. Because [some reason here]. Let's just call it "wanting experience."
That was a good idea. The dough handled very nicely. Stuck to the counter enough so that I could really stretch that thing out. But... it didn't stick to my hands. Beautiful! Just beautiful...
I gave it about a half-dozen stretch and folds and rounded it up. Then I went away.
I came back 30 minutes later. Rounded the ball again...
I put this on some parchment paper to lower it into the Dutch over. I slashed it on the parchment paper. I already know the slash isn't going to work.
After getting it into the Dutch over, I spritzed the top of the dough with some water straight out of a sprayer from a big box hardware store and put the cover on.
It gets weird here...
A couple of minutes into the bake, I thought that the dough was kind of large and it was cold. I bumped the oven up to 475°F (246°C) and let the bake go 20 minutes. And then I let it go for 25 minutes since I wanted it to really bake all the way through.
After 25 minutes, I pulled the cover off. The crust was pale, of course, The internal temperature was 153°F (67°C). I put the cover back on and let it bake another 8-10 minutes.
Then I took the cover off and browned the crust for 20 minutes and got the internal temperature to 198°F (92°C).
Almost there. I like my internal temperature to come in at 203-205°F (95-96°C). I let it go another 5-10 minutes and got it up to 208° (98°C).
A little over-baked but I like how the bread looks. Nicely shaped and brown. Too bad that there is no ear and the slash is barely noticeable. But, the bottom is not burned because I put a pizza stone on the rack below the Dutch oven.
The crust is a little crispy - not crunchy. It would have benefited from a longer cool-down in the oven with the door ajar but my wife wanted to use the oven. The loaf gives way when I squeeze it. Pretty much what I would expect.
It's not a good sign when the loaf is heavier than it should be for its size. I had great hope for this loaf but I expect to see some big holes when I cut it open. Do you see the blow-out on the lower-left corner of the loaf?
Here is a close-up of the left half of the loaf...
Here is a close-up of the right half of the loaf...
The loaf is obviously under-proofed. And why not? I stopped fermenting when the dough was doubled. I know I could have gone triple the volume.
The bread is not as chewy as past attempts at all. It's pleasant to bite into and chew. Soft. Not dense. A little more moist, as you might expect.
Also, and this is note-worthy... The flavor is mellow. Not much sour at all... maybe a hint in the background. This, of course, is due to the under-proofed nature of the bread.
I love all my breads. I am proud of them. Most of them. This is one that I can put under my pillow and sleep sweet dreams of better loaves to come.
Murph
That certainly looks much better than your previous breads, well done! But this goes towards the questions I was asking earlier. You didn't actually proof your bread at all, but degassed it by shaping pretty well. That's why it's so dense I think. After you shape the dough you need to let it proof. Something in the order of couple of hours at room temperature, or you can proof in the fridge as well, but if you started with cold dough maybe better to let it warm up a bit, and then put back in the fridge. With 70% hydration you'll have to proof upside-down in a banneton, or an imitation thereof, some sort of bowl lined with a kitchen towel.
Yes, YES! That is what is going wrong.
Thank you,
Murph
Your persistence will pay off if you don’t give up.
I have a few suggestions that you may or may not want to implement. A straight path is the shortest route to any destination.
I hope these remarks haven’t offended you. You persistence speaks volumes. Those that are dedicated will all eventually succeed. Sourdough baking is not a simple skill to master. In truth, no one ever masters it...
Danny
Murph, I was wondering about whatever happened to you just the other day. I was encouraged to see you are still around. I want to second Danny’s comments and support it with a brief anecdote of my experience:
I started baking sourdough in 2010
I found my specific inspiration in sourdough bread (a specific process that I was really moved by, if you will) in 2013
I became a small level professional in 2014
I opened a bakery in 2015
I have made 10000s of loaves of the same process sourdough in that time, including well over 10000 this year alone to the tune of approximately 300 kg of dough per week of sourdough.
I am still learning. The bread does not always come out great. I have made unforgivable mistakes far too many times. I turn out flat loaves still. I just figured out another cause for this. I learned to live with “my bread will turn out a certain way. It will not be so lacy and open like on the internet. It will not have ears, almost ever. It will be delicious with a chewy but not crispy crust. I don’t know how to change it exactly, but that is okay because I like how it tastes. I wish it would be taller, but the good news is that Sourdough isn’t particularly tall anyway.”
Keep on and keep working at it. You are not far, in my opinion.
Another thing Murph, after bulk was done and you took the dough of the fridge, you stretched and folded and shaped I think three time almost immediately before baking. Typically during final proofing one leaves the dough alone, you have stretched and folded and shaped any of the gases that your dough had produced during bulk fermentation. You might want to consider when bulk is done, to do a pre-shape then shaping the leave the dough alone to proof so you don’t remove all the gases from the dough that you worked so hard to achieve during bulk.
Benny
Today is a joyous day in the Murphy household. I am confident enough in my starter that I can throw away all the old Frankenstein experiments still lurking around in the refrigerator.
To say that Mrs. Murphy is delighted is an understatement.
The one in the front is the one I am keeping. It is an 85% hydration bread flour starter. The others are cups of mold.
I am glad I started putting dates on my cups because my wife would occasionally shuffle them around like a new deck of cards.
I spun up the starter using The Pineapple Juice Solution, Part 1 (and Part 2). You should, too. For any number of reasons in the articles and comments. This is a scientific treatise and peer-reviewed. Very. (Read: long.)
I have gradually weaned it off the rye and wheat feeding crutches. The last flour mixture i used was 90% bread flour, 5% dark rye, and 5% stone ground wheat.
I can get powerful and reliable rises from the activity in the cup. Easily 3x-3.5x. It's probably 4x but I use a plastic cup with sloping sides for easy cleanup (or throw away if I am in a hurry).
I will slowly switch it over to all-purpose flour. If it continues on as healthily as it is, I will store it in the refrigerator for a week at a time between feedings.
My feedings are 5g of old starter mixed with 34g water and 40g flour. Many times I take the old starter down to 3g but that small amount is hard to measure and mess with. Sometimes I just use cup scrapings. It all works.
I had to chuckle after just looking at the photo I posted. My plan was to slowly switch to an all-purpose flour starter. The cup is labeled "Olde AP Flour." Then I remembered that I fed my starter from a canister of all-purpose she keeps in the pantry.
It looks like I don't have to worry too much about the "gradually switch over" part.
And... as an aside... I DID keep my No Muss No Fuss Starter that is still safely tucked into a corner of the refrigerator. I think that will be my preferred starter if it works as advertised. I believe it will because I trust dabrownman, the author and creator.
One last thing... I usually write from my mobile phone. I have WAY too many browser pages/tabs open. I feel so good about my success so far that I can at least close the ones about starters.
Yay!
Murph
Murph:
Coincidentally I began using a near-indentical starter formula about a month ago. 88-6-6% (WBF-RYE-WW) at 75% hydration.
When fully fermented it nearly bounces off the water (float test).
Congratulations on your sourdough journey thus far. Sic Semper Panem!
Best wishes. Dave
PS to Dan: Your advice is spot on. Wish I had heeded it sooner. Thanks.
The quote above is my very favorite. Aside from anything that our Lord said, I try to live my life by that quote.
The quote is attributed to Marcus Tullius Cicero. The artwork comes from Quotefancy.com.
The point is, thinking, ruminating, worrying... planning... gets you nowhere if you don't execute.
Somebody else said, "Don't let the perfect be the enemy of the good." Same thing.
And again, "There is no try; only do."
All admonitions to get in there and mix it up. Make a mess. Break things. Be horrible.
I'm reminded of another of those motivational quotes: "Anything worth doing is worth doing badly... until you can do it well."
I'm not a big "motivational quote" kind of guy. I think a lot of it is bullsh!t designed to take your money. Like the old-time Snake Oil salesmen.
But after many years' experience of thinking, ruminating, worrying... planning... and getting nowhere... I only found success when I began to execute. Badly if necessary.
But execute I did!
Why? Because I noticed that I had to practice very hard before I learned to play the drums. I had to spend hours and hours of tinkering before I could make a web page... or grow a lawn... or a flower garden... or a vegetable garden... or sell my first product.
Or getting married. Or raising a family.
I look back and I sure did embarrass myself (and others around me!)... but I finally got it right!
I'm baking sourdough bread now. I'm not altogether good at it. I know I need help and know where to get it (at TFL). I have to write... communicate. Sometimes I'm not good at either. But that doesn't stop me!
Bakers bake. Writers write. The righteous pray.
Everybody does.
My shorthand is: Don't think. Bake!
What have I learned so far by baking and communicating?
Not bad for 3-4 loaves of bread. That got better with each iteration.
Don't think. Bake!
Murph
I'm also a beginner, and sometimes it's one step forward two steps back and step to the side do si do. Here are some ideas that need to be taken with as much salt as you think necessary.
The basic proportions in your recipe are very similar to a friend's recipe I've been using as the basis for my experimentation. (Everything added up together, everything from the starter, levain, and additions for the preferment, what's in my home turf recipe is 550 flour, 350 water, 10 salt.) So I don't think the recipe you're trying is weird or tricky in any way. But in my go-to receipe I'm using a much bigger amount of preferment, which might help with getting the rise you want. So building a bigger preferment might be something to try, if you feel like making a bit of a tweak to the process that might help you out.
And as a few other people have mentioned, it would be really useful to shape before you cold proof rather than the other way around. I do a bulk ferment with some stretch and fold, then shape it - not something I'm particularly confident in doing but it seems to work well enough! - then I cold proof. (I don't pay anywhere near as much attention to watching the rise levels at the various stages as you do. If I am uncertain I poke it with my finger and see what it does. It seems pretty forgiving about this, so I reckon this probably isn't your issue. )
Another thing to try if you haven't been doing it is to pre-heat the dutch oven. This is a pita. A flaming hot, heavy dutch oven isn't a lot of fun to wrassle out of the oven. Additionally I heat mine with water in it - out of paranoia that I'll wreck it if I don't - then tip the water out, which give additional excitement. Proper kitchen gauntlets are essential. It's a faff but I find it does make a different to the rise and to the crust.
Hope I haven't led you astray! Good luck and happy baking!
I loves me some additional excitement!
Regarding poking... my favorite baker, dabrownman, would say the wee beasties are too stupid to know they're being poked.
Thank you for the encouragement.
Murph
A lot of "new to sourdough" bakers stuggle to fit a bake into a busy schedule. The first step is to get your starters, levains, and doughs to rise on your schedule.
Your next challenge will be fitting what comes next into that same schedule. If you read around, you'll generally find that after you've fermented your dough to double in volume - again, on your schedule - you'll need to...
That presents its own set of scheduling problems as you will soon see in this next clumsy set of postings.
You are not alone!
The recipe is:
The time and temperatures are...
Here is the bread flour dough at 11 hours after mixing with 73g starter. The levain-build step was omitted to fit this last bake into the Christmas weekend.
The picture seems to show more than double but in person, it looke about right.
When you have learned to calculate hydration, you'll know that this recipe is 70% hydration. It's a bit too much water for just starting out. It is probably a good idea to drop the hydration down to 65-68%.
It might also be a good idea to cut the recipe in half while you get this part of the timing just right.
You will also make mistakes that look like this:
Trying to mix the recipe from memory is a bad idea. The recipe calls for 315g of water when 350g was used.
The picture shows what the dough looks like after two and a half hours of stretch and folds every 30 minutes. It comes in at 77% hydration. Completely hopeless for a new baker.
The original plan called for using the plastic bowl in the back to better help judge proof rise. The dough was nothing more than pancake batter.
There is not enough rice flour in the world to prevent the dough from sticking to the dish towel. Maybe the wicker basket from Goodwill will help.
The dough proofed in the basket for just over an hour and a half while dinner was served and the oven warmed up to 475°F (246°C) for 45 minutes. Total proof time was two hours, 15 minutes at 74-75°F (23-24°C).
When proof was over, the dough was very, very jiggly! There was even a successful poke test (But only where flour was present. Otherwise, it just sticks to the fingers.)
It is not pretty from here.
It didn't get any better. You get the picture...
Flattened on the parchment. Impossible to even attempt to shape...
The cover came off. Very disappointing! Flat, flat, flat... Baked 20 minutes at 475°F (246°C), five minutes at 450° (232°C), five minutes 425° (218°C).
A swing and a miss! Took the cover off, took the internal temperature... 212°F (100°C). The crust was difficult to penetrate with the thermometer. The crumb wouldn't hold it upright. And out of the oven to cool...
Crumb shot? Who cares...
Next time... much lower hydration and a smaller loaf.
Murph
Should you have similar problems another time with a dough that is too difficult to handle, just stick it into a loaf pan, proof and bake. And it's likely you overfermented it. Try lower inoculation (amount of starter) for a 12 hr fermentation at room temperature. Check out Abe's very simple sourdough, there he calls for 15g stiff starter for 500 g flour (from the fridge, so not as active) for a similar time/temperature combination. So 4.5 times less prefermented flour!
Ilya,
Thank you for your kind comments and suggestions. I will try your loaf pan idea the next time I run into this situation! I wish I had thought of that.
I posted the crumb shots in my post. I thought the crumb actually came out quite nicely. I think this dough would have made an acceptable loaf pan bread.
I hope you have time to take a look at that and let me know what you think.
All my very warmest!
Murph
The crumb is pretty good, you are right - your final proof was fine, but the bulk must have been way overdone. Another idea what to do with unshapable dough - it would have made a great focaccia. No shaping required, just stretch it with wet or oiled hands to fit an oiled baking tray, add some toppings and olive oil. Does it taste delicious?