Hi everyone, a newbie here, so be gentle :-)
This is my first attempt at making a sourdough bread, I have a new starter, 10 days old, basic flour and water, fed every day, smells fine and bubbly.
My recipe is very simple too, for 2 loaves, it's 800g flour (white), 460ml water, 320g starter and 10g salt. I mixed, kneaded until the dough was smooth and even did the window pane test, then I rolled it into balls, left to proof for 3 hours, knock it out and shaped into the bowls, then let is rest overnight in the fridge (about 8 hours). The next morning I took it out, let it come to room temp and rise (took about 2 hours maybe) and baked at 230c for 35 minutes with steam inside the oven.
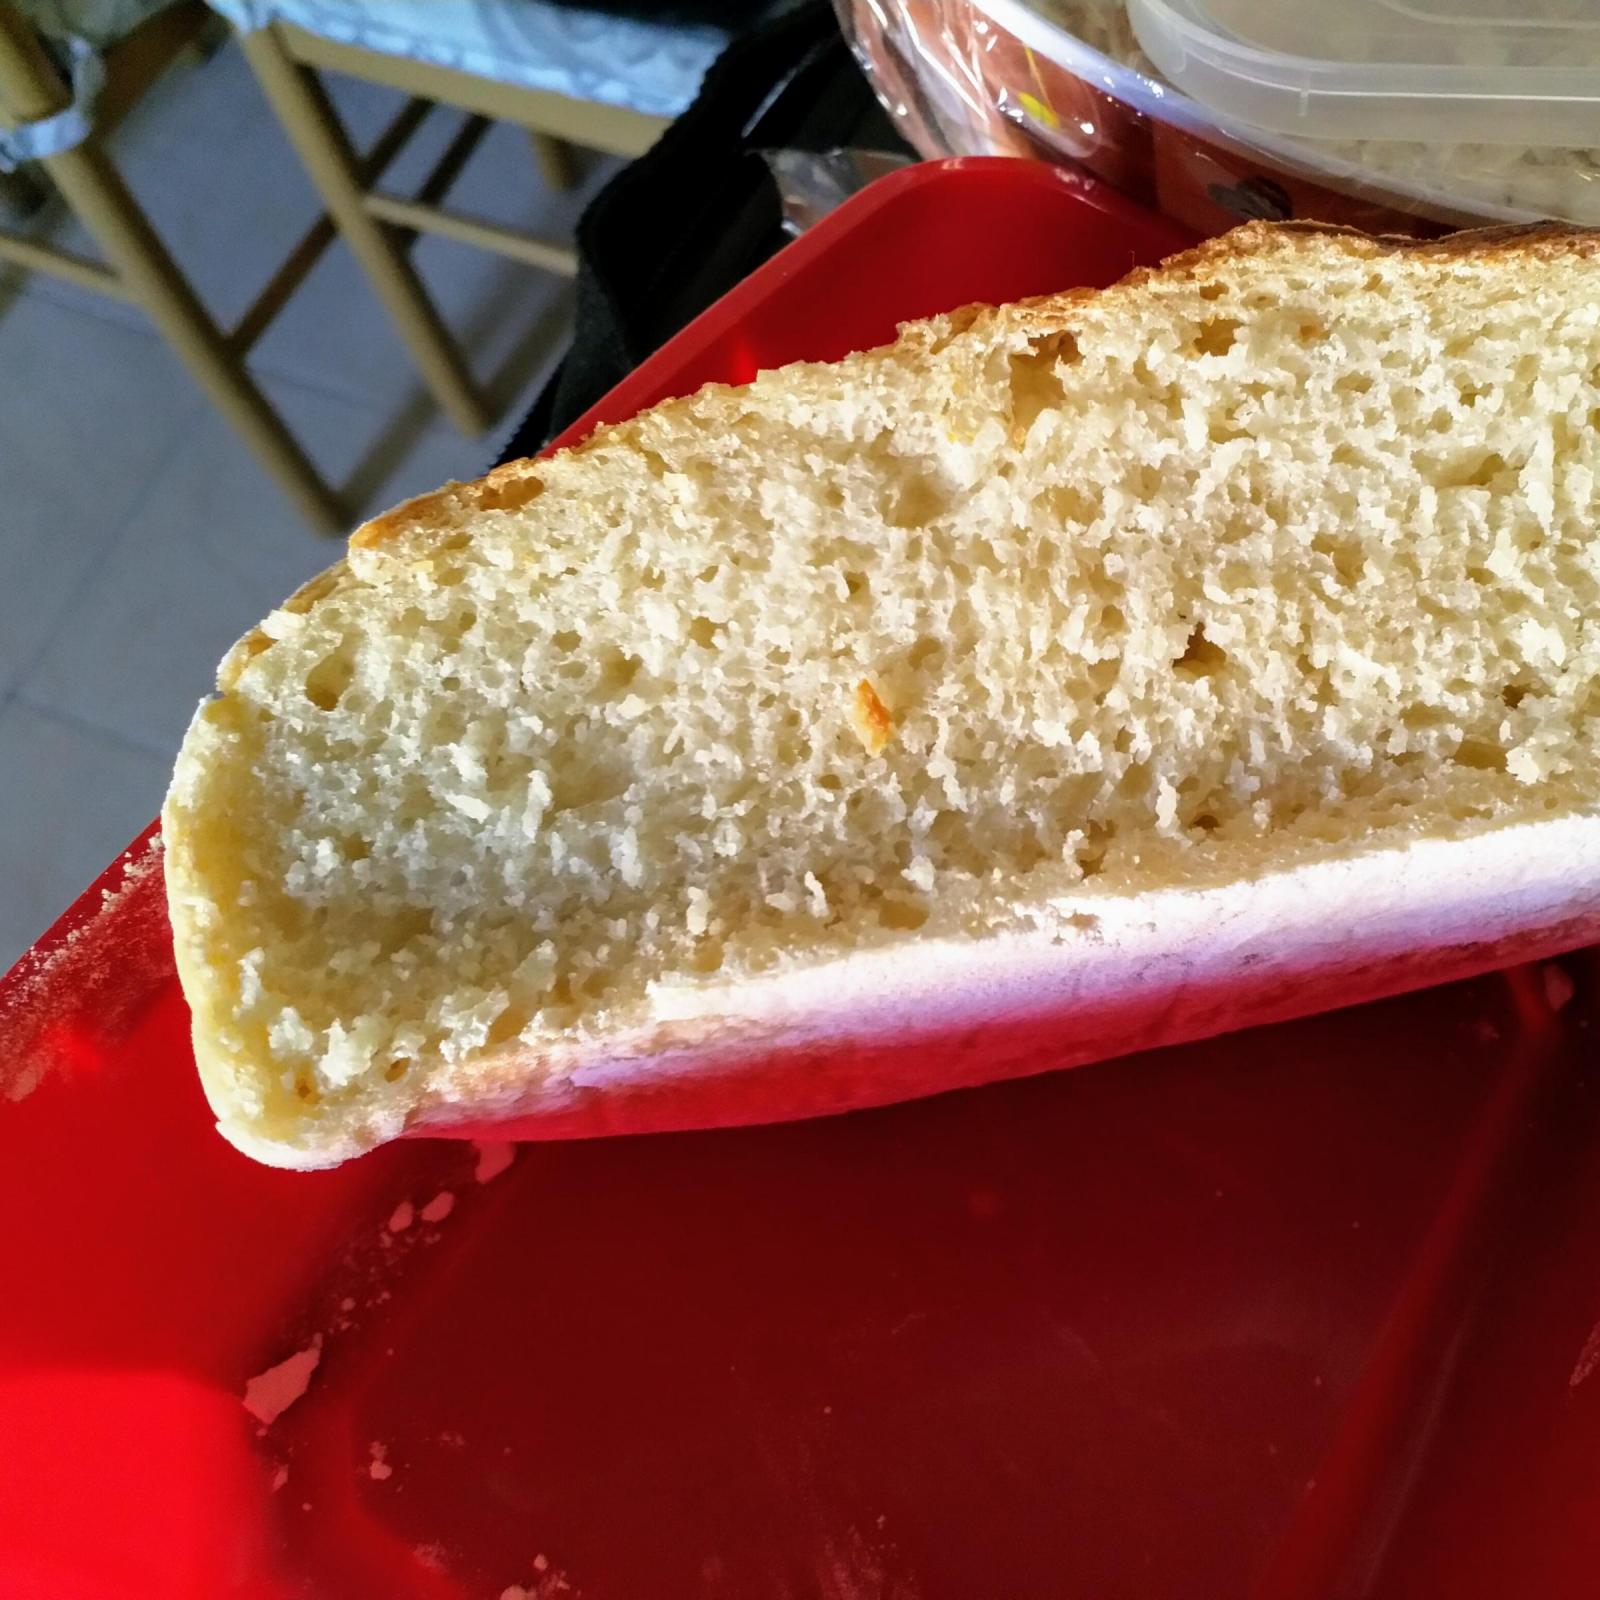
The loaves came out dense and had small crowded bubbles. The taste was very good but it wasn't airy and moist inside.
What did I do wrong here?
Did I over proof my dough or under proof it? Was I supposed to take it out of fridge directly into the oven?
Thank you for any help you can give me.
Did you do the finger poking test? When doing your final proof, poke the dough gently when it's supposed to be ready. This only works with room temp dough btw, doesn't work out of the fridge.
If it springs back completely, it's not done yet.
If it springs back, but leaves a little indent, it's ready to go.
If it barely springs back, it's over-proofed, be careful when scoring then.
Also I would bulk-ferment it first, meaning you let the dough proof as a whole before shaping it.
I would do following:
- bulk-ferment it first for 3 hours (our until doubled in size). Don't knock back your dough since you will knock out all the gas you just generated.
- portion the dough and slightly pre-shape it, let it rest for 20 min. (relaxes the stressed gluten).
- shape the breads and put them into the proofing bowls for final proof. I would proof it at room temp for 1 hour, then retard (delay) it in the fridge and bake straight out of the fridge.
Also make sure your starter is mature (meaning it has at least doubled in size, domed and fallen a little, google for visual reference). Your starter is also quite young yet, usually it takes a few weeks to reach its maximum potential.
Thanks for the detailed reply.
I did do the finger test and I think it didn't spring back completely. As for the sourdough yes, it is young, 10 days when I first used it and it was all bubbly, doubled in size (I live in a very hot area, and it's summer so had no problem with the first stages of the starter, work very smooth. I got some hooch on day 3 but other than that, it was ok.
I also tested it in water, to see if it floats, I heard that's another way to tell if it is ready.
So if I understand what you mean by bulk fermentation, I need to mix everything until I get a wet sticky dough and just let it sit for 3 hours, then shape it roughly and proof for one hour before shaping them? - but, don't I have to knead the dough?
In the video the guy kneaded the dough until it was soft and smooth, then he proofed it for 3 hours before shaping and retarding overnight.
If you're saying I can skip the kneading by bulk fermentating, I am all for it :-)
No, I mean first you mix the dough to a proper, smooth-ish consistency (do the windowpane), then let it bulk-ferment as a whole for about 3h (do a fold every hour or so). Then you portion and pre-shape it (if you make multiple loafs from one dough), let it rest for 20 min. (covered with a towel), and then do the final shape. Then let it proof until it passes the poke test.
As somebody mentioned downer, be gentle when pre-shaping and shaping the loaf to not degas the loaf.
If you want to reduce kneading, you can do an autolyse: mix only the water and flour until just hydrated, then let it rest for min. 20 min, up to 2h...then add the other ingredients and proof until doubled in size. Then proceed as described as above.
You can watch "Bon Appetit-Brad and Claire make Sourdough Bread" on YT, it's a great video. They guide you well and go into detail why you do all those steps (while remaining entertaining): https://youtu.be/oidnwPIeqsI
The starter seems to be a very large percent of the overall
Hey Guy, welcome to The Fresh Loaf! I’m read your reply on You Tube and glad you joined.
Update - while I was posting this you were posting more information, along with an image of your starter. Your starter looks great!
With the belief that your starter is healthy, may I suggest that you try this recipe/formula and follow the instructions. It was published with the intent to help new SD bakers achieve success with their beginning loaves. http://www.thefreshloaf.com/node/56678/123-sourdough-no-knead-do-nothing-bread
Disregard the info below, your starter seems good. First, lets make sure your starter is up to the task. Please tell everything you can about your starter. How it is feed, what it is fed, how often feed, room temperature that starter ferments in, etc, etc.. pictures will be helpful. How much does it rise and how long does it take to reach full height? How much starter + water + flour are you feeding?
Your starter maybe perfectly healthy, but since it is only 10 days old, it seems good to check it out first.
Here is an experiment that may help with the troubleshooting. I assume you are mixing equal weights of water and flour when feeding your starter. Take 25 grams of your starter and thoroughly mix in 53 grams of water. Once all of your starter is completely broken down and mixed add 88 grams of flour. Once everything is mixed together (no need to develop the gluten now) and no dry flour remains, let it rest (covered) for 30 minutes. Then come back and knead the dough until a windowpane can be made. Take the kneaded dough and place into a straight sided glass container. With a piece of tape mark the high water level of the dough. Try to put it in a warm (26C or 80F) and periodically watch it for growth. Take photos for posting. Let us know how long it takes to double and also how long it takes to reach it’s highest height. Don’t forget the photos...
Send this info along with images and we should be able to know the health of your new starter.
Danny
I posted some pictures of my starter in the previous reply, I started with a basic white flour recipe,only flour and water, in grams I used:
Day 1: 50+50, day 2: 50+50,day 3: discarded of 100g and added 100+100, day 4: discarded of 150 and added 150+150...
I live in a very hot area, I don't have a thermometer at home but during the day it's around 35-42c outside, inside it's cooler but when I'm at work the AC isn't on of course so the house is worm.
I'll definitely do the recipe you suggested, it's interesting to see what happens. I'm trying my second attempt today, have my dough resting in the fridge, I'm feeling a bit better about it, I'll post the results here and let you know what I did different this time.
Wish me luck.
At those hot temps your dough will move fast. As you progress you will probably use much less starter in your dough. Ferment while home and then (like you are doing) retard in the refrigerator for as long as you want (<24 hr) for convenience. Temperature has a huge affect on the fermentation of a dough. 4 degrees difference can have a very noticeable affect on the fermentation. Be careful, not to over ferment your starter. An active starter can double in 3-4 hours or less @ 80F.
A word of caution- the often used (in books) terminology, “knock down the dough” has a connotation of rough handling. When going from bulk fermentation to pre-shaping handle the dough gently. The most aggressive handling of a sourdough dough is called degassing. And often even degassing is not used when pre-shapng and shaping a loaf. For the most part, treat the dough like your baby :-D
You should be baking good bread soon...
Danny
Guy, there is no need to keep 300g of starter, unless you are baking every day. You’ll go through too much flour. IMO, 100g is a lot. When preparing to bake bread it is common to build a levain from a small portion of your starter.
I thought about the temperature factor a lot, you're making perfect sense here, as I said, I watched videos to understand how SD works and most bakers were from my ch cooler places, I live in an actual desert.
I also get what you're saying about knocking down the dough, and I believe I am being very gentle with it, I learned the hard way from baking cakes what an "abused" dough looks and tastes like.
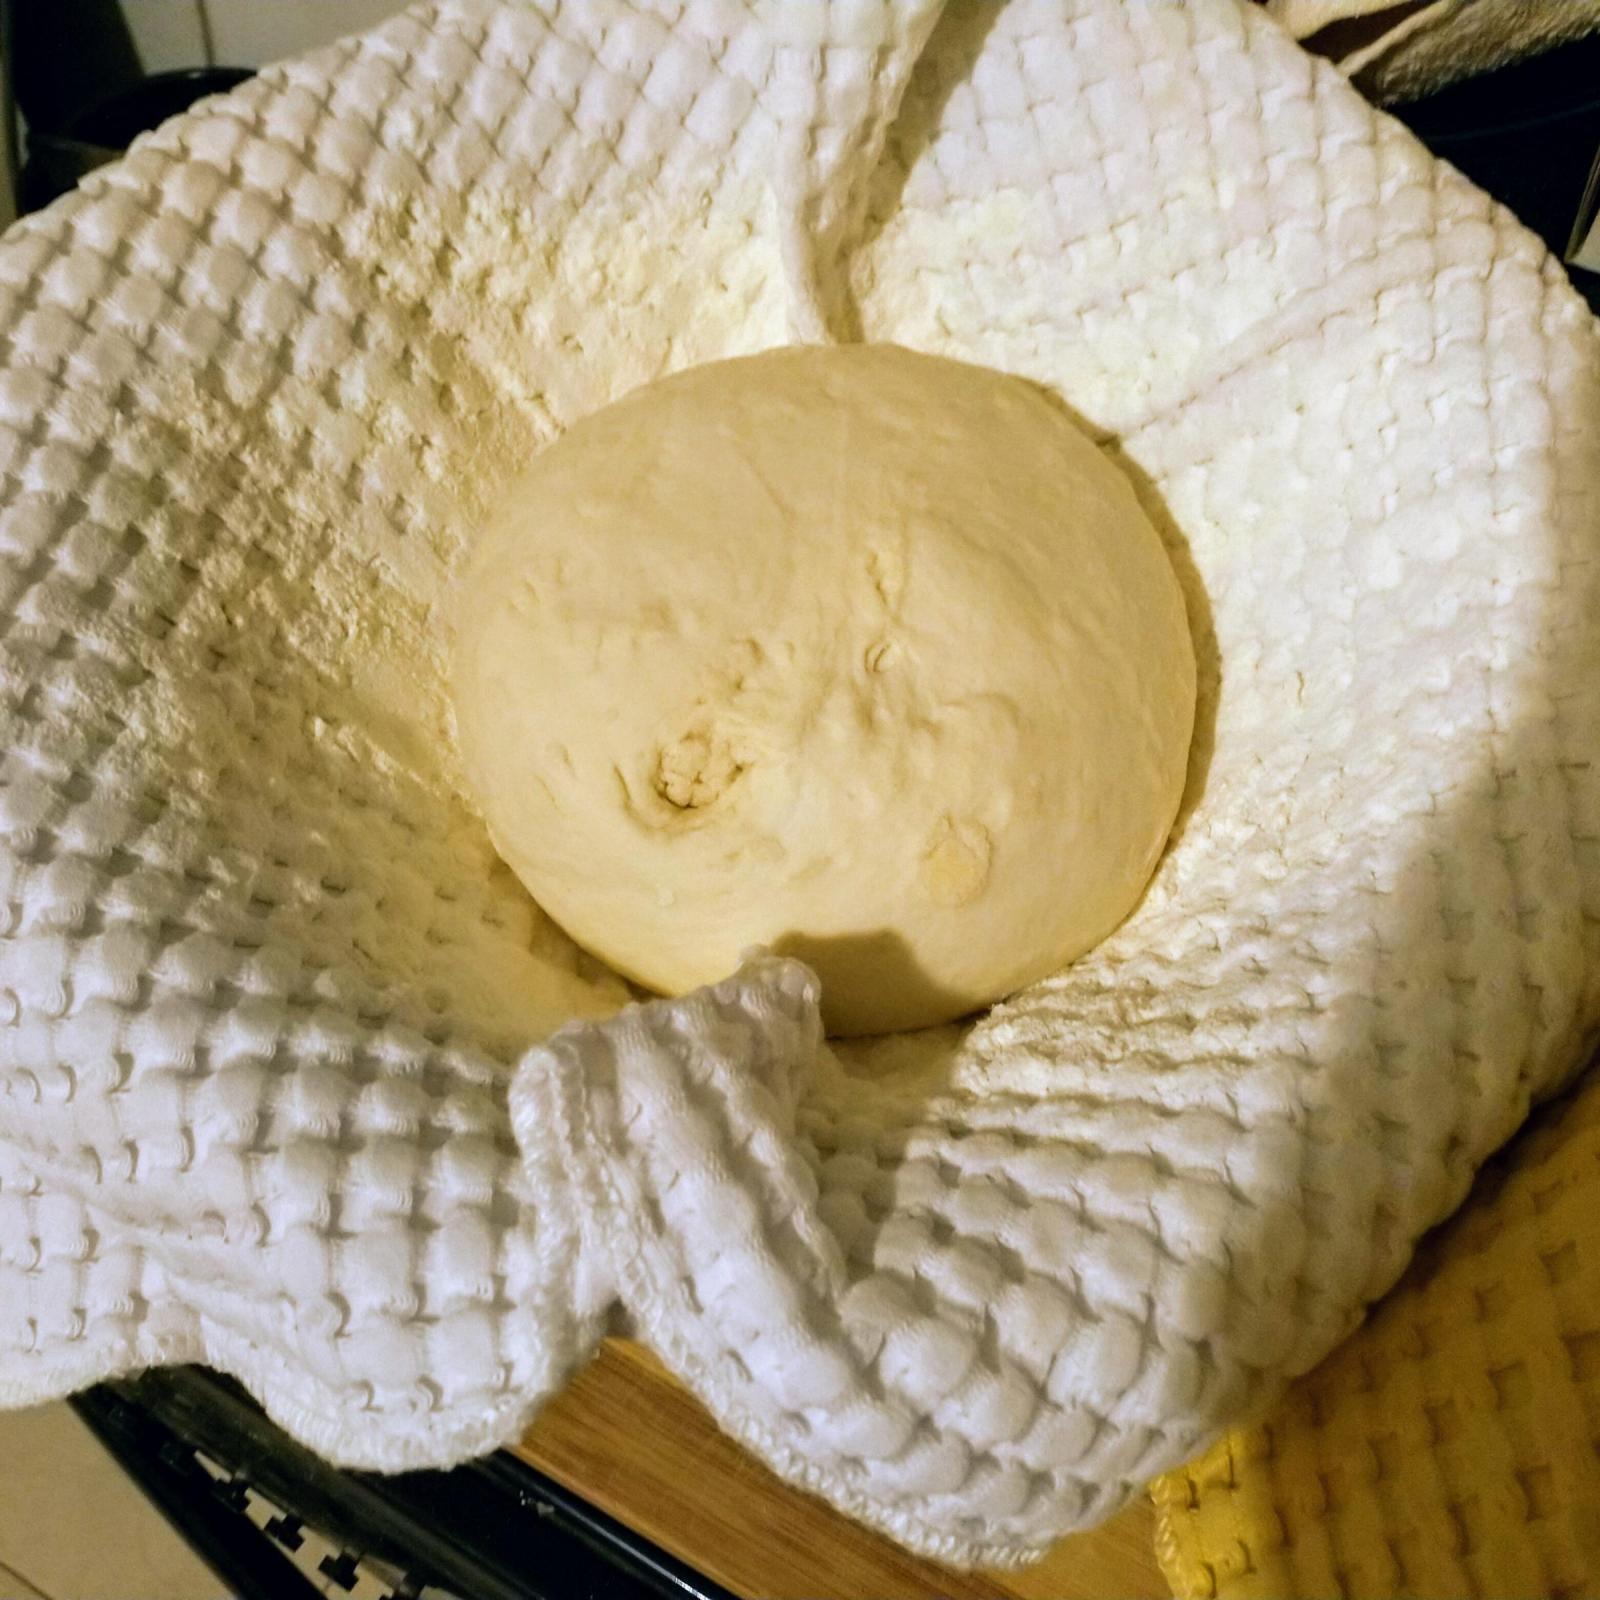
When I shaped it, I placed it on a lightly dusted table, smooth side down, smooshed it a little bit with my finger like you'd do with a pizza, then folded the edges over each other until I got a nice ball, flipped it, rolled it a couple of times and placed it into a bowl with a kitchen towel in it (my proofing baskets are on their way from China)
After mixing everything I got a very sticky dough, I kneaded it without adding flout at all, the temptation was there, but after a few minutes of tucking and folding, stretching and pulling, the dough got smoother and nore elastic, did the window pane test, it did tear so I rolled it and let it rest for 3 hours before shaping.
The one thing that I noticed while it was in the oven was that the bread didn't rise enough, I placed a tray with water, there was some steam, as you can see the bread is like a disc, it's too flat.
I am taking pictures of all the process today, I'll post everything ones tge bread is ready, chilled and cut.
Well I do have some suggestions but want to look at your recipe too.
Total flour is 800g + 160g flour within the starter (prividing it's 100% hydration) = 960g
Salt is 10g.
Salt percentage to total flour is about 1% which is quite low. In addition to a high percentage of starter and very hot weather your dough is going to work very fast.
Salt strengthens the dough and if the flour you are using is low protein then that won't help either. So what flour are you using?
So we have to adjust the salt and either you lower the starter percentage or do the bulk ferment in the fridge. Which idea do you like best?
Abe, considering the low percentage of salt and the warm temps, it may be a case of simply over fermenting. The crumb seems to indicates that.
Guy, you want to take care not to use a levain that is grossly over fermented, especially when using a large percentage of levain. With your heat, you may need to watch it like a hawk. If the percentage of levain is high and it over ferments, you will introduce a large amount of degraded gluten into your dough. You seem to be well read and knowledgeable but thought I’d bring that up just in case.
the low percentage salt has contributed to the problem. So that will need to be adjusted. Then we have three options...
1: Actually increase the starter percentage but do the whole bulk ferment in the fridge.
2: Do the bulk ferment at "room temperature" but significantly lower the starter percentage.
3: Increase the starter percentage but then after kneading go straight into shaping and final proofing.
Either way the recipe should be altered to:
Then how much should be prefermented will be decided on plan of action.
Abe, did you intend to write 650g water?
Typo. Hang on... correcting now.
Well spotted.
I'm learning a lot here.
I followed a recipe with zero knowledge about the chemistry, well... not zero zero, I know that you never put salt directly with instant dry yeast because it kills them, so I understand what you're both saying about the amount of salt I use.
If I summarize the main problem I have, it's the heat and the rate of fermentation.
Since it happens faster here, the times and ratio of flour/water and salt aren't good.
So I want to try some of your suggestions, less proofing time and add more salt or less starter, use 1:2:3 formula for one loaf this time, I guess I'll need 100g of starter, 200g water and 400g flour, 1.8% salt as Levaineer suggested will be 8g but I'll add 10 just to slow things down a bit more, will that work?
I still don't understand if I have to knead the dough after the initial mixing or just bulk ferment it in a bowl for a few hours until it doubles in size, pre-shape it, let it rest for 20-30 minutes and then do the final shaping and proofing?
Because I've seen "no knead" recipes and ones that require kneading until the dough develops elasticity and structure, then proofing for a few hours, shaping, retarding and baking, which is better and why knead if you don't have to?
And one last question just to make sure, I don't have to retard the dough, right?
I mean, I can shape it after proofing, let it proof again while checking with the finger poke test and bake when ready, right?
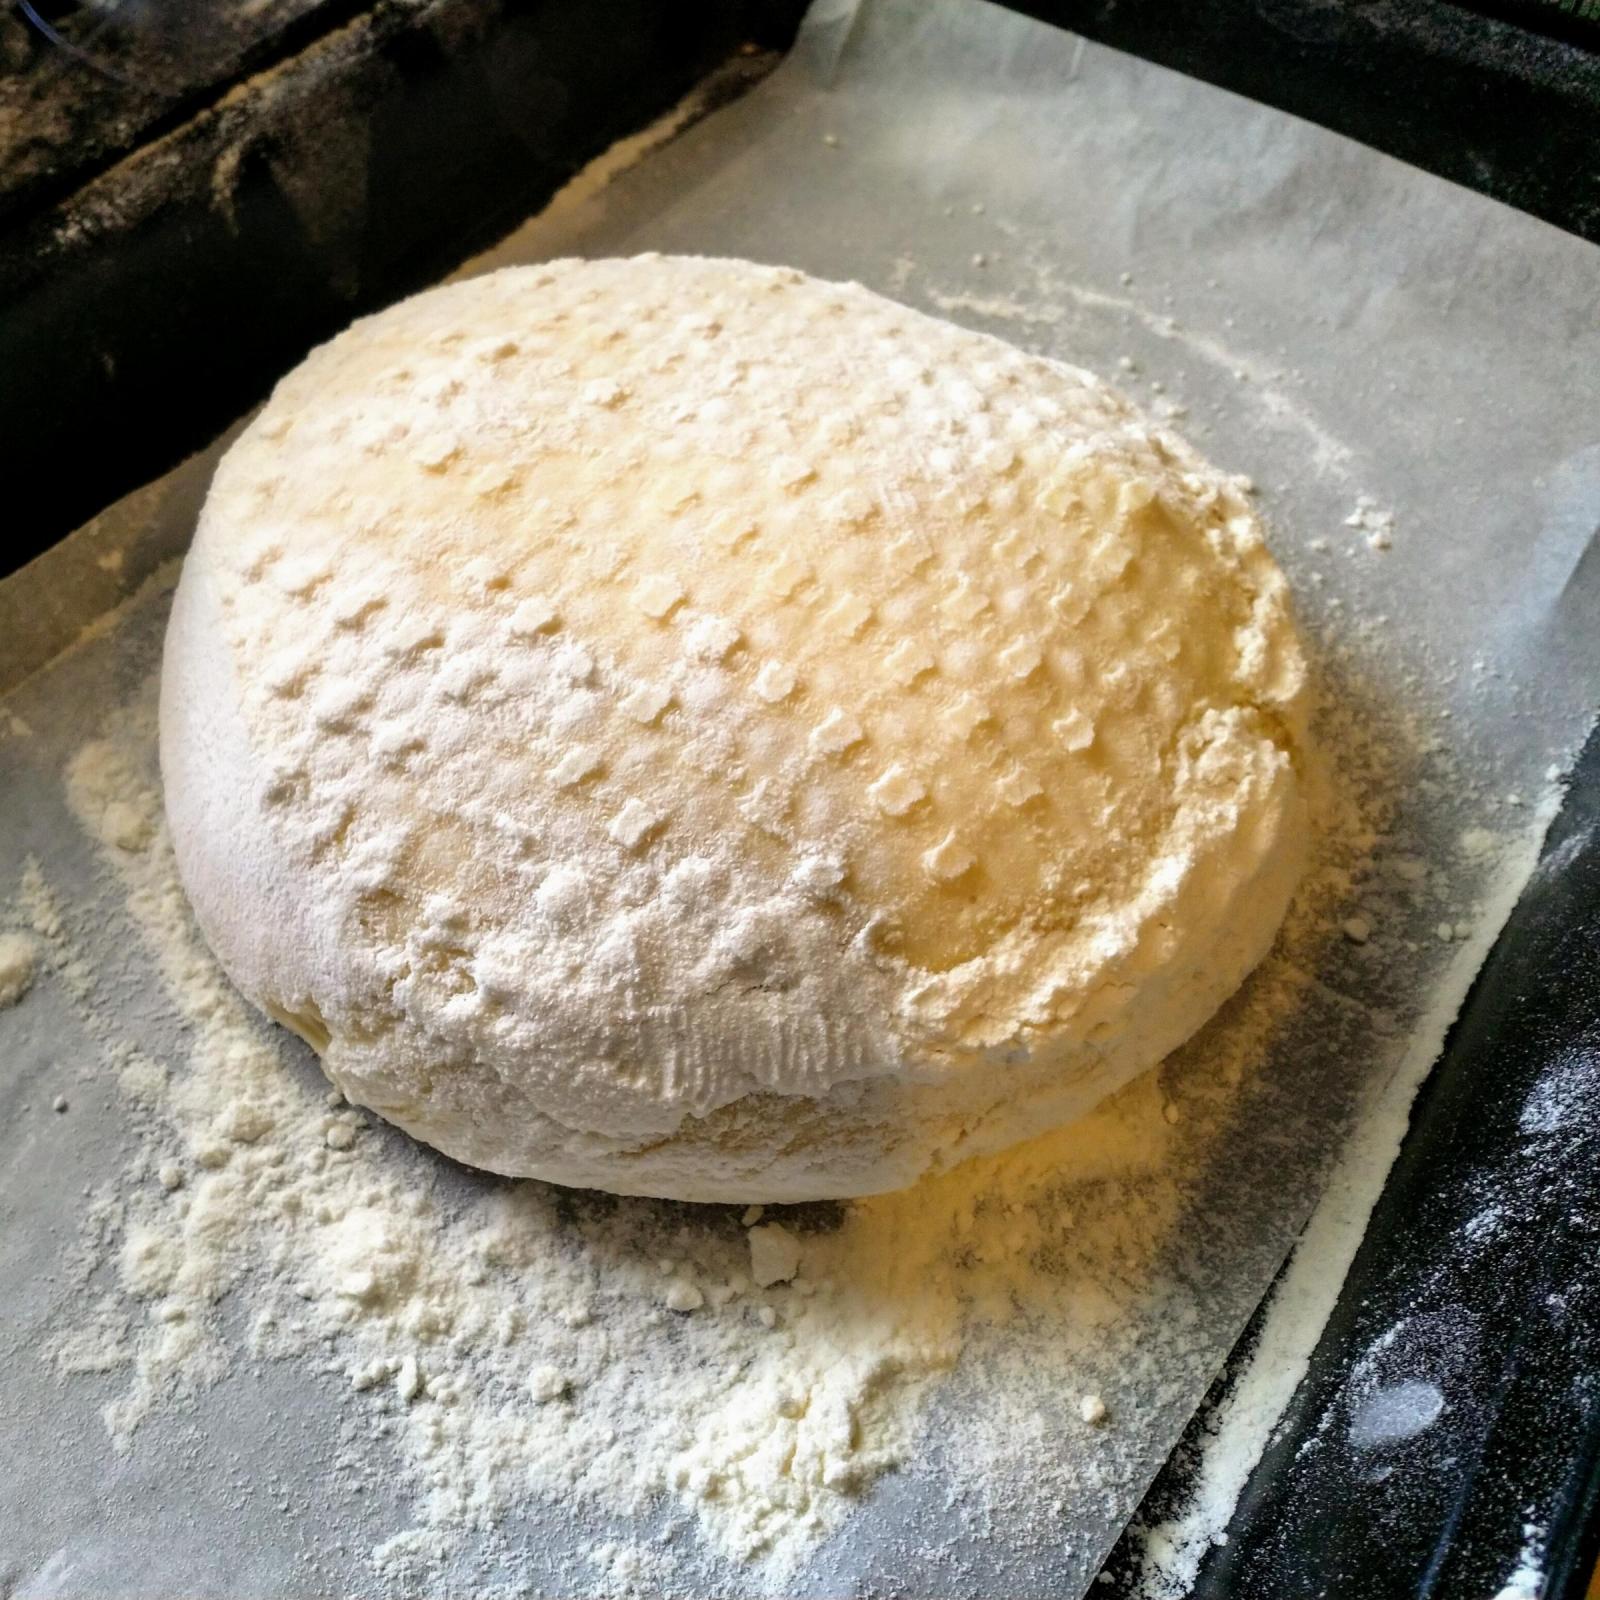
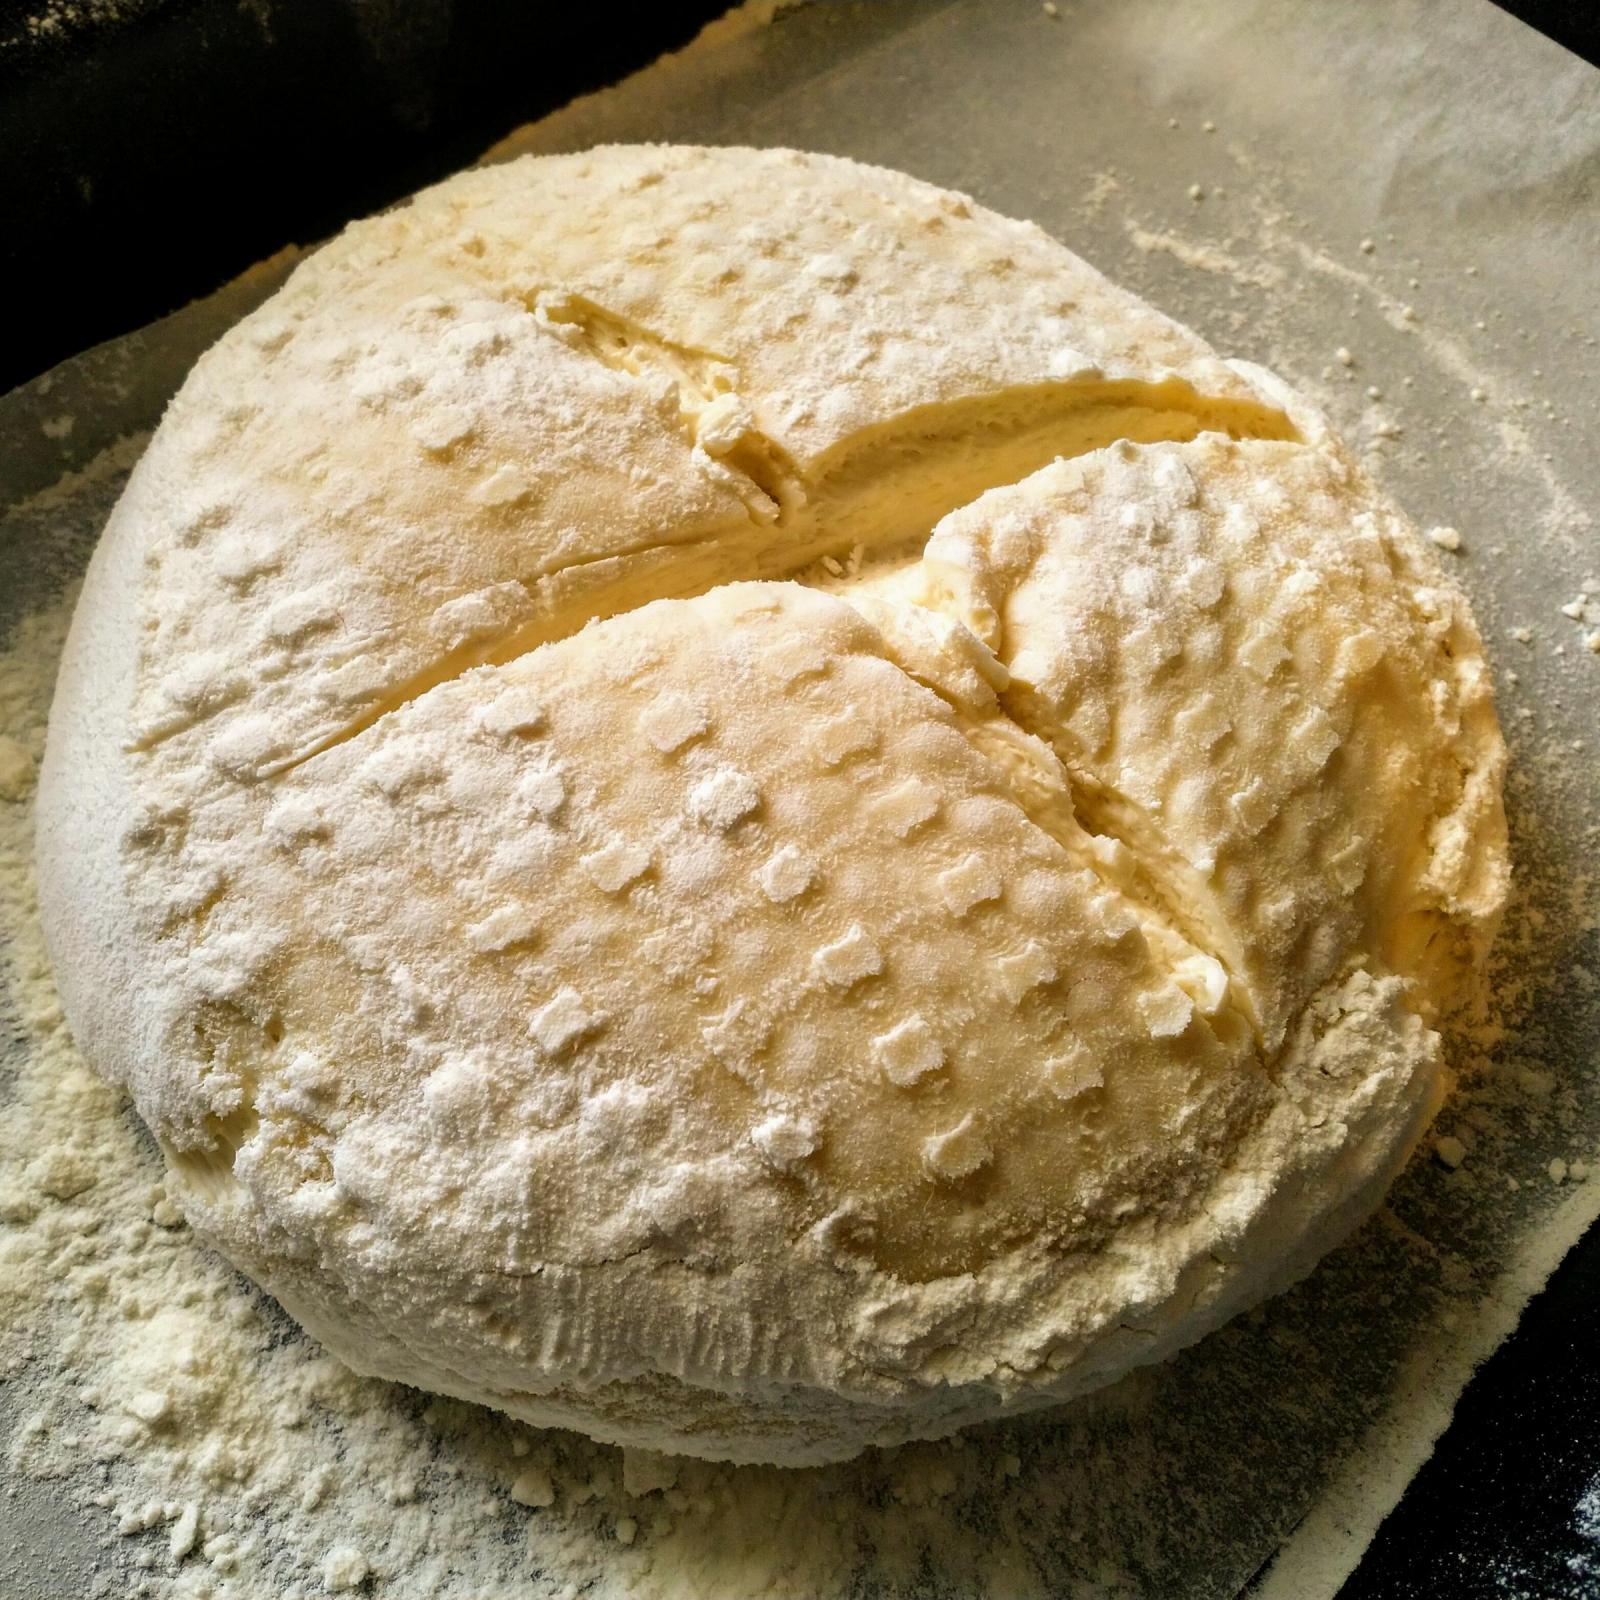
Update about today's attempt, same recipe because I started before I joined this forum, it went a bit better but still not there yet...
Stage 1, after mixing and kneading
Stage 2, after 3 hours
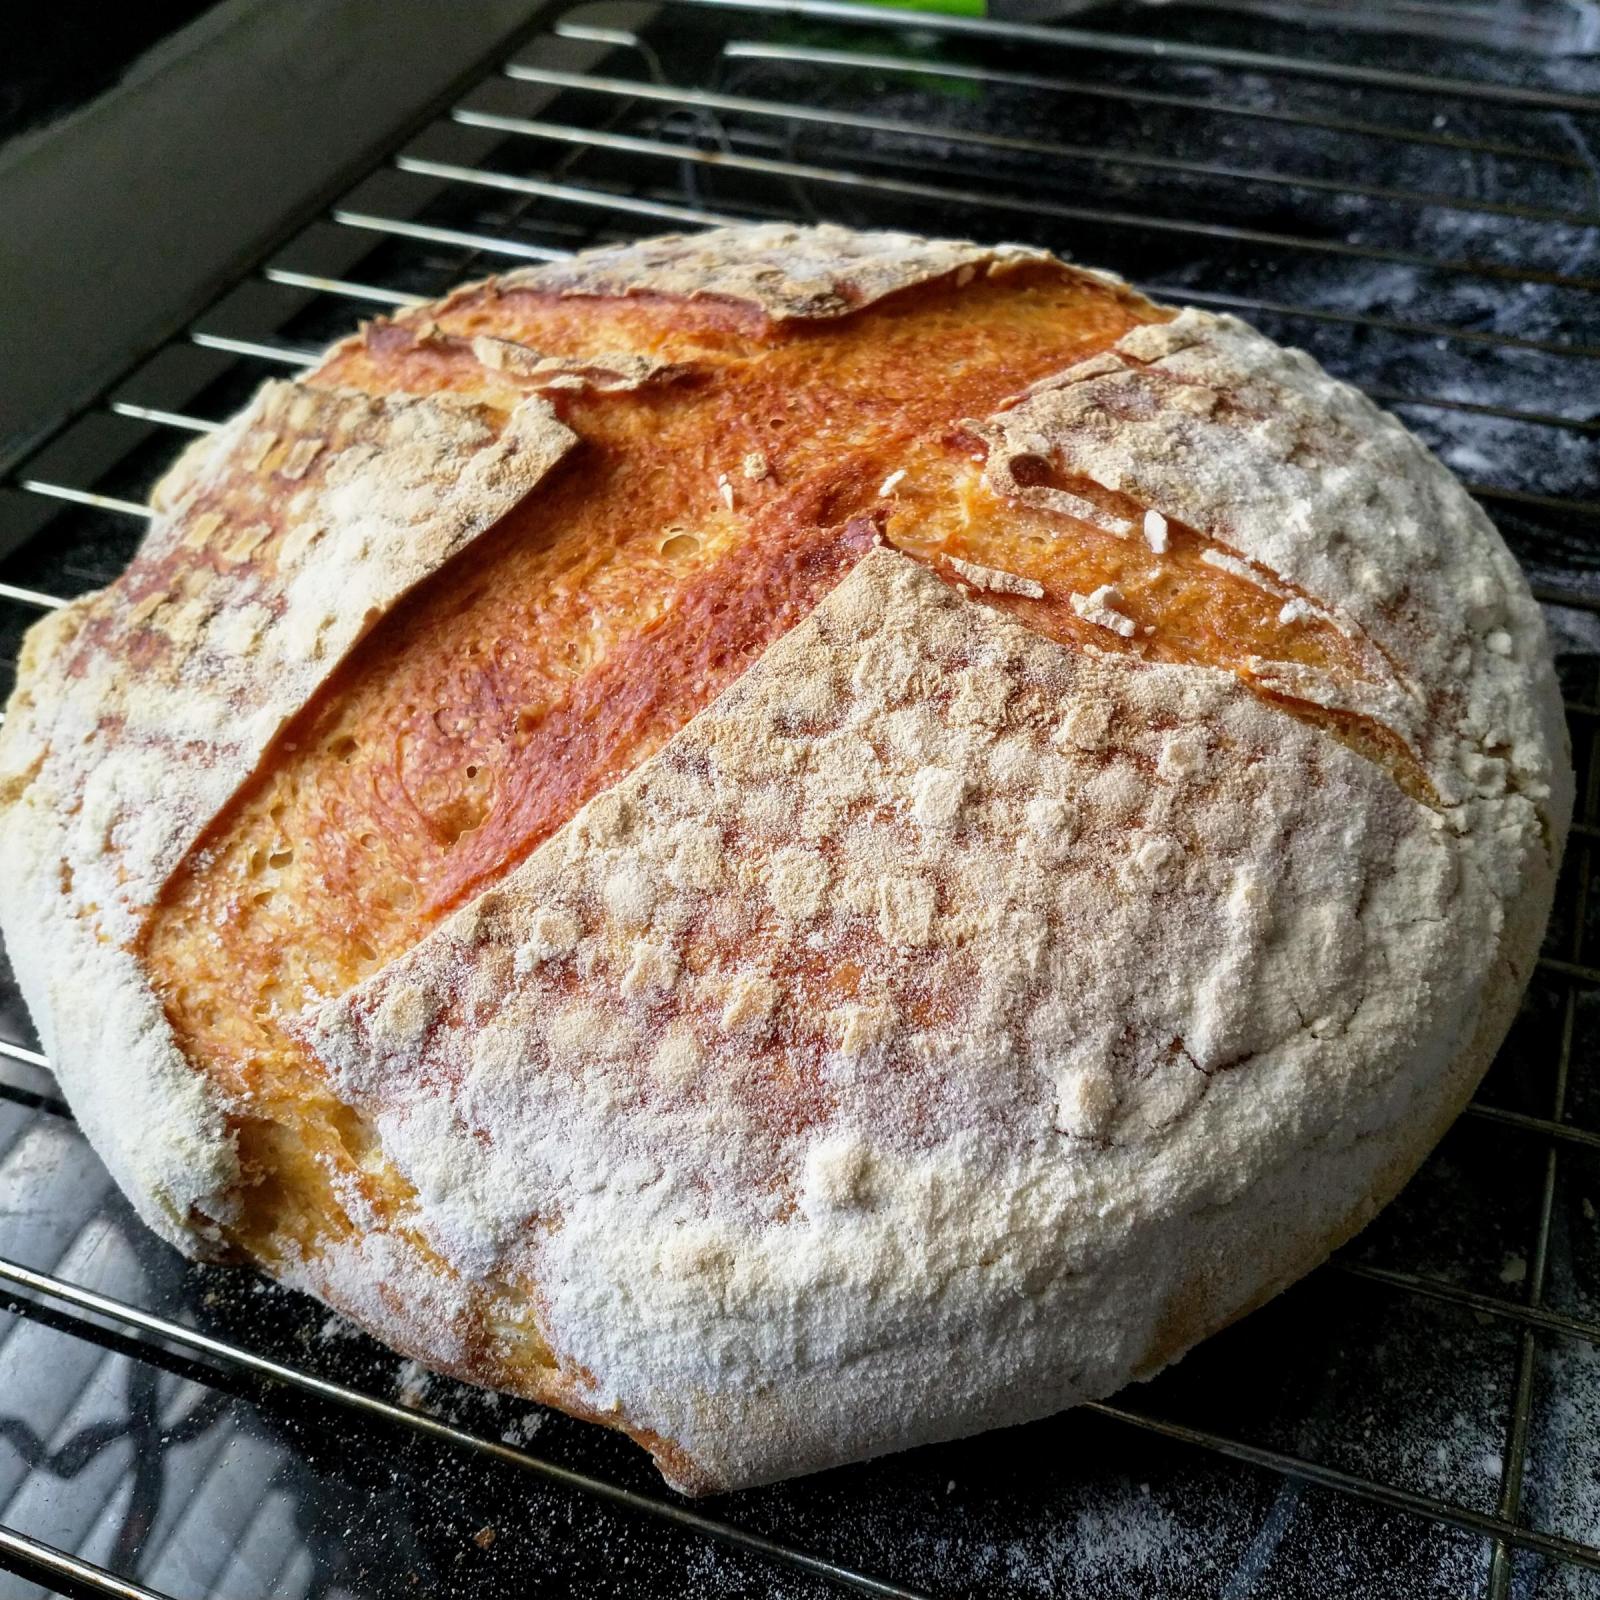
Stage 3 after about 9-10 hours in the fridge, 45 minutes of baking in a 230c oven with steam, I'm guessing that you can tell by the bumpy texture it's over fermented and perhaps over-proofed, right?
The crumb is lighter and I have more bubbles and some bigger ones too, it's less dense than the first one but...
I just think you're riding a learning curve, getting to know how it behaves and what to look for. I'd be well happy with that.
A 123 recipe is 1 part starter, 2 parts water, 3 parts flour and 2% of flour for salt.
E.g. 150g starter + 300g water + 450g flour and 9g salt
Now I'd say include an autolyse but I think getting the salt in straight away will help.
Nothing fancy. Mix the flour and salt together in one bowl. In another add the starter to water and mix. Add the wet mixture to the dry mixture and form the dough. Give the dough a knead for a few minutes until medium gluten formation then bulk ferment till ready giving the dough a stretch and fold a few times. Don't go over board with the bulk ferment. As soon as it looks aerated and billowy with a good matrix of bubbles then move into shaping. Try and find the coolest spot in your home and use chilled water to slow things down.
If you wish to regard the dough then do so straight away and bake it straight from the fridge when ready. If not then keep an eye on it and while most will be looking at 1.5-2 hours for a final proof you keep an even closer eye on it and expect it to be closer to an hour or so.
That's how I'd advise you to tackle a 123 recipe.
Fixed that, and I'll take your idea, 150, 300 and 450 with 9g of salt.
I am happy with the results this time and the taste is amazing, I didn't think it's gonna be easy learning this, there's a lot of "sciency stuff" with every aspect of baking, especially when using wild yeast.
I'm learning, and you guys are helping a lot, thank you all, I'll keep you posted.
Recipe: 150g starter + 300g water + 450 flour + 9g salt.
Mixed, kneaded for a few minutes then left to ferment, this is what I got after kneading, it was light but still sticky
After 3 hours it looked like this
I pulled and folded it a few times, flipped it and shaped into a ball
Proofed it in a bowl with a towel and here's the interesting part, I remembered what you said about watching it like a hawk, I thought I had at least 1 hour as you thought, but I checked after 30 minutes and it was already puffed up significantly, pocked it, it was soft and the dimples didn't spring back all the way, I'd say only halfway maybe... so I pre-heated the oven and popped it in, it didn't rise, just expanded to the sides :-(
The crumb has some nice and not too big holes, not enough in my opinion...
The crust looks ok but this one turned out even flatter than the previous one
What am I missing here? did this one over-proof?
The dough was soft, when I flipped it from the bowl to the tray it immediately expanded a little and looked a bit jiggly, I scored it and popped it right into the oven.
I put a tray with hot water below the tray with the dough. to create steam, I know this has the tendency to reduce the direct heat coming from below, at least with my oven, because of the extra tray there... it still bakes all around but I've noticed when I baked 'regular' bread with that same method, the bottom needed a few more minutes without the tray...
have no idea if this makes sense, I'm giving you all the information I have because I'm clueless here.
Guy, you appear to be doing things well. Your gluten doesn’t appear very strong in the photos.
Your total flour is 525g. At 1.8% salt that would technically come out to 9.45g salt. With your heat you might want to go 525 x 2% = 10.5g. But, I don’t think that is a big enough issue to cause your problem.
I am seriously wondering if the quality and/or type of your flour is the culprit. Can you try another flour?
Dan
I'll try to get a strong bread flour for my next attempt.
The main thing is that I noticed in all of the loafs was how tender and soft was the dough after fermentation and proofing. When I baked straight out of the fridge it was harder and tighter because of the cold but the ones that I proofed room temperature and by "room temperature" I mean scorching mid-summer desert heat, the puffed up significantly and where very fluffy.
I'll try a stronger flour plus,since I only bake on weekends, I hope that even 1 week of additional 'maturity' will make a tiny difference in my starter as well.
Thanks again :-)
What percentage protein?
Guy, another thought that you may or may not want to consider. Your dough is slightly above 71% hydration. Looking at your images of the dough it looks wetter, may be 80%. You might consider reducing the hydration to 65%. If so, add only 266g water to your final dough.
The above is based upon the assumption that your 150g levain is composed of 75 water + 75 flour.
Dan, my starter is 75-75 as you assumed, and tge dough was very sticky and soft, this time in particular but on my other attempt too, but I thought it was a good thing since all the videos I saw started this way and after a few minutes of kneading the dough became smooth and cohesive.
I'll try less water next time, same amount of salt and a strong bread flour.
Abe, according to the package, my flour is 10.7% protein.
If you can find 12.6% or higher then you'll notice a big difference. Great advice from Dan. Dropping the hydration for now is a good idea and it can be increased when you've ironed out these small issues. Don't worry, we've all been down this road. Keep at it.
Guy, if you can’t find flour with higher protein, look for some vital wheat gluten (VWG). It will increase the protein in your flour. But stronger flour would be best.
10.7% protein is extremely weak for sourdough bread. I really think this is your main problem.
How about a young, instead of a mature, starter and bringing the percentage down to 20%. That and an overall hydration of 60% should yield better results.
So something like this...
Starter Build: feed your starter the night before and use the next morning when mature.
Use after 3-4 hours.
Recipe:
Same procedure as guy has been following. Mix flour and salt. Mix water and starter. Add the wet to the dry and form the dough. Knead for 8-10 minutes. Bulk ferment till ready adding in some stretch and folds. Pre-shape and bench rest for 15-20 minutes. Shape and final proof till ready then bake in a pre-heated oven.
I definitely think the lower hydration will help. King Arthur Flour calls 10.3 % protein pastry flour. It s not a good bread flour for a new sd baker.
Guy can you get higher protein flour near you?
I used it once when I was trying to make an apple strudel from scratch, the recipe called for a strong bread flour that can handle the stretch because it needs to be paper thin.
I can't tell the protein percentage but I was able to stretch it out with my hands like a pizza but much much thinner, it was like a membrane.
I'll buy this brand and try again, and I'll reduce the hydration as well.
(Aug 10 posting). You are doing quite nicely with your learning!
There is one little thing I'd like to comment on, and that is the lighter bottoms of the loaves. Try getting more heat under the loaf while baking. That may mean moving the oven shelf down a notch or simply using a darker surface to bake on. Keep up the good work!
I've noticed that if I leave the tray with the water underneath the loaf all the time I tend to get less heat from below, next time I'll remove it for the final 10 minutes.
It is a commonly accepted practice to remove steam and vent the oven after the first 10-20 minutes.
Take a look at this article concerning steam. I think it will interest you.
http://www.thefreshloaf.com/node/16036/good-bad-and-enlightenment#comment-112898
Rising steam is capable of cooling down your stone or baking vessel.
Thank you.
The first thing that jumped out at me was the low salt amount. You usually want at least 1.8% salt. The loaf also looks overferemented. Adding salt will slow down fermentation.
I got 2 brands of flour, one is plain white flour with 12.5% Protein and the other is whole wheat flour with 13.03% Protein.
I'm guessing this is much better, right?
I am exciting to see your results after using the stronger flour!
I recommend using the white flour until you have a few successful bakes under your belt. Whole Wheat is more challenging...
I figured it behaves differently... I once accidentally picked up a 30% whole wheat flour instead of a regular all-purpose white one (stupid labels are virtually identical).
I wanted to bake my famous Chocolate Babka and as soon as the water touched the dough I realized something is not right... and was only 30%...
I'll wait with the whole wheat, for now, maybe just start a different starter and let it grow for a while, but focus on white flour.
It's a shame I only have time during the weekends, I can't wait :-)
So, attempt #3
Gathered all of your advices and here's what I did:
Recipe:
1kg strong white bread flour, 12.5% protein
560g water
200g starter, well fed and bubbly n' stuff
20g salt
Mixed, kneaded, covered for 2 hours, stretched and folded, covered for another hour x2, divided into 2 loaves, pre-shaped, covered for 30 minutes, shaped, into bowls, into the fridge overnight.
Today I heated up the oven, placed a cast iron pot to heat up as well, took the loaf out of the fridge, scored and placed into the hot hot pot, sprayed some water inside and covered for 25 minutes.
Then I removed the lid and baked for additional 25 minutes.
Notes: the low hydration dough was tougher than before, as expected, but much more steady and strong, I believe it has something to do with the better flour too.
Less starter made the dough prove slower, again, expected, but I didn't had that fear of it collapsing onme all of the sudden.
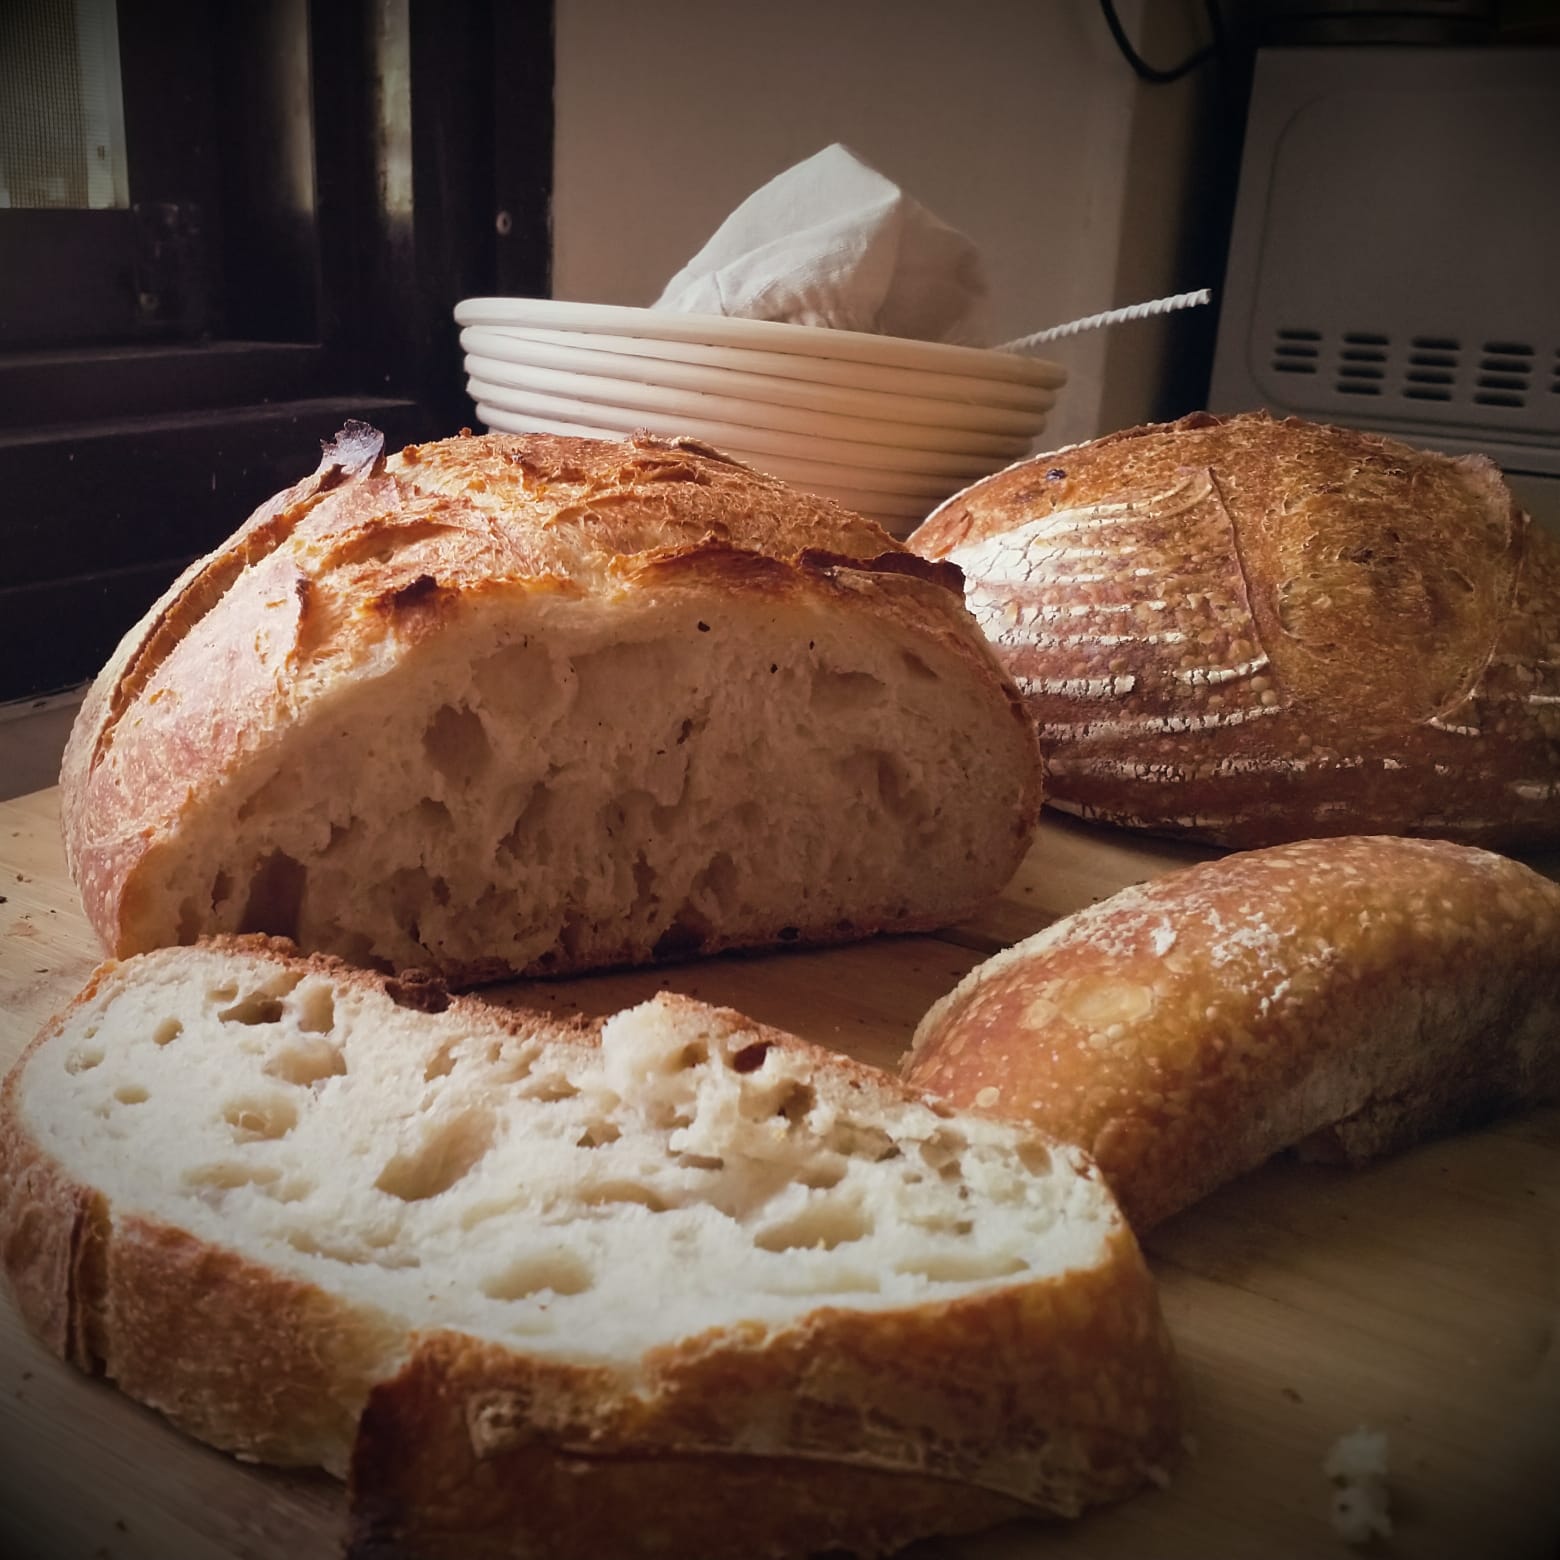
Results: this is the first loaf, the second one is more puffed up, still chilling, I'll post pictures when I'll cut it.
The crumb is much better, less dense, bigger holes, I was expecting a more open crumb but I guess it is harder to achieve with a low hydration dough, right?
I learned so much from you guys, and I have much more to learn, thank you.
It would show us more detail if the crumb shot was taken straight on. Was the crumb wet? It looks moist.
A complete image of the bread would also help. That way we could see how it rose, bloomed, and/or spread. Please send us more closeup images.
Are you making up your own formula or are you using a pre-existing one?
Your hydration is 60% and the percentage of prefermented flour is 9%.
Just doubled the numbers because I decided to make 2 loaves instead of 1.
He said 500g flour, 280g water, 100g starter and 10g salt.
Here are a few more pictures of the first loaf, the second one is a little more puffed, I think that's because the pot was hotter, it's still cooling off so I don't know what's going on inside.
The crumb was a bit moist, yes, but it's not wet or doughy.
The loaf looks good. It rose well and bloomed. It stands tall from the sides.
My guess would be that it over proofed a little. But it may be the low hydration.
The hydration of this loaf was 60%. Next time I recommend you up it to 65%. If you choose to do so, add 358g of water.
Learn to observe your fermentation. Use time as a guide, but make determinations on visual and tactile clues. Look for a dough that is doomed. The surface should be rounded where the top of the sides meet the container. The top of the dough should not be dense, but have moderately bouncy feel. The top should have no indication of deflation. These things are difficult to describe. That is my best effort.
You are making good progress. Persistence will pay off.
Actually that looks great! Raising the hydration a little should open your crumb more.
look at how far you’ve come.
Are you using a baking stone?
Working with the lower hydration dough was a good learning experience, I guess now with the stronger flour and the other things I learned about the process I can amp the hydration back up.
I have high hopes for the second loaf, I keep the lid on for 5 more minutes with that one and baked it without the lid for 5 more.
I the first 2 times I used a regular oven tray but this time I used a cast iron pot.
Cast iron pot is great. Most bakers leave the bread covered for a maximum of 20 minutes.
Some said 20, others 25, I figured it depends on the oven and other variables, my oven is kinda old and only goes up to 230 "on paper", so I went with 25.
Definitely got better results with the formula and tips you gave me, and with the pot I didn't have to play with stream so that's a plus as well.
You should be very happy with this one. What do you think about it?
The taste is great, the texture is great as well and the crumb is more open and lighter than the other ones I made.
I do want to take your last advice and increase hydration next, but this loaf actually joined the "clean plate club" and was gone before the end of the meal, my family loved it and I owe it all to you guys ?
hey! You learn fast! It's to your credit! Take a bow!
Now repeat.... before changing things around. Get to know it well. :)
I have no plans to move to different flours and recipes at the moment, I need to see that I can replicate the success, however I did use a very low hydration dough this time and want to try a little bit more water as Dan suggested, to get a more open crumb.
It's a learning experience to see for how hydration affects the dough and process, this is better than videos and pictures, hands on experience.
I bake only on weekends, after I use part of my starter, do I need to feed it before putting it back in the fridge?
I took it out, fed it,, let it warm up at room temperature and do its bubbly magic, took some for the bread and now I have a fed and activated starter, what do I do?
Why not make your levain a little larger than needed? Then you could use the extra for your refrigerated starter. Just make sure you remember to save some.
After all of the recent attempts, I now have about 300g of starter in my fridge.
The last time I used it I took out what I had, the whole jar, fed it and let it warm up, then I took about 200g for the bread and placed the jar back in the fridge.
I'm a bit confused about how I should store it, some say you have to feed it and then place in the fridge while other stored the remaining starter as is without feeding, then took it out when they wanted to use it, fed it and let it warm and activate.
Which is better?
And if I fed it before placing in the fridge, do I need to feed it again when I take it out?
Or did you mean take out some starter from the fridge, not everything, feed and use what I need then give the remains as "food" for what I left in the fridge?
Sorry if I made a mess of things, just trying to process too much information :-)
Guy, there are many ways to handle a starter. They are extremely resilient. Many bakers keep a relatively small amount of starter and from that build a levain in 1 or more builds. For example. 20g of starter can turn into 500g in two builds using a 1:2:2 ratio. 20 starter + 40 water + 40 flour. At 80F it could double in ~3-4 hours. Then take 100g starter + 200 water + 200 flour and in ~3-4 more hours you have 500g Levain ready for bread baking. This is an example. You can use an unlimited amount of vairables, it’s up to the baker. This example shows how little starter can be quickly built into a very large levain. NOTE - using multiple builds after refrigeration makes for an active levain. The concept of building more levain than is needed for your weekly bread kills 2 birds in a single shot. You get levain for bread and at the same time refresh your starter before it is refrigerated until the next bake. With this method, if you bake weekly, your stater is refreshed every 7 days.
This is not your only option. Many bakers simply take a little starter from the mother and make a levain from that. The concept above refreshes your starter weekly instead of refreshing when the mother runs low. It’s up to you...
A starter that is destined for the refrigerator should be given enough time to regain activity before it goes into cold storage and becomes near dormant. You want to jump start the microbes.
Other successful bakers use different routines and have healthy, active starters.
Dan
I saw one guy with 20g left after baking build up 300g, use about 280g and refrigerating the remaining 20. I understand that you can take 10g and build up 200 of lavian from it, all it takes is time, Abe actually told me to do 1:2:2 ratio the last time.
I was just wondering, since I take out the whole starter, feed it, let it rise and double in size, use some of it and store what's left, do I have to feed it again before putting it in the fridge or just put it in there till next week.
After reading your explanation, I think for me the best option is first to reduce the amount I keep now (I don't think I need about 300g of dormant starter in the fridge), then whenever I bake I will just build up from what I have, depending on how much I need it night take a few builds as you described, use what I need and chill the remains of the next time.
No need to feed it again. It is already active.
Thanks :-)
So, to summarise your advises and tweaks for this week before I start (later on today so I can bake tomorrow morning), I need to increase the hydration while staying within the range of 20-25% levain, right?
This week I think I'll make 1 loaf so using the same formula Abe gave me with Dan's adjustments I'll use:
500g White Flour
308g water (which will bring me to 65% hydration)
100g starter
11g salt (2%)
Do you think I should go higher to 70% or try with 65% first?
5% hydration is a very noticeable change. I’d stick with 5.
Go with your plan...
Wish me luck! :-)
(wait, isn't it 4:30AM on the east coast right now?)
You missed it by an hour 3:20AM :-) I live south of New Orleans.
I was up watching a levain.
Even earlier than I thought... But, a baker timezone is different from others :-)
“I was up watching a levain” something you don’t hear in your usual day to day life except here. ??
Bennie, I may have found a work around for the levain watching. I wanted to mkae sure it didn’t over ferment. Here is an option for overnight ferments that should solve that.
http://www.thefreshloaf.com/node/61042/tip-levain-timing
Danny
You can totally swap the phrase "like watching paint dry" with that, but only here :-)
So, while we're on that subject, my bread for this week: working with the higher hydration percentage was a bit harder, it took a lot out of me not to reach into that flour bowl and grab a handful of it... after the bulk fermentation and a few stretch-and-folds the dough was still kinda sticky but I was able to get some tension and shape it by doing 2 pre-shapes and letting it rest between each one.
I think I used too much water on my fingers when stretching and folding just to avoid the stickiness and maybe that just made it worse in the end... I don't know... I still need to learn how to handle wetter doughs, it's the technique and skills that I lack.
But anyway, my banneton basket arrived so I shaped the loaf, placed in it, proofed overnight, it domed nicely, did the finger poke test and it didn't collapse or spring all the way up so I baked it with medium to low expectations, turned out ok, I think.
The crumb is very similar to the one from last week, at least it wasn't a total disaster.
You are getting there. Next dough should be fermented less. If the image with the finger polk was taken after the hole rose out, it is overproofed.
How much did you increase the hydration?
You can definitely increase the hydration if you are not careful with the water on hands, tools, counter. Etc.. Think about this example. 3 tablespoons of water can increase the hydration of of a dough that uses 500g flour by 9%. That means 65% is now 74%. That is a huge difference.
Using a spray mister is a good idea. Make sure to shake the excess water off of the hands and tools.
You have probably learned that going from 65% to 75% is a radical change is the feel (wetness) of your dough.
Danny
Technically I made a 65% hydration dough so I only increased by 5 from the last time, but every time I tried to fold it, it was sticky so I sprayed my hand, and probably too much, so I ended up adding more and more water to the dough.
Guy, did you take into account the hydration of the levain? 65% should be very easy to handle.
I wanted 65%, so if I use 100g of levain with 500g of flour, the total amount of flour is 550, so I need 357.5 of water, minus 50 in the levain, I added 308g.
I believe I got the baker's math down, right?
Your idea is brilliant, take out some of the water I use for folding, amazing dude, amazing.
Yes Guy, you math is right. Wasn’t sure if you figured in the levain @ 100%. You did.
I actually inadvertently add even more water each time I do stretch and folds because I wet my hands by dipping them into my measuring cup of filtered water before each set of S&F.
Benny, one way to make sure you don’t add too much water and change the hydration is like this. Measure out something like 30g of water and put in a bowl. Subtract 30g water from your total dough water. Then when you slap & fold, coil fold, stretch & fold, etc. you use the 30 grams of holdout water to wet your hands, tools, and counter.
This way you know the water has not inadvertently increased.
That is just crazy logical, I love it. Thanks Dan.
Benny
Another way to deal with sticky is to cool your hands down with cold water first then blot off most of the excess. Use just the tips of your fingers when handling the dough. Can even put finger tips in ice water for a quick cooling before handling. Dough should always have a little bit of stick or tackiness to it. The only doughs I found that had a dramatic decrease in tackiness are those made with a water/flour roux, also known as Tangzhong or cold porridge bread. They make for fine pored loaf texture too.
And it's mid-summer, yesterday it was around 105 degrees during the day, right now it's 9:30pm and it's 80 degrees outside :-)
I thing everything is warm here, including my hands.
I believe it's probably true, both of you are right, it's the heat and the added water, plus what Dan also said about the dough being over-proofed, and that's the heat again.
I'm trying to fit the process into my schedule so I do what I can to be around the dough until I place it in the fridge to retard overnight, but if I leave it alone for too long it's puffing all over the place, it's like that movie, "The Blob"...
If your dough is continuing to rise in the refrigerator most probably the temperature is above 3C (38F). At the aforementioned temperature the dough should not have any noticeable rise even is left in for 3 days.
If this is your case you could try terminating the BF early (sooner than expected) with the idea that it will continue to rise under retardation.
Where there is a will, there is a way...
Danny
Now that I think about it, I really need to invest in some new appliances, I spend too much on computers and game consoles yet I have a refrigerator so old it has one setup for the temperatures and no indication of what they are :-)
The images of the last dough I posted were after a few hours and you're right, I think it rose a bit, the dome is noticeable and I placed it in the fridge directly after shaping so it didn't have the change to puff like that outside.
One more thing I thought about, when I look at all my attempts, the second loaf always looks better and has more spring, I think that's because the pot and the oven were hotter on the second bake, maybe I'm not preheating it enough, I will try to give it more time.
Guy, before buying a new refrigerator check out the lowest possible temperature it s capable of producing. Many bakers in countries other than American tell us their frig will not get cold enough even when new.
But my fridge is old, when the compressor kicks in it's very loud and it has some broken parts too, like the bottle holder / shelf on the door, so whenever I open the door, bottles are flying out hahaha ?
For now I am able to get by, as long as it keeps the food cold enough, I do have a wishlist and this is one of the things on it, along with a new oven, a new laptop and replacing the air conditioner in the living room (the current one is too small ans weak). But, since I just got a new TV and a new food processor (which I worship and can't understand how I managed to live without one for so long), it'll have to wait.
Put 2 glasses of water in your refrigerator. One on the top shelf and the other on the bottom. Come back in 6 hours or more and check the temperature of the water in each glass. Let me you your findings.
The best way to compensate for a warm refrigerator is to shorten the BF to accommodate for the rise during retardation. If the temperature goes above ~38F, your dough will rise during retardation.
$an
I'll leave the water overnight and let you know what happens
If the fridge is too warm, a trick I sometimes use is to empty a tray or two of ice cubes into a large zipper bag. Rub a tiny bit of oil on the bag and place it on top of the dough, cover with a small folded towel for insulation, and then place in the bottom of the fridge. This is also a handy technique if called away suddenly to stop the fermentation until you can get back to it.
I'll remember that the next time I leave the dough unattended for an unknown period of time, thanks.
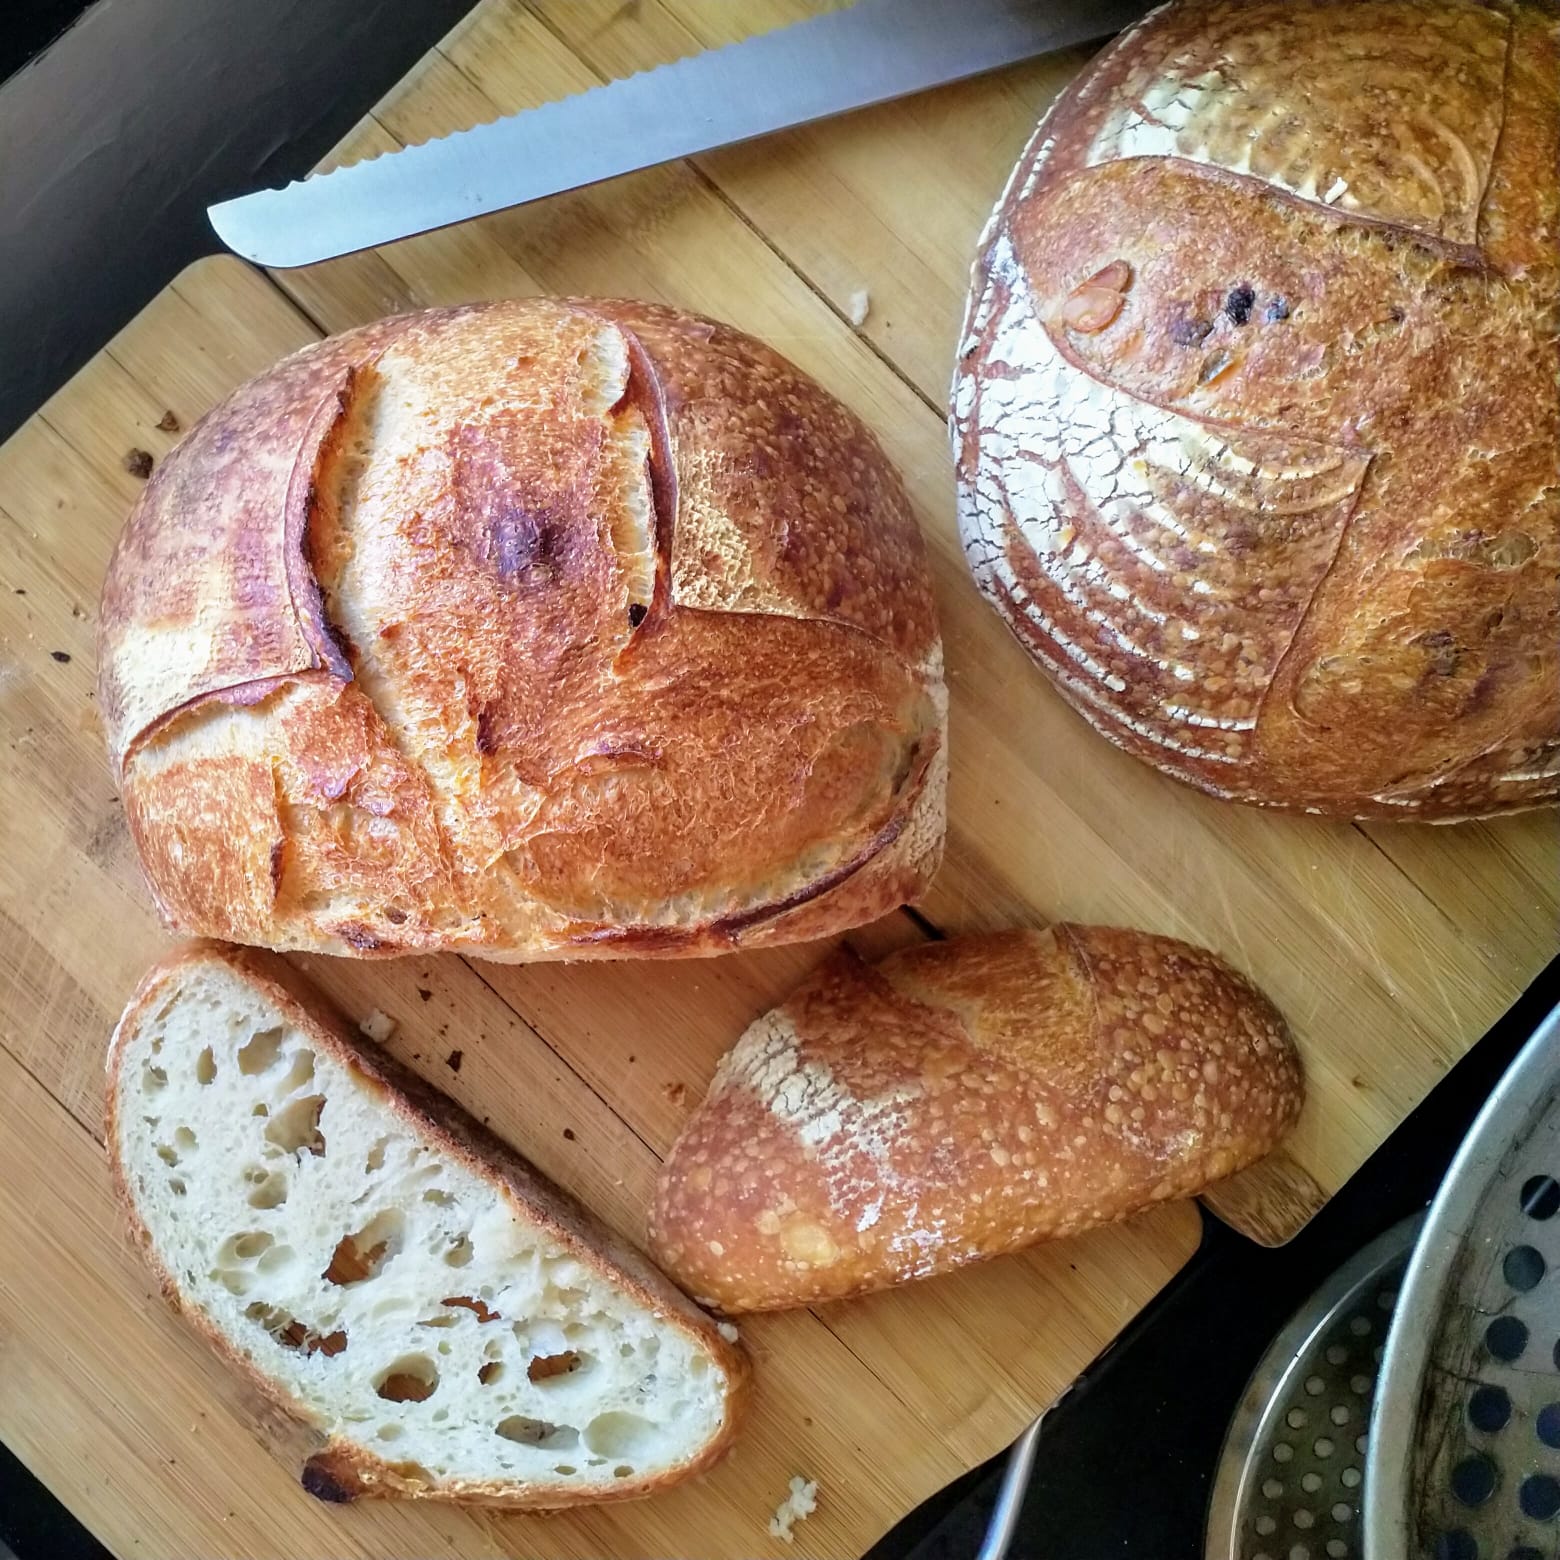
With minor modifications suggested here I baked 1 loaf today.
What's changed?
As Dan suggested I shortened the BF, used less water on my hands while stretching and folding and used water from the over whole hydration of the dough so I won't add more water during the process.
Pre-heated the oven and the pot for 30 minutes (instead of 10 minutes the last time)
I also added autolyse to the process, I've been reading some posts here about it, some of Mini Oven's comments in particular, so I tried that, 1 hour of autolyse before I added the levain and salt.
And that's it, same formula, same baking method (20 minutes covered, 25 minutes uncovered, 230C)
The crumb isn't too moist, I let this one cool completely before cutting it, the crust is great.
Next time I'll brush off the flour a bit more... :-)
That bread looks great to me. What was your finalhydration and what flour(s) and % of flours did you use?
And it tastes great, the texture is spot on in my honest opinion.
I used all white flour, the same brand, strong bread flour (it's branded as "Pizza Flour", hehe), 12.6% Protein.
So, 500g flour
330g water which I divided into 313g for the initial dough (autolyse) and the extra 17 sent into the spray thingy... the one I use to spray my hands before I do my Stretch & Fold.
100g starter
11g salt
All in all, it came to be 69% hydration.
1 hour of autolyse, 3 hours BF (last week I think I did 5 hours because I left the house and let it sit on the table) with 5 S&F every 30-40 minutes, pre-shaped twice with 10 minutes rest in between to build some tension, then shaped, into the basket and retard for about 10 hours,
I still use all white flours, I want to try using whole wheat flour but for now I'm trying to "perfect my craft" with white before stepping up to whole grain, whole wheat, rye and blending stuff.
"I still use all white flours, I want to try using whole wheat flour but for now I'm trying to "perfect my craft" with white before stepping up to whole grain, whole wheat, rye and blending stuff."
I keep reading that as a recommendation and I don't understand why. For most home bakers, it would take months and months to bake enough bread to perfect it no matter what method. All those months of not eating more nutritious bread when that is the desired end result for many. Why not learn how to work with whole grains from the beginning? Is it that there is just fewer books and videos to learn from?
Are people afraid of something? Am I missing something? I'm not pointing fingers or trying to persuade people to make more whole grains, but I don't understand the discouragement of baking with whole grains from the beginning if that is what they prefer? I started baking with 100% whole grain loaves (Laurel's Kitchen Bread Book). I started baking before there were the videos and the web to learn better techniques and I made fine and tasty loaves. I've just learned more as I went along and most of those tricks that I see for white bread and sourdough bread recipes work for whole-grain recipes too.
Melissa, I guess it depends on your bread baking goals. If a baker wants to make whole grain breads only and nothing else, you might have a point. Success is important for those new to sourdough. SD in and of itself is challenging. Whole grains ramp up the difficulty quite a bite. Shouldn’t the piano student learn chopsticks before Mozart?
By the way - “A loaf for learning” in Laurel’s book taught me how to successfully bake my first whole wheat bread. Her book is very simplistic and that is exactly what I needed. That single bread was worth the price of the book.
I sure am glad to came back to TFL after your time off.
Danny
I've been baking cakes and cookies for years and I know from experience that swapping white flour with whole wheat is not a straight forward process and if you want to keep the main characteristics of your cake or cookie and still enjoy the benefits of whole wheat, you have to learn how and play with your recipes a lot.
I personally like white bread, so I'm in no hurry to start playing around with whole wheat, but I am planning on blending flours, maybe rye, whole wheat... but for now I'm happy with the progress I made using all white flour, and I want to repeat this a few time so it will not count as a fluke?
Very nice loaf! If it's a fluke, fluke away! :)
I'm going to try again today, and I'm feeling more than lucky this time :-)
Your autolyse comments (on other posts here) helped a lot, by the way.
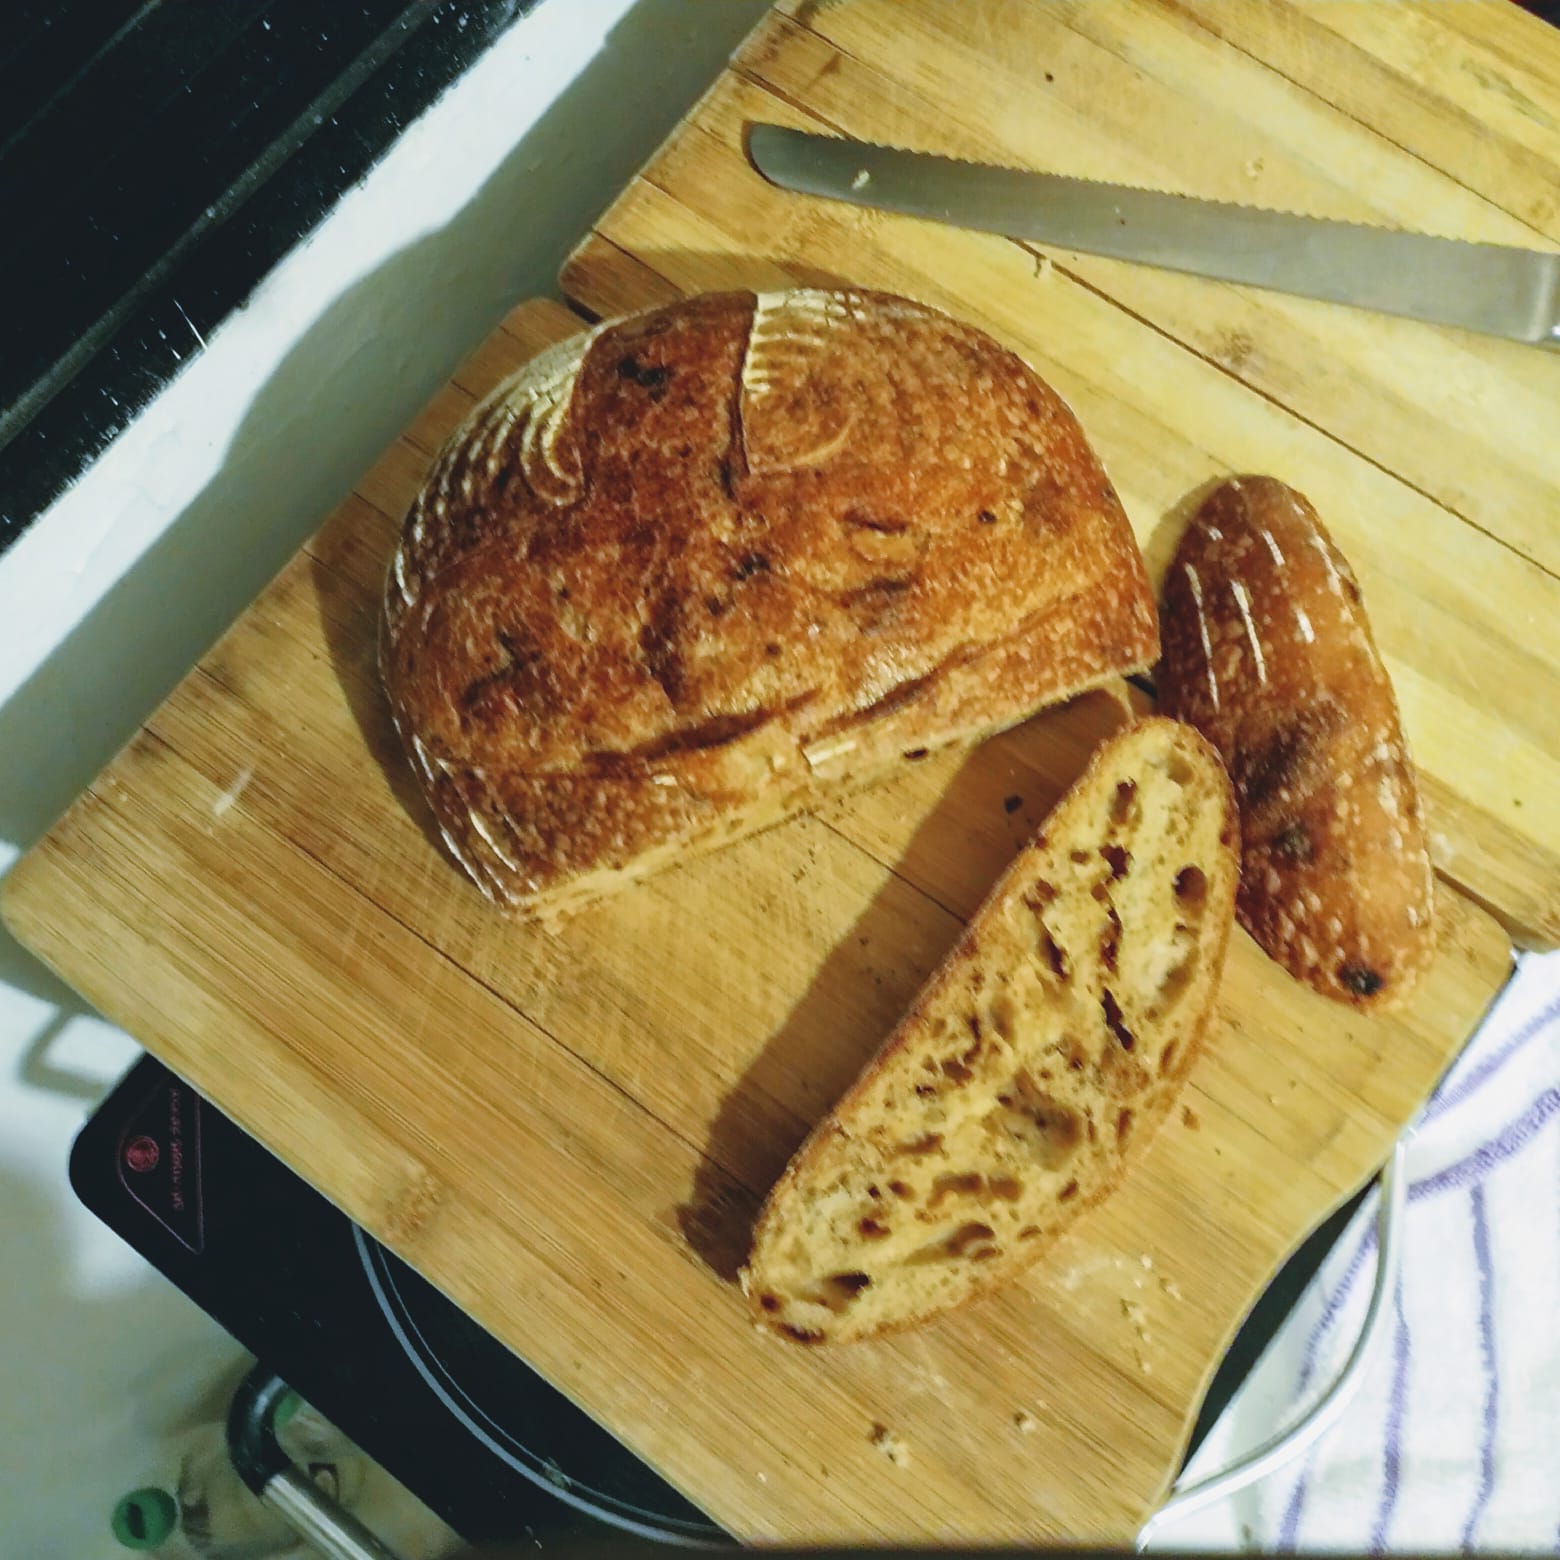
I'm trying the same formula again, making 2 loaves this time, and I want to do something interesting with one of them. I got some dried Chipotle, I thought it would be nice to add some chopped Chipotle to the dough, nothing fancy, just to add some smoky and spicy aroma and flavor to the bread, what do you think?
My thought is hydrating them, soaking them in warm water for a while, then chopping them really fine and adding them to the dough after the autolyse... my only concerns are:
Will this affect the dough?
Should I add it later in the process?
Will it affect the proofing and do I have to add more leaven?
but there are a few here who have. My attempt would be caution and slice dry (wear gloves and a mask) super thin threads and add them after the bulk rise and before shaping. Roll them in like when adding cinnamon or nuts and let the baking steam soften them up. That way they have less time and interaction with yeast should they want to interfere.
look up in the site: cheese and chipotle loaf
and see what pops up. :)
Some people added as you said, some added right after the autolyse, someone said you should hydrate them so they won't soak up some moisture from the dough... I'm already using only 65% hydration dough so I did what you suggested and added them just before the end of the BF but I did hydrate them for 10 minutes and then chopped them and mixed them in, I also saved some of the the red spicy water that's left, right before I close the dutch oven I spray some water and close the lid so I think I'll use the pepper water to add a little bit more of that smoky goodness...
Chipotles aren't that spicy, at least not for me, I like the flavor though, I hope they are going to be good to the yeast and everyone will get along.
If everything goes well I will post the results and the recipe here.
If not, I'll come here to cry about it and look for some comfort.
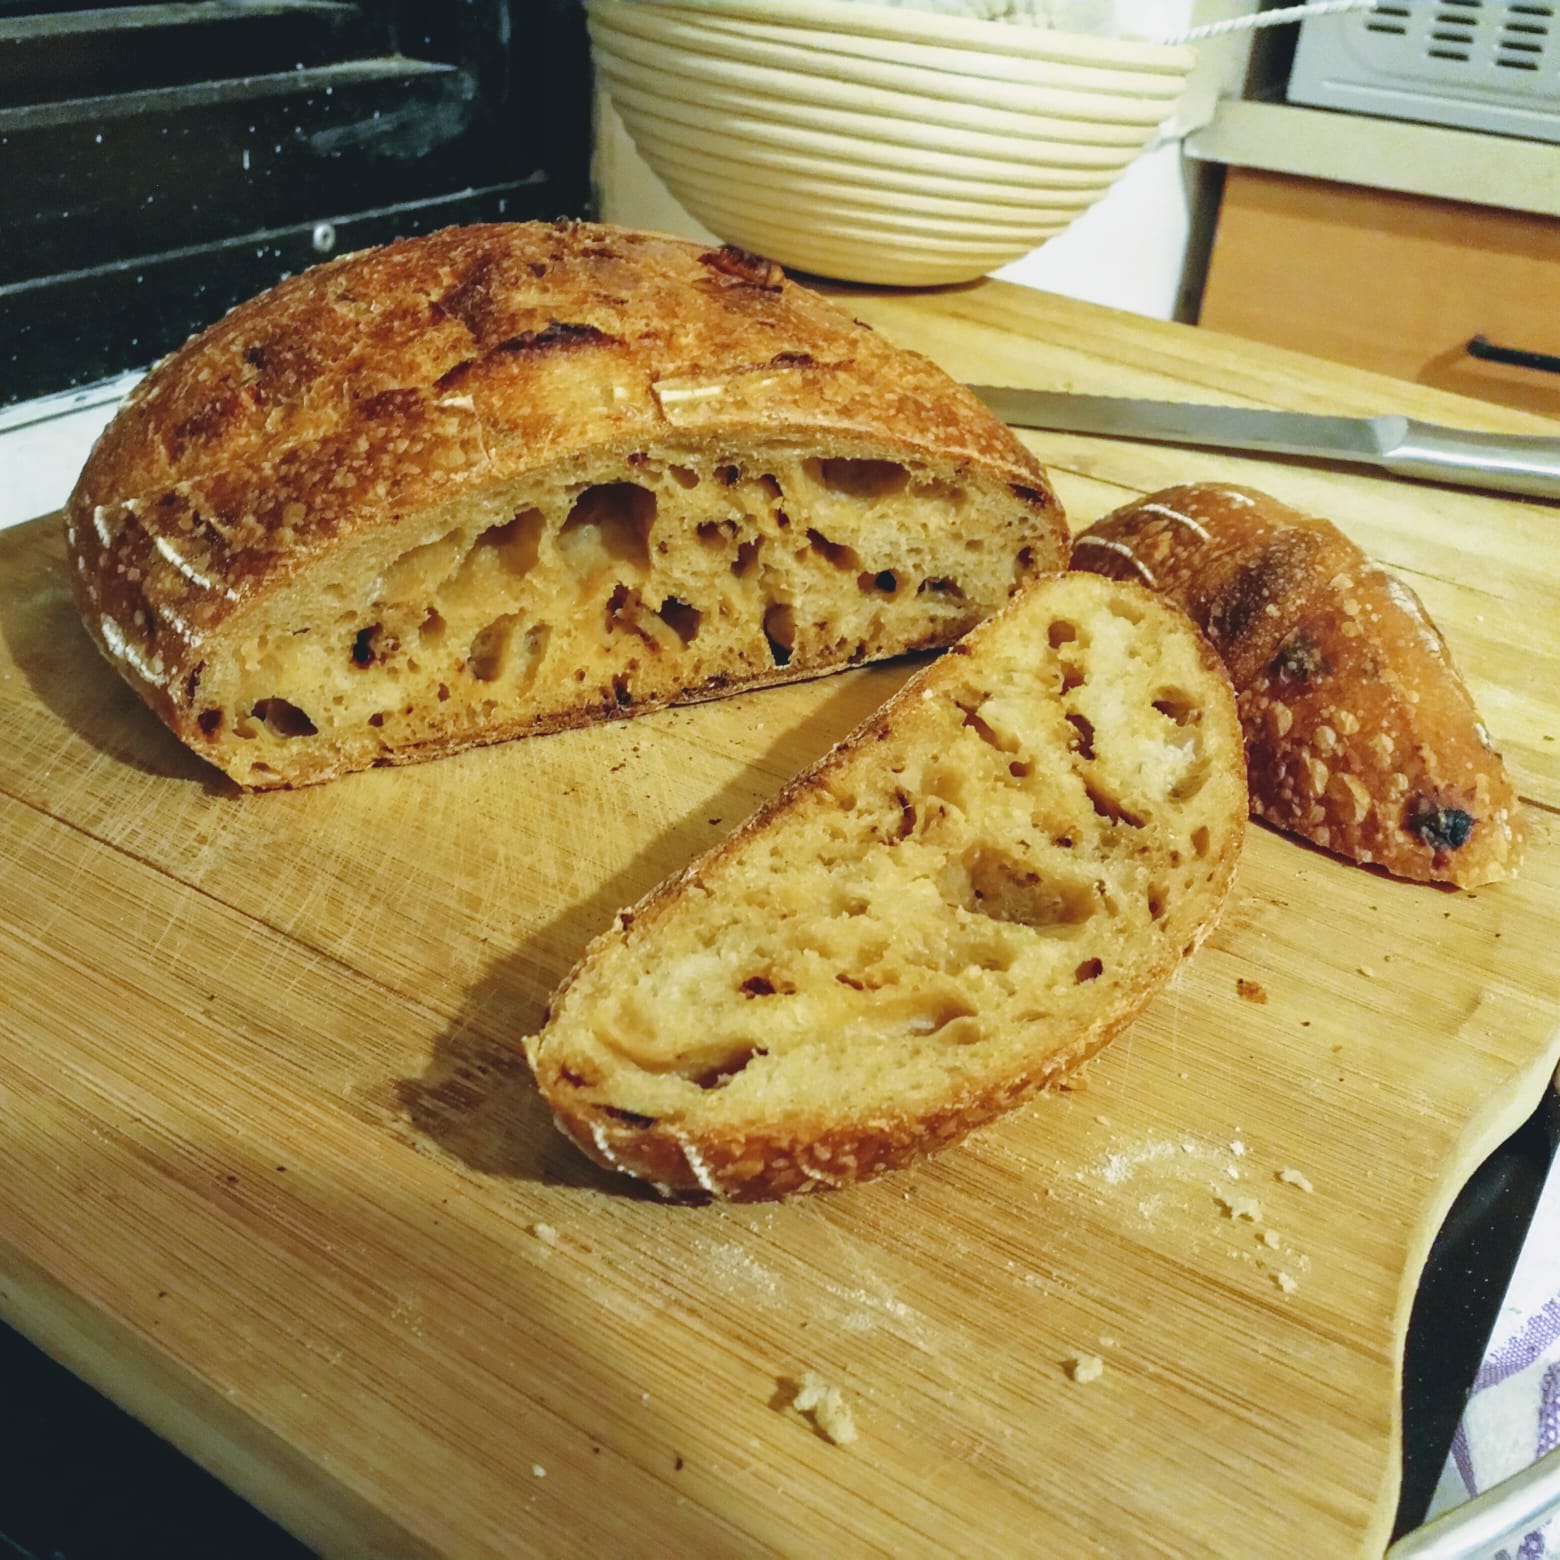
The left one is the regular white flour bread I made the last couple of times, the right one is the Chipotle Bread.
The Chipotle one didn't sping as much as the other one but it's a small difference, the crumb was wetter, I guess it's from the moisture of the peppers but it had a wonderful smoky aroma, it wasn't spicy because I didn't put a lot of peppers.
This is the regular one
And this is the pepper one, the light is different because it was already evening
WOW, Guy! Your improvements have been amazing. It is not often that a person improves as quickly as you have. You’re making this stuff look easy :D
Extremely impressive, you obviously have a natural talent for baking.
Benny
Seriously, I've been wondering around Facebook groups and couldn't find good answers, mainly because Facebook is not as organized as this Forum, I read a lot of posts here and you're guiding me along the way.
The loaves are a big hit at our family dinners ☺️
white wheat is often thought of as a standard and many discussions compare to the standard when making comparisons. Does that make sense? Knowing and having a feel for "the standard" helps in understanding the changes one makes away from "the standard" (as when substituting part or all of the flour for another grain.)
For instance, using whole wheat instead of refined sifted white flour in the dough. The dough will have special needs relating to the amount of whole wheat substituted. The greater the substitution the more important these needs become. Whole wheat may require a longer time to hydrate, to let harder particles in the flour such as fiber (bran) and protein molecules to soak up bonding with water before adding yeast and salt and other ingredients that compete for the available water in the recipe. It may also require more recipe water when compared to a recipe without whole wheat.
Generally, the higher the protein and/or fiber content, the more water the dough can hold and still come out decent bread for those who want to raise the amount of water in the dough. The lower limit will also be higher as whole wheat bread can easily bake out too dry or have a crumbly crumb.
I usually bake 1 or 2 loaves, this week, by public demand, I made 3, but I am so used to making 2 that I left one out of the fridge... Saw it this morning after 6 hours... Over proofed to the next century... I knocked it down and re-shaped it twice and baked it after 10 minutes...
I got a good spring but I don't know what to expect inside.
Pictures are coming soon...
Never reshaped an over proofed dough. Looking forward to seeing your images of that loaf.
But I didn't want to throw it away... I thought it's worth a try...
I saw a video about how to save an over proofed dough and gave it a shot ?
I’ve read about it many times, but never tried it. Looking forward to seeing your results.
What do you think?
It puffed up, got a good spring, the crust is good and the crumb is not too dense, the taste is great, a bit more tangy than the other loaves...
I think I could have given it maybe 20 minutes more to proof but it was getting hot in my kitchen so I popped it in the oven... Pictures:
I find an overproofed loaf needs a refolding/shaping or it bakes out flat and heavy. Important to let it rise but it will be a fast rise. It could have used a few more minutes final proof but I like the way it turned out. What differences do you note in mouth feel when eating?
i have to wonder, was it really overproofed or was it shaped too early? I've been noticing the crumb slowly changing and beginning to look like the dough could use more bulking time. What do you think?
I should have let it rise for maybe 10-15 more minutes, it was already pretty warm and as you said, the rise is fast after over proofing... you live and learn, you live and learn...
This loaf came from the same dough as 2 other loaves, when it comes to texture the crumb was a bit tougher than the others but not too much, it was still surprisingly light even though it wasn't as open.
The taste was a little bit "tangier" and had more sourness, which is something I actually liked.
The first loaves I backed (those disasters at the top of this post) had the same characteristics, and as I used less and less starter in my formula and shorter fermentation, the sourness became a little bit on the mild side.
Yes. Could have proofed more.
I thought after 6 hours (even though it was night) I have to move fast, I did a pre-shape and let it rest to see if there's anything alive and preheated the oven. It actually puffed up again vary fast so I shaped it again, placed in a basket and the moment my oven was hot enough I just popped it in, lid on... and now we pray...
I can't say I'm proud of the results, but I saved something and I kept this one for me, the other two came out way better and those are for my mom and sister, all in all it was a good baking session and I was also able to squeeze in a nice Lemon Drizzle cake, no sourdough here ?