I recently came across a very easy to follow recipe for a 50/50 wholewheat loaf and decided to give it a try. I've only ever made a wholewheat loaf with 20 to 25% wholewheat flour in case it was too dense but I was quite successful for a first attempt at a 50/50 ww.
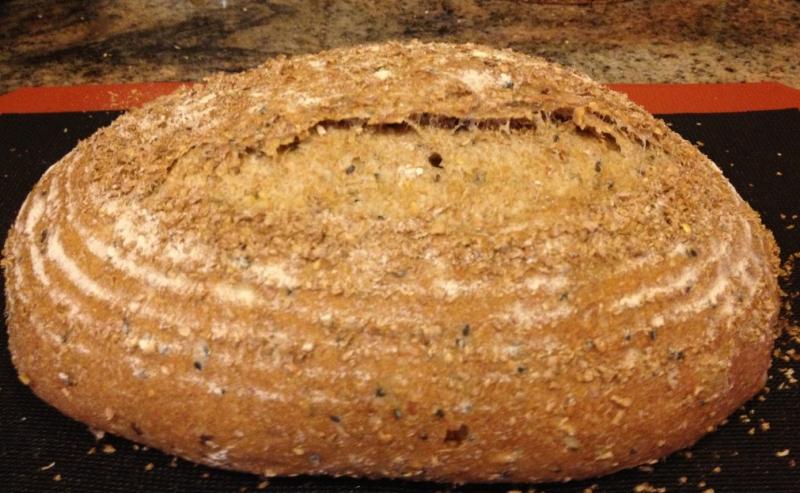
Using the same method, but reducing the qty of wholewheat flour to 40%, I tried 2nd proofing the dough in a cast iron pot and baked it @ 220C in a cold dutch oven, another method I learnt from TFL as someone demonstrated that the difference of baking in a pre-heated dutch oven vs. a cold dutch oven was minimal and decided to give this a try since I've always found it difficult to load the dough into a blazing hot cast iron pot. The result was simply amazing and I'm very pleased with the end result.
I'm not good enough a baker to warrant a personal blog but I would like to let other ppl who are new to TFL know how much I have benefitted from this wonderful website.
Judy
The bread looks very nice and is good enough to warrant a blog of its own :). TFL is truly wonderful!
Great Whole wheat bread, Judy! Now, you have enough confidence to increase % of wholewheat. Wheat Gluten is an amazing protein matrix that can lift itsef up and anything in it if you knead it well.
How was the the flavor?
-Khalid
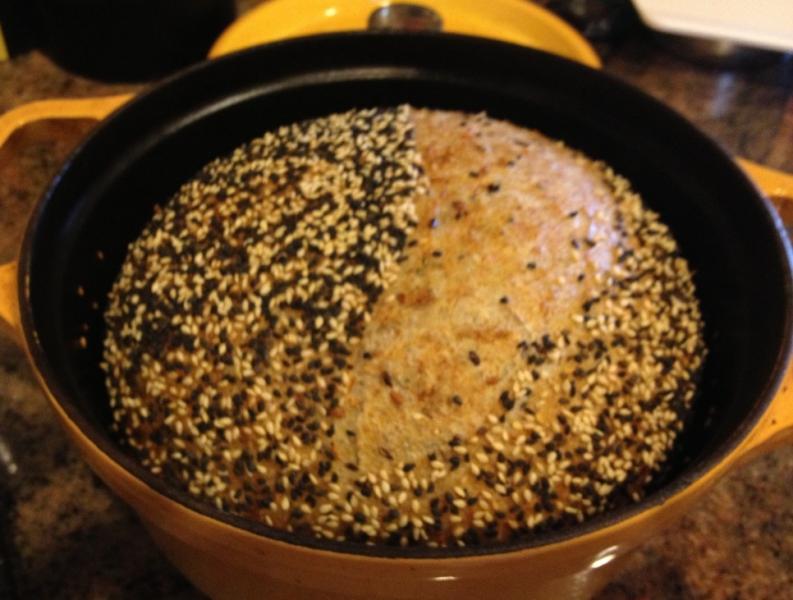
I added 1 tbsp of maple syrup as advised to the water to autolyse the ww flour overnight but it needed a bit more salt. I increased the salt to 8 grms in my 40% and this one def. tasted better, maybe because I used more sesame for the topping instead of using wheat bran as I did for the 50/50.
I am lucky in that I can get a small amt of white starter from my tutor who owns a bakery producing breads made with a natural levain which is not very common in HK and I have started to experiment with recipes using a starter instead of IDY.
Judy
I made a fig (previously soaked in a bit of brandy) and walnut sandwich loaf using IDY but the dough was a little too short for the loaf pan. It expanded beautifully lengthwise during the second proof although the upward rise was lost in the process and ended up with a midget sandwich loaf that resembles more like a pound cake.
Wouldn't it be nice if someone would think of producing a loaf pan with a sliding piece of metal at one end so that one can easily adjust the size of the pan for odd sized doughs?
Judy
That loaf of bread looks awesome and delish... pound cake size or not, it is lovely!
Happy Baking,
Diane
deserves a blog of its own not to mention the rest of your breads. Sourdough will get you even deeper into dough - not an entirely bad thing:-)
Nice baking!
compliments and encouraging words. I would love to learn more about using a starter but when I look at other TFLers' awesome breads and recipes, I can't quite understand how to interpret the formula so right now, I'm just using a bit of starter in my dough as a yeast replacement. When I first started bread baking I would only use IDY and then I learned to make my own yeast water to bake with which was quite successful but somehow the taste and texture was not quite satisfactory and I gave up on my yeast water.
I have since found a baker who's very generous with his starter (he has a bakery so he bakes breads everyday and has plenty of discards that he can give away.)
I'm not very knowledgeable when it comes to working with SD so I'm just experimenting with my starter by using 50 grms or so in my dough and reducing the required amt of water and flour called for in the normal yeasted recipe so as to keep the % correct. I'm not even sure if I'm doing the right thing. Is this how one would use a starter. I've seen ppl use a lot more in their starter builds but since I don't quite understand the formula, I've not been too adventurous with my baking. I mostly do the hard stuff at my baker/tutor's workshop since he has professional ovens with built in steam and my breads come out much nicer.
Judy
another wholewheat using the same method above and added raisin and walnuts this time.
The crust doesn't look too good but the crumbs were soft and not as gummy as my first bake. However, there appears to be an uneven distribution of flour/starter as I notice some white patches here and there but otherwise the taste and texture is fine.
When using a starter, does one just add it to the dough or should it be dissolved in the water before adding to the flour? Thanks.
Judy
but I prefer to dissolve the starter into the liquids. If the starter is firm, tearing and cutting into little pieces with a scissors is also a good way to break it up. Kneading works it in but if you are not kneading, then into the liquids to soak and thin so it gets distributed well.
I would bake the loaf longer, so much flavor is in a browned crust and I'm afraid you are missing out. Give it an extra 5 minutes when you think it is done. Raisins and fruit that come to the surface have a tendency to burn so I either pull them off and tuck them deep into the bottom of the loaf when shaping or push them in deep so the dough closes around them.
Crumb looks lovely!
makes a wonderful job when you have to dissolve a firm starter in water.
Nice bread, it has the usual lovely color that nuts give.
I read your comments again and realised that I had misunderstood your comment. I thought I should dissolve the 100% levain in water but cut up the firm pieces and add to the dough straight. I now realise that I should cut up into small pcs and also dissolve in water. Duh.... :(
Judy
its been a long time since we last spoke on TFL! I use a 100% hydration starter, it's the only way I know how to feed/maintain it without making mistakes on the calculation :) I do give it a stir in the water and it should be mixed well enough in the mixer, the problem may well be a the flour that I use when I degas the dough after bulk fermentation. This was baked in a cold dutch oven at 210C for 25 mins (the oven was at 220 but lost the heat by the time I loaded the pot) before removing the lid for further browning. I'll remember to leave it covered for longer next time, considering that it was baked in a cold pot and not at a very high temp.
Judy
And here's my 20% rye with caraway seeds
The shape is somewhat lopsided as it stuck to one side when I dropped my dough from the banneton. I baked this on max heat throughout the bake (around 230/240 C, unfortunately this is as high as my oven can go) again in a cold DO but with a pre-heated pizza stone on the lower rack. I find that the oven temp is more stable with a heated stone and I don't lose the heat when I open the oven door to load the bread. My crust improved slightly this time but crumb structure still needs improvement.
and the crumb structure...
What do you mean the crumb needs improvement? It looks Great!
It is a Great looking loaf!
You are getting bolder with your baking too, getting your crusts browner and more flavorful. How do you like them?
bread almost 2 weeks after the bake. That's how much I'm enjoying this. :)
Judy
I'm quite happy with the outcome of this boule, considering I've not work worked with rye for a long time. It's a difficult flour to work with and I remember I had to throw out the whole dough when I first started experimenting with rye, and that was before I knew about TFL. The stretch and fold method works wonders! I'll do this again with a bit more caraway seeds next time. This was just a recipe that I got off from another TFLer who used malt powder but since I didn't have any, I just replaced it with a bit of caraway seeds. :)
malt works a lot like sugar, using brown sugar would be closer. Caraway is a spice, no sugar or enzymes involved. But I also like caraway. Like those little bursts of flavour.
The malt powder that I used in the pst resembles cocoa powder and is used in a small qty for flavour and colour. I also found out that it makes the dough extremely sticky to work with (similar to using malt extract/molasses/honey) Would this malt powder be the same as diastatic malt (I've no idea what this is but I see this popping up here and there in TFL posts and wondered if its the same thing).
Judy
I have not used a dark malt powder. Others may know more. I have used light colored diastatic malt powder/flour that I have made myself. It is light in color because it is kept cool during the entire soaking, sprouting and drying process. Should it get too warm, it looses its active diastase enzyme and is no longer diastatic.
If I want to use it as malt without the enzyme, all I have to do is brown some in a pan, cool and use as a sweetener, it would not have a chain effect on the dough starch, which left too long without baking, leads to a gummy crumb. (one way to test your powder, work a half teaspoon (an obvious overdose of active enzyme) into a single portion of dough and bake it next to one containing a extra half teaspoon of sugar. Compare.)
That leads me to be suspicious about any malt product that is dark in color, why is it dark? A temperature change like browning or caramelizing would raise the temperature on the malt making it no longer "active." As in the case of molasses and dark syrups. Dark powder makes me think the barley sprouts were first dry roasted before making into a powder. More investigation is needed as to why the powder is dark.
I like to use active diastatic malt (sprouted barley flour with active diastase enzymes) in white wheat breads, particularly baguettes and kaiser rolls made with instant yeast. I keep it in my freezer.
and threw out the rest In HK, some local bakers use a brown liquid which looks like coffee essence, called "black water" and I'm told its actually like thinned down molasses which they add to the dough to give it a darker colour and usually used in raisin breads for a nice brown colour. I think the malt powder could be the same thing, i.e. malt extract in powder form. I'm not using this again, ever.
I took some of my storage starter and tried to make a ww starter last nite. After three feedings at 1:2:2, starting out with 10 grms of white starter and used a mix of 10gr ww/10 gr bf with 20 grms water. 2nd feed was at 20 grm with 15 ww/25bf using 20 grm f I gave it a total of 3 feedings and it more then doubled after 4 hrs, however it failed the float test. It wasn't very bubbly either, just a thick paste with gluten strands. Is this normal for ww flour? However, while I was typing, I noticed that my ww starter has started to rise again after failing the float test, a proof that it still has some energy to go further. It's not bubbly on the top but I can see very tiniy bubble from the sides.
I also tested the strength of my white starter, same ratio, same amt. @ 10 grms first feeding It managed to triple in 5 hrs and meanwhile I'm giving it another feed at room temp to see if I can get it to become more bubbly with more prounced gluten strands. The discard from my first feed floated, this is the same white starter that I've been using in all of the breads shown above.
I fed this again at 6:30 p.m. and here's what it looks like after 3 hrs, the markings on the left shows the first feed which tripled in 5 hrs. and the 2nd feed doubled in 3 hrs, same pace as first feed but still not as bubbly as it should be. Does this look right?
Thanks
Judy
When trying to calculate a recipe that calls for 75% hydration, should this include the water used in the 100% hydration starter or not?
E.G. if 100 grms of starter is being used with 1000 grm flour, should one be using a total of 750 grm water or 750grm plus 50 grms water in starter which then becomes 80% or 750 grms water minus 50 grms of water from starter? Many thanks for your advice.
Judy
Yes, starter is part of the calculation. A 100g of 100% hydration starter would be 50g of the total flour and 50g of total water. 950g flour would be in the rest of the recipe along with 700g water. That is if the total flour used is 1000g.
OR
If you were adding 100g starter to 1000g flour, the total flour weight would be 1050 and the water total would be 787.5g ( 50g of each for the starter.) So 737.5g water would be added to the one kilo of flour along with the starter.
Mini
I
I had omitted to take the flour into consideration. I've been most ly working with IDY recipes and simply tweak my recipes for a smaller/larger dough using bakers % for fairly straightforward recipes without the use of a starter. However with the introduction of my starter (approx 50-60 grms ) I'm a little cautious and I hold back a small amt of flour (which I use when I remove the dough from the mixing bowl for pre-shape/dividing and water to wet my hands when doing my s&f as I find my dough quite sticky when used with a starter.
Thanks for the explanation, I have a lot to learn....
Looking forward to my next weekend bake...
Judy
to measure everything out first and then take what you need to build the starter from the measured out ingredients. But do keep in mind that sometimes you may need less water than the instant yeast recipe because sourdoughs tend to get wetter as they ferment. Don't know if you noticed this yet.
It may be a tablespoon or two and you may find that some recipes won't adapt well. Often the temperatures are changed for a longer fermenting time or a retardation is added. This further softens the dough.
Better to experiment using a little less water than to hold back the flour. All other calculations are based on the flour. If the flour amount changes, so does the salt and other weights.
Water is the easiest ingredient to change up or down. If you find the dough too dry, switch to work with lightly wet hands instead of flour. It takes a few loaves to get used to the idea but using wet hands does add another tool to dough handling.
this time I increased to 25% rye with caraway seeds with added toasted sunflower and pumpkin seeds for a different flavour following the same recipe but a much longer bulk fermentation period. I botched the hydration % using less water than necessary. I was expecting a very dense and dry crumb but thankfully it turned out better than expected although with less rise than the previous version.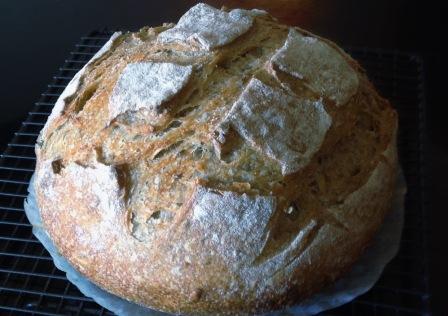
Judy
After reading all the advice offered by the TFL bread folks, today I finally managed to produce a 35% wholewheat boule that doesn't taste sour and one that is also found to be more than acceptable by my helper. Taste is great but the bread was badly distorted while transferring my dough from a banneton to the DO resulting in some areas being squashed against the interior wall of the DO and no being able to lie flat on the bottom. Paper thin crusts that may be a sign of over-proofing?
Back to the kneading board to practice more on my shaping and scoring skills.
Judy
After working with wholegrain and seeded breads for the past couple of weeks, its time I revisited some old forgotten recipes and do a sandwich loaf with my left over starter and a bit yeast to refresh my basic kneading and shaping skills.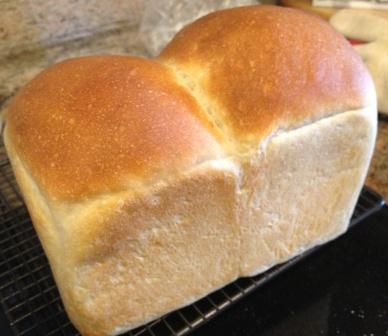
Still can't get the crust right
Judy
Same formula as the lavender loaf above but added 40 grms of black and white sesame just to give it a different taste. Crust improved slightly this time :) I think I didn't roll the dough tight enough and there were air bubbles on the surface.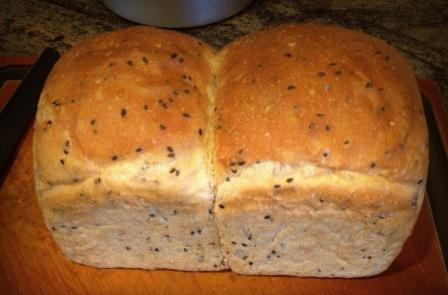
a slight improvement from the last loaf but less rise this time.
Hi Judy,
Looks like a really nice loaf.
Ordinarily, those gas pockets close to the surface would indicate overproof, especially if they are visible on the dough surface prior to baking.
I would be looking for some degree of oven spring with this type of loaf, and would seek to get the bread into the oven sooner to try to achieve that, especially if you have some fresh yeast in the final dough.
Best wishes
Andy
I've noticed that everytime I try to roll it tightly into a ball, using the technique shown by David Snyder, i.e. cupping the dough and gently dragging it towards myself, air pockets rise to the surface, I give it a poke but as I let the dough proof, the pockets get bigger. I thought I did not roll it tight enough. The dough came up to just a few cms below the rim and that was the time I load the bread pan in the oven. I did notice that there was not a lot of oven spring this time. I've made similar breads but using a professional steam injection oven monitored by my baker/tutor. I just can't replicate this at home with my oven or it could just be my bad timing and shaping skills.
Better eh? :)
Cherers,
Judy
Hi Judy,
Possibly you have a shaping issue, although I've always believed that poor hand-moulding tends to be over-played when it comes to fault diagnosis in a finished loaf. You might want to take a look at the video I put together below:
http://www.youtube.com/watch?v=Rc_U0w3Xreg
I'm wondering then, if you have gas pockets forming during moulding if you haven't extended the bulk period for too long?
It's quite easy to replicate steam in the home oven. The difficulty is keeping the steam in the oven, as the door seals on a home oven are very poor compared to commercial ovens.
Nice fluffy bread!
Best wishes
Andy
Is this how it should look, like a fermented dough ball with air bubbles at the bottom? When is this considered ripe and ready to be used? Does it need to rise to double or more? This was out in room temp for 2 hrs after mixing and then back in the fridge. I think it continued to rise a little even in the cold. I would think it may continue to rise further if I brought it back to room temp so I'm not sure if I should keep it back in the fridge until I'm ready to bake with it. I have a recipe that uses a 60% recipe that I could experiment with over the weekend. Thank you for the advice.
Judy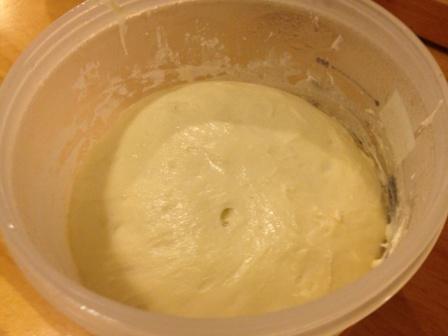
Hi Judy,
If you still have activity in the fridge that is a sign of a good strong fermentation. I look for the dough to be fully-peaked, so it can start to collapse easily when you work with it, but it hasn't actually collapsed of its own accord. It should smell good, with sweeter overtones which are stronger than the tangy hint of sourness.
Are you about to use this leaven now?
Andy
or sooner if I can. I'd like to use the starter at it's optimum best.
Judy
Ok Judy,
well you will need to feed it a few times later in the week to bring it back to good state for use.
Good luck
Andy
I've measured out all the ingredients for the bake this evening and will work on it tomorrow.
Just to be sure I should use this before it deflates? It showed signs of deflation when I woke up this morning (that was the conversion from 100% to 60% but used for the next feeding,
I thought at 60% I could feed it a little less often? I'll feed it once more tomorrow after my bake and lower the starter amt. like 50:50:30.
Best wishes,
Judy
Hi Judy,
employ minimal mixing to make the leaven, and allow the dough to strengthen through that last fermentation. The strength in the dough means it will hold its shape for a longer time, so long as it remains undisturbed. For all that, your leaven should be ripe, but I don't like it to have gone too far.
I'm not sure how much more help I can give. The leaven looks good, so I'm optimistic you know enough now and your plan will work.
Best wishes
Andy
Here's my Hazelnut and Bing Cherry boule (didn't have prunes readily available and just settled for cherries. I found this quite difficult to work with as the levain was extremely sticky and difficult to incorporate evenly into the dough. I first mixed with a paddle and then decided to turn and fold the dough in the mixing bowl. Baked in the DO for 30 mins at 240C for 30 mins, removed lid and continued baking until brown and here's the final result: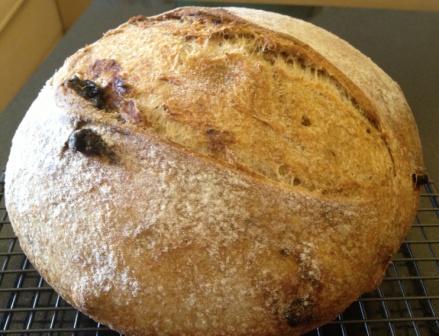
Whilst it looks fine on the exterior, there are signs of white dough that has not been mixed thoroughly. The crust was hard and crisp when it came out of the oven but after leaving it to cool, it became soft and wrinkly. I just can't get the crust right!
Judy
and your learning curve is steep! A thick sticky levain, have you tried cutting it up with a wet scissors?
I got some prunes here that are very dried out, too dried out to just eat straight. I often add the soaked fruit when I shape the loaf especially when the fruit are very soft and tend to mush with kneading and mixing. This also helps me keep the fruit inside the loaf protected from burning near the surface. They are sweeter and brown more readily than the dough. If I add a lot of fruit, I tend to bake at a lower temperature and longer to make up for the difference.
Hi Judy,
firstly, to echo and endorse what Mini says; great job.
Regarding mixing I'll offer 2 lines of thought and advice.
The first is general: flour/water paste is the original glue. So to some extent, bakers have to learn to embrace stickiness. If you want to keep that relationship as distant as possible, then you need to revert to using liquid levain.
I'll assume you are at least considering continuing your experiment with stiff levain and offer you tips for dough mixing - assuming you are mixing by hand. I use a mixer, but I also have several kilos of dough to mix for each batch. If you are using a mixer, then use the dough hook only, if you possibly can. If you have a Kitchen Aid with those dreadful "J" hooks, then you have my sympathies! But if the hook isn't at least picking up all the materials and making a semblence of dough, then I venture to suggest your mix is too wet. Once the dough is formed, then srape it down the bowl and off the hook as necessary. Moving from paddle to hook is a pain, and suggests either your dough is mixing incorrectly, or, your machine is pants: you choose which diagnosis applies.
For easier hand-mixing [and I prefer to mix by hand for small quantities!]:
Method One assumes no autolyse: weigh your water first, then weigh your leaven straight into the water. Weigh your flour into that. Using a plastic scraper begin mixing by scraping down the sides of the bowl to encourage the flour and water to combine reasonably well without getting your hands wet and covered in sticky flour. Add the salt and bring the mass together as a dough. From there tip out the dough onto the bench and use whatever method you are comfortable with to develop the dough. Bertinet's method is excellent for these types of loaves.
Method Two assumes you are using autolyse. Lightly oil your work surface and stretch out your autolyse on the bench. Tip your leaven on top of that, then fold the leaven into the autolyse using lightly oiled hands if necessary. Combining these is probably the most tricky step, and there will be stickiness along the way. The sooner you add the salt, the quicker the stickiness will be lessened as the sodium ions will toughen the gluten as it develops. So, add the salt sooner rather than later. Try Mini's advice of wet scissors. Try using a metal [Scotch] cutter to cut through the dough. That way you are not stretching the gluten so much, so the dough will develop more gently and not get too sticky. I recommend you add fruit and nuts after the dough has been mixed and allowed some period of rest - 15 minutes to one hour, perhaps. Again use a metal cutter; see my YouTube video here: http://www.youtube.com/watch?v=bSif2A1-7ys
If your leaven is very active, then you could also consider using some of the salt in the formula within the leaven. This will control your fermentation, and it will also make the leaven less sticky.
Best wishes
Andy
Thank you Andy for your advice and tips on kneading. I'm ok with the stickiness, in fact I find it picks up the flour from the sides of the bowl faster and cleaner, just take some getting used to as you know it's my first time with a stiff starter. I usually do an autolyse and only recently started using the K paddle to mix. I've always used the dough hook in the past until someone suggested that it works better with a paddle to ensure you get the slapping sound of the dough against the bowl which I seldom get with the dough hook. I use a Kenwood Chef, I seldom go past speed 1 and at most a little over 1 when kneading. I'm not sure if I can go higher as KA uses 4 but different machines have different calibrations and this may not apply to the Kenwood.
For small amts of dough, I do agree that it's better by hand as the hook doesn't always pick up the dough and I end up with a longer kneading time. I'm familiar with the Richard Bertinet method too, I do that often when I'm working with my baker/ tutor but at home I tend to rely on the machine to mix until its less messy. I then move on to kneading by hand for a bit so that my dough doesn't get too hot and back in the mixer again for another spin until dough is ready.
Best wishes,
Judy
Always best to mix slowly Judy,
Kenwood machine has a good dough hook if I remember rightly. Sorry, but I think you've been given poor advice regarding using the paddle. Maybe the person who gave you that advice has a KitchenAid machine?The hook takes care of the dough development if you have everything correct. You should achieve that slapping sound with the hook.
The machine should mix your dough better and quicker, so I cannot see the need to use an element of handmixing as well. Maybe you are not getting the best from your machine? Can you get advice on the ground, so to speak? If you have a bakery tutor, get them to watch you using the machine and ask how it might be used more effectively.
Best wishes
Andy
I gave her the advice to use first the paddle and then the hook. I find that -especially with difficult flours that come together slowly- the paddle accelerates the development of the dough, the mass forms much quicker because the paddle has a larger base and permits the dough to beat quicker and more efficiently against the bowl. A refinement with the hook is almost always necessary, of course.
I have a Kenwood Kmix that uses the same paddle as Chef line, if I remember correctly.
Hi Nico,
that's fine, but Judy's original comment implied she used the paddle, then finished by hand, not using the hook at all.
You know better than everyone on this site my true opinions about non commercial mixers!
Take good care
Andy
Good morning Mini O, if you're back in Austria :) Considering I abused the starter and the dough terribly throughout the whole baking process. I'm relieved that it turned out ok in the end. I was expecting to see a very dense gummy loaf. I did try to cut the starter but just using dry scissors, but they kept sticking together so I just used my hands and tore the pieces apart. I'll know to use wet scissors next time :) One important thing I've learnt is to save some of the water for the dough to loosen the bits of levain that are stuck to the sides and the bottom of the container. I soaked my cherries in a capful of Grand Marnier as they too have dried out in the fridge. :) I'd like to make this again next time with apricots or figs and will add them in when I shape rather than kneading them in.
The bread is def. not sour except for a hint of sourness from the rye and the cherries :)
Judy
Hi Judy,
These are essential to my minimum bakers' kit:
http://www.google.co.uk/search?gs_rn=17&gs_ri=psy-ab&suggest=p&cp=12&gs_id=1a&xhr=t&q=plastic+dough+scraper&bav=on.2,or.r_qf.&bvm=bv.47883778,d.d2k&biw=1153&bih=677&um=1&ie=UTF-8&hl=en&tbm=isch&source=og&sa=N&tab=wi&ei=9iTAUeOJA-TS0QXLwoDICg#facrc=_&imgrc=mebZgbgEKvrTmM%3A%3Br2x1c-Xy0mTsiM%3Bhttp%253A%252F%252Fsignorbiscotti.files.wordpress.com%252F2012%252F03%252Fdough-scraper-21.jpg%3Bhttp%253A%252F%252Fsignorbiscotti.wordpress.com%252F2012%252F03%252F23%252Fplastic-scraper%252F%3B1024%3B910
Andy
I like to use the large trapezoid cutter/scraper best. Use two together to transfer a sticky dough and to help lift the dough off the table when hand kneadng.
Judy
Wish I had seen this earlier, with pictures of a 60% starter and all...
http://www.thefreshloaf.com/node/2390/firm-starter-glezer-recipe
Great thread Judy
A
and I like what I've read so far. I've only gone through one fifth of the whole thread. I'm switching to firm!!
Judy
Using what's left from my levain from the last bake, I managed to produce a good loaf with much improved bread crumbs compared with the last one.
The flavour was mild and the crust was nice and chewy, not leathery. So far so good... Special thanks to Andy, Mini O, dabrownman, Phaz, and RobynNZ etc. etc. who all jumped in to help and of course, not forgetting ZolaBlue who first posted Maggie Glezer's instructions on maintaing and feeding a starter/levain.
As a sidenote, I cheated with two very small pinches of IDY in the flour. :)
Judy