While I enjoy a variety of breads, the San Joaquin Sourdough remains my “go to” bread. It's easy to fit into a busy schedule. It uses few ingredients. It always tastes delicious. It's wonderful freshly baked but also makes great toast, French toast, garlic bread and croutons for salads or onion soup. It is almost as good after being frozen as fresh. What's not to like?

I first developed this formula about 3 years ago. Since then, I've tweaked the formula and methods in many ways. I know many TFL members have made this bread and enjoyed it. So, I thought an update on my current recipe might be of interest.
To summarize the changes I've made in the past 6 months:
I substituted 25 g of whole wheat flour for an equal amount of the rye flour in the original formula. The difference in flavor is subtle, but I like it better.
I adopted the oven steaming method for home ovens we were taught in the SFBI Artisan I and II workshops.
SFBI Steaming method
I switched from using a parchment paper couche to a baker's linen couche. (Highly recommended! Here is my source for linen: San Francisco Baking Institute)
Most recently, after trying several different methods, I've settled on the method of pre-shaping and shaping bâtards taught in the King Arthur Flour instructional video. (See: Hamelman technique videos The relevant instructions are in the fourth video, starting at about 7:00 minutes.) The SJSD dough is very extensible. This method forms a tighter loaf which is shorter and thicker than that produced with the method I had been using.
Ingredients |
|
Active starter (100% hydration) | 150 g |
All Purpose flour (11.7% protein) | 450 g |
BRM Dark Rye flour | 25 g |
Whole Wheat flour | 25 g |
Water | 360 g |
Sea Salt | 10 g |
Procedures
Mixing
In a large bowl, mix the active starter with the water to dissolve it. Add the flours and stir to form a shaggy mass. Cover tightly and let rest (autolyse) for 20-60 minutes.
Sprinkle the salt over the dough. Using a plastic scraper or silicon spatula, stretch and fold the dough 30 times, rotating the bowl 1/5 turn between each stroke. Cover tightly. Repeat this stretch and fold procedure 3 times more at 30 minute intervals.
Fermentation
After the last series of stretches and folds, scape the dough into a lightly oiled 2 quart/2 liter container and cover tightly. (I use a 2 quart glass measuring pitcher with a tightly fitting plastic lid manufactured by Anchor Glass.) Ferment at room temperature for 90 minutes with a stretch and fold after 45 and 90 minutes, then return the dough to the container and place it in the refrigerator and leave it there for 21 hours.
Dividing and Shaping
Take the dough out of the refrigerator and scrape it gently onto a lightly floured work surface. Gently pat it into a rectangle. Divide the dough into two equal pieces.
To pre-shape for a bâtard, I now form a ball rather than a log. Place each piece of dough smooth side down. Pat into a rough circle, degassing the dough gently in the process. Bring the far edge to the middle and seal the seam. Then go around the dough, bringing about 1/5 of the dough to the middle and sealing it. Repeat until you have brought the entire circumference of the piece to the middle. Turn the piece over, and shape as a boule. Turn each ball seam side up onto a lightly floured part of your board.
Cover the dough with plastic wrap and/or a kitchen towel and let it rest for about 60 minutes. (The time will depend on ambient temperature and how active your starter is. The dough should have risen slightly, but not much.)
To shape a bâtard, I now favor the method portrayed in the King Arthur Flour instructional video. I encourage you to watch the video, but here is a verbal description of the method:
For each piece of dough, place it in front of you on an un-floured board.
Hold down the near side and stretch the far side of the piece into a rough rectangle about 8 inches front to back.
Now, fold the far end two thirds of the way to the near end and seal the seam with the heel of your hand.
Take each of the far corners of the piece and fold them to the middle of the near side of your first fold. Seal the seams.
Now, the far end of the dough piece should be roughly triangular with the apex pointing away from you. Grasp the apex of the triangle and bring it all the way to the near edge of the dough piece. Seal the resulting seam along the entire width of the loaf.
Turn the loaf seam side up and pinch the seam closed, if there are any gaps.
Turn the loaf seam side down. Then, with the palms of both hands resting softly on the loaf, roll it back and forth to shape a bâtard. Start with both hands in the middle of the loaf and move them outward as you roll the loaf, slightly increasing the pressure as you move outward, so the bâtard ends up with the middle highest and the ends pointed .
Preheating the oven
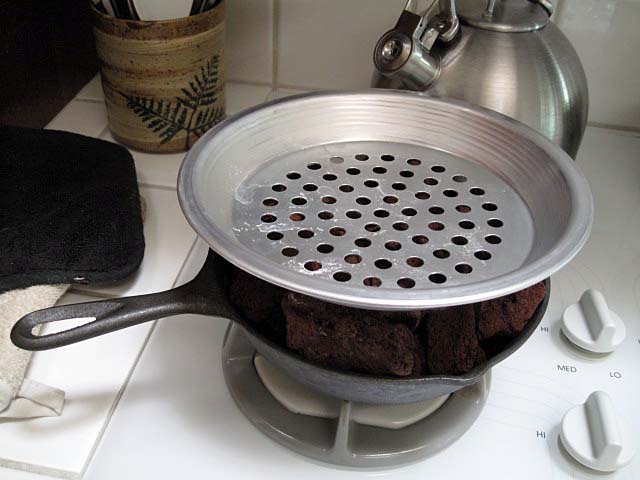
One hour before baking, place a baking stone on the middle rack and put your steaming apparatus of choice in place. (I currently use a 7 inch cast iron skillet filled with lava rocks.) Heat the oven to 500F.
Proofing
After shaping the loaves, transfer them to a linen couche, seam side up. Cover the loaves with a fold of the linen. Proof until the loaves have expanded to about 1-1/2 times their original size. (30-45 minutes) Test readiness for baking using “the poke test.” Do not over-proof, if you want good oven-spring and bloom!
Baking
Pre-steam the oven, if desired.
Transfer the loaves to a peel. (Remember you proofed them seam side up. If using a transfer peel, turn the loaves over on the couch before rolling them onto the transfer peel. That way, the loaves will be seam side down on the peel.) Score the loaves. (For a bâtard, hold the blade at about a 30 degree angle to the surface of the loaf. Make one swift end-to-end cut, about 1/2 inch deep.)
Transfer the loaves to the baking stone. Steam the oven. (I place a perforated pie tin with about 12 ice cubes in it on top of the pre-heated lava rocks.) Turn the oven down to 460F.
After 12-15 minutes, remove your steaming apparatus from the oven. Rotate the loaf 180 degrees, if it is browning unevenly. Close the oven door. (If you have a convection oven, switch to convection bake, and turn the temperature down to 435ºF.)
Bake for another 12-15 minutes, then remove the loaf and place on a cooling rack. Check for doneness. (Nice crust color. Internal temperature of at least 205F. Hollow sound when you thump the bottom of the loaf.) If necessary, return to loaf to the oven to bake longer.
When the loaves are done, turn off the oven but leave the loaves on the baking stone with the oven door ajar for another 7 minutes to dry the crust.
Cooling
Cool on a rack for two hours before slicing.
Enjoy!
David
Submitted to YeastSpotting
- dmsnyder's Blog
- Log in or register to post comments
Thanks for the update.
I'm so glad that bread re-heats well.
Glenn
I don't believe I said anything about "re-heating." The best way to thaw the SJSD is to unwrap it and let it sit on the counter until thawed. I'm not sure this would be the best way in a very humid climate, but it would probably be true for you.
David
I like to toss a thawed loaf in the oven for 10 minutes to crisp the crust. Doesn't seem right to slice hearth bread without crust shards flying off the knife.
Glenn
You're correct. The SJSD dough is relatively high hydration. It is harder to handle than the dough in the video, but if you are comfortable with judicious flour dusting and bench knife use, standard shaping techniques work well. This is not ciabatta dough.
Two things to keep in mind: The stretch and folds in the bowl and the additional stretch and fold on the board and tight pre-shaping all develop really good dough strength. The other point is that you do your pre-shaping with dough right out of the fridge. This makes it less sticky than the same dough at room temperature.
Hope this helps.
David
I gather you'll be baking it again. I'm certainly an advocate for keeping ones spouse happy with bread.
I'm looking forward to seeing your photos. Until then, Happy Baking!
David
Hi David,
Do you normally pre-shape tightly? So many videos/bakers I see barely touch the dough during pre-shaping. Your loaves are always beautiful, so whatever your procedure, I'm in.
Hi David,
Do you normally pre-shape tightly? So many videos/bakers I see barely touch the dough during pre-shaping. Your loaves are always beautiful, so whatever your procedure, I'm in.
Very nice shaping on these loaves David, with spot on final proof and slashing. Perfect! Clear and thorough writeup from you as usual. Thanks for keeping us updated on this TFL favourite.
Franko
I appreciate your kind words.
David
David
wonderful david, thank you for the update, san joaqin sourdough was on my must-try-list for a long time. Now you just put it on the top of the list. I know the video with hamelman and I learned a lot watching him and his team.
Have you tried to make baguettes using this formula? I want a sourdough baguette recipe, do you think this will work?
codruta
The SJSD dough makes wonderful baguettes and ficelles. I especially like the ficelles rolled in a mix of sesame, poppy and sunflower seeds before baking.
Here's another formula for sourdough baguettes that I particularly like: Baguette Tradition after Phillip Gosselin
Happy baking!
David
David, those are beautiful, perfectly-shaped and scored batards!
Your SJSD looks like a wonderful formula!
from breadsong
David
I decided to make this bread, so I started today. Wish me good luck!. I just made a rye bread wich turn out flat-ish (I didn't cut it yet to see the crumb) and I'm a little sad. I need SJSD to turn out good, or else I'll completely lose my confidence. Any last moment advices?
codruta
Just follow the method. Don't stint on the S&F's.
Let us know how it turns out.
Happy baking!
David
Very handsome looking batards, David. I read your notes closely and with interest. Your recipe is quite similar to my "go to" loaf in terms of ingredients except that I usually go for 20% whole wheat and 10% rye. My hydration is closer to 71% whereas yours is slightly higher than 75%. I have never tried the folding with the dough-scraper-in-the-bowl method that you describe. My worry would be that it wouldn't distribute the salt evenly enough. However, you have obviously found that not to be a problem. I am wondering if your kneading method is what contributes to that nice open crumb you have achieved?
That is just the amount of crust caramelisation that I always strive for. I bet it has lots of flavour. Nice bake.
Syd
When you consider that I do between 82 and 122 S&F's, salt distribution is just not a problem.
This technique results in excellent gluten development with the gluten strands cross-linked in a chaotic pattern, as opposed to the more regular pattern achieved with machine mixing. I do think this has a big impact on crumb structure. Of course, the high hydration level also contributes to the larger holes.
David
david, sorry to bother you again... If you read this message in time, can you tell me what temperature is in your fridge? Mine has 50F (10C) and I don't know if I should let the dough 21 hours or less. That is how it looked after last S-F , before I put it in fridge. (I halved the amounts given in your formula)
Thank you, codruta
Hi, codruta.
My fridge runs right around 40 degrees F.
50 degrees F is great for retarding bread and storing wine, but I think it's above the safe temperature for storing foods, e.g., milk products.
With the SJSD, I'd compensate for the higher temperature by shortening the bulk fermentation prior to retarding the dough, but give it the full time in the fridge. But "watch the dough, not the clock." If the dough seems to be expanding too fast, shorten the retardation time. You don't want to over-ferment this dough. Hmmm --- You could also shorten the time between pre-shaping and shaping, if the dough seems pretty gassy. Again, let the condition of the dough be your guide.
The dough in the photo looks really nice.
David
I don't know if I should put my bread pictures here, your post is too beautiful. The problem is I don't know what happened to my loaf. It has poor volume, and seems heavy. At first I suspected it was over-fermented in the fridge (I let it stay 18 hours at 48F), but it has no sour taste. The taste is quite good actualy. When I preshaped it, it was fine, a nice ball of dough, tight and smooth. But after that, the disaster happened. when I tried to give it the final shape, the skin broke and the dough started to expand (to flow slowly). I couldn't manage to make it smooth again, it kept breaking and breaking. I overworked the dough? or it was already overprooved? I let it proof another 30 min, and then I baked it. With your permission I'll upload some pictures, if you don't mind.
codruta
You're free to post your photos here or start a new topic.
From your description, it does sound like the dough over-fermented and you had proteolytic degradation of the gluten.
FYI, I've cold retarded SJSD dough for 36 hours at 40 degrees F without a problem. The bread was just more tangy.
David
david, I'll put the pictures here, maybe you can help me. After I cut the crumb, I now suspect the dough was underproofed. It annoys me not to be able to give a correct diagnosis... I'm making the same mistakes over and over because I can't figure out what I did wrong last time.
here are the pictures, in that order: after retardation, pre-shape, proofed, and final product.
best wishes, codruta
The photos do help. I see good looking stuff until the shaped loaf, as you described before. The proofing loaf and the baked bread look like either you need to work on your shaping technique or the gluten quality was poor. Since the pre-shaped dough looks so nice, with a good gluten sheath supporting the ball, I lean towards the problem being with how you shaped the loaf.
What do you think?
David
I have exactly the same issues: dough will come together and shape well. Then I let it ferment in the fridge for overnight or 24 hours.
If I try to shape it, it literally starts to "puddle" on the surface. I've resigned myself to getting an oval ceramic dutch oven (Walmart has a Paula Dean 3.25 qt version for $26...ceramic doesn't burn the bottom like cast iron...no oil needed...just preheat with in a very hot oven at 525 degrees; I added about 1/8 cup of corn meal to the bottom before adding the dough) and just "pouring" it into the dutch oven.
The picture attached comes from a round le creuset dutch oven. Notice the rise. This is due to the walls of the dutch oven keeping the loaf from flattening out. I've tried over-kneading, under-kneading, more rise, less rise. I have no idea how to ferment a loaf and get it to hold it's shape so I can bake it on a stone.
From your question, it sounds like you are cold retarding shaped loaves. That is a different procedure than mine, of course. In any case, it is important to provide good lateral support while the loaves are proofing when you are working with a relatively high-hydration dough. I use a linen couch with the SJSD.
You might clarify your procedure and how you are supporting the loaves while they proof, in particular.
David
You know, maybe I can try that. I've made the poolish, then for the 2nd step, putting the add'l flour and water in the mixing bowl alone, mixing and then letting it autolyse, then adding the poolish and salt, then having my machine knead the dough until it pulls away and then put that in an oiled covered bowl. I then have tried doing stretching and folding every 1/2 hour for 3 hours, then letting it rise until it is about 1.5x the size before stashing in the fridge overnight. The problem is the next day when I remove it from the fridge and try to form the loaf. There is not enough structure for it to hold any shape at all. It has lots of bubbles and is very sponge-like, but literally just puddles on the counter when I try to form a loaf.
I was wondering if you've weighed your dough before you flour your hands and surface and then form the loaf, and then weigh it again to see how much flour has been added/absorbed? I'm wondering with "wetter" doughs, if using the flour on the surface changes the hydration?
From your last reply, I have the impression that you have tried a number of variations on the procedure. The procedure described in the OP is tried and true. It works for me every time and has worked for lots of other folks on every continent except Antarctica. May I humbly suggest you give it a try. Then, once it has worked for you, if you want to change things, change one thing at a time. That way you will know what you can get away with. Who knows? Maybe you can discover a better method.
Specifics:
1. When you use a liquid levain, include it in the autolyse. All you need to add after the autolyse is the salt.
2. You are bulk fermenting at room temperature for at least 3 hours - I suspect significantly more, then, in addition, cold retarding overnight. This makes proteolysis very likely as the cause of you runny dough when you go to shape the loaves. Refrigerate sooner.
I do S&F and shape on a floured board. I would be surprised if this adds more than 2 tablespoons of flour to the dough altogether.
I baked a couple loaves of SJSD this evening. I'll upload some photos to this topic shortly.
David
Thank you for all your help. It means alot.
I think my challenge may be ambient temperatures as well. I will follow your instructions to the "T" and also start measuring the temperature of my dough at various stages and put all in a journal this time.
I will also do a photo journal at various stages this time.
Success or no, I will report back! It'll probably be 2-3 days if I start today.
Wish me bon chance!
Bon chance! Buona fortuna! Mazel tov!
That oughta do it. ;-)
David
One last question for clarification please? For your 2KG loaf your recipe calls for 132g of "stiff starter". May I ask the number of grams of flour to water in your version of "stiff starter" please? That should help me eliminate another variable in my next attempt.
Thanks again.
The SJSD uses a liquid starter. Are you asking about a different one of my bakes?
If so, please re-post your question in that thread. I use slightly different stiff starters for different breads.
David
Success! It had everything to do with:
1) Mixing the flour and water separately and letting it autolyse for 1 hour;
2) Adding the starter with no salt - stretching and folding for about 5 min, letting it bench rest for an hour and then incorporating the salt, stretching and folding until it formed a smooth skin, about another 3-5 min.
3) Allow it to ferment on the counter (I tried 3 hours as I was gun shy; I'll try the full 6 less the S&F hour above next time) before stashing in the fridge overnight.
This morning I have happy structured dough, and then some! No more puddling or "pouring" the dough into dutch ovens. I can now cook on a stone without getting wide flat bread. Yippee!
Thank you so much for all your help.
I'm glad things are working better for you, but I definitely do not recommend bulk fermenting at room temperature for six hours before retarding, unless your room is 50 dF or less. You will have breakdown of the gluten by proteolysis and be back to a sloppy mess, most likely.
David
Richard Bertinet's youtube video of how to make dough, including the stretch & fold method:
http://www.youtube.com/watch?v=kXV8mayG3W0
This was the first video I've seen showing how to stretch & fold until the dough comes together.
I did two things differently:
1) I mixed the flour and water separately and let it "autolyse" for 1 hour before adding the starter (I left the salt out at first);
2) Once I added the starter, I did the Richard Bertinet stretch & fold, though got impatient, and decided to let it bench-rest after about 5 minutes of stretching and folding with no real change in the dough. The bench rest for an hour after did the trick, at which point I did additional stretch & folds (I added the salt at this point), and the dough came together into a nice smooth round. I didn't try a window pane test on it yet.
I then let it rise at room temp for 3 hours before placing in the fridge. If I need to, I will let it finish rising tomorrow as it is late and I was nervous about what happened to me last time when I let it sit for 6 hours on my counter before stashing in the fridge overnight and the subsequent puddling that occurred.
After watching the youtube video, I think I have a better understanding of what the dough is supposed to look like. We will see tomorrow! I'll post pics of the dough after shaping/prior to putting in the oven, and the after bake.
Hi Codruta-
You may have already seen this video on youtube, but if not, it really helped me alot to understand how dough should be mixed, stretched & folded, for how long, and what each stage looks like when it comes together:
Richard Bertinet's youtube video of how to make dough, including the stretch & fold method:
http://www.youtube.com/watch?v=kXV8mayG3W0
Good luck!
David, as you said, I don't think the gluten quality was poor, so there must be a problem with my technique . I've watched that video (with hamelman & co) tens of times, I know every step, and I am able to make those moves... but... the problems are, I think, I'm not sure I'm right, (1) that I didn't give the dough enough time between preshaping and shaping (maybe 25-30 minutes, and the preshaped ball was pretty tight, the dough was still cold when I worked it), and (2), my working surface is not good. I can't work the dough as you mentioned in your instructions, on an un-floured board. I tried to work it on my un-floured counter, it sticked, I moved it on an un-floured wooden board, it sticked more. It even sticked on my hands, when I tried to seal the seams. I managed somehow to ruin a wonderful dough... and what's upsetting me even more, is that this bread, ugly and stiff as it is, has a taste close to perfection. It might become my everyday bread, if i'll ever learn to do it right...
So, the reason why the skin fissured was because I tried to stretch the dough when the gluten was not fully relaxed... or it cracked simply because it sticked on the working area and on my hands?
codruta
I suspect the dough sticking to the work surface was more the problem than it not being sufficiently relaxed.
As I said, judicious use of board flouring and use of the bench knife to free the dough from the bench, rather than pulling and tearing it, is the trick. Also, in handling sticky dough, your hand contact with the dough should be as brief as possible with each move. Note in the Hamelman videos that, when they feel the dough sticking to their hands, they keep flouring their hands. This is a good technique to emulate. Some bakers wet their hands or even oil them. I prefer Hamelman's technique, myself.
David
These just seem to get better and better each time you bake David.
Just wonderful loaves that you have baked here.
I agree with your advice to codruta; more judicious use of flour on the bench and hand at the final stage should sort out the shaping problems.
I like the steaming tip with the perforated pie tin and ice cubes too; thanks for that one
All good wishes
Andy
The optimal use of bench flour is one of those "minor" techniques one learns by experience, as is the many ways the bench knife can be used. Since these skills tend to be acquired gradually, I don't usually think about them as important to communicate to new bakers. I think Sjadad's nice comment, above, shows what a big difference these little things can make.
Regards,
David
Do you still use the perforated pan for steaming?
I recently used a roasting pan with a small cup of water steaming inside, & think I got my prettiest loaf yet.
What do you think is the difference? Where did you get the perforated pan?
Thanks for all the great tips!
Yes. I continue to use this method. It works for me, but whatever works best for you is best for you.
I think I got the pan from Bridge Kitchen Wares. Amazon.com has some, but they shipped me the wrong ones twice, and I gave up on them.
David
but how do you feel the affect of leaving this dough to retard for, say 12 hours in the fridge would affect it? Could I perhaps leave it out and extra 30 minutes before the cold retard? I've tried this once already and it was delicous with a lovely crumb (but I still need to work on my scoring).
Thanks, Ed
Hi, Ed.
At various times, my cold retardation time has varied from 12 to 36 hours. The bread has always been good. That resiliency is one of the things I like about the San Joaquin Sourdough.
That said, the shortest fermentation times result in less sourdough tang and overall less flavor complexity. The longest fermentation times result in a less open crumb, presumably due to proteolysis. I think 18-24 hours is probably the best range.
I have also varied the bulk fermentation times prior to retardation with no ill effects. The dough does show more expansion during cold retardation if you bulk ferment longer. This has a limit of course, but 30 minutes is no problem. I have not done this planfully in anticipation of a shorter cold retardation, but it makes sense. I'm glad it has worked well for you and that you are enjoying the SJSD.
BTW, I personally appreciate members "resurrecting" older posts. TFL has been online long enough that there is a lot of excellent older content that is unknown to more recently joined members. I've been thinking recently about some breads that were really astonishingly good but have not been posted on for 4 years or more.
Happy baking!
David
Hello, I'm new around here, but I find your posts full of specific and interesting informations. Everything is quite simple to understand:) Still, i have one question about my 3 kg SJSD dough (we are a big familly an I always give bread to my friends). After the first 7 hour of cold retardation the dough nearly doubled in size. Is that normal? Should I continue with cold retardation until 21 Hours? I don't wanna end up with an over-proof dough or too sour ... The temperature in my fridge is around 3.5 - 4 Celsius degrees. Thank you very much.
How much expansion the dough has during the first part of the retardation depends on starter activity and dough temperature. However, once the dough is cooled to 4dC, expansion should essentially stop. I would continue retardation, although you could certainly divide and shape after less than 21 hours, if it is more convenient.
David
So, i let it in the fridge for 19h. And I think that I coud let it even more:) DDT until going into frigde was 23.5 C so I thing this was the reason for a quick expansion in the first 7h. But, of course I had problems with the pre-shape and shape. Still, I can say that it's my favorite bread until now:) Thank You very much for your help.
those batards. Varda must be drooling :-) I still like this formula and now that it hs equal amounts of rye and WW it should be delicious. Have you ever tried it with Spelt or Kamut?
Nice baking David
Those points were really tasty, too. :-)
I have used 10-20% Spelt and once a higher amount. I haven't appreciated much difference. I have never used Kamut. In the SJSD, the 5% rye plus 5% whole rye makes an amazing difference. It's the best flavor yet in this bread.
BTW, since I posted this update last Summer, I've gone back to using just 100 g of liquid levain per 500 g flour.
David
As a new member, I appreciate being able to see prior information that was posted. I came across this from the daily email link. I have been salivating ever since I found this site. First night started the cibatta and had it the next day w/olive oil, basil & a tomato paste I made from the fresh tomatoes from the garden. So tasty. I can easily live on bread and water, but hubby doesn't agree -I'll bake all different breads, and then he comes home from the store with what they sell as "bread", and he prefers that! No accounting for taste! I do have a suggestion. When I started looking around the site, was really confused as to the meanings of the abbreviations. Some I figured out, others remain confusing. Perhaps a faq on them would assist hapless individuals such as myself? Thanks for a great site!
There is a FAQ. See the menu at the top of every page on TFL. However, it may not include the abbreviations you find mysterious. I suggest you make a list of them and post them as a new topic. The FAQ might need expanding to include more commonly used abbreviations.
David
Hey David,
Your loaves look beautiful and am looking forward to trying this recipe. I have a question about your cutting tool. Are you using a baker's lame, plain razor or sharp knife? If I assume correctly due to your beautiful angles, whereabouts did you get your lame? And do you have an online sources to purchase one?
Thanks a lot,
Jack Twist
I use a double-edged razor blade attached to a French lame. The latter can be had from a couple US sources I've found: 1) the SFBI site, 2) Bridge Kitchen wares (or something like that) in N.J.
David
http://www.bridgekitchenware.com/browse.cfm/french-lame-(straight)-bakers-razor/4,270.html
that is the cheap one. They have one at 6x the price that looks the same...
I DO NOT use the lames with the plastic handles. I am talking about the thin sheet metal ones. Traditionally, these are sharpened and used themselves to score loaves. I use them as a handle and slip a double-edged razor blade over the sharp end. Note that when one cutting corner gets dull, you can rotate the blade so another corner is used for cutting. Thus, you get 4 blades in one. That's pretty economical.
David
http://www.bridgekitchenware.com/browse.cfm/serrated-bakers-blade-(lame)-5.4in/4,7979.html
:)
Lame is on the way.
Cheers.
There have been a number of recent replies lamenting loaves of SJSD that don't hold their shape, but flatten out. There have been related lamentations of dough that is too goopy to shape into loaves after the cold retardation. My questioning of the bummed out bakers has revealed a small number of root causes of these problems. This reply is a kind of "FAQ" for this set of problems.
By way of background, why would a loaf keep its shape anyway? Well, it's all about gluten. But it's not a matter of more is better. It's not that simple.
Gluten forms when two proteins that are present in wheat are exposed to water. The two proteins join and form gluten. This is a long molecule. When dough is mixed, the gluten strands are folded over each other, and, where these strands overlap, they form chemical bonds. So, eventually, with mixing, the gluten strands in the dough form a network that gives the dough "structure" and "strength." Other components you add, such as salt, and some products of fermentation, such as organic acids, strengthen the structure formed through hydration and mixing.
When you shape the dough into loaves, you are stretching and smoothing the outer layer of the gluten network to form a sheath covering the outside of the loaf and containing it. The natural elasticity of the gluten forming this sheath should have enough strength to maintain the shape of the loaf against the pull of gravity, which works to pull it down and flatten it.
Now, just as there are components of the dough and processes applied that strengthen the dough, there are others that weaken it. A few examples: Water is necessary for gluten to form in the first place. Anything that fights with the gluten for water molecules can interfere with gluten formation. Salt is the most common villen in this regard. That's one of the reasons we do an autolyse, to let the gluten start to form before salt can keep the water from it. But too much water can keep the gluten molecules from coming close enough to each other to form bonds. That's why a high-hydration dough seems so wimpy and "slack." That's why the "double hydration" technique can be so useful for very high-hydration doughs, such as for ciabatta.
Another enemy of gluten is protease. Wheat flour when wetted activates a number of enzymes. From wheat's perspective, these are for the purpose of helping make more wheat by providing small molecules that the baby wheat (the germ) can use for its growth and development. For the baker, these enzymes do many important things, some good, some bad, and some good or bad depending on circumstances. Protease is an enzyme that breaks down proteins. Gluten is a protein. We want gluten to be strong. Fortunately, compared to other important metabolic processes occurring as dough ferments, proteolysis is a slow one, especially when the dough is kept cold. But it never stops working. So, if you ferment the dough for too long, eventually the gluten network formed during autolyse, initial mixing and any stretch and folds you did during bulk fermentation will be ... well ... digested.
As I mentioned above, gluten development is more of a challenge with high-hydration doughs. And, while not as high-hydration as ciabatta, for example, San Joaquin Sourdough is somewhat slack and needs some of the special treatment other breads like this require. One of the principal requirements is that you have to provide some sort of lateral support to the loaves during proofing to keep them from flattening out. This could be provided through a loaf pan, a banneton or the folds of a couche. A couch is a length of flexible material that can be folded into a trough to support proofing loaves. Linen is traditional. It has some intrinsic non-stick properties which suit it for this purpose. That's what I use. But you can also use parchment paper. That has the advantage of remaining with the loaves as you transfer them to the oven and having non-stick qualities when heated. The disadvantage of parchment compared to linen is that linen is absorbent and dries the surfaces of the loaves just slightly, making scoring easier.
In summary, the requirements for a well-shaped loaf made of slack dough are:
1. Really good gluten development, which includes forming a strong network of gluten/gluten bonds to provide strength and structure to the dough.
2. Enough but not too much fermentation.
3. Gentle but firm dough handling. You want to maintain the gas bubbles generated by fermentation and trapped by the gluten network. That is what makes up you crumb structure and keeps your loaf from being brick-like.
4. Shaping loaves in a way that stretches a layer of gluten into a containing sheath around the dough.
5. Providing lateral support to the loaves as they proof.
6. Proofing to the "right degree." This may be different for different types of breads.
7. Scoring to achieve the desired loaf profile and expansion in the desired direction.
8. Baking with appropriate oven humidification and at an appropriate temperature.
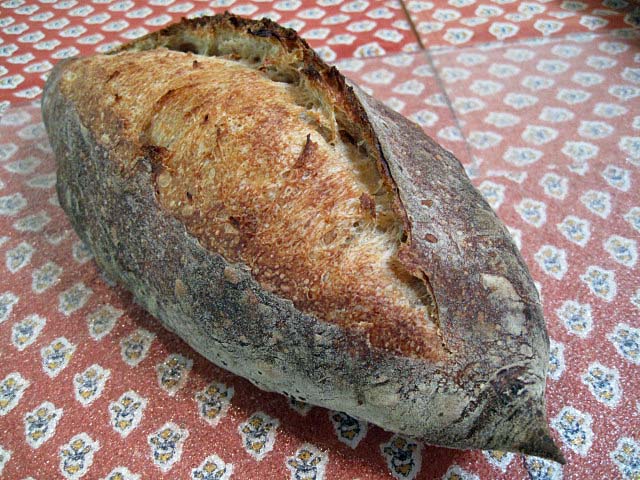
These are two loaves of San Joaquin Sourdough. They were proofed on bakers' linen (seam-side up) and are fully proofed in this photo. Note the fold of linen between the loaves that keeps them from sticking to each other as they grow.
Before transferring the loaves from the couche to the peel, you straighten out the couche. Grasping both ends, you pull them apart. Note that the fold seen between the loaves in the previous photo has flattened out. Also note that the loaves have not flattened out. They have retained their nice height, demonstrating good gluten formation, gluten network formation, etc.
The loaves have been flipped over on the couche so the seam is down, flipped onto a transfer peel and then to the Super Peel for scoring and loading onto my baking stone. Again, note the nice high profile of the loaves.
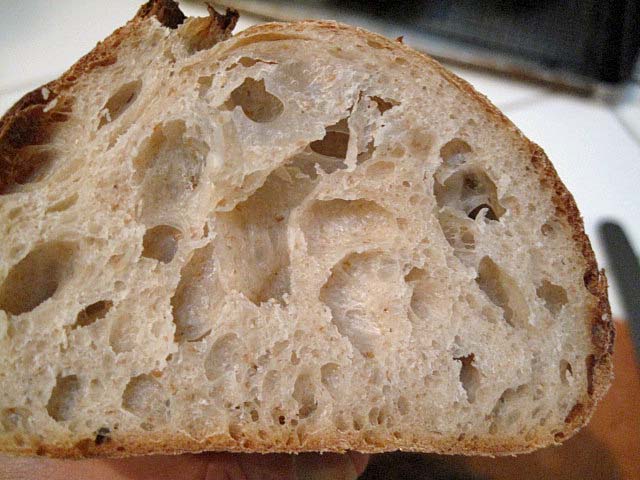
The loaves are now cooling in this photo after baking as described in the OP. There are no crumb photos. Both loaves were frozen. I baked a couple loaves of a different bread tonight also which just came out of the oven and will be for our breakfast tomorrow.
I hope this helped some of you who have struggled with the SJSD. If you have questions, I am happy to try to answer them.
David
David, this is a silly question, but when you use active starter does that essentially mean starter that has been fed long enough ago that it has become gassy but not so long ago that it has begun to collapse on itself?
Yes, basically. There is a range of optimal ripeness, not a specific point. One of Chad Robertson's special techniques is to use "young" starter, which results in a less sour bread.
The criteria you use to judge starter maturity vary with starter hydration, but that's another longish discussion.
david
A sourdough starter is about fermentation and acid production. If it is doing those things actively, it is "active." How can you tell? For a liquid starter, such as is used in the San Joaquin Soudough, you can tell fermentation is going on when you see lots of bubbles forming. Fermentation is the "digestion" of sugar by yeast with the byproducts CO2 and Alcohol. The alcohol evaporates and the CO2 makes bubbles that float to the top of the starter and pop. If you ripen your starter in a relatively tall and thin container, it will also expand a lot. The surface of the starter will look wrinkled (You will know what I mean when you see it.) and will have lots of bubbles. If very active, you can actually see them forming and bursting.
You can also tell about the activity of bacterial metabolism (acid and other flavor-giving chemical production) by the smell of the starter. A "young" starter smells rather fruity. A very mature starter smells more "sour."
How much time a starter takes to reach peak activity depends on many variables, so an exact time is impossible to specify. You can influence the time by using less seed starter (and more new flour and water), feeding it using cold water or lowering the temperature of the environment. How active the seed starter is makes a difference too.
I hope this helps.
David
sorry I see you've just had another question on this, for some reason it didn't load when I went to post my comment. If you get the chance wld still love an answer on timings. Kitchen is probably on cool side, no more than 21ish degrees C (around 70df?)
David - thanks so much for the reply. I get the science (used to be a scientist, perhaps why I like baking), just not yet used to my starters - I started w the richard bertinet method which works brilliantly for me but the starter is very firm and matures gently in the fridge so less worries about how active it is. My first attempt at your bread was an utter failure (ended up in the bin), and I think the starter just croaked and I didn't notice. The tartine bread last weekend the starter was ok but I wasn't good enough at S and F to get it to get some structure so it was flat (but tasted great). Need to keep practicing! Will try the starter at 12 hours cool maturation today and see how it goes.
thanks again
Hi David,
Thanks so much for sharing your recipe!! I baked your SJSD bread yesterday and it's AMAZING!!! The whole family LOVED it! I think it might be my favourite sourdough that I have baked so far :-)
Cheers Sonia
I appreciate your sharing your family's approval. That feedback means a lot to me.
Happy baking!
David
P.S. I just looked at some of your recent TFL blog entries, and I admire your baking talents a lot. Now, I really feel flattered by what you and your family said about the San Joaquin Sourdough. You set a pretty high standard!
Thanks David! It's not often my family agrees when it comes to our bread tastes, it was voted unanimously "the best loaf ever" . I baked two loaves yesterday and have half a loaf left, so guess what I am baking again today lol. I took some photos I'll upload them to my blog soon :-)
Sonia
I'll watch out for your photos!
David
Thanks so much for posting this, David. I am giving this a try this evening. As I have to fit my bakes around a busy job, at 21 hour bulk fermentation in the refrigerator is just perfect. I'll update with results from this newbie (unless it's just too embarrassing). Best wishes, Colin.
hi david how are you
your loaves looks awesome and i wanna try to make them
two questions before
1 the dough is 75% hydration- will i get open crumb with nice holes?
2. most of the recipes i read talked about 2-3 hours final proof at room temperature- your recipe talk about 30-45- isn't it too short? i won't suffer underproof loaf f i proof only 45 minutes>?
thanks in advance
I get an "open crumb with nice holes." I don't know if you will. Try it and let us know.
This bread distributes total fermentation time in several unconventional ways. Consider the hour between pre-shaping and final shaping. That is much longer than in most recipes.
I have been making this bread for 8 or 9 years. It turns out well consistently using the procedures I outlined - as in the photos in the original posting. Does it look under-proofed to you?
David
i will try
Hi David
Santa gave me a flour mill for Xmas. Wow....does that bread taste fresh. I know that for most of us, home-milled flour is basically by definition "whole wheat".
Question: AP flour is, as I understand it, basically a mixture of hard and soft wheats. If I want to make your bread, should I just do a 50/50 hard/soft wheat berry combo? Or some other ratio?
And then add a little more agua for the hydration, maybe 5%?
Or am I better off just using store bought AP flour? Thanks
Congratulations on the flour mill!
AP flour has no official definition. In general, it is a "white" flour. That is, most of the bran and germ have been removed. Therefore, unless you are doing extensive sifting, your fresh-milled whole grain flour is very different.
AP flour is usual between 10% and 11.5% protein. Often the level of protein desired by the miller is achieved using a mix of wheats. The mix will vary because of year-to-year variation in protein content of the wheat varieties.
If you want to duplicate my SJSD, use the flours I used. However, you can make perfectly wonderful bread with other flours. Your product will just be different.
Happy baking.
David
Hi Dave Thanks for posting this! Two quick questions. What is your approximate room temperature? During the 90-min bulk fermentation before it goes in the fridge, you have a stretch and fold at 45 and 90 min. I assume these are *single* stretch and folds rather than the 30X stretch and folds earlier in the procedure, right? Thanks! --Andrew
My kitchen temperature is subject to seasonal variation. In the Summer, it can get up to 78-80dF (with air conditioning). In the Winter, in can be 65-68dF. When it's very cool, I use a proofing box.
The S&F on the bench are "letter folds." However, I do them only when I feel the dough needs additional strength. Mostly, I skip them.
David
HI, David, very nice walk-through on your recipe. I have enjoyed so many of your posts here.
I do have a question on your method for this formula. Why do you move the dough from one container to the oiled container just to continue the stretch and folds and ferment?
You don't have to change containers, but, if you want to use the same bowl you used for mixing, you should transfer the dough to something else while you wash and oil it. Switching to a clean bowl seems easier to me.
Besides, I use a 2 liter glass measuring pitcher to bulk ferment. I like that I can both measure dough expansion and see bubble formation with this container.
I'm glad you enjoy my posts. I enjoy writing them.
David
Ah...I think I see. Thanks for the reply. I was actually wondering why you didn't just use the mixing container - without washing it - all the way through to dividing. I guess at that point when you transfer the dough to a new bowl it's taut enough to not mess the glass container you like to develop the dough in. Maybe less messy and less likely to tear this way as well?
Hi David -- After book marking your recipe for SJSD years ago, I'm finally getting to trying out a batch this weekend, which I'm excited about. Because I like to tinker, though, I was wondering if you've ever played around with the order of operations with when you shape/retard the dough. I've grown somewhat fond of the "pre-shape>shape>place in banneton>place banneton in fridge overnight>score/load into oven" routine that Tartine/FWSY uses often (seems to just fit nicely into my weekend schedule), so was wondering if you've tried out something similar with this recipe? More specifically, I was toying with the idea of dividing, pre-shaping, and shaping directly after your 90 min fermentation step, and then putting the shaped dough in bannetons to retard for 21 hours, baking the next day. Would love to hear an tips if you've experimented with this, and of course, will happy to share what I find out!
Hi.
The short answer: No. I've not done that. I don't see why it wouldn't make good bread. What you describe is the procedure I use all the time for other breads. It would be good to try "my way" first, then the one you describe, so you could "compare and contrast."
The longer answer: This update needs updating! FYI, here are the changes I have made since this posting.
1. I use only 100g of starter for 500g of new flour, not 150g. I like the resulting flavor better.
2. My bulk fermentation generally goes longer than 90 minutes. Generally, it is more like 150 minutes. Longer in cooler weather. Note that the lower % of starter results in longer bulk fermentation and, I think, better flavor.
Happy baking!
David
And thanks for the updates to update, good to know, continuous improvement and refinement!
For this batch, I had already used your prior update formula (150g of starter) and started down the path of the more Tartine-ish order/process, so I don't have a control made your way for this bake, but I will do that one next and compare.
I'll let you know what comes of it, and thanks again for sharing your recipes and advice!
-Drew
Just finished a batch, posted some results here: http://www.thefreshloaf.com/node/49053/sjsd-experiment-take-1
By all (exterior) appearances, results seem good. (I'm having issues with the bottom of loaves burning, but that's not specific to this recipe, more how I'm using my baking steel I believe)
Will try the more standard order of operations for comparison next time.
Thanks again!
I made a profile on here specifically to thank you for sharing your amazing recipe. This was my first time baking any sourdough without using a banneton, so I was very nervous. I only had a cast iron pizza pan to bake on and I didn't implement steam, but I love this so much, I'm prepared to start another batch tomorrow to fine tune my scoring and shaping!
I'm happy you like the SJSD! Thanks for letting me know.
If you can work out a way to steam your oven, you will get a nicer crust, better oven spring and bloom. But, to get that result, you must have the fermentation and shaping nailed!
Happy baking!
David
I wanted to say thanks for your recipe. I'd been wanting to get back into baking sourdough, and had been reading up on your various experiments. Made a batch this weekend, and it came out wonderfully. Good flavor and good crumb, and I learned some new techniques (like the batard shaping). Thank you!
Hi there I’m a beginner and just tried your recipe as friend sent me a link to this recipe - I realize this post is relatively old. My sourdough loaf turned out amazing. At first I thought it was going to be flat, but after the poke test I went ahead and placed it in the oven to witness the most magical spring and bloom. The hollow sound, the crunch the tang. . .everythign was perfect. Lovely.
I did make one substitution. I didn’t have rye and whole wheat on hand, so I used whole wheat spelt in place of those two. That brings me to my question. While I loved the bread, I did have to eat about 6 slices to feel full. Is there a chance if I used all whole wheat spelt that it would work the same way? Or would some major adjustments be necessary? Thanks!
I'm happy you enjoyed the bread.
I don't have a lot of experience with spelt. I am not sure what you are asking. Is it about how much you have to eat to feel full? Are you asking about making a 100% spelt loaf?
In general, I find breads with lots of whole grain flour more satiating. However, if you make this bread with 100% whole grain spelt, it's an entirely different bread. One major difference is that whole grain flours absorb more water, so the effective hydration would be less. Also, spelt is high in protein but low in gluten. My understanding is that you have to mix it less and more gently than hard winter wheat. I would expect the loaf to be denser, but I've never made a 100% spelt loaf.
David
David, thank you so much for your reply! I wasn’t sure if I’d get a response as I saw the date of the post! Cool! I was asking about making a 100 % Whole wheat spelt sourdough with the same recipe. I’m used to darker breads which make me feel full more quickly (I only need to eat 2 slices instead of 5 to be full.) However,I would really like to switch to fermented breads with sourdough. It’s way tastier and more digestible for me. Good to know your thoughts about the spelt - makes sense. I’ll do some experimenting. Here is a photo of the bread I made! Thank you again!
Your bread looks really nice!
I have a bag of spelt berries. I just haven't gotten around to milling some and making bread with the flour. You have encouraged me to get on with it. I'm curious how a bread with 20% whole spelt would compare to my usual mixed grain breads.
I'll let folks know. I am activating my starter now.
David