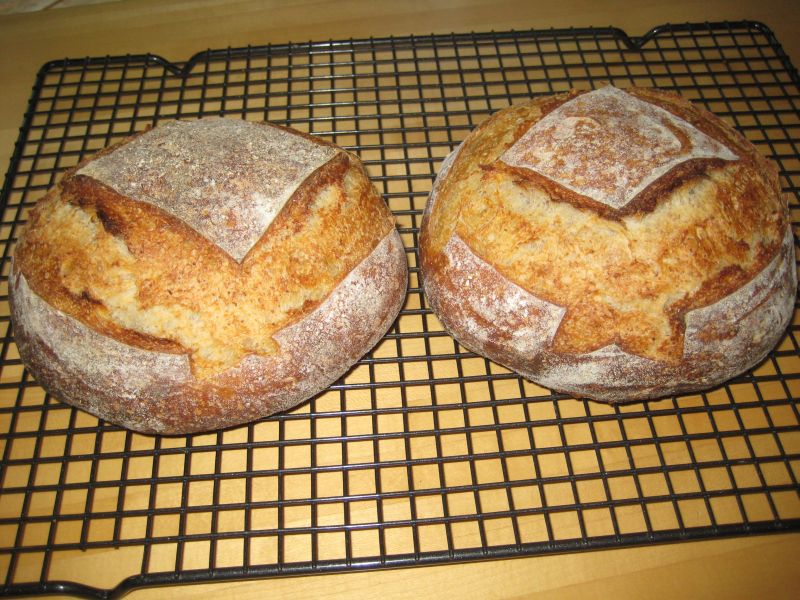
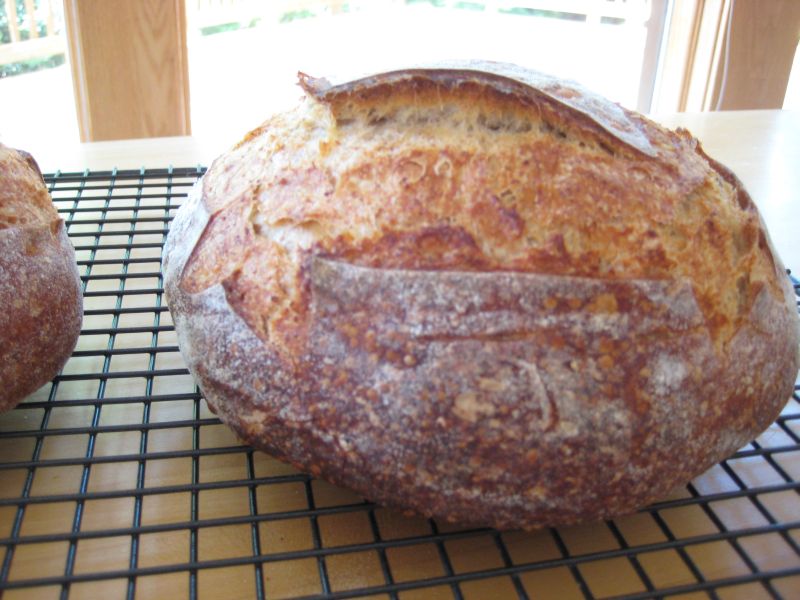
The Fresh Loaf

A Community of Amateur Bakers and Artisan Bread Enthusiasts.

Blogs

dmsnyder's picture
dmsnyder

I made cinnamon rolls for the second time today. I used the recipe from SusanFNP's "Wild Yeast" blog, a wonderful site for bakers. The recipe is adapted from Michael Suas, with whom Susan has taken classes at the San Francisco Baking Institute, I believe. The link to Susan's recipe is:

http://www.wildyeastblog.com/2008/10/13/cinnamon-sticky-buns/

I modified the filling by using a "only add water" cinnamon bread/roll shmear from KAF and added some plumped up raisins and lightly toasted, coarsely chopped pecans.

The rolls were a pleasure to make. Susan's instructions are always so good. I'm sure these rolls would be a delight to any cinnamon roll lovers. Sad to say, I've decided I just don't like pastries this sweet. 


I must return to my quest for the Cheese Pockets of my Dreams.

David

Addendum (1/12/09): This recipe makes 16 rolls, which is a lot. In "Baking with Julia," the recipe for sticky buns says you can freeze the dough right after rolling it up, i.e., before cutting the rolls and proofing them. So, I divided my dough into two parts, filled and rolled up both, baked one and froze the other. Good to know. I'll probably not bake the frozen roll for at least a week. I'll let you all know how those turn out.

DMS

dmsnyder's picture
dmsnyder

I haven't blogged about this bread for a while. We have lots of new members, and they should be aware of this wonderful bread. The recipe is in Jeffrey Hamelman's "Bread." Like Poilâne's Miche, it is an attempt to replicate the bread of the common folk in the 17th and 18th century in France and Quebec. A "Miche" is a very large boule. This recipe makes 3.6 lbs of dough.

This is a pain au levain made with 100% high extraction flour. I used the first clear flour that Norm got in December and shared with some of us. This flour is more finely milled than KAF's First Clear. It is slightly gray in color and acts like a high-gluten flour.

This dough is higher in hydration than Reinhart's Miche in BBA. It is quite slack. It makes a very moist and open crumb. The taste is wonderful and gets better for several days after baking. The bread stays moist for nearly a week. 

Miche, Pointe-à-Callière


Miche, Pointe-à-Callière Crumb

David

SylviaH's picture
SylviaH

This is my first attempt at Howard's formula for Petiti Pain/Check out holds99's Blog for Bernard Clayton's S.S France Petite Pain - Revisited and Revised ....Thank you so much Howard for posting the recipe and especially for adding a poolish to it!!  These are just out of the oven and hot!  Sorry no crumb post!  They smell deliteful.  I placed these on parchment and put them on a preheated stone under a cover and steamed.  I overproofed them a little to much....they deflated a little when I sliced them!  I know you warned me...Howard!  We will enjoy these Sunday!

SylviaH's picture
SylviaH

This is another recipe from Beth Hensperger...This bread is intoxicating!  I love it and I can't believe how wonderful light and airy it is with a crisp to the thin crust...I baked it under cover for 30 min. steamed it about 5 seconds, uncovered and baked another 20 min...registered 200 done!

I had everyting except the fennel seeds...darn!...couldn't keep my nose from smelling the cooling chocolate, caraway sent!...I thought the taste was very good....I can just imagine it with a poolish!!  This was actually set on a dough cycle last nite in my bread machine!  It finished at about 10AM this morning mixing and first rise of the dough!  Shaped it and put it into my pre-heated 400 oven..turned down to 350 and placed on a hot stone.  There is a very similar recipe given  on-line under Russian Black Bread my Beth Hensperger.

Thought I might as well give this one a try...since I was going to heat up my oven to make rolls that Howard had just listed recently...I'll post them a little later today.

Shaped

My X on top was rather blown away...prep. for dinner while it cooled!

Crumb is light and airy with a thin crispy crust.

Crumb shot! There is Wheat Bran, Medium Rye Flour, Bread Flour, Caraway seed, Chocolate, and I used Robust Molasses and Expresso Powder.

Sylvia


pmccool's picture
pmccool

We had invited friends for brunch the weekend after New Year's day and I had already decided to make zolablue's cinnamon rolls.  It seemed, though, that something else would be good to have with the quiches that my wife was making; something not quite so sweet as the cinnamon rolls (which were fabulous, by the way).  It occurred to me that a croissant's buttery, flaky lightness would be a perfect accompaniment for the richness of the quiche.  There was one minor problem: I'd never made a croissant in my life.

The first step: search TFL for threads dealing with croissants.  I found two things that proved to be very helpful.  The first was a formula for Bertinet's croissants, posted by dolfs.  The second was a link to SteveB's Breadcetera site, which included some very helpful videos and other instructions for croissants.  Armed with this information, I decided to forge ahead.  If the croissants turned out well, I would serve them to my guests; if they turned out badly, my guests would never hear about them but my wife and I would have some very tasty french toast.

The next step was to assemble all of the ingredients and start building the dough.  I'll spare you all of the process steps; Dolf and Steve have done an excellent job of documenting those, which you can read by clicking on the links, above.  My laminated dough skills, being essentially non-existent, caused a couple of butter breakouts during the turning and rolling steps.  Happily (for me, anyway), the end product didn't seem to have suffered as a result; although M. Bertinet may not have wanted his name attached to them.

I was grateful to have a largish island on which to roll out the final dough before cutting the croissants.  A 3-foot long strip of dough is much longer in reality than it would seem to be in concept.  While I suspect that I may not have rolled the dough as thinly as a professional baker would have, I did get 14 croissants out of it, plus a couple of smaller scraps from the ends (which served well for QA testing).  

Here's a picture of the shaped croissants during their final rise, after shaping:

By this point, I could already tell that they would taste wonderful.  All I needed to do was bake them successfully.  Here's how they looked after coming out of the oven:

I could probably have left them in the oven another couple of minutes for additional browning, but I was very skittish about burning them after having gotten them this far.  (By the way, Dolf, thanks for including the tip on applying the egg wash.)  Turns out they were fully baked and absolutely delicious, as confirmed by our QA samples.  Lots of tender, buttery, flaky goodness.  

So, our guests did get croissants to go with the quiche, although the cinnamon rolls were probably the bigger hit of the party.  

As good as they are, these will probably remain on my "special occasion" baking list.  For one thing, there's almost a tablespoon of butter in every single one of them.  For another, they require significantly more effort for the yield than a similar quantity of dinner rolls.  Still, after a bite of one warm from the oven with a dab of marmalade, I know I'll be making them again.

Paul

holds99's picture
holds99


In the recent past a number of TFL bakers have asked me for the recipe for Bernard Clayton’s S.S. France Petite Pain rolls. I sent the recipe to all who requested. The requests got me to thinking. Mr. Clayton’s rolls are baked using the direct method, using only yeast for leavening. Recently I began thinking how this recipe might be improved, or at least made differently, with the addition of a poolish. With that in mind I began experimenting and testing the recipe and have come up with what I believe are rolls with a somewhat better flavor than a direct method baking.  The added flavor is, I believe, a result of using an overnight starter (poolish). Above are some photos and below is the recipe for anyone who may be interested in what I believe are really good breakfast or dinner rolls.

Note: This recipe can be halved.

Howard


Petite Pain – Howard’s Formula

Starter Dough Mixture (Poolish)Ingredients

Unbleached all-purpose flour………………………………………………… 10.4 ounces
Instant yeast………………………………………………………………………….... 1/4 teaspoon
Malt powder (optional)…………………………………………………………..... 2 teaspoons
Water, at room temperature (70-90 deg. F.)…………….…..... 8 ounces

Total Starter Dough Mixture……………………………….. 18.8 ounces

Six hours or up to 2 days ahead, make the starter dough (poolish). In a medium bowl or 2 quart plastic container, combine all the ingredients for the poolish and stir the mixture with a wooden spoon for 3 to 5 minutes or until it is smooth and comes away from the side of the bowl/container. It will be slightly sticky to the touch.

Cover the bowl/container tightly with a lid or oiled plastic wrap (or place the poolish in a 2 quart food storage container with a lid) and set it aside until tripled in volume and filled with bubbles. Note: when the poolish has reached its peak there should be lines and creases on the surface and the mixture should be bubbly/foamy-like and it should be beginning to fall back on itself but not collapsing entirely. At room temperature, this will take about 6 hours. Note: After 3 hours the poolish can be stored in the refrigerator for up to 2 days.

If refrigerated, remove it to room temperature for 1 hour before mixing the final dough.

To proceed with the rolls add the water from the Final Dough Mixture (below) to the poolish container, stir it down and proceed with mixing the Final Dough per the instructions below.

Final Dough Mixture Ingredients

Unbleached all-purpose flour………………………………………………… 25.0 ounces
Instant yeast………………………………………………………………………....….. 1 teaspoon
Salt……………………………………………………………………………………….......… 2 teaspoons
Water, at room temperature (70-90 deg. F.)………………….. 16 ounces
Poolish (from above)……………………………………………….……………….18.8 ounces

Total Final Dough Mixture……………………….......…….. 65.36 ounces

Mix the Final Dough.

In the mixer bowl (I use a KitchenAid), whisk together the flour and yeast. Then whisk in the salt (this keeps the yeast from coming into direct contact with the salt, which could affect the yeast’s leavening properties). If you haven’t done so, add the Final Dough water to the container with the poolish and loosen the poolish from the container with a rubber spatula or wooden spoon, loosely mixing it with the water.

Add the water/poolish mixture to the mixing bowl. Using the paddle attachment, mix on low speed for a couple of minutes (#1 speed if using a KitchenAid) adding the flour/yeast/salt mixture ½ cup at a time, until the flour is moistened into a shaggy mass. Turn off the mixer and cover the top of the mixer bowl with plastic wrap or a clean kitchen towel and allow dough to autolyse (rest) for 20-30 minutes.

Remove the film/towel and turn the mixer on to speed #2 and continue for about 5 minutes until it starts to develop gluten has strands. After 5 minutes increase the speed to # 6 for about 30-60 seconds, or until the dough pulls away from the sides of the mixer bowl. If the dough hasn’t pulled away after about a minute, scrape down the sides of the bowl and beat on medium-high (#6 Kitchen Aid) for another 2 minutes. If it still doesn’t pull away from the bowl, beat in a little flour, 1 teaspoon at a time, on low speed (#2 KitchenAid). The dough should cling to your fingers when touched.

Let the dough rise.
Using an oiled spatula or dough scraper, scrape the dough from the paddle and container into a 4 quart food storage container, light oiled with cooking spray or oil. (The Final Dough will weigh 65.3 ounces and be 62.5% hydration) Push down the dough and lightly spray or oil the top with cooking oil. Cover the container with a lid or plastic wrap. With a piece of tape, mark the side of the container at approximately where triple the height of the dough would be. Allow the dough to rise (ideally at 75 deg. F) until tripled in volume, 1 ¼ to 2 hours.

Note: At 20 minute intervals, during the first hour of bulk fermentation, empty the dough onto a slightly wet work surface (not floured but lightly misted with water) and stretch the dough, folding it into thirds, like a business letter.  Turn it a quarter turn and fold it into thirds again. Then place it back into the container seam side down.

Do a total of 3 stretch and folds at 20 minute intervals during the first hour of bulk fermentation.

Divide and shape the dough and let it rise.
Distribute a moderate amount of flour onto your work surface in a square 16” X 16”. Using an oiled spatula, gently scrape the dough onto the floured work surface. Lightly dust the top of the dough with flour. Handle the dough gently at all times to maintain as much gas in the dough as possible. Using a sharp knife or the edge of a dough scraper and a kitchen scale, divide the dough into 4 ounce pieces. You should end up with approximately 16 pieces of dough, each weighing 4 ounces.

Divide the remaining piece of dough (1.3 ounces) into a half dozen, or so, pieces and spread it around, randomly adding a piece of it to the 4 ounce dough pieces. Shape the 4 ounce dough pieces into rolls, using the dry edge of the work surface to get traction in shaping.

Place the rolls on a parchment lined baking pan, cover your rolls lightly with a cloth, plastic wrap, sprayed with cooking oil (to keep it from sticking to the dough), or, as I do, with a rectangular plastic bin large enough to accommodate your baking pans. Let the rolls rise in a warm spot until doubled in volume, 1 ½ to 2 hours.
Use a floured finger to test the rolls to check for spring back.
Do not let them over proof.
Score the tops of each roll with 2 quick slashes made at a 90 degree angle and place them into a preheated 475 degree oven.
Add a cup of water to a preheated pan or skillet to product a large burst of steam.
After 5 minutes reduce the oven temperature to 450 degrees and bake for 20-25 minutes, turning the pans around midway through the baking cycle.
The internal temperature of the rolls, when done, should be 205-210 deg. F.

Notes:

Bobs Red Mill Flour – unbleached, unbromated
KAF instant yeast
Sea salt
KitchenAid Mixer and 5 minutes of hand mixing (Richard Bertinet's slap and fold method) 
3 stretch and folds at 20 minute intervals

SiMignonne's picture
SiMignonne

I'm rather new to the bread making, I've only made three loaves so far but I have a question.  I do not know what to do after punching down.  I'll punch the dough and it sinks in the bowl and then I quickly put it on a floured surface and try to 'shape it' as high and round as I can get it.

I bake the loaves on a pizza stone in the oven so I usually just flour a cutting board and let the dough rise it's last rise, and then transfer.  However, my loaves aren't as high as I would like them to be.  They aren't flat, but I want them to be a bit 'poofier'.  After I punch the dough down, can I knead it again and then shape it?  Or will that ruin the 'air bubbles'?

I finished lesson two last night and have wonderful bread. I just finished a PB&J sandwhich I had for lunch and it was quite tasty.  I also had some chease toast with it this morning that was wonderful!

Any advice anyone can give me will be much appriciated!

gaaarp's picture
gaaarp

Like many people, I found TFL in my quest to learn how to make sourdough.  I had a starter going and was sure I had killed it.  The advice I found here gave me the knowledge and confidence to make a starter that I've been using for months now, with ever-better results.

Although there is a wealth of information here, there was no one source that detailed the method I used, which was based on Reinhart's "barm" in BBA.  Now that I have succeeded in making several starters, I've been thinking about making a video tutorial to walk through the process step-by-step, day-by-day.  My own experience and that of others here has taught me one thing:  sourdough starters don't read baking books, so they don't know how they are "supposed" to behave.  I could have been spared the angst, the wasted time, and of course, pounds of precious flour, if only I had known what to expect and what to look for. 

I don't have the technical part of video-making worked out yet, so I have decided to do a tutorial blog.  This will be a real test, as I am trying out a modified starter that I haven't made before.  It's still based on Peter's starter, but I have altered the amounts, and possibly the times, to suit my own fancy.  If all goes well, I will end up with a more reasonable (i.e., much smaller) amount of starter, and I will get there with much less wasted flour.

So here goes:

Day 1: 

Ingredients:  1/3 cup rye flour and 1/4 cup water

For the flour, I use stone-ground rye.  Nothing special, just what I got from the grocery store.  My water is tap water run through a filter.  Before I had he filter on my sink, I used bottled drinking water.

Mix the flour and water in a bowl.  It will be thick and pasty, kind of like the oatmeal that's left in the pot if you don't come down for breakfast on time. 

Day 1 - thick and pasty

Once all the flour is mixed in, put it in a pint-sized or larger container and cover with plastic wrap.  Leave it out on the counter. 

Day 1 - ready to rest

And that's it for today.


Day 2:

Ingredients:  1/4 cup unbleached AP, bread, or high gluten flour; 1/8 cup water

There should be little, if any, change in the culture from yesterday.  Again, I'm not really particular about the flour.  I would just recommend staying away from bleached flour.  I am using AP flour for this batch.

Mix the flour, water, and all of the starter from yesterday in a bowl.  It will still be thick but a little wetter than yesterday. 

Day 2 - still thick, but not quite as gooey

Put it back in the container (no need to wash it), press it down as level as you can get it, and mark the top of the culture with a piece of tape on the outside of the container. 

Day 2 - nighty night

Put the plastic wrap back on top, and you're finished.


Day 3:

Ingredients:  1/4 cup unbleached AP, bread, or high gluten flour; 1/8 cup water

Around Day 3 or 4, something happens that puts terror in the heart of the amateur sourdough maker:  they get a whiff of their starter.  When you check your starter on Day 3, you may notice a strange, and not at all pleasant, odor.  And unless you know better (which you will now), you'll swear something is drastically wrong.  In fact, I would venture to guess that that smell has been the ruin of more amateur sourdough growers than anything else.  It's an acrid, sour, almost rotten smell, and it's perfectly normal.  And rest assured, your new baby sourdough starter will soon outgrow it.  So, take heart, and press on.

You may also notice that your starter has begun to come to life.  It probably won't grow a lot, maybe 50%, but you will start to see bubbles, like these:

It is ALIVE!!!!!

Regardless of the amount of growth, stir down your starter, throw out about half (no need to measure, just eyeball it), and mix the rest with today's flour and water.  You will get a slightly more doughy-looking mass:

Is is soup yet?

Once it's well mixed, put it back in the container (still no need to wash), pat it down, and move your tape to again mark the top of the starter.

Let 'er rise

Put the plastic wrap back on the container, and take the rest of the evening off.  You worked hard today.


Day 4:

Ingredients:  1/4 cup unbleached AP, bread, or high gluten flour; 1/8 cup water

And now, a word about measurements.  If you bake regularly, or even if you've just been nosing around baking sites for a while, you are no doubt aware that the ingredients in most artisan bread recipes are listed by weight rather than volume.  I measure by weight for my baking and for maintaining my sourdough starter. 

You might wonder why, then, am I using volume measurements here?  Two reasons: first, I have tried to make this starter as simple to follow as possible -- no special tools, no monkeying around with the scales, just a couple of measuring cups and a bowl.  And, when it comes to starting a starter, the measurements aren't as critical as when you actually go to bake with it.  So for now, we're just using measuring cups. 

Today is another one of those days where novice sourdough starter makers often lose heart.  Your starter is now coming to life, and like most living things, it kind of has a mind of its own.  Up until now, we followed the clock, making our additions every 24 hours.  Now, we will be letting the starter dictate the timeframe. 

Before you do your Day 4 additions, you want to make sure your starter has at least doubled.  If it doubles in less than 24 hours, you should still wait until the 24 hour mark.  If it takes more than 24 hours, be patient.  Let it double.  It may take another 12 or 24 hours, or it may take longer.  Again, be patient.  It will double.  Just give it time.  Eventually, you'll end up with a nice, bubbly starter:

Day 4 - rising to the occassion

You can see that mine more than doubled.  But I still waited for 24 hours.  Once it doubles, throw out half of the starter, then mix the rest with the flour and water, and back into the bowl it goes:

Day 4 - Edwina, back in bowl

Replace the tape and plastic wrap.  Then wait for it to double.   It could take as little as 4 hours, or it may take more than 24 hours.  This time, you can move on to Day 5 at any point after doubling.  It's OK if you let it more than double; it's also OK to move on right when it hits the double mark.  So, hurry up and wait.


Day 5:

Ingredients:  3/4 cup unbleached AP, bread, or high gluten flour; 1/2 cup water

Once your starter has at least doubled, it's time for the final mix.

Day 5 - alive and kicking

Combine flour, water, and 1/4 cup starter in a bowl and mix well.  Transfer to a clean container with room for the starter to at least double.

Day 5 - final mix

OK, one last time, cover with plastic wrap and let it sit on the counter until it gets nice and bubbly.  Don't worry so much about how much it grows, just so that it's bubbly looking.  This will probably take around 6 hours, but, again, don't stress about the time.  Let the starter tell you when it's ready.

Day 5 - Congratulations, it's a bouncing baby starter!

When your starter gets bubbly, pat yourself on the back:  you are now the proud parent of a bouncing baby starter!  Put a lid or other cover on your container and put it in the refrigerator.  Let it chill overnight, and you can begin using it the next day.

Day 6 and beyond:

By today, your starter is ready to use.  The flavor will continue to develop over the next several weeks to month, so don't be disappointed if your first few loaves aren't sour enough for you.  I would still recommend beginning to bake with it right away, especially if you have never made sourdough bread before.  That way, you can hone your skills while your starter develops its flavor.

Feeding your sourdough:  If you keep your sourdough in the fridge, you only have to feed it about once a week.  And you can minimize your discards by keeping only what you need and feeding it when you want to bake with it.  I recommend a 1:1:1 (starter:flour:water) feeding, which means each feeding includes an equal amount, by weight, of starter, flour, and water. 

Start by weighing your starter, subtracting the weight of your container.  Then add an equal amount of flour and water directly to the container.  So, for example, if you have 100 grams of starter, you would add 100 grams each of flour and water.  If you feed your starter right out of the fridge, as I do, warm your water to lukewarm (90 - 100 degrees F).  After you mix in the flour and water, leave it out on the counter for a few hours, then put it back in the refrigerator.  It's best if you feed your starter a few days before you intend to bake with it.

To illustrate, here is an example of my feeding routine, starting with the Day 5 starter and assuming that I finished making the starter on Friday night:

  • Saturday morning, I take out what I need to bake bread (2/3 cup using my normal sourdough bread recipe) and return the rest of the starter to the refrigetator.
  • Wednesday of the next week, I get out the starter, weigh it, and add equal amounts of flour and water in a 1:1:1 ratio, as outlined above.  My goal here is to build up as much starter as I need to make bread on the weekend, and enough left over for my next build.  It's OK if I have more than I need to bake with.  If I don't think I'll have enough after a 1:1:1 build, I will increase my ratio of flour and water, maybe to 1:2:2 or 1:1.5:1.5.  In that case, I will let it sit out until it almost doubles before returning it to the fridge, which might take a bit longer, as I'm using less starter relative to flour and water.
  • Friday night or Saturday morning, I again take out what I need to bake with and return the rest to the fridge, to be fed again mid-week.

This is just an example of how I keep my starter.  You can feed yours more often if you bake more than I do.  It's also OK to let it go more than a week between feedings.  If you do that, though, you might want to feed it a few times before you bake with it.

So, that's it.  Hopefully I've unravelled some of the mystery of sourdough starters and given you the confidence to try one yourself.  Good luck, and let me know how it works out for you!

SiMignonne's picture
SiMignonne

So I love blogging and I've recently discovered break baking.  Today I have discovered this website, and it's everything I could want :)  Blogging and bread!  I wanted to be more self sufficent with my food and I would love nothing more than to not pay $3.00 for bread each week when I can make it myself for half that. 

I started my first loaf after an article that I read about how to make artisan bread in five minutes a day.  It was on the motherearthnews.com website. Well, me being the beinning baker and all didn't understand that yeast has to foam up before you can use it.  So, needless to say, it didn't pan out so well.  (Can you check out all the inuendos in that sentance?!)  I started another batch and let the yeast do it's magic before hand and it worked much better.  I also found that I like kneading the bread, I really like to get my hands dirty and feel what I'm working with.  Today I have free time (no gym for me tonight it's my off night this week) so I'm going to try lesson number two on this website and add some sugar and milk to my loaf to see how it works out.  I'm also going to put wheat flour on my grocery list so I will have some healthier options to work with.  Can't wait to update with how well it turns out!


SiMi

Naomi Yoheved's picture
Naomi Yoheved

I have never had much success with Rye bread, and have no experience.  Can anyone suggest a good true to form marbled rye recipe?


Naomi Yoheved

Pages

Subscribe to RSS - blogs