The Fresh Loaf

A Community of Amateur Bakers and Artisan Bread Enthusiasts.

theuneditedfoodie's blog

theuneditedfoodie's picture
theuneditedfoodie

Tartine bread has been quite a quest, first in San Francisco, CA., and then here in my lovely little casa, where I basically toiled 25 hours for my two loaves of the basic Tartine country bread.  Let’s start the discussion with San Francisco, CA.; two months back when my wife and I were on vacation to that part of the world, we decided to visit some local bakeries there. Tartine bakery in the Mission district was one of the places we had decided to go. Unfortunately, when we did arrive there, we were told the loaves didn’t come out of the oven by 5pm, and then too there was no assurance if one would get anything or not. Personally, I was a little mystified by the person on the counter, who offered me no pledges even if I stuck around the area till 5pm. Evidently, later through my google searches and endless hours of browsing through the world wide web, I came to know that evidently the new policy of Tartine was that one had to call three days ahead to reserve any bread.. What kind of a bakery is this that even though you may stand long hours waiting outside there is no guarantee of a loaf; obviously there seems to be a problem. My reaction to that was in some ways similar to the SF Weekly’s Jonathan Kauffman, “screw all of you cult-of-Tartine members who use your insider knowledge to screw walk-in customers out of one little loaf of bread.” At least, I am not the only one grunting on my bad luck with Tartine.


To read more on Kauffman’s Tartine bread quest/grunt go here: http://blogs.sfweekly.com/foodie/2010/04/sf_rising_tartines_purported_s.php


Personally, I was a little more than disappointed at Tartine, because in my quest to get loaves from Acme or even Linguria Bakery in North Beach, I didn’t have any major issues. I mean sure on December 24th, I stood 3 hours outside Linguria Bakery, starting at 8 am, to get some of their delightful focaccia, but at least I didn’t go back empty-handed.


A couple of months post my major disappointment at Tartine bakery, I eventually got a hold of their bread book in my library. In some ways, I thought this would be the perfect solace to my disappointment at their bakery. Perhaps, by baking the Tartine bread at home, I may be able to taste what exactly their bread feels/tastes like.


And so, eventually, on Feb 17th at 11.45pm, I started building its leaven. Now, the Tartine leaven asked for a tablespoon of the mature starter, alongside 200 grams of water with 200 grams of 50/50 flour blend (bread flour/ whole wheat flour).  In a perfect world, now that I look back at it, I should have fed the starter to make it more active and bubbly.  For it probably had been close to 3 days since I had last fed it. Perhaps, I was just little tired. Anyways, building the leaven process in the Tartine bread book suggested to leave it overnight. In the morning around 8.45am, I checked to see the leaven and it wasn’t all bubbly. So I dropped a spoonful of it into the bowl of water, to see if it was actually floating or not? Unfortunately, like Titanic my spoonful of leaven sunk too. This was a bad omen, because if the leaven had fermented perfectly, it would have floated, so I decided to increase the temperature of my proofer and kept the leaven there for 3 hours more. Post the 3 hours of wait, I did experiment the same thing, however, this time the results were positive.


The next step was to dissolve the leaven in 700 grams of water, and then gradually add the 900 grams of white flour and 100 grams of whole-wheat flour and bring it together by mixing with bare hands. After that the dough mixture was left to rest for 25 minutes, to what Professor Raymond Calvel (Julia Child and Simon Beck’s teacher for the bread chapter of Mastering the art of french cooking, Volume 2) termed the autolyse.


At the end of the resting period, 20 grams of salt and 50 grams of water were added to the dough mixture. It is after this step where I perhaps created my biggest blunder for the Tartine bread. After combining the salt and the second batch of water was the beginning of the bulk fermentation period for 3 to 4 hours. This is where I forgot to read further instructions, which clearly stated to fold the dough every 30 minutes. So after about 3 hours at 3.30 pm, when I actually did read further, I realized my blunder. So to make that up, in the next hour between 3.30-4.30pm, I actually folded the dough four times, at the interval of 15 minutes. Then in the period from 4.30 to 5.20pm, I folded twice again, at that point of time, I thought I could take out the dough and continue further, that is when disaster struck. The dough just came out as a beast from the sea and took over my wooden cutting board, and like the old man at the sea, I vigorously tried to scoop it with my scraper and tame it. Unfortunately, I couldn’t, clearly the gluten structure had not developed in the dough. So I put it back from where it came, in the glass bowl, and let it ferment for 2 hours more, folding it every 30 minutes. In the mean time, I jumped onto YouTube and started feeding myself with videos on working with higher hydration dough. I would say this procedure did help somewhat, because when I went back at around 7.20pm even though the dough was quite wet, I could work my way through to build two pancake like structures, which were left for 20 minutes on the cutting board.


Eventually, the time came to do the final shaping of the dough—though, in my case, not exactly. For after 3 hours of final proofing, when I tried to take out the dough, it was still quite wet and sticking to my proofing basket cloth, even though I had plenty of flour in there. Somehow, I managed to take the dough out of the basket-however, it had almost gone flat, so I had to shape it again- one last time, before I put it on parchment paper and scored it and then lifted it into the Dutch oven.  By the time I put my first bread in the Dutch oven, it was 10.30pm and by the time, I got to bake my second bread and clean the kitchen it was about 12.30 pm. Since, the loaves were still cooling, I decided to cut the bread the next day and waited with breath abated.


So the following day, I decided to have some of my Tartine bread with good old butter and some Thimbleberry jam, which a friend of mine got me from Michigan. I would definitely recommend this jam to all the jam lovers; in fact you can even order it online at www.thimbleberryjamlady.com/store/. Now, coming back to my bread, the crust and crumb were quite decent. The crust as I have previously, repeatedly said, in a home oven the best crust can only happen in a Dutch oven. The performance of the crumb was quite delightful. The wife was also pleased that the bread had a sour note to it. I am guessing my overnight leaven build, did help accommodate the sourness to it. Looking back on thefreshloaf.com, I thought a lot of the members had varied feelings about the Tartine country bread. Some thought the recipe was just too long, which I can understand to a point, but then you tend to indulge in a lot of fine details that only helps you improve the overall performance of the bread. 

theuneditedfoodie's picture
theuneditedfoodie

Hamelman's Pain au Levain


 Reinhart's Pain au Levain

More recently, I have being doing a comparative analysis on two different kinds of Pain au Levain’s. The two Pain au Levain’s, I have been working on over the coarse of last few days were Jeffery Hamelman’s Pain au Levain (sourdough bread) from Bread- a baker’s book of techniques and recipes, and Peter Reinhart’s Pain au Levain from Peter Reinhart’s artisan breads everyday.

Having said that let me start with Hamelman’s Pain au Levain that had an interesting new twist that was different from the previous three sourdough breads that I have baked. The final build (Levain build) is basically built 12 hours before the final dough. Usually, I have noticed in Reinhart’ several recipes including his version of Pain au Levain that the starter is built only about to 6 to 8 hours or even lesser period before the final build. Another difference between the two Pain au Levain’s was that Hamelman’s version required some rye flour other than the bread flour, and Reinhart’s version required whole-wheat flour other than the bread flour. Although, Hamelman does have another recipe where he uses whole-wheat instead of rye. Frankly, speaking it doesn’t really matter much, I mean Pain au Levain is naturally leavened bread, which usually requires some amount of whole grain and that could be substituted with any whole grain such as rye or whole-wheat.

Another major difference between the two recipes was the different autolyse periods. Hamelman preferred anywhere from 20 to 60 minutes, while Reinhart insisted on just about 5 minutes. Also, Hamelman prefers to mix his levain build right after the autolyse period into the so called final dough, unlike Reinhart who asks to cut the levain build into 10 to 12 pieces and mix it with the final build, only then leaving it for an autolyse period after that.

The other variance I observed between the two recipes was the bulk fermentation periods. In Hamelman’s recipe, the period was for 2 and half hours, where in-between you had the folding to be addressed after every 50 minutes.  While in Reinhart’s recipe the so-called bulk fermentation was for 40 minutes, where in he asked to fold the dough at every 10 minutes. Of course in Reinhart’s case he asks you to put the dough back into refrigeration for 8 to 12 hours for some more delayed fermentation and then a final fermentation on baking day at room temperature for 2 to 3 hours. In Hamelman’s recipe the final fermentation takes place the same day as bulk fermentation for 2 and half hours.

As per baking is concerned, I took a new route on both the loaves, unlike what their authors had suggested. Having recently read Tartine by Chad Robertson and also having experimented several times with Jim Lahey’s No Knead breads, I personally have come to the conclusion that atleast in my oven the best approach to get a good crust can only be reached through the process of a dutch oven. Thus, I decided to bake both the Pain au Levain’s in the dutch oven.

In my conclusion, I would write that both the Pain au Levain’s turned out excellent with probably one of the better crusts in recent baking, thanks to the dutch oven. As per the crumb, I thought both were delightful, though I think I may prefer the whole-wheat over rye, but then that could purely be to the reasons that I have had more whole-wheat in my life than rye.  The other problem, I had faced more so with Reinhart’s dough was that it was a really wet dough, it had a hydration rate about 68.12%, while Hamelman’s recipe which had a 65% hydration rate was in some ways slightly easier to work with. In the end it is hard to say, which was a better recipe, but if I have to go back and choose from the two, it would probably be Hamelman. 

theuneditedfoodie's picture
theuneditedfoodie


I am on a roll and it is called the sourdough-juggernaut insane roll. I mean what else do you expect in a despondent economy like ours? For a miserable proletariat like myself, who is underemployed, partly circumstances/partly choice, what better way to spend your days than to bake up some bread.
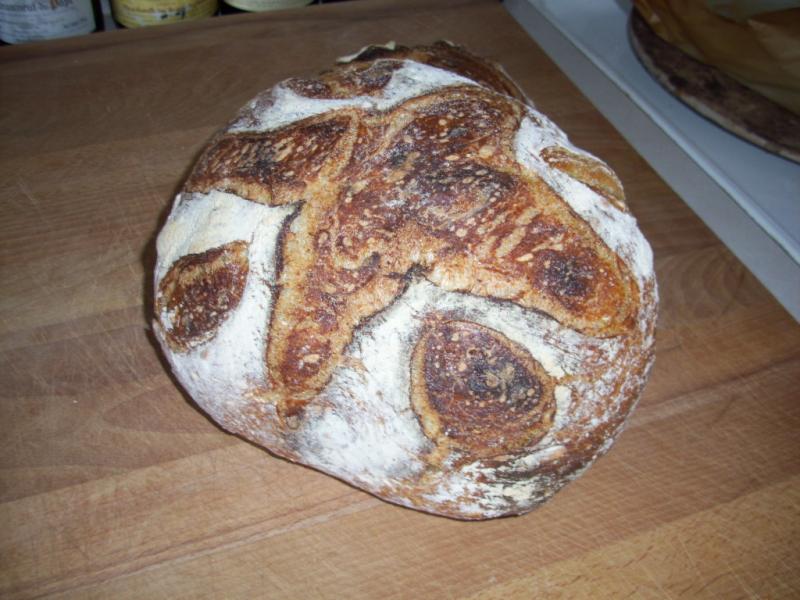
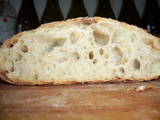
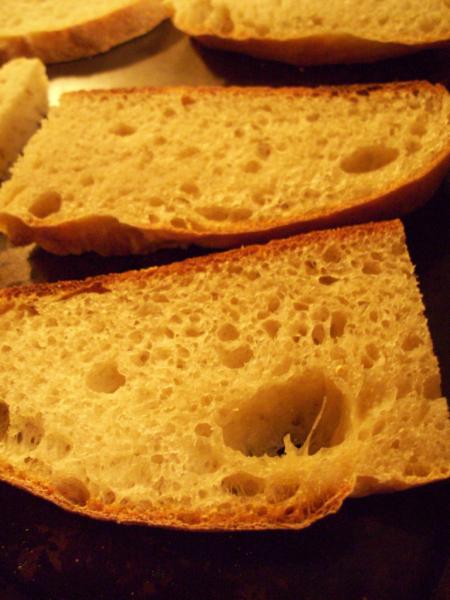
More recently, I ventured into the bread that I have long admired, this one being the Poilane-Style Miche from Peter Reinhart. Now, Lionel Poilane as a lot of bread enthusiasts would understand is clearly the best baker in Paris and so obviously the best baker in the world. It would be any bread fanatic’s wildest dream to be an apprentice in Boulangerie Poilane, someday. To my understanding, the Boulangerie Poilane even ships their famous miche loaves to the United States. I mean it may sound truly insane, but there have been days when I have actually thought of buying it and getting it shipped. But I have been resisting, for hopefully if I can save enough by next year and my stars finally do get aligned, I would love to go to Boulangerie Poilane in person and pay homage to one of the best bakers of my time.

As I was getting started with my mission miche, I was also excited since I started my sourdough adventures it would have been my first date with an almost whole-wheat sourdough bread, since the only thing that wasn’t whole wheat was the barm (mother starter), made up of bread/ white flour. In my heart of hearts, I have always been a little scared of everything other than the bread/white flour, for usually the crumb always tends to be a little tight and dense, particularly when the percentage of whole-wheat is almost 100%.  Now, I knew about this occurrence even before jumping into mission miche, but nevertheless the idea of reproducing a miche by your own hands was seductive enough for me to get into it.

My first major issue in the process came upon while going through the windowpane test. I mean I have successfully administered the windowpane test for the bread/white flour; however, I seriously started questioning during this procedure- if a windowpane process actually exists for whole-wheat flour? I mean, I understand it is a lot harder for the gluten to develop in whole-wheat, but at the same time I didn’t want to over-knead my dough. 


Also, with issues of kneading, proofing and baking, I had cut the original quantity in half. This way it was much easier to control the beast.  My final fermentation of the dough took place in a glass bowl, which I have started to question is a good idea or not, for some reason it tends to lose shape often, though not so much in this case, perhaps it was something to do with whole-wheat.  Just before launching my miche in the oven, I made some cuts or let’s say tried to. Now, I am not sure during making cuts, if one should just do it once and let it be, or actually sometimes go back and try to go deeper in the second or third turn. During this attempt, I went with the latter.

The miche stayed in the oven for slightly shorter time than Reinhart had suggested in the book, since my quantity had been cut into half from the original amount. Just to be on a safe side, I did check the temperature of the loaf and it had reached 205 degree Fahrenheit, before I took it out.  The miche looked good, not exactly like the Reinhart one or perhaps anywhere close to that but just about satisfactory. 

Cutting into the loaf the next day was a slight challenge, definitely had to use some strength to open it up. And even though the crumb was slightly dense as predicted, the flavors were amazing; you could really taste the sourdough in it. Also, the crust was wonderful. The interesting aspect was that even though the loaf was considerably heavy while holding it, while biting through it- it actually felt pretty light!


theuneditedfoodie's picture
theuneditedfoodie

I am a man on a mission. After having just baked my first sourdough bread- the basic sourdough bread from the BBA, I definitely want more sourdough. My first sourdough may have looked like unleavened bread to some of my friends, but even they, the most critical of the lot, appreciated its crust, crumb and aroma. Sure I need to improve my shaping and scoring, but that doesn’t stop me from experimenting with new sourdough breads. Fortunately or unfortunately, I have turned myself into a sourdough juggernaut.


On another note, the second sourdough bread that I recently made was something that I borrowed from a blog (wildyeastblog.com), and the blogger in turn had borrowed it from Jeffery Hamelman’s Bread: a baker's book of techniques and recipes. The blogger has evidently named this recipe as Norwich sourdough bread, to pay homage to Hamelman’s King Arthur Flour bakery in Norwich, Vermont. Now, my reasons to choose that particular recipe from the wildyeastblog.com was that the site looked pretty impressive and basically I was looking for a recipe for which I had all the ingredients, that mainly being the bread flour and the whole rye flour. Since the quantity just looked overwhelming to me I cut it into half- two batards, although if I had followed the original recipe it would have given me four batards.


After putting my ingredients into play I further ventured into this blog/hamelman’s recipe, which according to the blogger was her best sourdough then (2007), even though, I did see a variation later on, I believe in 2008 where she actually reintroduced the same recipe with more of the sourdough starter to make it sourer. On my own recipe, I followed the blogger’s recipe from A to Z as mentioned and then in the end retarded my dough for overnight final fermentation in the refrigerator.


Now, on day two, after taking my little batards out of the refrigerator, I tried to experiment with them. The first one pretty much hit the oven, as soon as it came out of refrigeration (this is what the blog suggests), while the second one, I left it at room temperature for about 30/40 minutes. As both the breads were done, one could see the results clearly; the second one had a better shape than the first. Also, when I sliced both these breads, I thought the one which was left at room temperature for 30 minutes before baking, seemed to have done better on the texture. Although, there was slight disappointment on the crust on both breads, the crumb on the first one which hit the oven directly after overnight refrigeration was slightly spongy, while the crumb on the second/better one which was allowed to sun bathe at room temperature for sometime, did a whole lot better. 

theuneditedfoodie's picture
theuneditedfoodie

A couple of weeks back, I met a group of bread bakers in the Kansas City area through thefreshloaf.com. The meeting place was decided to be Barley’s Brewhaus in Shawnee, Kansas. At the meeting, one gentleman by the name of Paul had brought some sourdough starter to share.
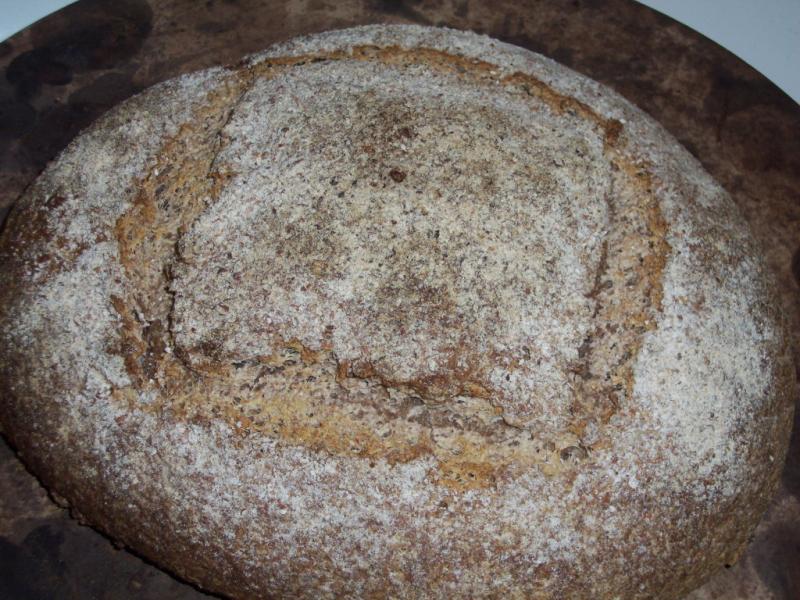
 Paul told us that he had actually started that starter in 2010 in South Africa.  My knowledge in sourdough bread baking was limited then, but I was definitely curious to get started with some sourdough culture. Unfortunately, with winter still lingering and my home temperatures still hovering around 50 to 55 degrees Fahrenheit, I knew that my options of starting a seed culture were limited. At best, I would have to wait till the summer for warm weather to arrive and thus get started on the process of seed culture. Thanks to Paul and his generous contributions with the sourdough culture, I knew that I did not have to wait till summer and could get started immediately. 


Unfortunately, baking with sourdough and keeping your sourdough culture alive is quite a process. It is almost like having a baby or even a pet. Unlike the industrial instant yeast that sits in your fridge, without crying for your attention this sourdough sucker demands regular feeding.  What is even more complicated is the math of feeding, aligned with the prediction of feeding and discarding. Unfortunately, I have never been good with numbers, whether understanding trigonometry or bakers percentage formula, and hence, I decided to write to Paul for advice on getting the sourdough thingy started. Paul was generous in replying back immediately to me on thefreshloaf.com, and his advice definitely came in handy. I mean I did bake my first sourdough bread, thanks to his number crunching. It may not be anything like the Boudin sourdough of San Francisco, but I am sure glad to have produced a loaf with just the wild yeast. So how did I get started? Here is my story.


As I told you guys before, Paul lent us some sourdough starter during our Kansas City bread bakers’ gathering. So basically, I had the sourdough starter in my fridge for about a week, before I got started on the process. Firstly, I took about 10g starter out from that chunk, right from its belly area- for the sides often tend to get a little dry. Then I fed about 10g water+20g flour to it, left it for 2 hours at room temperature, before sticking it back in the fridge.  So this was basically the feeding process, as I understood from Paul’s message.


After that I started with my baking process. This being my first time for sourdough baking, I decided to do Peter Reinhart’s basic sourdough recipe from BBA. Now the recipe called for 4oz of barm in the firm starter. Unfortunately, for some reason I thought it to be 4.5oz which basically equals to 125g. Now, I decided to do a 100% hydration levain for 150g, this way I could use 125g for my recipe and the rest 25g for my sourdough culture, which I would eventually feed and use for future endeavors. So as per the previous paragraph, I already had the starter with 10g water and 20g flour, hence for a 100% hydration for 150g- I added another 65g of water and 55g of flour. Left this at room temperature for about 4 to 5 hours.


Following that I started with Reinhart’s basic sourdough recipe—for that he needed about 110g of barm, which for some reason I calculated to 125g and stored the rest 25g out of the total 150g for future baking.  The rest of the process is pretty much how the basic sourdough recipe calls in BBA, except that in step 7 which is the fermentation for 3 to 4 hours where the dough doubles in size, and then one has to divide it in two batches of about 22oz, mine only came down to 20.5oz and 21oz respectively for some reason.  Also, since for the final proofing, I used a parchment-lined sheet, my boules almost spread flat and got attached to each other like Siamese twins. What also did not help was my scoring, which is pretty poor, and I would love some advice on improving that. Eventually, the loafs did get baked and I separated them after the process; obviously I wasn’t happy with the aesthetics of the bread- but otherwise it had some lovely holes/webs, and the best thing was the smell—you could really tell that it was a sourdough with one whiff! 

theuneditedfoodie's picture
theuneditedfoodie

Starting on where I left this in my previous blog, long story short some viewers got offended by my choice of words in my previous blog of No Knead Variations Part I (http://www.thefreshloaf.com/node/26972/no-knead-variations-part-i), hence, I am going to mind my language here. However, if you would like to read the unedited version of this transcript please visit theuneditedfoodie.blogspot.com

Now on to bread, so previously I talked about two no-knead variations both inspired from Jim Lahey’s, “My Bread”. So after a 1-1 score of no-knead baking, where I did well with the Cranberry-raisin version while sort of not so well at the olive-garlic and rosemary version- I ventured further, this time for the first time into the rye bread category. Personally, I hadn’t used rye flour before this and so it was interesting reading Mr. Lahey’s advice, where he suggested using only 25% rye flour, the other 75% just being the regular bread flour. According to Mr. Lahey, the rye flour can be heavy in itself, hence, the idea to mix it with bread flour- just to keep light. Now, I am sure a lot of you will disagree with me here, but that’s not me its Lahey.

So, now where was I again? Yes, at the no-knead rye bread. Eventually, when I did mix the bread flour, rye flour, yeast, salt and water and basically let it rise for the first time for 18 hours, I was disappointed to see its rise but then that has been the case of my bread rising all this winter. I mean the temperature of the house tends to be around 55 degree Fahrenheit on warm days, so I basically end up locking my no knead mixture in a makeshift proofing room, alongside a petite heater. I mean you have to have your priorities right, either bread or a warm house, I prefer the bread.  If anyone has any better ideas for rising of bread at room temperature of around 50 to 55 degree Fahrenheit, I will be happy to abide.  So once the first rising was done, I took the dough out folded it once or twice, as suggested by Mr. Lahey and wrapped it in a flour towel and let it rest for another two hours.  After, the second rise of two hours, when the bread was finally ready to be slapped into the Dutch oven- I took a deep breath, said my prayers, and even promised my soul to the devil, if the bread came out alright.

Once, it was done baking, I thought that the texture of the bread looked good from outside. However, when I did cut into the bread, I felt that the holes weren’t big enough as in my regular no-knead bread. Obviously, I understand the fact that rye tends to be lot heavier, and that could have played into it- but you know, it was a success that wasn’t very sweet. Sure, it may be good bread, but it definitely had room for improvement. 

Also, I had another question for my comrades on thefreshloaf-how do I upload pictures? I have tried a couple of times- it just keeps repeating upload failed. Could anyone care to send me some directions?

theuneditedfoodie's picture
theuneditedfoodie


I have been a fan of the no-knead bread ever since two of my friends told me about it having been featured in the NY times by Mark Bittman. Now, Bittman, the minimalist guru, is not the one responsible for the No-Knead Bread; sure he helped to sell the concept by featuring it in his column for the NY times, but the mind/man behind the No-Knead success has been Jim Lahey- founder of the Sullivan Street Bakery in New York City. In 2006, the NY times mentioned the no-knead bread for the first time and it just exploded in the amateur bakers’ world, the success of the bread reached phenomenal heights to the extent that Anothony Bourdain called Lahey the Dalai Lama of bread baking. In 2008, Bittman came back with a twist on this no-knead concept and introduced, alongside Lahey, a speedy no-knead concept- where the idea was basically to add more yeast. And although for an amateur baker the speedy no-knead is a revelation, personally, to me, the holes that the bread webs aren’t big enough to give it the perfect flaky/airy crumb. The thing that I love about the no-knead bread is the use of Dutch oven, I meaning by using this noble vessel one can truly get the heat of a professional oven and the physics behind it is just incredible that even a douche, like myself can prepare some great breads. In the past, I have tried the original no-knead bread, which has an initial rising time of 18 hours and then a secondary rising time of 2 hours before it hits the scorching hot Dutch oven. I have also tried the speedy no-knead too, which has a first rise time of 4 to 5 hours, followed by another hour.  So in my quest to understand more no knead and more Lahey, I got Lahey’s bread book, “My Bread-The Revolutionary No-Work, No-Knead Method". One of the first recipes that inspired me from Lahey’s book was the Pan co’ Santi (Walnut bread); this bread contains bread flour, raisins, walnuts, salt, cinnamon, yeast, black pepper, water and cornmeal for dusting. Now, since I am allergic to walnuts, well not exactly, but since I do not like walnuts- I opted for its exodus. Obviously, with walnuts now out of the scene- the bread wasn’t walnut bread anymore, and so I added some cranberry and called it cranberry-raisin bread.  Also, what was exciting to taste was the cinnamon alongside the black pepper with the cranberry and raisins. I have to confess, this was a good festive bread. High on my success of the cranberry-raisin bread, I decided to pull another bread recipe of Lahey’s, this one called the olive bread or Pane all’Olive. Now, the olive bread had of course bread flour, pitted olives, yeast, water and cornmeal for dusting. Although, Lahey strongly suggested to use kalamata olives, since they are soaked in pure salt brine, it would add to the taste of the bread- however, the cheap bastard that I am, I opted for the regular California olives.  Now, in the past when I have made olive bread, I have witnessed problems with gradually introducing olives within the bread, for olives have a huge amount of water and keep wetting my bread dough to where I am pushed to use more bread flour just to keep the dough dry enough for baking.  So when I was making Leahy’s olive bread, I tried to outsmart the liquefied olives by air-drying it with a hair dryer. Did it work? Yes, to some extent or at least I thought when introducing the olives to the flour mixture.  Unfortunately, after the first and second rising, I knew for sure that the motherfucking olives had peed yet again in my flour. This led to very soggy dough, which was extremely hard to handle. I mean as such it is hard to control the aesthetic of the no-knead bread when you are trying to toss it up in the Dutch oven without burning your hand. Somehow after stretching my dough somewhat, I was able to slam it into the container and finally get in the conventional oven to bake.  The results weren’t very satisfying…not only the bread was somewhat moist, the culprit being the olives-it almost tasted like it didn’t have any salt.  Why so? Well, one could say because Leahy didn’t introduce any salt in it, and why that- because he believed that the kalamata olives brined in sea salt would bring enough saltiness to the bread.  The only thing that I was glad about this bread at that point of time was that thankfully, listening to the wife, I had introduced some rosemary and garlic into the flour mixture, which made the bread somewhat edible. Moral of the blog, you live and learn and you bake and get better. To be continued…

Subscribe to RSS - theuneditedfoodie's blog