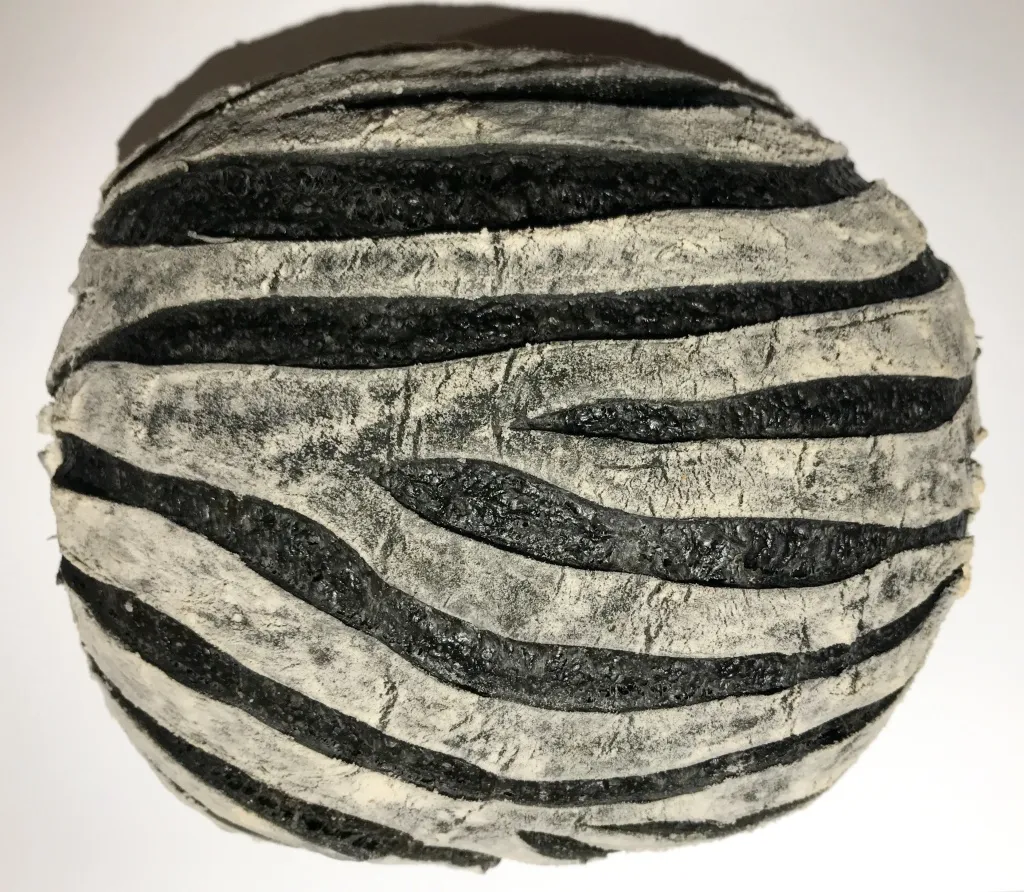
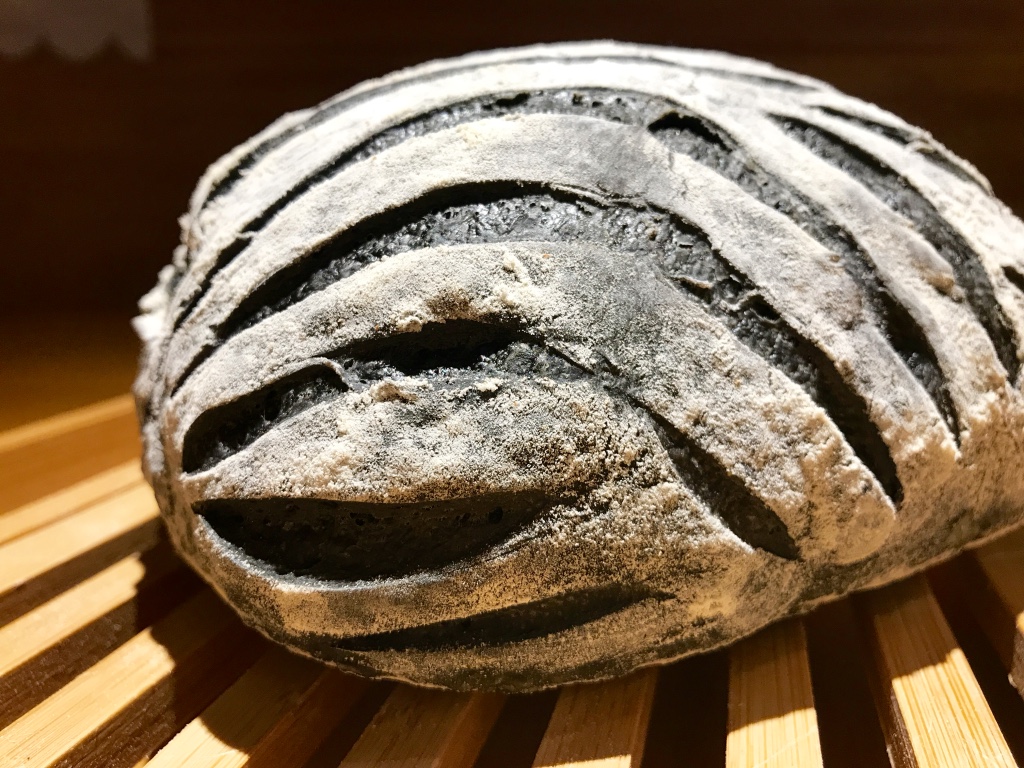
The Fresh Loaf

A Community of Amateur Bakers and Artisan Bread Enthusiasts.

joc1954's blog

joc1954's picture
joc1954

 I used recipe for Challah from Hamelman's book "Bread" for preparing the dough. The only difference was that I used milk instead of water. The dough is on stiiff side so it is relatively easy to work with it.

I did 5 strand braid for the bottom, the middle one was 4 strand and the top one 3 strand. The weight of the dough for one strand in the bottom braid was 130g, middle none 115g and top one 100g. The decorations were made from dough for pasta without egg (flour 150g, oil - 2 tablespoon, water - enough to get smooth but very stiff dough, 3g salt - 2%). For the final I used egg wash but this was done somewhere in the middle of the bake when the dough already stopped raising.

Actually this was my second braided bread in my life and I am really happy that I god a gold award for it on sa state level assessment of braided breads.

Happy baking!

Joze


joc1954's picture
joc1954

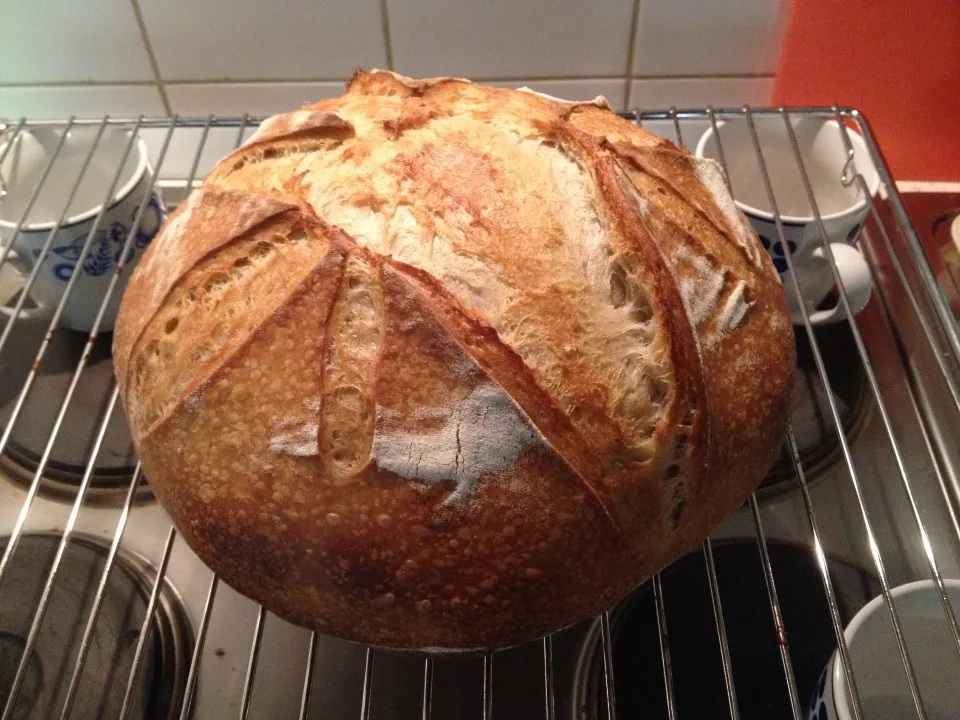
Another version of decorative bread scoring with zebra pattern, this time on a 100% semola rimacinata loaf with 70% hydration and 15% inoculation, cold retarded for about 10 hours only.

My oldest grandson is a big fan of "Pane di Altamura", so I like to bake the bread from semola rimacinata to make him happy. Actually I got only semola flour so I used my home mill to re-mill it twice and get rimacinata flour.
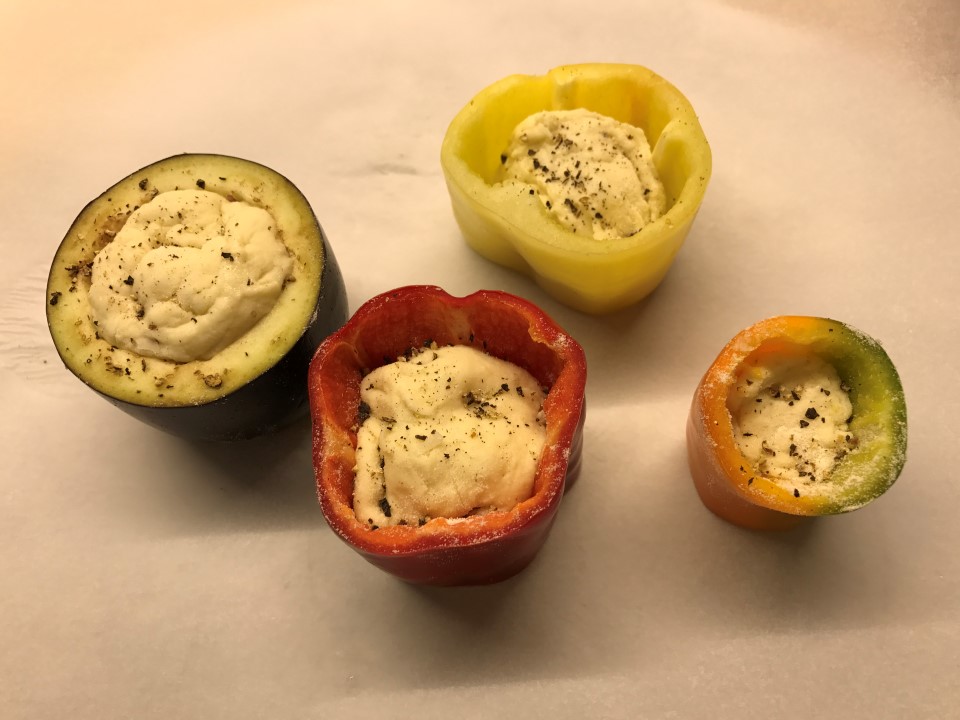
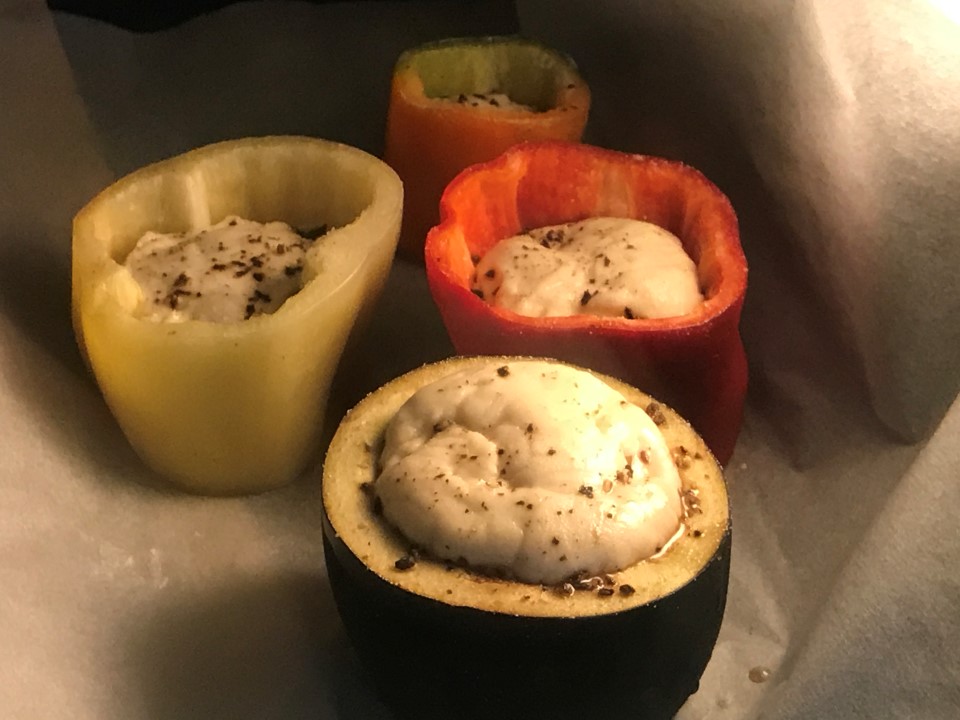
The crumb was extremely soft and puffy.

Happy baking!
Joze


joc1954's picture
joc1954

This bread was inspired by some post on Facebook some time ago. Since the "Eclipse Challenge" I never used the charcoal colour in the bread and therefore I thought that it's time to practice a bit with decorative scoring.

The recipe for the bread is simple - strong bread flour, about 63% hydration and 20% inoculation, bulk ferment for about 3 hours and cold final proofing in the fridge for 24 hours. The white dusting was done with bread flour and scored with a razor, baked in iron cast skillet.

Although the crumb might look unpleasant to somebody there is no change in taste and if one would eat this bread in the darkness he would never notice any difference. Actually the crumb is very lacy, puffy and soft for such low hydration.


joc1954's picture
joc1954

For a long time I was striving to achieve similar result to what dabrownman has done in this post.

Finally I think I got nailed it with extremely long cold fermentation of 66 hours. The kamut grain was milled at home. The only time the dough was out of fridge was first 30 minutes for autolyse. Then I added the salt and after building gluten and adding some more water I ended up with 92% hydration. After that the whole process was going on only in the fridge with several S&F, shaping and cold final proofing. The result is on the picture.

Happy baking to everyone.

Joze

joc1954's picture
joc1954

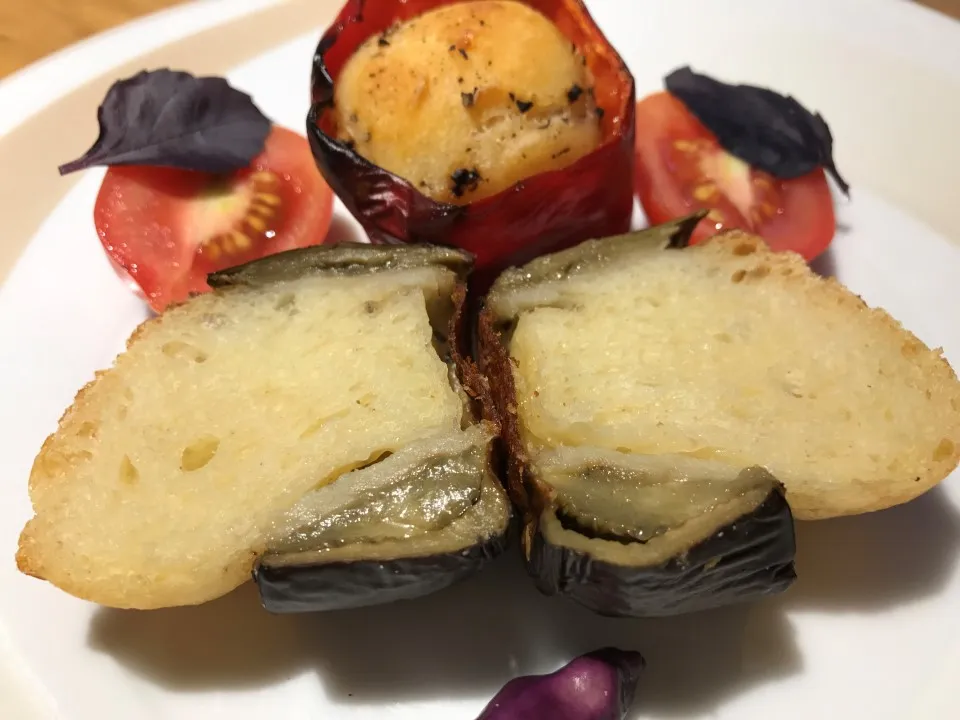
Inspired by Mini Oven comment to my Eclipse 2017 challenge bread #2 I decided to try the idea of stuffing the vegetables with the sourdough. All the bell peppers and egg plan are from our home garden.

I used dough with semola rimacinata which was just available at the time of this experiment. I added some parmigiano cheese and black pepper inside the dough just before final shape and then stuffed that small ball of dough into the bell peppers and egg plant sim side up.

The experiment succeeded nicely as you can see on the pictures. The flavor of roasted/baked bell pepper was transferred to the bread and it had a heavenly taste (I must say that I really like grilled bell peppers). 

I tried also with a egg plant and the result was excellent as well.

My basic idea is that instead of adding ingredients into the dough we can use vegetables or fruits to become the proofing basket and transfer their flavor to the bread. Of course we need to make this in a balanced way and prepare the dough in such way that it will pair well with the taste of the vegetable or fruit.

Actually the dough or hot bread is very susceptible for any flavors. We can use this property and infuse some flavors into the bread while baking. Possibilities are endless.

My experimental bell peppers were fantastic, much better than I was expecting. Served hot are extremely nice starter dish which could also be a one bite dish. Of course the crust should be softer than normal bread has.

Happy baking, Joze

joc1954's picture
joc1954

This bread was inspired by a nmygarden comment (Thanks Cathy for your comment!!!!) to my Elderberry and Hokkaido squash bread.

I wanted to be a little bit more innovative with this bread. I knew I need to make a black dough which was kind of a mental reservation for me, but then I accepted this idea and got 20 g of black color made from charcoal.
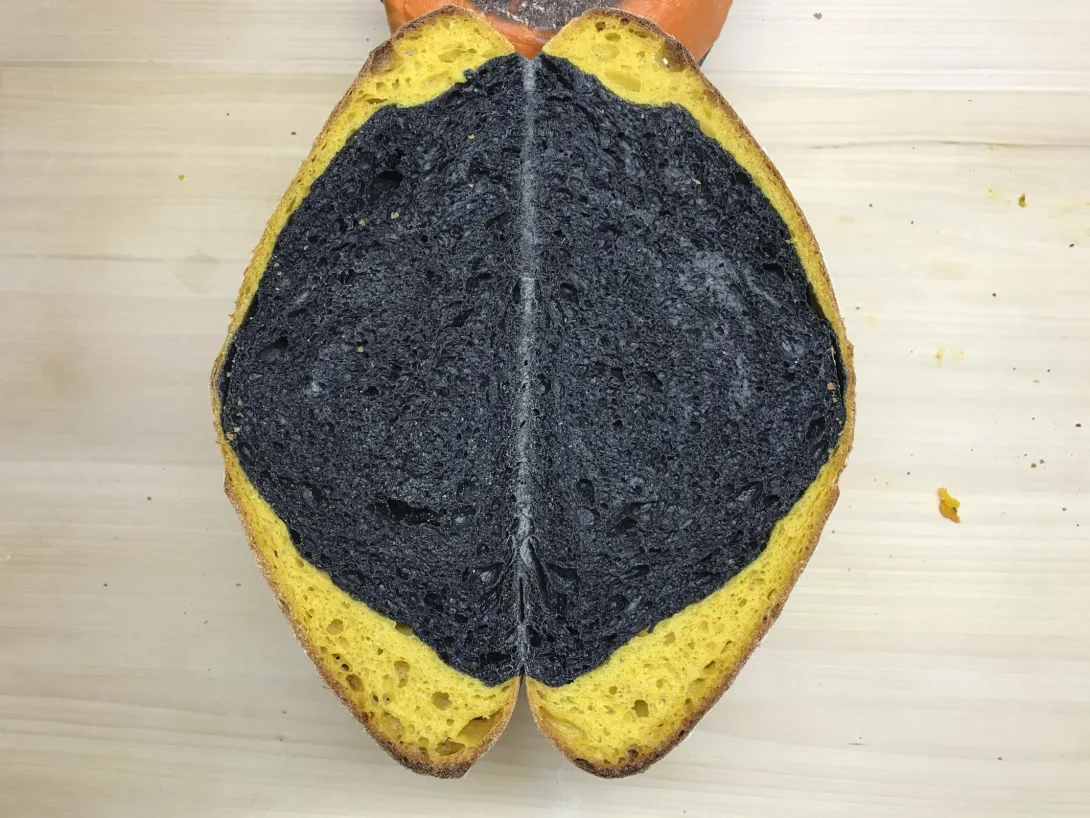


I wanted to cut the boule parallel to the bottom to get a nice black spot in the middle and yellow corona surrounding that. Finally I decided to make a "traditional" cut but not cut the crust on the bottom and then just open the bread and show the crumb what you see on the video.


The rest was easy - yellow color comes from Hokkaido squash puree, shaping was traditional with small exception that I just wrapped the upper part of the boule with yellow dough, but left the bottom part uncovered so I got picture of first solar eclipse right after putting the dough into banneton.

I think the rest is obvious from the pictures.


Happy baking!

Joze

joc1954's picture
joc1954

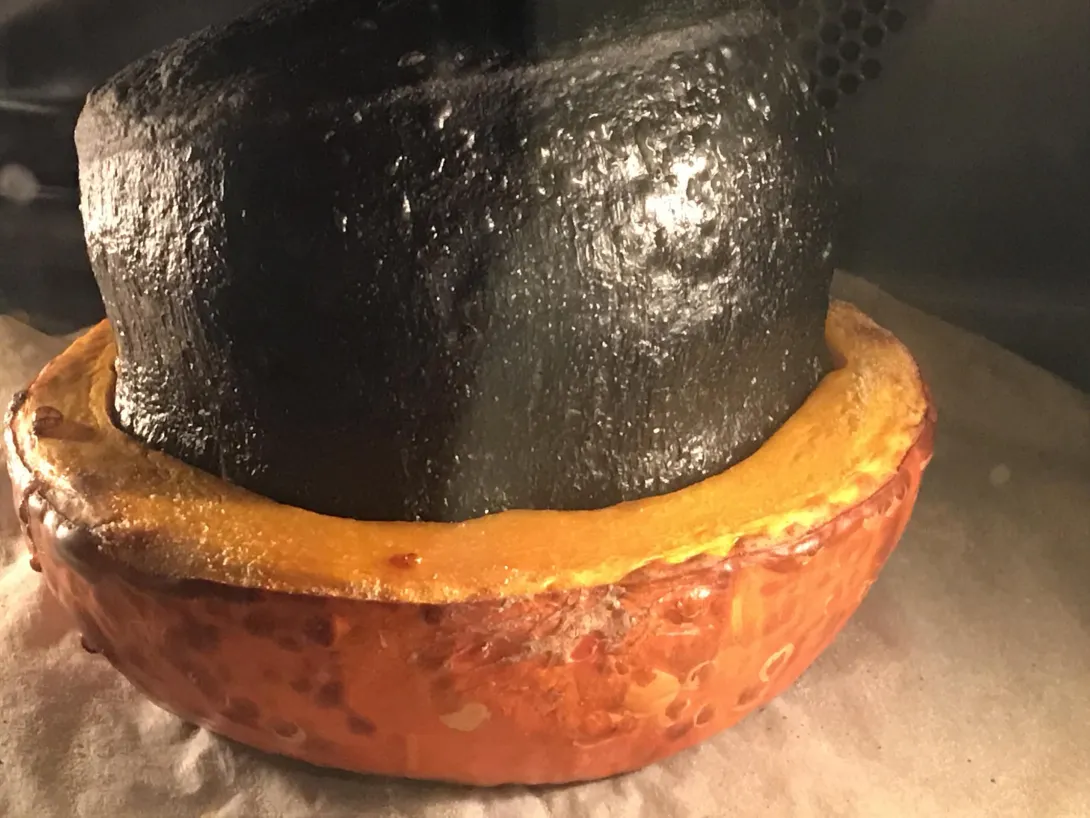
This bread is really a little bit unusual. I used sourdough colored with charcoal to simulate obscuration and Hokkaido squash to simulate the sun's corona.

The dough during the bake expanded much more than anticipated due to intensive fermentation in the bottom part which was warming up slowly due to the squash collar. I created an opening in the bottom of squash to get more even heat transfer and also to get another "solar eclipse" from the bottom side of the loaf.


I think I don't need to explain more as pictures are self explanatory.

First two movies:


joc1954's picture
joc1954

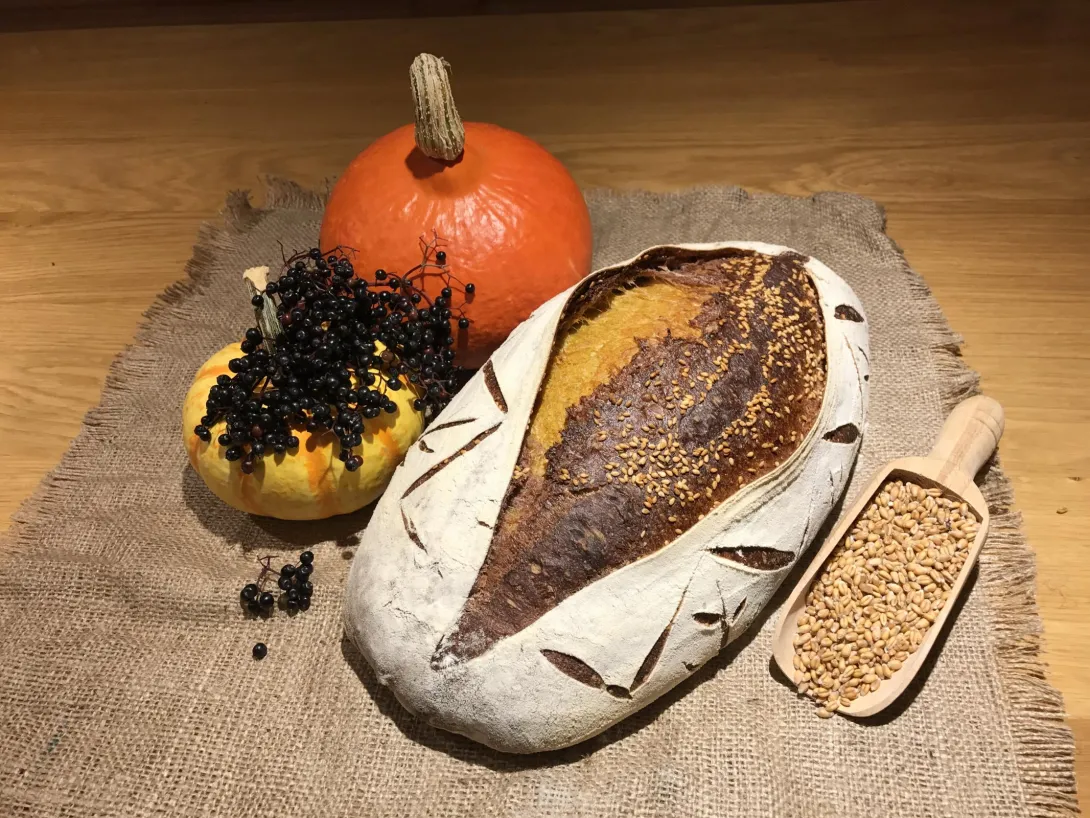
After a long time I decide to experiment with tastes and colors. Right now the elderberry in our vicinity is getting mature and there is abundance of Hokkaido squashes on our home garden. I also decided to coat the bread and dust it with extra flour before scoring it to get some extra effects.
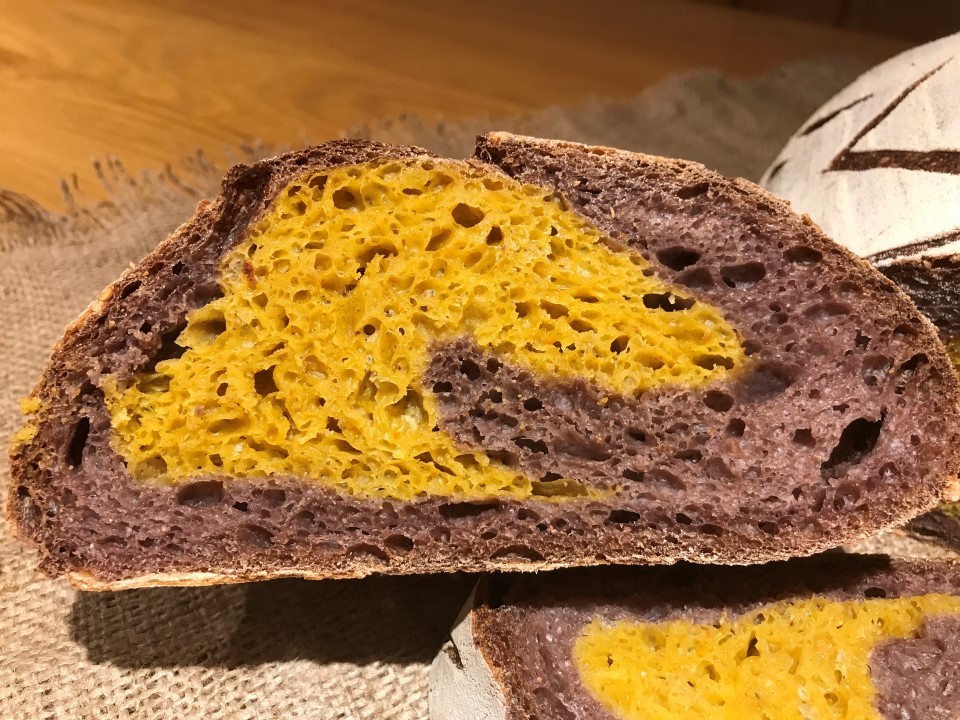
The squash puree was made at home by my usual procedure in a skillet and then pureed. The elderberries were removed from the stem, pureed as well, cooked for a while to get more thick paste. I compensated the sourness of the paste with a little bit of sugar.

I added the extra ingredients one hour into bulk fermentation. I used a pinch of  cinnamon to season the squash puree.

At he end I put the Hokkaido squash dough on top of the elderberries dough and roll it and coat it in a very thin dough made just from flour, water and salt (kind of a pastry dough). Underneath the skin I put some sesame seeds.

Flour use type 850, initial hydration 65%, with all added stuff estimated final hydration ~75%. Proofed in fridge and baked in a steam oven. I added about 40% (bakers %) of puree, and same amount of elderberry paste.

Result: extremely soft bread, with very even porosity, heavenly good. I had to make another batch of this bread a day after for my neighbors as they were so excited because of  so good taste. The rest of the procedure can be seen from the posted pictures..

Happy baking, Joze

joc1954's picture
joc1954


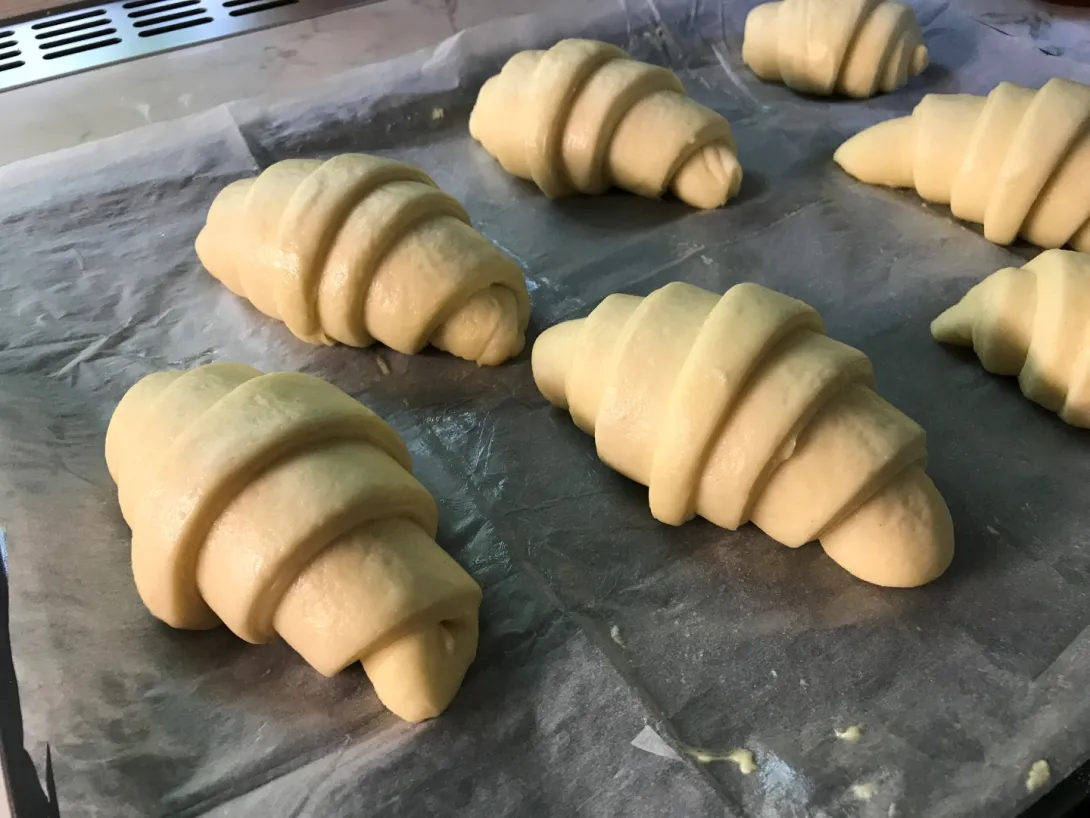
Inspired by recent ricman post about first try making croissants I decided to try my luck. Actually I have never made before a laminated dough as all recipes that I have checked looked very complicated and required a lot of time. 


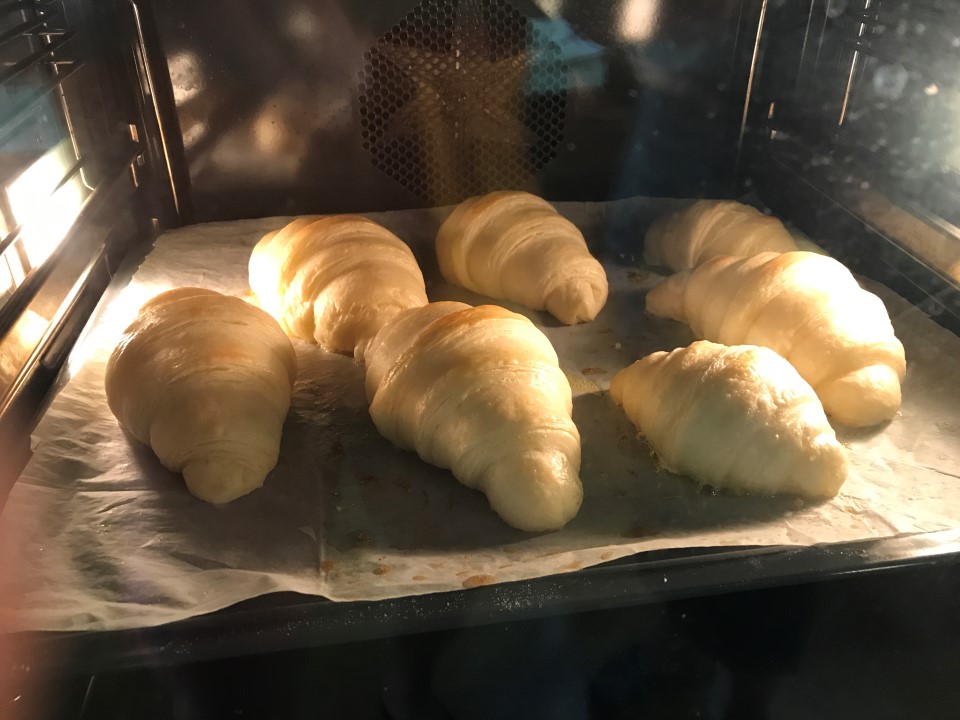
Croissants while being baked.


As a guide for my experiment I used this video by Yuval Ayalon which is about 30 minutes long with a lot of background information. Yuval promises that the overall time of making croissants is about 3.5 hours. I strictly followed his recipe and after about 4 hours I was able to try great croissants. Actually I have never eaten so good croissants so far with the exception of croissants I had eaten at Poilaine bakery in Paris which were far the best ones. I must say that my croissants were very close to those in Paris.

The final result

The only flaw I had was that maybe my oven was slightly too warm when I used it for final proofing. I used a bowl of warm water to warm up and moisten the air but maybe I came to close to melting temperature of butter. Yuval warns in his video about this potential danger, but I was so excited that I was hurrying with the final proof. That was probably the reason that the croissants slightly collapsed after being baked. 

The crumb shot - unfortunately the knife was not sharp enough to make a clean cut. The structure of the crumb was amazing.

The recipe is simple and easy to follow and the outcome was simply amazing. The croissants were heavenly good and just melted in the mouth.

Happy baking,

Joze


joc1954's picture
joc1954

While staying at Island of Hvar in middle Dalmatia I got inspired by big fields of lavender to give a try to a lavender bread. Right now there is a crop of lavender going on and when you pass such field the smell of lavender is simply amazing. Island of Hvar is known to be the island with most sunny days in whole Dalmatia what provides a very good natural conditions for growing lavender, wine and olive trees. As the landscape is very rough with a lot of rocks and small patches of soil the lavender fields are surrounded by stone walls made from rocks which were manually removed centuries ago in order to prepare small micro fields where people could plan olive trees and lavender. The lavender crop is performed completely manually old fashioned way with sickle. I took some shots of this process while passing people harvesting lavender by bike.

Typical lavender field at Island of Hvar with love trees in the background.

 Lavender from backyard where we stay on holidays.

I started lavender yeast water with one tablespoon of honey, some lavender flowers and water. I will use it to make another batch of lavender bread later on this week.


As this was the first time I was making lavender bread I searched through TFL posts and found this interesting post and comment by hanseata (here) with the idea that one should used melted butter to infuse lavender taste into the food. For my bread which was made out of 600g of bread flour I used lavender flowers from 8 stems.

Using butter to capture the lavender flovour.

I prepared the mixture of 70g of butter and lavender flowers (from 8 stems) at the time when I prepared my levain, so about 6 hours before mixing the dough.

The rest of the process was similar to my standard procedure. I used 600g of strong bread flour (type 850), initially 70% of water with additional 5%  added after first 30 minutes. The butter was warmed up and strained before initial mixing which included all flour, water, 100g of starter and all butter. Bulk fermentation was bout 3 hours and then immediate cold retard for about 11 hours. Baked in iron-cast skillet.

The result: I was extremely pleased with result. Whoever tasted the bread agreed that the flavor of lavender was maybe a little bit too strong when you tasted the bread without anything on top of it like butter with jam. So for next time I will use lavender flowers only from 5-6 stems.

This bread perfectly pairs with butter, creme fraiche and any kind of jam, but also fits perfectly together with the Parma ham.


Happy baking, Joze


Pages

Subscribe to RSS - joc1954's blog