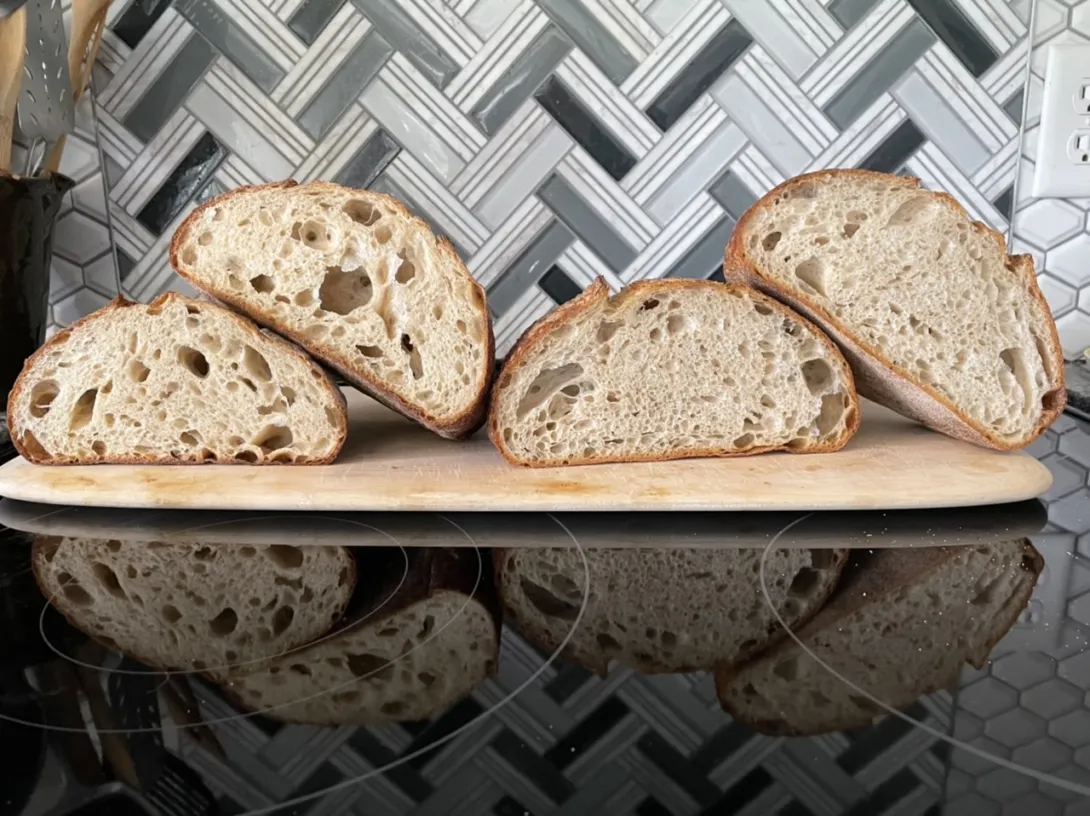
The Fresh Loaf

A Community of Amateur Bakers and Artisan Bread Enthusiasts.

MTloaf's blog

MTloaf's picture
MTloaf

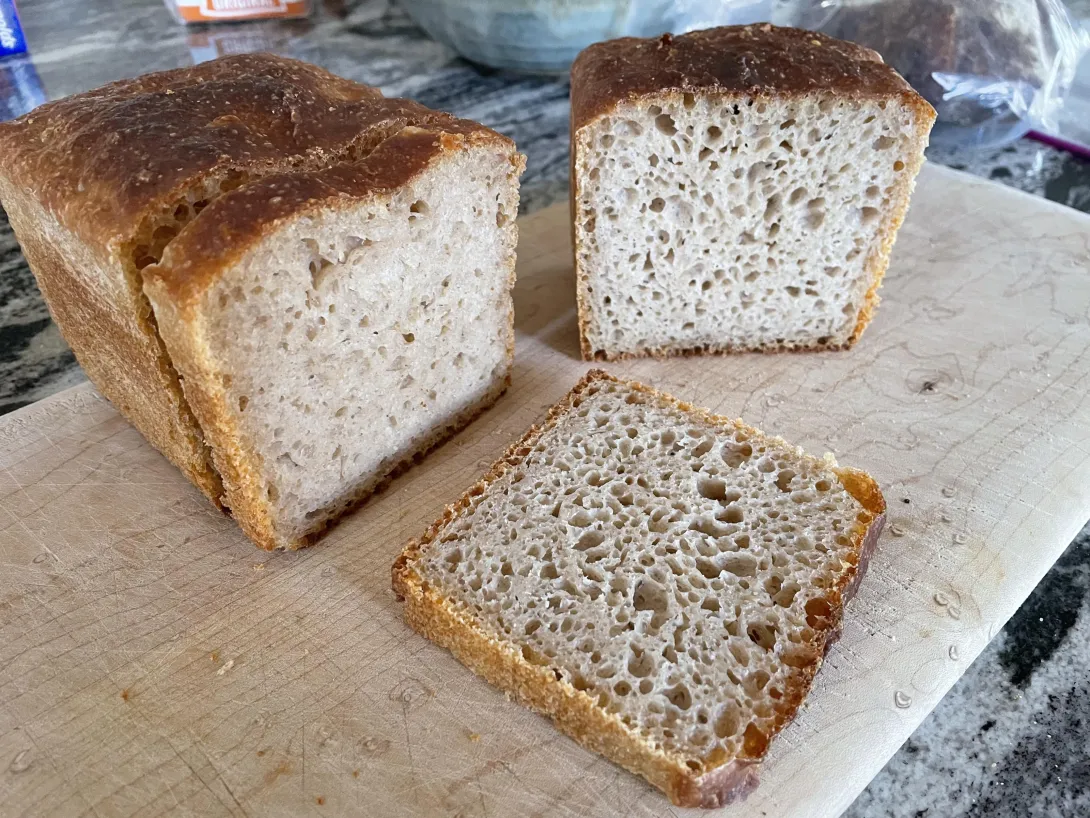
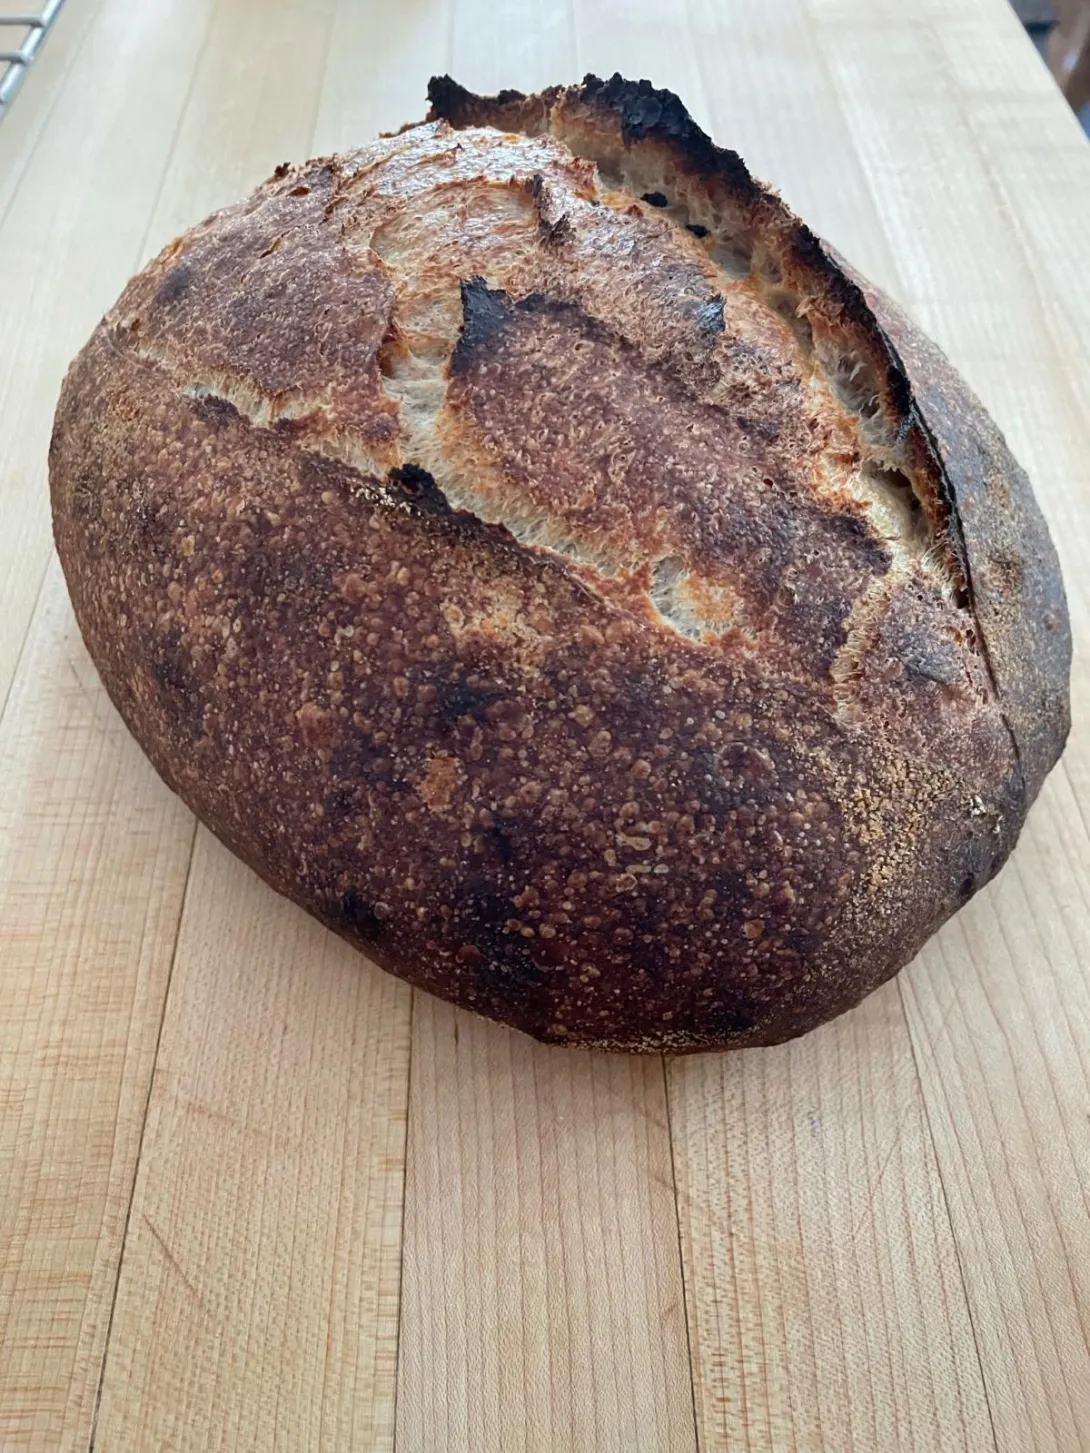
I have been switching my limited repertoire of breads over to the "Don't be a bread hostage" way of doing it from the King Arthur website. It has certainly simplified bread making for me and I really like how this recipe makes a more manageable high hydration bread to work with and produces a very soft and fluffy crumb.This is the Trevor Wilson recipe for cranberry spelt bread that I made a few changes to approximate a compromise of both recipes.

  • 800 grams Total flour 85% King Arthur BF 15% home milled spelt
  • 640 ml water (80%)
  • 18 grams sea salt
  • 180 grams dried cranberries (soaked)
  • 65 grams salted pumpkin seeds
  • 32 grams starter (a couple days old from fridge that was stirred again and warmed up until it was rising again)

Mix everything together but wait until the first fold to add the cranberries and seeds. I did two compass folds around the bowl and then two coil folds 20 minutes apart then bulk ferment until doubled about 12 hours. Divide, shape and proof partially on the counter before retarding in the fridge for 12 hours before baking.

The container I mixed in and the baskets they were proofed in. They baked up extra dark from the dried fruit but that is also recommended for higher hydration bread.

cranberry

I have made this recipe countless times with the former way of doing it including using a mixer but the crumb has never been this soft when using KABF before. When toasted and slathered with Nutella it's like having a slightly healthier pastry with my morning coffee.

A guess as to why this is making better bread for me is that the long slow bulk ferment is giving it more time for the gluten and the flavor to develop. I haven't found a reason for going back to the standard way of making bread. I thought I was going miss the more hands on process of making bread but now I have more time to make other things like this.

Don 

purple and partridge soft hackle

MTloaf's picture
MTloaf

The latest twist and shout version of Maura and Martin’s “Don’t be a bread hostage.” I had some cooked rolled oats leftover from breakfast and mixed it in to make a porridge bread. 

  • 720 grams KAAP 
  • 180 grams home milled hard red wheat 
  • 150 grams cooked oat meal
  • 720 grams water (hold back 100 grams to account for water in the oats
  • 18 grams sea salt
  • 36 grams starter fed in the morning 

Mix starter in the water stir then the WW folllowed by the AP flour and rest for 20 minutes. Add the oats and salt a squeeze together plus any additional water to make a loose foldable dough. Do 3 or 4 folds before bedtime. Dough will double in 12 hours at 72 degrees. Divide, rest and shape then refrigerate until ready to bake. 
Porridge breads have always been hit or miss for me. This one ended up slightly over fermented and was sticky, gassy and not easy to shape. Perhaps too much water as well. Extra stitching was required and I was sure it was going to pancake when it went into the oven. However It did firm up in the fridge and held its shape and ended baking up better than I expected. Someone said an over proofed dough will bake better in a hotter oven so that’s what I tried to do.  Although I should have gone for a bolder bake because of the extra hydration. 
Oat bread

Oat crumb
I like the soft crust and custard like crumb and will be making this again! I am now a captive to this way of making bread;-)

MTloaf's picture
MTloaf

This recipe was brought to my attention in a recent post here with a link to the King Arthur blog post. 
https://www.kingarthurbaking.com/blog/2020/04/06/dont-be-a-bread-hostage 
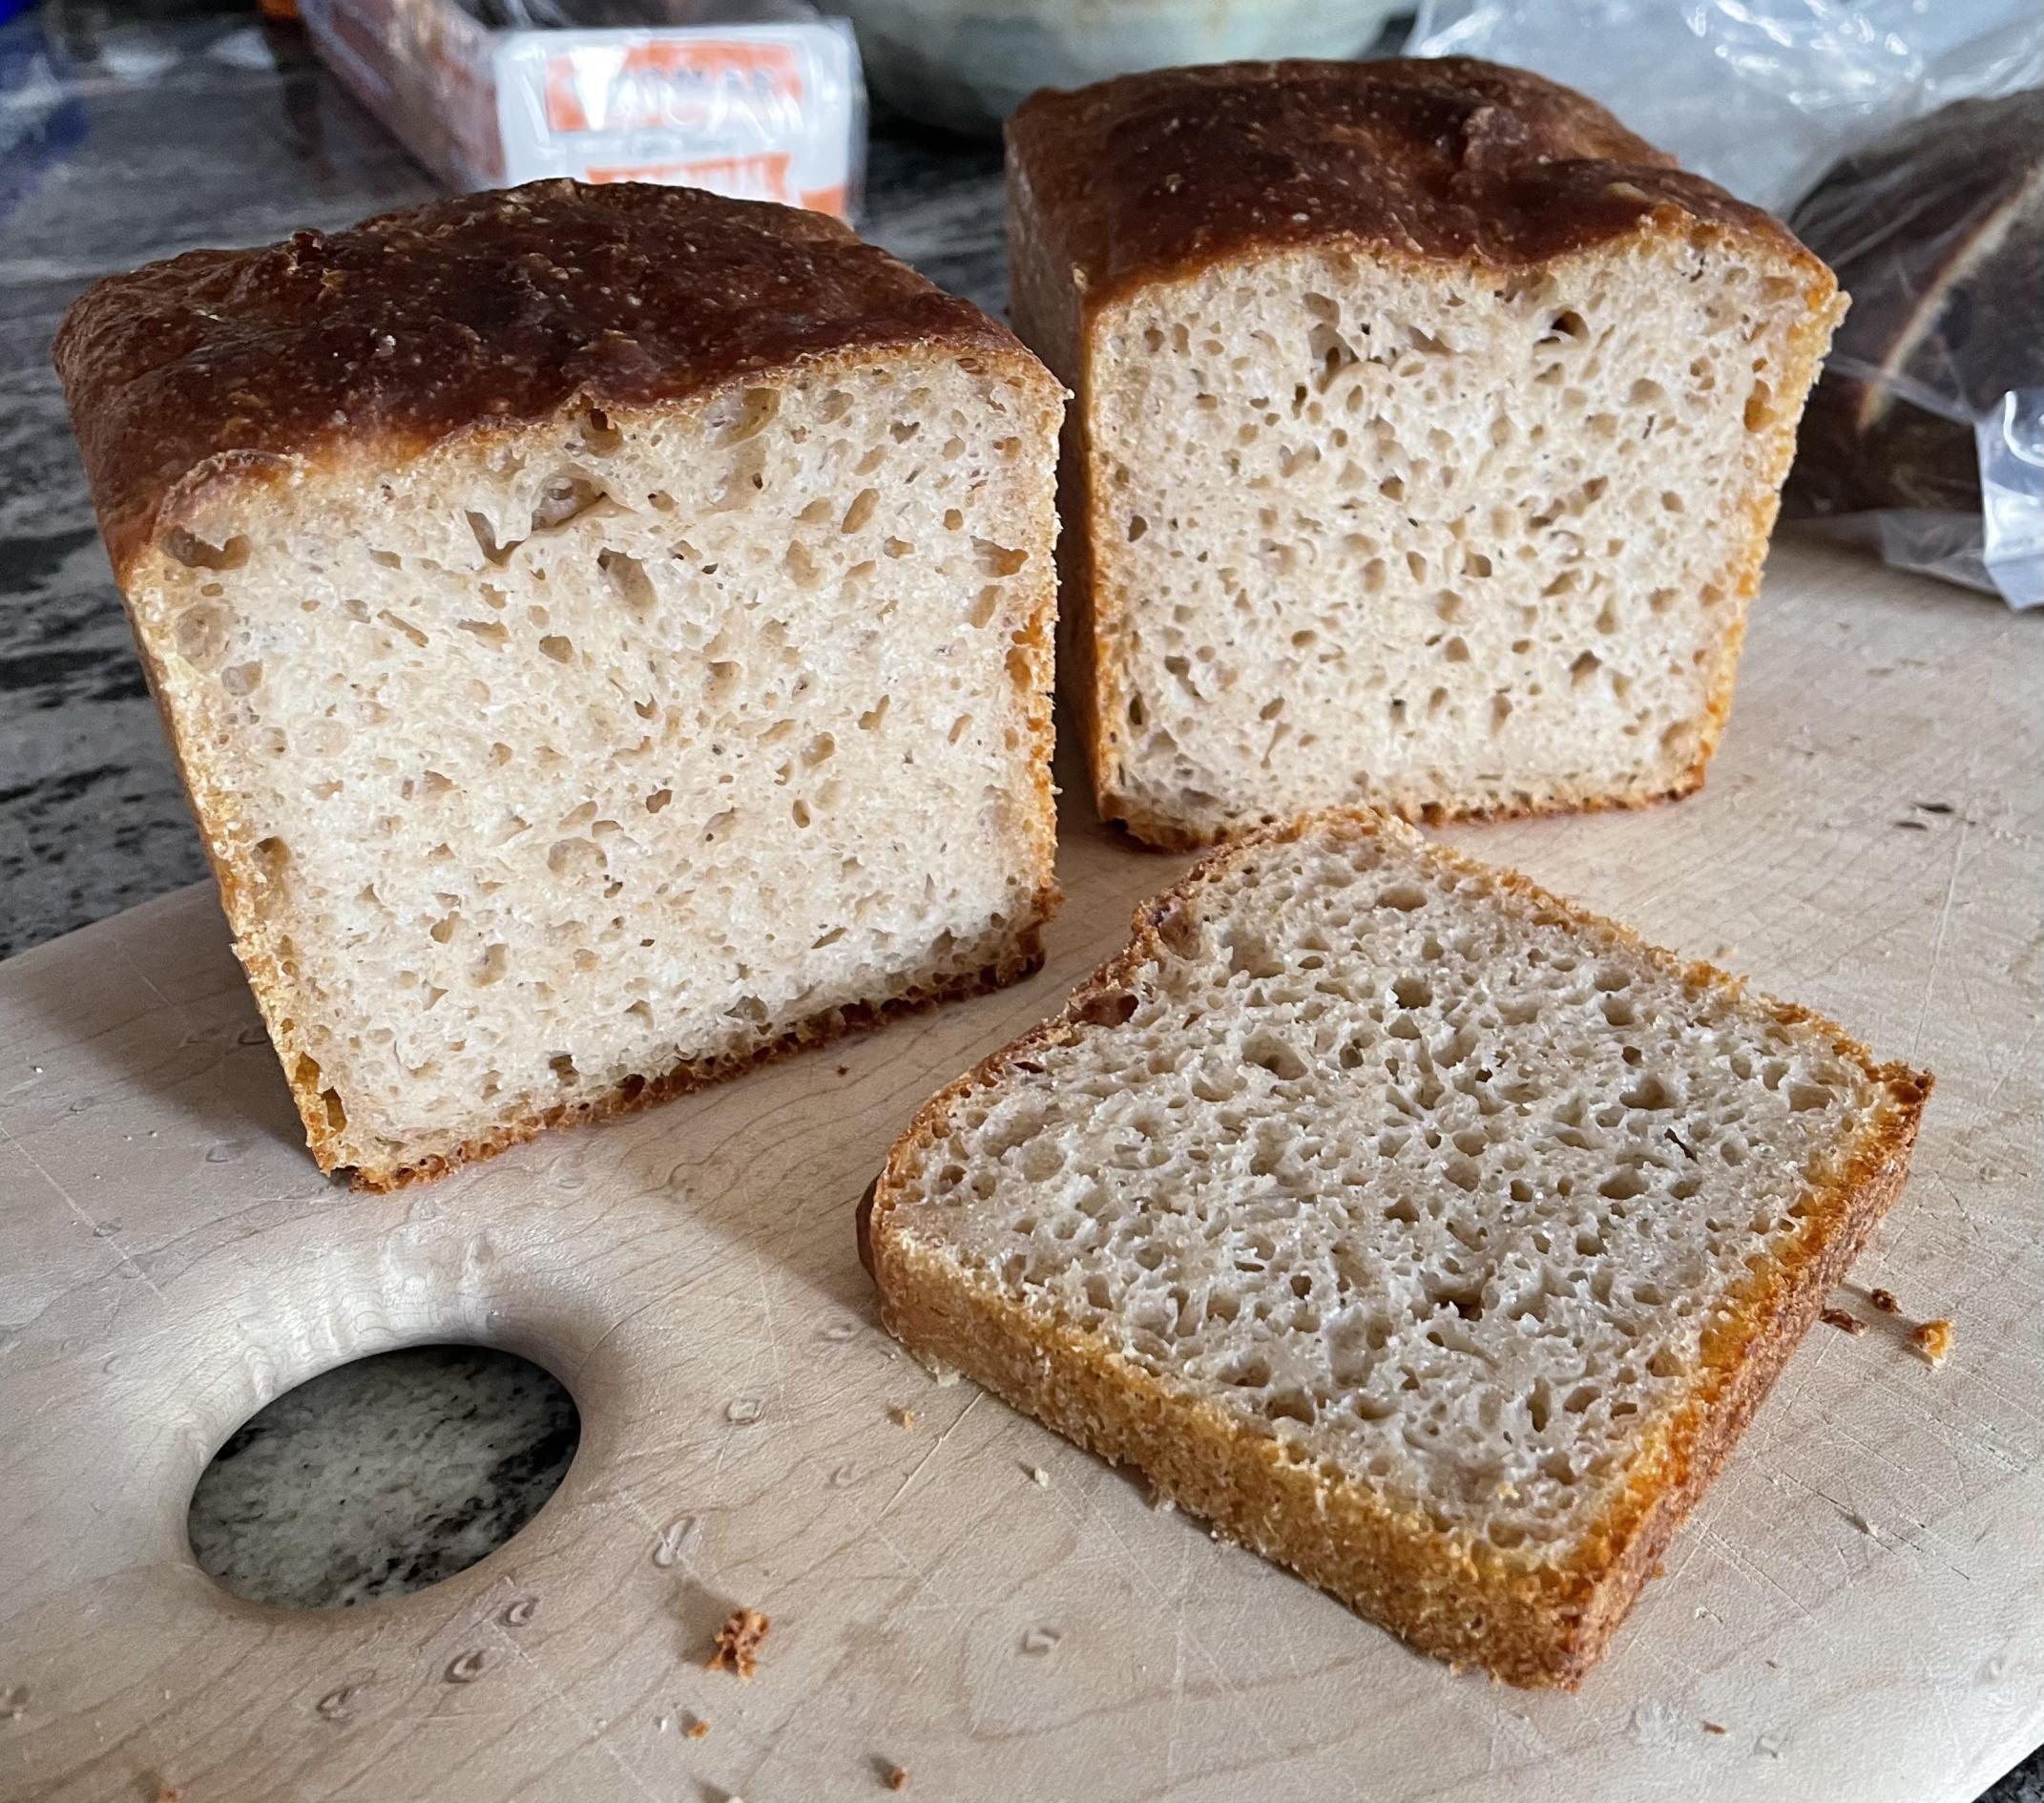
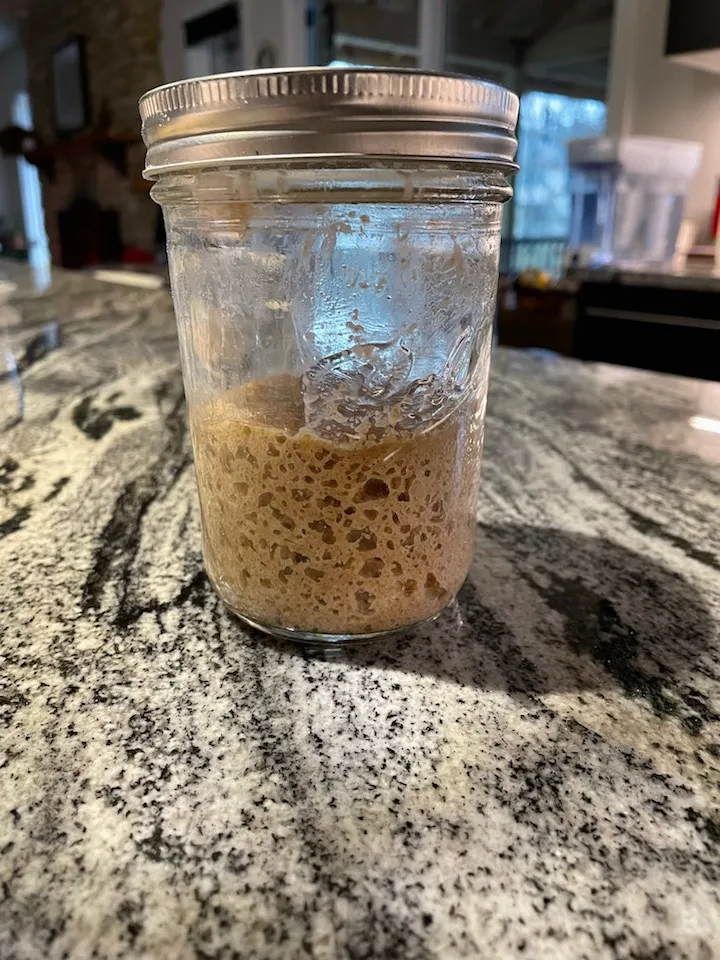
I was curious because the recipe makes a similar version of my weekly bread and requires little to no prior planning and the schedule frees up the shorter daylight hours for other things like fishing or the neglected chores around the house. I was skeptical at first that it would produce only a passable bread but would be lacking something that a more hands on approach would provide. I was wrong about that.
I am one of those bakers that believe a starter has to be well maintained and developed to make an open crumb country bread similar to the Tartine style. I used the warm days of this past summer getting my starter and bread to be like the version that Chad Robertson writes about in his latest Bread book and what he refers to as a boosted leaven required for his signature country bread. It requires a bit more time and effort but it did work better and it made some pretty good loaves. 
This so called “don’t be a hostage bread” might need a more catchy name but it has worked very well without fail in my few recent attempts at it. So well in fact that it may become my new go to method for my weekly bake. 
The recipe is fairly simple:

1000 grams total flour The recipe specifies KAAP for the white flour and 10 to 20% whole grain ( I have reduced it to 900 gr because the loaves wouldn’t fit in my bread bags)

80% hydration (which seems to work well for me) 

2% salt

40 grams starter recently fed but can be used straight from the fridge. (I have used a fresh fed and a few days old and both worked well.)

I mix the starter in the water first and then the flour and salt.The recipe calls for 4 compass folds 15 minutes apart. I used 3 coil folds 20 minutes apart. 
Bulk ferment for 12 hours at 72 degrees or until it doubles. I would normally ferment to 50% but without the intermittent folds during the bulk it will easily double. After which it is divided and shaped for another 12 hours in the fridge. 
Starting in the evening works best for me rather than putting it together first thing in the morning. 
There is something about the long slow fermentation that produces a silky beautiful dough to work with like no other I have had before and brings out the flavors as well. 
No hostage

Dough End of bulk
This is after the final fold and 11 hours later at the end of bulk fermentation. 

15% spelt

This loaf is 15% home milled spelt and the crumb is as good or better than the old way of doing it. 

Sliced spelt

Campagne
This is last weeks with 10% WW  5% spelt 5% rye

I would encourage others to try this method and come up with a better name but be aware of the “Stockholm Syndrome” because it has definitely changed my beliefs!

Don

edit:

The other loaf from the Campagne dough which was shaped with a different method resulting in a more even crumb. Country

MTloaf's picture
MTloaf


This just happens to be the softest, lightest, tallest, least sour WW pan loaf I have ever made. Something I wasn’t sure was possible with my home milled grains. I am not sure I can technically say it’s 100% WW because I sifted out 10% of the bran with a 40# screen but only out of the flour used in the final mix. I left the bran in for lthe two stage levain. This was my first attempt to use yeast water for whole grain after reading something Dabrownman wrote here years ago about how it would lighten up whole grain loaves. Indeed it does!

Crumb
In my weekly rotation of breads I always make a WW pan loaf partly for nutrition but also because I have an abundance of Wheat Montana organic berries from a miscommunication last year when I picked it up at the mill they brought out 50 pound sacks instead of 25. In lieu of today’s grains prices and the cost of shipping I don’t mind having a few extra buckets of grain in the basement. I was using The Approachable IDY version for a while but wanted a naturally fermented recipe to try. I tried Benny’s sweet levain and got good results but more often than not it would start to break down before it was fully risen. I scalded the bran which helped but I didn’t go the Tangzhong route because it is more involved and included dairy. Frankly I am not a fan of the soft tight cotton crumb that reminds me of supermarket sliced bread. I like a roux for rolls and such but I prefer a bread crumb that is less opaque and has a story to tell.
A few months ago I started a raisin YW that I had been using for fruit and nut breads and started using it for country bread when my starter went into a funk. It has gotten better with age and adding a few apple pieces and a citrus peel kicked it into high gear.(Thanks Trailrunner,Caroline) I am not a complete convert and certainly claim no YW expertise but the bread rising ability is pretty incredible. I know that YW responds well to higher temperatures so my back porch which is 90F degrees in the shade has become my latest proofing box. 

When the levain looks like this I have high hopes 

Levain


Pullman
I made a long Pullman yesterday to confirm my results. TDW 1150 grams The  spreadsheet is for the 9x4 Pullman. It was Wheat Montana organic Bronze Chief which is a hard red spring wheat that was milled in a Mockmill 100


Spreadsheet


Egg salad

 Egg salad is one of those sandwiches that are better on soft bread especially when they are farm fresh eggs!


 Happy Baking

Don

MTloaf's picture
MTloaf

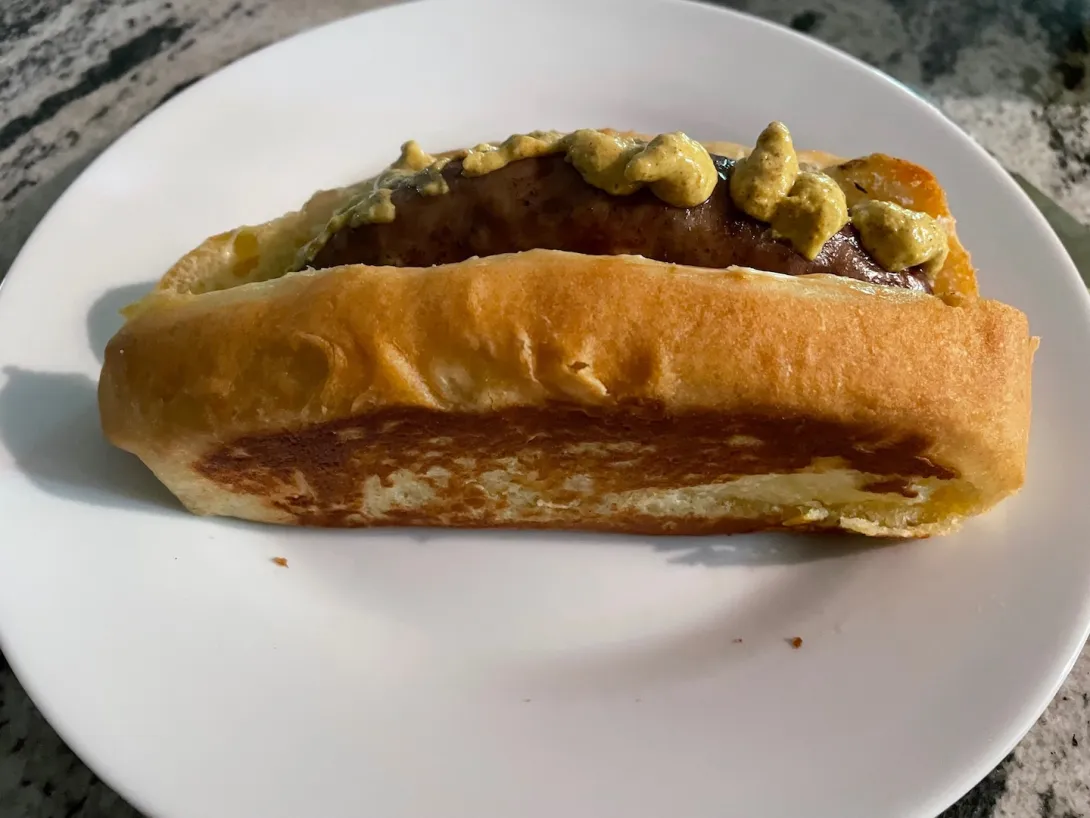
July 4th is also known as Independence Day here in the good ol’ US of A. The day we declared our freedom from tyranny of a different sort rather than today’s nut jobs that rule by decree  It’s celebrated with flags, parades, and picnics which must include hot dogs 🌭. Most grocery store buns are perfectly adequate for holding the tubular mystery meat and mustard but this version of a New England bun is a definite upgrade so much so that it is traditionally used for lobster rolls. I also use them for things like chicken salad and the same recipe can be used for hamburger buns. What makes these buns supreme is after they are separated they are buttered on the pull apart sides and browned in a pan. These buns require a unique but simple shaping technique but is well worth the effort. The recipe below has a video from the somewhat goofy but always excellent Chef John that shows the process. 

 Hot dog bun recipe https://www.allrecipes.com/recipe/237824/chef-johns-hot-dog-buns/ 


Buns 

Happy Fireworks Day

Don


MTloaf's picture
MTloaf

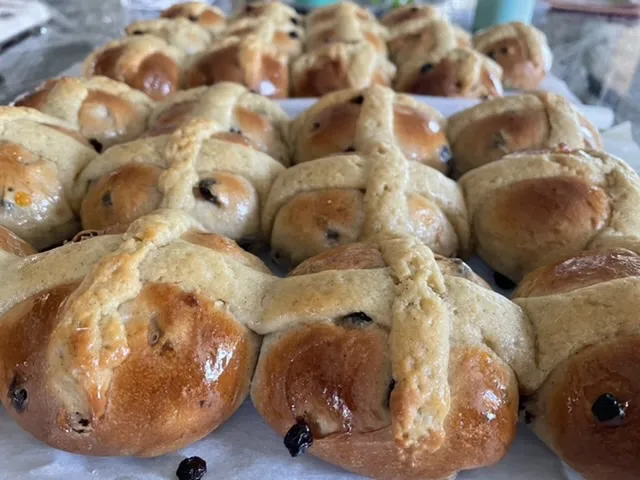
My attempt at Hamelman’s Hot Cross buns from his Bread book. I made these on previous Easter’s and they were always well received. One of the reasons I like his version is because the crossing paste is extra tasty. It is made with butter, sugar, egg, vanilla, lemon zest and flour. I am not going to post his recipe so buy the book. The recipe makes enough paste for four dozen buns and since I was only making two dozen and I didn’t have a smaller tip, I piped it on thick. The other thing that made these better this time was making my own candied orange peel and using the leftover orange flavored sugar water to brush on the buns after they come out of the oven. I usually buy candied fruit at the market but could not find it in any store and after making my own I will never buy them again.  
Without further ado here are more Hot Cross Buns to throw on the pile. 

Hot Cross


Happy  Easter 

MTloaf's picture
MTloaf

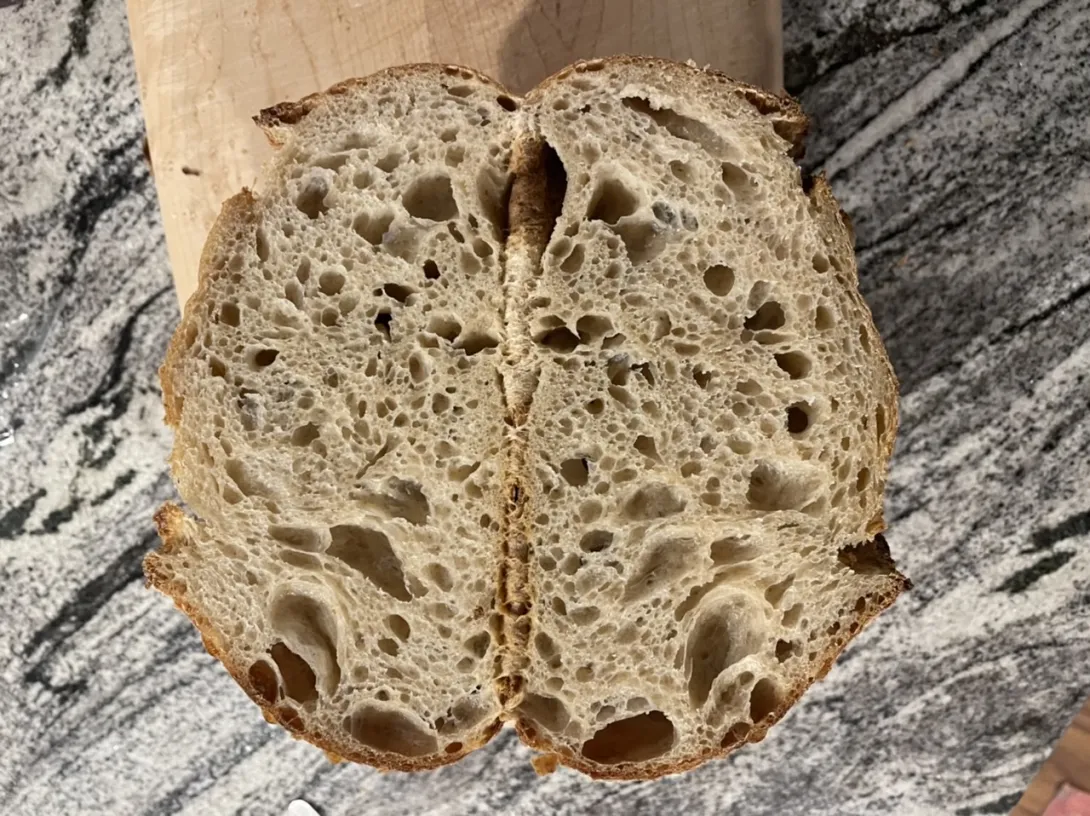
A follow up on a sweet stiff leavain bread after the first attempt produced a decent loaf but with large mysterious cavities in the crumb. For comparison I used my usual country bread recipe and did a second control version with the normal levain minus the sugar. Both doughs got the same autolyse and coil folds and a 4 1/2 hour bulk ferment. 

  • TF 450 gr 15% spelt home milled the rest was KABF and AP 
  • 80% +or- H2O
  • The sweet levain bread was baked straight through the SD was
  • retarded overnight 

Spelt
The sugar free breads. My starter has gotten quite vigorous lately and all the loaves had increased volume so much so that the fully proofed bread domed well above the basket rim. I am going to have to reduce the total flour because they no longer fit in a gallon bread bag. 
Proofed

The sweet levain bread has a thinner crust. 

Crumb

The sweet levain is on the left and the sugar free is on the right. In spite of popping many large bubbles when I shaped it the large holes were still prevalent. More than the photo shows because I had already cut two slices from the sweet one that had more strange holes than bread. The crust was much thinner on the sweet bread but that is probably related to not being retarded. The non sugar bread had more volume and a tighter but lighter crumb. 

I don’t know how much to conclude from this bake other than the sweet levain is a gassy unruly dough that is hard to predict. The sugar prolongs the keeping quality but there is a noticeable difference in texture between the two especially when toasted. The sweet levain bread toasted is sort of more like cotton candy. 
I have been using the sweet stiff levain for making 100% WW pan loaves and really like how it works for allowing for a longer proof. I intentionally pushed the fermentation to slightly over proofed because I like the shape and crumb better.

 PBB
Happy baking

Don


MTloaf's picture
MTloaf

I was intrigued by Benitos recent bakes with a levain that contains brown sugar and decided to give it a go. It seemed to be a novel approach worth looking into. With many bakers around here pursuing Alt-sourdough lately I am surprised no one else has thrown their hat into the ring. Perhaps it turns away the purist or it's an aversion to sugar in the FWSY equation at least that was my thoughts.

I followed his overnight levain formula to the letter and my first surprise was that the so called 60% stiff WW levain was not stiff at all because the brown sugar acted more like water and the levain stirred up like a 100% starter. I put it in my new makeshift proofer and in the morning it was domed but flattened out shortly afterwards. I don't normally do an overnight levain build but rather a two stage build starting in the morning that ends up being shaped in the evening for an overnight proof in the fridge. For this bake I decide to just go straight through with a total time of around 7 hours from mixing to going into the oven

.levain proofed

I am using my typical country bread formula ala Tartine with a total flour of 450gr and 15% milled WW and a mixture of half BF and AP at +75% hydration. I got a little distracted and didn't do my normal interval kneading and early folding but after 4 and a half hours the dough was domed, had a jiggle to it. It seemed ready for shaping with bubbles on the surface and a sufficient increase in volume. The dough was billowy yet strong and was still on the move during the 30 minute bench rest after the pre shape. I felt pretty good that it was going to be a nice loaf. 

My oven regime that I have settled on for the oven in our new home is 480F on bake for the first 20 minutes on a stone with a Granite ware roasting pan cover and then change to convection bake at 450 for the remainder uncovered. The oven spring was greater than my previous bakes but there was a hump at the top that I feared would reveal a large bubble under the crust.

baked

My concern for the large hole in the crumb was confirmed when I cut into it and not only was there room for the baker to sleep but a spare room for the apprentice.

crumb

I don't think it was under-proofed but maybe I should have been a little more assertive during the pre shape. Perhaps it was from the lack of early folding but the large bubbles is something that hasn't happened to me in quite sometime.

The crust and crumb was light and soft and the flavor was not sour but I did detect a sweetness from the sugar and the toast made from it browned more than usual.

So that's it. I am going to try it again soon and I hope others will try it as well. Any technical questions should probably be directed towards Benny since it is his baby.

MTloaf's picture
MTloaf

I haven’t had the time or reliable internet service to do much commenting or posting here because we recently sold our house and are in the process of relocating. We are temporarily staying in a small bunkhouse on a ranch for the summer. It has a small propane gas stove and that is the focus of this tale.
I have baked bread in a few different electric ovens before some better than others and my last one which was non convection worked well and had a good seal that held steam very well. Much better than the one it replaced with a warped door. I was under the impression from others that a gas stove was not the best way to bake bread because of the venting required made it difficult to provide the steam needed at the start of the bake. I was resigned to the fact that I would have to go back to using a vessel like a Dutch oven or clay baker and all that it entails like round loaves and a blacksmiths getup for handling hot iron pans. Not to mention that baguettes would be out of the question or so I thought. The oven is small only 18 inches deep and 18 wide but that happened to be just big enough for my smaller rectangular pizza stone to go in lengthwise and my graniteware roasting pan to barely fit over it. This was promising and I thought maybe I could bake a decent loaf after all. The oven is an older type with a pilot light and I was thinking it might work for proofing but with the baking stone in it was over 100 degrees in the oven with just the pilot light, so that was a no. However with my IR thermometer I found a few spots on the stove top in the 80 degree range that were perfect for my jar of levain and bulk fermentation.
My first attempt at bread in the new place was challenging in a small kitchen with limited counter space. I have continued to use the Tartine country bread method as told by Jenifer Latham described in my last blogs. I really like the double fed levain and the shaping method of folding in half lengthwise as it goes into the basket. The only difference is that I am now using a rye starter ala Hammelman(Thanks Gavin and Benito for steering me down this path). My starter has been strong, reliable and easy to maintain. My first levain feed in the morning is at a 1-1-1 ratio that doubles by noon time and then fed again at the same ratio and is peaking or doubled 4 hours later ready to use for bread making. It has been so hot here this summer that the fermentation has been moving at such a rapid pace that I didn't feel like it would slow down enough for an overnight retard in the small fridge  which has no room and doesn’t get very cold anyway. I fired up the stove for bread baking for the first time in a panic hoping it would heat up fast enough before the loaves over proofed. It heated up really fast and the IR gun read 550 on the stone in about 20 minutes. I have since then figured out that the dial on the stove is off by about 75 degrees. This first bake was shaping up to be a disaster. The slash was ragged in the wet jiggly dough that flattened out and spread before loading and covering. Ten minutes later I peeked under the cover and saw that there was already browning but the oven spring was tremendous so I removed the roasting pan and rotated the loaf because it was even darker towards the back. So uneven that it needed to be rotated every five minutes. It browned so quickly that I was worried the inside would not be cooked enough especially with the hydration being near 85%(its very dry here) It was a full on bold bake(burnt) in a little over 25 minutes of time in the oven. The second loaf went pretty much the same even though the oven was turned down to 375. By this time it was near 11 at night so I went to bed in a too warm of a house from the heat put out by this oven with visions of burnt toast in the morning.
When I sliced it the next day the crust was still crispy and the crumb was nice and open. It turned out to be one of the tastiest loaves I have ever made with the most enjoyable crust I have ever eaten. Go figure! Yet another path to chasing thin and crispy crust.
So the oven I was dreading is now baking better bread than I ever imagined. I am trying to understand the why. Perhaps the smaller oven chamber is generating more radiant heat. I moved the stone up to the middle of the oven to keep it from getting too hot and it is still dark on the bottom and the crust is thicker overall but the flavor and texture of the crust is incredible like the ends of a good baguette, even when toasted. Maybe the water is being cooked out in an optimal amount of time in a drying oven. I baked the same recipe in an expensive double oven in another kitchen on the ranch and got okay results similar to what I was used to in my former oven but nothing like the blast furnace I am using now. I am still struggling with enriched yeast breads browning too fast and baguettes that are too short for my liking although end loading is nice and easy.
I am amazed at the bread that is coming out of this oven and how much better my bread is in a darker shade than looks palatable. I now understand why some bakeries insist on a full bake for a superior flavor but the customers reject it because it looks burnt. 
One of the things I was looking forward to in our next home was a dedicated bread oven. It’s going to look a lot different now than I imagined it!

Those who prefer golden brown should look away.

raisin bread

Raisin bread with whole wheat and a little rye

raisin bread crumb

Tartine country bread

The darker one had better flavor and contrary to what I read somewhere the keeping quality is longer on the full bake.

dark and darker

slices

Approachables with high tech oven setup in the background. The roasting pan actually covers the two bread pans in the early phase of the bake.

Approachable

Baggies are constrained by the smaller oven but still doable.

I know I am not alone in my preference for a bold bake but I would encourage others to explore the dark side and reconsider a gas oven.


MTloaf's picture
MTloaf

I wanted to try the updated Tartine bread again from Jennifer Latham's IG post with the double fed levin and the delayed addition of the salt. The last time was a big improvement in my sourdough bread efforts so I wanted to confirm some things and get a better feel for it.

This bread is 10% WW and the rest is Wheat Montana AP. I started with a 75% fermentolyse of 30 minutes. The bassinage is done in stages as the dough tightens up with the squishes and folds and more water is added until the dough is quite extensible before the salt is added with more water. I think the final hydration was around 85% and it is quite supple but still fairly easy to handle.

I don't have a dedicated proofer so I use the mech room with the furnace and hot water heater in it as my warm spot. I can leave an overnight feeding in the cold kitchen where it doesn't move much and then place it on top of the water heater in the morning to kick it into overdrive. I feed it 1:1:1 and it doubles in three hours and then feed it again and it has doubled again and ready to use. I normally don't use the float test but the "fermentolyse" is a good test for it. In the past my levin would bob like an iceberg with most of it below the surface but this levain definitely floats high in the water.

Float test proofed loaf

I am getting more volume with this method but the problem is they no longer fit in my bread sacks.

Baked Tartine

I think the lateral fold before it goes into the basket is compressing the crumb so I am not getting the typical wildly open Tartine crumb but more of the lacy/honeycomb which I happen to like since it makes better toast and sammiches.

Tartine crumb

lacy

What is nice about this method is the soft crumb and the crust is really tasty and not like leather or hard to bite through..

Breakfast pizza

I like to have other things to bake while the oven and stone is hot so this morning there was breakfast pizza.


Pages

Subscribe to RSS - MTloaf's blog