
Pane Tipo di Altamura
31 March, 2016
David Snyder
Back in 2011, several TFL bakers worked on trying to replicate Pane di Altamura at home. I participate with one bake (see: http://www.thefreshloaf.com/node/24139/pane-tipo-di-altamura-quotlocal-breadsquot), but did not work to refine it and have not baked this bread since. Abe's (A BakEr on TFL) recent efforts have inspired me to give this bread another go.
Since my prior attempt, I have had a little experience baking in a wood-fired oven, which is how Pane di Altamura is baked. I realize how different that oven is from my home electric oven. I have further amended Abe's amendment of the Italian DOP specification based on this experience. Most significantly, almost all instructions for baking this bread omit steaming the oven. My thinking is that, in a wood-fired oven, generally there are multiple loaves baking at once, and the water that evaporates from them, in effect, steams the oven without the addition of any water by the baker. This effect is much less with a single loaf in an electric oven. Therefore, I did steam my oven for the first part of the bake. That said, the formula and procedures I used are largely based on the information Abe kindly shared with us.
Total Dough | Wt. (g) | Baker's % |
Semola Rimacinata (Fine Durum flour) | 550 | 100 |
Water | 330 | 60 |
Salt | 10 | 1.8 |
Total | 890 | 161.8 |
Biga Naturale | Wt. (g) | Baker's % |
Semola Rimacinata (Fine Durum flour) | 50 | 100 |
Water (80-90ºF) | 30 | 60 |
Semola Rimacinata starter | 20 | 40 |
Total | 100 | 200 |
I already had a biga naturale from a previous bake in my refrigerator. So, the biga used in the Final Dough was fed three times with about 12 hours' fermentation of each build.
Place the starter in a medium bowl.
Add the water and mix until the starter is in pea-size pieces.
Add the flour and mix until there is no dry flour and the biga feels like a bread dough.
Place the biga in a clean bowl and cover tightly.
Ferment for about 12 hours at 70-76ºF.
Repeat twice more.
Final Dough | Wt. (g) | Baker's % |
Semola Rimacinata (Fine Durum flour) | 500 | 100 |
Water | 300 | 60 |
Salt | 10 | 2 |
Biga Naturale | 100 | 20 |
Total | 910 | 182 |
Procedures
Mix the flour and water well in a large bowl. (There should be no dry flour in the bowl.)
Cover the bowl tightly and let it rest at room temperature for an hour.
Add the salt and the biga to the bowl. Mix thoroughly using the French “pinch and fold” method.
Knead in the bowl or on an un-floured board for about 10 minutes.
Cover the dough and let it rest for 10 minutes.
Knead for another 10 minutes.
Transfer the dough to a clean bowl. Cover the bowl tightly.
Ferment for 6 hours at 76ºF. (I used a Brød and Taylor Proofing Box set to 76ºF.) The dough should be expanded to double its original volume and feel soft and puffy.
Transfer the dough to a board lightly dusted with durum flour and pre-shape as a boule.
Pre-heat the oven to 500ºF with a baking stone and steaming apparatus in place.
Place the boule on baker's linen and cover well. Let it rest for 30 minutes.
Transfer the dough to the board and pre-shape as a bâtard, taking care to de-gas the dough as little as possible. (Note: Pane di Altamura is traditionally shaped as a boule. I elected to shape it as a long loaf. If shaped as a boule, the bake time should be increased, since the loaf would be thicker.)
Place the bâtard on the baker's linen and cover well. Let it rest for another 30 minutes.
Transfer the bâtard to the board. Gently stretch it by grasping the two long sides and pulling it into a flat oval.
Using the sides of your two hands, make a wide groove down the long axis of the loaf. Then fold the loaf at the groove so that the upper half over-laps the lower half 3/4 of the way. Gently seal the seam between the upper and lower layers.
Transfer the loaf to a peel.
Turn the oven down to 450ºF, steam the oven and transfer the loaf to the baking stone.
Bake with steam for 15 minutes.
Remove the steam source from the oven. Turn the oven temperature down to 420ºF (or 400ºF convection bake).
Bake for another 15-18 minutes. The loaf should be nicely browned. It should sound hollow when the bottom is thumped with a knuckle. The internal temperature should be at least 205ºF.
Transfer the loaf to a cooling rack and cool thoroughly before slicing.
Tasting Notes
When fully cooled and first sliced, the crust is thin and chewy. The crumb is amazingly open for such a low-hydration bread, and a most attractive yellow color. The slices show that the multiple shaping steps did not over-de-gas the dough. The profile shape is pleasing. On tasting, the crumb is mildly chewy. There is a slight yeasty aroma. The flavor is balanced and mild with some nutty, some sweet and very little if any sour tang. When eaten toasted the next morning, the crust becomes pleasingly crisp. The crumb is a bit more tender. The flavor is similar to that of a couple hours after baking.
When tasted dipped in a local, low-acid, fruity EVOO, this bread is transformed into something ambrosial. Of course, Puglia is famous for both Pane di Altamura and for its ancient olive groves, so it is no surprise. The neutral flavor of the bread allows the full, complex flavor of the oil to come through, and the oil brings out the sourdough tang that was otherwise faintly present in the bread. Delicious!
Photo Gallery
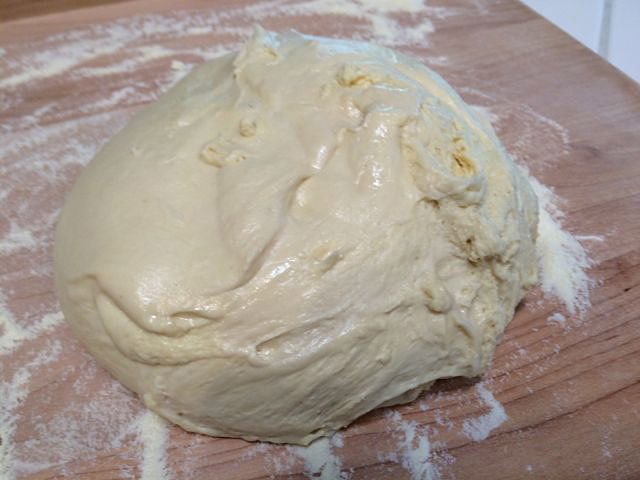
Fully fermented dough, on the board prior to first pre-shaping (Step 9)
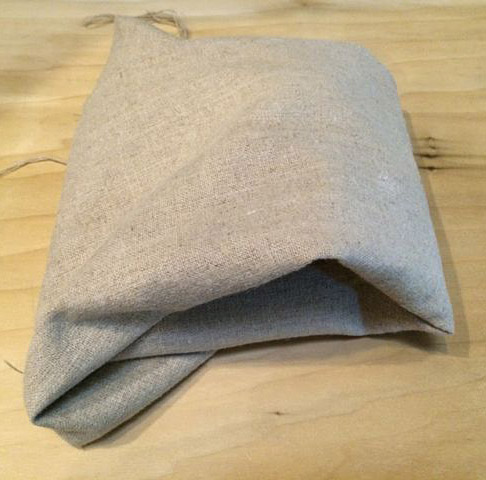
Pre-shaped dough, wrapped in baker's linen for a rest
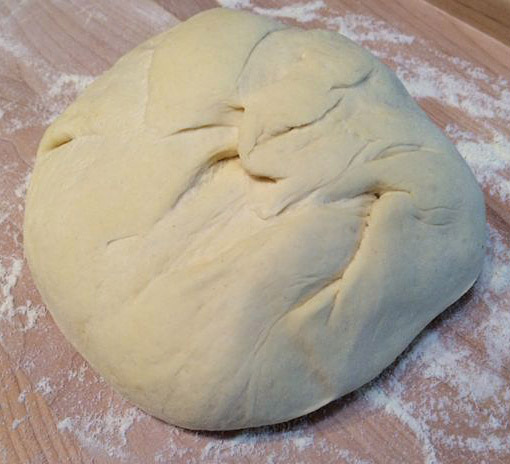
After first pre-shaping and a 30 minute rest wrapped in linen
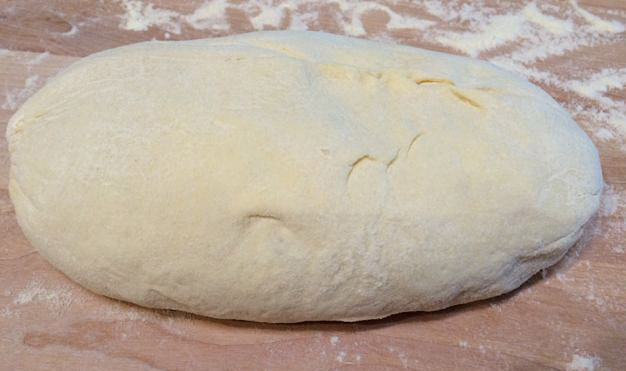
Dough after second pre-shaping as a bâtard (Step 12)
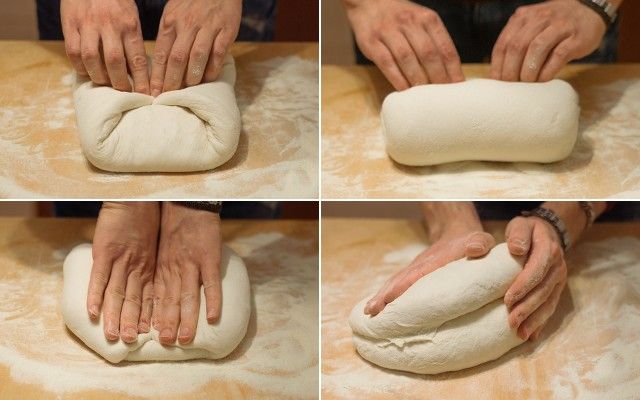
A helpful illustration of shaping I found on the agradolce.it web site (Pane di Altamura | Agrodolce)
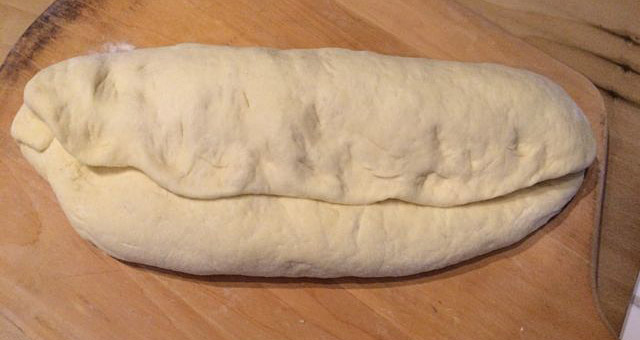
My loaf, after final shaping. On a peel, ready to bake. (Step 15)

Pane Tipo di Altamura
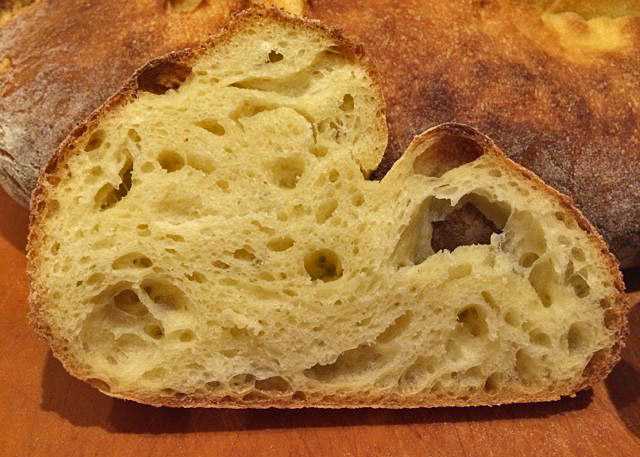
A slice
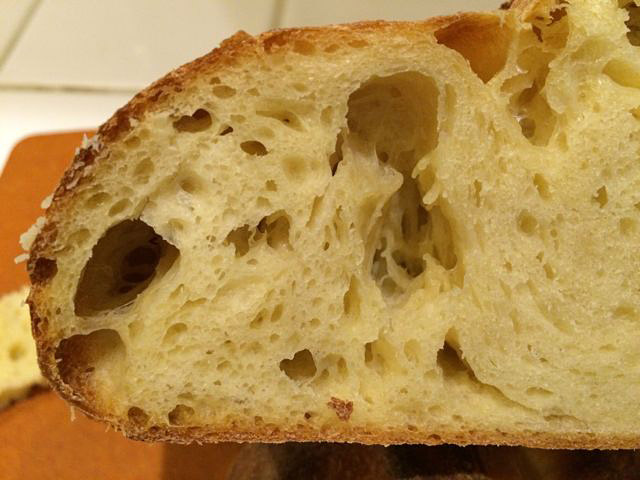
Crumb, close-up
Final Notes
This bread is fun to make. The dough is easy to mix and enjoyable to handle. Shaping is a challenge. I am pleased with the result. The baked loaf is attractive.
I do not find the bread provides outstanding eating by itself or with butter, however, dipped in olive oil as is traditional, it is transformed into a wonderful food. It is not merely a vehicle. The olive oil and the bread each compliment the other. (See "Tasting Notes," above.) I still need to taste this bread grilled then rubbed with garlic, another traditional way of eating it.
The obvious necessity is a trip to Altamura to calibrate my expectations.
David
- dmsnyder's Blog
- Log in or register to post comments
eating quality of this bread, or even possibly dipping it in that famous SF cioppino or grilled as a bruschetta of some kind. It sure looks fabulous and thanks for the shaping pictures too - a real help!
The spell checker says cioppino should be Pinocchio. It probably needs a trip to Altamura too:-)
Happy baking David
Its true that Pane di Altamura should be baked in a wood oven;
Anyway what I like of your bread its the crumb with irregular holes .Its very difficult to achieve such a crumb using only semola rimacinata that usually gives a dense crumb.
You can also watch more options here http://www.alfornodiosvy.com/forum/viewtopic.php?f=2&t=276
I will be attending a pot luck dinner with most of the guests being of Italian heritage, and the hostess has a large wood-fired oven in which I am going to bake bread for the group. I have decided this is one of the breads I will be baking!
I wish I could have you taste a slice of this bread. I have never had the true Pane di Altamura.
David
Wow, that is amazing crumb for such a low hydration dough. Thanks for sharing.
You may remember a few years ago when I made Pat's 65% hydration baguettes? That really changed my thinking about what it takes to get an open crumb. You have to "trust is the Force," i.e., Fermentation, and handle the dough gently.
David
That looks absolutely amazing, where did you find the Semola Rimacinata locally?
I got the flour from KAF, ordered from their web site.
BTW, I just discovered that Central Milling is now taking internet orders, and they mill an "Extra Fine Durum" flour! If you make a big enough order, the shipping costs are tolerable. Of course, <green with envy> you can just stop by the warehouse in Petaluma!
David
If you are in San Francisco, Rainbow Grocery sells a very nice Extra Fancy Durum in their bulk department.
-Brad
David.. I love the look of that bread, it's crumb and most importantly the news that there is something called "Pano Tipo di Altamura"! I'm going to be there this summer - in puglia, not far from altamura. I'm now going to try and make this bread using your recommendation before I go and then go find the real thing. What a treat - thanks for sharing this!
I've actually been meaning to post a message asking what italian bread bakeries I sould try to visit this summer. I'm going to be on a road trip and span the top to bottom of the country. One of the side benefits for me, will be to eat some seriously good bread. Any other recommendations for either bakeries to go visit or typical breads to try would be appreciated!!
Thanks .. bake happy!
Oh boy! We would love a detailed travelogue on your return! Have a great time.
I don't have any specific recommendations for bakeries. I have not been in the South of Italy. Not even to Rome or Naples. In general, the bread I have had in the North in restaurants is mediocre. Small town bakeries had much more attractive stuff, and what we bought for en route picnics was good. Not great.
There are some terrific youtube videos about Italian travel and food. Search for videos about the places you are going. We have found this has enhanced our enjoyment of travel in Italy.
The best recommendations, especially in Italy, have come from people who live in the town. Ask "Where do you like to eat?" "Where do you go for the best bread (or what have you)?" If you just ask for a restaurant recommendation, you are more likely to get a touristic place.
Buon viaggio!
David
My wife and I went to Southern Italy about a year and a half ago and it quickly became our favorite region, especially food-wise. Here are a couple of places that I remember and would recommend without hesitation.
If you get to Altamura to try their Pane, there was a panificio (where they sell bread but not necessarily make it there) just at the outskirts of the city on the road to Matera. It was the best Pane di Altamura that we had, and I tried several. Sorry I can't be more specific than that for location, but it is worth searching a bit for. They also sell the grano di semola rimacinata in 5 kg bags there, should you be inclined to bring some home (I did).
Probably the best local restaurant that we found was in Locorotondo, a beautiful town situated slightly inland between Bari and Brindisi, not far from Alberobello. We stayed in a lovely agritourismo (working farm/inn) about 1/2 km from Locorotondo. The restaurant is called U Curdunn (it is the name of the town in the local dialect). Fabulous local fresh food. For a sense of what they make, here is a link to a video. We've made both dishes depicted several times, though the ingredients we get are not quite the same as there.
In the Puglia region, they use an ingredient called grano arso, translated as "burnt wheat." Don't get put off by the translation, and order it whenever you see it. It is most commonly used in pasta and it imparts an extra dimension to it. The history, as I understand it, is that hundreds of years ago, when the wheat fields were farmed by essentially slave labor, the land owners torched the fields after harvest. The workers would try to recover and use any wheat kernels that were left to satisfy their hunger despite being burnt. It became an ingredient in what is now called cucina povera, poor people's cuisine. They typically use about 1/3 grano arso, 1/3 grano di semola (semolina/durum) and 1/3 wheat flour blended to make the pasta. If you get to Matera (highly recommended) there was one restaurant that made pizza dough with a similar blend, incorporating the grano arso and making for a very different pizza experience.
-Brad
David,
A really nice job with the bread and with the shaping.The look is very good and authentic (from what my fading memory lets me recall). The color and crumb are beautiful. Out of curiosity, how sticky did the dough get after the 6 hour bulk ferment, especially considering the temperature?
-Brad
The dough was puffy and smooth. At 60% hydration, it was not sticky at all, even after the long bulk fermentation. I would compare it to bagel or challah dough. It was just a bit less dense.
In fact, having reviewed several youtube videos from Alatamura in the last few days, the dough I see looks much wetter and is much more extensible than mine was. Because of that, I will probably boost the hydration to, maybe, 70% next time I bake this bread.
Re. the fermentation temperature: My kitchen was between 61 and 65 dF yesterday. I figured that was way below "normal" for a bakery in Puglia! I have found that a bulk fermentation temperature of around 76dF usually gives me the nicest results with most sourdough breads.
David
I've got some starter that I'm converting to durum right now in anticipation of trying this out again. All these posts and discussions have inspired me again. i expect to bake early next week.
-Brad
Great Bake David! That is a great crumb for so low hydration, but I have experienced similar crumbs with style of flour in the past as well. Reading all of these comments has really made my desire to visit Italy myself stronger. It is on the top of my list but no idea when I will be able to get there. I have to find some factories to visit so I have an excuse to go instead of my usual China trip :).
Thanks for posting all of the details and procedures. Will have to try this one soon.
Ian
Just apply your bread creativity to travel planning. I know you can do it!
I would like to get back to Italy and visit areas South of Rome. So much to see! (And taste!)
David
Hi David,
Well, it's time for you-know-what. But I have a few questions before I can get going.
For the three step build of the biga -
I always loved the seeded loaves from the Italian bakeries in the Bronx that I had as a young'un, but never really knew why or tried to figure it out. They were held in as high regard to my developing palate as the even more ubiquitous "Jewish" bakeries where rye, pumpernickel and "corn bread" held sway. When I moved to the West Coast in 1989 I said goodbye to all of those delights, for the most part. Even being back east now in FL after a quarter of a century in the west, it isn't the same. But thanks to home baking and TFL, I can say once more "hello" to these delicious breads.
March and now April seem to be Semolina Month on TFL. I'll deal with it!
Thanks, alan
Yup. Each biga build was identical, and I discarded all but the 20g used in the next build. Well, I actually saved it from build #2 in case I wanted to do another bread with biga in the next few days.
Besides volume and time, the aroma of the biga gives you ripeness information. But it's qualitative. The biga's did double.
David
That's just a lovely loaf. And such great color and crumb! I may have to give this one a try myself down the road.
Cheers!
Trevor
If you do try it, let us know how it works for you.
Happy baking!
David
I love the color and structure of the crumb. Thanks for sharing the pictures of the shaping process. The crumb is very impressive given all the handling the dough went through!
Happy Baking :)
Beautiful bread, I wish I could find fine durum flour in my area. I'm a little confused by the formula, though. It says at the beginning-Total flour 550 g. Biga uses 50 g. and the dough uses 500g. But the directions say Repeat twice more in the biga build. Doesn't that use 150 g of flour?
After a bike trip in Puglia, I tried to make this bread using the pasta grind of durum, not realizing it wasn't the right thing at all. Needless to say, it wasn't the same!
Bobbie
Only the final build of the biga is used in the Final Dough. The parts of the other biga builds that are not used to seed the next build or incorporate in the Final Dough are discarded or put to another use.
To be completely accurate, the biga contributes not 50g of flour but (100 parts flour/160 flour + water parts) x 100 = 62g. I fudged <blush>
David
I'm building my biga and while I am noticing signs of life (it's been going for a few days) such as it's expanding a bit and getting looser, I don't see the honeycomb type of gluten development I am used to seeing in my regualr sourdough starter. I realize this is a different type of flour. Just wanted to make sure I'm using the right flour. Looking to bake on Saturday. Thanks!
Durum wheat --- Check!
Semola Rimacinato --- Check!
Happy baking!
David
Good morning Mr. Snyder
Follow the links below for a look at my humble homage to Pane Altamura. Also related is my bake of the semolina bread of Matera. Did I mention I love working with durum wheat?
Presenting, Pane di Matera: the ancient bread of Basilicata. (In the style of) | The Fresh Loaf
The Golden Bread of Altamura (100% semola rimacinata) | The Fresh Loaf
The Golden Bread of Altamura Blog The Fresh Loaf