Hello everyone. I would love some more knowledge on this subject.
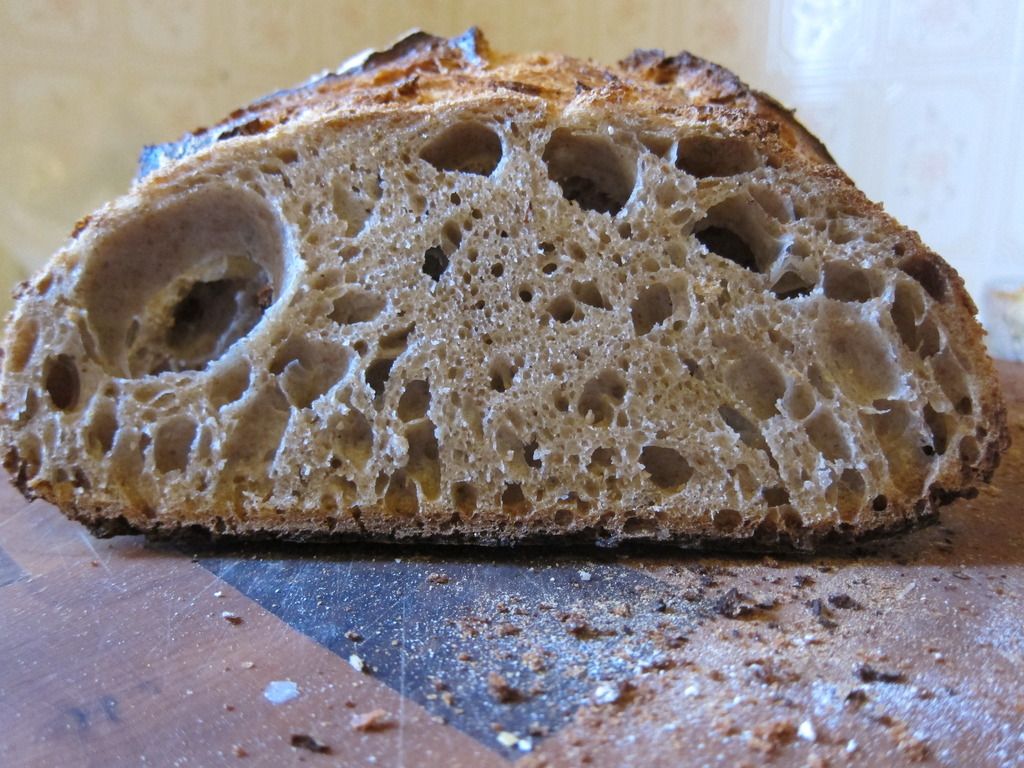
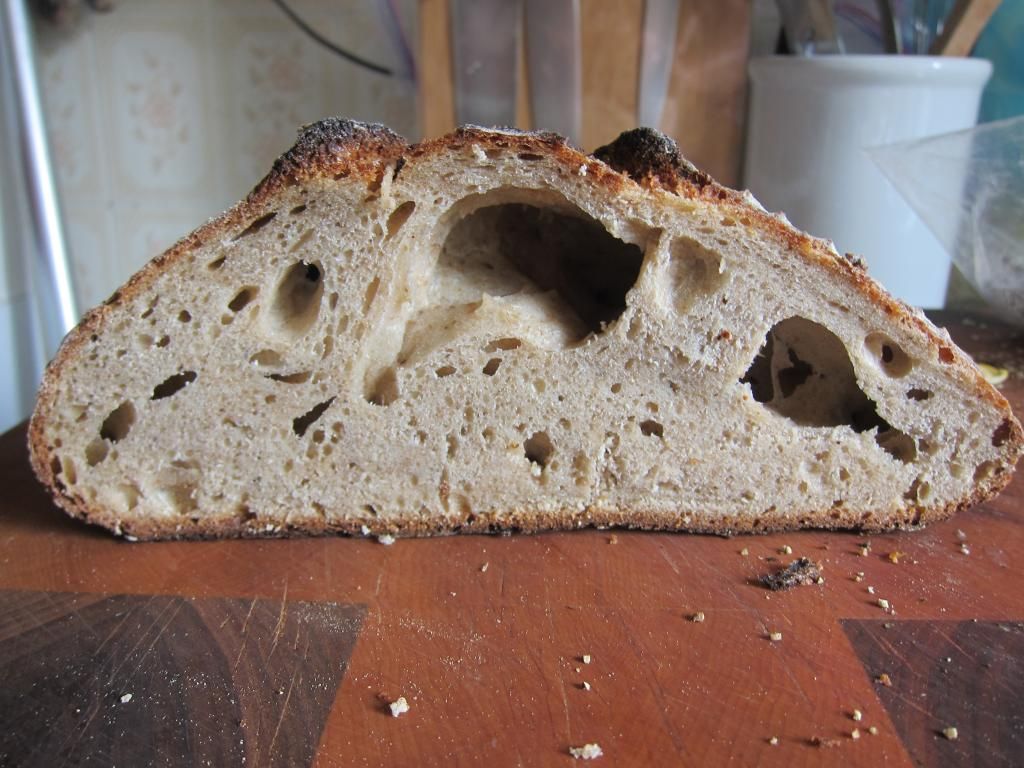
In my pictures below from past bakes, would this be considered over proofing? As you can see the larger irregular hols that have moved to the outside of the crumb. From what I have learned so far, I believe it is over proofing. But why does this happen? Any scientific knowledge out there?

Hi,
I'm no expert, believe me - but I experienced the same thing on my first two tries at sourdough - here's a pic that's very similar to yours.
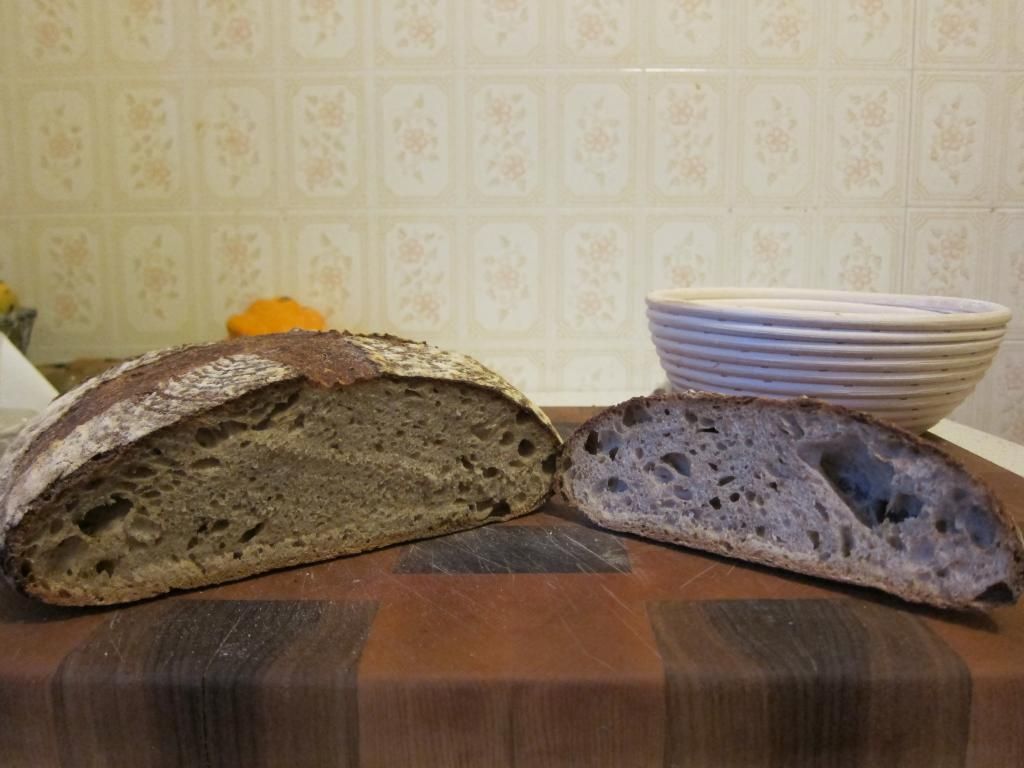
I was previously using a firm white starter - and I converted it to a 100% hydration rye starter (with the help of posters in the sourdough forum) - I think the change to the starter was the biggest thing and it significantly changed my crumb. Here's my photo from today's bake - as you can see HUGE difference. I also retard the dough overnight for about 12 hours and bake in a cast iron dutch oven right from the fridge (pot is pre-heated in the oven on a stone)
Photo is blurry, but you see the difference. The bread from today was super light and airy (in the hand) and the crumb was so super soft. Before, my breads were hard and heavy and hard to eat to be honest since they were so dense. I'm not sure what type of starter you're using, but I'd head over to the sourdough forum and the experts there will definitely help you!
Good Luck!
The type of starter has little to do with it, in my understanding. Your first pic is very under proofed. Based on your description, the second pic is a loaf that is "well-proofed" in my wording. Many would consider that over proofed, but I like it a lot for limited uses. At an ideal level of proofing, the bread is firm enough to hold up in a sandwich or bread bowl. Proof a bit longer and the crumb gets super soft and melt-in-your-mouth delicious, like you have here.
Try experimenting a bit and proof a little less during bulk ferment. I found that using a recipe of 100% flour, 85% water, 20% starter (100% hydration), and 2.4% salt, about 3-3.5 hours at 75-80 gave me the good all purpose bread, whereas 5 hours gave me the quite different pillowy soft bread. Cold ferment was the same in both cases.
Well, I guess today was a fluke then since I used the same timings that I did before (2.5 hour bulk w/2 S&f, 20 minutes after shape, and 12 hours retard), however this weekend was the first Spring like weekend with lovely temperatures, so I wonder if that helped the proofing and kick-started the sourdough.
Good to know for the future - I'd like to recreate today's loaf as much as possible because we loved it! So soft and delicious - a lovely sandwich bread for sure. We didn't really enjoy the other 3 attempts since they were pretty dense.
I have so much to learn on this topic, TFL is such an amazing resource!
is also a 100% Stone Ground/Whole Grain Rye Starter set at 100% hydration. I switched over to a Rye starter a few months ago as well and love it. Much better than my first starter which was a 50% Red Fife 50% Bread Flour set at 100% hydration. Although I had some pretty sweet loaves with that starter as well.
Thanks for sharing Renee!
Cheers!
None of your loaves look over proofed. The first two look good to me, the third could go a little longer, and the last is definitely under proofed. A few huge holes surrounded by very dense areas is indicative of under proofing, as is a nice burst at the points of scoring.
I like to get my dough nice and adequately proofed during the bulk ferment, not the final proof.
OK. Thanks Michael. For some reason I always thought that they were over proofed. That helps to clarify things a bit more.
Cheers!
Is the most difficult part of bread baking in my opinion. As to pin pointing what has gone wrong there are so many factors. The common belief is to allow the dough to double. But when a dough is in the banneton what seems like double is actually more since it widens towards the top. So easy to over proof. 90% is good for proofing but who can determine 90% by looks anyways? Then there's the finger poking test. Well I've been poking doughs for ages now and I'm sure each one behaves differently. I guess this is something you learn overtime. When I final proof I'd say it's 80/20 experience/praying.
I totally agree with ya on that one Abe. I have a pretty good handle on the dough expansion in my banneton, but still you're right when it comes to each one acting differently. Which I totally love about bread baking!!
I always rely on the poke test and the way the dough is reacting, not so much on how much it's expanded by. I find the poke test keeps you that much closer to feeling your dough out, rather than sizing it. So I kind of use the poke test and expansion together to tell me when the dough is ready.
Most of my loaves now turn out really good, but the odd time my timing is off and I end up getting what I posted.
Thanks so much for replying!
Cheers!
Dear Dave and Renee16, if it's not the former, it might be worth reconsidering (assuming you're not doing so already). Like Abe and Michael, my instant reaction (based on bitter experience) was that both the loaves that concerned you are over-proofed. The yeast has been left to work for too long, is now exhausted, does not provide enough gas to maintain cells, they collapse, and the escaped gas collects in big bubbles beneath the now quite tough skin. High hydration loaves are susceptible to this flaw (as I, and I'm willing to bet everyone else on this forum, know from bitter experience) because their gluten structure is very delicate and deflates easily. Your sourdough starters are not an important factor in this. They create yeast and taste, and have obviously done too good a job. But that's not their fault, it's all about getting your timings right.
The usefulness of proving seam-side up, is that when you flip the loaf over onto your peel/tray, any large cells are now at the bottom. Gravity gets to work, and the gas rises, redistributing the biggest cells, giving you a better crumb. Of course, better is a relative term. It's best not to over-proof at all but, if you have a little, it can be a big help. If you have a lot, you're still probably doomed.
To take Abe's point about doubling in size a little further, check out the artisan bakers at The Weekend Bakery and their breakdown of the myth of doubling in size. Here's the link:
http://www.weekendbakery.com/posts/the-myth-of-double-in-size/
They've also posted (and translated) a wonderful finger-poke checklist devised by Notox at www.sauerteig.de:
It is really important not to focus on absolute bulk rise and proving times. You need to keep checking. You need to keep poking. Finally, if you have over-proofed dramatically, all is not lost. You can reshape and proof again. What yeast is left will get to work and attempt to give you a good loaf. It will take longer. There's not much yeast left, so it needs time. Cold-retarding it might not be a good idea. The rest is up to you.This is hilarious!! I love it. Thanks for passing this on and I surely will remember these points when I'm proofing.
I do proof seem-side up. For the reasons you have mentioned.
And thank you for the explanation of over-proofing in relation to the holes. This is what I was looking for! Makes a lot more sense to me now.
Enjoyed the read from your weekendbakery link. The only thing is at the end they talk about that right after shaping, your dough is not elastic. I can definitely say that after shaping my dough is very firm and elastic, and springs right back into place after a poke test. I then poke test it every 15 minutes to see how it feels. Love that part!!
Cheers!
Dave
Just remembered, when you have over-proofed high-hydration loaves - as yours appear to be - the dense crumb is created by the mass of the dough squeezing together the now weak holes at the bottom of the loaf. The cells at the top are relatively unpressurised and expand - benefiting from the gases released lower down - to create the tunnels you see in the photos. A super-dense bottom with large holes on top is a classic sign of over-proofing.
And I also forgot to mention that flipping over an over-proofed loaf and letting it rest for a few minutes rather than baking immediately, is an even better way to equalise the holes and get a good crumb.
I have been struggling a little as a novice in the no yeast area, whereas my yeasted breads come out fine. Links have been bookmarked.
Next time I bake I'm going to experiment with keeping small pieces of dough in a glass and in water and see how that helps to know when the dough is ready for baking. For me its not the eating of the bread so much as the technique to perfect the final product. I leave the eating to others.
It is interesting to hear complete opposite opinions on some results while other times there is a lot of agreement. I toss my loaf in the RoundhayBake 's oven. I think they are over-proofed for the reasons stated. Of course for the "price" of one loaf the answer awaits. Follow the formula exactly with two loaves, proof one less than the original (maybe try a poke test) and proof one longer. Between the three there should be some indication of the direction to go. Worst case one is "terrible" and one is perfect. But both edible.
look at this thread, really look at the smaller bubbles.
http://www.thefreshloaf.com/node/42289/process-even-possible
If getting your loaf risen is taking a long time, so much so that it is very sour and still under-proofed, work on getting the starter stronger with more yeast. Feed it on the counter with more food letting it peak and feed again, repeating for several days.
I checked out the link and saw your comment about a stretch and fold after bulk ferment deflating some of the x-large bubbles.
Originally after my bulk ferment, I used to do a significant stretch and fold then shape, rest for 10 minutes and then into tension pulls. I stopped that and now right after bulk ferment I do a fold (but nothing major) to shape with a tension pull, rest 10 minutes and then more tension pulls.
Cheers!
with the term "bulk ferment" when dealing with sourdoughs; the idea of one bulk ferment followed by a final rise. I tend to think of sourdough fermenting as one continuous rise with a lot of interruptions to restore dough integrity and strength. When the dough reaches my various goals, I decide not to fold anymore and let it inflate to bake. Might try it with a small loaf and cut open the loaf with a sharp knife at various times to observe the growing bubble structure and the way it looks and traps gas. It's a great learning experience. Just slap the cut dough back together and continue on with the rise.
You can even split it at that crucial "is it ready to shape?" stage and let part of the dough over ferment so you are familiar with it. It starts to fight you with stretching and folding and tears, it rises fast only to fall fast, it gets fantastic aroma power and I'm sure sour as well and when done playing, bake it as is to experience a baked over-proofed loaf or add fresh dough doubling the size and go for one rise and bake adding a stretch or two if needed. :)