Scoring hearth loaves made with high hydration doughs is a challenge. Expressions of frustration with this in TFL postings are not rare. Much good advice regarding how to accomplish nice scoring of wet, sticky dough has been offered, but it is scattered. So, I thought I would share my own advice on this subject in one place.
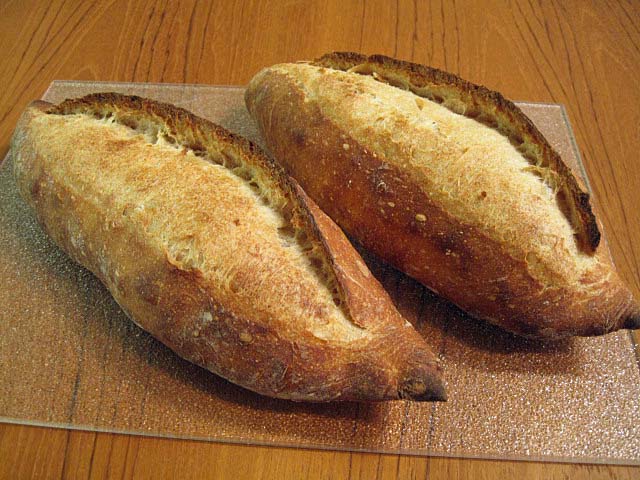
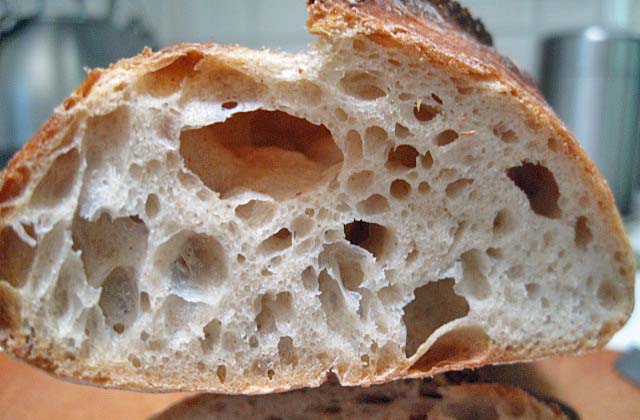
These two bâtards are San Joaquin Sourdoughs. (For the formula and procedures, please see San Joaquin Sourdough: Update. Today's bake was different only in that I used just 100 g of 100% hydration starter.) The effective hydration of this dough is 74.5%. It is a sticky dough and a good test of one's shaping and scoring abilities. Yet, as you can see, it is possible to get nicely shaped loaves from this dough with cuts that bloom nicely and form impressive ears.
The key points in achieving this are the following:
A Key Point
Gluten must be well-developed by mixing and fermentation. Good dough “strength” is important for crumb structure, but also for successful shaping. It is even more critical in wet doughs, because these tend to spread out and form flat loaves if their shape is not supported by a good, strong sheath of gluten.
Pre-shaping and shaping can add to dough strength through additional stretching of the dough in the process of forming the loaves. A wet dough like this needs to be tightly shaped. This is a challenge, because it also has to be handled gently. Rough handling will result in excessive de-gassing and a dense loaf. It will also tend to make the dough stick to your hands more. When it sticks, it tears and makes weak spots in the loaf surface which are likely to burst during oven spring. The goal is to form the tight gluten sheath by stretching the dough and sealing the seams while avoiding downward pressure on the dough pieces being shaped. “An iron hand in a velvet glove.” Dough sticking to your hands can be decreased by lightly flouring your hands, wetting them or oiling them. However, the most helpful trick is to touch the dough lightly and as briefly as possible each time.
The loaves need to have lateral support during proofing. This is to prevent them from spreading out. Support can be provided by a banneton (proofing basket) or on baker's linen or parchment, where folds in the couche material, sometimes reinforced with rolled up towels or the like under the material, provide the support. (I suppose the “ultimate support” is provided by a loaf pan.)
The ideal material to support proofing loaves is absorbent. Baker's linen, cloth-lined bannetons and floured, coiled cane brotformen all absorb some moisture from the surface of the loaves in contact with them. This makes that surface a bit less sticky and easier to score without the cut edges sticking to the blade excessively. (I do not want the loaf surface so dry it forms a “skin.”) I like to proof loaves with the surface I am going to score on the absorbent material. This means baguettes and bâtards are proofed smooth side down (seam side up). Note that baking parchment is not absorbent, so, while advantageous for other reasons, it is not ideal for this purpose.
Loaves should not be over-proofed. A greatly over-proofed loaf may actually collapse and deflate when scored. Short of that, it will still have less oven spring and bloom. This is a relatively greater problem with high-hydration doughs which are more delicate to start with. I find the “poke test” as reliable as any other criterion for when a loaf is ready to bake. However, it is not quite as reliable with very wet doughs. Neither is the degree of dough expansion. You just have to learn through experience with each formula when it is perfectly proofed.
Loaves should be scored immediately after transferring to a peel and immediately before loading in the oven. Letting high-hydration doughs sit too long on the peel is asking them to spread out, especially if they have been scored ,which disrupts the supportive gluten sheath.
The wetter the dough, the shallower the cuts. This is not as critical for boules, but, for long loaves like baguettes and bâtards, if you want good bloom, and especially if you want good ear formation, The cuts need to be very shallow (about 1/4 inch deep) and at an acute angle (30-45 degrees). A deeper cut creates a heavy flap that will collapse of its own weight and seal over, rather than lifting up to form an ear as the cut blooms open. The cuts made on the loaves pictured here were barely perceptible on the unbaked loaf surface. Resist the temptation to re-cut!
Minimize dough sticking to the blade and getting dragged, forming a ragged cut. The cuts need to be made swiftly and smoothly, without hesitation. A thin, extremely sharp blade is best. Some find serrated blades work well for them. I find a razor blade on a bendable metal handle works best for me. The cuts are made with the forward end of the blade only, not the whole length. Some find oiling or wetting the blade lessens sticking. I have not found this necessary.
Humidify the oven with steam during the first part of the bake. This delays firming up of the crust which would restrict the loaf from expanding (oven spring) and the cuts from opening (bloom).
Most of these points apply to scoring in general. I have indicated where there are differences or special considerations applying to high-hydration doughs.
Finally, a mini-glossary:
Scoring refers to the cuts made on the surface of the loaf prior to baking. The primary purpose of scoring is to create an artificial weak spot and direct expansion of the loaf to it so the loaf doesn't burst at some random point. Secondarily, the scoring pattern influences the final shape of the loaf. And lastly, the pattern of cuts can be decorative and, if unique, can serve as a “signature” for the baker.
Oven spring is the expansion of the loaf when exposed to oven heat.
Bloom refers to the opening up of the scoring cuts during oven spring. The French term for this is grigne.

Ear, when pertaining to bread, is a flap of crust that separates from the surface during oven spring and bloom.
For additional information regarding scoring and a more basic introduction to this topic, please see The Scoring Tutorial Also, excellent examples of shaping and scoring can be found in videos on youtube.com, particularly those made by Ciril Hitz, and on the King Arthur Flour web site. I have not found any that address the peculiar challenges presented by higher-hydration doughs, however.
Happy baking!
David
- dmsnyder's Blog
- Log in or register to post comments
Sage advice, David. Would you mind if I featured this post on the homepage for a bit?
-Floyd
I would be honored!
David
David,
What a comprehensive list. Thanks for putting it all into one place - you explained all the details so well.
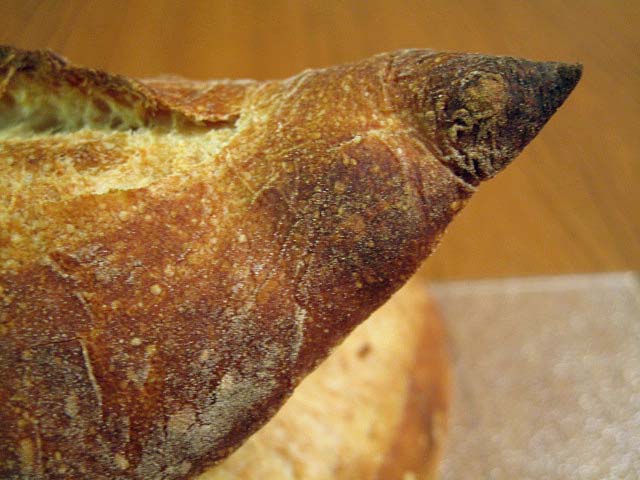
Now, can we ask for your advice on keeping the ends pointy?
-Brad
Shape a bâtard your favorite way. (I like the one illustrated in the KAF video. I think it's number 4 or 5.) When rolling out the loaf, increase downward pressure for the outside 2 inches or so. It helps to adduct your wrists (turn your hands so your fingers are pointing inward).
There is a good SFBI video of this, but it requires a subscription.
David
David - Do the ends stay pointy throughout the final proof or do you have to re-roll just prior to baking?
I don't re-roll.
David
This should come in handy for many TFL members, including myslef.
And what a beautiful, beautiful looking batard!
David
Love those loaves, they are pretty--look like yams!
Wonderful looking gringe David!
I'm planning a bake of your San Joaquin Sourdough this weekend (did the first starter feed before going to work this morning). I'll be the first to admit that my scoring is usually hit-and-miss, but we'll see how it turns out this time. I'll post up pics when they are done, the shape you chose is just about my favorite shape to make bread in.
Looking forward to seeing your results.
David
Looks like your teaching activity in retirement has begun. Or resumed. Thanks a million for this.
I for one would love to see a similar treatement of dough strength development, as it is so critical to this and loaf architecture in general. Remains one of my nemisae.
Thanks again.
Tom
I am totally sold on the combination of a short mix and long bulk fermentation with stretch and folds to build dough strength. Pre-shaping and shaping also play a role.
Tell me more about your issues regarding dough strength. Maybe I can help.
David
Thanks David,
I did the math: you log 180 S&F strokes by the time the SJ SD hits the couche. Aha. I do a fraction of that. I assume your S&Fs are more or less what Khalid (mebake) so nicely illustrated in his drawings. This weekend, I think I'll spare the household the weekly trauma of my french folding and leave the house-shaking to storm Isaac, forecast to shake, rattle and flood us :-(. I'll see if I can hit an S&F number close to 180.
Thanks for your pedagogical generosity, as always.
Tom
Please understand that most of the strokes are with the dough in a bowl, not on the board. Also, the counts are really maximums. Sometimes, the dough is at maximum strength after 15 or 20 strokes and needs to relax before doing the next batch of S&F's. If you have used this technique, I'm sure you know this.
If not, the best illustration of the technique I have is a video Mark Sinclair made a while back. Here's a link: NoKnead.html
David
for such an informative, concise tutorial. The point you make about ears - don't cut twice, keep the slash shallow - is most welcome. With my baking, ears have tended to be fickle features - sometimes they're 'ere (sorry) - and sometimes they ain't. Thanks to you, at last I see the link - sometimes I slash once, sometimes, I re-slash the same cut if I think it 's too shallow. The deeper slashes, come to think of it, never do produce ears. Huzzah!
This retirement of yours is working out to be kinda busy, isn't it?! :0)
All at Sea
Thanks for your nice comments.
The Scoring Tutorial has a more detailed explanation of why shallow cuts are better.
Scoring at sea must present interesting challenges. Please let us know if my advice actually helped. It works for me and has good theory behind it, but there is no substitute for data.
David
... and setting sail for Snyder Island and the buried treasure of Scoring Know-How! Thanks for directing me, David.
It's wonderful to find yet another piece of the great bread jigsaw puzzle plop into place ... been trying to understand why achieving good grigne doesn't necessarily equate to producing accompanying ears. But you've provided the Eureka! moment at last. And it's very much appreciated.
Baking bread while underway is challenging particularly with rough passages. A lot of guesstimating and minimal handling for obvious reasons. We are a catamaran, so don't have a gimballed stove, as we don't heel that much. But there is still a lot of "boat-dance" even so - especially if sailing to weather (in other words - with head winds). Tottering around trying to load the oven with high hydration dough requires good timing, I've learned that. And scoring must be super-fast and sure or "interesting" effects and consequences can ensue ... !
But these summer months in the Caribbean are mostly spent at anchor, with only short day-hops to various bays or local islands occasionally. So I usually bake once we've dropped the hook, and are nicely settled. But scales are always a challenge even at anchor. The boat is just never still enough for an accurate reading. And digital scales are a joke ... a teaspoon of salt might weigh 0.5 grams or 55 grams within the same nano-second! I've almost acquired an 'ology in just eyeballing (fairly) accurate quantities now.
Thank you, David, will do. You've already cleared up the mystery of why ears sometimes appear or don't; looking forward to learning and understanding more. I like understanding the theories behind why something works or doesn't. Your easy-to-digest, concise style is terrific for that.
All at Sea
That's just great! Thanks for letting us know. I hope you understand that you will have ups and downs but net improvement with practice.
I'd love to see the photos. I'll do a little button dance for you.
Happy baking!
David
David,
You make it sound possible and your results are encouraging. I don't normally score (or need to score) a dough at 75% but you make me want to try.
I have found that if I use a tangzhong method at high hydration I get a noticeably stronger dough that would probably take scoring, especially if it came straight from the retarder.
Thank you for taking the time to put it together.
Doc
If you perused my blog over the past 4 years or so, you would find my "results" have been consistent. The only times I have failed to get them has been when the loaves were over-proofed.
I have never employed the "tangzhong method." I can understand why it would result in a fluffier crumb, but that's not what I want in most of my hearth breads. I can't see why it should result in stronger dough. Can you help me?
David
David,
It is just my observation without any measurements. The tangzhong technique is something that I don't use often and only when I want a soft puffy result. My model for good bread is something that looks more like yours. I get excellent open crumb from my high hydration dough, and when I first read about tangzhong that was a natural place to try it out. I found that the timing was unchanged, the dough needed a little less development, and it was MUCH easier to handle when it came time to load. After a couple of reruns to demonstrate to myself that it was repeatable I just don't go there unless I am making a filled bun or perhaps hot crossed buns for Easter.
Doc
David,
Thanks for such a thorough and concise explanation about how to handle high hydration loaves. I have learned several things that have always puzzled me in regards to scoring in order to get ears and gringe when I want them to appear :-)
I had to chuckle to myself as I read your post because if I had run across it when I first found TFL I would have been totally baffled due to the vocabulary you have used. When I began baking bread again my baking vocabulary consisted of just a few common baking terms: flour, water, salt, dough, yeast, rising and baking. I had no clue then that I would need to learn a new language just in order to decipher the wealth of information found on this site. I am happy to say that I could read your instructions and I knew what every word meant!!! Huge accomplishment for this foreign language challenged woman. Lucky are the people who are somewhat new here because of your inclusion of a vocabulary list complete with definitions!!!!
You have done a wonderful job and I thank you so much for taking the time to write it all out and post it for all of us here. I have a neighbor who would kill for the tips you achieved on the ends of your loaves :-)
Take Care,
Janet
for your kind words.
It's hard to explain manual techniques in words or even in still photos. Videos help. Watching some one do it in person is much better. Having some one watch and coach you is the best. That and practice, practice, practice.
David
Hi David,
Just read your post on scoring high hydration doughs - masterful as usual (and, of course, included the two things I've personally found most important:
1) Use a couche for proofing or, even a good DRY banneton (well dusted with a 50/50 mix of rice and wheat flours, or better yet, 1/3 rice each rice, wheat and semolina) as the caning will also absorb some of the water from the to-be-scored surface). As you say - important that shaped loaves are placed to-be-scored side down - in contact with the couche/linen/cotton/banneton. Using a couche... above all else, facilitated a quantum leap for me past my early, numerous scoring failures.
2) Use a sharp, clean, new razor blade to score, adjusting depth of cut to the hydration of dough, with shallower cuts for higher hydration doughs. As you further note, if using a lame with a curved blade only use the front edge of the blade when making cuts, - which are otherwise impossible to do without creating ragged edges (due to blade curvature in the lame).
Note:... After using a plain "unmounted" razor blade for a while, I made a lame with a straight double-edge razor blade (not curved) which allows deep cuts for lower hydration breads - without causing a ragged edge. I found a chopstick with a split at the blade end of the chopstick (long enough to slip the razor blade into the slit, and a tiny bolt/washer/nut to secure the blade worked quite well. I still use my "mounted"/curved lame for making deeper circular cuts as the curve of the mounted blade allows relatively deep cuts if they're not in a straight line.
Thanks again for your yeoman's posts and repeated shares and tips.
Lee (also enjoying retirement - and the same contest between wasteline and extra time to bake!)
pointy ends and perfect slashing, I thought for sure it was one of mine...... and then I woke up from my dream to see it really was the work and result of a real Master Slasher. Now we know what DMS really stands for David Master Slasher.
Very nice teaching David.
Excellent post David. Lots of solid advice. Have you ever considered doing some part-time teaching in your retirement? I think you would make a great teacher. Not that you are necessarily looking for things to fill up your time, but if there were a baking school in your area that just happened to be looking for a part time instructor.... It could be very rewarding. Just a thought. :)
All the best,
Syd
Thanks for the compliment.
Actually, I have considered giving some classes, specifically for school-aged children and teens. I hope to get around to investigating some opportunities before next Summer. The closest thing to a baking school locally, to my knowlege, is a culinary arts program through a for-profit trade school. Not appealing to me.
David
David,
Without regard to your excellent tutorial and the various techniques employed here.........those are two stunningly beautiful loaves of bread. This is the first time a front page photo has so grabbed my attention. Really really beautiful,
Jeff
David
Beautiful breads and a very thorough tutorial. I will be making baguette this weekend and will re-read this while they proof.
Thanks, David.
Glenn
More Snyder Bros. synchronicity. I'm going to be making txfarmer's 36-hour baguettes this weekend for the first time. I'm really looking forward to them.
David
Have to thank you for that subject line. Every time I thought of it over the weekend, I couldn't help but grin. Combination of sibling sports banter and perhaps the goofy SNL-like image of Howard Cosell commentating a baker in action. A gem.
Thanks for that.
Tom
Another great tutorial, David.
Certainly deserves a more permanent home in the TFL Handbook.
Thanks for the suggestion. I have added this material to the Handbook section on Scoring.
David
Hello David,
Thank you so much for this very instructive and helpful post!
:^) breadsong
Lindy beat me to it. Excellent tutorial, David!
Sylvia
Hi David,
I can only add my thank you to those above.
Your loaves are a picture of perfection!
Judy
David!!!!
Spectacular loaf!!!!
I'm speechless!!!!
Congrats!!! :)
Attempted this today. Didn't quite turn out with as much ear as you did. I swear you are magic.
The bread looks delicious. Nice crust and crumb. You have the idea of the scoring, and you must have done everything else wonderfully well to get that result. Now just do it again (and again, and again). It will come.
Thanks for sharing your loaf.
David
Any advice on scoring multi-seed topped breads? The blade doesn't glide through the dough due to the seed tooping and then causes some unwanted pulls and sags.
I can't think of any special considerations. Having a very sharp, thin blade is just more important, and make swift, unhesitating cuts.
David
The most effective way to score a seeded loaf that I've found is to use scissors. Place one blade where you want to start the score, open the other blade to the length you want, making sure it's at the same depth as the other and close the blades. I had the same problem scoring seeded loaves until I found this method in Hamelman's "Bread" pg 81-82. It works like a charm.
Best,
Franko
Thanks for the compliment.
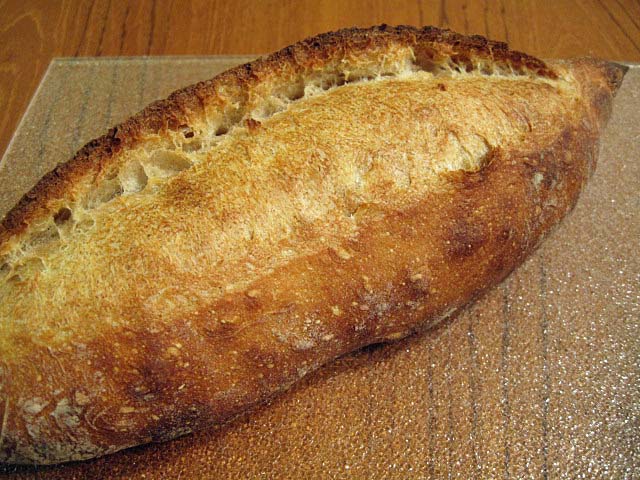
I scored these with a single straight cut down the center of the loaf. The cut was about 1/4 inch deep with the blade held at a 30 degree angle. Only 1/3 inch or so of the far edge of the blade entered the dough. I use a double-sided razor blade mounted on a very flexible French birds' beak lame, bent so the blade is curved with the concave side facing up.
I hope that helps.
David
David- I know that this may be a bit off topic, but your topic inspired me to make the San Joaquin bread. I am quite experienced baking sourdoughs, but I thought I would try the technique that you described where you do the final proof on a linen couche, which I had stopped using some time ago, when I discovered how easy it was to use parchment paper. So today I decided that I would like to try again to use the couche technique, but I found it really hard to transfer the loaves to the peel, and as a result I ended up compromising the shape of the loaves. So, if you could describe in a bit more detail how you do the transfer, I, and I think many others would probably benefit. Questions: Do you transfer the loaves one at a time to the peel and into the oven? And what is your basic method of transfer from the couche to the peel? If you have addressed this elsewhere on TFL, please just refer me to where I might find it.
Thank you,
Caryn
Hi, caryn.
Proofing on parchment does have the advantage of being easy to get on the peel. If proofing on linen, you generally use a "transfer peel," also known as a "flipping board," to transfer loaves from the couche to a peel. You can learn about this by searching TFL on either quoted expression or, better yet, both.
A couple years ago, rainbowz here on TFL made a way cool cartoon or how to use this device. See Quick doodle should help. Just note that, if you proof loaves smooth side down (as I generally do), you use the transfer peel to flip them over, still on the couche, before getting them on the transfer peel.
Read up on this and ask again, if your questions aren't answered.
David
David- Thank you for your reply. I did do some more research on this process. The cartoon demo is great. I do have a piece of wood that probably is a bit too narrow for a batard. (I think I got it to transfer baguettes some time ago.) I'll try to see if I can gat a bigger one cut for me.
The other question that I had is regarding loading the loaves into the oven. Do you load them onto the stone in the oven one at a time, or are you able to push them in both at once?
--Caryn
I transfer two bâtards at once using a Super Peel with an extension that they sell that widens the peel. This allows me to load two or even three loaves at once. When I was using a smaller peel, I could not get baguettes on it or load more than one boule at a time. I found even a very short difference in timing made a significant difference in how the loaves turned out. Also, loading once means the oven door is open for a shorter time, and there is less heat loss.
David
David- This is very useful information for me. But it leads me to yet another question or two. :) My baking stone is 14" x 16", and until I had read your last email, I have always placed it on the rack horizontally, i. e. with the long side parallel eo the oven width. It may make more sense to turn it around so I can load two loaves In the same direction at once. Does that make sense?
I am curious. What size stone do you use and how is it oriented? I have thought for a long time that I might find things easier with larger stone. (Of course I am limited by the size of my oven, a standard 30" oven, but the stone does fit the long way.)
I may also consider the Super Peel with the accessory if it will solve some of the loading difficulties as well.
In any case, I reaaly appreciate your advice. I hope I am not troubling you too much with my multitude of questions.
I have the same size stone as yours and orient as you do.
With the Super Peel, I can load loaves oriented in any direction.
David
David- I have to thank you, because as a result of our dicussion, I ended up making a big discovery. Today when baking my usual whole wheat levain a la Hamelman. I tried turning the baking stone around, so that it was perpendicular to the oven width. I understood that you don't set it up that way, but because I don't own the type of peel you have (the Super Peel), it would have been much harder for me to load two loaves from my peel otherwise. And the happy result was that it worked great for me. I did not use a couche this time, but when I do, I may be able to turn the loaves onto parchment and then onto the peel. So, thank you for your help!
David--
Your statements (at least those about bread) are generally reliably accurate, but I have to question this one.
How can you load baguettes with the point down. Maybe that peel is even super-er than I thought.
Glenn
For pointing out that pointing down is pointless.
David
David- This is very useful information for me. But it leads me to yet another question or two. :) My baking stone is 14" x 16", and until I had read your last email, I have always placed it on the rack horizontally, i. e. with the long side parallel eo the oven width. It may make more sense to turn it around so I can load two loaves In the same direction at once. Does that make sense?
I am curious. What size stone do you use and how is it oriented? I have thought for a long time that I might find things easier with larger stone. (Of course I am limited by the size of my oven, a standard 30" oven, but the stone does fit the long way.)
I may also consider the Super Peel with the accessory if it will solve some of the loading difficulties as well.
In any case, I reaaly appreciate your advice. I hope I am not troubling you too much with my multitude of questions.
I accidentally posted twice, and didn't know how to delete the duplicate.
Caryn
Wow, these are beautiful. Great explanation too!
That's what I am. I think I get too exited when the loafs are ready for the oven. I think I tend to cut too slow and to upright. Only some will have a shallow ear, others got none. Looks more like it melted over the score. I also tend to get confused which side is up and which side is down after final proofing. Excellent post and thank you for the effort. I'll keep practising. Otherwise I have to take a flight over to the USA so David can show me how its done. I'm becoming more and more desperate. Aaaach!!
Thank you for this tutorial. I am new to this website and breadbaking in general. This article answers many questions I had about working with high hydration SD doughs.
David, your posts are all wonderful, and this post has been enormously helpful.
My comment is far too late, but I just wanted to say that you are inspirational!(Better late than never, right?)
Wonderful post, very helpful.
Thank you.
David - I didn't see any indication that you retard or chill the dough before baking. I would expect chilling to firm up the dough and help with support in the oven and resistance to the blade when slashing. For you it appears to be unnecessary but I wonder if it might help us mortals.
Doc
The SJSD is cold retarded in bulk. By time it is baked, the dough has been out of the fridge for about 1.75 hours. It still feels a bit cooler than ambient temperature but not a lot cooler. I do not chill the shaped loaves. It might make scoring less fraught, as you say.
I really think that, besides good dough handling and shaping, the biggest help is proofing these loaves on a baker's linen couche, smooth side down because of the little bit of surface drying that results.
David
Any suggestions as to what is happening here? Only one of my slashes opened up ... the rest sort of sealed-up again, like one of those self-repairing car tires:
This one is even worse:
This was supposedly a moderate hydration dough (Peter Reinhart's Poolish Baguette recipe), though I found it more sticky than I thought it should be. I:
I'm wondering if maybe it was too hot? The recipe said 500 degrees to start, but I wonder whether the dough is just setting too quickly at that temperature ...?
The boule's uneven bloom is probably from inconsistent scoring. Try to make each cut at the same angle and depth.
The bâtard looks like some combination of over-proofing and insufficient oven steaming.
That is just based on the appearance of the loaves and without all the details on your oven.
BTW, if you are using the baking instructions for baguettes to bake other shapes, you are going to be disappointed. You need to make adjustments in temperature (lower) and time (longer) to accomplish ideal bakes. But that's another story.
David
it didn't even dawn on me that a larger loaf would need a lower temperature .. but it makes total sense.
The dough might have been overproofed as a result of me putting it into the fridge at the point I would have done the final shaping and baking. Something came up and I had to delay baking for about 12 hours. So between the 2 bulk fermentations called for in the recipe plus an extra one in the fridge overnight, the yeast might have lost its oomph.
As for oven details, mothing too exotic. Standard convection oven. Baking stone preheated for an hour, and a steam tray.
The boule is lopsided, but the oblong loaf came out better.
(Why is the site rotating my pictures?)
If your oven is an electric convection oven, and the convection fan can be turned off, do the first 1/3 to 1/2 of the bake with no fan and the rest with the fan but at 25 dF lower temperature.
At least in my oven, convection baking vents out the moisture, defeating my attempts to humidify the oven.
David