
Scoring Bread made with high-hydration dough
Scoring hearth loaves made with high hydration doughs is a challenge. Expressions of frustration with this in TFL postings are not rare. Much good advice regarding how to accomplish nice scoring of wet, sticky dough has been offered, but it is scattered. So, I thought I would share my own advice on this subject in one place.
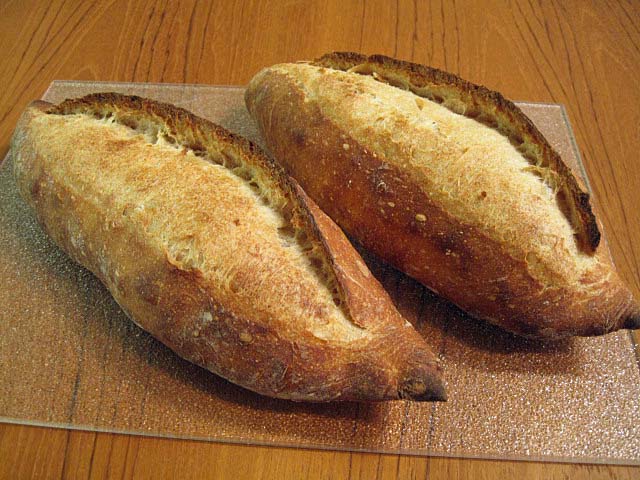
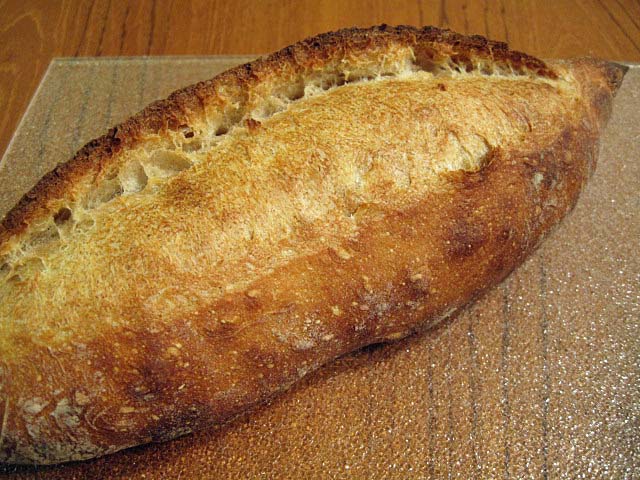
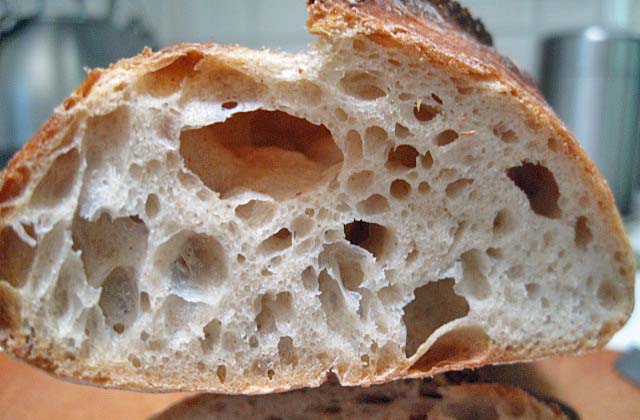
These two bâtards are San Joaquin Sourdoughs. (For the formula and procedures, please see San Joaquin Sourdough: Update. Today's bake was different only in that I used just 100 g of 100% hydration starter.) The effective hydration of this dough is 74.5%. It is a sticky dough and a good test of one's shaping and scoring abilities. Yet, as you can see, it is possible to get nicely shaped loaves from this dough with cuts that bloom nicely and form impressive ears.
The key points in achieving this are the following:
A Key Point
Gluten must be well-developed by mixing and fermentation. Good dough “strength” is important for crumb structure, but also for successful shaping. It is even more critical in wet doughs, because these tend to spread out and form flat loaves if their shape is not supported by a good, strong sheath of gluten.
Pre-shaping and shaping can add to dough strength through additional stretching of the dough in the process of forming the loaves. A wet dough like this needs to be tightly shaped. This is a challenge, because it also has to be handled gently. Rough handling will result in excessive de-gassing and a dense loaf. It will also tend to make the dough stick to your hands more. When it sticks, it tears and makes weak spots in the loaf surface which are likely to burst during oven spring. The goal is to form the tight gluten sheath by stretching the dough and sealing the seams while avoiding downward pressure on the dough pieces being shaped. “An iron hand in a velvet glove.” Dough sticking to your hands can be decreased by lightly flouring your hands, wetting them or oiling them. However, the most helpful trick is to touch the dough lightly and as briefly as possible each time.
The loaves need to have lateral support during proofing. This is to prevent them from spreading out. Support can be provided by a banneton (proofing basket) or on baker's linen or parchment, where folds in the couche material, sometimes reinforced with rolled up towels or the like under the material, provide the support. (I suppose the “ultimate support” is provided by a loaf pan.)
The ideal material to support proofing loaves is absorbent. Baker's linen, cloth-lined bannetons and floured, coiled cane brotformen all absorb some moisture from the surface of the loaves in contact with them. This makes that surface a bit less sticky and easier to score without the cut edges sticking to the blade excessively. (I do not want the loaf surface so dry it forms a “skin.”) I like to proof loaves with the surface I am going to score on the absorbent material. This means baguettes and bâtards are proofed smooth side down (seam side up). Note that baking parchment is not absorbent, so, while advantageous for other reasons, it is not ideal for this purpose.
Loaves should not be over-proofed. A greatly over-proofed loaf may actually collapse and deflate when scored. Short of that, it will still have less oven spring and bloom. This is a relatively greater problem with high-hydration doughs which are more delicate to start with. I find the “poke test” as reliable as any other criterion for when a loaf is ready to bake. However, it is not quite as reliable with very wet doughs. Neither is the degree of dough expansion. You just have to learn through experience with each formula when it is perfectly proofed.
Loaves should be scored immediately after transferring to a peel and immediately before loading in the oven. Letting high-hydration doughs sit too long on the peel is asking them to spread out, especially if they have been scored ,which disrupts the supportive gluten sheath.
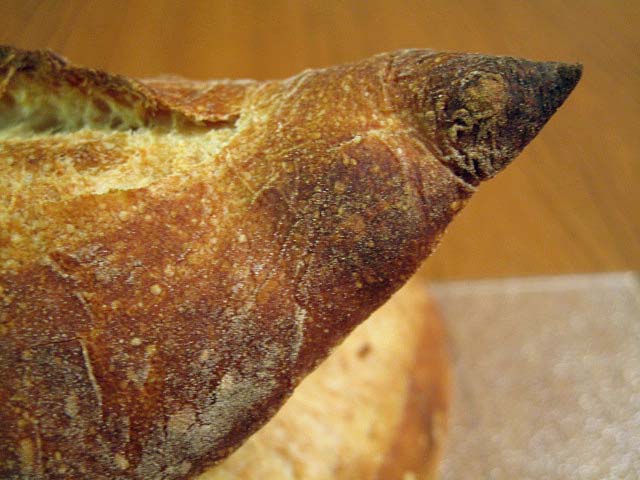
The wetter the dough, the shallower the cuts. This is not as critical for boules, but, for long loaves like baguettes and bâtards, if you want good bloom, and especially if you want good ear formation, The cuts need to be very shallow (about 1/4 inch deep) and at an acute angle (30-45 degrees). A deeper cut creates a heavy flap that will collapse of its own weight and seal over, rather than lifting up to form an ear as the cut blooms open. The cuts made on the loaves pictured here were barely perceptible on the unbaked loaf surface. Resist the temptation to re-cut!
Minimize dough sticking to the blade and getting dragged, forming a ragged cut. The cuts need to be made swiftly and smoothly, without hesitation. A thin, extremely sharp blade is best. Some find serrated blades work well for them. I find a razor blade on a bendable metal handle works best for me. The cuts are made with the forward end of the blade only, not the whole length. Some find oiling or wetting the blade lessens sticking. I have not found this necessary.
Humidify the oven with steam during the first part of the bake. This delays firming up of the crust which would restrict the loaf from expanding (oven spring) and the cuts from opening (bloom).
Most of these points apply to scoring in general. I have indicated where there are differences or special considerations applying to high-hydration doughs.
Finally, a mini-glossary:
Scoring refers to the cuts made on the surface of the loaf prior to baking. The primary purpose of scoring is to create an artificial weak spot and direct expansion of the loaf to it so the loaf doesn't burst at some random point. Secondarily, the scoring pattern influences the final shape of the loaf. And lastly, the pattern of cuts can be decorative and, if unique, can serve as a “signature” for the baker.
Oven spring is the expansion of the loaf when exposed to oven heat.
Bloom refers to the opening up of the scoring cuts during oven spring. The French term for this is grigne.

Ear, when pertaining to bread, is a flap of crust that separates from the surface during oven spring and bloom.
For additional information regarding scoring and a more basic introduction to this topic, please see The Scoring Tutorial Also, excellent examples of shaping and scoring can be found in videos on youtube.com, particularly those made by Ciril Hitz, and on the King Arthur Flour web site. I have not found any that address the peculiar challenges presented by higher-hydration doughs, however.
Happy baking!
David


Comments
I transfer two bâtards at once using a Super Peel with an extension that they sell that widens the peel. This allows me to load two or even three loaves at once. When I was using a smaller peel, I could not get baguettes on it or load more than one boule at a time. I found even a very short difference in timing made a significant difference in how the loaves turned out. Also, loading once means the oven door is open for a shorter time, and there is less heat loss.
David
David- This is very useful information for me. But it leads me to yet another question or two. :) My baking stone is 14" x 16", and until I had read your last email, I have always placed it on the rack horizontally, i. e. with the long side parallel eo the oven width. It may make more sense to turn it around so I can load two loaves In the same direction at once. Does that make sense?
I am curious. What size stone do you use and how is it oriented? I have thought for a long time that I might find things easier with larger stone. (Of course I am limited by the size of my oven, a standard 30" oven, but the stone does fit the long way.)
I may also consider the Super Peel with the accessory if it will solve some of the loading difficulties as well.
In any case, I reaaly appreciate your advice. I hope I am not troubling you too much with my multitude of questions.
I have the same size stone as yours and orient as you do.
With the Super Peel, I can load loaves oriented in any direction.
David
David- I have to thank you, because as a result of our dicussion, I ended up making a big discovery. Today when baking my usual whole wheat levain a la Hamelman. I tried turning the baking stone around, so that it was perpendicular to the oven width. I understood that you don't set it up that way, but because I don't own the type of peel you have (the Super Peel), it would have been much harder for me to load two loaves from my peel otherwise. And the happy result was that it worked great for me. I did not use a couche this time, but when I do, I may be able to turn the loaves onto parchment and then onto the peel. So, thank you for your help!
David--
Your statements (at least those about bread) are generally reliably accurate, but I have to question this one.
How can you load baguettes with the point down. Maybe that peel is even super-er than I thought.
Glenn
For pointing out that pointing down is pointless.
David
David- This is very useful information for me. But it leads me to yet another question or two. :) My baking stone is 14" x 16", and until I had read your last email, I have always placed it on the rack horizontally, i. e. with the long side parallel eo the oven width. It may make more sense to turn it around so I can load two loaves In the same direction at once. Does that make sense?
I am curious. What size stone do you use and how is it oriented? I have thought for a long time that I might find things easier with larger stone. (Of course I am limited by the size of my oven, a standard 30" oven, but the stone does fit the long way.)
I may also consider the Super Peel with the accessory if it will solve some of the loading difficulties as well.
In any case, I reaaly appreciate your advice. I hope I am not troubling you too much with my multitude of questions.
I accidentally posted twice, and didn't know how to delete the duplicate.
Caryn
Wow, these are beautiful. Great explanation too!
That's what I am. I think I get too exited when the loafs are ready for the oven. I think I tend to cut too slow and to upright. Only some will have a shallow ear, others got none. Looks more like it melted over the score. I also tend to get confused which side is up and which side is down after final proofing. Excellent post and thank you for the effort. I'll keep practising. Otherwise I have to take a flight over to the USA so David can show me how its done. I'm becoming more and more desperate. Aaaach!!
Thank you for this tutorial. I am new to this website and breadbaking in general. This article answers many questions I had about working with high hydration SD doughs.
David, your posts are all wonderful, and this post has been enormously helpful.
My comment is far too late, but I just wanted to say that you are inspirational!(Better late than never, right?)
Wonderful post, very helpful.
Thank you.
David - I didn't see any indication that you retard or chill the dough before baking. I would expect chilling to firm up the dough and help with support in the oven and resistance to the blade when slashing. For you it appears to be unnecessary but I wonder if it might help us mortals.
Doc
The SJSD is cold retarded in bulk. By time it is baked, the dough has been out of the fridge for about 1.75 hours. It still feels a bit cooler than ambient temperature but not a lot cooler. I do not chill the shaped loaves. It might make scoring less fraught, as you say.
I really think that, besides good dough handling and shaping, the biggest help is proofing these loaves on a baker's linen couche, smooth side down because of the little bit of surface drying that results.
David
Any suggestions as to what is happening here? Only one of my slashes opened up ... the rest sort of sealed-up again, like one of those self-repairing car tires:
This one is even worse:
This was supposedly a moderate hydration dough (Peter Reinhart's Poolish Baguette recipe), though I found it more sticky than I thought it should be. I:
I'm wondering if maybe it was too hot? The recipe said 500 degrees to start, but I wonder whether the dough is just setting too quickly at that temperature ...?
The boule's uneven bloom is probably from inconsistent scoring. Try to make each cut at the same angle and depth.
The bâtard looks like some combination of over-proofing and insufficient oven steaming.
That is just based on the appearance of the loaves and without all the details on your oven.
BTW, if you are using the baking instructions for baguettes to bake other shapes, you are going to be disappointed. You need to make adjustments in temperature (lower) and time (longer) to accomplish ideal bakes. But that's another story.
David
it didn't even dawn on me that a larger loaf would need a lower temperature .. but it makes total sense.
The dough might have been overproofed as a result of me putting it into the fridge at the point I would have done the final shaping and baking. Something came up and I had to delay baking for about 12 hours. So between the 2 bulk fermentations called for in the recipe plus an extra one in the fridge overnight, the yeast might have lost its oomph.
As for oven details, mothing too exotic. Standard convection oven. Baking stone preheated for an hour, and a steam tray.
The boule is lopsided, but the oblong loaf came out better.
(Why is the site rotating my pictures?)
If your oven is an electric convection oven, and the convection fan can be turned off, do the first 1/3 to 1/2 of the bake with no fan and the rest with the fan but at 25 dF lower temperature.
At least in my oven, convection baking vents out the moisture, defeating my attempts to humidify the oven.
David
Pages